
Keyword-driven Testing does not only consist in possibilities that are provided by TestComplete. In a wider sense, Keyword-driven testing is such an approach to testing: when we are creating our own keywords, and in the result, tests creation is nothing short of evoking these keywords. Ideally, tests are created as tables, where each line stands for one test action (call of the keywords with parameters). Apart from the tables, we also have the code written with the help of the programming language and the driver (a class, function or several functions) used, which read keywords from the tables and call the corresponding code from the project.
Schematically, the simplified Keyword-driven approach will appear as follows:
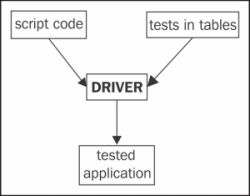
The major advantage of the approach consists in the fact that the code of the scripts and the driver are written and maintained by programmers, while the tests can be created by anyone, including those who are not well-cognizant in programming (that is, testers, product specialists, or customers).
In this recipe we will take up a simple example of creating our own Keyword-driven Tests, for consideration. As a tested application, we will use a standard Notepad application.
We will create three components for our keyword-driven framework:
- Functions for launching and closing the Notepad
- Test in Excel table, where we will store the necessary calls of the keywords
- Driver-function that will read the steps from the test one-by-one and execute the necessary actions
Also, for our example, it is necessary to create the C:somefile.txt file with any contents.
First and foremost, we will create a function to work with the Notepad:
- The function
startNotepadwill launch the Notepad and open the file that was passed as afileNameparameter:function startNotepad(fileName) { if(fileName == undefined) { fileName = ""; } Win32API.WinExec("notepad.exe " + fileName, SW_SHOWNORMAL) } - The
closeNotepadfunction closes all the open copies of the Notepad:function closeNotepad() { while(Sys.WaitProcess("notepad", 500).Exists) { Sys.Process("notepad").Terminate(); } } - The
checkNotepadFileNamefunction checks if the correct file has been opened:function checkNotepadFileName(expectedName) { var np = Sys.Process("notepad").Window("Notepad"); aqObject.CompareProperty(np.WndCaption, cmpStartsWith, expectedName); } - Now we will define the keywords. We will need the
OPEN,CLOSE,andCHECKkeys (as they correspond to the operations, which are to be executed in the test: open the Notepad, check if the correct file has been opened, and then close the Notepad). The keywordsOPENandCHECKwill also have their parameters. - From these keywords we will create tests and make them up into Excel table. In the result, our test will appear in the following manner:

- The last stage: driver creation. In our case, this is one and the same function, which scampers through all the lines of the assigned table and executes all the instructions one-by-one:
function driver(fileName, table) { var steps = DDT.ExcelDriver(fileName, table); while(!steps.EOF()) { var stepNum = steps.Value("Step"); var action = steps.Value("Action"); var param = steps.Value("Param1"); switch(action) { case "OPEN": startNotepad(param); break; case "CHECK": checkNotepadFileName(param); break; case "CLOSE": closeNotepad(); break; default: Log.Error("Unknown action: " + action); } steps.Next(); } } - Now, everything is all-set, and we can go ahead and launch the created test. To this end, we will need but a single line:
driver("C:\notepad.xls", "Sheet1"); - In the result, the Notepad will be launched twice: first, without the parameters (a new document will be created); and second, the Notepad will open up the
C:somefile.txtfile.
The driver calls the functions that correspond to each keyword, which is encountered in the test. Fine-tooth-combing of the file is made possible with the help of the DDT driver, provided by TestComplete.
The tests themselves are separated from the code, that is working with the tested application, this is why they are easy to comprehend even for a person who is not learned in programming (quite naturally, the keywords should correspond with the actions that are to be performed at the call of the keyword).
This is a very simple example, wherein we have the basics of the Keyword-driven approach demonstrated. In more complex situations (for example, when testing several or more multiple-components applications), more complicated approaches are usually used. For example, several self-standing drivers, each being meant for a separate application or a component, or a more complex structure of the tables (for example, we can add an Application column, wherein the presently workable application is to be signified), and so forth.
- Reading up on DDT, and the used driver, in greater details, is possible in the Chapter 9, Data-driven Testing