
Most often, the Data-driven approach is used to store the expected values in the process of testing. In this case, all the testing data are to be stored in one place, which really facilitates their overhaul and modification on as need-be-basis.
In this recipe we will consider an example of storing expected values for computing via the Calculator application.
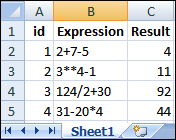
Launch the Calculator Plus application in the Standard mode by selecting View | Standard and create the file c: est_expected_values.xls with the following content:
To complete the task, we will need to create the following three functions:
- The
testExpectedValuesfunction contains the main logic, it loops through all the lines in the table, reading out the values from the cells:function testExpectedValues() { var data = DDT.ExcelDriver("C:\test_expected_values.xls", "Sheet1"); clickCalcButton("C"); while(!data.EOF()) { var expression = data.Value("Expression"); var result = data.Value("Result"); for(i = 0; i < expression.length; i++) { var button = expression.substr(i, 1); clickCalcButton(button); } clickCalcButton("="); checkCalcResult(result); data.Next(); } DDT.CloseDriver(data.Name); } - The
clickCalcButtonfunction simulates clicking on a button in the calculator, which has been passed as a parameter:function clickCalcButton(button) { if(button == "*") { button = "**"; } var calc = Sys.Process("CalcPlus").Window("SciCalc"); calc.Window("Button", button).Click(); } - The
checkCalcResultfunction compares the expected result with that which is factually obtained:function checkCalcResult(result) { var calc = Sys.Process("CalcPlus").Window("SciCalc"); var edit = calc.Window("Edit"); aqObject.CompareProperty(edit.wText, cmpEqual, result); } - By launching the
testExpectedValuesfunction, you will see that each expression among those assigned in the cells of theExpressioncolumns has been calculated, and the result will be compared with the expected one (from theResultcolumn).
First of all, we click on the C button to clear the results.
Further, the testExpectedValues function calculates one by one from each of the lines of the Expression, after which we obtain each symbol in the loop with the help of the substr method. This symbol is passed as a parameter to the clickCalcButton function.
The clickCalcButton function simply simulates clicks on the button with the passed heading. Exceptions arise only with the multiplication button: to click on the button with an asterisk, it is necessary to duplicate the same in the heading.
Then, with the help of the checkCalcResult function, we compare the obtained result with the expected ones.
Operations of clicks on a button and results verification are made into separate functions for better readability of the code and to avert code duplication.
Since in the Excel file the expected values have been inputted as numbers, the aqObject.CompareProperty method transforms the text from the Calculator into an integer value. If the expected values had been placed into the Excel files as stings, we would have gotten an error for each of the cases in view, as the real value of the text field of the Calculator contains a point and a space at the end.