
Similar to many other IDEs, TestComplete binds all the elements together in a single project; and the projects, in their due turn, are joined into project suites.
First and foremost, it is necessary to create a project suite and then create one or more projects in it to be able to add all the necessary elements for the project.
In order to create a project we need to perform the following steps:
- Select the following menu item File | New | New Project Suite.
- In the Create Project Suite window signify the name of the project suite and the path to it.
- Click on OK. In the result, there will appear the created project suite on the Project Explorer panel in the left part of the TestComplete window.
- Right-click on the created project suite and select menu item Add | New Item, as shown in the following screenshot:
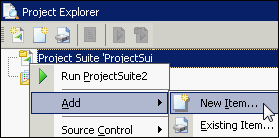
- In the opened Create New Project window enter the name of the project and the path to it, as you have just done in the previous instance.
- In the Language drop-down menu select the necessary programming language of your choice and click on the Create button (if you do not know which language to choose, please read the Choosing scripting language for the project recipe).
- In the result, a project will be created into which we will be able to write the testing scripts.
Each project suite and project has corresponding files in the XML format with the extensions of .pjs and .mds respectively. In these files, all the necessary information is stored: elements that are constituent parts of the project at hand or a number of projects, paths to them, their parameters, and so on.
Usually, the folders with the projects are stored in the same folder with the project suite. This is quite handy since the same TestComplete structure is stored on your hard disk drive (HDD) as well.
If, in any event or reason, you need to store the project separately from the project suite where it is located, it is sufficient at the point of creation to signify a different path. Please note, however, that in case of moving projects to another computer in the future, you will come up against another problem: migrating all the projects together with the project suite, which are located in different folders or even on separate discs. In this case, when opening the project suite, TestComplete will prompt you with an error message Project not found.
Try to give the projects and project suites some sensible names; do not use the default names (Project1, Project2, and so on). Otherwise, you will forget which project stands for which data.
The names of the projects and project suites are also used at the point of launching tests from the command prompt.