
The purpose of testing is all about executing different types of verifications, and at times we need to check both—one property of the controls elements (for example, text in the text input field) and several other properties at a time (for example, text, availability, and visibility). To this end, there exists the object checkpoint method. It affords the checking of both several properties of a specific controls element, and several properties of its children elements.
In this recipe, we will create a object checkpoint for the Calculator Plus window along with all of its child elements (buttons and a text field).
Add the Stores element to the project by right-clicking on the name of the project, then Add | New Item..., and select the Stores element. It will be necessary for us to store the data on the objects. Then launch the Calculator Plus application.
The following are the steps for creating the object checkpoints:
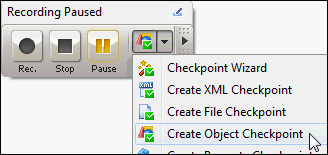
- Begin recording the script (go to Test | Record | Record Script menu).
- On the Recording panel, opt for the Create Object Checkpoint element from the Create New Property Checkpoint drop-down menu.
- In the opened Create Object Checkpoint window, drag-and-drop the target icon onto the heading of the Calculator Plus window. In the result, the Object field will contain the full name of the object, and in the Preview field there will be the screenshot of the window.
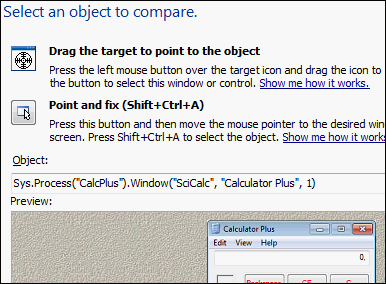
- Click on the Next button.
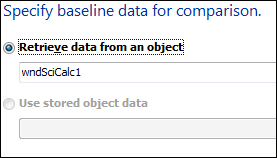
- Leave the Retrieve data from an object option selected by default and click on the Next button.
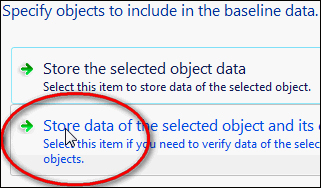
- In the next step, we can select whether we should check the information from the child windows. As we would like to check all the children objects inclusively (buttons and text fields), we select the second option, Store data of the selected object and its children.
- In the result, we will have a tree view of all the objects for which the check will be performed. Let's disable all the unnecessary elements (in our case these are all the objects of the type Static) and click on the Properties... button.

- Now, with the help of the left and right arrow buttons, for each of the elements we can add or remove the properties that are necessary to check. For the text field, we will need this properties: Enabled, Visible, and wText, and for the buttons: Enabled, Visible, and Caption, accordingly.
- Add all the necessary properties and remove the unnecessary, after which click on the OK button.
- Click on the Finish button.
- Stop the recording by clicking on the Stop button in the Recording panel. In the result, we will have created a script with just a single line:
Objects.wndSciCalc.Check(Sys.Process("CalcPlus").Window("SciCalc", "Calculator Plus")); - In the Stores element of the project, a new Objects element will be created. When clicking on the element, we will see a list with just a single wndSciCalc element which we have just created.
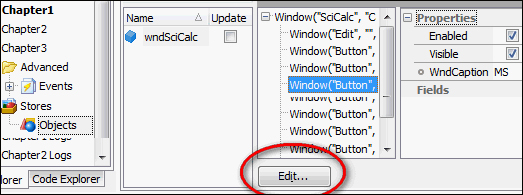
- By clicking on the Edit... button, we can edit the tested properties and their values.
- If now, one wants to launch the generated function, TestComplete would compare all the selected properties of all the controls elements that are stored in the
wndSciCalcobject, with all those that are really available in the application. In case of any mismatch, an error will be generated.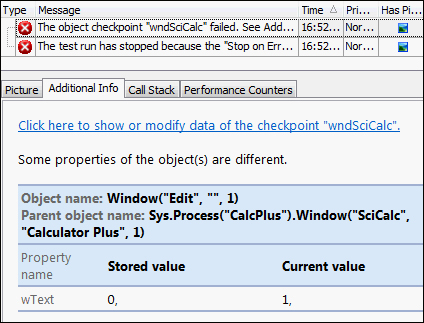
An object checkpoint facilitates verification of several objects' properties (or even all of them), including its child objects. The object to be verified can be either added during creation of the checkpoint (as we have done in the preceding steps), or selected from the existing objects from the Stores project item. In this case, the object should be added to the Stores element before starting to create the checkpoint. If later, the expected values of the properties change, we will not have to create the checkpoint again, but only edit the corresponding object in the Stores element.
It might happen that the object checkpoints are put to use in the project quite frequently, and sometimes, due to changes in the tested application, one has to trace back to make lots of changes to the objects. If you have encountered such a problem, and wish to work your way around making a great deal of manual changes, it is possible to launch scripts in the update mode. To do that, follow these steps:
- Open the settings for TestComplete (Tools | Options...), opt for Stores in the Engines section, and turn on the Update objects option. Having done so, for each element in the Objects list that should be customized, set the Update option.
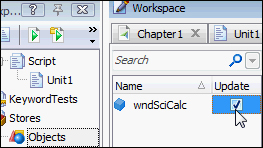
- Launch the scripts, TestComplete will update all the values of the properties for the selected elements.