
The written tests should be regularly launched, wherein it is preferable to have a handy tool for organizing and launching the tests. In TestComplete, there is Test Items project element that is meant for organizing and launching the available tests.
In this recipe, we will learn how to add Test Items to the project and customize tests parameters.
Create several functions which will be treated as tests to be added to Test Items. They can contain any actions or even lead to no action at all.
In order to create test plan, we need to perform the following steps:
- Right-click on the project name and select the Edit | Test Items option. In the result, the Test Items panel with an empty list will be opened in the right-hand side of the TestComplete window.
- Click on the New Test Item button on the workspace toolbar above the list. In the result, a new element with the default name as ProjectTestItem1 will be added to the list. This is the name of our Test Item. It can be changed by clicking once on the name and by entering a new name therein.
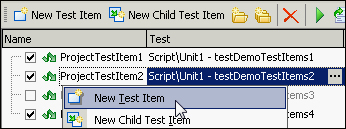
- Click on the button with the ellipsis in the Test column. The Select test window will open, select the Script element, and then the unit, in which the necessary test is to be found.
- In the Available Tests column, opt for the function you would like to map to the created Test Item, and click on OK.
- After this we readily have a prepared Test Item that can be launched using one of the two methods:
- By selecting the Run Focused Item item from the context menu
- By running the whole project (right-click on the name of the project and run the project).
Test Item is a special element of the project, which is designed for easy management of tests launches. To the left-hand side of each Test Item there is the Enabled checkbox, which allows at a single mouse-click to exclude the tests from being launched.
Besides, for each of the Test Items there are two more interesting customizations: Count and Timeout (they are assigned in the corresponding columns). The first one of them allows launching the test several times consecutively when needed, while the second method allows setting time in terms of minutes, upon expiry of which the test will be considered as a hung-up and stopped with a corresponding error entered in the log. Meanwhile, all the other tests will be launched as usual.
Moreover, if the tests accept some parameters, they can be assigned in the Parameters column. All the Test Items are independent of each other and in particular, on the functions they are bound to, this is why it is possible to create several Test Items that would launch one and the same function (for example, with different parameters or at a different time).
Working with the Test Items is possible directly from the tests, as the Project.TestItems object is being used to this end. For example, in the following code, we place the name of the current Test Item into the log:
Log.Message(Project.TestItems.Current.Name);