
If you have encountered a controls element which is not supported by TestComplete, and has no text to bind to (for example, with the use of text recognition or optical character recognition), working with such an element is possible as with an image, while looking up for other nested images, saved previously. This is done without a tie-up to the parent container-element coordinates, rather operating with the images themselves.
In this recipe we will suppose that no button inside the calculator window is accessible (which means we cannot work with them by using the Window method). First, we would save all the images of the buttons with the numbers to a special element of
Stores, and then we would undertake searching for these images inside the calculator window image.
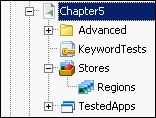
First of all, we need to go ahead and add the new project elements, namely, Stores and Regions.
- Right-click on the name of the project and navigate to Add | New Item.
- In the opened window, go to the Stores option.
- Right-click on the added element of Stores and navigate to Add | New Item.
- In the opened window, go to the Regions option as shown in the following screenshot:
- Launch Calculator Plus.
In order to deal with nonstandard controls we will need to perform the following steps:
- First of all, with the help of a simple function, we will add all of the buttons at once, the images will be worked on later:
function prepareOwnDrawnButtonsImages()
{
  var wCalc = Sys.Process("CalcPlus").Window("SciCalc", "Calculator Plus");
  for(var i = 0; i <= 9; i++)
  {
    Regions.AddPicture(wCalc.Window("Button", i), i.toString());
  }
}
Here we have simply gone through all the sibling objects with the corresponding headings, and thus have added their images to Regions. In real project we would not have had such a possibility, and this is why we would have to call the
Picturemethod for the whole of the calculator window, passing the coordinates of each button as follows:Regions.AddPicture(wCalc.Picture(150, 50, 30, 25), i.toString());
In the given instance, we have simplified our task for the sake of demonstrating the search for the images.
- Now, as we have got the stored images of all the necessary controls elements at our disposal, we can search for them inside the calculator window image. To this end, we will need to resort to the
Regions.FindRegionmethod. The following function demonstrates how one should click on the button 0, using only the saved image thereof:function testOwnDrawnControls() { var wCalc = Sys.Process("CalcPlus").Window("SciCalc", "Calculator Plus"); wCalc.Activate(); var btnRect = Regions.FindRegion("0", wCalc); var xCenter = btnRect.Left + btnRect.Width/2; var yCenter = btnRect.Top + btnRect.Height/2; wCalc.Click(xCenter, yCenter); } - Now we can wrap the code for clicking on the button into a separate function in such a way that we call just one function, without complicating the tests, as follows:
function clickWindowButton(window, imageName) { var btnRect = Regions.FindRegion(imageName, window); var xCenter = btnRect.Left + btnRect.Width/2; var yCenter = btnRect.Top + btnRect.Height/2; window.Click(xCenter, yCenter); } - In the result, the code for clicking on the calculator button will look as follows:
clickWindowButton(wCalc, "5");
The Regions.FindRegion method allows searching for one image (the first parameter, which is the named element of the Regions group, in our case) inside the other.
This method returns the Rect object, which is the information repository for the located image (coordinates and the size) in relation to their image, within which the search has been performed.
If the image has not been found, the Regions.FindRegion method returns the value null.
Since a mouse-click is made in the center of the object, we obtain the coordinates of the located image with the help of the image coordinates and its dimensions.
The advantage of this approach's usability over just clicks on the coordinates of an element is the fact that this approach will be correctly workable even if the size and location of the elements are being changed (you can verify this by changing the calculator mode from Standard to Scientific or vice versa).
We add the images of the buttons to the Regions repository with the help of the Regions.AddPicture method. This is optionally done via scripts, but can be done manually just as well.
To this end, we need to make a right-hand mouse-click on the Regions element, navigate to Add | New Item, and then follow the instructions of the wizard.
This is exactly the way we would add the images in case the objects inside the main calculator window would be past recognition.