
We're going to modify some States and create some new ones. We're also going to use three Scenes.
- Create three Scenes:
Scene0,Scene1, andScene2. - In the menu, open File | Build Settings....
- Add the three Scenes to Scenes in Build.
- Temporarily add some GameObjects to Scene1 and Scene2 for testing.
- Open Scene1 and add a Cube GameObject.
- Open Scene2 and add two Sphere GameObjects.
- Reload Scene0
- Double-click on BeginState to edit
- Edit the
BeginStateconstructor method as follows to add anifstatement for loadingScene0:public BeginState (StateManager managerRef) { manager = managerRef; if(Application.loadedLevelName != "Scene0") Application.LoadLevel("Scene0"); } - Make new C# classes for the new States. The following State Machine files should be coded as shown in Appendix A:
- The
BeginStatefile - The
SetupStatefile - The
PlayStateScene1_1file: (1 of 2 available States in Scene1) - The
PlayStateScene1_2file: (2 of 2 available States in Scene1) - The
WonStateScene1file - The
LostStateScene1file - The
PlayStateScene2file - The
WonStateScene2file - The
LostStateScene2file - The
StateManagerfile - The
IStateBasefile
- The
- Verify that the
StateManagerscript is attached to the GameManager GameObject
You just created nine States that the game can be in. You also created three Scenes that the game will use, determined by the State the game is in.
Notice the if statement added in step 9. How did I know about Application.loadedLevelName to be able to use it?
I knew I wanted the States to control the loading of the Scenes, so how is a Scene loaded using code?
I searched the Scripting Reference using terms like scene and load. It didn't actually show exactly what I wanted, but I did see things like Application.LoadLevelAdditive. That sounded like what I wanted to do, so I clicked it. That provided all kinds of links, but to find everything that's available, I needed to look at the class itself. Obviously, the class name is Application.
Reading that page showed me the variable loadedLevelName. This allows me to check if the Scene (level) I want is loaded. If not, then Application.LoadLevel() is called to load the Scene I want for that particular State.
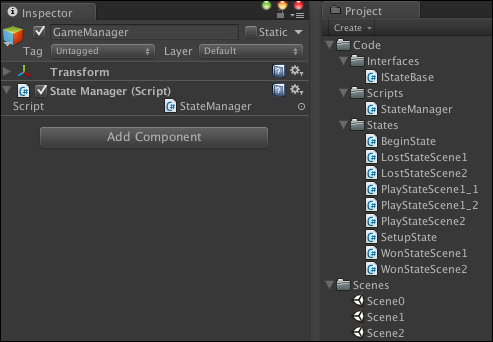
The following screenshot is a side-by-side view of the Project panel and the Inspector panel, showing StateManager as a Component of GameManager:
With these 11 C# classes coded, the three Scenes listed in Build Settings, the StateManager script attached to the GameManager GameObject, and Scene0 loaded in Unity; you should be able to click on Play and see the States switch in the Console. As shown in the previous
States and Scenes diagram, when you press the Space bar key and the Return key, watch the Scenes change in the Game panel.
This method was added to restart the game from scratch.
- The
Destroy(gameObject)method destroys the GameObject thisStateManagerscript is attached to, the GameManager. Why destroy it? - According to the State Machine, there are three places
Restart()is called:- At
LostStateScene1 - At
LostStateScene2 - At
WonStateScene2
- At
- If you have lost the game while in Scenes 1 or 2, the game needs to be restarted from scratch.
- If you have completed the game by winning in Scene2, then you're done. Restart the game.
When destroying the GameManager, there's no longer a State Machine, nor any data that was part of the State Machine. However, by calling Application.LoadedLevel("Scene0"), Scene0 is loaded. Whenever Scene0 is loaded, a new GameManager with attached StateManager is created because it's part of the Hierarchy of Scene0.
So why wasn't a new GameManager created the other times Scene0 was loaded, such as winning or losing in Scene1 or Scene2? Actually, it was created but it was immediately destroyed since we already had a GameManager. See the Awake() method in StateManager. This was discussed in Chapter 8, Developing the State Machine.
You may be wondering if the GameManager is destroyed and the State Machine with it, then how could Application.LoadedLevel("Scene0") be called? Needless to say, I could have put this method before calling Destroy(), but it doesn't make any difference.
The GameObject isn't destroyed immediately. Look up Destroy in the Scripting Reference and you'll see this phrase:
Actual object destruction is always delayed until after the current Update loop, but will always be done before rendering.
I can hear you saying that "Restart() isn't part of Update()." Actually it is. What called Restart()? We'll pick one of the three, WonStateScene2.
Here's the section of code calling Restart():
public void StateUpdate()
{
  if (Input.GetKeyUp (KeyCode.Space))
  {
    manager.Restart();
  }
The Restart() method is called in the StateUpdate() method, and what calls the StateUpdate() method? The StateManager does in the Update() method:
void Update()
{
  if (activeState != null)
    activeState.StateUpdate();
}
As far as Unity is concerned, all this code execution happened in the Update() method. So once everything is finished executing as a result of Update() being called, the GameManager is then destroyed. So Application.LoadLevel("Scene0") was called and executed before the GameManager and the State Machine were destroyed.
Note
I didn't forget PlayStateScene1_2. This State will be used in Chapter 10, Moving Around, Collisions, and Keeping Score.
We need to add a GameObject named Player to this game. You may use any similar shaped GameObject of your choice that you have available, or simply use a GameObject such as a Cube added from the
GameObject menu. The important part is that it be named Player.
It is going to behave like a hovercraft in the play States, so it floats above the terrain or any GameObject. In SetupState, we'll spin it around, select a color for it to use during the game, and set the allowed number of Lives.
In the following picture, on the left is the Player that was created using a flattened Cube, and a slightly stretched Sphere.
The Cube scale settings are 2, 0.5, 3. The Sphere scale settings are 0.32, 1.3, 0.35. The Sphere is a child of the Cube. Cube is renamed to Player. Naming it Player is required to have it work with the code.
On the right is a simple model I'll use just because it looks a little bit nicer than a floating brick. The model used isn't that important. The purpose of this model and the whole game is to study the C# code we will be writing.
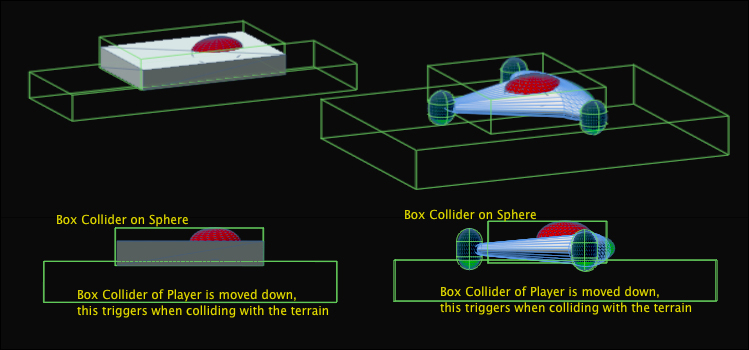
The Box Collider of Player is actually moved below Player so the collider can detect when it collides with the terrain. The Is Trigger property is checked. This makes a collider only detect when it collides with another collider instead of bouncing off it.
When it does detect colliding with any other collider such as the terrain or any other GameObject, Player will slowly rise up higher to get over it because vertical force is applied to Player whenever the collider is triggered.
The collider is extended a bit to the front and rear so as it moves, Player can rise in advance to go over small changes in the terrain, or other small GameObjects.
First thing to notice is that the Sphere isn't using a Sphere Collider, it's using a Box Collider instead. Since the Player Box Collider is being used for hovering, I used a Box Collider on the Sphere for Player to actually collide with other GameObjects, and also to prevent Player from ever falling through the terrain.