
Chapter 10. Dialogs
If you want to be noticed, you must find a way to attract attention to yourself. Whether your goal is to woo a potential sweetheart or market a new invention, it’s impossible to succeed if your target isn’t aware of your efforts. The same principle holds for software. If your program needs something from the user, it must find a way to draw that user’s attention to itself. There are a variety of ways to accomplish this, but the most common is to present the user with a dialog box. A dialog box is a window that is separate from your application’s main window. When this window is placed in front of the application, the user is forced to pay attention to whatever you display there, whether it’s a status message or a request for input, such as a filename to save to. Because displaying dialogs is such a common and necessary task, SWT and JFace provide support to make handling dialogs easy.
We need to discuss two independent Dialog classes: org.eclipse.swt.widgets.Dialog and org.eclipse.jface.dialogs.Dialog. As their package names suggest, the first class is part of SWT, whereas the second is from JFace. It would be possible to build an application using only the SWT dialogs, but doing so wouldn’t be fun. Still, SWT provides several prebuilt dialogs that perform common tasks. We’ll cover the use of the SWT dialogs first, followed by a comparison with JFace dialogs. We’ll round out the chapter by creating a username/password prompt dialog to demonstrate how to write a custom dialog.
10.1. SWT dialogs
The abstract class Dialog provides the basis for all dialogs in SWT. By itself, this class is of little interest, because it doesn’t provide much in the way of behavior. It’s possible to derive your own SWT Dialog subclasses if you wish. However, deriving from the Dialog classes provided by JFace will make your job easier. Consequently, we’ll discuss creating custom dialogs in the JFace section of this chapter.
SWT does provide prebuilt dialogs for common tasks that are convenient and easy to use. We’ll discuss how and when to use each of these dialogs next.
10.1.1. ColorDialog
Suppose you’re writing a text editor, and you want to let users specify the color of the text on the screen. You may be able to get away with letting them specify RGB values by hand if your target audience consists of hard-core programmers, but in general users want to see the available options and choose one by pointing and clicking. SWT does this for you with the class ColorDialog.
The grayscale nature of this book doesn’t do the image justice, but figure 10.1 shows how the user can easily choose a color from a ColorDialog.
Figure 10.1. ColorDialog allows the user to select from available colors.

Displaying this dialog is simple. Just instantiate it, and call open():
ColorDialog dialog = new
   ColorDialog(shell);
RGB color = dialog.open();
If you wish to preselect a color, call setRGB() before opening the dialog.
The call to open() blocks, which means it won’t return until the user clicks OK or Cancel. The selected color, if any, is returned from open() as an instance of RGB. null is returned if the user clicks Cancel. The selected color can also be retrieved later by using getRGB().
10.1.2. DirectoryDialog
DirectoryDialog chooses a target directory—for example, the location to which to save a group of files. The following snippet displays the directory chooser dialog along with a message explaining what the user is supposed to do:
DirectoryDialog dialog = new DirectoryDialog(shell);
dialog.setMessage("Choose a save directory");
String saveTarget = dialog.open();
if(saveTarget != null)
{
  java.io.File directory = new java.io.File(saveTarget);
  ...
}
The dialog looks something like figure 10.2.
Figure 10.2. DirectoryDialog waiting for the user to choose a directory
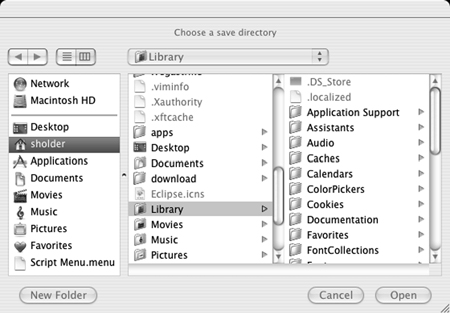
Once the user has chosen a directory, the call to open() returns a String that holds the absolute path to the chosen directory. This String can be used to create a java.io.File and then manipulated accordingly. Should the user cancel, open() returns null.
10.1.3. FileDialog
In many ways, FileDialog is similar to DirectoryDialog. The dialogs appear nearly identical, except that whereas DirectoryDialog displays only a list of directories, FileDialog adds the files present in each current directory to the display, as shown in figure 10.3.
Figure 10.3. FileDialog in Save mode allows the user to enter a filename to save to.

The next snippet shows how to let the user select multiple files, as long as the filenames end in “.txt”:
FileDialog dialog = new FileDialog(shell, SWT.MULTI);
dialog.setFilterExtensions(new String[] {"*.txt"});
dialog.open();
As usual, open() blocks and returns either the full path to the file as a String, or null. Unlike the dialogs you’ve seen before, FileDialog supports three different styles:
- SWT.SAVE— Treats the dialog as a save dialog, allowing the user to either select an existing file or type in the name of a new file to create.
- SWT.OPEN— Lets the user select a single existing file to be opened.
- SWT.MULTI— Lets the user select multiple files at once to be opened. Even if the user selects multiple files in a MULTI-style dialog, open() will return only one. getFileNames() must be used to retrieve the array of all filenames selected after open() returns.
Also of note in FileDialog are the methods setFilterPath(), setFilterNames(), and setFilterExtensions(). When they’re called before the dialog opens, these methods can be used to restrict the list of files that are visible to the user. setFilterPath() takes a single String that’s used as the path to the directory that should be displayed by default. The other two methods take arrays of Strings, which are used to assemble valid filenames and extensions. Our previous example filters out everything that doesn’t end in “*.txt”. Note that the filter is displayed to the user and is editable, so there is no guarantee that they won’t select a file of a type other than what you expect.
10.1.4. FontDialog
Just as users of your text editor need to select a color for their text, they also need to select a font to display it in. For this purpose, we have FontDialog. Its use is nearly identical to that of the ColorDialog we discussed earlier:
FontDialog dialog = new FontDialog(shell);
FontData fontData = dialog.open();
FontDialog automatically picks up the fonts available to SWT on the user’s system. This can result in a complex display, as figure 10.4 shows.
Figure 10.4. FontDialog displays all fonts installed on the user’s system.
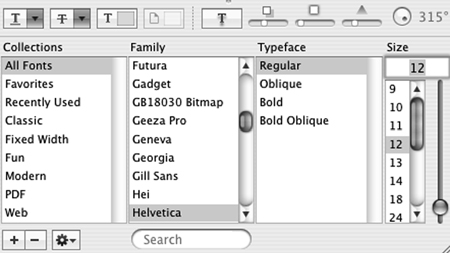
The returned FontData can be used to instantiate the correct font, as discussed in chapter 7.
10.1.5. MessageBox
If your application encounters an error it can’t recover from, the typical response is to display a text message to the user and then exit. For this or any other purpose where you need to display a dialog with a message, SWT provides MessageBox. A simple dialog that gives the user the option of continuing or not can be displayed with the following lines:
MessageBox dialog = new MessageBox(shell,
                        SWT.OK | SWT.CANCEL);
dialog.setMessage("Do you wish to continue?");
int returnVal = dialog.open();
There are two important steps when you’re using MessageBox. The easy part is to set the text message to display using setMessage(). More complicated is setting the style. Using an icon style adds an appropriate icon next to your message. Styles can also be used to control what buttons the MessageBox displays. However, some styles are valid only in combination with certain other styles; the allowed combinations are presented in table 10.1. Any of these can also be freely combined with one of the icon styles, which are listed in table 10.2. If no button or an invalid button style is specified, SWT.OK is used, resulting in a single OK button. open() returns an integer matching the SWT constant of the button that was clicked.
Table 10.1. Valid button style combinations
|
Dialog button style combinations |
|---|
SWT.OK SWT.OK | SWT.CANCEL SWT.YES | SWT.NO SWT.YES | SWT.NO | SWT.CANCEL SWT.RETRY | SWT.CANCEL SWT.ABORT | SWT.RETRY | SWT.IGNORE |
Table 10.2. Dialog icons
|
Dialog icon |
Indicates that... |
|---|---|
| SWT.ERROR_ICON | An error has occurred. |
| SWT.ICON_INFORMATION | The dialog is presenting noninteractive information to the user. |
| SWT.ICON_QUESTION | The dialog requires an answer (usually OK or Cancel) from the user. |
| SWT.ICON_WARNING | The user is about to perform a potentially harmful action. |
| SWT.ICON_WORKING | The program is in the middle of a task. |
10.2. JFace dialogs
The standard JFace dialog classes are straightforward to use, because they work similarly to dialogs in other UI toolkits such as Swing. The main difference you need to be aware of is that whereas Swing provides JOptionPane with a variety of static methods to display message dialogs, error dialogs, and so on, JFace has a separate subclass for each of these dialog types that may be instantiated and displayed as is or subclassed to further customize appearance or behavior.
All JFace dialogs extend from the abstract class org.eclipse.jface.dialogs.Dialog, which itself extends org.eclipse.jface.window.Window. Figure 10.5 shows the relationship between the standard dialog classes. As you can see, the relationships are for the most part simple; the Error and Input dialogs rely upon interfaces outside the basic hierarchy.
Figure 10.5. JFace dialog inheritance hierarchy

A few design considerations are common to any subclass of Dialog. You change dialog behavior by overriding the buttonPressed() method. The default implementation closes the dialog immediately as soon as any button is clicked—even nonstandard buttons that you may have added yourself. If you wish to change this behavior or do processing of any kind before the dialog is closed, you must override the method. Keep in mind that if you do override buttonPressed(), the dialog won’t close unless you call super.buttonPressed() at the end of your implementation.
You can also get hooks into specific buttons by overriding okPressed() or cancelPressed() for any dialog that supports those buttons. Again, by default, these methods just close the dialog—if you’re going to add behavior, be sure to call the parent method when you’re done.
Finally, the createButtonsForButtonBar() method controls the buttons that are created for any given dialog. If you want to change the buttons for any dialog, this is the place to do it. The one exception is MessageDialog—because you’ll much more frequently want to change the buttons in a message dialog, the constructor provides a convenient way to specify the buttons that should be displayed without having to create a subclass.
It’s recommended that a dialog be modal, meaning that once it’s opened, no other window can receive focus until the dialog is closed. Writing code that uses a modal dialog is generally simpler, because you can be sure that as long as the dialog is displayed, your user isn’t interacting with the rest of your application. All the basic dialogs discussed in this section follow this recommendation. This impacts your code in two ways. First, it doesn’t make sense to open a dialog without a parent window, so all our code examples include a parent ApplicationWindow for this purpose. Second, you must remember that in your code, the call to open() blocks, meaning that the method won’t return until the dialog is dismissed in one way or another. open() returns an int, which is the zero-based index of the button that was clicked, or –1 if the dialog’s window was closed by some means other than clicking a button (such as pressing the Esc key).
10.2.1. Message dialogs
A message dialog is used to display a message to the user. Little interaction is possible with a message dialog—the user is limited to dismissing the dialog by clicking one of the displayed buttons.
The following snippet shows how to display a message dialog—as you can see, displaying the dialog itself requires only two lines of code. This is roughly equivalent to calling JOptionPane.showMessageDialog() in Swing:
    MessageDialog dialog =
      new MessageDialog(
        testWindow.getShell(),
        "Greeting Dialog", //the dialog title
        null,
        "Hello! How are you today?",   //text to be displayed
        MessageDialog.QUESTION,        //dialog type
        new String[] { "Good",
                       "Been better",
                       "Excited about SWT!" },      //button labels
        0);
    dialog.open();
Message dialogs come in several different types, defined as static constants in the MessageDialog class. This type determines the image that’s displayed; in our example, we get an image of a question mark, because we’ve declared this to be a dialog of type QUESTION. Other types include ERROR, INFORMATION, WARNING, and NONE. Each uses the standard image for that type on your operating system (except type NONE, which causes no image to be displayed).
You can also create buttons automatically by passing an array of Strings that are the button labels. For each label found, MessageDialog creates a corresponding button. By default, all buttons behave the same and close the dialog. In practice, it’s unusual to find a message dialog with any button other than OK and perhaps Cancel.
The constructor also optionally accepts an image to be displayed.
10.2.2. Error dialogs
Error dialogs are in many ways similar to MessageDialogs, in that they display an error message to the user. You can mimic an ErrorDialog by creating a MessageDialog with type ERROR. However, the ErrorDialog allows you to display more in-depth error details by using the IStatus interface. IStatus holds a detailed message and information about the severity of each error that has occurred. The result can be seen in figure 10.6.
Figure 10.6. An error dialog with multiple instances of IStatus
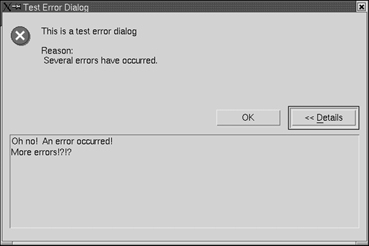
The error dialog shown in figure 10.6 is created with the following code. We create an instance of ErrorDialog and pass it an IStatus object that holds error information. The root IStatus holds several other instances of IStatus that provide increasingly granular details about the errors:
...
  ErrorDialog errorDialog = new ErrorDialog(testWindow.getShell(),
                                  "Test Error Dialog",
                                  "This is a test error dialog",
                                  testWindow.createStatus(),
                          IStatus.ERROR | IStatus.INFO );  1  Severity mask
...
  public IStatus createStatus()
  {
    final String dummyPlugin = "some plugin";

    IStatus[] statuses = new IStatus[2];

    statuses[0] = new Status(IStatus.ERROR,   2  Status
                        dummyPlugin,  3  Plug-in
                        IStatus.OK,
                        "Oh no!  An error occurred!",
                        new Exception  4  Exception

    statuses[1] = new Status(IStatus.INFO,
                        dummyPlugin,
                        IStatus.OK,
                        "More errors!?!?",
                        new Exception() );

    MultiStatus multiStatus = new MultiStatus(dummyPlugin,  5  MultiStatus
                                    IStatus.OK   6  Severity
                                    statuses,
                                    "Several errors have occurred.",
                                    new Exception() );
    return multiStatus;
  }
-
 IStatus defines several severity-related constants. By bitwise ORing them together, we create a bitmask describing the severities
we’re interested in displaying. The severity set in each individual IStatus object is compared with this mask, and details of that object only are displayed in the case of a match. By changing INFO to WARNING in this example, the details of our second Status object are suppressed.
IStatus defines several severity-related constants. By bitwise ORing them together, we create a bitmask describing the severities
we’re interested in displaying. The severity set in each individual IStatus object is compared with this mask, and details of that object only are displayed in the case of a match. By changing INFO to WARNING in this example, the details of our second Status object are suppressed.
-
 Here we create an instance of Status, which implements the IStatus interface. The idea is to encapsulate all the information about an error in this class and let the ErrorDialog or any other consumer decide what is appropriate to display based on the context.
-
 IStatus requires a plug-in identifier, which is supposed to be a unique string. This identifier is never used for ErrorDialogs, so we give the object a dummy value.
-
 The Status stores the exception it’s given. The exception is included in the output of Status’s toString() method and can also be retrieved using getException().
-
 MultiStatus also implements the IStatus interface and groups together multiple instances of IStatus.
-
 The severity set here is used to select an appropriate image to display in the dialog. The choices work the same as in a MessageDialog.
This code will display an error dialog with the message “Several errors have occurred”, as you saw in figure 10.6. Clicking the Details button opens a panel at the bottom of the dialog with the messages from the two Status objects we’ve defined.
The Details button appears because the root IStatus object given to the dialog is a MultiStatus and returns true for the isMultiStatus() method. Upon seeing that it’s dealing with a MultiStatus, the ErrorDialog calls getChildren() to retrieve the detailed status messages. If the root IStatus returns false for isMultiStatus(), a Details button won’t appear. Children of a MultiStatus may be MultiStatuses themselves, allowing you to build trees of arbitrary complexity, should the need arise. A MultiStatus’s severity is equal to the greatest severity of its children. The Javadocs define a MultiStatus with no children as defaulting to a severity of OK.
As you can see, ErrorDialog provides a significantly more advanced error-reporting mechanism than using a MessageDialog of type ERROR. The primary drawback to using ErrorDialog, however, is that it’s tied more closely to the Eclipse platform than we’d like, instead of being a purely JFace-based widget. Not only do the various IStatus-related classes come from org.eclipse.core.runtime, but they also ask for plug-in identifiers as parameters—a concept that’s present in Eclipse but not in JFace. How serious a drawback this may be is open for debate; it’s possible to use the classes in this case by passing dummy values, because the values aren’t used. However, you can’t pass null, because Status checks the plug-in value it’s given and throws an internal assertion failure exception in case of null. Thus, using the classes is at minimum confusing, and in general creates an awkward design for any application not based on Eclipse. If you don’t need to provide expanded details for your error messages, it’s best to avoid ErrorDialog and stick to creating MessageDialogs with type ERROR. However, if you need the Details functionality, it may be worth making a small compromise in your application design to take advantage of these classes that have already been written and debugged.
10.2.3. Input dialogs
As the name suggests, an InputDialog is used to allow the user to enter text. These dialogs are primarily intended for relatively short amounts of text (one line at most). They fill the same role as Swing’s JOptionPane.showInputDialog().
The key functionality provided by an InputDialog is the optional use of an IInputValidator, which is responsible for validating an input string. The following example prompts the user for a string that’s from 5 to12 characters long:
    IInputValidator validator = new IInputValidator() {
      public String isValid(String text) {  //return an error message,
              if(text.length() < 5)         //or null for no error
                return "You must enter at least 5 characters";
              else if(text.length() > 12)
                return "You may not enter more than 12 characters";
              else
                return null;
           }
    };

        InputDialog inputDialog = new InputDialog( testWindow.getShell(),
                                "Please input a String", //dialog title
                                "Enter a String:",   //dialog prompt
                                "default text",      //default text
                                validator );         //validator to use
    inputDialog.open();
The isValid() method implements the validation check for the text entered by the user. The semantics of the method seem slightly odd at first glance, but they let you be flexible in communicating status back to the user. The method is passed the text to validate and returns null if the text is valid. If it’s invalid, the method should return a String that’s displayed to the user as an error message. It’s permissible to return different error messages in different conditions, to help make it clear to the user exactly what you expect them to enter.
Note that this method is called frequently—each time the text is modified (every keystroke), it’s checked for validity. This means your implementation should perform as little work here as possible in order to return quickly. Spending much time in this method will make your UI unbearably sluggish.
You may provide a default string to be entered into the dialog. You can pass null, in which case the text field is left empty. The validator passed may also be null, in which case any input is accepted.
The InputDialog is passed a title, a prompt, and optionally some default text and an instance of IInputValidator. The dialog is shown with OK and Cancel buttons. The OK button is enabled or disabled at any given time depending on the return value of isValid() from the supplied IInputValidator; if no validator is supplied, the button is always enabled. Once the dialog has been closed, you can retrieve the entered value using getValue().
10.2.4. Progress monitor dialogs
Applications often perform tasks that take a long time to complete (in computer terms, at least). While your application is busy, it’s important to let users know that you’re working on fulfilling their request so they don’t become frustrated. JFace makes doing so relatively easy by providing a framework for displaying the task status to the user. We’ll start by discussing the ProgressMonitorDialog and how it fits into this framework.
You must understand several interfaces to effectively use a ProgressMonitorDialog. Figure 10.7 shows the relationship between these interfaces.
Figure 10.7. Progress monitor classes

The most important things to note here are the IRunnableContext and IRunnableWithProgress interfaces. IRunnableContext provides a context for any long-running task, and ProgressMonitorDialog implements this interface. IRunnableWithContext uses an instance of IRunnableWithProgress, which is meant to be implemented by a long-running task. IRunnableWithProgress is therefore the interface that your class must implement. Finally, IRunnableWithProgress is provided with an instance of IProgressMonitor, which it uses to report its progress as it executes.
When interacting with an IProgressMonitor, calls must take place in a certain sequence. The process starts by calling run() on an IRunnableContext, giving it an instance of IRunnableWithProgress. After doing whatever initialization might be necessary, IRunnableContext calls run() on IRunnableWithProgress, passing an IProgressMonitor. IRunnableWithProgress starts by calling beginWork() with the total amount of work it expects to do. It periodically calls worked() and subTask() to notify the progress monitor of its progress. It should also call isCanceled() to check whether it has been canceled. Finally, done() is called when the task is finished. After the call to done(), no more calls can be made on the IProgressMonitor.
IProgressMonitor assumes that your task can be broken into abstract units of work. It then provides a callback method to let you notify it that x units of work have been completed. Typically, this notification is called as the last step in a loop. However, if your task is a sequential series of slow operations, such as database or network accesses, you can assign a value to each operation as a percentage of the total work to be done. Doing so effectively decouples the implementation of the long-running task from the code that notifies the user how much work remains to be done. In our case, ProgressMonitorDialog implements IRunnableContext and provides the instance of IProgressMonitor; but because we deal only with the interfaces, the same code can be used with any implementation of IRunnableContext. In SWT/JFace, the only other implementation of IRunnableContext is ApplicationWindow, but it’s conceivable that you could implement your own status notification for your specific application—for example, for truly long-running tasks, it may be appropriate to send an email as each stage is completed. In this case, you can use these same interfaces.
Our next code snippet provides an example of using a ProgressMonitorDialog. Note that the status text to display to the user is controlled by the IRunnableContext when it calls beginTask() and subTask(), whereas updating the progress bar on screen is handled by the IProgressMonitor as it receives calls through its worked() method:
ProgressMonitorDialog progressMonitor =
    new ProgressMonitorDialog(shell);
try
{
  IRunnableWithProgress runnable = new IRunnableWithProgress() {
    public void run( IProgressMonitor progressMonitor )
                    throws InterruptedException
                  {
                    progressMonitor.beginTask("Doing hard work...",
                                                 100);  1  Total work
                    while(!taskCompleted())
                    {
                      progressMonitor.worked(10);   2  Amount worked
                      progressMonitor.subTask("sub task: " +
                                               getCurrentTask());
                      ... //Perform some long task
                      if( progressMonitor.isCanceled() )    3  Canceled check
                      {
                        throw new InterruptedException();
                      }
                    }
                    progressMonitor.done();    4  Done
                  }
  };

  progressMonitor.run(true,    5  Fork
                      true,    6  Cancellable
                      runnable );
}
catch (Exception e)
{
  e.printStackTrace();
}
-
We must notify the ProgressMonitor that we’re starting work on our task. Additionally, we must either tell it how many units of work we expect to perform or
use the constant IProgressMonitor.UNKNOWN if we don’t know. This value is a hint to the UI—if we end up performing more work than we specified, the progress bar will
clear itself and start over until we tell it we’re done.
-
Here we notify the ProgressMonitor that we’ve performed some amount of work. This causes it to update the progress bar displayed to the user, if the increase
is enough to be visible. In our case, each unit of work is 10% of the total, so every call to this method causes the bar to
increase in length by a significant amount.
-
If we allow the user the option of canceling our task, we must periodically check whether they have requested cancellation.
IRunnableContext.run() specifies that when a task has canceled itself, it should throw an InterruptedException after doing whatever cleanup is necessary. This exception eventually propagates to the original caller of IRunnableContext.run().
-
When we’re finished, we must notify the IProgressMonitor.
-
When starting a long-running task using an IRunnableContext, we’re allowed to specify whether we should run the task in a separate thread. If you do run in a separate thread, you’re
responsible for ensuring that you access all resources in a thread-safe manner—see Chapter 4 for a discussion of threading and SWT.
-
We can also specify whether this task may be canceled by the user. In the case of a ProgressMonitorDialog, this value decides whether a Cancel button is displayed. Generally, if your task takes long enough to require the use of
a ProgressMonitor in the first place, you should allow the user to cancel it if at all possible. Note that clicking the Cancel button is only
a recommendation to the running task; the task won’t be forcibly stopped. It’s up to the task to check for cancellation requests
and handle them appropriately—it’s free to ignore them, and by default it will do so if you forget to add the check to your
code.
Using ProgressIndicator for more control
The ProgressMonitorDialog provides an easy way to keep the user informed of a task’s progress. Sometimes, however, you’ll want more control over the way in which a progress bar is presented. When necessary, SWT lets you instantiate and directly use widgets that control the progress bar, as we’ll discuss next.
The ProgressIndicator widget allows you to display a progress bar without worrying about how to fill it. Like the ProgressMonitorDialog, it supports abstract units of work—you need only initialize the ProgressIndicator with the total amount of work you expect to do and notify it as work is completed:
    ProgressIndicator indicator = new ProgressIndicator(parent);
    ...
    indicator.beginTask(10);  //total work to be done. Control is
    ...                //not displayed until this method is called
    //use asyncExec() to update in the UI thread
    Display.getCurrent()display.asyncExec(new Runnable() {
      public void run() {
        indicator.worked(1);      //inform the ProgressIndicator that
                               //some amount of work has completed
      }
    });
As it receives notifications, the ProgressIndicator assumes responsibility for updating the appearance of the bar on the screen by calculating the percentage of the total work that has been completed.
The ProgressIndicator also provides an animated mode, where the total amount of work isn’t known. In this mode, the bar continually fills and empties until done() is called. To use animated mode, you call beginAnimatedTask() instead of beginTask(); and there is no need to call the worked() method. Assuming your work is being correctly done in a non-UI thread, this implies that you don’t need to worry about the asyncExec() call, either.
Occasionally, you may need more control than a ProgressIndicator allows. For times when you need to manipulate widgets at a low level, SWT provides the ProgressBar.
If you decide that you need to use a ProgressBar directly, you’re taking responsibility for changing the display of the bar yourself. The following code snippet shows an example:
  //styles are SMOOTH, HORIZONTAL, or VERTICAL
ProgressBar bar = new ProgressBar(parent, SWT.SMOOTH);
    bar.setBounds(10, 10, 200, 32);
    bar.setMaximum(100);
    ...
    for(int i = 0; i < 10; i++) {
      //use asyncExec() to do updates in the UI thread
      Display.getCurrent()display.asyncExec(new Runnable() {
        public void run() {
          //update how much of the bar should be filled in
          bar.setSelection((int)(bar.getMaximum() * (i+1) / 10));
        }
  });
}
Note that in addition to needing to calculate the bar update amounts yourself, calling setSelection() causes the widget to be updated every time; this behavior is unlike that of ProgressIndicator or ProgressMonitorDialog, which will update the display only if it has changed by an amount that will be visible to the end user.
As you can see, there is more work involved with using ProgressBars than the other widgets we’ve discussed, and in general we recommend avoiding them unless you have no choice. However, you may occasionally need to use them—for example, if you need to unfill the bar, there is no way to do it with the higher-level controls.
10.2.5. Custom dialogs
Although the dialogs that we’ve discussed so far cover many common tasks, you’ll frequently find that your application’s requirements call for a unique dialog that the designers of JFace couldn’t have anticipated. If you need to create a new type of dialog for your application, we recommend that you extend from the JFace Dialog class instead of using SWT’s Dialog. The JFace framework provides more structure to make your job easier; using SWT, you would be taking on the job of writing most of this common functionality yourself.
Because JFace provides the framework necessary to manage opening and closing dialogs, your job primarily consists of defining the controls present on the page. Dialog provides several different hooks to use in defining the layout of your dialog, depending on the level of control you need. We’ll discuss what methods are called in what order before we talk about when to override specific methods.
Because Dialog extends Window, everything starts with the createContents() method discussed in chapter 2. After it does some initialization, createDialogArea() is called. This method builds the top section of the dialog. After createDialogArea() returns, createButtonBar() is called and creates a new Composite and Layout for the bars at the bottom of the dialog. Finally, createButtonBar() calls createButtonsForButtonBar() to instantiate the buttons that appear on the dialog. By default, OK and Cancel buttons are created.
You’re free to take control of this process at any point by overriding the appropriate methods. In general, however, you can limit yourself to implementing createDialogArea() or createButtonsForButtonBar().
createDialogArea() takes a Composite that’s used as the parent for any controls you create and must return a Control whose layout data is an instance of GridData. The easiest way to fulfill this contract is to call the default implementation before you do your own work:
Composite composite = (Composite)super.createDialogArea(parent);
...//add custom controls
return composite;
Other than these restrictions, you’re free to add whatever controls are appropriate for your dialog.
Like createDialogArea(), createButtonBar() must return a Control with a GridData for its layout data. Rather than override createButtonBar(), however, it’s simpler to implement createButtonsForButtonBar(), where you can focus on creating the buttons you need without worrying about layout issues. Buttons are created using the createButton() method. For example, the default implementation of createButtonsForButtonBar() uses the following code to create OK and Cancel buttons:
createButton( parent,
              IDialogConstants.OK_ID,
              IDialogConstants.OK_LABEL,
              true );      //make this button the default
createButton( parent,
              IDialogConstants.CANCEL_ID,
              IDialogConstants.CANCEL_LABEL,
              false );
createButton() takes the button’s parent, an integer ID, the String to use as the label, and a flag indicating whether this button should be made the default. In addition to adding the button to its internal list and updating the layout data appropriately, by default createButton() also adds a SelectionListener to the button, which causes the dialog’s buttonPressed() method to be called with the ID of the button that was clicked. You’re free to override createButton() if you have requirements unique to your dialog, such as adding a specific style to all buttons created.
10.3. Updating WidgetWindow
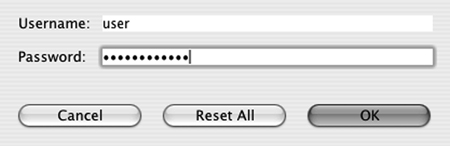
You’ve already seen examples of invoking each of the dialogs provided by SWT and JFace, so our in-depth example for this chapter demonstrates creating a custom dialog. Listing 10.1 creates a subclass of Dialog that displays two text-entry fields, one for a username and one for a password. We’ve also added a third button that clears any text that has been entered. Figure 10.8 shows what this dialog will look like.
Figure 10.8. The custom password dialog
To accomplish this, we override the createDialogArea(), createButtonsForButtonBar(), and buttonPressed() methods of Dialog. Notice that createDialogArea() is the only one of these methods that is at all complex.
Listing 10.1. UsernamePasswordDialog.java
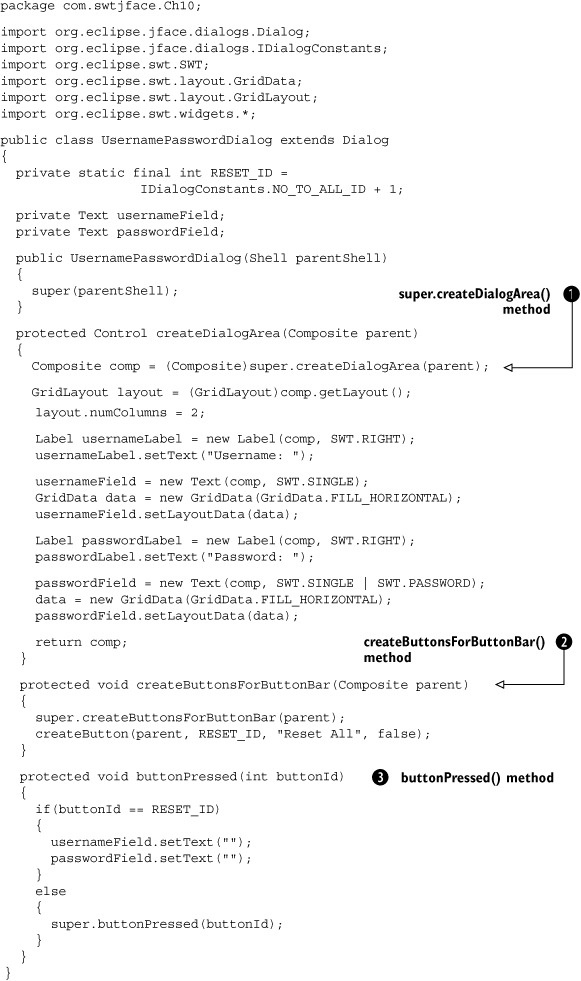
-
We override createDialogArea() to instantiate the controls necessary for this dialog. First we call the method on the superclass to handle all the layout
information. The superclass guarantees that it will return a Composite with a GridLayout, so it’s safe to cast the object that is returned. After setting the layout to have two columns, we create a pair of labels
and text fields to be displayed.
-
Adding our Reset All button requires only a single line. We make sure to call super.createButtonsForButtonBar() so we get the standard OK and Cancel buttons.
-
Finally, we want to react to the user’s button clicks. When createButton() was called, it associated an appropriate listener with each button to ensure that buttonPressed() is called. We check the ID of the button to see if it matches the ID we used to create the Reset All button earlier. If so,
we reset the text on our text fields. Otherwise we can delegate to the superclass and let it handle the button click as normal.
Listing 10.2 presents the Composite, which isn’t terribly interesting. Its only purpose is to launch our dialog. We can’t display a dialog directly in the tab, so the Composite creates a button instead. When the button is clicked, the listener instantiates and displays the UsernamePasswordDialog we showed you earlier.
Listing 10.2. Ch10CustomDialogComposite.java
package com.swtjface.Ch10;

import org.eclipse.swt.SWT;
import org.eclipse.swt.events.SelectionEvent;
import org.eclipse.swt.events.SelectionListener;
import org.eclipse.swt.layout.FillLayout;
import org.eclipse.swt.widgets.Button;
import org.eclipse.swt.widgets.Composite;

public class Ch10CustomDialogComposite extends Composite
{

  public Ch10CustomDialogComposite(Composite parent)
  {
    super(parent, SWT.NONE);
    buildControls();
  }

  protected void buildControls()
  {
    FillLayout layout = new FillLayout();
    setLayout(layout);

    Button dialogBtn = new Button(this, SWT.PUSH);
    dialogBtn.setText("Password Dialog...");
    dialogBtn.addSelectionListener(new SelectionListener() {

      public void widgetSelected(SelectionEvent e)
      {
        UsernamePasswordDialog dialog =
            new UsernamePasswordDialog(getShell());
        dialog.open();
      }

      public void widgetDefaultSelected(SelectionEvent e){}
    });
  }
}
After creating a button, we attach a SelectionListener to it. When the listener receives a widget-selected event, it creates a new UsernamePasswordDialog and opens it, just like any prebuilt dialog that comes with JFace.
You can run this example by adding the following lines to WidgetWindow:
TabItem chap10 = new TabItem(tf, SWT.NONE);
chap10.setText("Chapter 10");
chap10.setControl(new Ch10CustomDialogComposite(tf));
10.4. Summary
Using the dialog classes provided by JFace is generally straightforward, although you’ll be well served by carefully considering the design of your application before you write any code.
MessageDialog and InputDialog provide powerful alternatives to the capabilities provided by the dialog support in Swing. Unlike JOptionPane’s static methods, the dialog classes in JFace may be subclassed and customized to meet your application’s unique requirements, yet they provide easy-to-use options for handling the simple cases.
ErrorDialog provides more advanced error-reporting capabilities at the cost of introducing extra library dependencies into your application as well as parameters that you’ll never use. You should give careful thought to these issues before you use ErrorDialog; but we think the class is valuable enough that it’s sometimes worth using anyway, especially if you can effectively isolate knowledge of the org.eclipse.core.runtime-related classes and parameters from the rest of your application.
The IProgressMonitor framework, on the other hand, provides a clean, extensible set of classes ready to be used by your code. It’s possible to manipulate the lower-level controls directly, but we recommend sticking to the framework classes and interfaces except in unusual circumstances. By writing to the IRunnableWithProgress and IProgressMonitor interfaces, you’ll make it much easier to reuse your code in new situations as they arise.
Finally, when you’re creating a custom dialog, you’ll be better served by starting from the dialog class provided by JFace, as opposed to deriving from the basic SWT class. JFace’s framework provides the structure needed to make creating a new dialog easy. All you need to do is override a couple of methods to define the specific components used by your dialog.