
Chapter 7. Using digital signatures
This chapter covers
- XML canonicalization
- XML signature
- Signing SOAP messages
In the previous chapter, we learned how to apply encryption to safeguard the confidentiality of messages. When studying the basics of encryption and PKI, we also briefly looked at digital signatures and how they aid in the detection of message tampering. In this chapter, we will study signatures in detail, particularly to verify the integrity of SOAP messages received over an unsafe network.
The theory behind digital signatures is easy—in fact, we learned most of it in the previous chapter. Just like with encryption, the structure of the data, namely XML and SOAP, makes signing of a SOAP message complex. Before going into these details, let’s first recap the basics of signatures.
The goal of signing a message is to detect message tampering. If the sender can create a checksum and communicate it securely to the receiver, the receiver can recompute the checksum and compare it with that provided by the sender. Instead of using a simple checksum, we prefer to compute a message digest using a cryptographic hash algorithm (such as SHA-1) for the following reasons:
- Even a small change in the message produces a substantially different digest value. This means that flipping a single bit in a 1MB document produces a digest value that is clearly different from the original one.
- It is very difficult to find two messages that produce the same digest. That is, if an attacker wants to change the message without breaking the digest, he cannot do so.
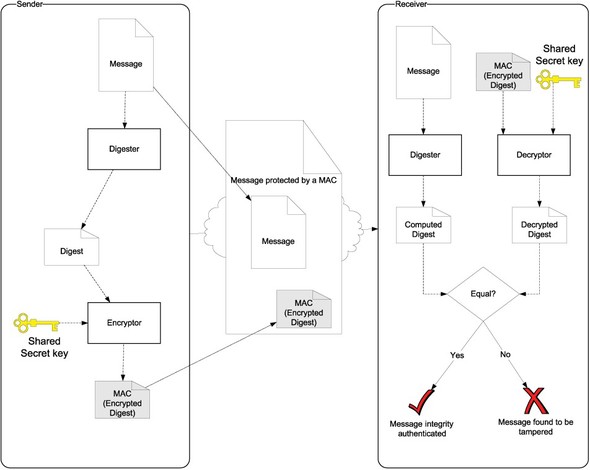
The message digest itself can be tampered with in transit. To take care of such a problem, the sender can send a Message Authentication Code (MAC) that is computed using the digest and a shared secret key. If a man in the middle tampers with the message, he cannot possibly fix the MAC value as well, since he does not have possession of the secret key. Figure 7.1 shows this technique pictorially.
Figure 7.1. A MAC is a message digest encrypted using a shared secret key. The receiver can use a MAC as shown to detect whether the message has been tampered with along the way by a man in the middle.
Clearly, a MAC provides us with the ability to check whether the message has been tampered with in transit. A MAC-based message integrity check suffers from two drawbacks:
- Dependency on a shared secret A shared secret needs to be established between the sender and the recipient. From the discussions in the previous chapter, we know how difficult it is to manage a shared secret.
- Inability to counter repudiation As the key is shared, the sender can always claim that the recipient is making up a message exchange that never happened. The recipient will not be able to conclusively prove that the sender indeed sent the message in question. Thus, MAC cannot establish repudiation.
PKI and digital signatures provide a better solution than MAC. The sender can digitally sign a message—that is, encrypt the message digest using his private key—before sending it to the recipient. The sender can also attach his digital certificate to provide the recipient with his identity information and public key. The recipient can verify the sender’s certificate using PKI and then use the public key available in the certificate to verify the signature—that is, decrypt the digest and compare it with a recomputed digest.
In summary, this mechanism establishes two facts: the identity of the sender and the proof that the message is from that sender. Nonrepudiation is ensured since only someone with the sender’s private key could have signed the message.
Figure 7.2 illustrates the use of PKI in verifying the integrity of messages.
Figure 7.2. PKI and digital signatures provide another way to verify message integrity. Unlike with MACs, PKI does not require a shared secret. The sender signs a message by using his private key to encrypt a digest of the message. The receiver can use the sender’s public key, available from the sender’s digital certificate, to decrypt the signature and verify the message digest.

A man in the middle tampering with the message cannot fix the encrypted digest in the digital signature because he doesn’t have the sender’s private key. In addition, the recipient can conclusively prove that the message could only have come from the sender because the digest has been encrypted with the sender’s private key.
That is all you need to know about the theory of digital signatures. In the rest of the chapter, we will go into the details that make this theory work. In particular, we will describe:
- The basics of XML signatures, the challenges in signing XML and how to overcome them using canonicalization.
- Signing SOAP messages in compliance with the XML Signature and WS-Security specifications, and a sample implementation in Java for signing SOAP messages and verifying signatures on SOAP messages.
- Practical issues with signatures when adopting them for securing message integrity in the real world.
We will start with a discussion of the challenges in signing XML and how to overcome them. These lessons are directly applicable to SOAP messages.
7.1. The basics of XML signatures
We told you in the previous chapter and in the introduction to this chapter that you can detect tampered messages using digital signatures. In these previous discussions, we never specified any constraints on the types of messages you can protect with digital signatures. The basic idea of using an encrypted message digest as a signature that can be verified to detect tampered messages is applicable to any kind of message. Signatures on XML messages need to tackle additional challenges that are unique to XML. Since the same challenges apply to SOAP message signatures, we will describe a technique named canonicalization that helps us tackle the toughest and most critical of these issues. Solutions to the rest of the challenges will be self-evident in section 7.2 where we show you examples of signatures on SOAP messages.
7.1.1. Challenges in signing XML
When applying a signature-based solution to ensure integrity of XML-based messages, additional challenges need to be tackled.
Syntactically equivalent XML documents may produce different signatures
The toughest and most fundamental challenge in signing XML comes from the fact that digest algorithms used to produce signatures do not understand XML syntax. The algorithms simply work on a specific sequence of input bytes. Consequently, two syntactically equivalent XML messages may get two different signatures. For example, attribute values may be quoted using a single quote (') or a double quote ("). Line endings may be represented in a platform-specific way. All these insignificant differences will cause two syntactically equivalent XML messages to produce two different signatures.
There are practical consequences to this problem, as shown in figure 7.3.
Figure 7.3. Superficial differences in how XML is serialized can result in signature mismatch. In the example shown here, the merchant’s application extracts an e-check from an order and submits it as part of a settlement request to the bank. The bank finds a signature mismatch, as the merchant’s application serializes the e-check in a slightly different fashion than the buyer’s application.

If an XML message travels through multiple parties before it reaches the ultimate destination, there is a good possibility that the byte sequence received will not be the same as the byte sequence sent by the sender, even though none of the intermediate parties intended to modify the message. For example, as shown in figure 7.3, if you create the electronic equivalent of a check (let’s refer to it as an e-check) using your digital signature and submit it to a merchant for buying goods/ services over the web, your merchant’s application may inadvertently modify the byte sequence in the e-check when it parses your request XML, extracts the e-check, and serializes it back into bytes for submission to the bank. In figure 7.3, observe that the e-check element lost line breaks and whitespace characters after the merchant’s application reserialized it. This transformation happens because XML syntax allows quite a few variations when serializing a document. So, in order to make sure that these variations do not result in failure to veriy signatures, we need to lay down one standard way of serializing an XML document when signing and verifying signatures. The XML canonicalization specifications fulfill this need. We will describe them in section 7.1.2. For now, let’s move on to the next challenge in signing XML.
The need for signing selected elements in an XML document
We often need to sign selected elements in a given XML document as opposed to signing the whole document. There are several reasons for signing only a part of an XML message. Figure 7.3 illustrates one of these reasons. When multiple parties are involved in a message exchange, different parts of a message may be intended for different parties. For example the buyer needs to sign the e-check separately, as the bank gets to see only the e-check and not the rest of the message. Another reason for signing only a part of message is performance. In some situations, we may not want to incur the cost of signing the complete message.
The need for communicating metadata on signatures
When signing XML messages such as SOAP requests, we need to communicate metainformation about signatures, preferably in the very XML message that was signed. For example, we would like to let the recipient know which portions of the message are signed and with what keys. It is helpful if this information can be represented as an XML fragment that can be added to the original document to create a signed document.
The need for representing signatures using XML
If what is being signed is XML, as is often the case in web services, it makes sense to represent the signature as well using XML. Further, we might want to represent a signature as XML even if what is being signed is not XML. For example, if a SOAP message involves attachments (yes, SOAP messages can have attachments besides the XML Envelope we have seen so far; we will discuss attachments in appendix C), we may want to sign the contents of some of the attachments and represent the signature value in XML.
Observe that none of these additional challenges are related to the principles of signing a message; these challenges are all unique to signing XML. We will explicitly describe here how the first of these challenges can be addressed; you will see for yourself how the rest can be easily addressed when we introduce the XML Signature standard in section 7.2. We will focus now on the solution for the first and toughest of these challenges: standardizing (or canonicalizing) how XML is serialized so that two syntactically equivalent XML documents produce the same signature.
7.1.2. XML canonicalization
As we just discussed, XML syntax allows a few variations when serializing a document, and this poses a fundamental challenge in the use of signatures to detect tampering of XML messages. The solution to this challenge comes from the XML canonicalization specification, which discusses each possible variation in XML syntax and proposes a transformation that will convert any well-formed XML document into one “standard” serialized representation. This transformation is known as canonicalization or c14n (there are 14 letters between the first letter and the last).
Mathematically speaking, you can think of canonicalization as a transformation of an XML document. It takes a well-formed XML document and produces a syntactically equivalent XML document that is standard in the sense that any further canonicalization results in the same document. As shown in figure 7.4, if we were to take all possible XML documents, the canonicalization process would divide them into equivalent sets, each of which can be represented by the canonical forms or standard representations.
Figure 7.4. XML canonicalization (c14n) process divides the universe of all possible XML documents into sets of syntactically equivalent documents. Each such set can be represented by a canonical form to which every member of that set can be reduced using the canonicalization process.

There are several ways to describe how a canonical XML document is obtained from an XML document. Here, we are going to show a set of rewrite rules that produce a canonical form when you keep applying them to an XML document until you cannot produce any further changes. These rewrite rules also have some special properties. You can apply them in any order; you will always end up with the same canonical form. And, the process always terminates in a finite number of steps. Table 7.1 presents these rewrite rules.
Table 7.1. Canonicalization scheme for each possible variation in an XML document
|
Possible variations |
Canonicalization |
|---|---|
| Character encoding | Convert to UTF-8 if any other encoding is used. |
| Character sequence used for line breaks | Standardize to #xA (line feed). |
| Optional XML declaration | Remove. |
| Optional DTD declaration | Remove. |
| Character references | Expand character references. For example, replace A with A, B with B, etc. |
| Use of CDATA sections rather than escaping special characters | Replace all CDATA sections with the equivalent character content, replacing special characters with character references. |
| Use of empty element tags (such as <a/>) rather than a start/end tag pair (such as <a></a>) | Replace all empty element tags with a start/end tag pair. |
| Whitespace within tags (for example, <a> or </a>) | Remove. |
| Whitespace before the root element and after the end of the document | Remove. |
| Whitespace in element content | Retain. |
| Choice of quotation marks (' or ") to delimit attribute values | Use double quotes to delimit all attribute values. |
| Attribute values | Use attribute value normalization defined in XML specification. Specifically: Expand character references. Replace each tab, line feed, and carriage return with a space. Expand entity references and repeat steps 1, 2, and 3 on the replacement text. If the attribute value is declared by a DTD to be anything other than CDATA (character data), remove leading and trailing spaces and replace sequences of whitespace characters with a single space. If a DTD is not available (as in SOAP messages), attribute values are assumed to be CDATA. Replace all special characters (such as &, <, and ") with character references (such as &, <, and " respectively). |
| Default attributes | Add all missing attributes for which default values are available |
| Attribute order | Sort attributes by their namespace URI (not prefixes) and local names in lexicographically ascending order. Attributes in no namespace come first. Namespace nodes (of the form xmlns:...=...) come before other attributes, and the default namespace node (xmlns=...) comes first. |
| Namespace declarations | See subsection “Inclusive and exclusive canonicalization” for a detailed description, as canonicalization of namespace declarations is quite an involved task. |
The rewrite rules in table 7.1 are all simple. They may be tedious to apply, but they are straightforward. There is one remaining variation for which we haven’t yet described a rewrite rule: variation in namespace declarations (the last row in table 7.1). For reasons we will describe shortly, there is no perfect way to rewrite namespace declarations when canonicalizing an XML document. In fact, there are two different possibilities for rewriting namespaces, as described next.
Inclusive and exclusive canonicalization
Canonicalization of XML documents without namespaces is easy as the rewrite rules can attest. Let us now examine how namespaces complicate canonicalization.
Consider the task of canonicalizing namespace declarations in the entirety of an XML document. What are the possible variations in namespace declarations that canonicalization should address? Prefixes bound to namespaces may vary, there may be superfluous namespace declarations, and namespace declarations on each element may appear in any order.
We can take the following simple approach to these issues.
- We do not change the prefix names at all. If this means that we treat two identical documents using different namespace prefixes as different, so be it. There are very good reasons why this is the right approach. If one part of the document refers to another using an XPath expression, it is very likely that we will break the reference when rewriting prefixes.
- We eliminate all superfluous namespace declarations. We remove a namespace prefix binding on an element if the same binding (that is, a binding with same prefix and same namespace URI) is in scope for its immediate parent element.
- We order namespace declarations using the same rules that we described in table 7.1 for ordering attributes.
These rewrite rules for namespace declarations, combined with the rules in table 7.1, produce a unique canonical form for any XML document, regardless of the order in which they are applied.
Signing the entirety of an XML document may not be what we need in some applications. For example, if we are sending a SOAP message that contains an e-check, we may want to sign only the e-check element. In that case, we need to sign a single element of an XML document. Therefore, we need to define how to canonicalize a single element.
Let us take a look at an example from chapter 2.
<soapenv:Envelope
 xmlns:soapenv="http://schemas.xmlsoap.org/soap/envelope/"
 xmlns:xsd="http://www.w3.org/2001/XMLSchema"
 xmlns:xsi="http://www.w3.org/2001/XMLSchema-instance">
 <soapenv:Body>
  <ns1:getQuoteResponse
     soapenv:encodingStyle="http://schemas.xmlsoap.org/soap/encoding/"
     xmlns:ns1="http://manning.com/xmlns/samples/soasecimpl">
     <quote xsi:type="xsd:float">103.25</quote>
  </ns1:getQuoteResponse>
 </soapenv:Body>
</soapenv:Envelope>
In this document, say we want to canonicalize the namespace declarations for the quote element. The simplest choice is to canonicalize the whole document and just pick out the quote element. As there are no superfluous namespace declarations in this example and as namespaces declarations for each element are already in the right order, this process would yield:
<quote xsi:type="xsd:float">103.25</quote>
This simple mechanism is not suitable for our purpose. If the quote element is signed in this form, a man in the middle can change the namespace URIs bound to xsi and xsd prefixes without getting detected. But that is a clear violation of the quote element’s integrity, as the element derives some of its semantics from the namespace bindings for xsi and xsd prefixes. Ideally, the canonical form for the namespace declarations on the quote element should look like this:
<quote
  xmlns:xsd="http://www.w3.org/2001/XMLSchema"
  xmlns:xsi="http://www.w3.org/2001/XMLSchemainstance"
  xsi:type="xsd:float">
  103.25
</quote>
How do we get to this canonical form of namespace declarations? As we have shown, we cannot get this with simple selection from a canonical XML document. Since namespace declarations for xsi and xsd prefixes are inherited, we somehow should get the right declarations from the ancestor elements. It turns out that this is not easy. Instead, we have two imperfect solutions for this problem, shown in figure 7.5.
Figure 7.5. Two possible schemes for canonicalizing namespace declarations on the quote element. In the first scheme, called inclusive canonicalization, all namespace declarations in scope for the quote element are included. In the second scheme, exclusive canonicalization, only those namespace prefixes that are used on quote and its descendant nodes (such as xsi:type attribute in this example) are included.

In the first solution, we blindly include all the name space declarations that are in scope, whether or not they are used. This scheme is known as or simply XML canonicalization. It is identified by the URI inclusive canonicalizationhttp://www.w3.org/TR/2001/REC-xml-c14n-20010315. For example, the previous quote element, under this canonicalization, will appear as follows:
<quote
  xmlns:ns1="http://manning.com/xmlns/samples/soasecimpl"
  xmlns:soapenv="http://schemas.xmlsoap.org/soap/envelope/"
  xmlns:xsd="http://www.w3.org/2001/XMLSchema"
  xmlns:xsi="http://www.w3.org/2001/XMLSchema-instance"
  xsi:type="xsd:float">103.25</quote>
In the other solution, exclusive canonicalization (identified by the URI http://www.w3.org/2001/10/xml-exc-c14n#), only those namespace prefixes that are used on elements and attributes in the document subset being canonicalized are included, along with any nonempty default namespace declaration in scope on the root of the document subset. So, in our example, exclusive canonicalization of namespace declarations would yield the following:
<quote
  xmlns:xsi="http://www.w3.org/2001/XMLSchema-instance"
  xsi:type="xsd:float">
  103.25
</quote>
Both canonicalization schemes clearly have drawbacks. The drawback in exclusive canonicalization is apparent in our example; we will describe that first. We lost track of the URI bound to the xsd prefix. An attacker can redefine the namespace URI bound to the xsd prefix without getting caught. The solution people have adopted is to provide the exclusive canonicalization algorithm with an additional list of prefixes to be included using the <exclc14n:InclusiveNamespaces Prefix-List="prefix1 prefix2 ... prefixn"/> parameter. This solution will result in the inclusion of listed prefixes even if they are not used as element/attribute prefixes in the canonicalized document subset. The problem with this is that you cannot compute all the required namespaces dynamically.
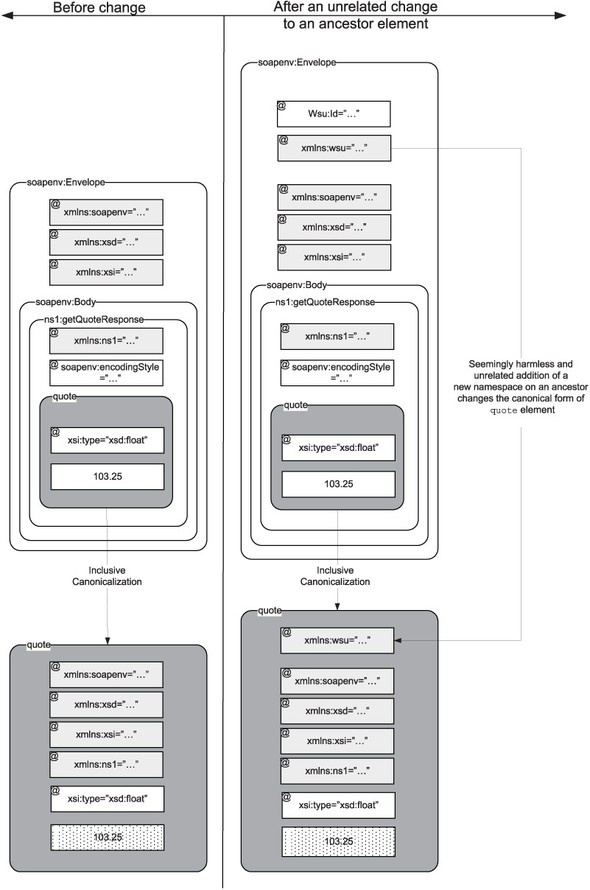
What is wrong with inclusive canonicalization? It suffers from a different drawback: It is very fragile. If we add a namespace declaration to any ancestor, it changes the canonical form of the element, too. Let’s say we create a digest of the quote element in its inclusive canonical form. The digest value thus computed is very fragile, as any change (even a harmless addition) in the namespace declarations of the quote element’s ancestors (such as the SOAP Envelope or Body elements) will also mean a change in the inclusive canonical form of quote. For example, if we add a wsu:Id to the Body element carrying the quote, the namespace binding of the wsu prefix will get added to the inclusive canonical form of quote, as shown in figure 7.6.
Figure 7.6. A demonstration of how fragile inclusive canonicalization can be. A seemingly innocuous and unrelated change—addition of a wsu:id attribute to the Envelope element, an ancestor of quote—changes the canonical form of the quote element.
This excessive dependence on context is undesirable for canonicalization of elements in a SOAP message. We will see in part III that a SOAP message may pass through multiple applications, each of which may modify different parts of the envelope. We will also see that there is a frequent need to extract some elements (SAML assertions, in particular) and their digest values from one message and embed them in another. All these requirements mean that digest values keep changing, invalidating the signatures.
Note: The xml:id specification breaks inclusive canonicalization further
Inclusive canonicalization is broken in one other way. A few standard attributes such as xml:lang and xml:space have been defined over the years in the reserved xml namespace. The xml:lang attribute can be used to identify the human language used in contents and attribute values of any element in a document. The xml:space attribute can be used to indicate how whitespace in the element’s content should be handled. Both of these attributes are inherited by descendents of the element on which they are set unless explicitly overridden. As all standard attributes defined in the xml namespace behaved similarly at the time inclusive canonicalization was being standardized, it was wrongly assumed that all attributes in the xml namespace would be scoped the same way. The spec for inclusive canonicalization declares that the nearest occurrences of attributes in the xml namespace must be included on the root of the canonicalized document subset, unless they are already present. This assumption is being broken by the recent xml:id specification.
The xml:id attribute can be used to set an identifier on any XML element without the need for a DTD or schema (just like wsu:Id defined by WS-Security). Obviously, it would be wrong to propagate the nearest identifier onto the canonicalized document subset root.
This is less of an issue in WS-Security–based applications, as wsu:Id is used as an identifier rather than xml:id.
As you may have realized, neither inclusive nor exclusive canonicalization come anywhere near solving the problem of variation in namespace declarations. In any given situation, one needs to pick the better scheme, based on the knowledge one has about the situation. We will visit the question of which canonicalization algorithm to prefer under what circumstances later in section 7.3 when we discuss practical issues in signatures.
We started this section by identifying the challenges in signing XML. Of the challenges we identified, the most fundamental is in producing the same signature when two syntactically equivalent XML documents are signed. You now know how to use XML canonicalization to overcome this challenge (modulo the difficulty in canonicalizing namespace declarations). We will now move on to addressing the rest of the challenges we identified earlier by explaining how the XML Signature and WS-Security specifications standardize the way we sign SOAP messages.
7.2. Signing SOAP messages
Let’s get back to the focus of this chapter: the use of digital signatures to verify the integrity of messages. As we discussed in the previous section, signing XML documents such as SOAP messages is more complicated than signing an arbitrary message. In addition to using XML canonicalization to cancel variations in XML syntax, we need to worry about:
- How we can represent the signature and its metadata within the signed XML document itself
- How we can sign selected parts of an XML document as opposed to signing its entirety.
In this section, we will address these two issues. In particular, we will discuss:
- The elements defined by the XML Signature and WS-Security specifications for standardizing the use of signatures in SOAP
- The usage of Apache XML Security Library and JAX-RPC handlers to sign SOAP messages and verify the integrity of signed SOAP messages
Let’s start with an example that shows how SOAP messages are signed.
7.2.1. Example: Signing order creation request
In this example, a brokerage customer digitally signs his request to create a market order. Table 7.2 provides instructions for running the example.[1]
1 One or more known issues in Apache Axis 1.x prevent this example from running successfully. See appendix A for a description of these issues.
Table 7.2. Steps to run the example that illustrates selective signing of SOAP message elements
|
Step |
Action |
How to |
|---|---|---|
| 1 | Set up your environment. | If you have not already set up the environment required to run the examples in this book, please refer to chapter 2 to do so. ant deploy installs all the examples. |
| 2 | If it is not already running, start TCP monitor. | Run ant tcpmon so that you can observe the conversation. Check the “XML Format” check box to allow tcpmon to format shown requests and responses. |
| 3 | Run the example. | Run ant demo –Dexample.id=5. You should be able to view the request-response messages as they are captured in the tcpmon console. |
Once you run the example, inspect the SOAP request message captured by tcpmon to understand how the sender is signing his market order. You will see the message structure shown in figure 7.7.
Figure 7.7. High-level overview of an XML signature used to protect the integrity of a SOAP message.

The structure of the signed message is a little too complex to understand at first sight. We drill down into the signed request so that you can understand its structure.
Structure of a signed SOAP message
In listing 7.1 we start by examining the signed message at a high level, without going into details of the Signature element.
Listing 7.1. Example of a signed SOAP message

Just as we did for authentication and encryption elements, a WS-Security header ![]() is used as the container for signature related information.
is used as the container for signature related information.
A BinarySecurityToken ![]() is used to carry the sender’s certificate chain (explained in section 6.2.2). This certificate chain securely provides the sender’s public key to anyone who wishes to verify the signature made by the
sender. We have used a BinarySecurityToken once before; we used it in chapter 5 to carry a Kerberos service ticket. To indicate that the enclosed token is an X.509 certificate chain (packaged in the PKIPath format), the ValueType attribute is set here to a URI defined by WS-Security’s X.509 Certificate Token Profile. The EncodingType attribute is set to indicate that the embedded (binary) certificate chain is base64-encoded. In addition, an identifier is set using the wsu:Id attribute so that we can refer to this token from within the Signature element.
is used to carry the sender’s certificate chain (explained in section 6.2.2). This certificate chain securely provides the sender’s public key to anyone who wishes to verify the signature made by the
sender. We have used a BinarySecurityToken once before; we used it in chapter 5 to carry a Kerberos service ticket. To indicate that the enclosed token is an X.509 certificate chain (packaged in the PKIPath format), the ValueType attribute is set here to a URI defined by WS-Security’s X.509 Certificate Token Profile. The EncodingType attribute is set to indicate that the embedded (binary) certificate chain is base64-encoded. In addition, an identifier is set using the wsu:Id attribute so that we can refer to this token from within the Signature element.
The Signature element ![]() carries all the information on what is signed, how it is signed, and what the signature value is. It is defined in a namespace
standardized by the XML Signature specification. We will look at what goes into this element later.
carries all the information on what is signed, how it is signed, and what the signature value is. It is defined in a namespace
standardized by the XML Signature specification. We will look at what goes into this element later.
The SOAP body ![]() containing the order creation request is what we sign in this example. A wsu:Id attribute is set on the SOAP body so we can refer to it from within the Signature element.
containing the order creation request is what we sign in this example. A wsu:Id attribute is set on the SOAP body so we can refer to it from within the Signature element.
Now let’s look at what goes into the Signature element.
Structure of a Signature element
The Signature element consists of three child elements, as shown in listing 7.2.
Listing 7.2. Outline of a Signature entry in the WS-Security header

The SignedInfo element ![]() is actually what is signed. But didn’t we say we were going to sign the SOAP body containing the order creation request?
Yes, we did, but what happens in reality is we sign the SignedInfo element and that in turn contains the digest values for all the elements we really want to protect using the signature. In
this case, we want to protect the integrity of the entire SOAP Body element, and the SignedInfo element contains the digest value of the Body element. We will show you the contents of SignedInfo shortly.
is actually what is signed. But didn’t we say we were going to sign the SOAP body containing the order creation request?
Yes, we did, but what happens in reality is we sign the SignedInfo element and that in turn contains the digest values for all the elements we really want to protect using the signature. In
this case, we want to protect the integrity of the entire SOAP Body element, and the SignedInfo element contains the digest value of the Body element. We will show you the contents of SignedInfo shortly.
The SignatureValue element ![]() , as the name suggests, is where the value of the signature is. As you should understand by now, a signature is nothing but
an encrypted digest of what is signed (the SignedInfo element, as we just said). Because the encrypted digest is binary data that cannot be embedded in XML as is, the encrypted digest is included in the SignatureValue element using base64 encoding.
, as the name suggests, is where the value of the signature is. As you should understand by now, a signature is nothing but
an encrypted digest of what is signed (the SignedInfo element, as we just said). Because the encrypted digest is binary data that cannot be embedded in XML as is, the encrypted digest is included in the SignatureValue element using base64 encoding.
The KeyInfo element ![]() provides information on the key that can be used to verify the signature. We will return to a discussion of KeyInfo shortly. We will first look at the contents of the SignedInfo element
provides information on the key that can be used to verify the signature. We will return to a discussion of KeyInfo shortly. We will first look at the contents of the SignedInfo element ![]() .
.
Structure of a SignedInfo element
When we dig deeper into the contents of SignedInfo element, we see something like listing 7.3.
Listing 7.3. Example of SignedInfo element in a signature

SignedInfo essentially answers the questions: What is protected by the signature, and how?
In listing 7.3, you can see that the “how” question is answered first. The first two child elements of SignedInfo, CanonicalizationMethod and SignatureMethod ![]() , define the processing used to arrive at the SignatureValue. It is important to include these as part of SignedInfo; otherwise, an attacker can deceive the recipient into using weaker algorithms than the ones used by the sender.
, define the processing used to arrive at the SignatureValue. It is important to include these as part of SignedInfo; otherwise, an attacker can deceive the recipient into using weaker algorithms than the ones used by the sender.
The rest of SignedInfo is simply a collection of one or more Reference elements ![]() that are used to specify “what” is secured against tampering. The URI attribute on a Reference element is used to indicate what is being secured. In this example, we are using the #Id (fragment identifier) syntax to refer to an element in the current document using its ID. Refer to listing 7.1 and you will see that the ID Signed-2478770-0 identifies the Body element in the SOAP message. It is perfectly possible to refer to external resources using absolute URIs, but that would
usually not be the case when we are using signatures to check tampering of SOAP messages.
that are used to specify “what” is secured against tampering. The URI attribute on a Reference element is used to indicate what is being secured. In this example, we are using the #Id (fragment identifier) syntax to refer to an element in the current document using its ID. Refer to listing 7.1 and you will see that the ID Signed-2478770-0 identifies the Body element in the SOAP message. It is perfectly possible to refer to external resources using absolute URIs, but that would
usually not be the case when we are using signatures to check tampering of SOAP messages.
How are elements identified by Reference elements protected by the signature? Every Reference element contains the digest ![]() ,
, ![]() of the referred element. Because all Reference elements are part of the SignedInfo that is protected by the signature, the contents of elements identified by Reference elements are indirectly protected.
of the referred element. Because all Reference elements are part of the SignedInfo that is protected by the signature, the contents of elements identified by Reference elements are indirectly protected.
When computing the digest of an element referred to by a Reference element, some amount of preprocessing may be necessary before the digest is computed. For example, canonicalization needs
to happen if the referred resource is an XML fragment. (Note that we are talking about canonicalization of the resource being
digested, as opposed to the canonicalization of SignedInfo. The latter is what we discussed in ![]() ). The Transforms element
). The Transforms element ![]() in Reference allows one or more transformations to be applied to the resource’s content before it is digested. The transformations happen
in a pipeline, with the output of a transform feeding the input for the next transform. The first transform is fed the content
retrieved by resolving the referred URI. The output of the last transform is fed to the digester to compute the digest value.
in Reference allows one or more transformations to be applied to the resource’s content before it is digested. The transformations happen
in a pipeline, with the output of a transform feeding the input for the next transform. The first transform is fed the content
retrieved by resolving the referred URI. The output of the last transform is fed to the digester to compute the digest value.
Now that you understand the structure of SignedInfo element, let’s take a look at KeyInfo, the other element in Signature that we promised to discuss in depth.
Structure of a KeyInfo element
Before we take a look at a sample KeyInfo element, let’s recall why it is needed by looking it at the steps a receiver needs to take in order to validate a signature.
- Verify that the information in SignedInfo is consistent with the rest of the message. Recall that SignedInfo contains the digests of the elements the signature is intended to protect. The receiver of a message needs to verify that these elements have not been tampered with. This can be done by taking each Reference in SignedInfo and going through the same computations as the sender did: applying the same series of transformations on the referred element and using the same digest algorithm to produce the digest. Since all the information needed to verify the digests is already in the Reference element, the receiver can verify without any a priori arrangement with the sender.
- Verify that SignedInfo itself has not been tampered with. For this, the signature on the entirety of SignedInfo needs to be verified using the canonicalization and signature algorithms specified in SignedInfo. It is easy to do the canonicalization given the algorithm, which is specified in the SignedInfo element. But, how does a receiver verify the signature? If you recall, a signature is nothing but an encrypted digest of what was signed. The receiver can recompute the digest of SignedInfo and compare the result with the digest provided by the sender. Before he can do that, he needs to decrypt the digest in the signature. For this, the receiver needs a key to use for this purpose. The KeyInfo child element under Signature provides information on the key (certificate for PKI-based signatures; shared secret for MACs) that can be used to verify the signature.
Now, take a look at listing 7.4 and what the KeyInfo element contains in our example.
Listing 7.4. Example of KeyInfo element in a signature

Let’s look at the use of SecurityTokenReference in KeyInfo. We have already seen one kind of SecurityTokenReference in the previous chapter. There, we needed to unambiguously refer to the receiver’s certificate, from which the sender took the public key to encrypt a message. Since a receiver can have any number of certificates, that reference tells the receiver which private key to use to decrypt. The need here is different. In this case, the sender needs to:
- Provide a mechanism for the receiver to verify that the message has not been tampered with.
- Provide his identity to the receiver in a verifiable way.
Both goals can be achieved if the sender somehow provides a certificate that proves the identity of the sender as well as provides a public key for use in signature verification. That means the certificate referred to is the sender’s. That is the essential difference from the previous chapter.
If the receiver already has access to the sender’s certificate, possibly in a key store, the sender can use the same mechanism as in the encryption example—simply refer to the certificate using the issuer name and serial number. Generally, where a prior trust relationship may not exist between the sender and the receiver, the sender has to send a certificate issued by a CA that is trusted by the receiver. Alternately, the sender can also attach a chain of certificates that ends in a certificate signed by a CA trusted by the receiver.
In listing 7.4 we see that a wsse:Reference ![]() (not to be confused with the ds:Reference we saw under SignedInfo) is used to refer to a security token embedded in the same message with the given ID, SignatureKey-2478770. If you revisit the message outline shown in listing 7.1, you will notice that this ID belongs to a BinarySecurityToken containing the sender’s certificate chain. (Other ways of referring to the sender’s certificate chain are possible. See the
WS-Security X.509 Certificate Token Profile specification for a detailed list.)
(not to be confused with the ds:Reference we saw under SignedInfo) is used to refer to a security token embedded in the same message with the given ID, SignatureKey-2478770. If you revisit the message outline shown in listing 7.1, you will notice that this ID belongs to a BinarySecurityToken containing the sender’s certificate chain. (Other ways of referring to the sender’s certificate chain are possible. See the
WS-Security X.509 Certificate Token Profile specification for a detailed list.)
You now know all the elements that go into a Signature in a SOAP message. This is a good time to take a look back at figure 7.6 and compare what’s shown in that figure with what you have learned in this section.
We will now look at the code that went into this example. Figure 7.8 shows an overview of the implementation.
Figure 7.8. Overview of the example implementation of signatures to guard the integrity of a SOAP request.

Figure 7.8 should look very similar to what you have seen in previous chapters. On the client-side we have a SigningHandler that is responsible for signing, and on the server-side we have a ServerSideWSSecurityHandler[2] that is responsible for verifying the signature.
2 You might be wondering why we didn’t name the server-side handler SignatureVerificationHandler. We will clarify this when we discuss the implementation of this handler.
Just as in previous chapters, we will dig into the details on the client- and server-sides separately. To emphasize that the signing and signature verification logic in the handlers shown here will switch sides when we discuss signing of response messages (messages originating from the server-side and addressed to the client-side), we will use the terms sender-side and receiver-side instead of client-side and server-side. We will discuss the sender-side first.
7.2.2. Sender-side implementation
So far in this chapter, you have seen how SOAP messages can be signed. Now, let’s see the Java code that can be used on the sender’s side to create a signature. As shown in figure 7.8, the job of signing a message is taken up by the SigningHandler, which we will discuss now. The code for this handler can be found in example5/SigningHandler.java at http://www.manning.com/kanneganti.
Handler intialization
The SigningHandler is initialized with information on which direction to sign in (request/response), what to sign, and what keys to use. Just as we did in EncryptionHandler, the message elements to protect with a signature are specified using an XPath expression. Key information needed for signing is retrieved from a key store. This information includes the private key used in signing and the certificate chain carrying the associated public key.
When initializing the handler, the XPath of elements to protect the parameters needed to retrieve the key information—the alias of the key pair and the password protecting the private key—are obtained as configuration parameters.[3] In previous chapters, you saw the code to initialize a handler using configuration information, so we will not be showing it here. Look up the init method in the source if you would like understand it in detail.
3 If the SigningHandler is intended for use in an interactive client application, it helps to use a JAAS KeyStoreLoginModule to prompt the user for key pair alias and password. See chapter 4 for details on JAAS.
There is one additional step that we did not do before. Once we retrieve the certificate chain carrying the public key of the sender, we need to encode it in bytes that we can embed in a WS-Security BinarySecurityToken element. The Java Certification Path API defined in the java.security.cert package comes in handy here, as shown in listing 7.5.
Listing 7.5. Encoding a certification path for use in a signature element

Facilities for encoding a certificate chain are provided by the CertPath class. So, we will first create a CertPath instance ![]() using the chain of certificates we retrieve from a key store
using the chain of certificates we retrieve from a key store ![]() . As CertPath is an abstract base class, it does not provide a public constructor. Each implementation of Java Cryptography Architecture
(JCA), called the cryptographic service provider, will provide its own implementation of the CertPath. We can use the services provided by a CertificateFactory to locate and construct the appropriate instance of the class implementing CertPath.
. As CertPath is an abstract base class, it does not provide a public constructor. Each implementation of Java Cryptography Architecture
(JCA), called the cryptographic service provider, will provide its own implementation of the CertPath. We can use the services provided by a CertificateFactory to locate and construct the appropriate instance of the class implementing CertPath.
With a CertPath instance in hand, we can encode the certificate chain. We use the PKIPath encoding scheme here ![]() as recommended by the WS-Security X.509 Certificate Token Profile. As PKIPath is a binary encoding scheme, we need to further encode the bytes produced in the previous step using base64 encoding
as recommended by the WS-Security X.509 Certificate Token Profile. As PKIPath is a binary encoding scheme, we need to further encode the bytes produced in the previous step using base64 encoding ![]() .
.
Signing a message
Just like EncryptionHandler and DecryptionHandler, SigningHandler can work in both directions. That is, it can sign parts of a request or parts of a response. So, the first thing to do in the handleRequest or handleResponse method is determine if the SigningHandler is configured to sign in the current direction (request/response) or not. We saw that code in the previous chapter.
Once the handler determines that it should sign parts of the message in the current direction, it needs to complete the steps in table 7.3 in order to get the envelope to the signed form shown in listing 7.1.
Table 7.3. Steps to sign select parts of a message
|
Step |
Action |
|---|---|
| 1 | Determine the elements to sign. |
| 2 | Make sure that all elements to sign have an Id attribute set so that we can refer to them using fragment URIs in SignedInfo References. |
| 3 | Insert a Security header targeted at the target actor unless it is already present in the envelope. |
| 4 | Prepend a Signature element to the Security header. |
| 5 | Prepend a BinarySecurityToken to the Security header and embed the certificate path we have encoded in the init method (listing 7.5) for use here. |
| 6 | Add KeyInfo to the Signature element. |
| 7 | Add a Reference to each of the elements to sign in SignedInfo. Compute and fill in the digest values for each of the elements. |
| 8 | Compute the signature value on the prepared SignedInfo element and fill in the SignatureValue element under Signature. |
Note that the order in which we execute these activities is very important considering the following:
- Any changes we make to the envelope should happen before we start computing the digest and signature values. Otherwise, we may ourselves be invalidating the digests and the signature.
- Prepending BinarySecurityToken after prepending Signature to the Security element allows for better performance during signature verification. By the time the receiver looks at KeyInfo/Reference in Signature, it would already have seen the BinarySecurityToken, and hence it would not need to search the entire envelope for the token to resolve the reference.
- SignedInfo should be completely filled in before SignatureValue can be computed.
Some of the steps shown here, such as figuring out the elements to sign by evaluating an XPath expression (step 1) and inserting a Security header entry for the target actor (step 3) are very similar to steps shown in EncryptionHandler and elsewhere. We will skip describing those steps here and focus on the rest of the procedure (steps 4-8). We’ll also skip the simple task of iterating over all elements to sign, checking if an ID is available on each, and setting one in case there isn’t one (step 2). We will start with step 4, in which we prepend a Signature element to the Security header.
Creating a signature element (step 4)
We have seen the utility of XMLCipher and related classes provided by the Apache XML Security library in the previous chapter. In this chapter, we will rely on XMLSignature and related classes defined in the same library. Just as XMLCipher did for encryption, XMLSignature provides Java APIs to create, parse, and manipulate the contents of the XML elements required to implement signatures.
The Apache XML Security library requires that its initialization method, org.apache.xml.security.Init.init(), be called before any of its classes can be used. Just as we did in EncryptionHandler, we use a static initializer block in SigningHandler to accomplish this.
The code snippet in listing 7.6 creates a Signature element and prepends it to the WS-Security header entry.
Listing 7.6. Creating a signature element and prepending it to the WS-Security header. The signature is not fully filled in.

In this code, we first construct an XMLSignature instance ![]() using the following arguments:
using the following arguments:
- The first argument to the constructor is the DOM Document instance we will be creating the signature elements in.
- The second argument is the base URI to prepend to all relative URIs. In our case, we do not need any of the relative URIs such as fragment identifiers to be interpreted relative to any external URI, so we will simply pass the empty string as base URI.
- The third argument is the signature algorithm to use. The signatureAlgo value is set at initialization time to the configured value; if none is set, it defaults to XMLSignature.ALGO_ID_SIGNATURE_RSA_SHA1.
- The fourth and final argument is the canonicalization algorithm to use when signing SignedInfo. We use exclusive c14n, as it will make the SignatureValue more robust to changes (such as additional namespace bindings on the SOAP envelope) that should not break the signature. As we are generating SignedInfo programmatically, there aren’t going to be any comments in it. So we let the c14n algorithm omit comments.
Once the XMLSignature instance is available, we obtain the DOM element underlying the instance and add it as the first element in the WS-Security
header ![]() .
.
Why prepend instead of appending the Signature element to the Security header entry? Say we are signing a message that is partially encrypted. The receiver needs to know that the signature should be verified before decryption is attempted. By prepending the Signature element, we let the receiver see the Signature element before the currently existing elements (such as an EncryptedKey) in the security header entry.[4]
4 We can communicate the order of operations to the receiver using other conventions as well, but the standards suggest this one, as it allows efficient implementations.
Let us now look at the code for next step (step 5 in table 7.3) in the sender-side implementation. In this step, we will be prepending the sender’s certification path to the Security header entry as a BinarySecurityToken element.
Adding the certification path as a BinarySecurityToken (step 5)
Looking back at listing 7.1, we see that we need to prepend our certification path to the Security header entry using a BinarySecurityToken element. We repeat here, for convenience, the structure of the BinarySecurityToken we need to create and prepend to the Security header entry.
<wsse:BinarySecurityToken
  ValueType="...#X509PKIPathv1"
  EncodingType="...#Base64Binary"
  wsu:Id="SignatureKey-2478770"
  xmlns:wsu="...utility-1.0.xsd">
  ...
</wsse:BinarySecurityToken>
We have already seen in listing 7.5 how to encode the sender’s certification path using PkiPath and base64 encodings. All that’s left is to see how we can embed the encoded bytes as the content of the BinarySecurityToken element. Listing 7.7 shows this.
Listing 7.7. Creating and adding a BinarySecurityToken that contains the sender’s certification path to the Security header entry

This code shows very straightforward use of DOM APIs. The only part that really needs an explanation is how we compute the
Id to set on the BinarySecurityToken. It is dynamically computed using the handler’s hash code ![]() so that BinarySecurityToken elements added by more than one handler instance do not end up with the same ID.
so that BinarySecurityToken elements added by more than one handler instance do not end up with the same ID.
Let’s now move on to the code for the next step (step 6 in table 7.3) in senderside implementation. In this step, we will create and add a Keyinfo element to the Signature element created in step 4.
Adding KeyInfo to the signature (step 6)
We now have the Signature and BinarySecurityToken elements prepended to the Security header, as shown in listing 7.1. Now, we are ready to start filling in the content of the Signature element shown in listing 7.2. Let us first deal with the KeyInfo element. Listing 7.4 showed what we want in the Signature’s KeyInfo element. Here it is once again.
<ds:KeyInfo>
  <wsse:SecurityTokenReference>
    <wsse:Reference URI="#SignatureKey-2478770"/>
  </wsse:SecurityTokenReference>
</ds:KeyInfo>
As we have set a wsu:Id on the BinarySecurityToken we just created, we can create a KeyInfo element, add to it a SecurityTokenReference element and add to that a wsse:Reference pointing to the BinarySecurityToken using its wsu:Id. Listing 7.8 shows how to do this.
Listing 7.8. Populating KeyInfo in the Signature element

The code in this snippet, once again, involves simple DOM API calls, as the XMLSignature instance constructed in step 4 exposes a KeyInfo element for direct manipulation. Let’s now move on to the next step (step 7 in table 7.3), where we add a Reference to each of the elements that need to be protected using signatures.
Adding a reference to SignedInfo (step 7)
We now have KeyInfo, one of three children of the Signature element shown in listing 7.2, in place. We still have to fill in SignedInfo and SignatureValue. We cannot compute SignatureValue until SignedInfo is filled in. So, we will focus on SignedInfo next.
Listing 7.3 showed what goes into a SignedInfo. Of what is shown there, we already have set CanonicalizationMethod and SignatureMethod when we constructed the XMLSignature instance in listing 7.6. We just need to add a Reference element for each of the elements we want to secure using the signature, as shown in listing 7.9.
Listing 7.9. Adding a reference to each of the elements that need to be protected using signatures

In this listing, we define a method named addReferencesToSign that takes all the responsibility of populating SignedInfo with References to elements that should be protected by the signature. This method loops ![]() over the elements to protect and adds a Reference for each of those elements using the addDocument method
over the elements to protect and adds a Reference for each of those elements using the addDocument method ![]() provided by the XMLSignature class in Apache XML Security library.
provided by the XMLSignature class in Apache XML Security library.
The addDocument method of the XMLSignature class takes the identifier (URI) of a document and adds a Reference to it in SignedInfo. When adding a Reference, the addDocument method computes the digest of the referred element. We can optionally specify the transforms ![]() to apply before computing its digest. In general, we only need to apply the canonicalization algorithm the handler is configured
to use. In the special case where the Signature element is part of the element being signed, we need to add an enveloped signature transform. This transform removes the signature element from the digest calculation. Why is this necessary? The mere act of setting
the computed digest will invalidate the digest when the Signature element is part of the element being signed. It is necessary to discard the Signature element during digest computation. Also, notice that we set the enveloped signature transform before we set the canonicalization
transform. This ordering is important. We want to canonicalize the element being signed only after we remove the Signature element from it. If we do it in the reverse order, it is possible that the canonical form degrades into a noncanonical form
when we remove the Signature element.
to apply before computing its digest. In general, we only need to apply the canonicalization algorithm the handler is configured
to use. In the special case where the Signature element is part of the element being signed, we need to add an enveloped signature transform. This transform removes the signature element from the digest calculation. Why is this necessary? The mere act of setting
the computed digest will invalidate the digest when the Signature element is part of the element being signed. It is necessary to discard the Signature element during digest computation. Also, notice that we set the enveloped signature transform before we set the canonicalization
transform. This ordering is important. We want to canonicalize the element being signed only after we remove the Signature element from it. If we do it in the reverse order, it is possible that the canonical form degrades into a noncanonical form
when we remove the Signature element.
How does XMLSignature’s addDocument method resolve the URI provided to it? We help do that with a resource resolver ![]() . Apache XML Security defines a resolution service provider interface, ResourceResolverSpi, to implement for different URI schemes. Any number of resolvers can be set to allow different kinds of URIs to be resolved.
As we are only signing elements within the signed SOAP envelope, we exclusively use fragment identifiers as URIs. We only
need to set one resource resolver. The sample ResolverFragment class in the org.apache.xml.security.utils.resolver.implementations package fits our needs except for one small hitch. This resolver does not understand WS-Security–defined wsu:Id as an identifier. We extend it as WsuIdResolver and set it
. Apache XML Security defines a resolution service provider interface, ResourceResolverSpi, to implement for different URI schemes. Any number of resolvers can be set to allow different kinds of URIs to be resolved.
As we are only signing elements within the signed SOAP envelope, we exclusively use fragment identifiers as URIs. We only
need to set one resource resolver. The sample ResolverFragment class in the org.apache.xml.security.utils.resolver.implementations package fits our needs except for one small hitch. This resolver does not understand WS-Security–defined wsu:Id as an identifier. We extend it as WsuIdResolver and set it ![]() for use in our XMLSignature instance. The code for WsuIdResolver can be found in listing 7.10.
for use in our XMLSignature instance. The code for WsuIdResolver can be found in listing 7.10.
Listing 7.10. Extension of Apache XML Security Library’s ResolverFragment class to resolve a wsu:Id identifier to an element bearing that identifier
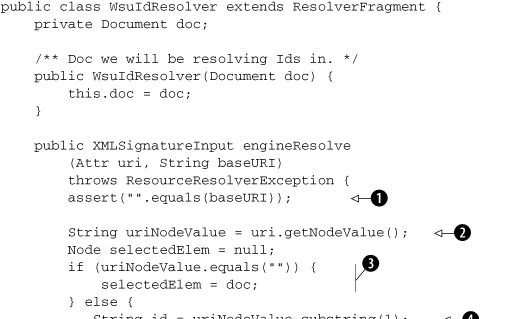
Here’s what we do in this code. We first verify that baseURI is an empty string ![]() , as our implementation does not support the use of base URIs. We read the URI to resolve from the given URI attribute (DOM
Node)
, as our implementation does not support the use of base URIs. We read the URI to resolve from the given URI attribute (DOM
Node) ![]() . If the URI is an empty string, we should resolve it to the entirety of the document
. If the URI is an empty string, we should resolve it to the entirety of the document ![]() . Otherwise, we can assume that the URI will be of the form "#Id"
. Otherwise, we can assume that the URI will be of the form "#Id" ![]() . This is guaranteed, as the engineCanResolve method (not shown here) in the base class returns false unless the URI is an empty string ("") or of the #Id form. Now that we know the ID of the element we wish to find, we simply have to walk through the DOM tree and find the element
bearing this ID
. This is guaranteed, as the engineCanResolve method (not shown here) in the base class returns false unless the URI is an empty string ("") or of the #Id form. Now that we know the ID of the element we wish to find, we simply have to walk through the DOM tree and find the element
bearing this ID ![]() . We have seen this code in DecryptionHandler as well (when resolving ReferenceList in EncryptedKey). So, we will skip describing it in detail.
. We have seen this code in DecryptionHandler as well (when resolving ReferenceList in EncryptedKey). So, we will skip describing it in detail.
The result of ID resolution is returned in the form an XMLSignatureInput instance. This class encapsulates a node set or byte sequence that can be acted upon by signature transforms. Here, we construct
an instance of XMLSignatureInput and initialize it with the element we resolved the given URI to ![]() . The XML Signature specification states that comments should not be included when resolving URIs of the form #Id (also called barename XPointers).[5] So, we indicate the same in the returned XMLSignatureInput instance, along with the MIME type of the result and the source URI that was resolved.
. The XML Signature specification states that comments should not be included when resolving URIs of the form #Id (also called barename XPointers).[5] So, we indicate the same in the returned XMLSignatureInput instance, along with the MIME type of the result and the source URI that was resolved.
5 If comments are to be retained, it suggests the use of XPointer syntax: #xpointer(/) instead of "" and #xpointer(id('Id')) instead of #Id.
We are now almost done discussing the code for SigningHandler. The only step we have yet to discuss from table 7.3 is step 8, where we compute the signature.
Creating the SignatureValue (step 8)
Now that SigendInfo is filled in, all we have to do is sign. The code for this can’t be simpler!
xmlSignature.sign(ourKey);
This completes the sender-side of implementation. Let’s now look at the receiver-side implementation.
7.2.3. Receiver-side implementation
For the receiver-side implementation, we enhance DecryptionHandler, which you saw in the last chapter, to also handle verification of signatures and rename it ServerSideWSSecurityHandler. Why not write a different handler as we have been doing all along? Now, we have come to a stage where the ordering of different activities on the receiving side is dependent on the contents of the received message. For example, if a sender encrypts a message after signing it, we should first decrypt and then verify the signature. We modify DecryptionHandler to process elements of a Security header entry in the order they appear. Listing 7.11 shows the part of the code in ServerSideWSSecurityHandler that invokes appropriate methods to process each of the elements of a Security header entry.
Listing 7.11. Code in ServerSideWSSecurityHandler to handle elements of a Security header entry in the order they appear
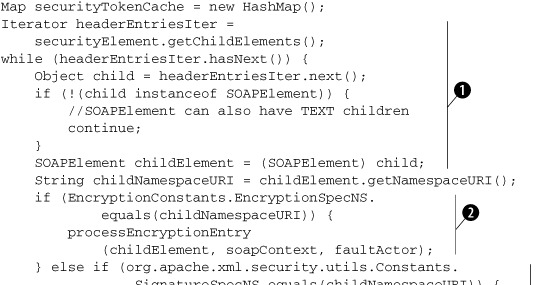
In this code, we iterate over each child element of the Security header entry ![]() . Observe that we are careful enough to skip over TEXT children (if there are any). If the child element is from the namespace
reserved by the XML Encryption specification, we delegate the responsibility of processing the element to a method named processEncryptionEntry
. Observe that we are careful enough to skip over TEXT children (if there are any). If the child element is from the namespace
reserved by the XML Encryption specification, we delegate the responsibility of processing the element to a method named processEncryptionEntry ![]() . If the child element is from the namespace reserved by the XML Signature specification, we delegate the responsibility of
processing the element to a method named processSignatureEntry
. If the child element is from the namespace reserved by the XML Signature specification, we delegate the responsibility of
processing the element to a method named processSignatureEntry ![]() . If the child element is a BinarySecurityToken, we delegate the responsibility of processing the element to a method named processBST
. If the child element is a BinarySecurityToken, we delegate the responsibility of processing the element to a method named processBST ![]() .
.
As we have already seen the code to handle encryption-related elements in the previous chapter, let’s focus on the code required to process signature-related elements. This code needs to process BinarySecurityToken and Signature elements, using the processSignatureEntry and processBST methods respectively. Before going into the details, let’s look at the process of signature verification so that you will have high-level understanding of the functionality needed:
- We first need to locate a key that can be used to verify the signature. To get the key, we need to extract KeyInfo (shown in listing 7.4) from the Signature element and resolve the SecurityTokenReference to obtain the key that can be used to verify the signature. Locating the token using the ID found in the Reference URI can be costly if we scan a long message looking for an element with the given ID. In our example, the sender has tried to help us out by making sure that the BinarySecurityToken containing the sender’s certification path comes before the Signature element. We can take advantage of such assistance by caching the security tokens if and when we find them as we walk down the list of elements in the Security header entry. If the BinarySecurityToken is not found and cached by the time the Signature element is encountered, we can scan through the message looking for the ID referenced in the KeyInfo. In either case, if the token happens to be a certificate or a certification path, we need to validate it. This validation requires the sender’s certification chain to consist of at least one CA whose public key is known to us beforehand.
- We need to verify the digest values of each of the References in SignedInfo. If these values tally up correctly, we then need to verify the SignatureValue using the key found and validated in the previous step.
- Together, these activities establish that signed parts of the message have not been tampered with. They also establish that the message originated from the subject identified in the certification path, as no one else other than the subject could have signed the message. This is equivalent to authentication of the sender’s claimed identity. Just as we did in the handlers shown in chapter 4, we will save the authenticated subject information in MessageContext so that downstream handlers and service can make use of the information if needed.
Let us now look at the code that goes into each of these steps.
Processing certificates and certification paths
We saw previously that a method processBST is called when we encounter a BinarySecurityToken element in the Security header entry. Listing 7.12 shows how to process a BinarySecurityToken when it happens to contain an X.509 certificate or certificate chain. The certificate or certificate chain in the BinarySecurityToken is validated, and if validation succeeds, the process certificate/chain is saved in a security token cache that can be looked up later when verifying signatures.
Listing 7.12. Code to process BinarySecurityToken elements containing an X.509 certificate or certificate chain


In this code, we first check to see if the given BinarySecurityToken has already been processed and cached. If so, we simply return the cached token ![]() . This happens if the BinarySecurityToken element follows the Signature element that uses it rather than preceding it. In such a case, we scan and locate the BinarySecurityToken, process it, and cache it when we encounter the Signature that refers to it.
. This happens if the BinarySecurityToken element follows the Signature element that uses it rather than preceding it. In such a case, we scan and locate the BinarySecurityToken, process it, and cache it when we encounter the Signature that refers to it.
We next determine the type of BinarySecurityToken by looking at its ValueType attribute ![]() . The way we process a BinarySecurityToken will depend on the type of the token it holds.
. The way we process a BinarySecurityToken will depend on the type of the token it holds.
If the BinarySecurityToken happens to be holding a certificate ![]() , we first do base64 decoding of its content and then generate a java.security.cert.Certificate instance using the CertificateFactory API we introduced in section 7.2.2 (see listing 7.5). The certificate can be validated if we know the public key of the CA that signed it or if we have a trusted copy of the
certificate itself. We use the Utils.validateCertificateChain method for this purpose. We will look at that method in a short while. Once the certificate is validated, it is stored in
the cache.
, we first do base64 decoding of its content and then generate a java.security.cert.Certificate instance using the CertificateFactory API we introduced in section 7.2.2 (see listing 7.5). The certificate can be validated if we know the public key of the CA that signed it or if we have a trusted copy of the
certificate itself. We use the Utils.validateCertificateChain method for this purpose. We will look at that method in a short while. Once the certificate is validated, it is stored in
the cache.
If the BinarySecurityToken happens to be holding a certification path ![]() instead of simply a single certificate, we do similar processing. After doing base64 decoding, we generate an instance of
java.security.cert.CertPath using the CertificateFactory API. To validate the sender’s certification path, we need to know in advance the public key of at least one of the CAs in the sender’s certification chain, or we need to have a trusted
copy of the subject’s certificate. Once again, we use the Utils.validateCertificateChain method to validate the sender’s certification path and save the validated certification path in the cache.
instead of simply a single certificate, we do similar processing. After doing base64 decoding, we generate an instance of
java.security.cert.CertPath using the CertificateFactory API. To validate the sender’s certification path, we need to know in advance the public key of at least one of the CAs in the sender’s certification chain, or we need to have a trusted
copy of the subject’s certificate. Once again, we use the Utils.validateCertificateChain method to validate the sender’s certification path and save the validated certification path in the cache.
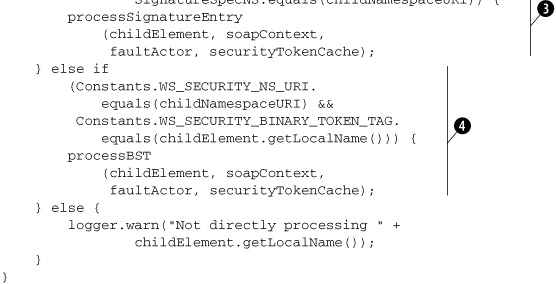
Listing 7.13 shows the code in the Utils.validateCertificateChain method to validate the sender’s certification path.
Listing 7.13. Code to validate a certificate or a certificate chain
When asked to validate a Certificate ![]() , we wrap it as a CertPath with a length of one so that we can use the same method to validate both certificates and certificate chains.
, we wrap it as a CertPath with a length of one so that we can use the same method to validate both certificates and certificate chains.
To validate a CertPath, we get hold of a CertPathValidator instance that can validate certification paths encoded using the PkiPath scheme ![]() . A CertPathValidator using the PKIX algorithm can do this validation. PKIX is name of the Internet Engineering Task Force (IETF—a standards body)
working group that defines PKI-related standards such as the PkiPath encoding scheme for certification paths.
. A CertPathValidator using the PKIX algorithm can do this validation. PKIX is name of the Internet Engineering Task Force (IETF—a standards body)
working group that defines PKI-related standards such as the PkiPath encoding scheme for certification paths.
To validate a certification path, the validator needs the public keys of trusted subjects and CAs. In addition, we may want
to specify what the validator should or should not do. For example, we may not want the validator to check with any CRL distribution points if we do not have access
to one. These settings and choices can be communicated to the validator using a PKIXParameters instance. Here, we initialize a PKIXParameters instance ![]() with the trusted certificates from a key store and turn off CRL lookup. (Note that real applications should not be turning
off CRLs, as they provide an important protection mechanism against certificate abuse.)
with the trusted certificates from a key store and turn off CRL lookup. (Note that real applications should not be turning
off CRLs, as they provide an important protection mechanism against certificate abuse.)
Finally, to validate, we simply call the validator’s validate method ![]() and provide it with the CertPath instance to validate and the validation parameters.
and provide it with the CertPath instance to validate and the validation parameters.
Now that we know how to validate the certificate or certification path presented by the sender as a BinarySecurityToken in the Security header entry, let’s look at how we can use the validated certificate or certification path to verify a signature.
Verifying signatures
The XML Signature API you have seen in the sender-side implementation can also be used on the receiver-side to verify signatures. Listing 7.14 shows how you can do this.
Listing 7.14. Code to validate a Signature element
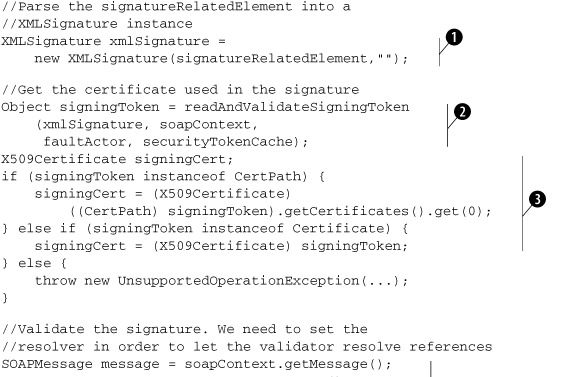

We first parse the Signature element into an XMLSignature instance ![]() . Using KeyInfo in Signature, we locate and validate the key needed to verify the signature
. Using KeyInfo in Signature, we locate and validate the key needed to verify the signature ![]() . The readAndValidateSigningToken method (not shown here; you can look it up in the example source code archive) extracts the wsu:Id of the BinarySecurityToken holding the required key from KeyInfo/SecurityTokenReference/Reference and looks up the securityTokenCache to see if the corresponding BinarySecurityToken has already been processed and cached. If not, it scans through the envelope to locate and process the BinarySecurityToken with the given ID. In either case, we end up with a security token we can use to verify the signature.
. The readAndValidateSigningToken method (not shown here; you can look it up in the example source code archive) extracts the wsu:Id of the BinarySecurityToken holding the required key from KeyInfo/SecurityTokenReference/Reference and looks up the securityTokenCache to see if the corresponding BinarySecurityToken has already been processed and cached. If not, it scans through the envelope to locate and process the BinarySecurityToken with the given ID. In either case, we end up with a security token we can use to verify the signature.
What we need for validating a signature is a certificate holding the public key of the sender. If the security token obtained
in the previous step is a certification path instead, the first certificate in the path is the sender’s certificate ![]() .
.
When validating a Signature, we also need to verify the DigestValues of each of the elements referred by SignedInfo/References. As we use wsu:Ids to identify signed elements, we need a WsuIdResolver (introduced previously) to locate the referred elements. We construct a WsuIdResolver here and provide it with the document (soapPart) it needs to scan when resolving wsu:Ids. The constructed resolver instance is provided to XMLSignature so that it can use the resolver when verifying the signature ![]() .
.
Finally, we rely on xmlSignature.checkSignatureValue(signingCert) to verify the digest values and signature value. Now that the signature has been verified using a certificate that has been
found to be valid, we can say for sure that the message originated from the user (subject) identified by the signing certificate. We set the authenticated subject information
and the username in message context for the benefit of downstream handlers and the endpoint itself ![]() .
.
This concludes our discussion of the code that goes into verifying signatures on SOAP messages. As you now know the theory as well as the APIs needed to implement signatures, it is time to look into any practical issues you may face when adopting signatures. The next section will help you do this.
7.3. Practical issues with signatures
Signatures provide a very important piece of the security puzzle. As you have seen in this chapter, signatures provide the ability to detect tampering of data transmitted over an unsafe network. Signatures also come in handy for addressing another important security concern in enterprises: nonrepudiation. Enterprises need to guard against customers, partners, or other parties disowning messages they previously communicated. In theory, this is simple. All that is needed are records of digitally signed messages received from customers. In practice, it will require a very careful application of digital signatures to conclusively prove that the apparent sender of the message did indeed send it.
Quite a few choices need to be made when applying signatures, and it is easy to get them wrong. This section focuses on the choices you are often faced with and gives you high-level advice that will help you avoid the traps when adopting signatures.
7.3.1. Three rules of signatures
The XML Signature specification provides three useful guidelines for deciding what should be signed and what should be construed as secure based on signatures.
- Only what is signed is secure A signature does not guarantee the integrity of everything in the envelope it belongs to. It only guards those parts of the message that are signed. Furthermore, not all the information in the signed parts is guarded. Data discarded by transforms applied before signing cannot be guarded by the signature. External resources (such as images and style sheets) referred to from signed parts are not secure unless the content of those resources is also signed.
- Only what is seen should be signed In the case of UI applications, signatures should only be used to sign the data presented to the user. Any data that is not shown to the user should not be included in the signature. Equally, it is preferable to include in the signed info as much as possible of the transforms (such as style sheets) applied to the data for visual presentation. If somebody signs a document, it is assumed that they see everything in the document. If we add anything that they do not see, it may invalidate the signature legally.
- See what is signed Applications receiving signed messages should only “see” and act on transformed and signed data instead of the raw or pre-transformed data. The application can only trust the transformed data, since that is what is guaranteed by the signature.
Next, we will look at the design choices that we encounter when using signatures. The first choice involves mixing signatures with encryption.
7.3.2. Mixing encryption and signatures
We have to be careful when combining encryption and signatures. The goals of one can be compromised by the other if not correctly mixed. For example, if we encrypt signed data without encrypting the signature as well, we leave the door open for guessing attacks. It is always a good idea to also encrypt the signature (or the digest) associated with the encrypted data.
The order of encryption and signature can be deciphered from the order in which the respective entries appear under the WS-Security header.
Next, we will see how we can sign a message that has different syntactically valid forms. That is, when there are different ways the message can be written, which one do we sign?
7.3.3. Which canonicalization scheme?
By far, the trickiest decision when applying signatures is what to sign. Even the applications that are not supposed to touch a message may really touch the message, but leave it in a form that is syntactically equivalent. To allow for such situations, we must sign a canonical form. As you may recall, there are two canonical forms—inclusive and exclusive. Which one do we prefer?
The short answer is that there is no one preferred form. Obviously, there are drawbacks to both inclusive and exclusive canonicalization. Inclusive canonicalization makes signatures liable to break even on unrelated changes, whereas exclusive canonicalization may leave out a few namespace bindings, leaving the door open to a security attack that tampers with the omitted bindings without being detected.
The choice of the canonicalization schemes should really be made on a case by case basis, based on the following principles:
- Use inclusive canonicalization as much as possible, since it does not suffer from the security problems that exclusive canonicalization does.
- When using inclusive canonicalization, make sure that the namespace context of the signed element is stable. For example, when signing the whole of a SOAP Body, make sure that no more namespace bindings get added to the Envelope element. In general, namespace bindings should not be defined in a larger scope than necessary, to reduce the possibility of breaking signatures that use inclusive canonicalization.
- If you cannot be sure that the namespace context of the signed element remains stable, use exclusive canonicalization, but make sure that none of the attribute values and element content depends on qualified names in their content. For example, use exclusive canonicalization if you know beforehand that the signed element needs to be imported into a different XML document (such as another SOAP envelope).
- When using exclusive canonicalization, if you cannot make sure that attribute values and element content do not depend on qualified names in their content, restrict the list of allowed prefixes to a known set that is passed in to the canonicalization transform using the <exclc14n:InclusiveNamespaces PrefixList="prefix1 prefix2 ... prefixn"/> parameter.
This completes our discussion of the practical issues involved with signatures. There is one additional issue that we have not addressed here, as described in the callout.
Note: Signing binary data attached to SOAP messages
In this chapter, we have applied the techniques standardized by the XML Signatures specification to sign selected or all parts of SOAP messages. This assumes that all parts of a SOAP message qualify as XML. This is true for all of the examples you have seen in this chapter. Because XML does not allow binary data, SOAP allows binary data to be attached to SOAP messages in multiple ways. In such cases, we will need to figure out how to apply the XML Signature standards you learned in this chapter. We discuss this topic separately in appendix C.
7.4. Summary
In this chapter, you have seen how digital signatures can be applied to guard the integrity of SOAP messages.
We started off describing why digital signatures are such an important security mechanism, and contrasted them with MACs to demonstrate their power and ease of use. We then talked about the challenges in applying signatures to XML. In particular, we discussed the need for XML canonicalization and showed you how canonicalization eliminates superficial differences between multiple representations of the same XML document. We described the need for two different XML canonicalization algorithms—inclusive and exclusive—and showed how neither is perfect.
We used an example to show you how signature information can be carried in a WS-Security header entry. We then presented the code to sign a SOAP message on the sender’s side and verify the signature on the receiver’s side.
Finally, we discussed the use of signatures in the real world and explained how poor choices can reduce the efficacy of signatures in practice.
This chapter concludes part II, which is devoted to showing you the nuts and bolts of SOA security. In this part, you have learned to apply WS-Security to authenticate identities, protect data confidentiality, and verify data integrity. In part III, we will take full advantage of these capabilities to build enterprise-class SOA security architectures.
Suggestions for further reading
- The specification for inclusive XML canonicalization is available at http://www.w3.org/TR/xml-c14n.
- The specification for exclusive XML canonicalization is available at http://www.w3.org/TR/xml-exc-c14n/.
- Constraints on the use of XML as a namespace prefix are described in the XML Namespaces specification at http://www.w3.org/TR/xml-names11/#xmlReserved.
- The specification for xml:id is available at http://www.w3.org/TR/xml-id/.
- “XML-Signature Syntax and Processing,” a W3C Recommendation, is available at http://www.w3.org/TR/xmldsig-core/.
- JSR-105, a Java Specification Request for the standardization of APIs for XML signatures, can be found at http://www.jcp.org/en/jsr/detail?id=105. The API is available at http://jcp.org/aboutJava/communityprocess/final/jsr105/index.html.