
[O]ne is blinded to the fundamental uselessness of their products by the sense of achievement one feels in getting them to work at all. In other words, their fundamental design flaws are completely hidden by their superficial design flaws. | ||
| --The Hitchhiker’s Guide to the Galaxy (Douglas Adams) referring to the Sirius Cybernetics Corporation | ||
You might wonder why this book contains a specific chapter about Groovy on Microsoft’s famous and ubiquitous operating system. After all, Groovy is a language that lives on the Java platform and its Java Virtual Machine, so it is a language that also obeys the mantra “write once, run everywhere”—on all operating systems with a JVM. So why is it worth talking about Windows specifically? Because of Scriptom.
Scriptom’s name stems from a mix of the word scripting and the acronym COM, Microsoft’s component object model. Groovy’s meta-programming capabilities allow manipulating COM and ActiveX objects with Scriptom to be as simple as it is in Visual Basic or JavaScript. Combining Scriptom and Groovy means that you can leverage the wealth of the Java world and its multitude of outstanding libraries at the same time as controlling applications such as Microsoft Word or Excel from Groovy. This gives you the best of both worlds, bridging the gap between them.
Scriptom is not part of the Groovy distribution; it is an external module that can be easily installed on a standard Groovy installation. In this chapter, you’ll see where to download and install Scriptom and discover what scripting native applications looks like. We’ll then start hacking away by controlling some applications such as Internet Explorer, Word, and Excel. We’ll then show more advanced integration with the native applications by providing our own event support to react to user actions or application state changes. Finally, we will show a real-world use of Scriptom and various other automation tasks.
Before getting started with the Windows native integration that Groovy offers, you first need to download and install Scriptom. It is an add-on that you can choose to use if you are running Windows on your machine. Downloading and installing Scriptom is as easy as unzipping an archive. First, point your web browser to the Scriptom documentation page on the Groovy web site: http://groovy.codehaus.org/COM+Scripting. Click the link for the zip bundle, download it, and unpack it in your Groovy installation directory. That’s all there is to do!
The archive contains only three files:
A jar called scriptom-*.jar (the star denoting the latest version number), which is the meat of the animal
A DLL named jacob.dll
A jar called jacob.jar
The last two do the heavy lifting of providing an API using the Java Native Interface (JNI) to access the native functions of COM and ActiveX objects in a groovy way.
To test the installation, let’s write our first Groovy script to use ActiveX:
import org.codehaus.groovy.scriptom.ActiveXProxy

def wshell = new ActiveXProxy('WScript.Shell')
wshell.popup('Scriptom is Groovy!')
Run it like any other Groovy script—there’s no need for any classpath changes or anything else. If everything has worked, you should see a dialog box like the one shown in figure 15.1.

It’s hard to imagine how integration with COM/ ActiveX could be much easier than that. Now that we’ve shown you a little of what can be done, let’s look at how Groovy, Scriptom, and Jacob fit together to let you script native applications.
Magic tricks like rabbits coming out of hats are usually best left unexplained. Similarly, you can use Scriptom without knowing how it works. Unlike stage magic, however, understanding how Scriptom makes integration so easy takes nothing away from the effect—indeed, seeing the elegance of the solution enhances the appreciation of it. Toward this end, you’ll learn a bit of the mechanics behind Scriptom while exploring how to use it. First we will look at the library Scriptom relies on for the native code interaction. After that, you’ll be ready to create component instances and learn how to call their methods, interrogate their properties, and subscribe to their events.
The Scriptom module uses Jacob (Java COM Bridge), a project hosted on Source-Forge,[1] which is a Java/COM bridge that allows you to call COM automation components from Java. It uses JNI to make native calls into the COM and Win32 libraries. Figure 15.2 shows the interaction between those different elements.
Jacob offers a generic API that can be used to access any native object. For instance, you can manipulate Internet Explorer with this sample Java code—imports, exception handling, classes, and methods are omitted for brevity:
// Java
ActiveXComponent ie =
    new ActiveXComponent("InternetExplorer.Application");
Dispatch.put(ie, "Visible", new Variant(true));
Dispatch.put(ie, "AddressBar", new Variant(true));
Dispatch.call(ie, "Navigate",
    new Variant("http://groovy.codehaus.org"));
ie.invoke("Quit", new Variant[] {});
Scriptom builds on top of Jacob API to provide a more intuitive syntax similar to what VB programmers are used to. This example becomes
import org.codehaus.groovy.scriptom.ActiveXProxy

def explorer = new ActiveXProxy('InternetExplorer.Application')
explorer.Visible = true
explorer.AddressBar = true
explorer.Navigate 'http://groovy.codehaus.org'
explorer.Quit()
We create a proxy that wraps the native application, set one property to make the application visible, set another one to show the address bar, and call a method to make the browser visit the Groovy web site.
Jacob does a good job of being concise, but the code to deal with native objects is harder to read in the Java form. Scriptom leverages the underlying Jacob API to make it look like standard object handling. As we hinted before, Scriptom performs its magic using Groovy’s Meta-Object Protocol, and in particular the facilities of the GroovyObject class. Scriptom consists of only three classes:
ActiveXProxywraps the COM or ActiveX component, which is the class you use to instantiate native applications.VariantProxywraps all properties and return values of the wrapped application.EventSupportdeals with event support; but you should not have to deal with this class, as you’ll see when we review how to subscribe to events the Windows applications generate.
As shown in figure 15.3, ActiveXProxy, VariantProxy, and EventSupport extend GroovyObjectSupport (which in turn implements GroovyObject). They intercept method calls by overriding invokeMethod and intercept properties with getProperty and setProperty. They then delegate to Jacob for the work.
What do you need to do to manipulate a Windows application or component? First, you have to instantiate an ActiveXProxy that will wrap the Jacob component, and then you can access its properties and call its methods. Let’s see how you can do that.
To make direct use of native code on the Java platform, you have to use JNI. Although this is powerful, it is difficult to use, and the resulting code tends to be hard to read. Thanks to the Groovy meta-programming capabilities, Scriptom provides a simplified syntax for interacting with native COM/ActiveX components as easily as possible. The result can often appear as simple as Visual Basic component interactions—but with the full power of Groovy behind it, of course.
The first step to instantiate a native component is to import ActiveXProxy with the following directive:
import org.codehaus.groovy.scriptom.ActiveXProxy
Once the class is imported, you can instantiate it through its only constructor, which takes a string parameter. You can pass the constructor either the application name or Program ID of the application, or its class identifier (CLSID), which is a globally unique identifier that identifies a COM class object.
For instance, you can use Excel by using its application name
def xls = new ActiveXProxy('Excel.Application')or by referring to its related class identifier:
def clsid = 'clsid:{00024500-0000-0000-C000-000000000046}'
def xls = new ActiveXProxy(clsid)
Jacob utilizes the clsid: prefix to differentiate application names from class identifiers.
Usually, for the sake of clarity and readability, it is preferable to use the application name. However, it can sometimes be handy to reference a component by its class identifier, particularly if you need to use a specific version of an application and multiple versions might be installed on a single machine. If you want to discover the class identifier associated with a given application, you should search in the Windows registry under the following key:
HKEY_LOCAL_MACHINESoftwareClasses
Figure 15.4 shows what you would see in the Registry Editor if you searched for Excel. In this case, you can see that Excel’s class identifier can be found under
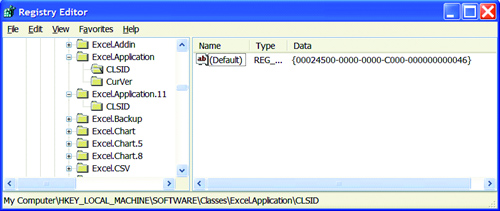
HKEY_LOCAL_MACHINESoftwareClassesExcel.ApplicationCLSID
and its value is {00024500-0000-0000-C000-000000000046}.
Just to get you started automating a few Microsoft applications with Scriptom, table 15.1 provides a list of some common applications and their Program IDs.
Table 15.1. A few Windows applications and their Program IDs
Application | Program ID |
|---|---|
Access |
|
Excel |
|
Explorer |
|
FrontPage |
|
Internet Explorer |
|
Notepad |
|
Outlook |
|
PowerPoint |
|
Windows Media Player |
|
Word |
|
For Microsoft Office applications, there are different program names for the various Office releases. If you want to address a given version (in case several are installed at the same time, or because your script targets a specific version), you can append the version number to the Program ID with the suffixes given in table 15.2.
With this table in mind, you’ll be able to use a specific version of an Office application. If you refer to Word.Application.9, you use Word 2000; but if you want to stay more general and use the latest version installed on the computer, you can use Word.Application without any version suffix.
In addition to applications, several utilities available on the Windows platform let you interact with the operating system in a simple fashion. This is handy when your automation tasks include activities such as reading and writing keys in the registry, popping up file dialogs, or sending keystrokes to running applications. Table 15.3 has a few of these utilities and their uses.
Table 15.3. Utility components and their purpose
Utility | Purpose |
|---|---|
ScriptControl | Evaluate Visual Basic or JavaScript expressions |
Scripting.FileSystemObject | Deal with the filesystem |
Shell.Application | File explorer; manipulate running application windows |
WScript.Network | Access network information |
WScript.Shell | Interact with the registry and the Windows shell; show pop-ups |
We will be using those utilities to explain how you can invoke methods as well as set and retrieve properties on those native objects.
You’ve already seen an example of method invocation when we manipulated Internet Explorer. Invoking a method on a COM component is no different than invoking a method on a standard Java or Groovy object. Using the file explorer, which has a Program ID of Shell.Application, you can call a method to minimize all the windows opened on your desktop:
import org.codehaus.groovy.scriptom.ActiveXProxy

def sh = new ActiveXProxy('Shell.Application')
sh.MinimizeAll()
Contrary to the Java naming conventions, in the Microsoft universe, method names and properties are often capitalized. This looks a bit strange when you see it in the midst of a Groovy script, but Scriptom keeps the same convention: The case is unchanged. In our example, on the Shell object, we call the MinimizeAll method; true to its name, all windows will be minimized.
Obviously, we can also use methods with parameters. Let’s go back to our first example using WScript.Shell, the Windows Scripting Host shell, to show a popup message window. The code is reproduced here for reference. (It’s so short, there’s no reason not to!)
import org.codehaus.groovy.scriptom.ActiveXProxy

def wshell = new ActiveXProxy('WScript.Shell')
wshell.Popup('Scriptom is Groovy!')
The Popup method takes a string parameter representing the message that will be shown inside the pop-up dialog. The Jacob API wraps all values or parameters inside Variant instances. Scriptom wraps these values inside instances of VariantProxy. Through that wrapper implementing GroovyObject, other methods can be called without resorting to using the raw Jacob API. Let’s see an example of chained methods. We’re going to show a file-chooser dialog like the one shown in figure 15.5.
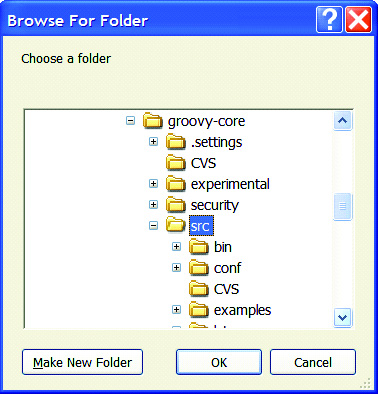
Here is the script that displays the file chooser:
import
  org.codehaus.groovy.scriptom.ActiveXProxy

def sh     = new ActiveXProxy('Shell.Application')
def PARENT = 0
def OPTS   = 0
def folder = sh.BrowseForFolder(PARENT, 'Choose a folder', OPTS)
println "Chosen folder: ${folder.Items().Item().Path.value}"
With the shell, you can use BrowseForFolder, a utility method, which shows a file-chooser widget to allow you to select a file or directory. The PARENT and OPTS values are the parent window (where 0 means there is no parent) and the option flags to use, respectively. On the last line, you can see that the method returns an object representing a file selection. On this object, you can call the Items method to retrieve the selected files and Item to select the chosen one. This item has a property called Path to retrieve the path of the chosen file. Finally, value is a Groovy property that lets you unmarshal the value of the Path, as you shall see further. This is a bit of black magic; but you can find the documentation of this ActiveX component by looking at its API on the Microsoft Developer Network library, which is always of great help when you need to script those components.
Native components have more than methods, though—they also expose properties that can be accessed and modified. The next section explains how to access these properties and also how to deal with the return values of the methods you invoke.
You already saw a few examples showing how to access properties and method return values. Again, doing so is not very different from standard property access in the Java or Groovy world. The following example will print the name of the computer:
import org.codehaus.groovy.scriptom.ActiveXProxy

net = new ActiveXProxy('WScript.Network')
println "Name of this computer: ${net.ComputerName.value}"
assert net.ComputerName.value == net.ComputerName.getValue()
This time, we’re using the WScript.Network component, which is used for network-related needs. In our example, we retrieve the name of the computer, which is represented through the ComputerName property. However, you will have noticed that we append another property called value. Because all methods that return values and properties are wrapped in VariantProxy objects, we need to use a trick to retrieve the real value. VariantProxy has a special value property that will give you a value usable from Groovy. The name of the computer is contained in a VariantProxy, and value returns the string representing that name. In case a property named value already exists in the wrapped object, you can also retrieve the real value with the getValue method as shown by the last line of the script. This has the same effect as the value property.
Now that you know how to call methods and access properties of the objects of the native Windows component, it is time to also be able to respond to events happening in the application by subscribing to them.
Being able to script running applications is one side of the story, but there’s also the other side: the person in front of the computer being able to use the application and click buttons, type in text, or execute shortcuts. It would be beneficial if our script control could recognize and react on these user-triggered events. Additionally, the application could receive other notifications, such as reaching the end of a media stream.
This is where event support comes into play, and your Groovy scripts need to know what is happening and how to react to changes or actions. Most applications that expose a part of their internals through ActiveX or COM objects also expose a set of events that a caller can subscribe to.
ActiveXProxy has a special property called events, which can be retrieved either with the myProxy.events property access notation, or through a method call with proxy.getEvents(). It’s through this special object that you can interact with a component’s events.
Subscribing to events and registering your own event listener isn’t rocket science, even though the effect can be impressive when you consider the layering of Groovy on top of native code. It can be achieved with two easy steps:
Define a closure taking an array of
VariantProxythat will be called whenever the associated event is triggered, and specify it using theeventsproperty. The property withineventsto which you assign the closure should be named after the event you’re subscribing to. For a given event, you can define a single handling routine by assigning a new closure to the propertyevents.myEventName.Once all event handling closures are defined, call the
events.listenmethod to make the event subscriptions active.
Again, a code sample will make things crystal clear, as shown in listing 15.1, where we are evaluating VBScript expressions in Groovy! Evaluating VBScript expressions can produce errors. When this happens, all error listeners are notified. We register a Groovy error listener to demonstrate the mechanics.
Who would have thought it would be so simple to invoke Visual Basic code from Groovy? Windows offers a COM component called ScriptControl, which allows you to evaluate JavaScript or Visual Basic expressions. We subscribe to an event called Error, and when this event is triggered, the associated closure is executed in a separate thread to the main thread of control.
Let’s take a close look at this code. At ![]() , a
, a ScriptControl is instantiated with the VBScript language. We subscribe to the Error event and assign a closure event handler at ![]() . In the
. In the try/catch block ![]() , we evaluate 1+2, which will print 3. We then try to evaluate
, we evaluate 1+2, which will print 3. We then try to evaluate +, which will throw an exception and call the event handler. Finally, we catch the exception thrown in case an expression wasn’t parsed successfully—which is the case in the last evaluation.
Now, let’s see a more complex example. Let’s play the DJ, and illustrate the use of events subscription by scripting Windows Media Player. In listing 15.2, we play all the songs in the directory from which the script is launched.
The Windows Media Player is instantiated at ![]() from its Program ID name.
from its Program ID name.
We register an event handler at ![]() for the
for the PlayStateChange event by defining a new property on the events special property of the ActiveX proxy, whose value is a closure corresponding to the code that will be executed once the event is triggered.
The closures used as event handlers have only one argument, which is an array of VariantProxy instances that wrap the values passed to the native event handler routine. Here, for this PlayStateChange event, the array of VariantProxy contains only an int corresponding to the state of the player: In our case, we’re interested in the state 1, which means a media playback just finished.
When the end of the playback happens, we notify the player at ![]() in the main loop that it can process the next media file. We take advantage of the fact that Groovy fully complies with Java’s thread and object model. Therefore, we can use the same wait/notify handling for coordination. For the use of
in the main loop that it can process the next media file. We take advantage of the fact that Groovy fully complies with Java’s thread and object model. Therefore, we can use the same wait/notify handling for coordination. For the use of synchronized blocks, the same rules apply as in Java.
The special method listen on events is the method at ![]() that registers all the closure event handlers and starts the subscription to events we’re interested in.
that registers all the closure event handlers and starts the subscription to events we’re interested in.
On the local directory, we call eachFileMatch at ![]() to iterate over all files matching the regular expression pattern: files ending with some common media extensions.
to iterate over all files matching the regular expression pattern: files ending with some common media extensions.
We call the play method ![]() on the
on the controls object to play the song.
Once the playback is started, we’re waiting at ![]() for the event handler to give us back control and continue looping over the media files to play, when the currently playing song is finished.
for the event handler to give us back control and continue looping over the media files to play, when the currently playing song is finished.
We finally close the player when the song has finished playing.
It is high time we take the bull by the horns and start developing an even bigger example, integrating different native applications and leveraging some Groovy or Java APIs. In the next section, we’re going to introduce a real-world scenario right from the battlefield and show how you can provide an elegant and useful solution to the problem at hand.
For an example of how Scriptom can help in the real world, we’ll consider an example from a leading European car manufacturer. They had created a component of the technical documentation production infrastructure that could generate various documents for all the countries worldwide where cars were sold. This component was a huge thesaurus, storing hundreds of thousands of sentences translated into more than 40 languages. Technical documents were represented as an XML structure in Microsoft Word ML format, holding the page layout, the embedded images, and the set of sentence identifiers composing the document. When a document was to be printed, the list of sentence codes was read, and the thesaurus was queried through a web service to return all the translated sentences to build the final readable and localized document. The overall scenario is briefly presented in figure 15.6.
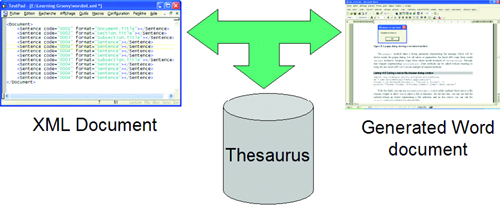
We’ll get inspiration from this real-world scenario, and we’ll create a document in a custom XML format, holding both the layout of the document and its style, along with the list of sentence codes it contains. The document will be stored on the filesystem in a file named document.xml. The thesaurus will be a simple Excel spreadsheet (thesaurus.xls), with each line representing a sentence and the columns being all the translations available. From those two sources, the XML document and the Excel thesaurus spreadsheet, we’ll create a Word file representing the final document through our producer.groovy script. We’ll look at each of the steps in isolation and then put them together to form the complete application.
Let’s start at the beginning, with the document format.
Our document format is simple. It’s an XML file that will use only two tags:
A root element named
Documentholding all the sentences of the documentChild elements named
Sentencerepresenting each sentence, with two attributes: a sentence code, and a format string
Let’s see an example of that format:
<Document>
    <Sentence code="S0001" format="Document.Title"/>
    <Sentence code="S0002" format="Section.Title"/>
    <Sentence code="S0003" format="Subsection.Title"/>
    <Sentence code="S0004" format="Sentence"/>
    <Sentence code="S0005" format="Sentence"/>
    <Sentence code="S0006" format="Subsection.Title"/>
    <Sentence code="S0007" format="Sentence"/>
</Document>
In this example, all our codes will be of the form Sxxxx, and the format is just a style to use when rendering each sentence in the final document.
The Groovy groovy.util.XmlParser class makes parsing the document trivial. We need to iterate over all the Sentence elements in the documents, so we use the each method, passing a closure that will initially print out the data so we can check that it looks correct:
def xmlDoc = new XmlParser().parse(new File("document.xml"))
xmlDoc.each{ node ->
    println "Code: ${node['@code']}, Format: ${node['@format']}"
}
In the final script, we’ll replace the logic inside the each{} iteration to output text in the Word document. But now, let’s see how we will design our thesaurus.
The thesaurus is a table of sentence codes and associated translations in all the supported locales. The rows contain a sentence each, whereas the columns give all the translations for a given locale. Our spreadsheet looks like the Excel screenshot shown in figure 15.7.
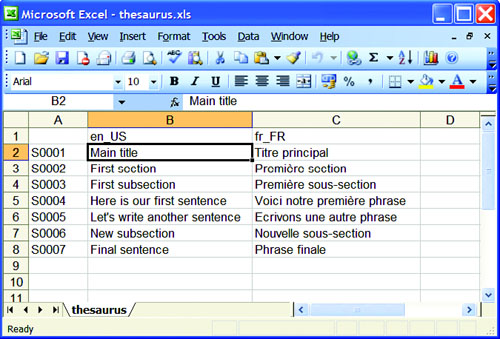
To look up a particular translated sentence, knowing its code and its locale, we’re going to open the thesaurus.xls spreadsheet with Scriptom, read the first row containing the ISO codes of the locales and the first column containing the sentence codes, and retrieve the value of the cell containing the translation.
The first obvious step explained in listing 15.3 is to launch Excel through Scriptom and its ActiveXProxy and see how we select the active sheet, and also see how we close and quit the application appropriately.
In ![]() , after importing the
, after importing the ActiveXProxy class and creating the proxy instance, we retrieve the Workbooks object to open our thesaurus and select the active sheet containing our translations.
Then, in ![]() and
and ![]() , we create maps containing associations of locales and the columns where they are found, and sentence codes and their rows, respectively. We cache these values to avoid having to traverse the sheet each time we’re looking up a locale or code. We use ranges to iterate through the rows and columns, and GStrings to pinpoint the cells we’re interested in. We’re only interested in a single cell at a time, but as far as Excel is concerned, they’re ranges that happen to have only one row and column. These Excel ranges have a
, we create maps containing associations of locales and the columns where they are found, and sentence codes and their rows, respectively. We cache these values to avoid having to traverse the sheet each time we’re looking up a locale or code. We use ranges to iterate through the rows and columns, and GStrings to pinpoint the cells we’re interested in. We’re only interested in a single cell at a time, but as far as Excel is concerned, they’re ranges that happen to have only one row and column. These Excel ranges have a Value property from which we’ll retrieve the equivalent value in Groovy thanks to the value property—getValue could have been used too.
Eventually, in ![]() , when we don’t need the thesaurus anymore, we close it and close Excel.
, when we don’t need the thesaurus anymore, we close it and close Excel.
Warning
Due to a bug in Jacob, the underlying Java/COM bridge, we noticed certain Excel versions don’t always exit gracefully and keep a process running in the background. If this is the case, you should make sure that you call the release method on the ActiveX proxy instance: It tries its best to free all the allocated resources and hence closes the launched process.
Armed with these locale and code associations, we can easily retrieve a translation for a given sentence. Suppose we have a code of S0045 and that we want the French translation with the fr_FR locale. We can write
def cell = "${localeColumns['fr_FR']}${sentenceCodeRows['S0045']}"
def translation = activeSheet.Range(cell).Value.value
Now, on to drive Word for creating the final document!
After our Excel manipulations, we have to master Word to make it produce our localized documentation. In our path to COM nirvana, we are going to follow four steps.
First, we create a Word instance, create a new document, and select it as the active file for editing:
def word = new ActiveXProxy("Word.Application")
word.Documents.Add()
def doc = word.ActiveDocument
Making good-looking documents is not just a matter of style; it’s also a matter of formatting the output with the required font, thickness, size, or color. That’s why we are creating a map that associates the styles defined in the XML document with formatters defined as closures—another handy usage of closures:
def CENTERED = 1
def styleFormatter = [
    'Document.Title':    { it.Font.Size = 24
                           it.Font.Name = 'Arial'
                           it.ParagraphFormat.Alignment = CENTERED },
    'Section.Title':     { it.Font.Size = 18
                           it.Font.Name = 'Arial' },
     'Subsection.Title': { it.Font.Size = 14
                           it.Font.Name = 'Arial' },
     'Sentence':         {  it.Font.Size = 12 }
]
For instance, the styleFormatter map associates the style Document.Title with a closure that will take a Word text range selection, apply a 24-point Arial font, and center the text.
Note
The magic constant 1 references a centered alignment, whose value in the VBA Object Inspector is Word.wdAlignParagraphCenter. Unfortunately, those constants aren’t directly available in Scriptom by name. Also note that rather than using our styling closures, you can use the Style property to use a style defined in your document.
Let’s reuse our XML parsing routine in listing 15.4 to write each localized sentences in our Word document.
Of particular interest is the somewhat awkward part for inserting each sentence: An empty text range is created, the sentence text is defined as the content of the range, and we then apply our formatter closure on this range. The closure is obtained by retrieving the format attribute on the sentence node of the XML document and using it as a key in our styleFormatter map. Finally, the Select method is called. Although this is not usually required, it is always harmless, and some versions of Word don’t apply the style until it is called.
Our last step is to save the produced document and close Word:
doc.SaveAs(new File(".\document-${locale}.doc").canonicalPath)
word.Quit()
You have now seen each of the individual pieces of the application, so we just need to put everything together to finish our translation system.
It’s now the magic moment when everything falls into place and we produce our final localized documents with the full script shown in listing 15.5.
Once you have saved the full script in a file named Producer.groovy, you can run it from the command line with the following command, using two parameters that indicate the XML document to transform and the locale used for the translation:
groovy Producer document.xml fr_FR
The command will produce a document named document-fr_FR.doc in your local directory. This document is shown in figure 15.8.
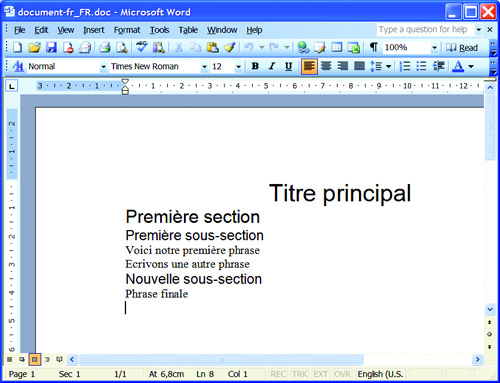
You’ve now successfully created a full script automating two Office applications and benefiting from the Groovy XML APIs. With a concise and clear syntax, you can build useful script glue, which takes only 60 lines of code to parse XML files, look up translations in an Excel spreadsheet, and generate fully styled Word documents.
In the following section, you’ll see how you can further integrate Groovy on your desktop to automate some administrative tasks.
You’ve happily launched and automated native Windows applications, focusing on the generation and manipulation of documents. Although this is helpful and bridges two opposite worlds that usually never meet to create a value-added program, it is only a small part of the Scriptom story.
The larger part is using Scriptom to relieve you of repetitive work that involves operating-system-related activities. This can be as simple as opening your corporate timesheet application and submitting today’s numbers or letting your scripts conduct a series of actions in an endless loop to make up a self-running presentation. You can even use it for sophisticated tasks such as writing your own application installer or password manager.
From the endless list of possibilities, we show how to interact with the host environment to tweak the Windows registry and how to roll out your own macro system.
Most Windows applications use the Windows registry to store information such as user preferences, software configurations, or application defaults. The Java Preferences API stores its data in the registry as well. But manipulating the registry directly has never been possible, apart from writing the JNI calls yourself—some third-party libraries provide that feature, though. But again, Scriptom comes to the rescue by allowing you to use the WScript.Shell object to manipulate the registry: You can read, write, or delete keys and values.
To give you a simple example, we’ll show you a nice trick we’ve come across: On some Windows machines, filename and path autocompletion in a DOS console isn’t always activated by default, particularly on older machines. However, completion can be enabled thanks to some magic values in the registry. Two keys are responsible for that behavior:
HKLMSOFTWAREMicrosoftCommand ProcessorCompletionChar
HKLMSOFTWAREMicrosoftCommand ProcessorPathCompletionChar
Note
In our code, we’re using the abbreviation HKLM, which is short for HKEY_LOCAL_MACHINE. Similarly, HKEY_CURRENT_USER can be abbreviated as HKCU.
By setting the associated values of these keys to the character number, you can define or redefine the key you can use for autocompletion of filenames and paths. The following scripts[2] can do that for you, by setting the Tab key to become the completion key:
import org.codehaus.groovy.scriptom.ActiveXProxy

def TAB = 9
def ROOT = /HKLMSOFTWAREMicrosoftCommand Processor/

def wshell = new ActiveXProxy('WScript.Shell')
wshell.RegWrite(/$ROOTCompletionChar/,     TAB, 'REG_DWORD')
wshell.RegWrite(/$ROOTPathCompletionChar/, TAB, 'REG_DWORD')
You can write registry keys, but obviously, you can also read them. For example, if Internet Explorer is your default web browser, you can read the browser user agent string like so:
import org.codehaus.groovy.scriptom.ActiveXProxy

def wshell = new ActiveXProxy('WScript.Shell')
def key = /HKCUSoftwareMicrosoftWindowsCurrentVersion/ +
          /Internet SettingsUser Agent/
println wshell.RegRead(key).value
Accessing the registry can be handy, particularly if you wish to customize the default settings of applications that store their preferences or configuration there. Thanks to Scriptom, you can easily create specific software-installation scripts. This is often needed in big companies where the IT department is trying to commoditize its desktop platforms and computer assets to provide a smoother upgrading mechanism, lowering maintenance costs. Of course, Windows administrators can use VBScript or JavaScript for most of these tasks, but when integrating with Java applications, libraries, or components, Scriptom can help bridge the gap between the native world and the JVM camp.
Another area where Scriptom shines is in automating repetitive tasks. Some applications provide custom macro systems to let users write their own sequences of atomic actions to realize a specific complex job. Let’s see how Scriptom can fake user actions by sending keystrokes to running applications.
The ubiquitous and almighty WScript.Shell object appears yet again and will enable us to roll out our own automation system. We may even consider it to be a macro system, as long as the application being automated supports launching external scripts and assigning shortcuts for these custom commands—some text editors support that feature, for instance.
So far, the interaction with native applications we’ve dealt with has been done through the COM or ActiveX components exposed by those applications. This time, we are going to use the WScript.Shell object to control running applications by sending them keystrokes. To illustrate, you can use Notepad or any other application within which you can enter some text. We’ll fill in some text as keystrokes to Notepad, as shown in listing 15.6.
Once Notepad is launched at ![]() —here through Groovy’s
—here through Groovy’s execute method on String—we activate the application at ![]() with the
with the AppActivate command to put its window on the forefront. Then, at ![]() , we can send strings and keystrokes to the application.
, we can send strings and keystrokes to the application.
All special keys can be entered with their names between curly braces, such as {ENTER} for carriage return, {F1} for the F1 key, and so forth. There are also special characters to represent combined keystrokes: the Shift key corresponds to +, Ctrl maps to ^, and Alt to %. For a more comprehensive list of available keystrokes, please refer to the online documentation: http://msdn.microsoft.com/archive/default.asp?url=/archive/en-us/wsh/htm/wsMthSendKeys.asp.
This is a rather contrived example because we wanted to show you how the sendKeys method can be used, but this means you can control a set of applications to make them collaborate as long as these applications can be operated with keystrokes. With this method, you may cut and paste selected elements from one application to another, create automated GUI test suites as if a robot agent were testing your application, and so on. Furthermore, if the application under control accepts the definition of external commands, you may launch automation tasks from within the application, without having to open a shell and execute a Groovy script manually. For instance, imagine selecting a piece of text and creating a script invocable by Scriptom that would retrieve translations or definitions. Your creativity is the only limit!
In the Java world, IDEs are clever enough to propose code completion and Java-Doc pop-ups to help you discover the available methods and properties on a given object and also help you understand how to use them. For dynamic languages, the task is more difficult, because you usually find out the type of an object—and which methods and properties are available—at runtime. Currently, the various Groovy integration plug-ins in the most popular IDEs are not capable of code completion. And the task is even harder when automating native applications, as you might have already experienced if you tried making some slight modifications to the scripts you’ve written so far!
You might be wondering how you can know which methods and properties are available on a given native object or application. Unfortunately, you will have to dive into the documentation of the application you are driving and see what is available through its exposed APIs. For instance, for Microsoft applications, the best source of information is the Microsoft Developer Network (MSDN) web site: http://msdn.microsoft.com/library/.
Although no JavaDoc-like documentation is available, Microsoft does a good job of providing comprehensive online documentation for its applications and components on MSDN. For each application, there is a list of properties, methods, and events for each object, often with snippets of code in Visual Basic, JScript, or C# showing how to use them. It is trivial to translate those examples to Groovy code.
Because finding the relevant documentation is like looking for a needle in a haystack on MSDN’s site, in table 15.4 you will find a few pointers for the object model and documentation of the applications we have used throughout this chapter.
Table 15.4. Common applications and their associated documentation
Application | Documentation |
|---|---|
Excel | |
Internet Explorer | |
ScriptControl | |
Scripting.FileSystemObject | http://msdn.microsoft.com/library/default.asp?url=/library/en-us/script56/html/jsfsotutor.asp |
Shell.Application | |
Windows Media Player | |
Word | |
WScript.Network | http://msdn.microsoft.com/library/en-us/script56/html/wsobjwshnetwork.asp |
WScript.Shell | http://msdn.microsoft.com/library/default.asp?url=/library/en-us/script56/html/wsobjwshshell.asp |
With a few Office applications such as Word or Excel, and with some of the aforementioned Windows Scripting Host tools, you should be able to find interesting and inventive solutions to common tasks in your everyday life as a developer.
Although Groovy is a language that runs on top of a multiplatform JVM, you’ve discovered in this chapter how to leverage Windows native applications through the use of the complimentary Scriptom module, which wraps an API to access native COM and ActiveX objects through JNI, the Java Native Interface. You learned how to access properties and call methods on these objects, and you also saw how to subscribe to events supported by these applications. You put what you learned into action by creating and running some compelling scripts that automate collaboration between various applications and interact with the host environment.
Groovy and Scriptom are a powerful combination to bridge two worlds: the Java world with its many free libraries and server-side applications, and Microsoft’s platform and its end-user-rich native applications. Scriptom allows you to interact almost intuitively with the host environment to create complex automation tasks and control multiple applications and external Java libraries at the same time.