
Blog is a contraction of Web log, describing a Web site on which a writer, or group of writers, posts items on a regular basis focusing on a specific subject. The items typically include text, images, and links to other Web sites or Internet resources. Blogs display content in reverse chronological order, with the latest entries at the top of the page.
Although we didn’t call them blogs in the early days, blogs have been on the Web all along. Blogging took off in 2001 with the emergence of Blogger and other free Web-based blogging services that made it easy to add new blog entries and keep old entries organized. Blogging has become a popular means of communication and has been adopted by the mainstream media, although it is primarily known as an alternative media capable of affecting worldwide opinion.
iWeb’s Blog page type provides most of the elements of a classic blog:
An overview page with excerpts of the most recent posts listed in reverse chronological order.
Detailed blog entries on their own pages.
An archive of past entries that your readers can visit.
Comments with attachments (when the Web site is published to .Mac)
A tool for searching iWeb blogs (.Mac only)
In this section, I show you how to be an iWeb blogger. I’m a bloggy kind of guy, so I want to add a blog to the example Web site:
Add the Blog pages: Choose File > New Page (Command-N) or click the
 button below the Site Organizer. Select the Blog page type for the template you’re using, and then click Choose.
A Blog item appears in the Site Organizer, heading a category that includes Entries and Archive. The Entries item opens in the Canvas area (Figure 43), in case you want to make a new entry right away.

This figure shows a new blog entry in the White template. Notice that Entries is selected in the Site Organizer, and that buttons are available for adding or deleting a posting. Starting a new blog also creates a Blog summary page (called Blog in the Site Organizer), and an Archive page that automatically collects older entries.
Figure 43.
Update the Blog summary page: iWeb initially shows you the Entries item, but since your readers see the Blog summary page when they click the Blog button, you should update that page first:
Change the summary page name: If, for instance, you would rather call your blog a journal, you can change the summary page name and the corresponding label on the button. Double-click Blog in the Site Organizer to select it, and then type a new page name following the naming suggestions I made earlier in Name Your Site.
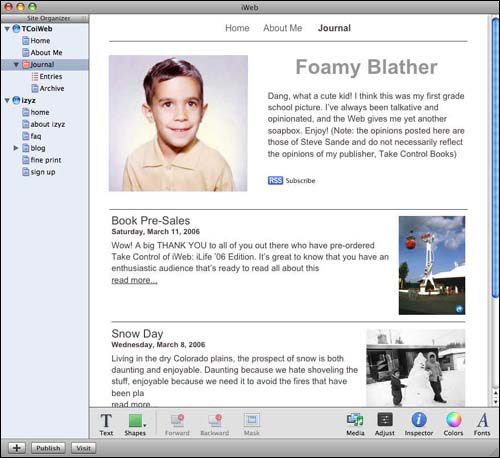
Customize the title: Sure, My Blog is a descriptive headline, but I’d like a headline to match my witty personality. Double click the headline in the Canvas to select it, and type a new headline. I chose Foamy Blather as the name of my blog.
Replace the blog description: Few people want to read the lorem ipsum, so double-click it to select it, and then type a short paragraph or two about what you plan to accomplish with the blog and why the reader should take the time to read it.
Change the picture: The placeholder photo for the White template is a woman on a surfboard. Since I don’t swim and have a different body type, I doubt people will believe that the person shooting the curl is me. To change the photo, drag a photo from the Desktop or the Media Browser to the placeholder (see Change the Picture for help with the Media Browser). I used a picture of me as a child since it’s not as frightening to people as my current photo.
Set the number of entries on the Blog summary page: It’s considered good etiquette to restrict the number of recent entries on the Blog summary page so that readers don’t feel compelled to scroll down a long list of entries. In the Inspector, click the Blog & Podcast button (
 ) and change the number of excerpts if you like—iWeb defaults to 5, which may be a good number to start with (Figure 44).
Set the length of each blog excerpt: With the Blog view of the Blog & Podcast Inspector still open, adjust the excerpt length by moving the slider left or right. At the leftmost setting, each blog entry appears as a headline, date, and “read more” link. With the slider all the way to the right, each blog entry will appear on the Blog summary page in its entirety, but without any associated images. I prefer to show about five lines of each excerpt, enough to whet my readers’ appetites so that they’ll click the “read more” link.
Allow comments: If you wish to allow readers to comment on your Blog posts, check the “Allow comments” box. Although comments add interactivity to blogs, they can also provide a target for spammers who seek out and destroy blog sites with unwanted advertisements.
Comment compatibility
Comments set up in iWeb work only if you publish to a .Mac account. If you publish to another Web host, check out Chad Brantly’s iComment (http://web.mac.com/cbrantly/iWeb/Software/iComment.html), which helps you add comments, sophisticated statistics, and other features to your iWeb sites.
Allow attachments: If you’ve allowed comments, you should also decide if you want to let people attach files to their written comments. In my opinion, this is a bad idea unless you’re running a private Web site and know who will be sending files to your Web server.
Now that the Blog summary page is ready to go (Figure 45), you can replace the longboarding placeholder text with an actual entry.
Add a blog entry: In the Site Organizer, click the Entries item. Now, above the Canvas, you’ll see a list of entries containing a default, new blog entry, and at the bottom you see a placeholder page for the new blog entry (if you don’t see a new placeholder page, click the Add Entry button, located below the list of blog entries). Let’s edit the placeholder page:
Edit the title of the blog entry: Double-click the title to select it, and then type a new title. The title does not appear in the URL for the entry page, so you don’t have to worry about technical considerations when you choose your title. My first entry is called “Snow Day,” since it was supposed to snow the day I wrote it.
Delete or change the headline: The White template that I’m using has two headlines for each entry. If you’re using the White template, or another template with two headlines, you may want to delete the second headline, since it is redundant.
Delete or customize the picture: When you do a lot of blogging, you don’t always have a photo to go with your text. If this is the case with your blog entry, delete the picture to save space and make the page load faster. To delete the picture, click it to select it, and then press Delete. You can also replace the photo with one of your own, as described in Change the Picture.
Write your blog entry: Now it’s time to play Ernest Hemingway and sweat over a hot keyboard. Triple-click the lorem ipsum of the text placeholder and begin typing your masterpiece. Concentrate on your writing and not on how the text looks. In Make Text Sparkle, I show you how to perform tricks with your text to make your blog entries stand out.
At this point, you should save your Web site (choose File > Save), and then publish it to .Mac or another Web server, as I described in Publish Your Site.

If your blog or any of the other pages you’ve created aren’t exactly what you had in mind, don’t worry, unless you don’t like the look of your Blog summary page—try a different template if that’s the case, since it’s difficult to modify that page and have your changes stick. You’ll have plenty of opportunities to fine-tune your Web site and add new features as we continue.