
Chapter 3. Getting rich with Flex
- Creating a Flex project using archetype
- Creating a Flex frontend for the sample application
- Adding a wrapper for an SWF
In chapter 2 we introduced you to AppFuse and created our sample issue tracking application. Now it’s time to begin creating the Flex frontend for our sample application. We’ll start by incrementally building up the view layer, introducing you to a few of the pertinent concepts of Flex. This chapter is not meant to be a comprehensive guide to the Flex framework by any stretch of the imagination, so you should be able to follow along without much trouble. If you want a more in-depth look at the Flex framework refer to Flex 4 in Action by Tariq Ahmed, Dan Orlando, John C. Bland II, and Joel Hooks (to be published by Manning in September 2010).
3.1. Generating the application structure
You need to create a Flex application. Because you’ll be using the Flex Mojos Maven plugin you’ll be creating the application in a manner similar to what you used for the AppFuse portion of the application. We’ve taken the liberty of creating a Maven archetype to minimize the amount of manual work required to create the project structure.
Folks at Adobe Consulting have started a new project at Google Code called FNA, which stands for FNA is Not AppFuse (http://code.google.com/p/fna-v2/). The FNA project has similar goals to that of AppFuse in that they are attempting to create a framework that enables developers to jump-start their RIA applications with Flex and Java. We have decided against using this framework for this book, but feel the project has potential and warrants a look at if you are starting a new project.
Let’s get started. Open a command prompt and navigate to the root directory of our application. Enter the following command to create our Flex application.
$ mvn archetype-create –DarchetypeGroupId=org.foj
      -DarchetypeArtifactId=flex-mojos-archetype
      -DarchetypeVersion=1.0-SNAPSHOT
      -DgroupId=org.foj
      -DartifactId=flex-bugs-ria
      -DremoteRepositories=http://flexonjava.googlecode.com/svn/repository
This will create a Flex project that slightly resembles a standard Maven project. Because this is not a Java project, the project structure varies slightly. The sources for our Flex application will go in the src/main/flex folder, and the tests in src/test/flex folder. Maven will also modify our main project pom.xml and add this project as a module as shown here.
Listing 3.1. Parent pom.xml
<?xml version="1.0" encoding="UTF-8"?>
<project xmlns="http://maven.apache.org/POM/4.0.0" xmlns:xsi="http://www.w3.org/2001/XMLSchema-instance" xsi:schemaLocation="http://maven.apache.org/POM/4.0.0 http://maven.apache.org/maven-v4_0_0.xsd">
  ...
  <modules>
    <module>flex-bugs-ria</module>
    <module>flex-bugs-web</module>
  </modules>
  ...
</project>
Now that the project has been created you need to configure the Flex Mojos plugins for both the Flex project and the AppFuse project.
3.2. Configuring the flex-bugs-ria module
For this application we chose to use the Flex Mojos plugin to leverage the powerful dependency management facilities of Maven as well as to avoid writing yet another Ant build script.
Listing 3.2. The pom.xml for the Flex application
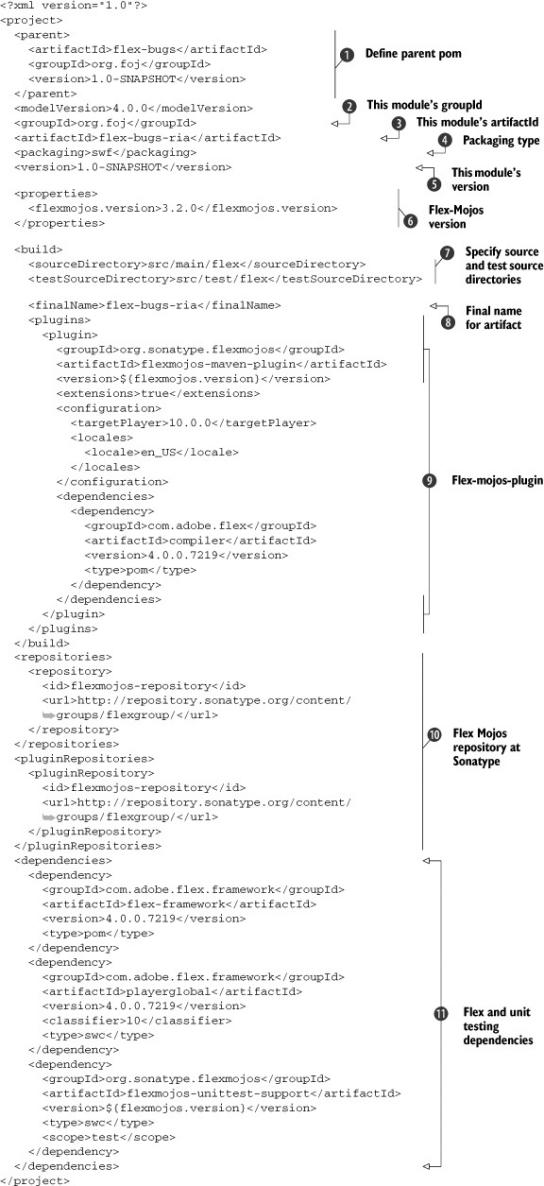
Listing 3.2 shows the resulting pom.xml for the Flex application after you generate the project using the mvn archetype:create command shown in section 3.1. Because this is part of a multimodule project, the pom.xml lists the parent module’s POM as the parent for this project
![]() . Next you’ll see the values you specified for the groupId
. Next you’ll see the values you specified for the groupId ![]() and artifactId
and artifactId ![]() defined, as well as the packaging type
defined, as well as the packaging type ![]() of swf because this project is our Flex application and will be compiled to an SWF file.
of swf because this project is our Flex application and will be compiled to an SWF file.
Note
You may need to associate the SWF file with the Standalone Flash Player or your build may time out trying to run the FlexUnit tests. Because FlexUnit requires the Flash runtime to run its test suites, Maven will try to execute the resulting SWF file for your test suite using the default application for SWF files. You can add a file association in Windows through the Windows Explorer Folder Options and on a Mac by using the file’s context sensitive menu. See the documentation at https://docs.sonatype.org/display/FLEXMOJOS/Running+unit+tests for more information.
Next you set the project’s version ![]() , which is set to 1.0-SNAPSHOT. We define the final name of our artifact so that the SWF that is generated will not have the version information as part
of the filename
, which is set to 1.0-SNAPSHOT. We define the final name of our artifact so that the SWF that is generated will not have the version information as part
of the filename ![]() . The archetype also defines a common property
. The archetype also defines a common property ![]() for the Flex Mojos version so that you can be sure that the plugin
for the Flex Mojos version so that you can be sure that the plugin ![]() and any dependencies
and any dependencies ![]() defined for the Flex Mojos are using the same version. You’re also overriding the version for the Flex compiler here to compile
it with the Flex 4 compiler and target version of Flash Player. Because this is not your typical Maven project, the pom.xml
defines the source and test-source directory locations
defined for the Flex Mojos are using the same version. You’re also overriding the version for the Flex compiler here to compile
it with the Flex 4 compiler and target version of Flash Player. Because this is not your typical Maven project, the pom.xml
defines the source and test-source directory locations ![]() . It also defines the repository and plugin repository locations
. It also defines the repository and plugin repository locations ![]() for the Flex Mojos plugins and dependencies because they don’t exist in the central Maven repository.
for the Flex Mojos plugins and dependencies because they don’t exist in the central Maven repository.
3.3. Configure Maven for the flex-bugs-web module
Now that you’ve configured Maven to build the Flex application, you need to make minor modifications to the pom.xml for the flex-bugs-web module in order to get the Flex application to be copied over to the appropriate place in the web application. To accomplish this, you’ll use the maven-dependency-plugin.
Listing 3.3. Configuring the maven-dependency-plugin
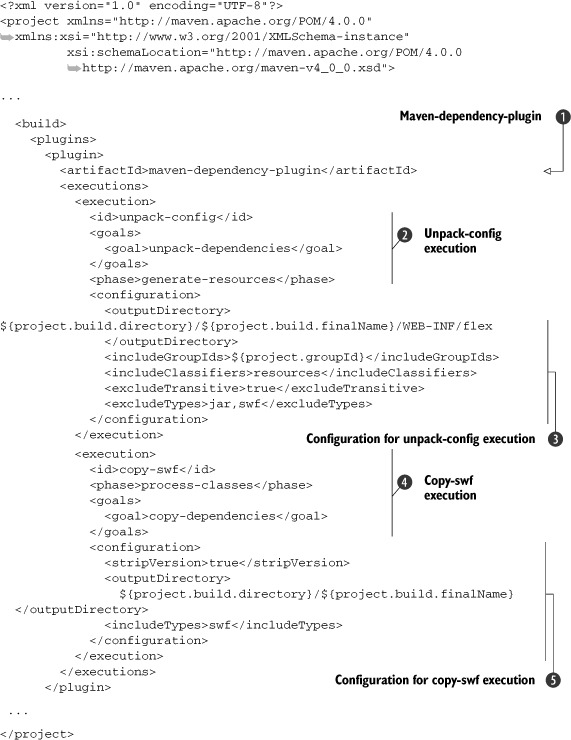
Listing 3.3 shows the plugin configuration ![]() needed for your web application to properly resolve the dependency for the Flex application and ensure that the SWF file
is placed correctly.
needed for your web application to properly resolve the dependency for the Flex application and ensure that the SWF file
is placed correctly.
First define an execution that you’ll call unpack-config ![]() and tell Maven to execute this during the generate-resources phase of the build, and call the unpack-dependencies goal on this plugin. In the configuration
and tell Maven to execute this during the generate-resources phase of the build, and call the unpack-dependencies goal on this plugin. In the configuration ![]() you tell the plugin to limit the scope of what is affected by this execution to artifacts with the same groupId as your project and to artifacts of type resources. This will be utilized in chapter 5 as you create a common project for all of the configuration files for BlazeDS that need to be shared between the web application
and the Flex application.
you tell the plugin to limit the scope of what is affected by this execution to artifacts with the same groupId as your project and to artifacts of type resources. This will be utilized in chapter 5 as you create a common project for all of the configuration files for BlazeDS that need to be shared between the web application
and the Flex application.
Maven follows the convention over configuration paradigm in the build lifecycle aspect, and many others. The folks who designed Maven realized that there are many common steps in every build and developed the concept of the build lifecycle around it. The default lifecycle flows through the following build phases (in order):
- validate
- compile
- test
- package
- integration-test
- verify
- install
- deploy
For more information on Maven and the build lifecycle, read Maven: The Definitive Guide, a free ebook by Eric Redmond available at http://www.sonatype.com/products/maven/documentation/book-defguide.
The second execution that you define ![]() is copy-swf, and it will do exactly that. You configure this execution to run during the process-classes phase of the build lifecycle and execute the copy-dependencies goal to copy the SWF file from the Flex project into the target folder to be placed in the proper location before Maven creates
the final WAR file
is copy-swf, and it will do exactly that. You configure this execution to run during the process-classes phase of the build lifecycle and execute the copy-dependencies goal to copy the SWF file from the Flex project into the target folder to be placed in the proper location before Maven creates
the final WAR file ![]() . Next let’s take a look at how to create an HTML wrapper, or in this case a JSP wrapper for our Flex application.
. Next let’s take a look at how to create an HTML wrapper, or in this case a JSP wrapper for our Flex application.
3.4. Adding a wrapper for our SWF
Adobe provides numerous templates for creating HTML wrapper files for your SWF, located in the /templates directory of your Flex SDK installation. There is everything from the basic no frills wrapper, to wrappers that include functionality to detect whether the client has the correct version of the Flash Player installed, and whether to support deep linking and history for your application.
Note
Normally the HTML wrapper would be an HTML file in your web application. Because the SiteMesh filter in AppFuse is configured to decorate anything with a .html extension, we decided the easiest way to circumvent this filter was to make the wrapper a JSP file.
For this application, copy the contents of the client-side-detection-with-history folder including the index.template.html, AC_OETags.js file, and the history folder from the /templates directory of your Flex SDK installation to the src/main/webapp directory of the flex-bugs-web project. Rename the index.template.html file flexbugs.jsp, and replace the placeholders in the file with the values shown in listing 3.4.
Listing 3.4. HTML wrapper values
${title} -> FlexBugs
${version_major} -> 9
${version_minor} -> 0
${required_revision} -> 28
${width} -> 100%
${height} -> 100%
${application} -> flex-bugs-ria
${bgcolor} -> #869ca7
${swf} -> flex-bugs-ria.swf
We aren’t going into detail about what is contained in flexbugs.jsp because it’s likely you won’t have to change anything inside of it in the future. Learn more about the HTML templates that Flex provides in the LiveDocs at Adobe’s website at http://livedocs.adobe.com/flex/3/html/wrapper_04.html#178239.
3.5. “Hello World!” in Flex
Now that you have the web application configured to properly resolve the Flex application dependency, have placed the resulting SWF file properly, and have the HTML wrapper configured, let’s write a “Hello World!” application in Flex to verify that everything is working as expected. In the src/main/flex folder of the flex-bugs-ria project create a Main.mxml file for the Flex application.
Listing 3.5. Hello World! in Flex

Shown is a minimal “Hello World!” application in Flex. It consists of only the root Application component ![]() , a layout definition
, a layout definition ![]() and a single SimpleText component
and a single SimpleText component ![]() which has its text property set to "Hello World!"
which has its text property set to "Hello World!"
You may run into heap space problems when compiling your Flex application with the Flex Mojos, and your build may fail with a message similar to the following:
[INFO] --------------------------------------------------------
[ERROR] FATAL ERROR
[INFO] --------------------------------------------------------
[INFO] Java heap space
[INFO] --------------------------------------------------------
[INFO] Trace
java.lang.OutOfMemoryError: Java heap space
To fix this issue, you need only define an environment variable named MAVEN_OPTS and set its value to "-Xmx512m" adjusting the memory size as needed (https://docs.sonatype.org/display/FLEXMOJOS/FAQ).
To build the Flex application you first need to run mvn install from the flex-bugs-ria directory. That’s it. This will build the flex-bugs-ria project, and deploy the resulting artifact into your local Maven repository so that the flex-bugs-web project can include it as a dependency in its pom.xml. After it finishes building you can navigate to the flex-bugs-web directory and run the application by typing mvn jetty:run-war on the command line. This will start up a Jetty instance and deploy your WAR inside this instance so that you can visually verify everything is working. When you see the output shown in the following listing, you know that your application is running.
Listing 3.6. Console output from the maven-jetty-plugin
...
2009-03-28 19:31:14.206::INFO:  Started [email protected]:8080
[INFO] Started Jetty Server
[INFO] Starting scanner at interval of 3 seconds.
Open your favorite browser and navigate to http://localhost:8080/flexbugs.jsp and you should see a screen similar to figure 3.1.
Figure 3.1. Our “Hello World!” application
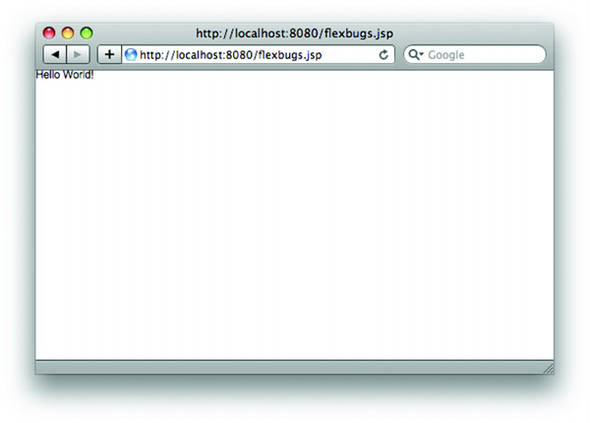
This sanity check is not terribly exciting, but you can see that the application is configured correctly. Now that you have the obligatory “Hello World!” application out of the way, let’s get on with the task of developing the real application.
3.6. Developing the FlexBugs application
To begin developing the application, you should have an idea of what you would like it to look like. Figure 3.2 shows a mockup.
Figure 3.2. A mockup of the FlexBugs application
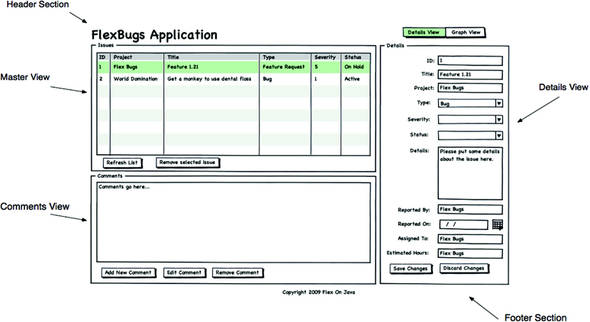
The application is divided into three main areas in a modified master/detail view with a second detail view for any comments on the selected issue. The application can also be divided into header, footer, and main application areas. Defining the application in these terms achieves a couple of objectives. By separating the application into these different pieces, you can create separate mxml files to help keep the code manageable. By breaking up our application into separate mxml files, you can reuse parts of the application.
Next we’re going to decompose the application into manageable chunks. We’ll start by introducing some of the container and navigation components we’ll be using to build this application starting with the ViewStack navigation component.
3.6.1. Introducing ViewStack
ViewStack is a navigation component that allows you to stack a collection of views and selectively display them. Unlike traditional web applications, Flex applications typically don’t have many pages. A Flex application typically has one application that will change its view state depending on which part of the application is active. The ViewStack is one of the Flex components that allows you to do this by bringing the active view to the foreground and hiding the inactive views in the background as shown in figure 3.3.
Figure 3.3. How the ViewStack works

You can control the ViewStack in a number of ways, the most common of which is to utilize one of the navigation components such as the LinkBar, ButtonBar, or ToggleButtonBar. For the FlexBugs application we’ll leverage the ToggleButtonBar to facilitate switching the view state. In the top-right corner of the figure 3.2 mockup you’ll see buttons labeled Details View and Graph View; these are the two views that we’ll use of in this application. We’ll develop the details view in this chapter and the graph view in chapter 10 when we talk more about graphing components.
Listing 3.7. Defining the ViewStacks
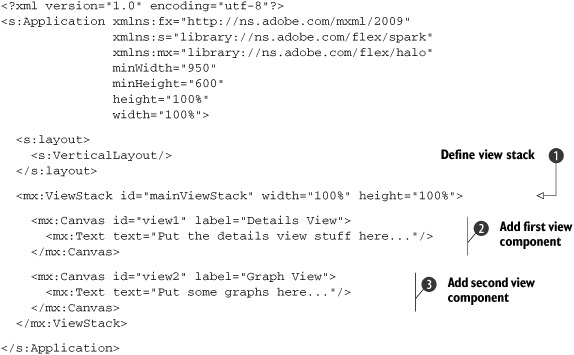
Listing 3.7 shows the Main.mxml after you add the ViewStack components to the application. After you remove our HelloWorld code, create a ViewStack element ![]() and give it an id of mainViewStack; this will become important later when you define the ToggleButtonBar as the dataProvider attribute, for the ToggleButtonBar will be set to this ViewStack component. You want this ViewStack to use up all available horizontal and vertical space so set its width and height to 100%.
and give it an id of mainViewStack; this will become important later when you define the ToggleButtonBar as the dataProvider attribute, for the ToggleButtonBar will be set to this ViewStack component. You want this ViewStack to use up all available horizontal and vertical space so set its width and height to 100%.
Next add two Canvas components ![]() and
and ![]() to the ViewStack giving them ids of view1 and view2 respectively. These two Canvas components will be the two main views the ToggleButtonBar will control. The label attribute of these two components will be displayed as the text of the two ToggleButton controls, so you set those to Details View and Graph View, respectively. Inside these two Canvas containers put Text components as placeholders, so you can see how the ToggleButtonBar will control the two view states in the next section.
to the ViewStack giving them ids of view1 and view2 respectively. These two Canvas components will be the two main views the ToggleButtonBar will control. The label attribute of these two components will be displayed as the text of the two ToggleButton controls, so you set those to Details View and Graph View, respectively. Inside these two Canvas containers put Text components as placeholders, so you can see how the ToggleButtonBar will control the two view states in the next section.
3.6.2. HeaderView
Before you go much further with building up the application create the header view so you can control the view states that you just created. In the src/main/flex folder create the directory structure shown in figure 3.4 to house the view components.
Figure 3.4. Folder structure for view components

ActionScript and Flex follow a similar packaging structure as Java so you will leverage that aspect in order to keep the source files organized in the same manner you would in a Java project. Inside of the view folder create a new file called Header.mxml, where you will put the code for the header for the application.
Listing 3.8. Header.mxml
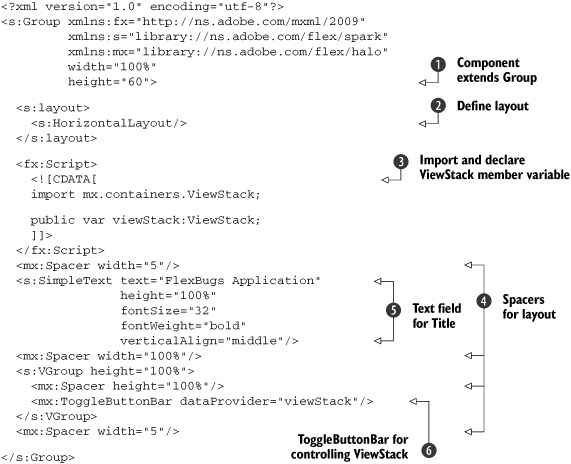
Listing 3.8 shows the code for the Header.mxml component. There’s not much to it. The component itself extends the Group component ![]() , and defines its layout
, and defines its layout ![]() as being HorizontalLayout, meaning that all the components inside it will be laid out horizontally as opposed to vertically or absolutely. Next you
define a public member variable
as being HorizontalLayout, meaning that all the components inside it will be laid out horizontally as opposed to vertically or absolutely. Next you
define a public member variable ![]() , which will be used to allow the main application to pass in the ViewStack that the ToggleButtonBar
, which will be used to allow the main application to pass in the ViewStack that the ToggleButtonBar ![]() will control. To do that you create a Script block and enclose some ActionScript inside a CDATA section, so that any characters that may potentially be parsed as XML are handled correctly.
will control. To do that you create a Script block and enclose some ActionScript inside a CDATA section, so that any characters that may potentially be parsed as XML are handled correctly.
For the Application Title you have a SimpleText component ![]() with a couple of attributes defined on it. The first one is the text attribute, which sets the text to be displayed in the application. Flex has support for CSS styles similar to those in web
applications. Finally there are Spacer elements
with a couple of attributes defined on it. The first one is the text attribute, which sets the text to be displayed in the application. Flex has support for CSS styles similar to those in web
applications. Finally there are Spacer elements ![]() , which you use to make sure everything is laid out properly. The Spacer elements do just what you would expect; they take up space and fill in blank space so that you can effectively lay out components
in the application.
, which you use to make sure everything is laid out properly. The Spacer elements do just what you would expect; they take up space and fill in blank space so that you can effectively lay out components
in the application.
Listing 3.9. Adding the header to Main.mxml

The preceding listing shows the updated Main.mxml file that includes the Header. mxml component you just created. First you
defined a custom namespace for the view components by adding the code shown at ![]() . Next add the custom component to the Main.mxml by using this custom namespace prefix and pass in a reference to the ViewStack component by using the binding expression {mainViewStack}
. Next add the custom component to the Main.mxml by using this custom namespace prefix and pass in a reference to the ViewStack component by using the binding expression {mainViewStack} ![]() . Now you should be able to build and run the application as outlined earlier, and be presented with a screen that resembles
figure 3.5.
. Now you should be able to build and run the application as outlined earlier, and be presented with a screen that resembles
figure 3.5.
Figure 3.5. The header view added.

When you click the ToggleButtons in the upper-right corner, you should see the text in the main part of the application change. Next let’s build a simple footer component for the application.
3.6.3. FooterView
Inside the same folder where you created the Header.mxml in the previous section, create another file named Footer.mxml. Though it may seem like overkill to separate the footer into its own MXML file, we’ll do it anyway just to get you in the habit of systematically breaking your Flex application into smaller, more manageable pieces.
Listing 3.10. Footer.mxml
<?xml version="1.0" encoding="utf-8"?>
<s:Group xmlns:fx="http://ns.adobe.com/mxml/2009"
xmlns:s="library://ns.adobe.com/flex/spark"
xmlns:mx="library://ns.adobe.com/flex/halo"
width="100%"
height="40">
<s:layout>
<s:HorizontalLayout/>
</s:layout>
<mx:Spacer width="100%"/>
<s:SimpleText text="Copyright © 2009 Flex On Java"
height="100%"
verticalAlign="middle"
textAlign="center"/>
<mx:Spacer width="100%"/>
</s:Group>
The code in the preceding listing shows the footer file. Like the header, the footer extends the Group component. It contains only a single SimpleText component, which contains the copyright information, and sets its textAlign attribute to center. Once again you leverage a couple of Spacer elements to assist in layout.
Listing 3.11. Main.mxml updated with footer

Next you add the footer ![]() to the application much as you did earlier for the header. Near the end of the Main.mxml, place the tag for the footer. Next let’s move on to creating the view component for the master view.
to the application much as you did earlier for the header. Near the end of the Main.mxml, place the tag for the footer. Next let’s move on to creating the view component for the master view.
3.6.4. Master view
Now you’re getting to the more interesting parts. The master view if you’ll recall from figure 3.2 consists of a few components. At the top resides a data grid component with two buttons for adding and removing issues.
Listing 3.12. MasterView.mxml
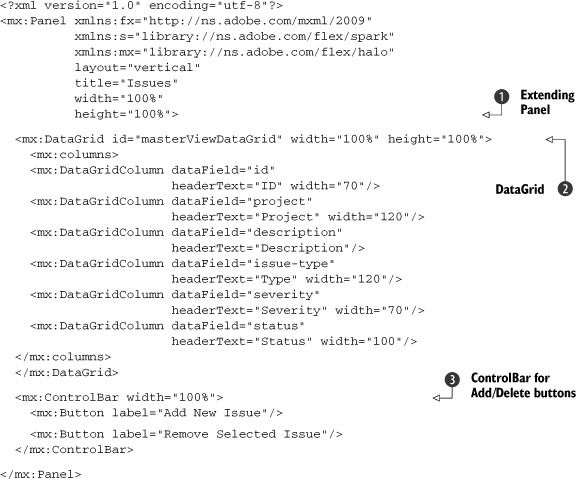
Create a file inside the org/foj/view folder called MasterView.mxml. This will contain the code to create the master view,
shown in listing 3.12. This component will be based on the Panel component ![]() , which is one of the layout containers available in the Flex framework. The Panel component provides us with a title bar area where we can provide the group of components contained within a meaningful title
much like the <legend> tag in HTML, or a group box control, for those more familiar with desktop development.
, which is one of the layout containers available in the Flex framework. The Panel component provides us with a title bar area where we can provide the group of components contained within a meaningful title
much like the <legend> tag in HTML, or a group box control, for those more familiar with desktop development.
DataGrid ![]() is used to display tabular data, and is one of the fundamental controls used in data-driven applications. The DataGrid and its big brother AdvancedDataGrid let you edit rows of data within the table cells. For the application, we’ll forego that functionality in favor of using
a detail view. A ControlBar
is used to display tabular data, and is one of the fundamental controls used in data-driven applications. The DataGrid and its big brother AdvancedDataGrid let you edit rows of data within the table cells. For the application, we’ll forego that functionality in favor of using
a detail view. A ControlBar ![]() at the bottom of the Panel will contain the buttons for adding and removing issues from the application.
at the bottom of the Panel will contain the buttons for adding and removing issues from the application.
3.6.5. Detail view
Next we’re going to develop the detail view, where you will allow the users of the application to modify the data fields for the issues displayed in the master view. DetailView has a form containing the fields that can be updated for the issues in the application. Begin just as you did earlier for the master view, by creating a file named DetailView.mxml in the org/foj/view folder. The following listing shows the code we’ll be adding to that file.
Listing 3.13. DetailView.mxml

Similar to the master view, the details view component will be based off of the Panel layout container ![]() . Add a Form
. Add a Form ![]() container to help organize the input fields that will be used to ultimately update the issues in the application. Unlike
in HTML, the Form container in the Flex framework serves no other purpose than to group form controls on the page. You do not need to wrap
fields in a Form tag to submit data to the backend; it’s there for aesthetics. Inside the Form wrap each input field inside of a FormItem
container to help organize the input fields that will be used to ultimately update the issues in the application. Unlike
in HTML, the Form container in the Flex framework serves no other purpose than to group form controls on the page. You do not need to wrap
fields in a Form tag to submit data to the backend; it’s there for aesthetics. Inside the Form wrap each input field inside of a FormItem ![]() component that provides styling, a label, and layout for each of the form fields. A ControlBar
component that provides styling, a label, and layout for each of the form fields. A ControlBar ![]() contains the buttons that control saving the data and canceling the edits.
contains the buttons that control saving the data and canceling the edits.
3.6.6. Comments view
The final section of the application we’ll lay out is the comments view, which will list any comments added to the issues. First create the CommentsView.mxml file in the org/foj/view folder just as you did for all of the other view components. For this List component we’re going to display the comment text; you could easily create a custom ItemRenderer for the List items similar to what we’ll do in chapter 8 for the custom chart that we’ll create.
Listing 3.14. CommentsView.mxml
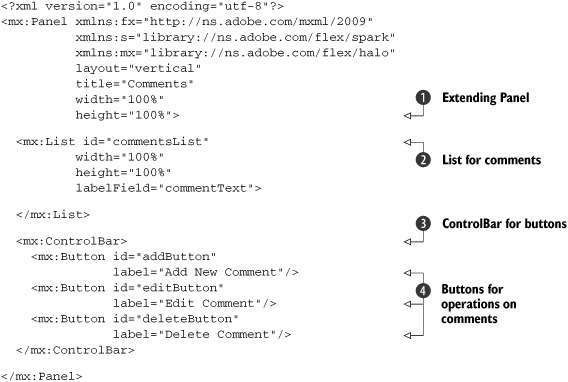
The code for the comments view is based on the Panel component ![]() . Next add a List component
. Next add a List component ![]() , which you’ll use to contain a list of the comments. At the bottom of the Panel add a ControlBar
, which you’ll use to contain a list of the comments. At the bottom of the Panel add a ControlBar ![]() to hold the three Button components
to hold the three Button components ![]() we’ll define to operate on the comments.
we’ll define to operate on the comments.
3.7. Laying out the components
Now that you’ve got all of the components defined, let’s add them to the Main.mxml and define the overall application layout. In Flex, all components can be laid out within other containers generally in one of three ways—horizontally, vertically, or absolutely. In most cases it’s best to go with either horizontal or vertical layouts, especially if you want your application to resize appropriately. To achieve the layout you want you’ll need to nest layout containers as illustrated in figure 3.6.
Figure 3.6. Layout for the application

Figure 3.6 shows the nesting of layout containers that was necessary to duplicate what was shown in the mockup shown in figure 3.1. Listing 3.15 shows the updated Main.mxml with all of the layout components necessary.
Listing 3.15. Laying out the application
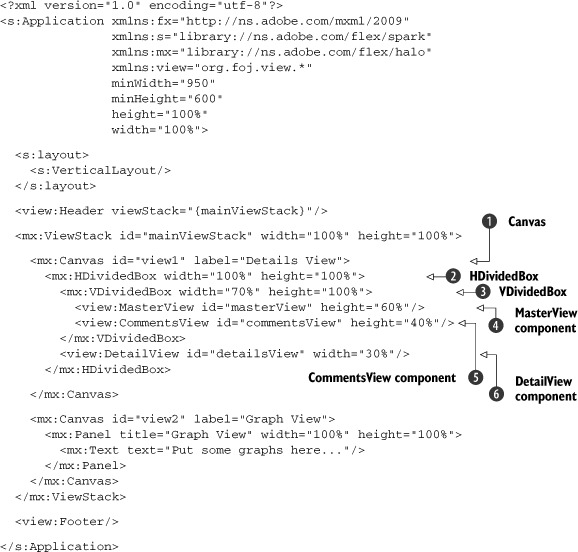
As illustrated in figure 3.6, you start out with a Canvas ![]() container to hold all the nested layout containers for the main ViewStack. Inside of this you create an HDividedBox,
container to hold all the nested layout containers for the main ViewStack. Inside of this you create an HDividedBox, ![]() setting its width and height to 100%, so it will take up all available space. Within that you place a VDividedBox
setting its width and height to 100%, so it will take up all available space. Within that you place a VDividedBox ![]() , which will contain the MasterView
, which will contain the MasterView ![]() and the CommentsView
and the CommentsView ![]() . Lastly you add the DetailView
. Lastly you add the DetailView ![]() , which will occupy the right side of the HDividedBox. The application is almost complete. Next let’s create a component to use as a modal popup to edit the comments in the List view of the CommentsView component.
, which will occupy the right side of the HDividedBox. The application is almost complete. Next let’s create a component to use as a modal popup to edit the comments in the List view of the CommentsView component.
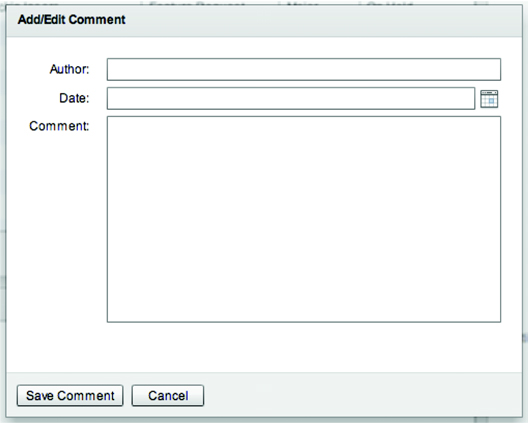
3.8. Creating a pop-up component
The final component you’ll develop in this chapter is a modal pop-up form that you’ll wire into the application in the next chapter to add new comments and edit existing ones.
Figure 3.7 is a screenshot of the pop up. Listing 3.16 shows the code for the pop up.
Figure 3.7. Pop up for editing comments
Listing 3.16. EditCommentForm.mxml
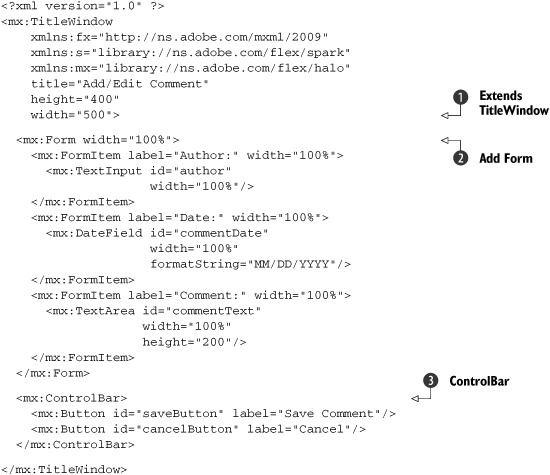
The pop-up window is fairly simple. You define the component to extend the TitleWindow component ![]() , which you’ll typically use for pop ups. Next you add a Form and a number of FormItems
, which you’ll typically use for pop ups. Next you add a Form and a number of FormItems ![]() just as you did earlier for the DetailView. The ControlBar
just as you did earlier for the DetailView. The ControlBar ![]() added to the window holds the Button components for controlling the pop up.
added to the window holds the Button components for controlling the pop up.
3.9. The finished application
The final design is far from finished, but we’re done for now. This is as good a time as any to build the application and see the progress you’ve made. The application won’t be functional until the end of the next chapter, but it’s always reassuring to see what the finished product will look like anyway.
From the root of the flex-bugs-ria project run the command mvn install. The build should complete successfully. If not double-check the code to ensure that it matches the code shown in the listings. Next, inside the root of the flex-bugs-web project run the mvn jetty:run-war command to start up the embedded Jetty web container and deploy the war file. When the container is up and running, navigate to http://localhost:8080/flexbugs.jsp and you should see something that resembles figure 3.8.
Figure 3.8. The finished application

3.10. Summary
This chapter moved quickly and only briefly introduced many of the components available to you in the Flex framework. You started with an idea of what you wanted the application to look like and decomposed that into several smaller components. By doing that you made the code more manageable, and as you’ll see in the next chapter, you made the presentation models and event handling easier to handle. When you had all the pieces built up, you could illustrate basics of layout containers in Flex and put the application together. We’re hopeful that you were able to follow along; if you feel like you need more information about layouts and the components of the Flex framework, a good place to start would be the LiveDocs at http://help.adobe.com/en_US/flex/using/index.html.
Now that you’ve built up the Flex application and laid out the components, where do you go from here? In the next chapter you’re going to begin connecting the Flex application to the Java backend you developed in chapter 2 using the WebService component. In chapter 5 you’ll refactor this to use the BlazeDS framework to talk directly to the Java application.