
Chapter 4. Connecting to web services
- Model View Presenter
- Event dispatching and handling
- Calling a web service
- Interfaces and views
In chapter 3 you designed the UI for the Flex application, but it won’t be useful until it can communicate with a server-side component. In this chapter you’re going to continue building up the client-side application. Many Flex books attempt to hide complexity when dealing with client-side code and ActionScript, usually by having you create all your WebService components and event handling code in your MXML files. This solution, as many developers agree, does not scale well and quickly shows its warts in any but the most trivial application.
We’ve decided instead to architect the client-side code in such a manner as to not only scale well, but also isolate your View from Presentation and from external services. This allows the application to be flexible enough to easily refactor and replace one implementation of external service with another with minimal code changes. You could, therefore, painlessly change your application from calling web services to leveraging BlazeDS as you’ll see in chapter 5. You’ll do this by using MVP.
Because a good portion of the interaction between the Flex framework and the server-side occurs as asynchronous calls, we’ll go over events and event handling. We’ll cover how to utilize events to facilitate communication between separate sections of the application. We’ll also learn how to create the WebService component and call the web services you defined in the application in chapter 2. By the end of this chapter you should have a functioning application that communicates with the Java server side.
4.1. Model View Presenter
To build the backend for the Flex application, we’re going to make use of a popular GUI architectural pattern called Model View Presenter, and more specifically a variation of that pattern called Passive View. As you may have guessed already, the MVP pattern consists of three main components: a Model, a View, and a Presenter, as shown in figure 4.1. By leveraging the Passive View architecture you are able to create what Michael Feathers describes as a “Humble Dialog Box” (http://www.objectmentor.com/resources/articles/TheHumbleDialogBox.pdf). The primary reason to follow this style of development is that you are able to remove as much logic from the UI as possible
Figure 4.1. The relationship between the Model, View, and Presenter
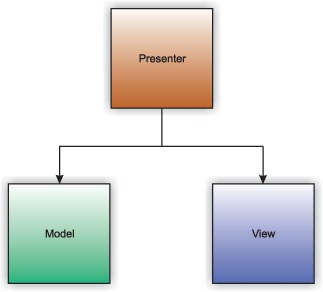
Figure 4.1 shows the relationship among the three components of the MVP pattern. The first element of the MVP triad is the Presenter. As the diagram shows, all information flows from the Presenter to either the Model or View. The Model and View are isolated from each other and should have no knowledge of each other or of the Presenter.
All communication with the Presenter should be done through events. The Presenter is then responsible for maintaining the state of the application, making calls to the Model and updating the View when necessary. Read more about the MVP pattern and the Passive View pattern at Martin Fowler’s blog at (http://martinfowler.com/eaaDev/PassiveScreen.html).
For those of you who are familiar with Flex, you’ll notice sooner or later that we’ve decided not to use the built-in data binding functionality that Flex provides. Because we’re following the Passive View pattern for this application, we’re relying on the Presenter to push any changes to the data being displayed to the view. The main reason is for testability. It’s much easier to unit test the presentation behavior if it is in the Presenter than in the View.
4.2. Web services in Flex
It is fairly common to use web services for application integration, especially when there are disparate platforms involved. Because of the availability of XML parsers for most every common programming language in use today, web services are a prime candidate for applications to share information with each other.
There are two major styles of web services:
- SOAP-based, which are primarily service-oriented
- RESTful, which are primarily resource-oriented
For this application you’ll use the WebService component to talk to the SOAP-based web services you created in chapter 1. In the example we won’t use the HTTPService component to connect to RESTful web services, but it’s similar enough to using the WebService component you should be able to modify the code without too much effort.
Exposing your business functionality via web services has the least impact on your server-side code, as it doesn’t couple the application to the clients that will be consuming the service. As you’ll see in chapter 5, when we expose a service for consumption using BlazeDS, the remote service is coupled only to clients who can communicate using the AMF binary protocol that BlazeDS uses.
Web services are commonly used to integrate applications especially if they run on different platforms. As it happens, Flex falls into this category because it needs to communicate with the server side, which is most likely not written in ActionScript. With that in mind, the fine folks at Adobe have made integrating a Flex application with a back end using web services a fairly trivial endeavor. Most Flex books show you how to call your web services by creating the service components directly in the MXML files, but because we’re striving for reusability, maintainability, and clean code, we’re going to encapsulate the WebService objects in our model.
4.3. Dispatching and handling events
Dispatching and handling events is fundamental to Flex development, and also to development using the Passive View pattern described previously. All interaction with the Presenter is done through dispatching events. In this section we’ll discuss how to enable communication between the parts of the application via events.
4.3.1. Creating a custom event
Many components in Flex have their own built-in events, such as the click event on a button. If you want to send any data along with your event, such as which row in a DataGrid was selected, you’ll need to create your own custom event class that extends the flash.events.Event class.
Note
Like Java, ActionScript uses packages to logically group related classes and avoid naming conflicts. To declare that a class belongs to a particular package, use the package keyword, followed by the package name with a set of braces containing the code belonging to that package. Then place the class file in a folder structure corresponding to the package name you defined. If your package name is com.example, the class must be located in a com/example folder of your source tree.
To differentiate between events, you can either create a separate subclass for each event that you wish to react to, or create fewer events and use the type attribute to filter out only the events you want to add event listeners for.
Listing 4.1. UIEvent.as

In listing 4.1 you’ve created a custom event class called UIEvent ![]() and defined constants for the different types of events that will be dispatched
and defined constants for the different types of events that will be dispatched ![]() . There’s also a defined field called data
. There’s also a defined field called data ![]() that will accept any type of variable. This will hold any kind of payload you pass with the event. As a last step overload
the constructor
that will accept any type of variable. This will hold any kind of payload you pass with the event. As a last step overload
the constructor ![]() and specify default values for whether or not the events should bubble up the chain and be cancelable. Next you’ll look at
how to dispatch these events.
and specify default values for whether or not the events should bubble up the chain and be cancelable. Next you’ll look at
how to dispatch these events.
4.3.2. Event dispatching
For the application to react to events, you first have to dispatch them. Because every component in Flex is an ancestor of UIComponent, you have the ability to dispatch an event by simply calling the dispatchEvent method within your MXML; event bubbling only travels upward toward a component’s parent. For the application to work as you expect, you need a mechanism to allow sibling components to intercept events being dispatched to notify you of a button being clicked, or the selected item in a DataGrid being changed. To accomplish this you will create an EventDispatcherFactory so that all event dispatching and subscribing happens with the same EventDispatcher object.
Listing 4.2. EventDispatcherFactory.as
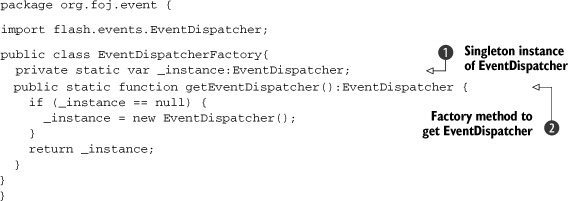
Listing 4.2 shows the code for the EventDispatcherFactory. There’s not much to it. It consists of a factory method getEventDispatcher ![]() , which returns a singleton instance of an EventDispatcher
, which returns a singleton instance of an EventDispatcher ![]() . You’ll use this instance of EventDispatcher to dispatch and subscribe to events. That way any part of the application can dispatch and react to events regardless of
where it exists in the application’s hierarchy of components and classes. Now that you have the custom events and a way to
dispatch them, let’s move on to enhancing the application to make it more interactive and useful.
. You’ll use this instance of EventDispatcher to dispatch and subscribe to events. That way any part of the application can dispatch and react to events regardless of
where it exists in the application’s hierarchy of components and classes. Now that you have the custom events and a way to
dispatch them, let’s move on to enhancing the application to make it more interactive and useful.
4.4. Creating Issue and Comment transfer objects
To ease handling the responses from calling web services, you need to duplicate the data objects defined in chapter 1 in ActionScript so that you can effectively deal with the data on the client side.
Listing 4.3. Issue.as
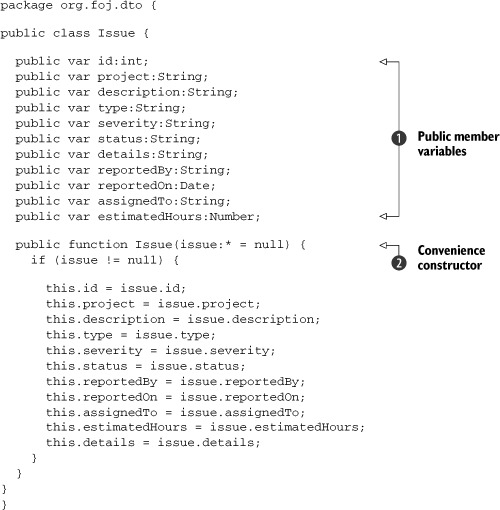
Listing 4.3 shows the Issue data object. There’s not much to it. It contains several public member variables ![]() , which match the properties in its Java counterpart. Then you define a convenience constructor
, which match the properties in its Java counterpart. Then you define a convenience constructor ![]() for constructing an Issue because the WebService will not return actual Issue objects, but rather construct an ObjectProxy, which is an anonymous dynamic object that contains the same properties as the Issue object. You define a constructor that allows you to create an Issue object from this ObjectProxy.
for constructing an Issue because the WebService will not return actual Issue objects, but rather construct an ObjectProxy, which is an anonymous dynamic object that contains the same properties as the Issue object. You define a constructor that allows you to create an Issue object from this ObjectProxy.
Listing 4.4. Comment.as
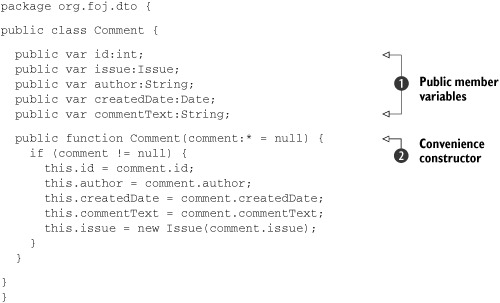
Listing 4.4 shows the Comment data object, which looks similar to the Issue data object. It contains a few member variables ![]() and a convenience constructor
and a convenience constructor ![]() . Next let’s get down to the task of enhancing the UI by applying the MVP pattern to the application.
. Next let’s get down to the task of enhancing the UI by applying the MVP pattern to the application.
4.5. Enhancing the master view
The first part of the application that you’ll be enhancing is the master view. You’ll start by creating the Presenter for the master view. Then you’ll create the Issues model, which will encapsulate the interaction with the web services you created in chapter 1. When you’re done, update the view to dispatch the necessary events to function properly.
4.5.1. Creating a Presenter for the master view
Because the Presenter is responsible for most of what goes on in the application, it will be the first part of the MVP triad that you’ll be creating. The Presenter for the master view part of the application needs only a couple of different events to react to. Because the application is stateful by nature, you need to refresh the list of Issues whenever any of the issues are changed, that is, an issue is created or removed, whenever an individual issue is updated, or when the user clicks the Refresh Issues button. The Presenter also needs to react when the user clicks the Remove Issue button. The following listing shows the code for the MasterPresenter class.
Listing 4.5. MasterPresenter.as

The MasterPresenter contains references to the other two pieces of the MVP triad, the view ![]() and the model
and the model ![]() . The constructor
. The constructor ![]() takes as an argument its view. These actions are necessary because you’ll be constructing the Presenters in the view components as they’re created. The
view will then pass in a reference to itself when creating the Presenter. You then create an instance of the Model you’ll be calling
and register a few event listeners for the events that the Presenter needs to react to
takes as an argument its view. These actions are necessary because you’ll be constructing the Presenters in the view components as they’re created. The
view will then pass in a reference to itself when creating the Presenter. You then create an instance of the Model you’ll be calling
and register a few event listeners for the events that the Presenter needs to react to ![]() .
.
Methods are called as a result of the events being fired by the View. The first method getIssues ![]() is called to react to events that require the application to refresh the DataGrid. It first calls the CursorManager to change the mouse cursor to the busy cursor. Then it calls the Model’s getIssues method, passing in an AsyncResponder, which is a way to provide callback methods to the Model to call when a result is returned.
is called to react to events that require the application to refresh the DataGrid. It first calls the CursorManager to change the mouse cursor to the busy cursor. Then it calls the Model’s getIssues method, passing in an AsyncResponder, which is a way to provide callback methods to the Model to call when a result is returned.
When a ResultEvent is fired by the Model, it calls the getIssuesResult ![]() callback method, which changes the mouse cursor back to the normal cursor and updates the DataGrid by setting its dataProvider property to the collection of Issues returned from the Model. As stated earlier, the web service returns a collection of ObjectProxy objects you need to iterate through to create actual Issue objects for the view.
callback method, which changes the mouse cursor back to the normal cursor and updates the DataGrid by setting its dataProvider property to the collection of Issues returned from the Model. As stated earlier, the web service returns a collection of ObjectProxy objects you need to iterate through to create actual Issue objects for the view.
There are also methods to handle when the user clicks on the Remove Issue button ![]() and its callback for a successful return
and its callback for a successful return ![]() . A simple and generic error handling function
. A simple and generic error handling function ![]() returns the cursor to the normal state, and pops up an Alert box containing the error message returned from the remote call. Obviously you’ll want to replace this simplistic error handling
when developing real applications, but for the simple example, this will suffice. Now let’s create the Model component.
returns the cursor to the normal state, and pops up an Alert box containing the error message returned from the remote call. Obviously you’ll want to replace this simplistic error handling
when developing real applications, but for the simple example, this will suffice. Now let’s create the Model component.
In Flex, calls to remote services happen asynchronously, and return an AsyncToken object that you can use to add callbacks to be executed when either a ResultEvent or FaultEvent returns as a result of the remote service call. One way to bind these event handlers to an AsyncToken is to add an object that conforms to the IResponder interface, such as an AsyncResponder, which takes in a callback to call on a ResultEvent and one to call if it returns a FaultEvent instead in its constructor.
4.5.2. Creating an Issue Model
The next component in the MVP triad that you’ll implement is the Model. The Model in MVP, sometimes referred to as the Domain Model, represents the core of the business domain and is often responsible for manipulating data in a relational database, or in this case calling an external service that will handle persisting the data.
Listing 4.6. IssueModel.as
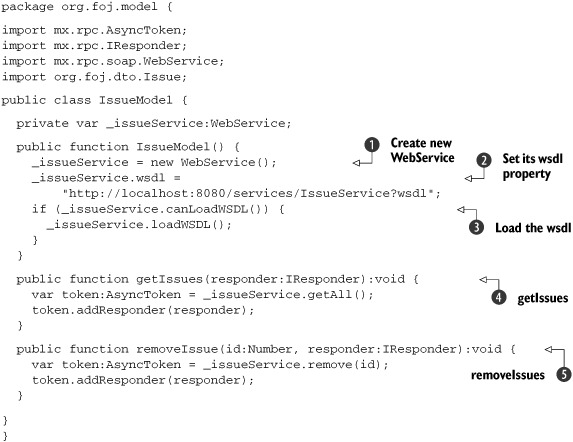
Listing 4.6 shows the code for the IssueModel so far. In the constructor, you create a WebService object ![]() and set its wsdl property to http://localhost:8080/services/IssueService?wsdl
and set its wsdl property to http://localhost:8080/services/IssueService?wsdl ![]() .
.
If you prefer not to hardcode the WebService URL inside your Model classes, you can set up the WebService destination metadata in the services-config.xml configuration file. Using this approach enables you to refer to the WebService by its destinationID in order to load the WSDL rather than using a URL to the WSDL.
To use this approach you’ll need to replace the sections of code where you set the wsdl property on your WebService objects like _issueService.wsdl with code that sets the destination property to the destination name you configured in the services-config.xml. By leveraging Maven profiles along with its resource filtering you can put property placeholders in your services-config.xml and define different destinations for your web services in the Maven profiles for the different environments. For more information on using Maven profiles and resource filtering, refer to the Maven reference at http://www.sonatype.com/books/mvnref-book/reference/public-book.html. We’ll cover working with destinations in chapter 5 when discussing BlazeDS remoting.
Next you need to call the loadWSDL method ![]() on the WebService so that the WebService will download the WSDL and be able to make calls against the web service. This is a necessary step when defining your WebService in ActionScript as opposed to using the WebService MXML tag. As the final steps, you define the two business methods getIssues
on the WebService so that the WebService will download the WSDL and be able to make calls against the web service. This is a necessary step when defining your WebService in ActionScript as opposed to using the WebService MXML tag. As the final steps, you define the two business methods getIssues ![]() and removeIssue
and removeIssue ![]() , which call the web service and add the responder callback you passed in from the Presenter as a responder to the AsyncToken. Let’s wrap up this MVP triad by refactoring the MasterView.
, which call the web service and add the responder callback you passed in from the Presenter as a responder to the AsyncToken. Let’s wrap up this MVP triad by refactoring the MasterView.
4.5.3. Updating the master view
Now that we’ve got the Presenter and Model in place, let’s update the MasterView to add functionality.
Listing 4.7. MasterView.mxml
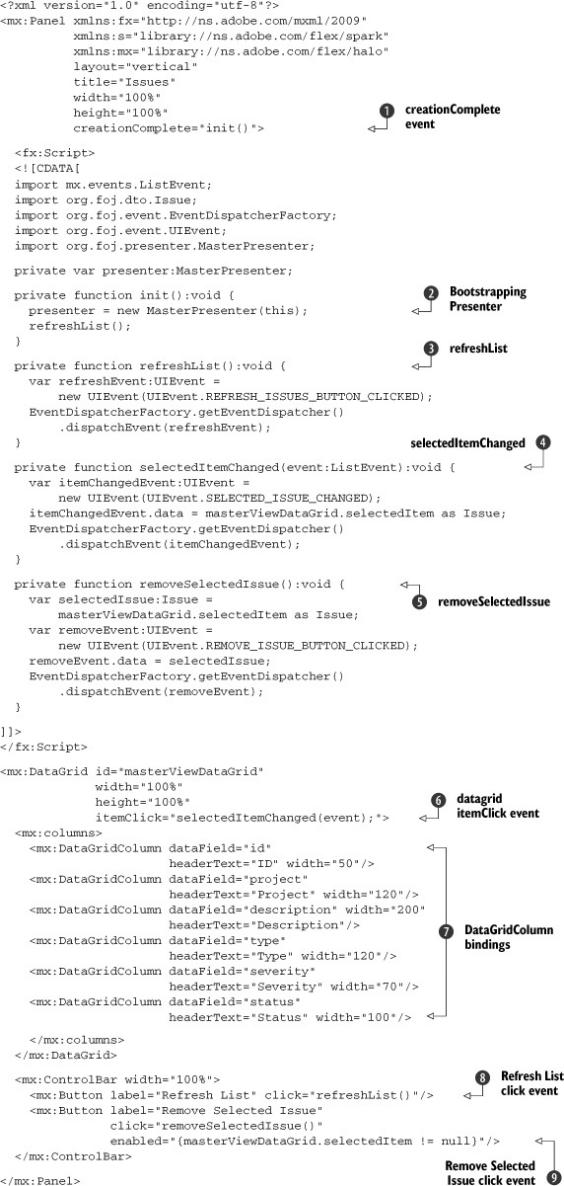
Listing 4.7 shows the updated MasterView.mxml. The first change is the addition of a handler for the creationComplete event of the component ![]() . You use this event to help bootstrap the Presenter
. You use this event to help bootstrap the Presenter ![]() and make a call to the refreshList
and make a call to the refreshList ![]() method to populate the DataGrid automatically on startup. The refreshList method is used to respond to the click event on the Refresh List button as well
method to populate the DataGrid automatically on startup. The refreshList method is used to respond to the click event on the Refresh List button as well ![]() . Next you define an event handler method called selectedItemChanged
. Next you define an event handler method called selectedItemChanged ![]() , which responds to any clicks within the DataGrid
, which responds to any clicks within the DataGrid ![]() .
.
You also define an event handler method called removeSelectedIssue ![]() to respond to any clicks of the Remove Selected Issue button
to respond to any clicks of the Remove Selected Issue button ![]() . To ensure that this button is enabled only when we have an actively selected row in the DataGrid, we’ve bound the enabled property of the button to the selectedItem property of the DataGrid. We’ve bound the DataGridColumn items
. To ensure that this button is enabled only when we have an actively selected row in the DataGrid, we’ve bound the enabled property of the button to the selectedItem property of the DataGrid. We’ve bound the DataGridColumn items ![]() in the DataGrid to the properties defined on the Issue data object earlier. This will allow the DataGrid to bind the column values to the objects in its data provider.
in the DataGrid to the properties defined on the Issue data object earlier. This will allow the DataGrid to bind the column values to the objects in its data provider.
4.6. Enhancing the detail view
The next MVP triad you’ll create is for the detail view. Just as you did in the previous section, you’ll begin by creating the Presenter, then add the necessary methods to the IssueModel, and finish by enhancing the View.
4.6.1. Creating a DetailPresenter
The DetailPresenter must maintain more state than the MasterPresenter. Because the code necessary for the DetailPresenter is more complex, we’ll break it up into smaller chunks, starting with listing 4.8.
Listing 4.8. DetailPresenter.as
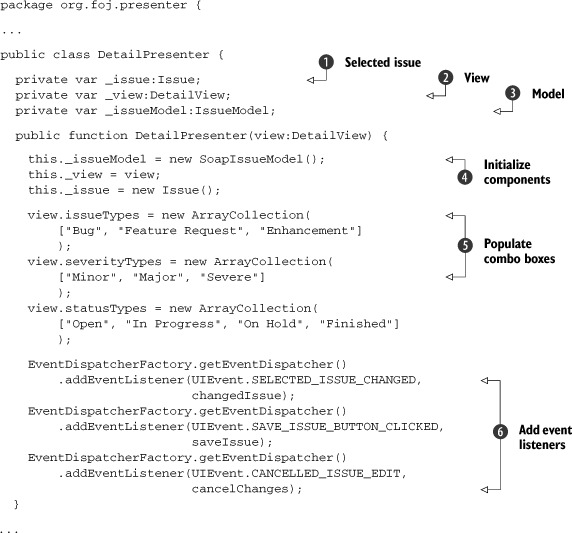
The DetailPresenter not only holds references to the View ![]() and Model
and Model ![]() , it also needs to hold a reference to the currently selected issue
, it also needs to hold a reference to the currently selected issue ![]() from the DataGrid in the MasterView. In the constructor you initialize the Model, set the View to what is being passed in, and create an empty Issue object
from the DataGrid in the MasterView. In the constructor you initialize the Model, set the View to what is being passed in, and create an empty Issue object ![]() . Next the Presenter sets the possible values in the combo boxes for the issue types, severity, and status
. Next the Presenter sets the possible values in the combo boxes for the issue types, severity, and status ![]() by creating ArrayCollections with the possible values and setting the dataProvider property of the corresponding ComboBox. Then you add event listeners
by creating ArrayCollections with the possible values and setting the dataProvider property of the corresponding ComboBox. Then you add event listeners ![]() to respond to the events that the DetailView will fire, as well as the changed issue event that the MasterView fires when the selected item in the DataGrid changes. The following listing shows the rest of the code for the DetailPresenter.
to respond to the events that the DetailView will fire, as well as the changed issue event that the MasterView fires when the selected item in the DataGrid changes. The following listing shows the rest of the code for the DetailPresenter.
Listing 4.9. DetailPresenter.as

You then create get and set properties ![]() ,
, ![]() for the currently selected issue. The get property will return the current issue; the set property will update all the form
fields in the view so that they match the currently selected issue.
for the currently selected issue. The get property will return the current issue; the set property will update all the form
fields in the view so that they match the currently selected issue.
Next you’ve defined a method to handle saving the Issue ![]() , which gets the values from the view and updates the currently selected Issue before calling the saveIssue method on the model. The method that responds to the Cancel Changes button being clicked
, which gets the values from the view and updates the currently selected Issue before calling the saveIssue method on the model. The method that responds to the Cancel Changes button being clicked ![]() sets the selected issue to a brand new Issue object. Whenever the SELECTED_ISSUE_CHANGED event is fired, the changedIssue
sets the selected issue to a brand new Issue object. Whenever the SELECTED_ISSUE_CHANGED event is fired, the changedIssue ![]() method is called and sets the selected Issue by using the set property you defined earlier. You create the handlers for the saveIssueResult
method is called and sets the selected Issue by using the set property you defined earlier. You create the handlers for the saveIssueResult ![]() and the error handler
and the error handler ![]() to handle the result from calling the IssueModel.
to handle the result from calling the IssueModel.
ActionScript, unlike Java, has first-class support for properties similar to other languages such as C#, Ruby, and Groovy. This gives you the ability to get and set values on a variable as if it were a public member variable on the class, instead of having to do getXXX() and setXXX() methods as you would in Java.
The syntax for defining get/set properties is as follows:
public function get name():String {
  return _name;
}
public function set name(value:String):void {
  _name = value;
}
Many developers use the convention of prefixing the private member variables with an underscore (_) so that the compiler can figure out if you are trying to reference the private member variable or the get/set property in the class. One of the advantages of using get/set properties is that it removes the need to define a lot of getXXX/setXXX methods that do nothing beyond getting and setting the private variable. Using properties allows you to define your member variables as public. If you need to encapsulate logic when member variables are accessed, you can easily refactor your class to use a get/set property, and none of the classes that use it will have to change as a result.
4.6.2. Updating the IssueModel
Now that you’ve implemented the Presenter for the details view, let’s do the same for the new methods in the IssueModel to support the updated functionality.
Listing 4.10. IssueModel.as

Just as before, the methods in the IssueModel are fairly simple. The getIssue ![]() method takes an id parameter to find a specific Issue as well as an IResponder to add a responder to the token returned from the call to the WebService. The saveIssue
method takes an id parameter to find a specific Issue as well as an IResponder to add a responder to the token returned from the call to the WebService. The saveIssue ![]() method takes in an Issue object to pass along to the WebService to persist, as well as an IResponder.
method takes in an Issue object to pass along to the WebService to persist, as well as an IResponder.
4.6.3. Updating the detail view
The last part of the MVP triad that needs to be updated now is the DetailView. Listing 4.11 shows the updated version of the DetailView.mxml after you add the necessary methods to dispatch the events to save an Issue or cancel the changes.
Listing 4.11. DetailView.mxml
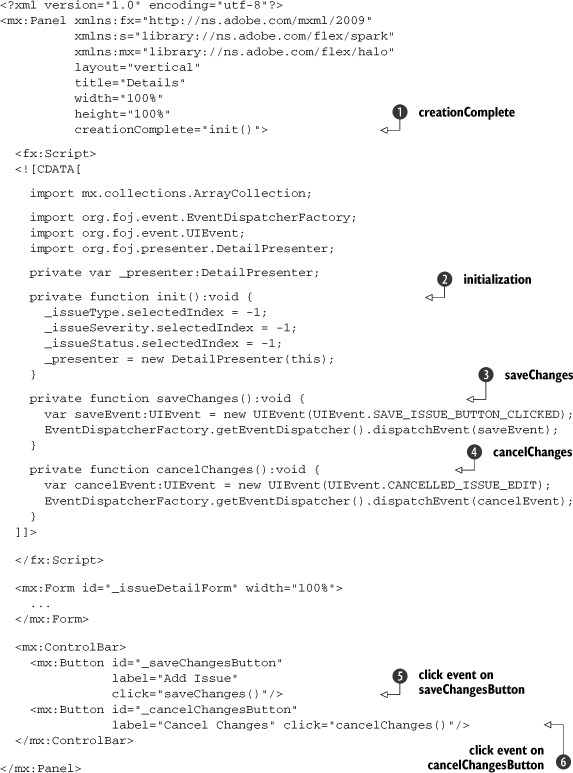
You tell the component to call the init ![]() method to initialize the component when the creationComplete
method to initialize the component when the creationComplete ![]() event is fired. Inside the init method, you bootstrap the Presenter just as you did earlier in the MasterView. You also set the selectedItem property on the three combo boxes to -1, so they don’t have a value selected when the component is first created. Then you add an event handler for the click event
on the saveChangesButton
event is fired. Inside the init method, you bootstrap the Presenter just as you did earlier in the MasterView. You also set the selectedItem property on the three combo boxes to -1, so they don’t have a value selected when the component is first created. Then you add an event handler for the click event
on the saveChangesButton ![]() called saveChanges
called saveChanges ![]() . Inside the saveChanges method you dispatch an event signaling that the button has been clicked. As a final step, you add an event handler cancelChanges
. Inside the saveChanges method you dispatch an event signaling that the button has been clicked. As a final step, you add an event handler cancelChanges ![]() for the click event on the cancelChangesButton
for the click event on the cancelChangesButton ![]() and it dispatches an event notifying the application that the button had been clicked.
and it dispatches an event notifying the application that the button had been clicked.
4.7. Enhancing the comments view
You’ve almost finished enhancing the sample application. The last part that needs to be updated is the comments view. You’ll start by creating an MVP triad just as before. Later you’ll add a modal pop up to add new comments and edit existing comments. Let’s get started.
4.7.1. Creating a comments presenter
Creating the Presenter for the comments view of the application will be just like creating the last two Presenters. The CommentsListPresenter will be responsible for maintaining more state than the previous Presenters. It will need to maintain a reference to not only the currently selected issue, but also the currently selected comment, to properly persist the Comment objects. Because the code for the CommentsListPresenter is rather lengthy, we’ll break it up. The following listing shows the first section in which you define which events this Presenter will listen for and a couple of get/set properties.
Listing 4.12. CommentsListPresenter.as

First you define variables to maintain the state ![]() . Then you define a constructor
. Then you define a constructor ![]() that takes in a reference to the View that this Presenter is created for. Next you initialize the Model, and add a few event
listeners
that takes in a reference to the View that this Presenter is created for. Next you initialize the Model, and add a few event
listeners ![]() for the Presenter so it can react properly to specific events.
for the Presenter so it can react properly to specific events.
Once again you’re leveraging get and set properties in this Presenter, using the set property to trigger whether or not certain elements of the view should be enabled. You start by creating a get property for the currently selected issue ![]() , and in its corresponding set property
, and in its corresponding set property ![]() , you determine whether or not to enable the Add Comments button based on whether or not the currently selected issue’s id property is greater than zero, indicating it has been saved. You do this to make sure that the user can’t save a comment
for an Issue that has not been persisted to the backend previously. You create a get property for the currently selected comment
, you determine whether or not to enable the Add Comments button based on whether or not the currently selected issue’s id property is greater than zero, indicating it has been saved. You do this to make sure that the user can’t save a comment
for an Issue that has not been persisted to the backend previously. You create a get property for the currently selected comment ![]() as well as a set property for the selected comment
as well as a set property for the selected comment ![]() . Similar to the last set property, you use this opportunity to enable or disable the Edit Comment and Delete Comment buttons based on whether or not
there is a comment selected in the List component containing the comments.
. Similar to the last set property, you use this opportunity to enable or disable the Edit Comment and Delete Comment buttons based on whether or not
there is a comment selected in the List component containing the comments.
Listing 4.13. CommentsListPresenter.as
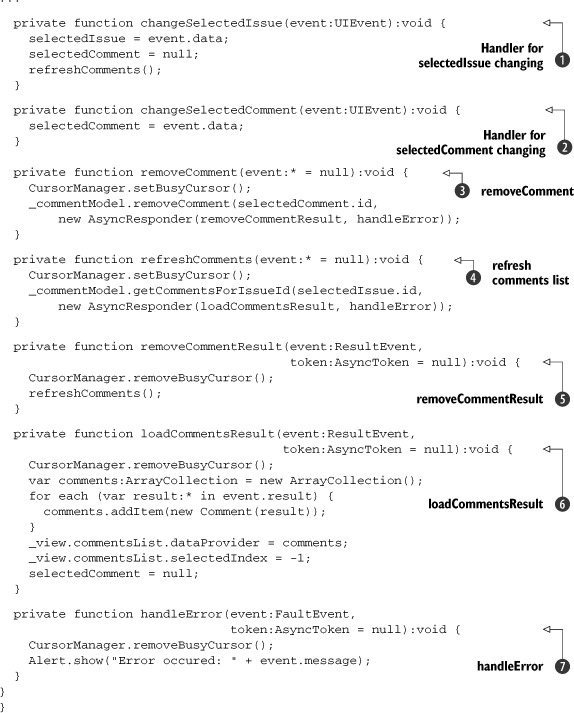
Listing 4.13 shows the rest of the code for the CommentsListPresenter. First you define a method to handle changes to the selected issue ![]() , where you set the selected issue from the data passed along in the event. You then set the selected comment to null, and refresh the list of comments to be displayed. When someone clicks on a comment in the List view of the CommentsView, the selectedCommentChanged
, where you set the selected issue from the data passed along in the event. You then set the selected comment to null, and refresh the list of comments to be displayed. When someone clicks on a comment in the List view of the CommentsView, the selectedCommentChanged ![]() method will be called, where you set the selected comment to the comment in the incoming event.
method will be called, where you set the selected comment to the comment in the incoming event.
The next method you define handles the user clicking the Remove Comment button ![]() . You first tell the CursorManager to set the busy cursor, as you did earlier in the other Presenters. Then you make a call to the CommentModel to remove the selected comment. When the result comes back
. You first tell the CursorManager to set the busy cursor, as you did earlier in the other Presenters. Then you make a call to the CommentModel to remove the selected comment. When the result comes back ![]() from the call to the CommentModel you remove the busy cursor and tell the Presenter to refresh the list of comments for the view.
from the call to the CommentModel you remove the busy cursor and tell the Presenter to refresh the list of comments for the view.
To refresh the list of comments you created a function called refreshComments ![]() , which makes a call to the CommentModel to retrieve a list of comments for a given issue id. When the result comes back from this call
, which makes a call to the CommentModel to retrieve a list of comments for a given issue id. When the result comes back from this call ![]() , you iterate through the list of ObjectProxy instances that come back from the WebService and use the convenience constructor you defined at the beginning of this chapter to create a list of Comment objects. You then set the dataProvider property of the List component in the view to this list of Comment objects and remove the busy cursor. Last you create a simple error handler
, you iterate through the list of ObjectProxy instances that come back from the WebService and use the convenience constructor you defined at the beginning of this chapter to create a list of Comment objects. You then set the dataProvider property of the List component in the view to this list of Comment objects and remove the busy cursor. Last you create a simple error handler ![]() as you did for the two Presenters you created earlier.
as you did for the two Presenters you created earlier.
4.7.2. Creating a comment model
Other than the method names, the CommentModel will look similar to the IssueModel you created earlier.
Listing 4.14. CommentModel.as

In the constructor ![]() you create a new WebService component and set its wsdl property to the WSDL for the web service. Then just as you did earlier, you tell the WebService to load the WSDL so you can make calls to it. Next you define the two methods needed for the application to function, the
getCommentsForIssueId
you create a new WebService component and set its wsdl property to the WSDL for the web service. Then just as you did earlier, you tell the WebService to load the WSDL so you can make calls to it. Next you define the two methods needed for the application to function, the
getCommentsForIssueId ![]() and the removeComment
and the removeComment ![]() methods.
methods.
4.7.3. CommentView
Now that you have the methods implemented in the CommentModel, you can update the CommentsListView component to enable it to respond to user interaction. Listing 4.15 shows the updated CommentsListView.mxml file. For now, you’re going to respond only to clicks in the List component containing the comments and the Remove Comment button. In the next section you’ll start implementing the modal pop up that will allow you to add and edit comments.
Listing 4.15. CommentsListView.mxml

Again, you use the creationComplete event ![]() to call the init method
to call the init method ![]() where you bootstrap the Presenter. You then create an event handler named removeComment
where you bootstrap the Presenter. You then create an event handler named removeComment ![]() to handle the user clicking the Delete Comment button
to handle the user clicking the Delete Comment button ![]() . Inside this method you set the selectedIndex to -1 so no items are selected in the List and dispatch an event notifying the rest of the application that the button has been clicked. Next you define an event handler
method selectedItemChanged
. Inside this method you set the selectedIndex to -1 so no items are selected in the List and dispatch an event notifying the rest of the application that the button has been clicked. Next you define an event handler
method selectedItemChanged ![]() to handle the user selecting an item in the List component
to handle the user selecting an item in the List component ![]() .
.
4.8. Adding a pop-up form for editing comments
All that’s left to complete the sample application is creating a pop up for adding and editing comments. Figure 4.2 shows a wireframe mockup of the pop up. It’s a fairly simple pop-up dialog that consists of a text input for the author’s name, the date the comment was created, and a text area for entering the comment details.
Figure 4.2. Wireframe of pop up for editing comments

Now that you see what you want to build, let’s get started. The following section illustrates how you build the pop up, starting with updating the Comment Presenter.
4.8.1. Updating the CommentPresenter
First let’s add the methods you need to the CommentPresenter for the pop-up dialog.
Listing 4.16. Adding a pop up to CommentListPresenter.as
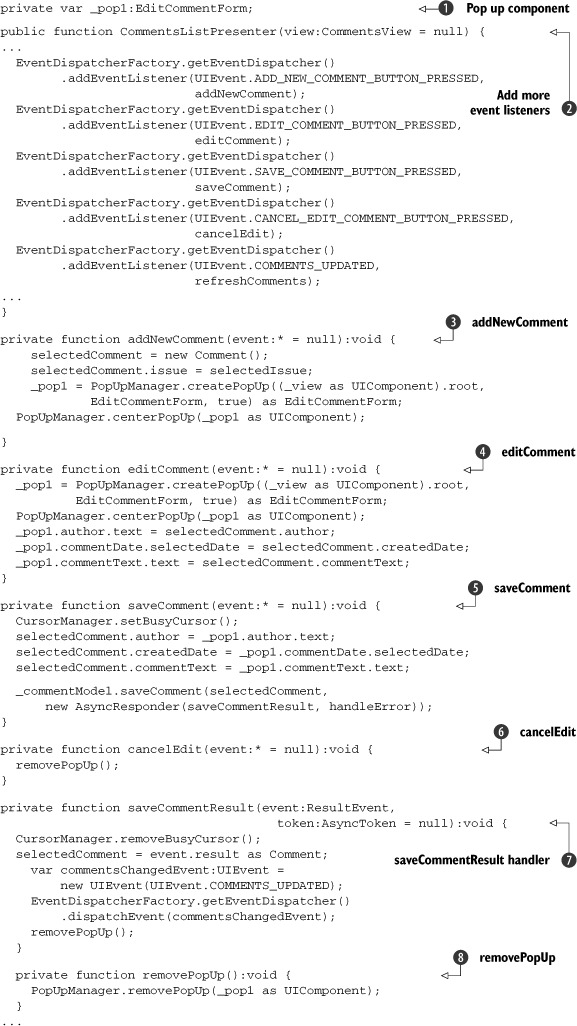
Change the CommentPresenter to declare a member variable for the pop up itself ![]() . Next add event listeners
. Next add event listeners ![]() to respond to user clicks on the buttons on the CommentsView and the pop up you’re going to create.
to respond to user clicks on the buttons on the CommentsView and the pop up you’re going to create.
Define an event handler for the Add New Comment ![]() button, set the selected comment to a brand new comment and create the pop up using the PopupManager. The call to createPopUp takes three parameters: the component that will be the parent of the pop up, pop up class, and whether or not the pop up
should be modal. Set the parent for the pop up to be the root application component so that when you call centerPopUp on the PopUpManager in the next line it will center relative to the whole application instead of to the CommentView.
button, set the selected comment to a brand new comment and create the pop up using the PopupManager. The call to createPopUp takes three parameters: the component that will be the parent of the pop up, pop up class, and whether or not the pop up
should be modal. Set the parent for the pop up to be the root application component so that when you call centerPopUp on the PopUpManager in the next line it will center relative to the whole application instead of to the CommentView.
The next event handler, editComment ![]() starts out in a manner similar to the addNewComment handler. You create a pop up using the PopUpManager and center it, then update the fields in the pop up with the values from the currently selected comment. When the user clicks
the Save Comment button in the pop up, the saveComment
starts out in a manner similar to the addNewComment handler. You create a pop up using the PopUpManager and center it, then update the fields in the pop up with the values from the currently selected comment. When the user clicks
the Save Comment button in the pop up, the saveComment ![]() handler is called. You then take all the values from the pop up and update the currently selected comment and make a call
to the CommentModel to save the comment. When the user clicks the Cancel Changes button on the pop up, the cancelEdit
handler is called. You then take all the values from the pop up and update the currently selected comment and make a call
to the CommentModel to save the comment. When the user clicks the Cancel Changes button on the pop up, the cancelEdit ![]() method is called, where you remove the pop up.
method is called, where you remove the pop up.
When the result comes back from the call to save the comment, the saveComment-Result handler ![]() is called. There you update the selected comment with the result from the web service call, then trigger the List to update by dispatching an event signaling that the comments have changed and remove the pop up
is called. There you update the selected comment with the result from the web service call, then trigger the List to update by dispatching an event signaling that the comments have changed and remove the pop up ![]() .
.
4.8.2. Updating the CommentModel
Next you add another method to the CommentModel to call the web service and save a comment.
Listing 4.17. CommentModel.as
...
public function saveComment(comment:Comment,
                              responder:IResponder):void {
    var token:AsyncToken = _commentService.save(comment);
    token.addResponder(responder);
  }
...
Listing 4.17 shows the method you add to the CommentModel to save comments. This method is just like every other call we’ve made to the WebService. It delegates the call to the web service and adds a responder to the token so the application can react when the result comes back from the asynchronous call to the web service.
4.8.3. Creating the pop-up component
Now you can create the actual pop up component that you’ll use to create new comments as well as edit existing ones. Even though you’re instantiating the pop up in ActionScript by making calls to the PopUpManager, it’s easiest to define this actual component in MXML just as with all the other View components. Listing 4.18 shows the contents of the EditCommentForm.mxml file defining the pop up.
Listing 4.18. EditCommentForm.mxml

The code for the pop up looks similar to the DetailsView for the issues. The main difference is this component extends the TitleWindow ![]() component instead of the Panel component. Most of the pop up windows you’ll create will extend this component. You then define a couple of methods
component instead of the Panel component. Most of the pop up windows you’ll create will extend this component. You then define a couple of methods ![]() ,
, ![]() to react to the button clicks of the pop up to dispatch UIEvents for the application to listen for. Just as with the DetailView, you use the Form component
to react to the button clicks of the pop up to dispatch UIEvents for the application to listen for. Just as with the DetailView, you use the Form component ![]() for convenient layout of the form fields and labels for the pop up. You then create a ControlBar
for convenient layout of the form fields and labels for the pop up. You then create a ControlBar ![]() to hold the Save Comment and Cancel buttons.
to hold the Save Comment and Cancel buttons.
4.8.4. Updating CommentsListView
The only thing left is to update the CommentsListView to dispatch the necessary events for the Add Comment and Edit Comment buttons.
Listing 4.19. Updated CommentListView.mxml
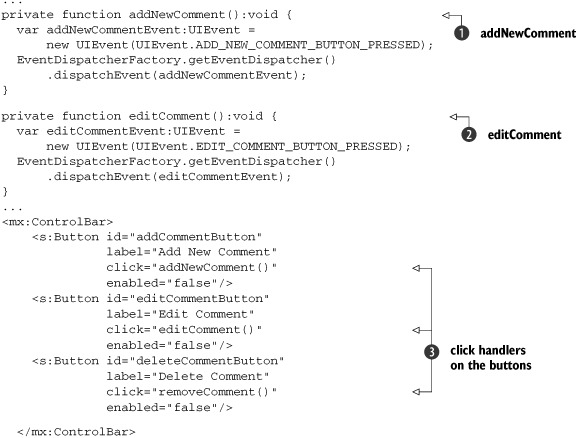
The first two changes to the CommentsListView are adding methods ![]() ,
, ![]() to be called when the Add New Comment and Edit Comment buttons are clicked. These will create and dispatch UIEvents like every other view you’ve defined so far. Then you update the buttons themselves
to be called when the Add New Comment and Edit Comment buttons are clicked. These will create and dispatch UIEvents like every other view you’ve defined so far. Then you update the buttons themselves ![]() so that they will call the methods you defined when they are clicked.
so that they will call the methods you defined when they are clicked.
4.9. Summary
In this chapter you explored the architectural elements that make up a well-designed, flexible, and maintainable RIA. You learned how to apply the MVP pattern to the code and how following that pattern, you effectively separate the areas of concern into their isolated parts. After you abstracted the calls to external services in the Model, you discovered how easy it would be to potentially replace this portion of the code without affecting any other part of the code.
In the next chapter you’ll build upon what you’ve assembled in this chapter and introduce the Spring BlazeDS Integration framework and BlazeDS remoting.