
Chapter 5. BlazeDS remoting and logging
- Building a BlazeDS Configuration Module
- Flex and Java communication with BlazeDS
- Spring BlazeDS Integration framework
- Logging events and performance statistics
In previous chapters you built a Flex client application using the MVP design pattern and connected it to Java through web services. Now you’re going to move from XML/HTTP web services and try remoting.
For Action Message Format communication, or AMF, Flex provides the RemoteObject component that uses Adobe’s own AMF binary protocol to communicate with the server. This means you’ll need a process running on the server side, such as BlazeDS, that understands how to serialize and deserialize the AMF protocol.
In the next section we introduce you to BlazeDS and begin integrating with our sample application. We’ll be using the FlexBugs sample application but it would be equally useful to wire up your own slice of functionality to see it work for your own purposes.
5.1. Introducing BlazeDS
A Flex client typically runs in a web browser or through the AIR desktop application platform. BlazeDS comes into the technology stack for use when the client needs to communicate with a Java application on the server that is commonly powered by a service-oriented architecture (SOA). Figure 5.1 shows the basic anatomy of a BlazeDS application framework.
Figure 5.1. The BlazeDS architecture
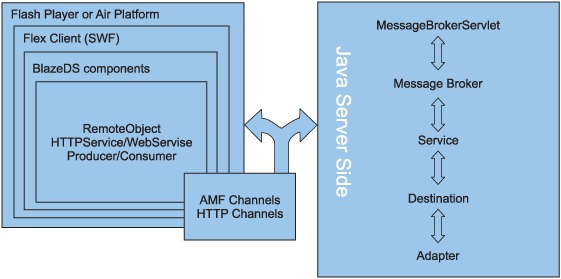
In a nutshell, BlazeDS is a collection of Java components that you can deploy with your web application for AMF/HTTP communication between Flex and Java. BlazeDS also supports messaging. BlazeDS is basically a subset of the commercial Flex Data Services offering from Adobe, and although you can do many things with BlazeDS, certain functions like clustering and advanced binding techniques can only be accomplished with the full-blown Flex Data Services.
Note
In Adobe’s words, BlazeDS is the server-based Java remoting and web messaging technology that enables developers to easily connect to back-end distributed data and push data in real-time to Adobe® Flex® and Adobe AIR™ applications for more responsive rich Internet application (RIA) experiences.
You may be asking, “Why would I use BlazeDS instead of web services?” One of the biggest advantages to using the AMF protocol for communication is performance. Adobe’s James Ward put together a nice application called BlazeBench (http://www.jamesward.com/wordpress/2007/12/12/blazebench-why-you-want-amf-and-blazeds/), which benchmarks methods of communicating to the server side from a web application, including Flex, and displays the different aspects of the transaction. Figure 5.2 shows a sample output from BlazeBench.
Figure 5.2. Comparing performances of various methods of transferring data from the server side to the client
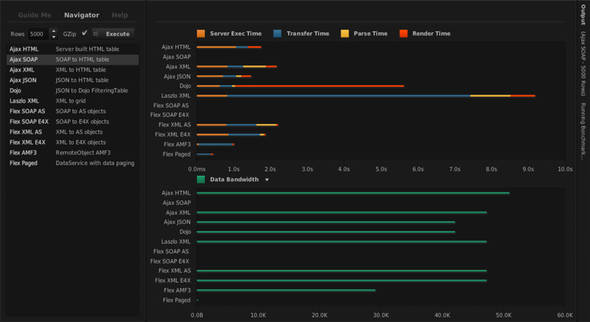
It may be difficult to see in the screenshot, but the total execution time for an operation using Flex AMF3 is by far quicker for round-trip time to the server, and it has the smallest data bandwidth for the transmission as well as the shortest parse time.
5.2. Getting BlazeDS
You’re in luck if you are using Maven to build your web application. After much persistence from the development community, there are now BlazeDS JARs in the main Maven repository. Add the dependencies shown in listing 5.1 in your pom.xml to include the BlazeDS libraries in your application and they are downloaded for you.
Listing 5.1. Adding BlazeDS to your pom.xml
<dependency>
    <groupId>com.adobe.blazeds</groupId>
       <artifactId>blazeds-core</artifactId>
       <version>3.2.0.3978</version>
    </dependency>
    <dependency>
        <groupId>com.adobe.blazeds</groupId>
        <artifactId>blazeds-common</artifactId>
        <version>3.2.0.3978</version>
    </dependency>
    <dependency>
        <groupId>com.adobe.blazeds</groupId>
        <artifactId>blazeds-proxy</artifactId>
        <version>3.2.0.3978</version>
    </dependency>
    <dependency>
        <groupId>com.adobe.blazeds</groupId>
        <artifactId>blazeds-remoting</artifactId>
        <version>3.2.0.3978</version>
    </dependency>
    <dependency>
        <groupId>org.springframework.flex</groupId>
        <artifactId>spring-flex</artifactId>
        <version>1.0.0.RELEASE</version>
    </dependency>
We’ve also included the Spring-Flex artifact because you’re going to use this framework for communicating with server-side destinations. The Spring BlazeDS Integration reduces the complexity in configuring BlazeDS.
For those not using Maven, you have to jump through a couple of hoops to get the proper libraries in your application. Adobe doesn’t provide the JAR files directly on the BlazeDS downloads page (http://opensource.adobe.com/wiki/display/blazeds/Release+Builds); it provides only the binary distribution as a WAR file, a turnkey solution which contains a ready-to-use Tomcat instance with sample applications, and a source download. The easiest way to get the JAR is to get the WAR distribution and extract them out of the WEB-INF/lib directory. Thankfully everything you need to add to your web application is there including all the dependencies. Figure 5.3 shows the libraries contained in the WEB-INF/ lib directory.
Figure 5.3. BlazeDS libraries and their dependencies

Now let’s get BlazeDS connected up in a more modular way with Maven.
5.3. Building a BlazeDS configuration Maven module
To share configuration dependencies between the Java web application and the Flex client you’re going to create a BlazeDS configuration module. The directory structure will look like the one in figure 5.4. You can create this module at the same level as the flex-bugs-web module and the flex-bugs-ria module.
Figure 5.4. BlazeDS configuration module project structure
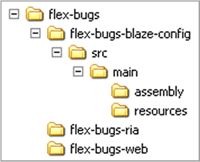
As you can see the only thing needed is the resources directory for the BlazeDS configuration files and the POM descriptor and a Maven assembly. Remember that the project structure can be generated much as was demonstrated in chapters 2 and 3. If you don’t generate them with the Maven archetype you must specify in the top-level POM (flex-bugs) a new module, and you must associate the BlazeDS configuration as a dependency for the other projects.
Next modify the module’s POM descriptor file.
Listing 5.2. BlazeDS configuration module POM

Because you created this module only to share its resources between the client and server modules you can specify the packaging
type of pom ![]() and specify that you’ve chosen to use the maven-assembly-plugin
and specify that you’ve chosen to use the maven-assembly-plugin ![]() to zip up resources
to zip up resources ![]() during the package phase
during the package phase ![]() . This POM basically instructs Maven to collect into a zip file the resources you need to share.
. This POM basically instructs Maven to collect into a zip file the resources you need to share.
Listing 5.3 shows the contents of the resources.xml descriptor file found in the src/main/assembly folder of the flex-bugs-blaze-config module.
The Maven framework automatically installs and deploys anything built through the context of an assembly. For installation, Maven installs the artifact(s) into your local repository located typically in the .m2 directory, which is usually found in your home directory. Maven deploys artifacts if the distribution management is specified with snapshot or release repositories defined. For deployment, a valid Maven repository, like Sonatype’s own Nexus repository, is required.
Listing 5.3. resources.xml
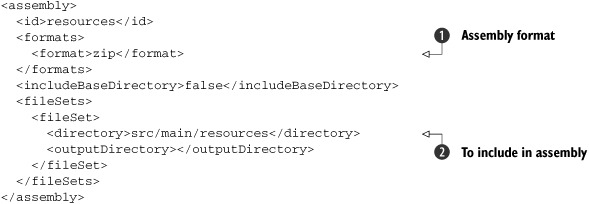
This assembly instructs Maven to create a zip file ![]() with the files listed in the fileset
with the files listed in the fileset ![]() . That is where you’ll be adding our two BlazeDS configuration files that need to be shared across modules.
. That is where you’ll be adding our two BlazeDS configuration files that need to be shared across modules.
5.3.1. Configuring BlazeDS
BlazeDS uses a couple of key configuration files that by convention are put in a flex folder under WEB-INF. You could put them wherever you like, but by placing them under the WEB-INF folder, you make them accessible only to your web application, and you can feel safe knowing any sensitive information, such as passwords in your proxy-config.xml, are safe from prying eyes.
The first file we’ll look at is services-config.xml.
Listing 5.4. services-config.xml
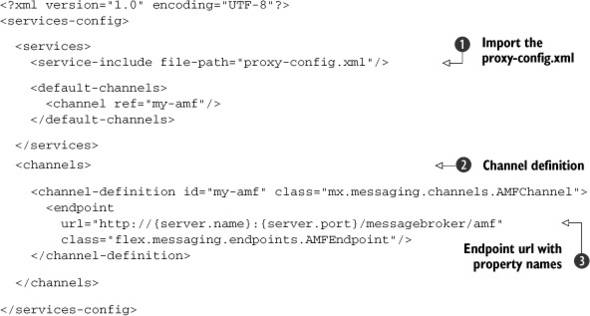
This is how the basic services-config.xml file should look for BlazeDS. There are a couple of sections to note here. First
you tell the services-config.xml file to import the proxy-config.xml ![]() and where to find it. Next in the channels definition
and where to find it. Next in the channels definition ![]() you define an AMF channel and point it at a servlet that you’ll define in the web.xml later.
you define an AMF channel and point it at a servlet that you’ll define in the web.xml later.
It’s also possible to use properties for the channel definition that transform into their real values when the application
starts. It’s common to do this for the endpoint url attribute ![]() . Using the {server.name} and {server.port} properties allows the application to be ported without having to hard code different static values each time it needs to
be deployed in a different environment. Refer to the BlazeDS documentation at http://opensource.adobe.com/wiki/display/blazeds/Developer+Documentation if you need more information on how to tweak the configuration.
. Using the {server.name} and {server.port} properties allows the application to be ported without having to hard code different static values each time it needs to
be deployed in a different environment. Refer to the BlazeDS documentation at http://opensource.adobe.com/wiki/display/blazeds/Developer+Documentation if you need more information on how to tweak the configuration.
Whenever you attempt to receive data from a remote service, Flash Player checks the domain name of the remote service location and compares it to the domain name of your Flex application’s location. If the two do not match, the data cannot be loaded from the remote service. The easiest way to remedy this situation is to host your Flex application on the same domain as your remote services. If this is not possible you have a few options. You can create a crossdomain.xml file to allow Flash applications outside of your domain to use the remote services. You can create a servlet in your web application to act as a proxy for the Flash application, or you can configure BlazeDS to do this by using the proxy-config.xml.
The last configuration file we’ll examine for now is proxy-config.xml.
Listing 5.5. proxy-config.xml
<?xml version="1.0" encoding="UTF-8"?>

<service id="proxy-service"
         class="flex.messaging.services.HTTPProxyService">

  <properties>
    <connection-manager>
      <max-total-connections>100</max-total-connections>
      <default-max-connections-per-host>2</default-max-connections-per-host>
    </connection-manager>

    <allow-lax-ssl>true</allow-lax-ssl>
  </properties>

  <adapters>
    <adapter-definition id="http-proxy"
       class="flex.messaging.services.http.HTTPProxyAdapter"
       default="true"/>
    <adapter-definition id="soap-proxy"
       class="flex.messaging.services.http.SOAPProxyAdapter"/>
  </adapters>

  <default-channels>
    <channel ref="my-amf"/>
  </default-channels>

  <destination id="DefaultHTTP">
  </destination>

</service>
In the proxy-config.xml file you can configure any server-side proxies you need to leverage, if, for instance, you’re communicating with web services outside your domain and have no control over placing a crossdomain.xml file on the server.
With BlazeDS configured and ready to go, you can now get on with the tasks of modifying some of your services to communicate via AMF.
Great question! The BlazeDS examples in this book take advantage of a brand new Spring BlazeDS Integration framework brought to us by SpringSource. Spring BlazeDS Integration allows you to set up remoting destinations by annotating a Java class and specific methods that need to be exposed to Flex through remoting. You can still choose to hand-wire the XML instead of using the annotations but we recommend the use of the Spring BlazeDS Integration annotations and will demonstrate them in this chapter.
Visit the BlazeDS developer documentation if your project requires the remoting-config.xml at http://opensource.adobe.com/wiki/display/blazeds/Developer+Documentation
In the next sections we’re going to start off simple by showing you how to connect to a POJO on the server side and get more complicated and leverage the powerful Spring Framework to communicate with a fully injected Spring bean.
Add the BlazeDS config module to the top-level POM
To configure the top-level POM, open and edit the pom.xml file in the flex-bugs directory and add the flex-bugs-blaze-config module.
Listing 5.6. Adding BlazeDS config module to the top-level pom.xml
<modules>
    <module>flex-bugs-blaze-config</module>
    <module>flex-bugs-ria</module>
    <module>flex-bugs-web</module>
</modules>
Next associate the dependency with the flex-bugs-web module and flex-bugs-ria module.
Update the Flex and Java web modules
Now you can add the configuration module to the other projects as a dependency by editing their respective POM files for the flex-bugs-web/pom.xml.
Listing 5.7. Adding the BlazeDS config dependency to the Java web module

As you can see, you add the new dependency to the dependencies element ![]() in each module’s pom and you are done. Because the scope is provided, it will not add the resources
in each module’s pom and you are done. Because the scope is provided, it will not add the resources ![]() to the WAR. You had to specify the type
to the WAR. You had to specify the type ![]() because it’s a zip and not the default type. You’ll be getting them from the Flex module by editing the POM descriptor in
the flex-bugs-ria module.
because it’s a zip and not the default type. You’ll be getting them from the Flex module by editing the POM descriptor in
the flex-bugs-ria module.
Listing 5.8. Adding the BlazeDS config dependency to the Flex module

There are many ways to share configurations, and as you see, you can use the maven-dependency-plugin ![]() . You execute the unpack-dependencies goal
. You execute the unpack-dependencies goal ![]() during the generate-resources phase
during the generate-resources phase ![]() and must choose an output directory
and must choose an output directory ![]() in order to unzip the file where you want. You may have noticed that you used the built-in maven property ${project.build.directory}, which equates to the location of the target directory. Now you must indicate what to unpack. This is where you specify the
flex-bugs-blaze-config artifact
in order to unzip the file where you want. You may have noticed that you used the built-in maven property ${project.build.directory}, which equates to the location of the target directory. Now you must indicate what to unpack. This is where you specify the
flex-bugs-blaze-config artifact ![]() .
.
After the configuration is completed for the shared configuration approach, you can start integrating Flex with Java through the use of BlazeDS AMF remoting!
5.4. Exposing Java services to Flex remoting
In this section you’ll demonstrate how to configure and expose Java services to Flex through the use of BlazeDS and Spring annotations. First you’ll modify the web module configuration, then modify the Java code. For demonstration purposes you’ll use the FlexBugs sample application.
5.4.1. Web module configuration updates
First you’ll modify the flex-bugs-web module’s configuration to enable it for remoting. You’ll start with the applicationContext.xml file located in the /flex-bugs-web/ src/main/webapp/WEB-INF directory.
Listing 5.9. ApplicationContext.xml
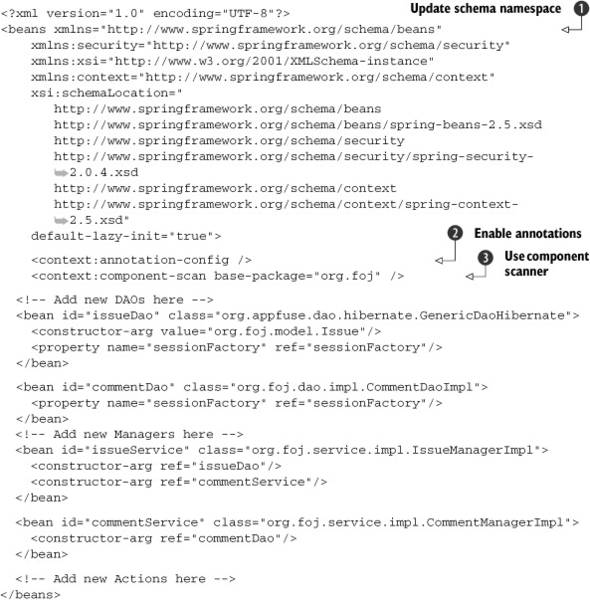
To take advantage of the Spring BlazeDS Integration you must add the appropriate schema changes and namespace elements ![]() . Because you’ll be using annotations to expose your services to BlazeDS remoting destinations, you must enable annotations
. Because you’ll be using annotations to expose your services to BlazeDS remoting destinations, you must enable annotations![]() and use the component scanner
and use the component scanner ![]() to help Spring find the annotations you’re going to define.
to help Spring find the annotations you’re going to define.
Next, by convention, you must create a flex-spring-servlet.xml configuration file, as seen in listing 5.10, because the framework depends on it.
Note
The naming of the flex-spring-servlet.xml file is important because the framework scans for it by convention, and the application will fail to start up properly without it.
Later, you’ll use the flex-spring-servlet.xml file to help configure the messaging service.
Listing 5.10. flex-spring-servlet.xml plumbing
<?xml version="1.0" encoding="UTF-8"?>
<beans xmlns="http://www.springframework.org/schema/beans"
    xmlns:flex="http://www.springframework.org/schema/flex"
    xmlns:xsi="http://www.w3.org/2001/XMLSchema-instance"
    xsi:schemaLocation="
        http://www.springframework.org/schema/beans
        http://www.springframework.org/schema/beans/spring-beans-2.5.xsd
        http://www.springframework.org/schema/flex
        http://www.springframework.org/schema/flex/spring-flex-1.0.xsd">

</beans>
Last, you need to add a new servlet definition to the web.xml so that your Flex application can communicate with the server-side application. Listing 5.11 shows the changes that need to be made to the web.xml of our web application module.
Listing 5.11. web.xml

This is a typical Java web application servlet mapping where you define a servlet name ![]() and a servlet class
and a servlet class ![]() to dispatch actions to whenever a URL pattern
to dispatch actions to whenever a URL pattern ![]() match is found.
match is found.
Now let’s begin working with code by modifying the server-side classes.
5.4.2. Expose AMF remoting destinations
Connecting to POJOs on the server side is trivial after you’ve got BlazeDS configured properly. To illustrate connecting to a POJO from Flex, we’re going to use the Flex-Bugs application by exposing the IssueManager interface to Flex remoting using the Spring BlazeDS Integration framework.
Updates to Issue code
This is the code for the IssueManagerImpl that we’ll be connecting to.
Listing 5.12. IssueManager.java

As you can see, not much had to change to expose the IssueService methods to Flex. The first step was to import the Spring BlazeDS Integration classes needed ![]() . The Spring classes help by supplying the @RemotingDestination and @RemotingInclude annotations.
. The Spring classes help by supplying the @RemotingDestination and @RemotingInclude annotations.
Next, you added the @RemotingDestination “my-amf” ![]() . The @Remoting-Destination must match the one defined in the services-config.xml BlazeDS configuration file. This annotation exposes this class as a
destination for any Java class that implements the IssueManager interface. This means that the IssueManagerImpl Java class, the class that implements the IssueManager, will be exposed as an AMF remote service and not just XML/HTTP.
. The @Remoting-Destination must match the one defined in the services-config.xml BlazeDS configuration file. This annotation exposes this class as a
destination for any Java class that implements the IssueManager interface. This means that the IssueManagerImpl Java class, the class that implements the IssueManager, will be exposed as an AMF remote service and not just XML/HTTP.
The Spring BlazeDS Integration framework removed the need for having to define this metadata through the remoting-config.xml configuration file. You don’t use a remoting-config.xml file with the BlazeDS Integration framework.
You can now annotate each method that you need to expose with the @RemotingInclude ![]() annotation and you are done! The @RemotingInclude annotation exposes the method over the @RemotingDestination.
annotation and you are done! The @RemotingInclude annotation exposes the method over the @RemotingDestination.
If needed, the Spring BlazeDS Integration framework’s remoting package also provides a @RemotingExclude annotation for intentionally excluding methods. Now let’s move on to making changes to the Flex client to take advantage of the exposed AMF service.
Updates to comments code
Now that you have everything in place for the issue code, you’ll need to make the same types of changes to the CommentManager interface. The following listing shows the CommentManager.java class changes.
Listing 5.13. CommentManager.java
package org.foj.service;

import org.foj.model.Comment;
import org.springframework.flex.remoting.RemotingDestination;
import org.springframework.flex.remoting.RemotingInclude;

import javax.jws.WebService;
import java.util.List;

@WebService
@RemotingDestination(channels = {"my-amf"})
public interface CommentManager {

  @RemotingInclude
  List<Comment> findCommentsByIssueId(Long issueId);

  @RemotingInclude
  void deleteAllCommentsForIssueId(Long issueId);

  @RemotingInclude
  Comment get(Long id);

  @RemotingInclude
  Comment save(Comment comment);

  @RemotingInclude
  void remove(Long id);

}
As you can see you didn’t need to change any of the application code to expose the CommentManager to remoting. All you had to do was add the necessary imports, include the @RemotingDestination, and add the appropriate @RemotingInclude annotations for the methods you need exposed.
Now you have a Java server side that is set up for BlazeDS remoting. You tackled much of the Java configuration through Spring’s robust Flex BlazeDS Integration framework and its extremely useful annotations.
5.5. Connecting to Java with BlazeDS
With the Java remoting services ready to go you can begin the work on the Flex client to connect to the exposed service objects and methods. Let’s start with the Issue object.
Listing 5.14. Issue.as

That wasn’t complicated. You only had to associate this object with the server side equivalent by using the RemoteClass annotation ![]() which you need because it allows you to map domain objects between Flex and Java by specifying the Java package and class
name.
which you need because it allows you to map domain objects between Flex and Java by specifying the Java package and class
name.
Tip
Without correctly specifying the RemoteClass, any attempts at persisting Issue objects will fail because BlazeDS will not know what server-side object the Flex object is bound to.
Next you need to modify the IssueModel class to call the POJO.
Listing 5.15. IssueModel.as

Again a few things have to change, and yet only minor ones are required to take advantage of the performance increases of
BlazeDS remoting. In the IssueModel you are now using the Flex RemoteObject ![]() for communication to the issueService instead of the WebService object. When you construct a new IssueModel you set the RemoteObject destination
for communication to the issueService instead of the WebService object. When you construct a new IssueModel you set the RemoteObject destination ![]() as the issueService you defined earlier in our applicationConfig.xml. That’s it. Really!
as the issueService you defined earlier in our applicationConfig.xml. That’s it. Really!
Note
Names of the RemoteObject instance variables map to the bean name in the Spring applicationContext.xml file. Be sure these names are correct!
With all of that out of the way you should be able to run your application and see that it’s now populating the DataGrid with data from our issueService through BlazeDS rather than the web services you created in chapter 4.
5.6. Logging
Since the inception of programming, developers have always found ways to enable applications to communicate what they are doing. This comes in all different forms, from logging basic information to fatal exceptions during the application runtime. With the FlexBugs sample application, you need to log the Java server-side events and the BlazeDS-specific events, and gather performance statistics.
Building the FlexBugs application with AppFuse simplified this task by configuring the popular log4j framework for logging Java application messages. Now you must inform the log4j framework that you want to log even more for BlazeDS.
5.6.1. BlazeDS logging
Adding BlazeDS into the mix was beneficial. But adding any library or framework to benefit the application presents new challenges; you must collect information from the library to better understand what is happening when you use it.
Thankfully, SpringSource recognized this with the Spring BlazeDS Integration framework and added a new logging object to its core package. The CommonsLoggingTarget class allows for automatic logging of events from BlazeDS into the application’s existing logging configuration.
Configure log4j for BlazeDS file logging
You have to configure an application to print messages to the console or even a log file in a couple of places. The first place, as seen in listing 5.16, is the log4j.xml configuration file found in the flex-bugs-web module, which can be found in the flex-bugs-web/src/main/resources directory.
Listing 5.16. log4j.xml
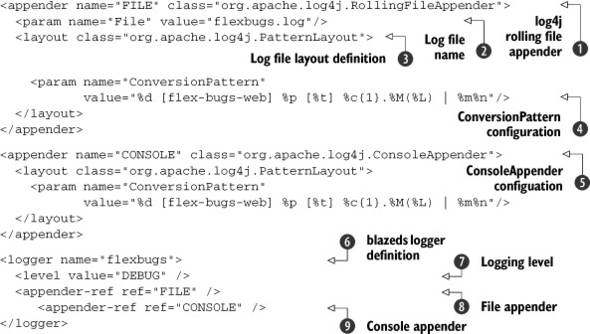
As seen in listing 5.16 the log4j configuration can be trivial and yet extremely robust. Log4j itself allows for outputting to both the console and
to a file. In the example you specified a RollingFileAppender ![]() so you can keep log messages and continue to add to that file as you use the application.
so you can keep log messages and continue to add to that file as you use the application.
You must specify the log file name as flexbugs.log ![]() . Log4j requires the file parameter and doesn’t provide a default. It’s also possible to specify a path to the file in this
parameter. It will place the flexbugs.log file at the root of the flex-bugs-web directory.
. Log4j requires the file parameter and doesn’t provide a default. It’s also possible to specify a path to the file in this
parameter. It will place the flexbugs.log file at the root of the flex-bugs-web directory.
Log4j also enables various layout styles. By choosing to use the PatternLayout ![]() you can specify what you want your messages to look like and what information should be in the log message. You do this by
defining the ConversionPattern parameter
you can specify what you want your messages to look like and what information should be in the log message. You do this by
defining the ConversionPattern parameter ![]() . There are other patterns to choose from but we chose this one to give us additional flexibility. The first thing to notice
about the log message pattern is that it will prefix each message with [flex-bugs-web]. It then assigns other parameters for printing the message. For more on log4j configuration go to http://www.scribd.com/doc/7679107/Log4j-Quick-Reference.
. There are other patterns to choose from but we chose this one to give us additional flexibility. The first thing to notice
about the log message pattern is that it will prefix each message with [flex-bugs-web]. It then assigns other parameters for printing the message. For more on log4j configuration go to http://www.scribd.com/doc/7679107/Log4j-Quick-Reference.
You also include an appender for the console ![]() . Console appending is especially helpful during software development. Writing the logs to a file is valuable not just for
development but also for production environments.
. Console appending is especially helpful during software development. Writing the logs to a file is valuable not just for
development but also for production environments.
Finally, you need to create the logger itself. Here you created a logger named blazeds ![]() . You configure the logger to output at the DEBUG level
. You configure the logger to output at the DEBUG level ![]() and append the messages to both our RollingFileAppender and the ConsoleAppender by their respective reference names FILE
and append the messages to both our RollingFileAppender and the ConsoleAppender by their respective reference names FILE ![]() and CONSOLE
and CONSOLE ![]() . Log4j is ready to create a log file for your application.
. Log4j is ready to create a log file for your application.
Configure BlazeDS to output to log4j
Setting up the logging of BlazeDS is a two-step process. Now that you have a logger available specifically for BlazeDS you can configure BlazeDS to work with log4j. Listing 5.17 shows the necessary changes to the services-config.xml file, located in the directory.
Listing 5.17. services-config.xml
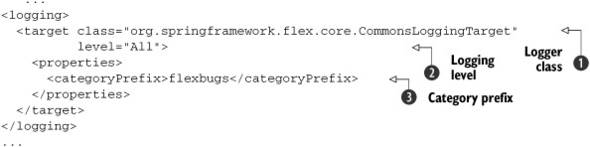
The BlazeDS configuration is simple. You specify the Spring framework’s CommonsLoggingTarget class ![]() , the logging level you desire
, the logging level you desire ![]() , and the categoryPrefix which points to the log4j.xml logger named flexbugs
, and the categoryPrefix which points to the log4j.xml logger named flexbugs ![]() . The CommonsLoggingTarget can be configured to output more—or less—information from BlazeDS events through its properties and logging categories by
using filters.
. The CommonsLoggingTarget can be configured to output more—or less—information from BlazeDS events through its properties and logging categories by
using filters.
Several categories are available for helping to filter out specific logging messages. Logging can be performance-intensive so it’s wise to log only what you absolutely need to provide the best support for the application. For more on the categories available or to know what you can filter out of the logs, see the API documentation for the CommonsLoggingTarget at http://static.springsource.org/spring-flex/docs/1.0.x/javadoc-api/org/springframework/flex/core/CommonsLoggingTarget.html.
Now that logging has been configured for BlazeDS it’s time to see the results.
View the FlexBugs log file
If you fire up your sample application you’ll find a log file available. If you’re using the FlexBugs samples and run the command mvn clean jetty:run-war on the flex-bugs-web module, after performing an mvn clean install on the flex-bugs-config module, you’ll find the log file in the flex-bugs-web directory.
Figure 5.5 shows the logging messages going to the console.
Figure 5.5. Console log of BlazeDS events
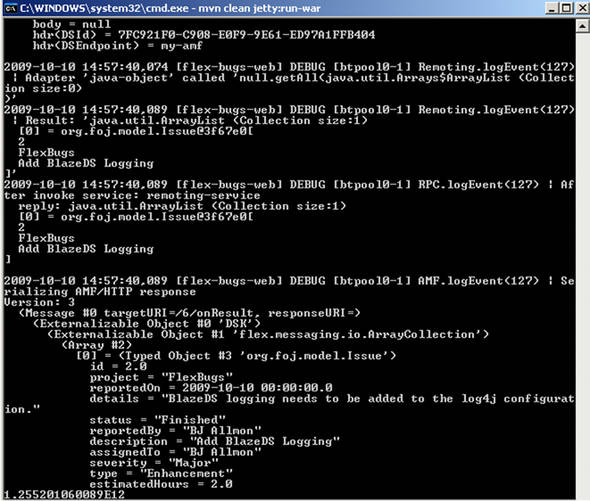
Toward the bottom of figure 5.5 you’ll find an AMF log event showing an issue completed for adding the BlazeDS logging to the log4j configuration. In that event you can see that the issue was serialized through AMF/HTTP with all the issue details. If you open the log file you’ll find the same results and logging of the BlazeDS events.
5.6.2. Built-in BlazeDS benchmarking
One nice feature of BlazeDS is its built-in ability to acquire performance results on its processing of messages. In this example you’ll configure the BlazeDS services-config.xml to retrieve the message times and size. These measurements are great for development but shouldn’t be enabled for production because they cause performance degradation. This may seem counterproductive but it’s not. It’s good to assure that you have the best performance possible for your production environments at all times to keep the users delighted.
To enable BlazeDS performance collection, open up the services-config.xml for editing. Listing 5.18 shows the changes to the my-amf configuration.
A developer must choose wisely the messages that are logged in a production environment. You shouldn’t keep log messages in an application that were only troubleshooting messages or sloppy in loop count logging that spits out a bunch of unimportant things for every element in a collection of objects. To put it simply, logging affects performance, especially when writing out to file IO. Make sure that debugging is not enabled in production unless it’s absolutely necessary. Also be sure to only log INFO type messages when they are helpful or required.
Listing 5.18. services-config.xml
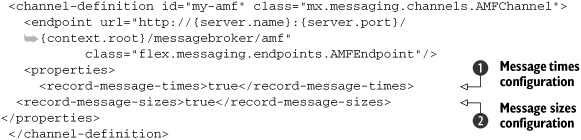
In listing 5.18 you enabled the performance tracking properties for recording both message times and sizes. It’s a simple Boolean that can be set to false for production environment configuration. Adding these properties allows for the automatic logging of this information. This is a great way to gain insight into the objects you’re sending back and forth between the client and server. If you were to create a new issue in Flex-Bugs you would see something like the display in figure 5.6.
Figure 5.6. BlazeDS MessagePerfomanceInfo in action
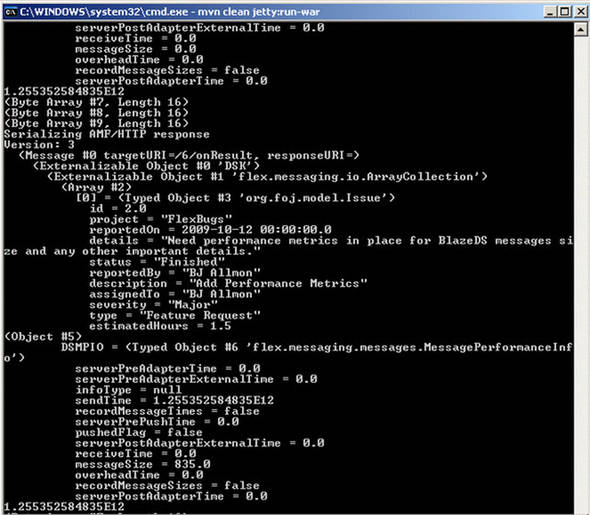
As seen in figure 5.6 you now have an additional log message directly under the insertion of a new issue for the project FlexBugs. The BlazeDS MessagePerformanceUtils class shows the sendTime and the messageSize that you defined in the services-config.xml. You can see that the sendTime is equal to 1.25ms and a message size of 835.0 bytes.
In general, the flex.messages.messaging.MessagePerformanceUtils class provides metrics that describe the size and timing of a message sent from a client to the server and its server response message. Performance information can be captured when the record-message-times and record-message-sizes are configured to TRUE. From there it’s possible to set up more performance-gathering metrics in the client. Configuring the client would mean creating a response acknowledgment or message handler.
Note
The BlazeDS development guide instructs developers to not activate more than one performance measurement at a time because of the extra performance hit that each measurement adds to the application runtime. Use them wisely. If you truly have performance issues you may consider other means for performance testing like an open source tool or commercial alternative. Using a separate tool for performance testing would allow the BlazeDS configuration to stay true to its production environment configuration during the performance testing.
For more on how to configure message performance logging through a message event handler refer to the BlazeDS development guide at http://livedocs.adobe.com/blazeds/1/blazeds_devguide/help.html?content=mpi_3.html.
5.7. Summary
In this chapter you refactored out the XML/HTTP web service implementation and replaced it with BlazeDS AMF remoting. The web service implementations had the least impact on the server side but required more work to be done on the client side, because we’re not receiving first class objects in the responses. When you switched to using BlazeDS to communicate with the server side you gained in performance without increasing the complexity of the application.
Using the Spring BlazeDS Integration framework reduced the amount of configuration typically required to set up remoting destinations. It also gave you a handful of useful annotations and other features that reduced the complexity of the application even more. As you’ll continue to see throughout the remainder of the book, the Spring BlazeDS Integration simplifies the code and makes building robust Flex and Java applications much easier.
You also configured logging to be sure that you can capture those important application activities in a log file. Setting up the logging for BlazeDS events was a simple task using both log4j and the Spring BlazeDS Integration framework logger class.
BlazeDS also enables the gathering of performance measurements on a channel service. With that you were able to pump performance stats on message size and time to your log file.
In the next chapter you’ll take the next step in evolving our Flex and Java communications and take advantage of real-time messaging between the two using BlazeDS messaging.