
Chapter 10. Testing your Flex application
- Unit testing with FlexUnit
- Mock testing with mock-as3
- Leveraging the hamcrest-as3 matchers
- Generating a test report
Every good programming book includes a discussion of unit testing. Whether you follow the practice of test-driven development, which the authors advocate, or write your tests after the fact, an automated suite of unit tests is a valuable accompaniment to your application. A comprehensive suite of unit tests proves to your customer that the code you wrote does what it’s supposed to do. It also provides developers making changes to your code both confidence that the changes will not break anything and up-to-date documentation in the form of unit tests. Written documentation can easily get out of sync with the implemented code; a good suite of passing unit tests should always be in sync with the code. You can think of your unit tests as a form of executable documentation that developers can use in the years to come.
10.1. Unit testing and TDD
If you’re not familiar with the practice of Test Driven Development (TDD), figure 10.1 shows the basic workflow. In a nutshell, you start by writing a failing unit test, then write only enough implementation code to make it pass. When you get a passing test, you start the process over again.
Figure 10.1. TDD workflow

Writing code this way has a couple of interesting side effects. The most obvious one is that your code is more likely to be written in a testable manner, because you’re starting with the tests first. A not so obvious effect of practicing TDD is that you add only code that is absolutely necessary, and less speculative coding occurs. There are a great many books about test-driven development available, including Test Driven: Practical TDD and Acceptance TDD for Java Developers, by Lasse Koskela (http://manning.com/koskela/).
It’s still easy to produce code that you don’t need in your application. Because you didn’t let the tests drive the code, you’ll have extraneous code, but it will be well tested extraneous code. One good way to ensure that you have only code and features that are relevant and required in your application is to practice a more refined technique of test-driven development called Presenter First, the main motivation behind the Model View Presenter pattern we introduced in chapter 4. The thinking behind the Presenter First approach is that your Presenter tests map closely to your user stories, and if you write only tests that map to your user stories, you’ll avoid much of the gold plating that we developers are often guilty of—sneaking in features that we think would be useful, but don’t appear in any of the requirements set forth by the customer. For a more thorough explanation of the Presenter First approach to development, read the article in Better Software magazine at http://www.atomicobject.com/files/BigComplexTested_Feb07.pdf.
In this chapter we use the unit testing framework FlexUnit, and more specifically the latest incarnation of the FlexUnit4, which brings the framework more in line with current unit testing frameworks available for Java such as JUnit4. Features introduced with this newest version of FlexUnit include:
- No need to inherit from the TestCase base class
- The addition of annotations for adding metadata to your test cases
- Easier asynchronous testing
- Introduction of Hamcrest matchers
For a comprehensive listing of all the new features in FlexUnit4, check out the documentation at http://docs.flexunit.org/index.php?title=FlexUnit4FeatureOverview. We won’t get into a lengthy discussion on FlexUnit and how to use the FlexUnit framework; instead, we’ll discuss the features as we introduce them in our examples.
One of the main purposes of unit testing is to try to narrow your scope of testing as much as possible, which is why it’s called unit testing. To do that you can use a mock testing framework to remove any external dependencies in the class you’re testing. By injecting these mocks into your class during unit testing, you’re able to test how your class interacts with its external dependencies without relying on the existence of those external dependencies. The mock testing framework we’ll be utilizing in this chapter is called mock-as3. The mock-as3 project is hosted via Google Code at http://code.google.com/p/mock-as3/.
Note
The mock-as3 framework is no longer being maintained but has been replaced by the Mockolate framework which can be found at http://github.com/drewbourne/mockolate.
To get started unit testing in our Flex application, we’ll need to make some changes to the project. Let’s get started.
10.2. Updating the project
Before we can start writing our first unit test, we’ll need to update the pom.xml for our flex-bugs-lib project to add the necessary unit testing libraries as dependencies and also the unit testing support for the FlexMojos plugin that we’re using for our builds. The following listing shows the updates that we need to add to our pom.xml.
Listing 10.1. Updated pom.xml
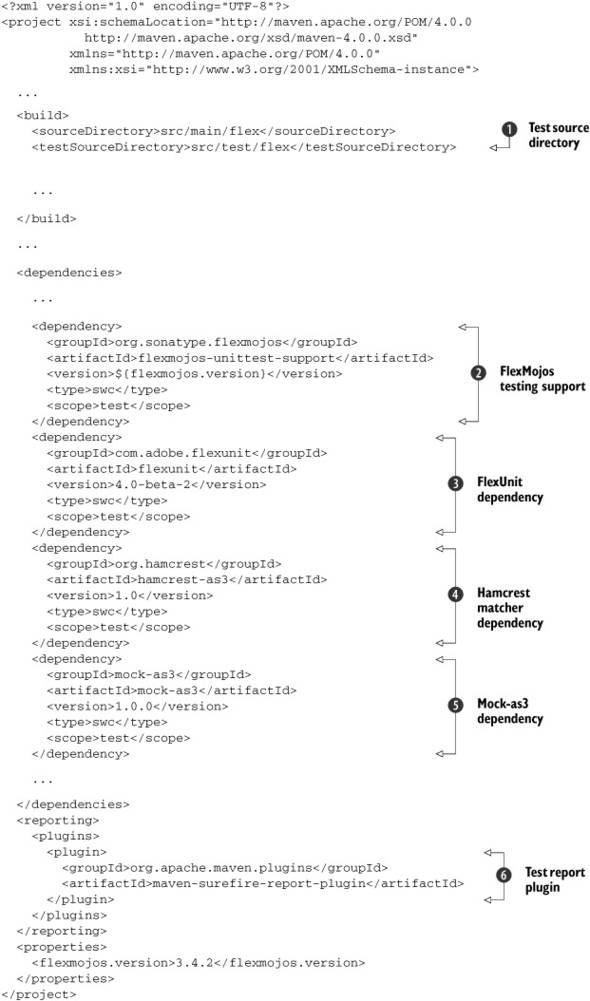
The first section of the pom.xml that needs to be modified is the section that tells Maven where your test sources are. You
override the default location of src/test/java with the location of src/test/flex ![]() to more closely follow the convention you’re following for your source code. Next you add a dependency on the FlexMojos unit
testing support library
to more closely follow the convention you’re following for your source code. Next you add a dependency on the FlexMojos unit
testing support library ![]() . Then you add dependencies on the FlexUnit4
. Then you add dependencies on the FlexUnit4 ![]() , the Hamcrest matcher library
, the Hamcrest matcher library ![]() , and the mock-as3 library
, and the mock-as3 library ![]() . You may also notice that you’ve defined the scope of these dependencies as having test scope. That way they will not be
included in the artifact that ultimately is deployed to your application server when you deploy your application. The last
thing you added to the pom.xml is the reporting plugin
. You may also notice that you’ve defined the scope of these dependencies as having test scope. That way they will not be
included in the artifact that ultimately is deployed to your application server when you deploy your application. The last
thing you added to the pom.xml is the reporting plugin ![]() , which gives you the ability to generate test reports for your unit tests.
, which gives you the ability to generate test reports for your unit tests.
The dependencies for the unit testing support and FlexUnit4 exist on the Sonatype Maven repository; however the Hamcrest and mock-as3 dependencies do not. You can either download those libraries and install them manually using the mvn install:install-file plugin or use the Maven repository we have set up for the sample code in our book using the Google Code repository.
Now that you’ve got the project set up and ready for testing, you’ll start looking at how to unit test your Flex application. To illustrate this you’re going to test the MasterPresenter, MasterView, and IssueModel. These classes are simple enough for us to keep our examples short and to the point, yet they contain enough functionality to properly illustrate most of the situations you’ll need to test. To start you’ll begin with testing the MasterPresenter.
10.3. Testing the Presenter
We’ve chosen to start our unit testing examples with testing the Presenter, because, as we stated earlier, the Presenter typically maps closest to your user stories, and the Presenter will often be the most complex part of the MVP triad because it has more responsibility than the other two parts. First you create the unit test class for your MasterPresenter. Create the package structure for the org.foj.presenter package under the src/test/flex folder inside the flex-bugs-lib project. Next create the MasterPresenterTest.as class inside this org.foj.presenter package. The first part of the code for the MasterPresenterTest class is shown in listing 10.2.
Listing 10.2. MasterPresenterTest.as
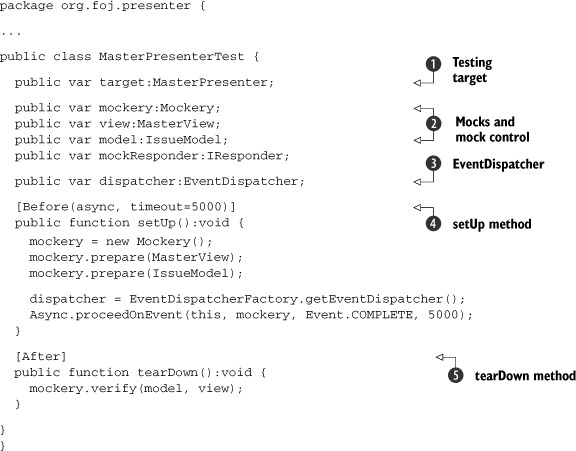
For those familiar with Java and JUnit this should look familiar. You name your test class with the convention of <ClassName>Test because this is the default pattern that Maven will use to look for test classes when running your tests during the build
process. You start with defining a few private member variables for the class you’re trying to test ![]() , the mock control and the mock objects you’ll need to interact with
, the mock control and the mock objects you’ll need to interact with ![]() , and your good friend the event dispatcher
, and your good friend the event dispatcher ![]() . Because most of your classes will use the event dispatcher from the EventDispatcherFactory, you’ll also need to use this in your tests to ensure that your events are properly dispatched and handled.
. Because most of your classes will use the event dispatcher from the EventDispatcherFactory, you’ll also need to use this in your tests to ensure that your events are properly dispatched and handled.
Next you create a setup method that will be run at the beginning of each test in your class ![]() . You named your method setUp merely out of habit—you could name it whatever you like. In the previous version of FlexUnit you had to override the setUp method from the base class; now the framework uses the [Before] annotation to know which method to use for its setup. You also add more metadata to the annotation to tell FlexUnit that
this test will use some asynchronous functionality and that it should time out after 5 seconds, meaning the test will fail
if it runs longer. This illustrates one of the potential pitfalls of testing with FlexUnit. If your unit tests are running
long, you may end up with false positive failures and you’ll find that periodically you’ll have tests that will time out and
fail for no reason.
. You named your method setUp merely out of habit—you could name it whatever you like. In the previous version of FlexUnit you had to override the setUp method from the base class; now the framework uses the [Before] annotation to know which method to use for its setup. You also add more metadata to the annotation to tell FlexUnit that
this test will use some asynchronous functionality and that it should time out after 5 seconds, meaning the test will fail
if it runs longer. This illustrates one of the potential pitfalls of testing with FlexUnit. If your unit tests are running
long, you may end up with false positive failures and you’ll find that periodically you’ll have tests that will time out and
fail for no reason.
Inside the setup method you set up a mock control by instantiating a new Mockery class. Then you tell the mock control to prepare the mocks by calling prepare() for each class that you’ll be mocking. The last step is to tell the test to wait until the mock control has finished preparing by calling the proceedOnEvent method and setting the event you want to proceed on to the complete event from your mockControl.
Then you define the counterpart to your setup method, the teardown method ![]() . As you did for the setup, you follow the convention of calling this method tearDown out of habit. The [After] annotation tells the framework to run this after every test method run. The only thing that you do inside your teardown method
is to call verify on your mocks to ensure that everything you expected the mocks to call was indeed called.
. As you did for the setup, you follow the convention of calling this method tearDown out of habit. The [After] annotation tells the framework to run this after every test method run. The only thing that you do inside your teardown method
is to call verify on your mocks to ensure that everything you expected the mocks to call was indeed called.
10.3.1. Testing refresh issues
Now that you’ve got the skeleton for your MasterPresenterTest written, let’s start with your first test. The first piece of functionality you’re going to test would probably come from a user story, the first part of which would read something like this:
- In order to ensure that the issues I’m viewing are up to date, when I click the Refresh button, the application should retrieve the issues from the server and refresh the data grid with the results.
The important part of this story is the when. The action identified in the when statement will need to be tested by your Presenter tests. The when that you will be testing is the part of the story that states when I click the Refresh button, the application should retrieve the issues from the server.
Listing 10.3. shouldCallGetIssuesFromModel
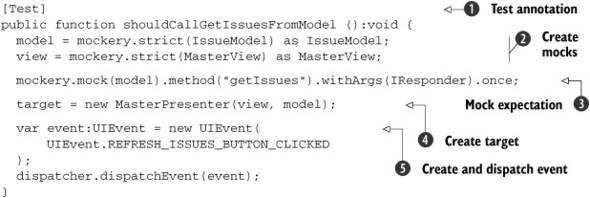
You start by annotating your test method with the [Test] annotation ![]() . FlexUnit4 utilizes this [Test] annotation to know which methods are your test methods. Next you create your mocks by calling the strict method on your mock control
. FlexUnit4 utilizes this [Test] annotation to know which methods are your test methods. Next you create your mocks by calling the strict method on your mock control ![]() passing in the class that you want to mock. You use strict mocks here so that if any methods are called on your mocks that
you don’t explicitly set up, your mock control will fail the test in the teardown when you call verify. You then set up the expectation on your mock
passing in the class that you want to mock. You use strict mocks here so that if any methods are called on your mocks that
you don’t explicitly set up, your mock control will fail the test in the teardown when you call verify. You then set up the expectation on your mock ![]() . The expectation syntax for mock-as3 is fairly self-explanatory, and most of the time will look similar to this.
. The expectation syntax for mock-as3 is fairly self-explanatory, and most of the time will look similar to this.
Let’s stop to analyze this line of code. The first method you’re going to mock is on the model, which is the mock for the IssueModel class. You’re expecting your code to call the getIssues method, and you’re going to pass in an argument of type IResponder and expect it only once. You could as easily put a concrete value or object in this expectation, and the mock framework would test the equality of what the method is called with. In this instance you can’t easily try to perform an exact match on the IResponder; you’re more interested in whether or not the method is called.
Next you create your target by calling the constructor and passing in the mocks that you created ![]() . Last you simulate the behavior that your view will exude. You create a new event of type REFRESH_ISSUES_BUTTON_CLICKED and dispatch it
. Last you simulate the behavior that your view will exude. You create a new event of type REFRESH_ISSUES_BUTTON_CLICKED and dispatch it ![]() .
.
For your code to compile, you need to change the constructor for your MasterPresenter class to allow injection of both the View and the Model.
Listing 10.4. Updated MasterPresenter

You first have to add in the ability to pass in an IssueModel to the MasterPresenter as well as the MasterView ![]() . You also are defaulting it to null, which means that you don’t need to change any of the code that you wrote earlier that doesn’t pass in this extra parameter.
That’s one of the nice things about being able to specify default parameters. Next you add a block of code to set the issueModel to either the value passed into the constructor, or instantiate a new one if nothing was passed in
. You also are defaulting it to null, which means that you don’t need to change any of the code that you wrote earlier that doesn’t pass in this extra parameter.
That’s one of the nice things about being able to specify default parameters. Next you add a block of code to set the issueModel to either the value passed into the constructor, or instantiate a new one if nothing was passed in ![]() . Last you set the view that was passed in
. Last you set the view that was passed in ![]() .
.
Now you can run the unit test and it should pass. Open a command line and navigate to the flex-bugs-lib folder and type mvn test. After all of the messages scroll by, you should see the results from the tests being run.
10.3.2. Issues result event test
Now you can test the second half of the user story from the previous section. To find the next when in that user story, you could rewrite the story to read more like this:
- In order to ensure that the issues I’m viewing are up-to-date, when I click the Refresh button, the application should retrieve the issues from the server and when the result comes back from the server, refresh the data grid with the results.
In an ideal world you would be able to capture the responder object passed into your mock in the test you wrote; unfortunately, as of this writing, the mocking framework that we’re using doesn’t support that. To overcome this you need to scope the methods that your result events call to the public scope so that you can call it directly. Listing 10.5 shows the test for the result from the call to the getIssues method on the IssueModel.
Listing 10.5. shouldSetIssuesPropertyOnView

You start as you did in the last test by annotating the method with the [Test] annotation ![]() . Next create your mocks by calling strict on the mock control
. Next create your mocks by calling strict on the mock control ![]() , create an ArrayCollection that will be included in the resultEvent
, create an ArrayCollection that will be included in the resultEvent ![]() . Not only can you mock method calls on your mocks, but you can also mock property access. You mock out access to the set
property issues
. Not only can you mock method calls on your mocks, but you can also mock property access. You mock out access to the set
property issues ![]() . In this case we’re saying that the issues property will be set with some instance of ICollectionView. With all of the expectations set, you can now instantiate your Presenter
. In this case we’re saying that the issues property will be set with some instance of ICollectionView. With all of the expectations set, you can now instantiate your Presenter ![]() with your mocks. Last you create a ResultEvent
with your mocks. Last you create a ResultEvent ![]() to simulate the model calling the event handler and call the getIssuesResult passing in the ResultEvent.
to simulate the model calling the event handler and call the getIssuesResult passing in the ResultEvent.
10.3.3. Testing issue removed
The next thing you want to test is what happens when an issue is deleted. This feature may be described something like the following:
- In order to remove issues that may be invalid or incorrect, when the user clicks the remove issue, the application should delete the selected issue.
Again, the important part of the user story is what’s described in the when part of the description. In this case you want to simulate some other part of the application dispatching an event indicating that the Delete Issue button has been clicked.
Listing 10.6. shouldCallRemoveIssueOnModel
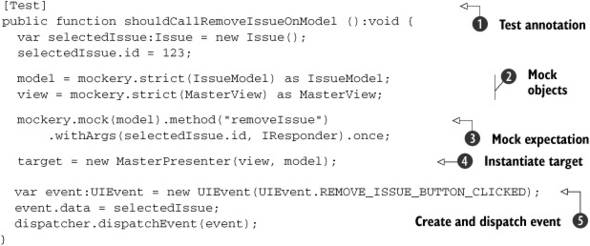
This test follows the same pattern as the first one you wrote. You start by annotating your test with the [Test] annotation ![]() . Next you create an issue local variable that you’ll utilize in your mock expectation. Then you create your mocks by calling the strict method on the mock control
. Next you create an issue local variable that you’ll utilize in your mock expectation. Then you create your mocks by calling the strict method on the mock control ![]() . After you’ve created your mocks you can define your expectation of the removeIssue method on the model being called
. After you’ve created your mocks you can define your expectation of the removeIssue method on the model being called ![]() . This expectation will take a value in trying to match the value of the id property on the issue you created in the test, as well as an argument of type IResponder. Next you instantiate your test target
. This expectation will take a value in trying to match the value of the id property on the issue you created in the test, as well as an argument of type IResponder. Next you instantiate your test target ![]() . In this test you’re passing along data with the event that you need to dispatch
. In this test you’re passing along data with the event that you need to dispatch ![]() , so you instantiate a new event and set its data property to the issue you created in your test and dispatch it.
, so you instantiate a new event and set its data property to the issue you created in your test and dispatch it.
10.3.4. Remove issue result test
Now that you have the first part of the Remove Issue functionality complete, you need to test what happens when you receive the ResultEvent from the IssueModel. This test will be similar to the way you tested the result for the Refresh Issues button being pressed earlier.
Listing 10.7. shouldResetGridAndFireSelectedIssueChangedEvent

The first thing you may notice is that the [Test] annotation ![]() looks more like the setup method you defined in listing 10.2, with the extra metadata stating that this method will use the Async.proceedOnEvent method and that it should time out after 8 seconds. Next you create your mocks as before, by calling the strict method on the mock controls
looks more like the setup method you defined in listing 10.2, with the extra metadata stating that this method will use the Async.proceedOnEvent method and that it should time out after 8 seconds. Next you create your mocks as before, by calling the strict method on the mock controls ![]() , along with setting the mock expectations that you’ll call the resetIssuesGrid method on the view (you will need to define this method to get the test to compile), and that you’ll call the getIssues method on the model to refresh the data grid
, along with setting the mock expectations that you’ll call the resetIssuesGrid method on the view (you will need to define this method to get the test to compile), and that you’ll call the getIssues method on the model to refresh the data grid ![]() .
.
The call to getIssues will occur as a result of the SELECTED_ISSUE_CHANGED event that you’re expecting to be dispatched in the event handler, and you define that expectation next ![]() . This call to the proceedOnEvent method allows you to define an expectation on the test method that will fail unless the Presenter dispatches the event you
pass in as an argument to the proceedOnEvent method. You’ll notice that we’re using the dispatcher from the EventDispatcherFactory in this expectation as well. This is because your application will use this to dispatch its events, and in order for your
test to work as expected, it will need to utilize the same event dispatcher that the application will use.
. This call to the proceedOnEvent method allows you to define an expectation on the test method that will fail unless the Presenter dispatches the event you
pass in as an argument to the proceedOnEvent method. You’ll notice that we’re using the dispatcher from the EventDispatcherFactory in this expectation as well. This is because your application will use this to dispatch its events, and in order for your
test to work as expected, it will need to utilize the same event dispatcher that the application will use.
The next step is to instantiate your Presenter passing in the mocks you created at the beginning of this unit test ![]() ; after that, you create a ResultEvent
; after that, you create a ResultEvent ![]() to call the method that you’re testing and invoke it.
to call the method that you’re testing and invoke it.
Now all that’s left to do is to run the tests again. Open a command line and navigate to the flex-bugs-lib project and run the mvn test command. When the smoke clears, you should be presented with a message telling you that you now have four passing tests. You have merely scratched the surface with unit testing the Presenters in this application; the examples we presented should be enough firepower for you to continue to write all the tests necessary for the Presenters. We’re now going to move along to testing your View components.
10.4. Testing the View
Now that we’ve shown how to test your Presenters, it’s time to move on and unit test your View components. When we say unit test your View components, we’re not talking about in browser functional testing. For that level of testing you’ll want to look at either the FunFX (http://funfx.rubyforge.org/) testing framework or the Selenium-Flex-API (http://code.google.com/p/sfapi/). Instead we’re talking about testing the public API exposed by your View components to the rest of the application. Again, you’ll start by creating the test class.
Listing 10.8. MasterViewTest

You start this test by defining a couple of private fields for your test target ![]() and your event dispatcher
and your event dispatcher ![]() . Then you define a setUp method
. Then you define a setUp method ![]() to be called before each test that runs. Inside of the setup method you instantiate a new MasterView and initialize it by calling the initialize method
to be called before each test that runs. Inside of the setup method you instantiate a new MasterView and initialize it by calling the initialize method ![]() . You do this because MXML components have a lifecycle of their own, and when your application starts and components are added
to your application, Flex will call these lifecycle methods and generate events. In order for your component to properly initialize
itself and all of the child components, you need to manually call the initialize method.
. You do this because MXML components have a lifecycle of their own, and when your application starts and components are added
to your application, Flex will call these lifecycle methods and generate events. In order for your component to properly initialize
itself and all of the child components, you need to manually call the initialize method.
One thing you may notice is that the test for your View component doesn’t include any mocks. Because this View component doesn’t have any external dependencies, this test will be more of a stateful test as you assert that the state of the components contained within your view change as you expect them to when calling the public methods.
10.4.1. Testing the issues set property
The first thing you’ll be testing in the MasterView is the set property for the issues data grid. By default any child components added to your MXML component have public access applied to them, so you could easily only allow your Presenter to access the child components directly because it has a reference to the View. The not-so-good news is not only is this not easily testable, it violates the Law of Demeter (http://c2.com/cgi/wiki?LawOfDemeter) by allowing your Presenter to call methods and properties on the child components of your View.
Listing 10.9. issuesPropertySetsDataProviderOnDataGrid

The code for your first view test is shown in listing 10.9. Start your test by creating an ArrayCollection with a couple of Issue objects to call the issues set property with ![]() . Then you call the issue set property and set it to the ArrayCollection you created
. Then you call the issue set property and set it to the ArrayCollection you created ![]() . Next you assert that the dataProvider property of the masterViewDataGrid is equal to the ArrayCollection you passed in
. Next you assert that the dataProvider property of the masterViewDataGrid is equal to the ArrayCollection you passed in ![]() . This last line shows the Hamcrest matcher syntax, and how readable it makes your assertions. You can clearly gather from
that line of code what it you expect to happen.
. This last line shows the Hamcrest matcher syntax, and how readable it makes your assertions. You can clearly gather from
that line of code what it you expect to happen.
10.4.2. Testing resetIssueGrid function
There is one other public method that you want to test for the MasterView, the resetIssuesGrid method. This method will make sure that there is no selected item on the data grid by resetting its selected index property to -1.
Listing 10.10. resetIssuesGridRemovesAllDataFromDataGrid

You start this test by creating an ArrayCollection to simulate your data grid having data ![]() , then set the issues property of your view to the sample data you created
, then set the issues property of your view to the sample data you created ![]() . Next you select an item on the grid by setting the selectedIndex property of the datagrid to 2
. Next you select an item on the grid by setting the selectedIndex property of the datagrid to 2 ![]() . Then you call the method you’re testing
. Then you call the method you’re testing ![]() and assert that the selectedIndex of the DataGrid is set back to -1
and assert that the selectedIndex of the DataGrid is set back to -1 ![]() . Although we discourage reaching into the insides of the View’s child components to directly modify properties in your production
code, you don’t have a choice when it comes to testing the View.
. Although we discourage reaching into the insides of the View’s child components to directly modify properties in your production
code, you don’t have a choice when it comes to testing the View.
10.4.3. Testing refresh issues button click
Now that you have the public API tested, you still need to test that certain events are fired when things such as button clicks occur. The first of these tests, testing for the Refresh Issues button click, is shown in listing 10.11.
Listing 10.11. refreshButtonClickTriggersUIEvent
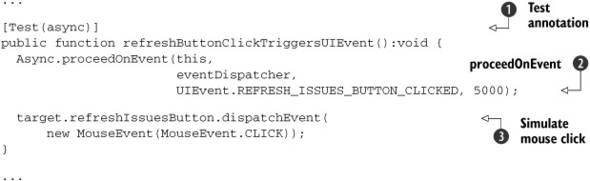
This is a fairly simple test because you don’t have to do any kind of setup to run it. You start by annotating the test with
the [Test] annotation and add the extra bit of metadata to tell FlexUnit that this test will utilize the asynchronous features ![]() . Next you set the expectation for the REFRESH_ISSUES_BUTTON_CLICKED event
. Next you set the expectation for the REFRESH_ISSUES_BUTTON_CLICKED event ![]() . Last you simulate your button click by having the refreshIssuesButton dispatch a MouseEvent of type CLICK
. Last you simulate your button click by having the refreshIssuesButton dispatch a MouseEvent of type CLICK ![]() . That’s all there is to it. Next we’re going to test something more complex, the item click on the DataGrid.
. That’s all there is to it. Next we’re going to test something more complex, the item click on the DataGrid.
10.4.4. Testing DataGrid item select
The last test we’re going to write for the View before we move on to writing tests for the model is for when a user clicks an item in the DataGrid. This test will require a bit more setup than the last test you wrote, as you need to have data in your DataGrid for the event handler to work.
Listing 10.12. selectingDataGridItemTriggersUIEvent
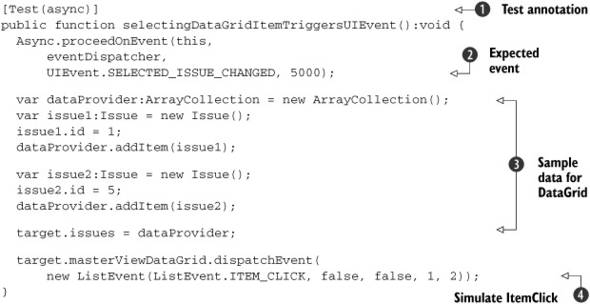
Again you start by annotating your test with the [Test] annotation and adding the async parameter ![]() . Next set your expectation that the SELECTED_ISSUE_CHANGED event will be dispatched
. Next set your expectation that the SELECTED_ISSUE_CHANGED event will be dispatched ![]() . Now you need to create an ArrayCollection and populate it with a couple of Issue objects, allowing you to set the dataProvider property on the DataGrid
. Now you need to create an ArrayCollection and populate it with a couple of Issue objects, allowing you to set the dataProvider property on the DataGrid ![]() so that the DataGrid will contain the item that you say you’re going to click. Last you simulate the user clicking an item in the DataGrid by having it dispatch a ListEvent of type ITEM_CLICK
so that the DataGrid will contain the item that you say you’re going to click. Last you simulate the user clicking an item in the DataGrid by having it dispatch a ListEvent of type ITEM_CLICK ![]() . The other parameters in the constructor for the ListEvent determine four things: whether the event should bubble up through the parent containers, whether or not it’s cancellable,
the column that you clicked, and which row you clicked. In this instance we’re simulating the user clicking the first column
of the second row of the DataGrid.
. The other parameters in the constructor for the ListEvent determine four things: whether the event should bubble up through the parent containers, whether or not it’s cancellable,
the column that you clicked, and which row you clicked. In this instance we’re simulating the user clicking the first column
of the second row of the DataGrid.
Now you should be able to run the tests again by opening up a command line, navigating to your project folder and typing mvn test. After all of the messages scroll by you should be presented with a message saying that all tests passed. If not, the results of the unit tests are located in the target/surefire-reports directory. Now that we’ve got the View tests working, let’s move on to the Model tests.
10.5. Testing the Model
Now that we’ve got the Presenter tests as well as the View tests well under way, it’s time to look at writing tests for the Model. The tests you’ll be writing for the Model will be somewhat similar to those you used to test the Presenter in that we’ll be testing the interaction between the Model and the RemoteService by utilizing mock objects and setting expectations on the executions performed on them. You’ll start as you did for the Presenter and View tests by creating the test class.
Listing 10.13. IssueModelTest.as

This test class starts much like the Presenter test. You define private fields for the target class you’re testing, the mocks
that you’ll need to interact with, and your mock control ![]() . Inside your setUp method, you instantiate your mock control and prepare the various mocks that you’ll be using, and set the expectation to
allow the test to continue only when the COMPLETE event is dispatched, ensuring that your mocks are ready to be used
. Inside your setUp method, you instantiate your mock control and prepare the various mocks that you’ll be using, and set the expectation to
allow the test to continue only when the COMPLETE event is dispatched, ensuring that your mocks are ready to be used ![]() . Last you define your tearDown method and put a call to the verify method on your mock control inside
. Last you define your tearDown method and put a call to the verify method on your mock control inside ![]() .
.
10.5.1. Mocking and RemoteObject
Before you can start writing your tests for the IssueModel, there is a caveat regarding the RemoteObject class. As we’ve mentioned before, ActionScript is a fairly powerful dynamic language. For those familiar with Groovy or Ruby you’ll likely be familiar with the concept of having the ability to create fluent domain specific languages (DSLs) by leveraging the method missing functionality. ActionScript also has this ability, and the AbstractService class, which all of your remoting components HTTPService, WebService, and RemoteObject derive from, takes advantage of this to allow you to call the remote object methods as if they were defined by these remoting components.
To learn more about how to use dynamic classes and implement something like method_missing in ActionScript, there is a good article on the FlexOnRails blog at http://flexonrails.net/?p=95, which should get you started.
The problem with this arises when you try to mock calls to these dynamic methods that don’t exist in the RemoteObject class. It would appear that there is a limitation on how the mocking framework instruments and creates mock objects—only the methods that exist in the class definition that you’re mocking are able to be called. If the methods don’t exist, the method call will be captured by the callProperty method and exhibit the same dynamic behavior that it would in your production code, which is not what you want. To get past this, define a stub class that will extend the RemoteObject class. Inside this class you will stub out the methods that your remote service exposes, then you’ll mock this MockIssueService class inside of your tests so you can properly set and verify your expectations.
Listing 10.14. MockIssueService.as
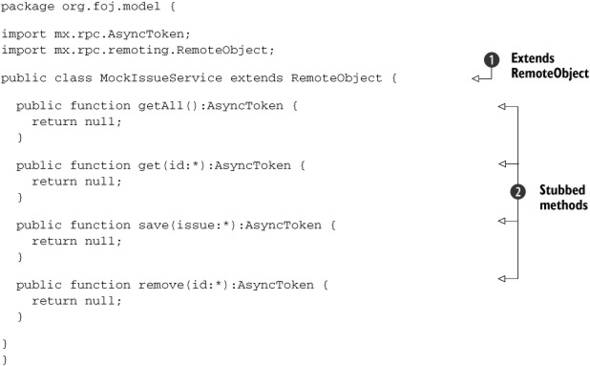
Start your class definition by extending RemoteObject so you can use this to create a mock and pass it to your IssueModel when you instantiate it in the test ![]() . Next stub out the methods that you call on your RemoteObject inside the IssueModel, and stub them to return null
. Next stub out the methods that you call on your RemoteObject inside the IssueModel, and stub them to return null ![]() . It doesn’t matter what you put in these methods because you’ll be using the mock framework to define your expectations.
. It doesn’t matter what you put in these methods because you’ll be using the mock framework to define your expectations.
Listing 10.15. updated IssueModel constructor
public function IssueModel(issueService:RemoteObject = null) {
    if (issueService != null) {
      _issueService = issueService;
    } else {
      var defaultChannelSet:ChannelSet =
     ChannelSetFactory.getDefaultChannel();

      _issueService = new RemoteObject();
      _issueService.destination = "issueService";
      _issueService.channelSet = defaultChannelSet;
    }

  }
You updated the constructor on the IssueModel class to enable injecting the mock RemoteObject via the constructor.
10.5.2. Testing getIssues
Now we’re ready to write the IssueModel tests. Let’s start by testing the getIssues method, which is probably the most called method in the IssueModel.
Listing 10.16. callsGetAllOnRemoteService

You start by creating the mocks you need for this test, a mock of your MockIssueService that you defined, a mock AsyncToken, and a mock IResponder ![]() . Next you define your expectations on the mocks, starting with the expectation to call the getAll method with no arguments, and returning the mock AsyncToken you created. Then you expect that the mock AsyncToken’s addResponder method will be called with the mock IResponder you created
. Next you define your expectations on the mocks, starting with the expectation to call the getAll method with no arguments, and returning the mock AsyncToken you created. Then you expect that the mock AsyncToken’s addResponder method will be called with the mock IResponder you created ![]() and use to also call the method you’re testing
and use to also call the method you’re testing ![]() . Let’s look at testing the getIssue method.
. Let’s look at testing the getIssue method.
10.5.3. Testing get single issue
The next method you’ll test on the IssueModel is the getIssue method, which takes in an issue ID as the first parameter to look up an issue by its ID. It’s only slightly more involved than the test you wrote, but still easy to follow.
Listing 10.17. callsGetOnRemoteService
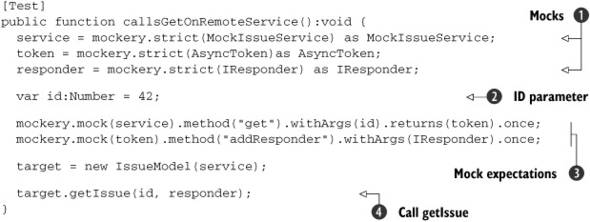
You start this test the same way you did the getIssues test, by creating all of the mocks that you need ![]() . You then define a local variable to contain the id parameter
. You then define a local variable to contain the id parameter ![]() that we’ll call the method we’re testing with. Next define your expectations on the mocks
that we’ll call the method we’re testing with. Next define your expectations on the mocks ![]() , which look similar to the getIssues test expectations, except that this time you’re expecting the get method on your RemoteObject to be called with the id parameter you defined previously. In the last step you instantiate your IssueModel with your mock service and call the getIssue method
, which look similar to the getIssues test expectations, except that this time you’re expecting the get method on your RemoteObject to be called with the id parameter you defined previously. In the last step you instantiate your IssueModel with your mock service and call the getIssue method ![]() .
.
You now have a good start on the unit tests for this project. If you’re feeling ambitious continue down the road of writing more tests for the project. When you’re finished come back and we’ll set up a continuous integration server using Hudson. Or come back after you’ve got Hudson set up. It’s your choice.
10.6. Continuous integration with Hudson
When a team of two or more of developers works together, an immediate need arises for frequent feedback on how things are going, as changes are committed between team members. This is where the practice of Continuous Integration (CI) comes in to play. Tooling, like Hudson, becomes a third party and impartial member of a team. A good CI server provides teams with essential feedback through the orchestration of critical project events as they pertain to the building and stability of the source code. It also can provide a unique look into the health of an application.
In this section, a Hudson CI server will be configured to:
- Listen for changes in the version control system
- Automatically build the project from the top-level POM when changes are discovered
- Execute and report on unit test execution
- Fail builds upon build errors or failed tests
- Send email out to team members upon failed or corrected builds
Setting up a CI server with even the most basic configuration yields several benefits. How a team configures and uses a CI server depends on what the application does and what kind of feedback is necessary to ensure that everything is in a healthy state. Every step, from code being checked into the version control system to the final verification of the deployment, and everything in between, is important.
Several plugins can be configured with Hudson for different purposes. To understand what kind of CI configuration best suits a team’s needs a team may consider jotting down a list of questions that may be important to know every day during development.
- What does the application do?
- What are the user stories? (test coverage?)
- Does the source code compile when integrated?
- Do all the unit tests run successfully?
- Is the code quality acceptable? (Hudson has plugins for code quality tools like PMD, FindBugs, and other analysis tools.)
- Is there an unhealthy volume of TODO and FIXME annotations in the code and what are they? (Hudson has a task scanner plugin that performs static analysis and creates visibility for these in Java code comment annotations along with unhealthy thresholds settings.)
- Does the application deploy successfully?
- How do you verify the application and the environment(s) it has to run inside?
Now that you have a feel for why you would want to have a CI environment let’s move on to getting a sample Hudson instance set up for demonstration.
10.6.1. Downloading and installing Hudson
Installing Hudson couldn’t be more trivial. Hudson is a simple Java web application and downloads as a WAR file. To download Hudson, open your browser and navigate to http://hudson-ci.org. There you will find the latest and greatest link for downloading the most current release.
Hudson requires JRE 1.5 or later and can be started standalone, without an application server, by invoking the command java -jar hudson.war, where the hudson.war file was installed. This will fire up Hudson inside of an embedded Winstone servlet container on port 8080 by default.
Hudson can also be installed into a fixed servlet container that supports Servlet 2.4/ JSP 2.0 or later, such as Glassfish, Tomcat, JBoss, and Jetty.
If problems arise during installation, consult the Hudson website for help. Let’s move on to configuring the server.
10.6.2. Configuring Hudson
If Hudson is installed correctly you should be able to see the start screen. For this sample you’re using the embedded Winstone server. Open a web browser and navigate to http://localhost:8080. When there, Hudson will present an initial start page with no jobs configured as seen in figure 10.2.
Figure 10.2. Hudson start screen

First configure Hudson globally by selecting the Manage Hudson link. There you can globally configure Ant, Maven, and JDK versions. Configuring things globally will make them available for all jobs you create. Figure 10.3 displays the Hudson management selection screen.
Figure 10.3. The Hudson management selection screen
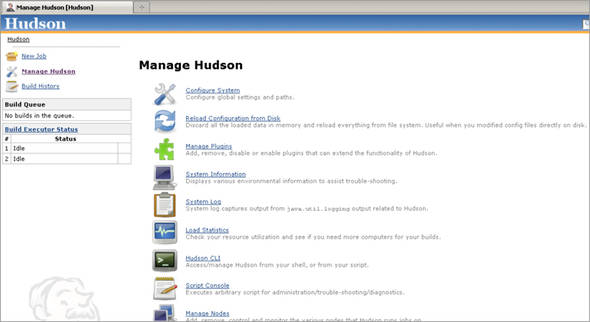
From the management screen select the Configure System link at the top of the list of options. It’s also possible to manage plugins, view system information, and view logs from this top-level screen. When you’re in the configuration screen you can begin to add the version of Maven and Java that you’d like to use globally. Figure 10.4 displays the configuration screen.
Figure 10.4. Hudson configuration screen
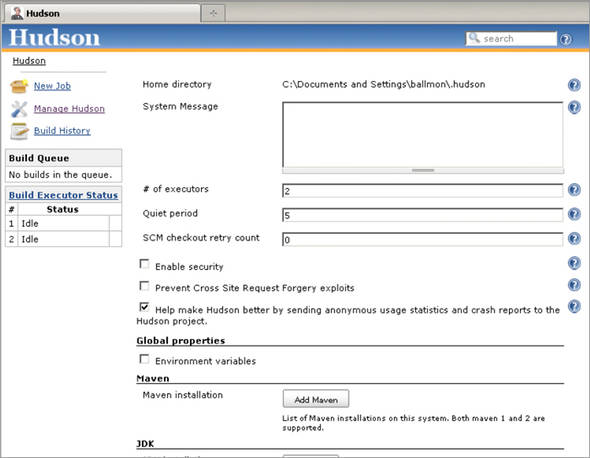
Consider the list of goals you want to accomplish for the demonstration. From the Hudson configuration screen you want to configure a version of Maven, a JDK, and email notification. Finally, you will save it from there.
Configuring Maven is as easy as selecting a version and instructing Hudson to automatically install as seen in figure 10.5 or pointing Hudson to an installed Maven location. Use the default to install Maven automatically and enter a name for the install something meaningful for the version. Choose the version and installation will occur. To select a version of Maven from a local installation, deselect the Install automatically checkbox. Figure 10.6 displays the result.
Figure 10.5. Maven automatic installation selection
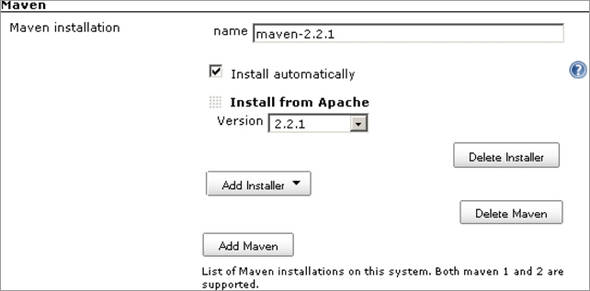
Figure 10.6. Maven local installation
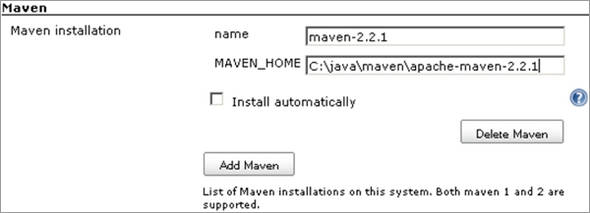
Enter the MAVEN_HOME, as seen in figure 10.6, by pointing to the directory where Maven is installed. That’s it! As you can see it’s possible to continue adding more Maven installations by selecting the Add Maven button.
Next, configure the JDK version used to compile the Java source code. It’s possible that the Maven POM files will override this but the Hudson build server must contain the version required by the POM. The JDK configuration works identically to the Maven configuration.
Finally, you can set up the mail settings by specifying a Simple Mail Transfer Protocol (SMTP) server, a default domain suffix, a system admin email address, and Hudson URL, as seen in figure 10.7.
Figure 10.7. Hudson email notification

Having email configured will allow Hudson to communicate to teams when build failures or corrections occur. Now that Hudson is ready, let’s move on to creating a job for the FlexBugs application.
10.6.3. Configuring a Hudson job
Configuring a job for Hudson is as simple as configuring Hudson itself. In fact, Hudson has good support for Maven projects and handles multimodule projects with elegance by allowing you to drill down into the specific modules to gain fine-grained visibility.
To create a job in Hudson, select the New Job link on the left side of the screen. Hudson will present options for what type of job to create with the ability to enter a name for the job and to copy configuration from another job, if one exists. Figure 10.8 displays this initial screen.
Figure 10.8. Hudson job configuration start screen
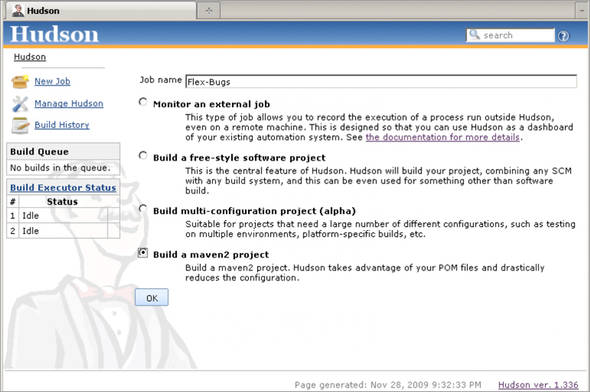
To demonstrate Hudson you will create a job for the FlexBugs application and select a Maven 2 project. After you select the OK button, Hudson will present the job configuration screen. This is where you will configure access to the source control system and other settings that will accomplish your basic goals for building and providing feedback to the team when changes are checked into the source control system.
On the job configuration screen you will mainly go with the default settings and start by pointing Hudson to your source control management system. Figure 10.9 displays the settings that will accomplish this with settings to check for changes every 5 minutes. This will cause a build to occur.
The next thing to do is configure the job with the needed Maven goals. Figure 10.10 displays this part of the screen. It’s good to note that you can point Hudson to a POM in any directory or even to a Maven POM other than something named pom.xml. The MAVEN_OPTS may need to be configured to increase the memory size for running inside the standalone Winstone server, for example, -Xms256m -Xmx768m -XX:MaxPermSize=512m.
Figure 10.9. Source code management section

Figure 10.10. The build instructions and email notification settings

For FlexBugs you need to call the clean install goals at the top-level POM. This will invoke the Maven build for all modules as usual. You also added the -e for outputting stack trace information and also set up email notification. The email notification will use the default mail settings you established when configuring Hudson global settings. After these settings are saved you can start the build by selecting the Build Now link.
From there you have a build started that will check out the source code and build the entire application while providing feedback on the status and emails on build failures or corrections.
That’s all there is to configuring a CI server from the ground up! As you can see Hudson provides all kinds of options and various ways to execute a job.
10.7. Summary
In this chapter we introduced you to unit testing using FlexUnit4 and the mock-as3 mock testing framework. We also reiterated the reasoning behind the Model View Presenter pattern that we introduced in chapter 4. We covered many of the common patterns that you would have needed to test in your sample application. With the knowledge presented in this chapter, you should be able to continue writing tests for the rest of the functionality in the application.
Finally, you set up and configured a CI server for providing critical feedback on how things are going as code is integrated into the source code repository. Hudson is a great choice for teams needing a reliable CI server. Hudson has numerous built-in capabilities and a vibrant user community with plugins for almost anything.
In chapter 11 we’re going to take a look at how you can quickly get a Flex application integrated with the Grails framework. We’ll quickly introduce a simple contact management application, and integrate it with Grails as well as JMS.