
Chapter 6. Using the portlet tag library
- Accessing portlet objects in JSPs
- Creating portlet URLs in JSPs
- Creating portlet-specific HTML elements
Having read the past five chapters and learned the basics of working with portlets, you may be wondering if there’s an easy way to create portlet URLs or to access portlet API objects in JSP. Well, you’re about to find out.
In previous chapters, you used JSP as the view technology for displaying portlet content. In servlet-based web applications, JSPs included or forwarded by servlets have access to certain implicit variables like request, session, and so on. You used these in the Book Catalog portlet to display user information (like the name of the logged-in user) and the book catalog. You also created render and action URLs programmatically in the portlet’s render method by using the RenderResponse object.
The portlet tag library is a set of tags that provide included and forwarded JSPs with access to portlet-specific objects (such as RenderRequest, RenderResponse, and PortletSession) and it also makes it simpler for JSPs to create portlet URLs. In this chapter, we’ll discuss the portlet tag library tags, their attributes, and their usage in developing portlets. You’ll rebuild the Book Catalog portlet so that it uses portlet tag library tags.
We’ll look at the following tags and their attributes:
- <defineObjects>—Used to make portlet objects available to the JSP page
- <renderURL>, <actionURL>, and <resourceURL>—Used to create render, action, and resource portlet URLs, respectively
- <param>—Used to add parameters to portlet URLs
- <namespace>—Used to create HTML elements that are specific to the portlet instance
- <property>—Used to add properties to portlet URLs
Warning
Portlet 2.0 supports the JSP 2.0 specification, so if you’re using JSP tags that use new features of JSP 2.1 (like the @Resource annotation to inject a database connection in your tag implementation class), the tags may not work.
Let’s first look at the requirements of the Book Catalog portlet, which we’ll use as a reference for understanding the different portlet tag library tags.
6.1. Using the tag library to build a Book Catalog portlet
Let’s redefine the requirements for the Book Catalog portlet, developed in chapters 3 and 4, to make use of portlet tag library tags. Figure 6.1 shows the modified Home page of the Book Catalog portlet, which you’ll create in this chapter. You’ll be coming back to this figure every so often in this chapter.
Figure 6.1. The Book Catalog portlet’s Home page showing debugging information, including the values of the myaction request attribute, the myaction session attribute, and the uploadFolder portlet initialization parameter, along with the current portlet mode, the window state, and so on

The Book Catalog portlet shows hyperlinks ![]() to print the book catalog, view help information, and set preferences. The Print, Help, and Preferences hyperlinks must be
created using the portlet tag library.
to print the book catalog, view help information, and set preferences. The Print, Help, and Preferences hyperlinks must be
created using the portlet tag library.
The Book Name and Author Name fields ![]() are used to enter the book search criteria. The scope of these fields must be restricted to the Book Catalog portlet; other
portlets in the same portal page must not be able to access the Book Name and Author Name fields using JavaScript.
are used to enter the book search criteria. The scope of these fields must be restricted to the Book Catalog portlet; other
portlets in the same portal page must not be able to access the Book Name and Author Name fields using JavaScript.
Clicking the Search button ![]() submits the search HTML form (which consists of the Book Name and Author Name fields) whose action attribute refers to the action URL of the Book Catalog portlet. The action URL to which the search form is submitted must
be created using portlet tag library tags.
submits the search HTML form (which consists of the Book Name and Author Name fields) whose action attribute refers to the action URL of the Book Catalog portlet. The action URL to which the search form is submitted must
be created using portlet tag library tags.
Hyperlinks must be created (![]() through
through ![]() ) using portlet tag library tags. Clicking the Add Book button
) using portlet tag library tags. Clicking the Add Book button ![]() submits the book catalog form whose action attribute refers to the render URL of the Book Catalog portlet. The render URL to which the book catalog form is submitted
must be created using portlet tag library tags.
submits the book catalog form whose action attribute refers to the render URL of the Book Catalog portlet. The render URL to which the book catalog form is submitted
must be created using portlet tag library tags.
Finally, the debugging information is printed ![]() by the Book Catalog portlet to show the value of the myaction request attribute, the current portlet mode, the current window state, the value of the uploadFolder portlet initialization parameter, and so on. All the debugging information printed by the Book Catalog portlet must be generated
exclusively in the JSP page itself.
by the Book Catalog portlet to show the value of the myaction request attribute, the current portlet mode, the current window state, the value of the uploadFolder portlet initialization parameter, and so on. All the debugging information printed by the Book Catalog portlet must be generated
exclusively in the JSP page itself.
Code Reference
The source code for the Book Catalog portlet discussed in this chapter is located in the ch6_TagLibrary folder. Before you build or deploy the portlet, make sure you change the value of the uploadFolder initialization parameter in the portlet deployment descriptor. Also, before you build the project, set the liferay.portal.home property in the build.properties file to point to your Liferay Portal installation directory.
Now that you know what you’re going to create in this chapter, let’s begin our discussion of the portlet tag library with one of the most important tags, <defineObjects>.
6.2. Accessing portlet-specific objects using <defineObjects>
JSPs in previous chapters relied on JSP implicit objects to achieve their functionality. It’s perfectly fine to use them in your JSP pages, but your JSP will be dealing with servlet-specific objects (like HttpServletRequest and HttpSession) and not portlet-specific objects (like RenderRequest and PortletSession).
You saw in chapter 3 that if you add an attribute to RenderRequest, it’s mirrored by HttpServletRequest and vice versa, and the same applies to HttpSession and PortletSession. So what difference does it makes if you use portlet-specific objects in JSPs? There are subtle but important differences between the servlet and portlet APIs. For instance, in your JSP page, you can’t use HttpServletResponse to create a portlet URL; only the RenderResponse object provides methods to create portlet URLs. Similarly, HttpServletRequest can’t provide information about the portlet mode and window state; the PortletRequest provides methods to obtain window state and portlet mode. The objects look similar, but they offer slightly different functionality.
In general, your JSP pages will use a combination of portlet and servlet objects to generate content. For instance, if you want to set the expiration time for the content in the JSP page, you’ll use the RenderResponse portlet object. If you need to obtain the value of an APPLICATION_SCOPE portlet session attribute, you may prefer to use session (which refers to the HttpSession object) or the sessionScope JSP implicit object (which is a java.util.Map of session attributes stored in the HttpSession object).
Note
JSPs included by portlets have access to JSP implicit objects because a portlet application is also a web application.
Let’s look at the different portlet objects that are made available to included and forwarded JSP pages using the <defineObjects> tag.
6.2.1. Making portlet objects available with <defineObjects>
The <defineObjects> name suggests that it can be used by JSP developers to define custom objects in their JSP pages, but that’s not the case. The portlet tag library’s <defineObjects> tag provides JSPs with access to portlet objects like RenderRequest, RenderResponse, PortletSession, and so on.
Table 6.1 lists the scripting variables (and their types) that are available to JSP pages that use the <defineObjects> tag.
Table 6.1. Scripting variables defined by the <defineObjects> tag
|
Variable name |
Variable type |
Description |
|---|---|---|
| renderRequest, renderResponse | RenderRequest,RenderResponse | The renderRequest and renderResponse variables are available to JSP only if the JSP was included during the render request phase. |
| actionRequest, actionResponse | ActionRequest, ActionResponse | The actionRequest and actionResponse variables are available to JSP only if the JSP was included during the action-processing phase. |
| resourceRequest, resourceResponse | ResourceRequest, ResourceResponse | The resourceRequest and resourceResponse variables are available to JSP only if the JSP was included during the resource-serving phase. The ResourceRequest and ResourceResponse objects are discussed in detail in chapter 12. |
| eventRequest, eventResponse | EventRequest, EventResponse | The eventRequest and eventResponse variables are available to JSP only if the JSP was included during the event-processing phase. The EventRequest and EventResponse objects are discussed in detail in chapter 11. |
| portletConfig | PortletConfig | The portletConfig variable is available to JSP regardless of the request-processing phase in which it was included. |
| portletSession | PortletSession | The portletSession variable is available to JSP regardless of the request-processing phase in which it was included. |
| portletSessionScope | Map<String, Object> | The portletSessionScope variable is used to obtain attributes stored in the PortletSession’s PORTLET_SCOPE. |
| portletPreferences | PortletPreferences | The portletPreferences variable is used to obtain portlet preferences defined for the portlet. PortletPreferences is discussed in detail in chapter 10. |
| portletPreferences Values | Map<String, String[]> | The portletPreferencesValues variable is used to obtain portlet preference values. |
As you can see, <defineObjects> provides JSP pages with all the Portlet 2.0 API objects they’ll ever need to use portlet-specific features. In JSP pages, you’ll usually use a combination of JSP implicit objects and the implicit objects made available by the <defineObjects> tag. You’ll probably never use the actionRequest, actionResponse, eventRequest, or eventResponse objects in your JSP pages because portlet containers ignore content written out to the response in the action- and event-processing phases.
Note
The <defineObjects> tag doesn’t define any attributes.
The version of the Book Catalog portlet in this chapter makes use of scripting variables introduced by the <defineObjects> tag to show the debugging information, as shown earlier in figure 6.1.
Code Reference
If you haven’t already, you should now import the ch6_TagLibrary source code into your Eclipse workspace so you can follow along with the code references in the rest of this chapter.
Let’s look at how the Book Catalog portlet uses the <defineObjects> tag to show debugging information to users.
6.2.2. Using <defineObjects> in the Book Catalog portlet
Listing 6.1 shows the debug.jsp page, which is included by all the JSP pages in the Book Catalog portlet. This page prints information about the portlet mode, the window state, the value of the myaction attribute from the request, the content expiration time, and so on, most of which is obtained by using scripting variables introduced by the <defineObjects> tag.
Listing 6.1. The debug.jsp page uses variables introduced by <defineObjects>.

The JSP page declares the portlet tag library using the taglib directive ![]() . The value of the uri attribute is http://java.sun.com/portlet_2_0 if you want to use the Portlet 2.0 tag library. If you’re using the Portlet 1.0 tag library, you should specify the value
of uri as http://java.sun.com/portlet. The <defineObjects> tag in Portlet 2.0 introduced additional variables, such as portletSessionScope, portletSession, and so on, which makes it easy to develop portlets using JSP as the view technology.
. The value of the uri attribute is http://java.sun.com/portlet_2_0 if you want to use the Portlet 2.0 tag library. If you’re using the Portlet 1.0 tag library, you should specify the value
of uri as http://java.sun.com/portlet. The <defineObjects> tag in Portlet 2.0 introduced additional variables, such as portletSessionScope, portletSession, and so on, which makes it easy to develop portlets using JSP as the view technology.
The <defineObjects> tag ![]() is used to introduce scripting variables in the JSP page.
is used to introduce scripting variables in the JSP page.
You can see the use of implicit JSP objects as well as objects made available to JSP ![]() by the <defineObjects> tag:
by the <defineObjects> tag:
- The requestScope JSP implicit variable is used to obtain the value of the myaction attribute.
- The renderRequest variable is used to obtain the current portlet mode and window state information.
- The renderResponse variable is used to obtain the CacheControl object, which is in turn used to obtain the expiration time for the generated content.
- The portletConfig object is used to obtain the uploadFolder portlet initialization parameter.
- The portletSessionScope variable is used to obtain the value of the myaction attribute from PortletSession.
- The portletSession variable is used to obtain the value of the bookNameSearchField value from the PortletSession’s APPLICATION_SCOPE.
- The session JSP implicit variable is used to obtain the value of the authorNameSearchField attribute from HttpSession. Using the session JSP implicit variable makes it easy to retrieve an APPLICATION_SCOPE attribute stored in PortletSession.
Listing 6.1 demonstrates how you can make use of JSP implicit variables and variables introduced by the <defineObjects> tag to create JSP pages. If you browse through the pages of the Book Catalog portlet, the debugging information will change to reflect the current value of various attributes.
In earlier chapters, you created self-referencing portlet URLs using create methods defined in the RenderResponse interface. The portlet tag library provides <actionURL>, <renderURL>, and <resourceURL> tags for creating URLs in the JSP page. Let’s look at these tags next.
6.3. Using <actionURL>, <renderURL>, and <resourceURL>
This time, what the tag names suggest is true—the <actionURL>, <renderURL>, and <resourceURL> tags let you create portlet URLs in the JSP page included by your portlet. These tags share some common attributes and have the same semantics, so we’ll look at these common attributes in the context of the <actionURL> tag. In our discussions of the <resourceURL> and <renderURL> tags, we’ll merely mention the common attributes that apply to these tags.
6.3.1. Using the <actionURL> tag
The action URL created with the <actionURL> tag can be used in hyperlinks or in the form tag’s action attribute to send an action request to a portlet when a user clicks a hyperlink or submits a form. In this section, we’ll take a look at the how and why of action URLs, and look at a few examples you can try yourself.
The <actionURL> tag defines attributes that let you specify additional options for the generated action URL, such as portlet mode, window state, and so on. Let’s take a look at each of the <actionURL> attributes in detail.
Specifying the Desired Window State
The <actionURL> tag’s windowState attribute is optional, and it specifies the desired window state when the action request is received by the portlet. The windowState attribute is useful if a certain action on a portlet UI must be invoked in a particular portlet window state.
The value for the windowState attribute is case insensitive; the values MAXIMIZED and maximized are treated the same way. You can specify either a standard window state or a custom window state as the value. If the specified window state isn’t supported or allowed by the portlet, an exception will be thrown.
The following <actionURL> tag shows how you can use the windowState attribute to set the portlet’s window state to MAXIMIZED:
<portlet:actionURL windowState="maximized"/>
Specifying the Desired Portlet Mode
The <actionURL> tag’s portletMode attribute is optional, and it specifies the desired portlet mode when the action request is received by the portlet. This attribute is useful when a certain action on a portlet UI must be invoked in a particular portlet mode, such as if the portlet mode must be EDIT when setting portlet preferences (as discussed in chapter 10).
The value for the portletMode attribute is case insensitive; the values EDIT and edit are treated the same way. You can specify either a standard portlet mode or a custom portlet mode as the value. If the portletMode isn’t supported or allowed, it’ll result in an exception.
The following <actionURL> tag shows how you can use the portletMode attribute to set the portlet mode to EDIT:
<portlet:actionURL portletMode="edit"/>
Storing an Action URL in a Variable
If you want to keep the <actionURL> tag separate from your HTML code, you should use the var attribute of the <actionURL> tag. The var attribute specifies the name of a variable (of type String) that contains the action URL generated by the <actionURL> tag. The var attribute is then used in the HTML code to refer to the action URL, as shown here:
<portlet:actionURL portletMode="edit" windowState="maximized" var="myUrl"/>
<form name="myForm" action="${myUrl}">
 ...
</form>
In the preceding code, the action URL generated by the <actionURL> tag is stored in the myUrl variable, which is later used in myForm’s action attribute. If myForm is submitted, an action request is dispatched to the portlet.
It isn’t always possible to use the <actionURL> tag’s var attribute to store an action URL for later use in the HTML code. For instance, in figure 6.1, the Remove link is dynamic and makes use of the portlet tag library’s <param> tag (discussed later in this chapter) to send the ISBN number of the book as a parameter in the action request. This means the action URL referenced by the Remove link must be created during the generation of the book catalog information in the HTML code, as shown in listing 6.2 for the Book Catalog portlet.
Code Reference
Refer to the home.jsp page in the ch6_TagLibrary folder to see how the <actionURL> tag is used to create dynamic links for the Upload, Download, and Remove hyperlinks.
Listing 6.2. Using <actionURL> to create dynamic links
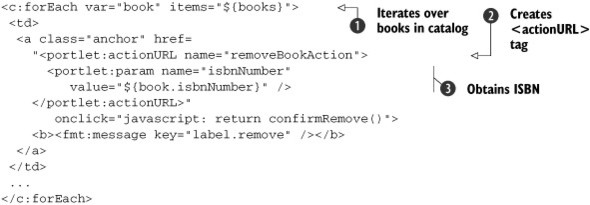
The forEach JSTL tag ![]() iterates over books (represented by the books variable) and generates the book information, such as title, author, and ISBN number, along with the Upload, Download, and
Remove hyperlinks. The <actionURL> tag
iterates over books (represented by the books variable) and generates the book information, such as title, author, and ISBN number, along with the Upload, Download, and
Remove hyperlinks. The <actionURL> tag ![]() is used to create the action URL referenced by the Remove hyperlink. The <param> tag
is used to create the action URL referenced by the Remove hyperlink. The <param> tag ![]() is used to define a request parameter named isbnNumber, with the ISBN number of the book as its value. The isbnNumber request parameter defined for the action URL is sent to the portlet when the Remove link is clicked.
is used to define a request parameter named isbnNumber, with the ISBN number of the book as its value. The isbnNumber request parameter defined for the action URL is sent to the portlet when the Remove link is clicked.
In the Book Catalog portlet, the ISBN number of a book uniquely identifies a book in the catalog. If you want to remove a book from the catalog, clicking the Remove link must send the book’s ISBN number to the portlet’s action method. Because you won’t know the ISBN number that should be associated with the Remove link until the forEach JSTL tag starts generating the book catalog information, you must place the <actionURL> tag within the forEach JSTL tag. The var attribute isn’t required in this case because the URL generated by the <actionURL> tag is used at the same place (inside the HTML anchor element) where it’s defined.
Securing an Action URL
The secure attribute is an optional attribute of the <actionURL> tag that indicates whether the generated action URL is a secured URL (meaning it uses the HTTPS protocol) or an unsecured URL (one that uses the HTTP protocol). If the value of the secure attribute is true, the generated URL is an HTTPS URL; if the value is false (which is the default value), the generated URL is an HTTP URL.
The following <actionURL> tag shows how the secure attribute is used to instruct the tag implementation to generate an HTTPS URL:
<portlet:actionURL secure="true"/>
If the security setting specified by the secure attribute isn’t supported by the portal server’s current runtime environment, an exception will be thrown.
Adding Private Render Parameters to an Action URL
A render parameter, in general, is a request parameter that’s available in the render lifecycle phase of a portlet. Public render parameters (discussed in chapter 11) are used in inter-portlet communication, and private render parameters are used by the action (or event) phase of a portlet to communicate with its render phase. For instance, the action methods of the Book Catalog portlet in chapter 4 (see the ch3_BookCatalog folder of the source code) use the myaction private render parameter to communicate information about the content that should be displayed in the render phase.
The <actionURL> tag’s copyCurrentRenderParameters attribute is optional, and it instructs the tag implementation to add all the private render parameters from the request to the generated action URL as request parameters. For instance, if a private render parameter named myparameter exists in the request, it’s added to the generated action URL as a request parameter.
This attribute is particularly useful when the render parameters set in the action or event phase need to be automatically added as action parameters to action URLs generated using the <actionURL> tag. Action parameters are request parameters that are sent to the action method, and they can be obtained in the action method using the getParameter, getParameterMap, and other such methods of the ActionRequest object.
Note
Private render parameters can be set in the action or event phase of a portlet using the setRenderParameter or setRenderParameters methods of StateAwareResponse. The private render parameters can be obtained in the render lifecycle phase using the PortletRequest’s getParameter, getPrivateParameterMap, getParameterMap, and getParameterValues methods.
You can set render parameters in a variety of different ways:
- By using the setRenderParameter or setRenderParameters methods of the ActionResponse or EventResponse objects in the action or event phase
- By using <param> tags to add a request parameter to the render URL generated with the <renderURL> tag (discussed later in this chapter)
- By using the PortletURL object’s setParameter method (when the PortletURL represents a render URL)
If an HTML form’s action attribute refers to the render URL of the portlet, submitting the form will also send the HTML form elements (such as text fields) as render parameters.
In the Book Catalog portlet in chapter 4, when a user clicks the Upload hyperlink to upload the TOC for a book, the ISBN number of the book is sent as a render parameter (named isbnNumber). The BookCatalogPortlet then saves the ISBN number in PortletSession. When the TOC is uploaded, the corresponding action method in the Book Catalog portlet retrieves the ISBN number from PortletSession and uses it to name the uploaded TOC file. The sequence diagram in figure 6.2 illustrates this process.
Figure 6.2. The Book Catalog portlet implementation (from chapter 4), where the PortletSession stores the ISBN of the book for which the user wants to upload a TOC. The book’s ISBN is used to name the uploaded TOC file.
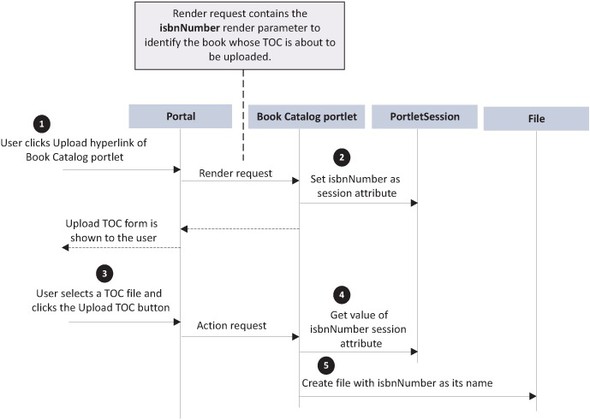
The user clicks the Upload link ![]() to upload the TOC of the book (see figure 6.1). The Upload link sends a render request to the Book Catalog portlet, and the isbnNumber render parameter is sent as part of that request.
to upload the TOC of the book (see figure 6.1). The Upload link sends a render request to the Book Catalog portlet, and the isbnNumber render parameter is sent as part of that request.
The Book Catalog portlet implementation class (the BookCatalogPortlet class in the ch3_BookCatalog folder) retrieves the render parameter from the render request (using the RenderRequest object’s getParameter method) and stores it ![]() in the PortletSession (using the PortletSession object’s setAttribute method). The Book Catalog portlet then displays a form so the user can upload the selected book’s TOC.
in the PortletSession (using the PortletSession object’s setAttribute method). The Book Catalog portlet then displays a form so the user can upload the selected book’s TOC.
The user selects the TOC file on the upload TOC form ![]() and clicks the Upload TOC button to upload the file. When the upload TOC form is submitted, it sends an action request to
the Book Catalog portlet.
and clicks the Upload TOC button to upload the file. When the upload TOC form is submitted, it sends an action request to
the Book Catalog portlet.
The Book Catalog portlet implementation class ![]() retrieves the ISBN from PortletSession, and
retrieves the ISBN from PortletSession, and ![]() it creates a file with the ISBN as the name and writes the uploaded TOC file content to it.
it creates a file with the ISBN as the name and writes the uploaded TOC file content to it.
As you can see, the book’s ISBN is only required when you’re uploading the TOC file. You’ll now learn how you can save the effort of explicitly managing the ISBN information in PortletSession by using the <actionURL> tag’s copyCurrentRenderParameters attribute.
Listing 6.3 shows the uploadForm.jsp page that generates the HTML form for uploading the TOC. It uses the <actionURL> tag (with the copyCurrentRenderParameters attribute set to true) to create an action URL to which the form is submitted when the user clicks the Upload TOC button.
Listing 6.3. The uploadForm.jsp file

The <actionURL> tag is used ![]() to create an action URL with the copyCurrentRenderParameters attribute’s value set to true. When the uploadForm.jsp file is included by the Book Catalog portlet, the render parameters from the request are added to
the generated action URL as action parameters. The generated action URL is stored in the uploadTocActionUrl variable.
to create an action URL with the copyCurrentRenderParameters attribute’s value set to true. When the uploadForm.jsp file is included by the Book Catalog portlet, the render parameters from the request are added to
the generated action URL as action parameters. The generated action URL is stored in the uploadTocActionUrl variable.
The value of the uploadTocActionUrl variable is specified ![]() as the value of the form tag’s action attribute. When the user clicks the Upload TOC button, the form is submitted to the action URL identified by the uploadTocActionUrl variable.
as the value of the form tag’s action attribute. When the user clicks the Upload TOC button, the form is submitted to the action URL identified by the uploadTocActionUrl variable.
In figure 6.2, you saw that the render request sent to the Book Catalog portlet contains the isbnNumber render parameter. If you’re using the uploadForm.jsp shown in listing 6.3, the isbnNumber render parameter is added to uploadTocActionUrl as an action parameter (because the <actionURL> tag specifies the value of the copyCurrentRenderParameters attribute as true). Now, if the upload TOC form is submitted, the corresponding action method will be able to receive the book’s ISBN as an action parameter.
The sequence diagram in figure 6.3 shows how the <actionURL> tag’s copyCurrentRenderParameters attribute can be used instead of PortletSession to provide the book’s ISBN to the action method responsible for uploading the TOC.
Figure 6.3. This Book Catalog portlet implementation makes use of the <actionURL> tag’s copyCurrentRenderParameters attribute to send the book’s ISBN to the action method responsible for uploading the book’s TOC. The book’s ISBN is used to name the uploaded TOC file.

The Book Catalog portlet renders the uploadForm JSP page ![]() . The <actionURL> tag (identified by the uploadTocActionUrl variable) in the uploadForm.jsp page copies the render parameters from the request as action parameters in the generated
action URL, including isbnNumber. Then, when the upload TOC form is submitted, the action request sent to the Book Catalog portlet
. The <actionURL> tag (identified by the uploadTocActionUrl variable) in the uploadForm.jsp page copies the render parameters from the request as action parameters in the generated
action URL, including isbnNumber. Then, when the upload TOC form is submitted, the action request sent to the Book Catalog portlet ![]() contains isbnNumber.
contains isbnNumber.
The action method responsible for uploading the book’s TOC ![]() retrieves the isbnNumber action parameter from the action request (by using the ActionRequest’s getParameter method). The action method responsible for uploading the book’s TOC
retrieves the isbnNumber action parameter from the action request (by using the ActionRequest’s getParameter method). The action method responsible for uploading the book’s TOC ![]() uses the ISBN obtained from the isbnNumber action parameter to create a file with the same name.
uses the ISBN obtained from the isbnNumber action parameter to create a file with the same name.
The copyCurrentRenderParameters attribute is an effective way to add render parameters to a JSP page’s action and render URLs. The downside to using copyCurrentRenderParameters is that you can’t specify which render parameters should be added to the generated action URL.
Escaping XML in a Generated Action URL
The <actionURL> tag’s escapeXML attribute indicates whether characters like &, >, <, and so on, are converted into their corresponding character entity codes, like &, >, <, and so on. If a portlet relies on a URL generated by the <actionURL> tag that isn’t XML-escaped, you should set this attribute’s value to false. The default value for the escapeXML attribute is true. Refer to section 3.7.3 of chapter 3 for more about escaping XML in portlet URLs.
Specifying an Action Name
The <actionURL> tag’s name attribute lets you specify the name of the action to which the generated action URL corresponds. The default implementation of the GenericPortlet class’s processAction method uses the value of the javax.portlet.Action request parameter to identify the action method that needs to be invoked. If you specify the name attribute of the <actionURL> tag, it effectively adds a parameter named javax.action.Action to the generated action URL.
For instance, if the value of the name attribute is myAction, the default implementation of the GenericPortlet class’s processAction method dispatches the request to a method annotated with @ProcessAction(name="myAction").
In figure 6.1, the Full Screen and Remove hyperlinks refer to action URLs created using the <actionURL> tag. When you click the Search button, the form is submitted to an action URL created using the <actionURL> tag.
Let’s now look at the <renderURL> tag, which is used to create render URLs.
6.3.2. Using the <renderURL> tag
The <renderURL> tag is used to create render URLs in JSP pages included by portlets. You can specify the following attributes in the <renderURL> tag: windowState, portletMode, var, secure, copyCurrentRenderParameters, and escapeXML. The semantics of these attributes is same for the <actionURL> tag.
In figure 6.1, the Print, Help, Preferences, Refresh Search Results, and Upload hyperlinks refer to render URLs created using the <renderURL> tag. When you click the Add Book button, the form is submitted to a render URL created using the <renderURL> tag.
6.3.3. Using the <resourceURL> tag
A portlet that implements the ResourceServingPortlet interface (which will be discussed in chapter 12) can make use of resource URLs to serve static resources, such as binary files. A portlet class’s serveResource method (defined in the ResourceServingPortlet interface) is invoked when a request is sent to the portlet using its resource URL. Like action and render URLs, you can use resource URLs in hyperlinks or in a form tag’s action attribute, depending upon your application’s requirements.
The <resourceURL> tag accepts the following optional attributes: var, secure, escapeXML, id, and cacheability. The semantics of the var, secure, and escapeXML attributes is same as in the <renderURL> and <actionURL> tags.
Let’s look at the <resourceURL> tag’s id and cacheability attributes.
Identifying Resources
The id attribute is used to identify the resource that should be served by the portlet. For instance, if you want to download a file named samples.doc from folder myfolder, you could specify this in the <resourceURL> tag as shown here:
<portlet:resourceURL id="myfolder/samples.doc "/>
The id provided in the <resourceURL> tag can be accessed by the portlet in the serveResource method to read the samples.doc file and write it to the portlet response.
Caching Resources
The cacheability attribute is used to specify the cache level for the resource URL. The attribute can take the following possible values: FULL, PORTLET, or PAGE; the default value is PAGE.
In figure 6.1, the Download link is used to download a book’s table of contents, so it refers to a resource URL. In chapter 12, we’ll discuss in detail how the <resourceURL> tag can be used to download a book’s TOC.
6.4. Adding parameters to portlet URLs using <param>
Request parameters play an important role in sending information to the portlet class for request handling. For instance, in figure 6.1, when a user clicks the Search button, the book title and author name information must be sent to the Book Catalog portlet class as search criteria. When a user clicks the Remove link, the book’s ISBN must be sent to the Book Catalog portlet class so the book can be removed.
By using <param> tags, you can add request parameters to portlet URLs that are referenced by buttons or hyperlinks and created using <renderURL>, <actionURL>, or <resourceURL> tags.
6.4.1. Using the <param> tag
The HTML form elements (like text fields) are available to a portlet class as request parameters when a form is submitted to the portlet’s render, action, or resource URL. If you want to pass extra request parameters to the portlet class, you can use the <param> tag with <renderURL>, <actionURL>, or <resourceURL> tags, as shown here:
<a class="anchor" href="
 <portlet:actionURL name="removeBookAction">
     <portlet:param name="isbnNumber" value="${book.isbnNumber}" />
 </portlet:actionURL>"
>
  Remove
</a>
In the preceding <actionURL> tag, the <param> tag has been used to add a request parameter named isbnNumber to the generated action URL.
A portlet class can retrieve the values of a request parameter by using the PortletRequest’s getParameter or getParameterValues method. For instance, the following action method retrieves the ISBN from the ActionRequest:
@ProcessAction(name="removeBookAction")
public void removeBook(ActionRequest request, ...) {
  request.getParameter("isbnNumber");
  ...
The <param> tag can exist multiple times within the same <renderURL>, <actionURL>, or <resourceURL> tag. If multiple <param> tags are defined for the same parameter, the portlet receives an array as the value of the request parameter. For instance, consider the following <actionURL> tag, which contains two <param> tags for the same parameter named category.
<a href="
 <portlet:actionURL name="doSomething">
    <portlet:param name="category" value="Java" />
    <portlet:param name="category" value="Portlets" />
 </portlet:actionURL>"
>
 Do Something
</a>
The <actionURL> tag in the preceding code contains two <param> tags for the category parameter values Java and Portlets. A portlet class can retrieve both values by using the PortletRequest’s getParameterValues method (which returns a String[]), as shown here:
@ProcessAction(name="doSomething")
public void doingSomething(ActionRequest request, ...) {
  String[] categories = request.getParameterValues("category");
  ...
}
The categories variable will contain the request parameter values in the same sequence as they were defined in the corresponding <actionURL> tag; the value of categories[0] is Java and categories[1] is Portlets.
Let’s now explore the attributes that can be specified for the <param> tag.
Note
You can set parameters on a portlet URL programmatically (using the setParameter method of PortletURL or ResourceURL) or declaratively (using the <param> tag of the portlet tag library). In either case, request parameters set on render, action, and resource URLs are referred to as render, action, and resource parameters, respectively.
Using <Param> Tag Attributes
The <param> tag defines two required attributes:
- name—Specifies the name of the request parameter that you want to add to the URL
- value—Specifies the value of the request parameter
Note
If you want a particular parameter to be added to or removed from all portlet URLs, you should consider using the PortletURLGenerationListener (discussed in section 4.6.3 of chapter 4). To remove a parameter from a URL, you can set the parameter value to null.
6.4.2. Adding parameters using string concatenation
In servlet-based web applications, you’ll sometimes add parameters to a URL using string concatenation, as shown here:
someUrl = someUrl + "&category=Java";
In this example, someUrl represents a URL to which you’re adding a parameter named category with a value of Java.
You might expect that you could add request parameters to portlet URLs using string concatenation as follows (but you can’t):
- Call the toString method of PortletURL or ResourceURL and then add request parameters.
- Use the var attribute value (which refers to a string representation of the portlet URL) of the <renderURL>, <actionURL>, or <resourceURL> tag, and then add request parameters.
These approaches must not be followed for adding request parameters to a portlet URL.
We mentioned in chapter 2 that portlet URLs are created by the portlet container, and they’re implementation-dependent. If request parameters are added using param tags or the setParameter method, the portlet container assigns internal names or encodes these parameters while generating the portlet URL. If you add request parameters using string concatenation, you’re adding parameters to an already-generated portlet URL. Because the request parameters are internally managed, the newly added request parameters won’t be accessible to the portlet instance.
Let’s now look at the <namespace> tag, which is used to uniquely identify HTML elements and JavaScript functions in a portlet.
6.5. Creating portlet-specific HTML elements using <namespace>
In previous chapters, you saw that a portlet can use HTML forms (like the Search and Add Book forms of the Book Catalog portlet), JavaScript, and CSS (like the bookCatalog.js and bookCatalog.css files for the Book Catalog portlet) to render its content. The <namespace> tag generates a unique string value specific to the portlet, and you can append or prepend it to the name of a form field, JavaScript function or variable, and ID attributes of HTML elements (like HTML DIV elements) to ensure that these elements don’t conflict with other page elements in the portal page.
Let’s now look at some scenarios that require you to use the <namespace> tag.
6.5.1. When to use the <namespace> tag
Consider a scenario in which you have two portlets, the Book Catalog portlet (which you developed in chapters 3 and 4) and the User Registration portlet (developed in chapter 2), on the same portal page. Let’s suppose that these two portlets include different JavaScript files (bookCatalog.js and userRegistration.js) containing a function with the same name, confirmSave.
The confirmSave function is defined in bookCatalog.js as shown here:
function confirmSave() {
  return confirm("Do you want to save Book information?");
}
The confirmSave function in userRegistration.js is defined as shown here:
function confirmSave() {
  return confirm("Do you want to save User details?");
}
When a user clicks a button that’s supposed to invoke the confirmSave function specific to the Book Catalog portlet, either the User Registration or the Book Catalog portlet’s confirmSave function will be invoked. It may happen that clicking the button of the Book Catalog portlet invokes the confirmSave function specific to the User Registration portlet or vice versa.
Note
A JavaScript global variable is a variable that’s defined outside a JavaScript function and that’s available to all functions defined on the HTML page. A JavaScript local variable is defined within a JavaScript function and has a local scope, which means it isn’t accessible to other JavaScript functions.
To resolve the issue with duplicate JavaScript functions or global variables, you can include your JavaScript code inside an HTML <script> tag in your JSP page, and use the <namespace> portlet tag library tag to make the name of the function or global variable unique to the portlet, as shown here:
<script type='text/javascript'>
  var <portlet:namespace/>someVar = 10;
  function <portlet:namespace/>confirmSave() {
    return confirm("Do you want to save Book information?");
  }
</script>
In the preceding code, the <namespace> tag is prefixed to the name of the someVar global variable and to the name of the confirmSave function, making their names unique on the portal page.
Note
You can’t add <namespace> tags to the functions and global variables defined in external JavaScript files included by your portlet. When using the HTML <script> tag within a JSP page included by a portlet, the <namespace> tag is processed by the JSP engine, making it available to the inline JavaScript functions and global variables.
If you now want to use the function or the global variable in your JSP, you must also use the <namespace> tag to identify the function or global variable, as shown here:
<a href="<portlet:actionURL name="save"/>"
onclick="javascript: return <portlet:namespace/>confirmRemove()">Save</a>
In the preceding code, the <namespace> tag is added to the confirmRemove JavaScript function call, which ensures that the JavaScript function of the same portlet is invoked.
Note
Even if you include multiple instances of the same portlet on a portal page, the <namespace> tag will generate a unique value for each portlet.
Because you can’t use the <namespace> tag in the external JavaScript file, the only option is to make the JavaScript functions part of your JSP page. But sometimes you may not be able to include all the JavaScript functions as part of the JSP page, in which case there’s no simple way to address the namespace issue. For instance, if you’re using a JavaScript library like the Dojo toolkit in your JSP page, you can’t copy all the functions defined by Dojo into your JSP page and add the <namespace> tag to them. The issue with externally loaded JavaScript is further compounded if portlets on a portal page use different versions of the same JavaScript library. For example, you could have two different portlets on a portal page using different versions of the Prototype JavaScript framework.
The namespace issue isn’t limited to JavaScript. It’s possible that external CSS files used by different portlets on the same portal page have conflicting style definitions, resulting in the wrong styles being applied to the wrong elements. In chapter 3, the Book Catalog portlet defined an anchor CSS class in bookCatalog.css that’s used to render a hyperlink in red:
.anchor { text-decoration: none; color: red; }
A hyperlink in the Book Catalog portlet makes use of the anchor CSS class using the class attribute, as shown here:
<a class="anchor" href="${fullScreenUrl}">
   <b><fmt:message key="label.fullScreen" /></b>
It’s possible that the User Registration portlet (or any other portlet on the same portal page) defines a conflicting anchor class. For instance, the User Registration portlet might define an anchor CSS class in its userRegistration.css file to show hyperlinks in green, as shown here:
.anchor { text-decoration: none; color: green; }
If conflicting CSS class definitions exist, the Book Catalog portlet may show hyperlinks in green or User Registration may show hyperlinks in red. To ensure that the correct CSS class definitions are applied to the correct portlets, you should name your CSS classes to uniquely identify the portlet they’re defined for or use CSS selectors to confine the scope of the CSS classes to the portlet.
The following entry in bookCatalog.css shows the use of a CSS selector:
div.bookCatalogPortlet_ch6 .anchor { text-decoration: none; color: red; }
The preceding CSS entry applies to elements with the class attribute anchor and that are inside a div tag with a class attribute of bookCatalogPortlet_ch6.
You can enclose your JSP page fragment inside a div tag with a class attribute of bookCatalogPortlet_ch6 to ensure that the preceding CSS applies only to the Book Catalog portlet:
<div class="bookCatalogPortlet_ch6">
<table align="left">
<tr>
<td><a class="anchor" href="${printModeUrl}"><b> <fmt:message
key="label.print" /> </b></td>
...
</tr>
</table>
</div>
In the preceding JSP code, the div tag’s class attribute value of bookCatalogPortlet_ch6 matches the CSS entry defined in bookCatalog.css, so the CSS entry will apply to the hyperlink (with class anchor) shown previously.
Note
A simpler way to avoid conflicts between CSS elements on portal pages is to use the style attribute of HTML elements to style your portlets.
If you’re using Ajax (which we’ll discuss in chapter 12), you may also need to uniquely identify the IDs of HTML elements and the names of HTML forms and form fields. You can easily do this by adding a <namespace> tag to an HTML element ID and to the names of form fields, as shown here:
<form name="<portlet:namespace/>addBookForm">
  <tr>
    <td>
      <input type="text" name="<portlet:namespace/>book"/>
    </td>
    <td>
      <div id="<portlet:namespace/>bookErrorMessage"></div>
    </td>
  </tr>
  ...
</form>
In chapter 14, you’ll see how the div tag (shown here) will act as a placeholder for all the error messages that occur for the book text field.
Let’s now look at how to retrieve form fields that use <namespace> tags in the portlet class.
6.5.2. Obtaining form field values in the portlet class
If you’re using <namespace> tags in form fields, you must append or prepend a tag (depending upon whether you appended or prepended the <namespace> tag to the name of the form fields) to the name of the field when retrieving them in your portlet class.
Consider the following JSP fragment, which defines a text field with the name bookTitle and prepends it with the <namespace> tag:
<input type="text" name="<portlet:namespace/>bookTitle"/>
When the form containing the preceding text field is submitted, the request will contain the bookTitle field with a name that you don’t know (because the <namespace> tag will generate a unique value that is prepended to the name bookTitle). To retrieve the value of the bookTitle form field in the portlet class, you need to add the namespace value (obtained using the PortletResponse’s getNamespace method) to the name of the form field, as shown here:
@ProcessAction(name = "addBookAction")
public void addBook(ActionRequest request, ActionResponse response)
  throws PortletException, IOException {
   String bookTitle =
     request.getParameter(response.getNamespace() + "bookTitle");
   ...
}
In the preceding code, the value returned by the getNamespace method is added to bookTitle before retrieving the value of the bookTitle form field from the request.
You may encounter differences in how different portal servers allow you to access namespaced request parameters. Suppose you define the bookTitle text field in your JSP page as shown here:
<input type="text" name="<portlet:namespace/>bookTitle"/>
Let’s see how different portal servers allow you to access this bookTitle text field in the portlet class.
Liferay Portal: Accessing Namespaced Request Parameters Without t- the Namespace Value
Liferay Portal 5.2.3/6.x removes the namespace value from the form fields (or any other request parameter) before making them available to your portlet class. You access namespaced form fields in Liferay Portal without adding the namespace value to their names.
If you want to access the bookTitle text field in your code, you must access it without adding the namespace value to its name, as shown here:
String bookTitle = request.getParameter("bookTitle");
If you add the namespace value to the name of the form field, the portlet class in Liferay Portal will return null, as shown here:
String bookTitle =
  request.getParameter(response.getNamespace() + "bookTitle");
Jetspeed: Accessing Namespaced Request Parameters by Adding a Namespace Value
If you’re using Jetspeed 2.2 (which uses the Pluto portlet container), you must access a namespaced form field (or any other request parameter) by adding the namespace value to the form field’s name, as shown here:
String bookTitle =
  request.getParameter(response.getNamespace() + "bookTitle");
You’ll get a null return value if you access the bookTitle text field without adding the namespace value to its name. As you can see, this is the opposite of the behavior in Liferay Portal 5.2.3/6.x.
Glassfish: Accessing Request Parameters with or Without Namespace Values
GlassFish (with OpenPortal Portlet Container 2.1.2) provides a much simpler way to access namespaced form fields. In GlassFish, you can access a form field (or any other request parameter) with or without adding the namespace value to its name. For instance, to access the bookTitle text field, you can use either of the following code lines:
String bookTitle = request.getParameter("bookTitle");
or
String bookTitle =
  request.getParameter(response.getNamespace() + "bookTitle");
In GlassFish (with OpenPortal Portlet Container 2.1.2), when you access a request parameter, the portlet container checks for the existence of the parameter in the request. If the request parameter is found in the portlet request, then it returns its value (which is why you can access form fields in GlassFish by adding the namespace value to the form field name). If the request parameter isn’t found in the portlet request, the portlet container prepends the namespace value to the request parameter name and again attempts to access the parameter in the request (which is why you can access form fields in GlassFish without adding the namespace value to the form field name).
Let’s now look at the <property> tag of the portlet tag library.
6.6. Adding properties to URLs using <property>
Properties contain portal- or portlet container–specific information that’s used by the portlet. You can add properties to a portlet URL with the <property> tag. This tag serves the same purpose as the PortletURL’s addProperty method, and it can be used only inside <renderURL>, <actionURL>, and <resourceURL> tags.
The <property> tag defines two required attributes:
- name—Specifies the name of the property that you want to add to the URL
- value—Specifies the value of the property
Note
If you want to add a property to all portlet URLs, you should consider using the PortletURLGenerationListener (refer section 4.6.3 of chapter 4).
If you’re using Liferay Portal 5.2.3 or Jetspeed 2.2, the <property> tag won’t work because Liferay Portal and Jetspeed ignore properties set in the portlet URL. If in Liferay Portal or Jetspeed you set a custom property using the <property> tag and retrieve it in the portlet class by using the PortletRequest’s getProperty method, it will return null.
Note
If you’re using Glassfish with OpenPortal Portlet Container 2.1.2, you’ll see that the OpenPortal Portlet Container translates properties into request parameters—properties added to a portlet URL are added as request parameters to the URL.
The <property> tag is one of the least used tags in JSPs, but it could be useful if a more consistent implementation of it were available across different portal servers.
That covers all the portlet tag library tags that are available as part of Portlet 2.0.
6.7. Summary
In this chapter, you saw how the portlet tag library tags can be used to simplify the development of JSP pages used by portlets. In chapter 4, you created render and action URLs in the portlet class—a task that should lie with the JSP page. Using portlet tags results in the content responsibility being contained completely within the JSP page.
If you’re using any other view technology, it’s up to your portal server to provide the necessary portlet objects and tag library features to your view technology.
Take a deep breath now, because we’re going to dive headfirst into Spring Portlet MVC next. It’s not simple, but we’ll walk through it step by step.