
Chapter 7. Getting started with Spring Portlet MVC
- Spring Framework basics
- Handlers or controllers
- Handler mappings
- Handler interceptors
- Exception handling
In earlier chapters, you learned about the portlet lifecycle and core concepts of the Java portlet technology. You developed the Book Catalog portlet by extending the GenericPortlet class and writing action and render methods containing navigation and validation logic, along with action processing and content generation logic. The portlet class acted as a controller, responsible for data validation, dispatching requests to appropriate JSPs, preparing data for the JSP pages, and encapsulating calls to business services.
As more and more features are added to a portlet, the portlet class becomes bloated with extra responsibilities, resulting in unfocused and unmanageable code. To deal with a bloated controller class, you can split the request-processing responsibilities into more focused components or classes by using a portlet framework. Web or portlet frameworks make use of best design practices and patterns to simplify development. Some of the widely used web frameworks, like Struts, JSF, and Wicket, currently let you develop portlets by bridging the differences between portlet and servlet technologies.
This chapter focuses on Spring’s Portlet MVC framework, which can be used to build real-world portlets. Spring Portlet MVC is the only framework designed specifically to develop portlets. You could alternatively use a web framework like JSF or Wicket (coupled with a portlet bridge) to create portlets, but that approach hides the multiple lifecycle phases of portlets, and in some scenarios you might find it difficult to take full advantage of the portlet technology. For instance, if you’re using the Wicket portlet bridge, you won’t be able to use Portlet 2.0’s inter-portlet communication feature. For more details on how you can use JSF or Wicket along with a portlet bridge, refer to chapter 14.
This chapter will begin with a gentle introduction to Spring Framework, and then we’ll move on and implement a simple Hello World portlet using the Portlet MVC framework. We’ll then cover the fundamentals of the Spring 3.0 Portlet MVC framework, which includes controllers or handlers, handler mappings, web application contexts, handler interceptors, and so on. You’ll find that handlers and controllers are discussed in great detail in this chapter because Spring Portlet MVC provides many built-in controllers or handlers to simplify portlet development. You’ll also find many code examples to demonstrate how the various pieces of the framework work together to handle portlet requests and generate content.
Note
Advanced concepts, like annotation-driven development support in Spring Portlet MVC, and unit testing portlets using mock objects, are covered in chapter 8.
7.1. Why use Spring Portlet MVC?
Spring (http://www.springsource.org/) is a non-intrusive framework that has gained prominence in recent years with its POJO (plain old Java object) approach to developing enterprise applications, which has resulted in increased productivity and ease of testing. In this chapter, we’ll discuss the basics of Spring’s Portlet MVC framework, which is Spring’s MVC framework for developing portlets. The Portlet MVC framework is designed around the same concepts as, and mirrors the classes and interfaces of, Spring’s Web MVC framework, which is used to develop servlet-based web applications. Developers who have prior experience in developing web applications using the Web MVC framework will find it easy to use.
The Spring Portlet MVC framework differs from other frameworks because it’s exclusively designed for developing portlets; it avoids the limitations that come with developing portlets in an existing web framework. Web frameworks are based on servlet technology, which doesn’t have the concept of lifecycle phases, so they end up hiding the different lifecycle phases of a portlet. With the Spring Portlet MVC framework you get not only a full-featured portlet framework that preserves the lifecycle phases of portlets, but also features like dependency injection, POJO-based development, and ease of testing, which are the cornerstones of the Spring Framework.
If you have prior experience working with Spring Framework or the Spring Web MVC framework, this chapter will get you started with portlet development using the Portlet MVC framework. This chapter attempts to provide a brief introduction to Spring Framework, but for a more comprehensive introduction to Spring, I recommend you refer to Spring’s tutorials, available at http://www.springsource.org, which cover the foundation concepts of Spring Framework. You may also want to refer to Spring in Action, Third Edition, by Craig Walls, also from Manning, to get a solid Spring Framework foundation.
Let’s now look at dependency injection and the application context in Spring.
7.2. Dependency injection and the application context
Dependency injection (DI) is at the core of Spring Framework. You’ll need a good understanding of DI to understand the rest of the topics discussed in this chapter. In this section, we’ll take a quick look at what DI is and how Spring uses it to allow developers to quickly configure and develop applications. We’ll also look at the concept of the application context in Spring, which provides access to the objects that form part of Spring-based applications.
7.2.1. An e-commerce example
Let’s consider an e-commerce application that involves a few application objects, as defined here:
- OrderHandler—A presentation-tier component that’s responsible for handling orders submitted by customers. It depends upon OrderService to save the submitted orders.
- OrderService—A component that contains the business logic for saving an order in the database. It depends upon OrderDAO to save the order information in the database.
- OrderDAO—A data access object that’s responsible for interacting with the database to save the order information submitted by the customer.
Figure 7.1 shows the dependency between the OrderHandler, OrderService, and OrderDAO application objects.
Figure 7.1. OrderHandler depends upon OrderService, which in turn depends upon OrderDAO.

The dependency of application objects, as shown in figure 7.1, can be fulfilled by manually creating these objects in the dependent objects, as shown next.
public class OrderHandler {
    private OrderService orderService = new OrderService();
    public void saveOrder(...) {
        orderService.saveOrder(...);
    }
}
public class OrderService {
    private OrderDAO orderDAO = new OrderDAO();
    public void saveOrder(...) {
        orderDAO.saveOrder(...);
    }
}
In the preceding code, the OrderHandler object is tightly coupled with OrderService, and OrderService is tightly coupled with OrderDAO.
Let’s now assume that you want to use the OrderService object in a different application that requires the business functionality of OrderService but that saves data differently than the way it is implemented in OrderDAO. The tight coupling of OrderService and OrderDAO makes it difficult to reuse the OrderService object in other applications.
The logical step is to factor out the dependency logic from OrderService and use a factory object, as shown here:
public class OrderService {
    public void saveOrder(...) {
        DaoFactory.getOrderDao().saveOrder(...);
    }
}
public class DaoFactory {
    public static OrderDAOIntf getOrderDao(...) {
        return new OrderDAO();
    }
}
public interface OrderDAOIntf {
    void saveOrder(...);
}
public class OrderDAO implements OrderDAOIntf {
   void saveOrder(...);
}
In the preceding code, OrderDAOIntf is an interface that’s implemented by OrderDAO. The DaoFactory is a factory class responsible for creating the OrderDAO object and returning it as OrderDAOIntf to the OrderService class.
The use of a factory class removes the direct dependency of OrderService on OrderDAO. With the introduction of the OrderDAOIntf interface, OrderService now depends on OrderDAOIntf, instead of OrderDAO. This is a better design, because direct dependency on the implementation was removed.
Now, if you want to use OrderService in a different e-commerce application, you only need to add the logic to create a different OrderDAOIntf implementation, specific to that e-commerce application. This means you still need to write code in the DaoFactory class, and at compile time, OrderDAO must be in the classpath.
A much cleaner approach is to use dependency injection (DI) to create and inject object dependencies.
7.2.2. Dependency injection and application contexts
When using DI, dependencies are specified in an external configuration file (like an XML file) or within the source code (using annotations), and these dependencies are injected into the dependent objects by an IoC (Inversion of Control) container. An IoC container is responsible for creating and managing application objects, and for injecting dependencies based on the configuration information. This relieves developers of the responsibility of managing application objects and injecting dependencies; it inverts the control of managing application objects and injecting dependencies.
Spring Framework consists of an IoC container that’s responsible for reading configuration information from an application context XML file, creating and managing application objects and injecting dependencies.
Note
Spring’s IoC container provides many features, but for the sake of simplicity I’ll focus only on the DI feature in this section.
To use Spring’s IoC container for DI in the e-commerce application, you’d first need to explicitly specify dependencies in the source code of the application objects. In Spring, dependencies are specified in the source code of an application object using constructors and setter methods.
Note
Spring offers many ways to inject dependencies into an application object. For the purposes of this book, I’ll just discuss DI using setter methods and constructors. Refer to Spring 3.0 reference documentation for a detailed discussion of different approaches for injecting dependencies.
The following listing shows how the OrderHandler and OrderService classes define their dependencies.
Listing 7.1. Defining dependencies in application objects

OrderHandler defines OrderService ![]() as an attribute of the class, and
as an attribute of the class, and ![]() a setter method is defined for the OrderService attribute. OrderService defines OrderDAOIntf
a setter method is defined for the OrderService attribute. OrderService defines OrderDAOIntf ![]() as an attribute of the class, and
as an attribute of the class, and ![]() a setter method is defined for the OrderDAOIntf attribute.
a setter method is defined for the OrderDAOIntf attribute.
In listing 7.1, setter methods define dependencies of the application objects, and they leave it up to Spring’s IoC container to inject the dependencies when the container initializes the application objects.
Now that the application objects have defined their dependencies using setter methods, you need to tell Spring’s IoC container about the existence of these objects in the application. The application context XML file is used to define the application objects and their dependencies, and it’s then read by the IoC container to create objects and wire dependencies.
You can define an object in Spring’s application context XML as follows:
<bean id="<beanId>" class="<beanClass>"/>
Here, beanId is the unique ID for the bean in the application context, and beanClass is the fully qualified name of the bean class.
Note
Application objects defined in the application context XML are referred to as beans, but that doesn’t mean that you can’t define non-bean objects in the application context XML.
The following application context XML shows how you can define the e-commerce application objects:
<beans ...>
  <bean id="handler" class="mypackage.OrderHandler"/>
  <bean id="service" class="mypackage.OrderService"/>
  <bean id="dao" class="mypackage.OrderDAO"/>
</beans>
In the preceding application context XML, beans is the root element of the XML, and each bean element represents an application object. You can assign any value as an id of the object, as long as it’s unique within the application context. The preceding XML simply defines the application objects, without any details about how the wiring happens between the application objects.
Note
The value of the id attribute is also referred to as the bean name.
You saw earlier that using setter methods for dependencies effectively makes the dependencies look like bean properties. If you want to call an application object’s setter method, you can use the property subelement of the bean and pass a value, which could be another bean, a simple String value, or any other value type. The next listing shows how the e-commerce application objects will be represented in Spring’s application context XML file.
Listing 7.2. Spring’s application context XML file

The handler definition ![]() refers to the OrderHandler class. The name attribute of the property element identifies the property of the OrderHandler class that’s set by Spring’s IoC container when the OrderHandler object is initialized. Because the name attribute refers to the OrderHandler class’s orderService property, the container will call the OrderHandler class’s setOrderService method.
refers to the OrderHandler class. The name attribute of the property element identifies the property of the OrderHandler class that’s set by Spring’s IoC container when the OrderHandler object is initialized. Because the name attribute refers to the OrderHandler class’s orderService property, the container will call the OrderHandler class’s setOrderService method.
The setOrderService method is defined to accept an instance of the OrderService object as an argument (see listing 7.1), so you need to set a value of type OrderService for the property. This is accomplished by using the ref element. In the application context XML, the ref element is used to cross-reference the application object defined in the application context XML file. The ref element’s bean attribute uniquely identifies an application object defined in the application context XML; it has a value of service, which instructs the container to find an application object whose id attribute value is service.
OrderService is defined ![]() with an id attribute value of service, so the container invokes the OrderHandler’s setOrderService method and passes it an instance of the OrderService application object. OrderService defines how the OrderService’s orderDAOIntf property
with an id attribute value of service, so the container invokes the OrderHandler’s setOrderService method and passes it an instance of the OrderService application object. OrderService defines how the OrderService’s orderDAOIntf property ![]() is to be resolved by the container. The OrderDAO properties are set to String values
is to be resolved by the container. The OrderDAO properties are set to String values ![]() using the property element’s value attribute.
using the property element’s value attribute.
Listing 7.2 shows how the configuration information regarding the initialization of and dependency between application objects is specified using Spring’s application context XML file. If you look at the OrderService class, it’s dependent on the OrderDAOIntf interface and not on the OrderDAO concrete implementation class.
As defined in the XML file, OrderService depends on OrderDAO in the current configuration. If you need to change the dependency from OrderDAO to a new XyzDAO implementation, all you need to do is create a new XyzDAO class that implements the OrderDAOIntf interface and change the configuration in the application context XML, as shown here:
<bean id="service" class="mypackage.OrderService">
   <property name="orderDaoIntf">
      <ref bean="dao"/>
   </property>
</bean>
<bean id="dao" class="somePackage.XyzDAO">
  <property ...>
    ...
  </property>
  ...
</bean>
The preceding XML fragment shows that as long as OrderService isn’t directly dependent on OrderDAO, you can easily replace the dependency with a different implementation.
The Spring IoC container uses the application context XML file to instantiate and initialize application objects and inject dependencies, which effectively saves you the effort of writing boilerplate code in the factory class. Because the Spring IoC container only takes the application context XML file as input, you can configure Spring Framework features in the application context XML. For instance, you can define transactional methods in the application context XML, and the Spring container takes care of invoking the methods within a transaction. For a detailed set of features offered by Spring Framework, refer to the Spring 3.0 reference documentation.
Let’s now look at the web application context XML, which is a variation on the application context XML file.
7.2.3. Web application contexts
You now know how to define beans in the Spring application context XML, and how to initialize their properties and resolve dependencies. Defining beans and their dependencies is fundamental to any Spring application.
If you’re using Spring Portlet MVC, each portlet in your portlet application is associated with its own web application context XML file. Note that even though we’re using the term “web application context XML,” the file isn’t associated with the web application but with an individual portlet. The portlet application (which is also a web application) is also associated with a web application context XML file, which is referred to as the root web application context XML file.
A portlet’s web application context XML file defines the controllers, services, DAOs, and other application objects that form part of that portlet. You may also define Spring’s special beans in your web application context XML; they provide functionality suitable for implementing most portlets. For instance, the Spring Portlet MVC framework’s PortletModeHandlerMapping bean is useful in mapping portlet requests to appropriate handlers based on the current portlet mode.
In the case of Spring Portlet MVC–based portlets, the beans defined in the web application context XML files are instantiated and initialized when the framework is initialized. The scope of the beans defined in the web application context XML file is the portlet for which they’re defined. If the portlet application also defines a root web application context XML file, the beans defined in that file are available to the web application contexts of the portlets in the portlet application. You can think of the root web application context as the parent of all the web application contexts associated with portlets in the portlet application.
With this basic understanding of Spring IoC containers and how you can define beans in an application context XML file, you’re now ready to create a portlet that uses the Spring Portlet MVC framework.
7.3. A Hello World portlet, the Spring way
The Hello World portlet that we’ll discuss in this section is same as the one in chapter 1, except that this version will use Spring Portlet MVC and will demonstrate what you need to do to create a portlet using Spring Portlet MVC.
Because the Hello World portlet uses Spring-specific JAR files, you can either download the Spring 3.0 release JAR files from the SpringSource website (http://www.springsource.org/download) or you can import the ch7_HelloWorld Eclipse project from the source code that accompanies this book.
Code Reference
You should import the ch7_HelloWorld project so that you can follow along with the code references and discussions in the rest of this section.
The following JAR files must be present in the WEB-INF/lib directory of the project structure described in chapter 1:
- org.springframework.asm-3.0.0.RELEASE
- org.springframework.beans-3.0.0.RELEASE (add this file to your project’s build path)
- org.springframework.context-3.0.0.RELEASE (add this file to your project’s build path)
- org.springframework.core-3.0.0.RELEASE
- org.springframework.expression-3.0.0.RELEASE
- org.springframework.web-3.0.0.RELEASE (add this file to your project’s build path)
- org.springframework.web.portlet-3.0.0.RELEASE (add this file to your project’s build path)
- org.springframework.web.servlet-3.0.0.RELEASE
The rest of this section shows the configuration files and classes for the version of the Hello World portlet that uses Spring Portlet MVC.
7.3.1. The Hello World portlet’s controller class
In Spring Portlet MVC, the controller class (and not the portlet class) contains the actual request-handling logic for the portlet. The next listing shows the HelloWorldController controller class.
Listing 7.3. The HelloWorldController class

The HelloWorldController portlet request handler implements the org.springframework.web.portlet.mvc.Controller interface ![]() , which defines two methods:
, which defines two methods:
- handleActionRequest—This is the same as portlet’s action method
- handleRenderRequest—This is the same as portlet’s render method
The HelloWorldController’s handleRenderRequest method returns a ModelAndView object ![]() that contains the model data and view information. You’ve seen in earlier chapters that a render method creates content by dispatching a render request to a JSP
page, and the data that needs to be rendered by the JSP page is passed as request attributes. In Spring Portlet MVC, the ModelAndView object holds the model data (the data to be rendered) and the view information (the JSP page), and it’s used by the Spring
Portlet MVC framework to dispatch the render request to the view and to pass the model data.
that contains the model data and view information. You’ve seen in earlier chapters that a render method creates content by dispatching a render request to a JSP
page, and the data that needs to be rendered by the JSP page is passed as request attributes. In Spring Portlet MVC, the ModelAndView object holds the model data (the data to be rendered) and the view information (the JSP page), and it’s used by the Spring
Portlet MVC framework to dispatch the render request to the view and to pass the model data.
Note
Because the Spring Portlet MVC framework takes care of dispatching requests and passing data to the JSP page, you don’t use the PortletRequestDispatcher in the handleRenderRequest method, nor do you set any request attributes.
The ModelAndView object in the HelloWorldController class contains a model (the model variable in the handleRenderRequest method in listing 7.3) as a Map object and a view name (the helloWorld string argument passed to the ModelAndView constructor in listing 7.3) as a String object. The "Hello World" message that you want to display using the JSP page is passed as a model attribute with the name helloWorldMessage.
7.3.2. The Hello World portlet’s JSP page
Listing 7.3 included a helloWorldMessage model attribute with a value of "Hello World". The Spring Portlet MVC framework converts model attributes (like the helloWorldMessage attribute) to request attributes so that JSP pages can easily access them.
The helloWorld.jsp page in the Hello World portlet shows the "Hello World" message as shown here:
<%@ taglib prefix="c" uri="http://java.sun.com/jsp/jstl/core" %>
<%@ page contentType="text/html" isELIgnored="false" %>
<c:out value="${helloWorldMessage}"/>
In the preceding JSP page, the <c:out value="${helloWorldMessage}"/> code writes the "Hello World" message to the response stream because that’s the value of the helloWorldMessage request attribute.
7.3.3. The Hello World portlet’s portlet deployment descriptor
If you’re using the Spring Portlet MVC framework to create your portlet, you’ll use the org.springframework.web.portlet.DispatcherPortlet class as the portlet class. It extends the javax.portlet.GenericPortlet class and is responsible for dispatching portlet requests to the appropriate handler. The following listing shows the portlet.xml file for the Hello World portlet example.
Listing 7.4. The portlet.xml file
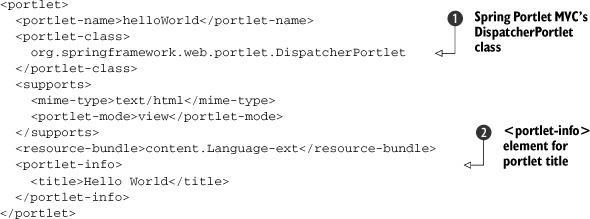
The Spring Portlet MVC framework’s DispatcherPortlet class ![]() is specified as the portlet class. The <portlet-info> element
is specified as the portlet class. The <portlet-info> element ![]() is used to specify the portlet title.
is used to specify the portlet title.
Note
If you specify the title both in the resource bundle using the javax.portlet.title key and in the portlet.xml file, the title specified in the resource bundle takes precedence.
7.3.4. The Hello World portlet’s web application context
As discussed earlier, the core of a Spring Framework application is the application context, which identifies the objects that form part of the application, and their interdependencies.
Listing 7.5 shows the objects defined in the Hello World portlet’s web application context XML file. The name of the web application context file must be
<portlet_name>-portlet.xml
where <portletname> is the name of the portlet, as defined by the <portletname> element in the portlet.xml file. This file must reside in the WEB-INF folder of your project.
Listing 7.5. The helloWorld-portlet.xml file

The HelloWorldController handler is defined ![]() . The PortletModeHandlerMapping bean
. The PortletModeHandlerMapping bean ![]() maps the portlet mode to the handler responsible for handling portlet requests in that mode. The VIEW portlet mode of the Hello World portlet
maps the portlet mode to the handler responsible for handling portlet requests in that mode. The VIEW portlet mode of the Hello World portlet ![]() is mapped to HelloWorldController, which means that any portlet request (render or action) sent by the portlet in VIEW mode will be handled by HelloWorldController.
is mapped to HelloWorldController, which means that any portlet request (render or action) sent by the portlet in VIEW mode will be handled by HelloWorldController.
The InternalResourceViewResolver is Spring Framework’s built-in bean ![]() , which is used to map view names (see listing 7.3) to the actual view (which could be a servlet or a JSP). It makes use of the viewClass property to define the class responsible for generating the view. If you’re using JSPs that contain JSTL, you should specify
the value of the viewClass property as JstlView. The prefix property value is prepended, and the suffix property value is appended, to the view name to create the URL referring to the actual view.
, which is used to map view names (see listing 7.3) to the actual view (which could be a servlet or a JSP). It makes use of the viewClass property to define the class responsible for generating the view. If you’re using JSPs that contain JSTL, you should specify
the value of the viewClass property as JstlView. The prefix property value is prepended, and the suffix property value is appended, to the view name to create the URL referring to the actual view.
In the Hello World portlet, the HelloWorldController’s handleRenderRequest method returns a ModelAndView object containing the helloWorld view name (see listing 7.3). That view name is resolved to an actual view by InternalResourceViewResolver, by prepending /WEB-INF/jsp/ and appending .jsp to the helloWorld view name. This makes the URL of the actual view /WEB-INF/jsp/helloWorld.jsp. This means that the helloWorld.jsp page shown in section 7.3.2 must reside in the /WEB-INF/jsp/ folder.
7.3.5. The Hello World portlet’s web application deployment descriptor
The InternalResourceViewResolver bean resolves a view name to an actual view, and the rendering of the view is done by Spring’s built-in ViewRendererServlet servlet. The ViewRendererServlet acts as a bridge between the portlet and the actual view.
The following listing shows the ViewRendererServlet configuration in the web.xml file.
Listing 7.6. The web.xml file

Spring’s ViewRendererServlet ![]() is defined. The ViewRendererServlet
is defined. The ViewRendererServlet ![]() is mapped to the URL /WEB-INF/servlet/view. This URL is used internally by DispatcherPortlet to dispatch a request to ViewRendererServlet for view rendering. The URL can be modified by using the DispatcherPortlet’s viewRendererUrl initialization parameter.
is mapped to the URL /WEB-INF/servlet/view. This URL is used internally by DispatcherPortlet to dispatch a request to ViewRendererServlet for view rendering. The URL can be modified by using the DispatcherPortlet’s viewRendererUrl initialization parameter.
That’s all you need to do to create a Hello World portlet using Spring Portlet MVC. You’re now ready to build and deploy the portlet, as explained in chapter 1.
The Hello World example in this section was a bit more involved than the Hello World portlet example in chapter 1 because of the new configuration file (the web application context XML file) and some new classes and interfaces (ViewRendererServlet, Controller, and so on). Spring Portlet MVC is most useful when creating multipage portlets that provide multiple functionalities, as you’ll see later in this chapter.
If this section has left you wondering exactly how Spring Portlet MVC works, the next section will show you how the different special beans of Spring Portlet MVC work together to handle portlet requests and generate responses.
7.4. How Spring Portlet MVC works
You saw in the previous section that the DispatcherPortlet acts as the portlet class for Spring Portlet MVC portlets. So what does DispatcherPortlet do?
If you have prior experience working with the Struts framework, you can closely relate the DispatcherPortlet here to the RequestProcessor class in the Struts framework. The DispatcherPortlet is at the heart of the Spring Portlet MVC framework and, like the RequestProcessor of the Struts framework, it’s responsible for coordinating all the request handling activities on receipt of a portlet request. It works with the other Spring Portlet MVC classes and interfaces that you saw in the Hello World portlet; figure 7.2 illustrates how they all interact.
Figure 7.2. Request processing in Spring Portlet MVC. The DispatcherPortlet acts as the front controller for each portlet and finds the handler mapped to the request using HandlerMapping. The result of executing a handler, ModelAndView, is used to resolve the actual view to be rendered, and the request is dispatched to ViewRendererServlet for rendering.
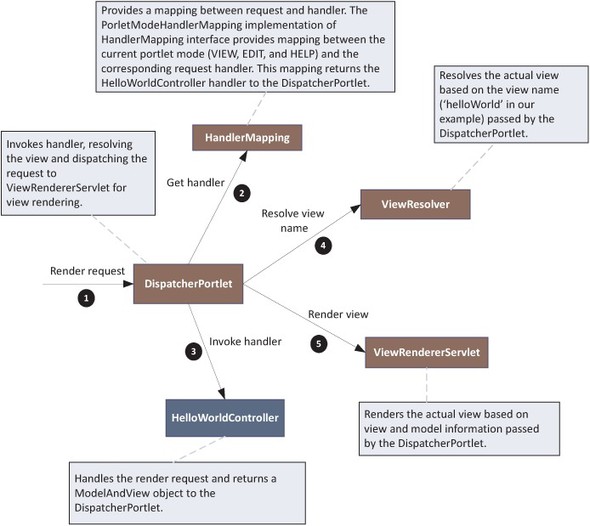
When a portlet request is received by the DispatcherPortlet (which is the portlet class) ![]() , it first attempts to find an appropriate handler for the request, and Spring Portlet MVC’s HandlerMapping type bean helps with this. Depending upon how you want to select a handler based on the portlet request, you’ll select an
appropriate built-in HandlerMapping bean implementation. The Hello World portlet uses the PortletModeHandlerMapping bean which implements HandlerMapping and which selects an appropriate handler based on the current portlet mode
, it first attempts to find an appropriate handler for the request, and Spring Portlet MVC’s HandlerMapping type bean helps with this. Depending upon how you want to select a handler based on the portlet request, you’ll select an
appropriate built-in HandlerMapping bean implementation. The Hello World portlet uses the PortletModeHandlerMapping bean which implements HandlerMapping and which selects an appropriate handler based on the current portlet mode ![]() . In the Hello World portlet, the PortletModeHandlerMapping maps the VIEW portlet mode to the HelloWorldController (see listing 7.5), so HelloWorldController is the handler for the render request received
. In the Hello World portlet, the PortletModeHandlerMapping maps the VIEW portlet mode to the HelloWorldController (see listing 7.5), so HelloWorldController is the handler for the render request received ![]() by DispatcherPortlet.
by DispatcherPortlet.
Once the handler is selected for request processing, the DispatcherPortlet invokes the appropriate handler method to do the actual request processing. In listing 7.3, the handler’s handleRenderRequest method is responsible for handling render requests, and the handleActionRequest method handles action requests. The request received at ![]() is a render request, so the request is handled by the HelloWorldController’s handleRenderRequest method
is a render request, so the request is handled by the HelloWorldController’s handleRenderRequest method ![]() . That method returns a ModelAndView object. The DispatcherPortlet uses the view information in the ModelAndView object to obtain a reference to the actual view, which, in the case of the Hello World portlet, is a JSP page.
. That method returns a ModelAndView object. The DispatcherPortlet uses the view information in the ModelAndView object to obtain a reference to the actual view, which, in the case of the Hello World portlet, is a JSP page.
Spring Portlet MVC’s built-in ViewResolver type bean helps with resolving the view; it finds the actual view corresponding to the logical view name. The Hello World
portlet makes use of the InternalResourceViewResolver bean (which implements ViewResolver) to resolve the view name to the actual JSP page ![]() . Once the actual view is resolved, the DispatcherPortlet dispatches the request to the built-in ViewRenderServlet servlet (see listing 7.6) and sends the reference to the actual view along with the model data for rendering the view
. Once the actual view is resolved, the DispatcherPortlet dispatches the request to the built-in ViewRenderServlet servlet (see listing 7.6) and sends the reference to the actual view along with the model data for rendering the view ![]() .
.
Spring Portlet MVC provides many built-in ViewResolvers that you can use, depending on the view technology you’re using. The built-in view resolvers include XmlViewResolver, VelocityViewResolver, FreeMarkerViewResolver, and ResourceBundleViewResolver. Later in this chapter, you’ll see how HandlerMapping and ExceptionResolver chains are created. Similarly, you can also create a ViewResolver chain to resolve views.
Note
The DispatcherPortlet auto-detects view resolvers based on the type of bean defined in the portlet’s web application context or in the root web application context, and applies them during view resolution. For example, if a bean that’s defined in the portlet’s web application context implements the ViewResolver interface, DispatcherPortlet makes use of that bean for resolving views for the portlet.
Now that you’ve a seen a simple Hello World example using Spring Portlet MVC, and you have a basic idea of what classes, interfaces, and configurations are involved while processing portlet requests in Spring Portlet MVC, we’ll look at each of them in detail, starting with DispatcherPortlet.
7.5. Using DispatcherPortlet
The DispatcherPortlet acts as the front controller in the Spring Portlet MVC framework (as shown in figure 7.2). It’s responsible for the following:
- Sending portlet requests to the appropriate handler (explained in section 7.7). The mapping of the portlet request to an appropriate handler is specified using HandlerMapping beans (explained in section 7.8). In the Hello World portlet, this mapping is specified by the PortletModeHandlerMapping bean in the hello-World-portlet.xml file (see listing 7.5).
- Resolving the view using ViewResolver. The InternalResourceViewResolver in listing 7.5 supports JSPs and servlets as view technologies. You can use different ViewResolvers depending upon the view technologies you’re using (such as JSP, Velocity, and FreeMarker).
- Dispatching requests to the ViewRendererServlet to render views. The ViewRendererServlet is configured in the web application deployment descriptor (see listing 7.6), and by default it’s mapped to the URL /WEB-INF/servlet/view. The DispatcherPortlet includes the content generated by the ViewRendererServlet using the PortletRequestDispatcher object:
getPortletContext().getRequestDispatcher(viewRendererUrl).
include(request, response) In this code, viewRendererUrl is the URL to which the ViewRendererServlet is mapped.
Note
The model and view information is passed to the ViewRendererServlet using request attributes. The model information is passed as a java.util.Map object, which can be transformed into any format (depending upon the view technology being used) by ViewRendererServlet, making it possible for ViewRendererServlet to render views in any view technology.
In most application scenarios, the features offered by the DispatcherPortlet are sufficient, and you don’t need to extend the DispatcherPortlet class to create a custom portlet class. DispatcherPortlet comes with certain built-in initialization parameters that you can use to customize its behavior. For instance, you can use the viewRendererUrl initialization parameter to change the default URL to which DispatcherPortlet sends requests for view rendering. Similarly, you can use the contextConfigLocation initialization parameter to provide a custom name and location for your web application context XML file, and so on.
Let’s now take an in-depth look at the concept of the web application context in Spring Portlet MVC.
7.6. Using the web application context
DispatcherPortlet is central to portlet request processing, and the web application context is central to configuring your portlet in Spring Portlet MVC.
In Spring Portlet MVC, the web application context XML file contains configuration information about the portlet; the file defines beans that form part of the portlet (see listing 7.5). Beans and their interdependencies are defined declaratively in the web application context XML file, and the Spring Framework is responsible for injecting these dependencies while creating them.
Note
In chapter 8, you’ll see how annotations can be used to specify bean dependencies.
The beans defined in a web application context XML file include application-specific beans (like services and DAOs) and Spring’s special beans, which implement framework-specific interfaces (like handlers and interceptors, handler mappings, view resolvers, and so on). In a portlet application, each portlet is associated with its web application context XML file, and the file is represented by the WebApplicationContext object in Spring. This effectively means that each DispatcherPortlet is associated with a WebApplicationContext of its own. The portlet application also has its own WebApplicationContext object. The WebApplicationContext object associated with the DispatcherPortlet inherits the beans defined in the WebApplicationContext associated with the portlet application.
Let now look at how web application context XML files are named.
7.6.1. Naming web application context XML files
As you saw in the Hello World example, developing a portlet using the Spring Portlet MVC framework requires at least a handler, a handler mapping, and a view resolver bean—all of which are defined in the web application context XML file. In the Hello World portlet, the helloWorld-portlet.xml file is the web application context XML file for the helloWorld portlet (see the <portlet-name> element in listing 7.4) in portlet.xml. Also, the helloWorld-portlet.xml file represents the WebApplicationContext associated with the helloWorld portlet’s DispatcherPortlet.
The name of the web application context XML file for a portlet must have the following format:
<portlet_name>-portlet.xml
Here, <portlet_name> is the name of the portlet as defined by the <portlet-name> element in the portlet.xml file. The web application context XML file must reside in the WEB-INF directory of your project, as shown in figure 7.3.
Figure 7.3. The web application context XML file is located in the WEB-INF directory and is named following the portletName-portlet.xml convention.

If you want to name your web application context XML files differently or store them in a different location, you can do so by using the DispatcherPortlet’s contextConfigLocation initialization parameter, as shown here:
<portlet>
  <portlet-name>helloWorld</portlet-name>
  <portlet-class>
    org.springframework.web.portlet.DispatcherPortlet
  </portlet-class>
  <init-param>
   <name>contextConfigLocation</name>
   <value>/WEB-INF/context/portlet/myContext.xml</value>
  </init-param>
  ...
</portlet>
You can also specify multiple locations for the web application context XML files as comma-separated values in the contextConfigLocation parameter.
Let’s now look at the scope of beans defined in the web application context XML file.
7.6.2. Scope of beans defined in the web application context XML
As mentioned earlier, DispatcherPortlet is associated with a WebApplicationContext of its own, defined by the portlet’s web application context XML file. Beans defined in this file aren’t accessible to other portlets in the same portlet application, which makes the bean definitions portlet-specific.
If you want to share beans across different portlets, you must define them in the root web application context associated with the portlet application. For instance, if you’re using JSP with JSTL in your portlet application, you’d need to specify the following ViewResolver bean in all your portlet-specific web application contexts:
<bean id="viewResolver" class="org.springframework.web.servlet.view.InternalResourceViewResolver"> <property name="viewClass" value="org.springframework.web.servlet.view.JstlView"/> <property name="prefix" value="/WEB-INF/jsp/" /> <property name="suffix" value=".jsp" /> </bean>
You can save the effort of writing this bean definition in all the portlet-specific web application contexts by defining it in the root web application context.
Root Web Application Context XML
The root web application context XML file is associated with the portlet application. The web application context XML file for a portlet contains portlet-specific beans, whereas the root web application context XML file contains beans that are accessible to all portlets in the portlet application. A bean defined in the root web application context XML can be overridden by the portlet-specific application context XML file by defining a bean with the same bean ID.
The portlet-specific web application context will implicitly inherit beans from the root web application context. By default, the root web application context XML file is defined with the name applicationContext.xml, and it must be located in the WEB-INF directory. The root web application context XML file is loaded by the ContextLoaderListener object, which is configured in the portlet application’s web.xml file, as shown here:
<listener>
  <listener-class>
    org.springframework.web.context.ContextLoaderListener
  </listener-class>
</listener>
If you want to name your root web application context XML file differently or store it in a different location than the WEB-INF directory, you can specify the location of the root web application context XML file by using the contextConfigLocation context initialization parameter:
<context-param>
  <param-name>contextConfigLocation</param-name>
  <param-value>/WEB-INF/context/applicationContext.xml</param-value>
</context-param>
Note
The contextConfigLocation portlet-initialization parameter is used to specify a custom name or location for the web application context XML file used by DispatcherPortlet. The contextConfigLocation context-initialization parameter is used to specify a custom name or location for the root web application context XML file.
If you don’t define a root web application context XML file, your portlets aren’t associated with a root web application context.
As in the case of portlets, the root web application context is represented by the WebApplicationContext object. Spring stores the root WebApplicationContext as an attribute in ServletContext and the portlet’s WebApplicationContext as an attribute in PortletContext. You saw earlier that PortletContext and ServletContext mirror each other’s attributes, so Spring is responsible for naming each WebApplicationContext attribute with a unique name.
The web application context XML file used by DispatcherPortlet defines controller beans that contain the render and action request processing functionality of the portlet. It’s possible that a controller contains only render or action request processing functionality of the portlet. Let’s now look at the built-in controllers that you can use to develop your portlets.
7.7. Using built-in controllers
I’ve generally used the terms controller and handler interchangeably in this book. A controller is a specialized form of handler that implements the Controller interface directly or indirectly. A handler in Spring is any object that’s responsible for handling any type of request (not necessarily web requests); a handler doesn’t need to extend or implement any Spring-specific class or interface.
Controllers are special beans in Spring Portlet MVC that implement the request-handling functionality of the portlet. The HelloWorldController controller is an example of a handler that directly implements the Controller interface.
Note
Spring Portlet MVC also supports annotations that allow you to use any Java class as a portlet request handler. This means that if you’re using Spring Portlet MVC annotations, the portlet request handler isn’t dependent on any Spring-specific interface or class. The use of annotations to create controllers is discussed in chapter 8.
Spring Portlet MVC provides many controller implementations, allowing you to use the controller implementation that best suits your application’s requirements. In this section, we’ll discuss the various types of controllers available in Spring Portlet MVC and see how they can be used in different scenarios.
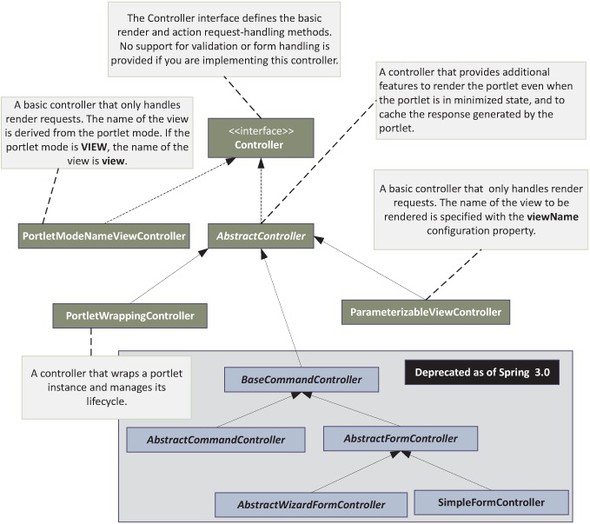
The controller hierarchy in Spring Portlet MVC is similar to that of Spring MVC, as shown in figure 7.4. In this figure, the controllers that offer features for creating and validating command objects and for handling forms are deprecated as of Spring 3.0, in favor of annotated controllers. Annotated controllers are discussed in detail in chapter 8.
Figure 7.4. The controller hierarchies in Spring Portlet MVC. The command and form controllers are deprecated in Spring 3.0 in favor of annotated controllers.
Let’s first look at the Controller interface, which all other Spring Portlet MVC controllers implement, directly or indirectly.
Code Reference
You should now import the ch7_Controllers Eclipse project that accompanies this book if you want to follow along with the code references in the rest of this section. You’ll find that Spring’s InternalResourceViewResolver is now defined in the root web application context (the applicationContext.xml file in the WEB-INF directory), and Spring’s ContextLoaderListener has been added to web.xml to load the root web application context.
7.7.1. Using the Controller interface
The Controller interface is at the root of the Spring Portlet MVC controller hierarchy, and it provides the basic methods for handling action and render requests. It doesn’t provide any request validation or form submission support. If you aren’t comfortable with using annotations, you can still make use of the deprecated command and form controllers, which provide support for form submission and validation.
Note
In this book, I won’t cover the use of controllers deprecated in Spring 3.0. Instead, this book will focus on the use of annotated controllers.
The HelloWorldController in listing 7.3 showed how the Controller interface is used to implement portlet request handlers. AbstractController implements the Controller interface (refer to figure 7.4) and provides a base set of features to all built-in controllers (except PortletModeNameViewController) in Spring portlet MVC.
7.7.2. Using the AbstractController
The AbstractController abstract class defines the following two render and action methods, which are meant to be overridden by the subclasses:
void handleActionRequestInternal(ActionRequest, ActionResponse)
ModelAndView handlerRenderRequestInternal(RenderRequest, RenderResponse)
The first of these two methods is meant to handle action requests, and the second is intended to handle render requests. The default implementation of these methods throws a PortletException, so you must override these methods if your controller class extends the AbstractController class.
AbstractController provides additional features that can be specified in the web application context XML file. Let’s look at each of these properties in detail.
Specifying Whether Portletsession is Required
The requireSession property specifies whether the PortletSession is required to process the portlet request or not. This feature translates into the following piece of code:
if(requireSession){
  if(request.getPortletSession(false) == null) {
       throw new SomeException(...);
   } else {
       handleRenderRequestInternal(...);
   }
}
In this code, getPortletSession(false) returns the current PortletSession. If the request isn’t associated with a session, it returns null and the code can throw an exception. If getPortletSession(false) returns the current portlet session, the handleRenderRequestInternal or handleActionRequestInternal method of the subclass is invoked, depending upon whether the portlet request is an action or render request.
Tip
Instead of directly implementing the Controller interface to create your controller, it may be convenient to extend the AbstractController abstract class because it provides additional properties that simplify controller implementation.
Caching Portlet Content
In chapter 4, you learned that expiration caching can be achieved by setting the MimeResponse.EXPIRATION_CACHE property in the response. The cacheSeconds property of AbstractController does exactly the same thing behind the scenes. It specifies the time (in seconds) for which the content generated by the portlet should be cached.
This property translates into the following piece of code:
response.setProperty(MimeResponse.EXPIRATION_CACHE, cacheSeconds);
Here, the EXPIRATION_CACHE constant defined in the MimeResponse object is set as a property in the RenderResponse, which instructs the portlet container to cache the portlet content for the number of seconds specified by cacheSeconds.
Rendering a Portlet Even When it’s Minimized
The renderWhenMinimized property specifies whether or not a portlet is rendered (whether or not its render method is invoked) when the portlet window is in minimized state. The default implementation of the GenericPortlet class’s render method doesn’t invoke the render method if the portlet’s window state is minimized.
This property translates into the following code:
if(renderWhenMinimized) {
  if(WindowState.MINIMIZED.equals(request.getWindowState())) {
    //do nothing
  } else {
    //invoke handleRenderRequestInternal method
  }
}
In this code, the WindowState object defines the standard portlet window states: MINIMIZED, MAXIMIZED, and NORMAL.
Synchronizing Request Processing
The synchronizeOnSession property specifies whether the invocation of the AbstractConstoller’s handleRenderRequestInternal and handleActionRequestInternal methods are synchronized around the PortletSession. This property ensures that the invocation of the handleRenderRequestInternal and handleActionRequestInternal methods by the same client is serialized.
This property translates into the following code:
if(synchronizeOnSession) {
   synchronized(mutex) {
    //invoke render or action method
  }
}
In this code, mutex is the session mutex object, which serves as a safe reference to synchronize while calling the handleRenderRequestInternal and handleActionRequestInternal methods.
The following listing shows how you can write a controller using the AbstractController abstract class, instead of the Controller interface, to create a Hello World portlet.
Listing 7.7. An AbstractController example

In listing 7.7, you don’t need to override the handleActionRequestInternal method because the Hello World portlet never sends an action request.
Code Reference
The MyAbstractHelloWorldController class in the ch7_Controllers folder shows how to use the AbstractController class to create your controllers in Spring Portlet MVC. Refer to the myAbstract-Controller-portlet.xml file to view the configuration of MyAbstractHelloWorldController.
The Spring Portlet MVC framework provides many out-of-the-box implementations of controllers that can be directly configured in your application context. The built-in controllers in Spring Portlet MVC include ParameterizableViewController, PortletModeNameViewController, and PortletWrappingController.
7.7.3. Using the ParameterizableViewController
The ParameterizableViewController is a basic controller that returns the name of the view to be rendered. The view name is configured as a property, named viewName, in the definition of the ParameterizableViewController bean in the application context.
Note
The ParameterizableViewController isn’t designed to handle action requests.
The Hello World portlet developed in section 7.3 doesn’t require action request processing, so we can make use of ParameterizableViewController to write a Hello World portlet.
Listing 7.8 shows the web application context XML file of a Hello World portlet that uses the ParameterizableViewController controller.
Listing 7.8. A ParameterizableViewController example

The ParameterizableViewController controller is defined ![]() with a myParameterizableViewController id. The ParameterizableViewController’s viewName property is set to parameterizedView
with a myParameterizableViewController id. The ParameterizableViewController’s viewName property is set to parameterizedView ![]() , so the viewResolver bean resolves the viewName to the /WEB-INF/jsp/parameterizedView.jsp page (see the application-Context.xml file in the WEB-INF folder for the ViewResolver definition).
, so the viewResolver bean resolves the viewName to the /WEB-INF/jsp/parameterizedView.jsp page (see the application-Context.xml file in the WEB-INF folder for the ViewResolver definition).
The PortletModeHandlerMapping bean is defined ![]() ; it’s responsible for mapping the portlet request to an appropriate handler based on the portlet mode of the incoming request.
The PortletModeHandlerMapping bean’s portletModeMap property maps portlet modes to the controller responsible for handling requests in that portlet mode.
; it’s responsible for mapping the portlet request to an appropriate handler based on the portlet mode of the incoming request.
The PortletModeHandlerMapping bean’s portletModeMap property maps portlet modes to the controller responsible for handling requests in that portlet mode.
The portletModeMap property ![]() sets the myParameterizableViewController handler as the handler for all requests that are received by the portlet in VIEW portlet mode. The map subelement of the property element indicates that the type of the portletModeMap property is java.util.Map. Because Map type objects contain key-value pairs, the entry element is used to identify the key in the Map. The name of the key is specified by the key attribute of the entry element. The value corresponding to the key is defined using the ref subelement of the entry element. Because the value of the entry element’s key attribute is view, and the ref subelement refers to the myParameterizableViewController controller, this controller is responsible for handling requests in VIEW portlet mode.
sets the myParameterizableViewController handler as the handler for all requests that are received by the portlet in VIEW portlet mode. The map subelement of the property element indicates that the type of the portletModeMap property is java.util.Map. Because Map type objects contain key-value pairs, the entry element is used to identify the key in the Map. The name of the key is specified by the key attribute of the entry element. The value corresponding to the key is defined using the ref subelement of the entry element. Because the value of the entry element’s key attribute is view, and the ref subelement refers to the myParameterizableViewController controller, this controller is responsible for handling requests in VIEW portlet mode.
Listing 7.8 shows that ParameterizableViewController is responsible for handling requests received in VIEW portlet mode for the Hello World portlet. If your portlet supports multiple portlet modes, the ParameterizableViewController’s portletModeMap property will contain entry elements corresponding to all the supported portlet modes.
Note
The ParameterizableViewController example in the ch7_Controllers folder uses a separate parameterizedView.jsp JSP page to show the hardcoded “Hello World” message, because ParameterizableViewController doesn’t provide the option to pass model data to the JSP page. In the case of the HelloWorldController (see listing 7.3), the handleRenderRequest method sends the “Hello World” message as model data to the target JSP page.
If you want to use the current portlet mode as the name of the view, the PortletModeNameViewController is the right option for you.
7.7.4. Using the PortletModeNameViewController
The PortletModeNameViewController is a basic controller that returns the portlet mode name as the name of the view to be rendered. For instance, if the current portlet mode is VIEW, PortletModeNameViewController returns view as the view name to be rendered. Like the ParameterizableViewController, the PortletModeNameViewController is not designed to handle action requests.
Listing 7.9 shows the web application context XML file of a Hello World portlet that uses Spring’s built-in PortletModeNameViewController handler.
Listing 7.9. A PortletModeNameViewController example

The PortletModeNameViewController is defined ![]() with an id of myPortletModeNameViewController. The PortletModeHandlerMapping bean is defined
with an id of myPortletModeNameViewController. The PortletModeHandlerMapping bean is defined ![]() ; it’s responsible for mapping the portlet request to an appropriate handler based on the portlet mode of the incoming request.
At
; it’s responsible for mapping the portlet request to an appropriate handler based on the portlet mode of the incoming request.
At ![]() ,
, ![]() , and
, and ![]() , the VIEW, EDIT, and HELP portlet modes are each mapped to myPortletModeNameViewController.
, the VIEW, EDIT, and HELP portlet modes are each mapped to myPortletModeNameViewController.
In listing 7.9, PortletModeHandlerMapping maps all portlet requests to the PortletModeNameViewController. Let’s say a request comes in EDIT portlet mode to the Hello World portlet whose application context is shown in listing 7.9. As the portlet mode of the incoming request is EDIT, PortletModeHandlerMapping selects PortletModeNameViewController as the handler of the request, because EDIT mode maps to PortletModeNameViewController. The PortletModeNameViewController returns EDIT as the name of the view that needs to be rendered by the Spring portlet MVC framework. The ViewResolver, defined in the root web application context XML file (see the applicationContext.xml file in the WEB-INF directory of the ch7_Controllers Eclipse project), resolves the EDIT view name to the /WEB-INF/jsp/ edit.jsp JSP page.
If you want to invoke an existing portlet using Spring’s dispatching mechanism, you should use PortletWrappingController.
7.7.5. Using the PortletWrappingController
The PortletWrappingController internally manages the complete lifecycle of a portlet instance, instead of allowing the lifecycle to be managed by the portlet container. This controller type is most appropriate when you want to invoke an existing portlet with Spring’s request-dispatching mechanism.
The following listing shows an application context that uses the PortletWrappingController to manage the Hello World portlet created in chapter 1.
Listing 7.10. A PortletWrappingController example

The PortletWrappingController ![]() is defined. The fully qualified name of the portlet class
is defined. The fully qualified name of the portlet class ![]() that the PortletWrappingController manages is specified. A name is assigned to the portlet managed by the controller
that the PortletWrappingController manages is specified. A name is assigned to the portlet managed by the controller ![]() . If you don’t specify a name for the portlet, the name of the controller bean is set as the portlet name. VIEW portlet mode
. If you don’t specify a name for the portlet, the name of the controller bean is set as the portlet name. VIEW portlet mode ![]() is mapped to the PortletWrappingController.
is mapped to the PortletWrappingController.
Warning
The PortletWrappingController internally manages the lifecycle of the wrapped portlet, so you should not declare your wrapped portlet in the portlet.xml file.
PortletWrappingController is most useful when Spring’s request-dispatching mechanism is used to add features to the wrapped portlet. For instance, you could use Spring’s HandlerInterceptors (discussed later in this chapter) to pre- or post-process portlet requests.
Note
As you saw earlier, methods defined in the Controller interface cater to portlet action and render requests. The Spring Portlet MVC framework also provides additional controller interfaces that allow you to handle resource requests (ResourceAwareController, covered in chapter 12) and event requests (EventAwareController, covered in chapter 11). This shows that controllers in Spring Portlet MVC preserve the different lifecycle phases of a portlet request (action, render, resource, and event), which is a unique feature of Spring Portlet MVC, compared to other web frameworks that support portlet development.
In Spring Portlet MVC, a portlet request needs to be mapped to an appropriate handler. This is achieved by specifying handler mappings in the application context.
7.8. Using built-in handler mappings
Handler mapping beans in the Spring Portlet MVC framework are used to map portlet requests to a handler. The mapping can be based on the portlet mode, the value of a request parameter, a combination of both, or any other custom approach. A handler mapping bean must implement the HandlerMapping interface either directly or indirectly.
In all the portlet examples that we’ve covered so far, we’ve used PortletModeHandlerMapping to map incoming portlet requests to an appropriate handler. In this section, we’ll discuss the role of handler mappings in portlet request processing and discuss the handler mappings that are available out of the box in the Spring Portlet MVC framework.
Note
A handler mapping maps a portlet request to exactly one handler; you can’t have a portlet request mapped to more than one handler. If you want to add additional functionality to a handler, you can either modify the handler or use handler interceptors (discussed in section 7.9).
As shown in figure 7.2, the DispatcherPortlet requests that the HandlerMapping bean return an appropriate handler for the incoming portlet request. The HandlerMapping bean analyzes the portlet request and returns an object of type HandlerExecutionChain, which contains a single handler that matches the portlet request and handler interceptors, which are executed before or after the execution of the handler, or both.
Figure 7.5 is an extension to figure 7.2, showing the role played by HandlerMapping in processing a portlet request.
Figure 7.5. The role played by HandlerMapping in fulfilling the portlet request. DispatcherPortlet obtains a HandlerExecutionChain from the HandlerMapping bean and invokes the HandlerExecutionChain’s handler and interceptors (if any).
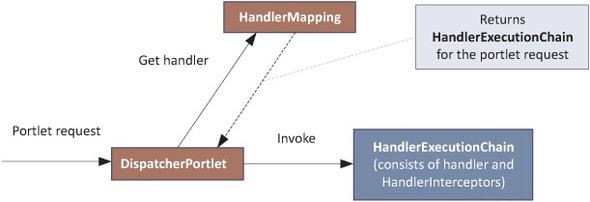
In figure 7.5, the DispatcherPortlet invokes the handler and handler interceptors of the HandlerExecutionChain returned by HandlerMapping.
Spring Portlet MVC comes with three HandlerMapping implementations: PortletModeHandlerMapping, ParameterHandlerMapping, and PortletModeParameterHandlerMapping, as shown in figure 7.6.
Figure 7.6. The HandlerMapping interface is implemented by the AbstractHandlerMapping class, which is in turn subclassed by the PortletModeHandlerMapping, ParameterModeHandlerMapping, and PortletModeParameterHandlerMapping classes.

If you have special requirements, you can also create your own handler mapping implementation. In the rest of this section, we’ll look at how these handler mapping implementations can be used in developing portlets.
Let’s look first at the Book Catalog portlet that we’ll develop in this section using the built-in handler mappings.
7.8.1. Developing a Book Catalog portlet with Spring Portlet MVC
The Book Catalog portlet for this section is a trimmed-down version of the Book Catalog portlet we discussed in previous chapters. This section’s Book Catalog portlet consists of the following pages:
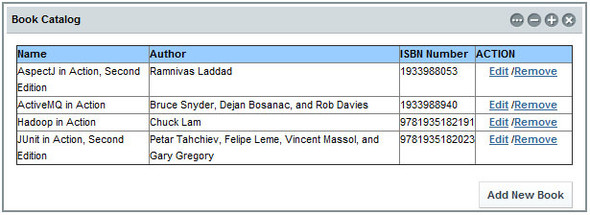
- Home page— A page that displays all of the books in the catalog (shown in figure 7.7)
Figure 7.7. The Book Catalog portlet page that shows the list of books in the catalog. The portlet allows users to add books to the catalog, edit books already in the catalog, and remove books from the catalog.
- Add book page— A page that allows users to add a new book to the catalog
- Edit book page— A page that allows users to edit information about an existing book in the catalog
Note
Because we’re focusing on the Spring Portlet MVC framework features, the requirements for the Book Catalog portlet in this chapter exclude some of the features implemented in previous examples of the Book Catalog portlet.
Figure 7.7 shows the simplified Book Catalog portlet’s home page with the option to add, edit, and remove books.
Code Reference
If you haven’t done so already, you should now import the ch7_HandlerMappings Eclipse project into your Eclipse workspace so you can refer to the examples discussed in this section. That project contains example portlets that use the built-in PortletModeHandlerMapping, ParameterHandlerMapping, and PortletModeParameterHandlerMapping handler mapping implementations. It also contains an example portlet that shows how to create handler mapping chains.
Let’s now look at the PortletModeHandlerMapping built-in handler mapping implementation in Spring Portlet MVC.
7.8.2. Using PortletModeHandlerMapping
As you’ve seen in earlier examples, PortletModeHandlerMapping maps an incoming portlet request to a handler based on the current portlet mode, which can be obtained using the PortletRequest object’s getPortletMode method. Our next listing shows the application context for a portlet that uses PortletModeHandlerMapping.
Listing 7.11. A PortletModeHandlerMapping example

As discussed earlier, the PortletModeHandlerMapping object’s portletModeMap property provides the portlet mode to handler mapping information. For instance, VIEW mode is mapped to the ViewModeController handler, and EDIT mode is mapped to the EditModeController handler.
If you want to use a properties file to maintain the portlet mode to handler mapping information, you can use the PortletModeHandlerMapping bean’s mappings property instead of the portletModeMap property. The next listing shows how listing 7.11 can be rewritten using the mappings property.
Listing 7.12. A PortletModeHandlerMapping example

Spring’s util schema ![]() is referenced. The util schema’s properties element
is referenced. The util schema’s properties element ![]() loads the WEB-INF/modemappings.properties file and creates a bean of type java.util.Properties with a bean id of modemappings. The PortletModeHandlerBean’s mappings property
loads the WEB-INF/modemappings.properties file and creates a bean of type java.util.Properties with a bean id of modemappings. The PortletModeHandlerBean’s mappings property ![]() is set to the modemappings bean.
is set to the modemappings bean.
The modemappings.properties file contains the portlet mode to handler mapping, as shown here:
view=viewModeController
edit=editModeController
help=helpModeController
Code Reference
Refer to the portletModeHandlerMappingExample-portlet. xml and modemappings.properties files in ch7_HandlerMappings.
The PortletModeHandlerMapping is useful only if you want to use the current portlet mode to identify the appropriate handler for the portlet request. If you want to use a request parameter value to identify the appropriate handler for the portlet request, you should use the ParameterHandlerMapping bean.
7.8.3. Using ParameterHandlerMapping
One of the shortcomings of PortletModeHandlerMapping is that it requires you to have only one controller for each supported portlet mode. If you don’t define any custom portlet modes for your portlet, you’ll have exactly three controllers for your portlet: one for each portlet mode (VIEW, EDIT, and HELP).
If you use PortletModeHandlerMapping for the Book Catalog portlet, a single handler is responsible for all the business functions that the portlet needs to perform. In most multipage portlets, like the Book Catalog portlet, it’s preferable to split the functionality of the portlet across different handlers, so that they’re each more manageable and focused.
To split portlet functionality across different handlers, you need a HandlerMapping implementation that maps portlet requests to different controllers based on the values of request parameters, session attributes, a combination of the two, or on any other custom handler mapping approach. The ParameterHandlerMapping implementation provides mapping of portlet requests to a handler based on the value of a request parameter.
The next listing shows the ParameterHandlerMapping definition in a web application context XML file.
Listing 7.13. A ParameterHandlerMapping example

The defaultHandler property ![]() defines the default handler for the mapping, if no matching handler is found. The parameterName property
defines the default handler for the mapping, if no matching handler is found. The parameterName property ![]() identifies the request parameter name whose value will be used by the handler mapping to find an appropriate handler. Because
the value of parameterName is specified as myaction, the value of the myaction request parameter is used to find an appropriate handler for the portlet request. The ParameterHandlerMapping bean’s parameterMap property
identifies the request parameter name whose value will be used by the handler mapping to find an appropriate handler. Because
the value of parameterName is specified as myaction, the value of the myaction request parameter is used to find an appropriate handler for the portlet request. The ParameterHandlerMapping bean’s parameterMap property ![]() specifies the handler corresponding to the value of the request parameter named myaction.
specifies the handler corresponding to the value of the request parameter named myaction.
Code Reference
Refer to the parameterHandlerMappingExample-portlet.xml web application context XML file in ch7_HandlerMappings to see how the ParameterHandlerMapping bean is configured.
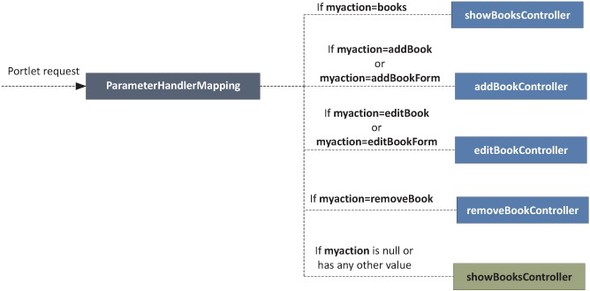
Figure 7.8 shows how the ParameterHandlerMapping bean defined in listing 7.13 selects an appropriate handler for the portlet request.
Figure 7.8. ParameterHandlerMapping maps portlet requests to appropriate handlers based on the value of the myaction request parameter. If the request parameter is missing from the request, or if its value isn’t mapped to any handler, the handler specified using the defaultHandler mapping is executed.
Note
If you don’t specify the parameterName property, ParameterHandlerMapping considers action to be the name of the parameter for finding an appropriate handler.
From figure 7.8, you can draw following inferences:
- If the value of the myaction request parameter is books, the portlet request is handled by the showBooksController handler. If the value of the myaction request parameter is addBook or addBookForm, the portlet request is handled by the addBookController handler, and so on.
- If no matching handler is found in the parameterMap properties, the default showBooksController handler handles the portlet request. For instance, in listing 7.13, if the myaction parameter isn’t in the request or its value is blank or anything but books, addBook, addBookForm, removeBook, editBook, or editBookForm, the showBooksController handles the portlet request.
Note
The defaultHandler property is defined in the AbstractHandlerMapping class and is available to all built-in HandlerMappings in the Spring Portlet MVC framework.
You saw that the ParameterHandlerMapping implementation checks the value of a request parameter to determine the appropriate handler for the request. So how can you send a request parameter to the portlet? You do that by using hidden form fields or by adding the request parameter to the portlet URL with the setParameter(...) method or the <param> portlet tag. The portlet URLs are discussed in chapter 2 and the <param> portlet tag is discussed in chapter 6. We’ll look at hidden form fields here.
Creating Hidden Form Fields
To send a request parameter to a portlet, you can create a hidden field on the HTML form, and give the field the same name as the request parameter your handler mapping inspects to find a matching handler. The value of the hidden field is set depending on the user action.
Suppose in the Book Catalog portlet (shown in figure 7.7) that when a user clicks the Add Book button, the addBookController handles the request and renders a form in which the user can enter details for a new book. The handler mapping in listing 7.13 suggests that if the value of the myaction request parameter is addBookForm, the addBookController handler is responsible for handling the request. You can pass the myaction request parameter with a value of addBookForm to the Book Catalog portlet by creating a hidden field named myaction and setting its value to addBookForm, as shown here:
<form name="booksForm" action="${myPortletUrl}"... >
      ...
  <input type="hidden" name="myaction" value="addBookForm"/>
  <input type="submit" value="Add Book"/>
</form>
When the Add Book button is clicked, the form is submitted to the myPortletUrl portlet URL, which sends the myaction form field as a request parameter.
Let’s now look at Spring’s built-in PortletModeParameterHandlerMapping handler mapping implementation.
7.8.4. Using PortletModeParameterHandlerMapping
The PortletModeHandlerMapping and ParameterHandlerMapping approaches either restrict the use of a handler to a single portlet mode or to a particular value of a request parameter. The PortletModeParameterHandlerMapping approach allows you to use a single handler for different portlet modes and for different values of a request parameter. For instance, you could define the following handler mapping: if the myaction request parameter has a value of addBookForm or addBook and the current portlet mode is VIEW, the handler for the request is addBookController.
The following listing shows an example of using PortletModeParameterHandlerMapping to resolve handlers based on portlet mode and the value of a request parameter.
Listing 7.14. A PortletModeParameterHandlerMapping example

The PortletModeParameterHandlerMapping handler mapping properties ![]() are specified. The defaultHandler property defines the default handler for the mapping if no match is found. The parameterName property identifies the request parameter name (myaction, in this case) whose value will be used by the handler mapping to find an appropriate handler. The PortletModeParameterHandlerMapping’s portletModeParameterMap property specifies the handler corresponding to a portlet mode and the value of the myaction request parameter.
are specified. The defaultHandler property defines the default handler for the mapping if no match is found. The parameterName property identifies the request parameter name (myaction, in this case) whose value will be used by the handler mapping to find an appropriate handler. The PortletModeParameterHandlerMapping’s portletModeParameterMap property specifies the handler corresponding to a portlet mode and the value of the myaction request parameter.
The first level of mapping is defined for the portlet request ![]() using portlet mode. If the portlet mode of the portlet request is VIEW, the portlet request is matched to a handler
using portlet mode. If the portlet mode of the portlet request is VIEW, the portlet request is matched to a handler ![]() , using the value of the myaction request parameter. Similarly, mappings for EDIT and HELP portlet modes are defined.
, using the value of the myaction request parameter. Similarly, mappings for EDIT and HELP portlet modes are defined.
Code Reference
Refer to the portletModeParameterHandlerMapping-Example-portlet.xml web application context XML file in ch7_HandlerMappings to see an example configuration for the PortletModeParameterHandlerMapping bean.
Figure 7.9 shows how portlet requests map to controllers, as defined by the PortletModeParameterHandlerMapping in listing 7.14. PortletModeParameterHandlerMapping takes into account the current portlet mode and value of myaction request parameter to find an appropriate handler for the request.
Figure 7.9. A portlet request is mapped to a handler by matching the current portlet mode and the value of the myaction request parameter. The default handler is executed if no matching handler is found for the combination of portlet mode and request parameter value.

When using PortletModeParameterHandlerMapping, the default behavior of the handler mapping is to restrict you from specifying duplicate entries for the parameter value in different portlet modes. For example, the following handler mapping will result in an exception:
<entry key="view">
  <map>
    <entry key="books" value-ref="showBooksController"/>
    <entry key="addBook" value-ref="addBookController"/>
    <entry key="editBook" value-ref="editBookController"/>
  </map>
</entry>
<entry key="edit">
  <map>
    <entry key="prefs" value-ref="editModeController"/>
    <entry key="editBook" value-ref="editPrefsController"/>
  </map>
</entry>
In this handler mapping definition, duplicate entries exist for the parameter value editBook in VIEW and EDIT modes of the portlet. The default behavior of disallowing duplicate entries for the parameter value in different portlet modes can be overridden by setting the PortletModeParameterHandlerMapping’s allowDuplicateParameters property to true.
Note
Setting the PortletModeParameterHandlerMapping’s allowDuplicateParameters property to true isn’t recommended because of the unexpected portlet behavior that may result if the portlet mode is overridden by the portal or portlet container.
If you want to create your own handler mapping implementation, you can either directly implement the HandlerMapping interface or subclass the AbstractHandlerMapping class. The AbstractHandlerMapping class provides additional properties that allow you to specify a default handler for the mapping, add handler interceptors, and create handler mapping chains.
7.8.5. Using AbstractHandlerMapping
AbstractHandlerMapping is an abstract class that implements the HandlerMapping interface (see figure 7.6) and does the following:
- Specifies a default handler if no matching handler for the portlet request is found
- Creates handler mapping chains
- Specifies handler interceptors for pre- and post-processing of portlet requests
The built-in handler mappings we’ve discussed so far are subclasses of AbstractHandlerMapping, so the preceding features are also available to them. Let’s look at each of these features in turn.
Default Handlers
AbstractHandlerMapping’s defaultHandler property specifies the default handler for the mapping if no matching handler is found. You saw earlier in this section how this property is used in handler mappings.
Handler Mapping Chains
A handler mapping chain is created when multiple handler mappings map to a particular request; the highest priority handler mapping is the first handler mapping in the chain. AbstractHandlerMapping’s order property supports the creation of handler mapping chains. The order property has an integer value that specifies the priority of the handler mapping.
If you specify more than one handler mapping in your application context, the handler mapping with the lowest order value has the highest priority and is matched first against the portlet request. The matching handler returned by the highest priority handler mapping is responsible for handling the request. If a matching handler isn’t found by the first handler mapping, the handler mapping with the next lowest priority is given the opportunity to find a matching handler. It’s because of the order property that you can create handler mapping chains for your portlet.
The next listing shows a handler mapping chain consisting of PortletModeHandlerMapping and PortletModeParameterHandlerMapping.
Listing 7.15. A handler mapping chain example

The PortletModeHandlerMapping is defined ![]() , which maps a portlet request based on the current portlet mode of the portlet request. The order property of the handler mapping is set to 0. The PortletModeParameterHandlerMapping is defined
, which maps a portlet request based on the current portlet mode of the portlet request. The order property of the handler mapping is set to 0. The PortletModeParameterHandlerMapping is defined ![]() , which maps a portlet request based on the combination of current portlet mode and the value of the myaction request parameter. The order property of this handler mapping is set to 1.
, which maps a portlet request based on the combination of current portlet mode and the value of the myaction request parameter. The order property of this handler mapping is set to 1.
Code Reference
Refer to the handlerMappingChainExample-portlet.xml web application context XML file in ch7_HandlerMappings to view the complete handler mapping chain shown in listing 7.15.
In listing 7.15, the value of the order property for PortletModeHandlerMapping is lower than the order value for PortletModeParameterHandlerMapping, so the portlet request is first matched against PortletModeHandlerMapping to find an appropriate handler. If no matching handler is found, PortletModeParameterHandlerMapping is consulted to find a matching handler for the portlet request.
Note
You should only specify defaultHandler for the lowest-priority handler mapping (the mapping with the highest value for the order property) in the handler chain. If you specify defaultHandler for higher-priority handler mappings, the defaultHandler would always result in a match for the incoming portlet request.
Handler Interceptors
The AbstractHandlerMapping’s interceptors property defines handler interceptors, which allow you to pre- and post-process the portlet request. You can specify any number of interceptors for a mapping by using this property.
Let’s now look at handler interceptors and how to configure them in the application context.
7.9. Using handler interceptors
In some scenarios, you may need to pre- or post-process a portlet request, or both, for various reasons, such as logging, security, or tracing. Spring Portlet MVC provides handler interceptors to allow you to pre- and post-process portlet requests.
Handler interceptors are special beans in the Portlet MVC framework that implement the HandlerInterceptor interface. They’re similar to servlet filters in servlet technology; they intercept portlet requests targeted to a handler and pre- or post-process the request. Handler interceptors help remove cross-cutting concerns from the handler code, such as logging, security checks, and so on.
In this section, we’ll look at the role played by handler interceptors and how they’re implemented and configured in Spring’s web application context XML file.
Let’s first look at how handler interceptors are implemented and configured.
7.9.1. Implementing and configuring a handler interceptor
Handler interceptor beans must implement the HandlerInterceptor interface directly or indirectly. You can create your own handler interceptor by implementing the HandlerInterceptor interface or subclassing the HandlerInterceptorAdapter abstract class.
Note
Like Spring Portlet MVC controllers, handler interceptors also preserve the lifecycle semantics of a portlet request by providing specific methods for intercepting the different lifecycle methods.
Handler interceptors are referenced by the interceptor property of the handler mapping. This listing shows a handler mapping that uses handler interceptors.
Listing 7.16. A handler interceptor example
<bean id="loggingInterceptor" class="..."/>
<bean id="securityInterceptor" class="..."/>
<bean id="portletModeHandlerMapping"
  class="org.springframework.web.portlet.handler.
    PortletModeHandlerMapping">
  ...
  <property name="interceptors">
    <list>
      <ref bean="loggingInterceptor"/>
      <ref bean="securityInterceptor"/>
    </list>
  </property>
</bean>
In listing 7.16, PortletModeHandlerMapping specifies two interceptors, loggingInterceptor and securityInterceptor, which pre- and post-process portlet requests before and after the processing of the handler.
Note
If you’re using Portlet 2.0, you can use portlet filters to pre- and post-process portlet requests. The difference lies in the scope: portlet filters do pre- and post-processing at the portlet level, and handler interceptors do preand post-processing at the handler level.
Let’s now look at how handler interceptors do the pre- and post-processing of portlet requests and responses.
7.9.2. Processing requests using handler interceptors
Figure 7.10 shows the role played by handler interceptors in processing a render request.
Figure 7.10. Handler interceptors are invoked before and after the execution of the handler. The preRenderHandle method is invoked before the handler execution, and the postRenderHandle method is invoked after the handler execution. The afterRenderCompletion method is invoked after the postRenderHandle method of all the interceptors is executed.

The sequence diagram in figure 7.10 shows the order in which HandlerInterceptor methods are executed by DispatcherPortlet during the portlet request processing. The interceptor’s preHandle method is invoked before the execution of the handler; postHandle is invoked after the execution of the handler; afterCompletion is invoked at the end to do any cleanup, if required.
Spring Portlet MVC provides a built-in HandlerInterceptor implementation, ParameterMappingInterceptor, which is useful when using the ParameterHandlerMapping and PortletModeParameterHandlerMapping implementations. ParameterMappingInterceptor ensures that the value of the request parameter (used for finding an appropriate handler in ParameterHandlerMapping and PortletModeParameterHandlerMapping) is forwarded from the action request to the following render request; this can help in ensuring that the render and action methods of the same handler are invoked.
Code Reference
Refer to the handlerMappingChainExample-portlet.xml web application context XML file in ch7_HandlerMappings to see how ParameterMappingInterceptor is configured.
Our next listing shows PortletModeParameterHandlerMapping, which uses the ParameterMappingInterceptor.
Listing 7.17. A handler interceptor example
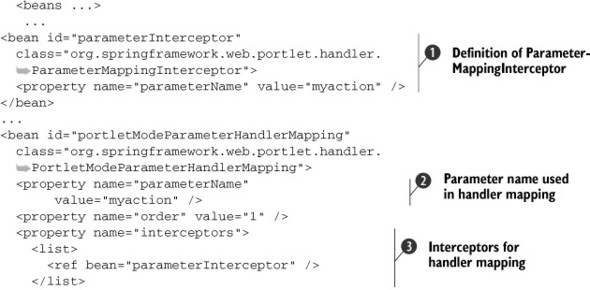

The ParameterMappingInterceptor’s parameterName property ![]() is set to myaction. This property specifies the name of the request parameter whose value must be maintained in the render request that follows
the action request processing.
is set to myaction. This property specifies the name of the request parameter whose value must be maintained in the render request that follows
the action request processing.
The PortletModeParameterHandlerMapping’s parameterName property ![]() is set to myaction. It identifies the request parameter name used by PortletModeParameterHandlerMapping.
is set to myaction. It identifies the request parameter name used by PortletModeParameterHandlerMapping.
The PortletModeParameterHandlerMapping’s interceptors property ![]() specifies the list of interceptors that apply to the handler mapping. ParameterMappingInterceptor is the only interceptor that applies to PortletModeParameterHandlerMapping.
specifies the list of interceptors that apply to the handler mapping. ParameterMappingInterceptor is the only interceptor that applies to PortletModeParameterHandlerMapping.
addBookController and editBookController handle incoming portlet requests ![]() if the portlet mode is VIEW and the value of the myaction request parameter is addBook or editBook, respectively.
if the portlet mode is VIEW and the value of the myaction request parameter is addBook or editBook, respectively.
Figure 7.11 shows the request flow for a Book Catalog portlet that uses the application context defined in listing 7.17.
Figure 7.11. The request flow when an action request is received by DispatcherPortlet. The AddBookController is the handler for the action request because the value of the myaction parameter is addBook. If AddBookController changes the myaction parameter’s value to editBook, the render request would be handled by EditBookController instead.

The value of the myaction request parameter ![]() is addBook, which means that addBookController is responsible for handling this action request (see listing 7.17). The ParameterMappingInterceptor’s preHandleAction method
is addBook, which means that addBookController is responsible for handling this action request (see listing 7.17). The ParameterMappingInterceptor’s preHandleAction method ![]() is invoked, which sets a render parameter with the same name and value as the incoming myaction parameter. The handler method for the action request
is invoked, which sets a render parameter with the same name and value as the incoming myaction parameter. The handler method for the action request ![]() is invoked. DispatcherPortlet again consults the HandlerMapping
is invoked. DispatcherPortlet again consults the HandlerMapping ![]() to obtain the handler execution chain.
to obtain the handler execution chain.
In figure 7.11, the ParameterMappingInterceptor’s preHandleAction method is responsible for calling the ActionResponse’s setRenderParameter method to set the myaction request parameter as a render parameter. Because render parameters are available to the portlet in the following render request, PortletModeParameterHandlerMapping again returns addBookController as the handler for the render request.
So far in this chapter, we’ve discussed scenarios in which exceptions don’t occur during request processing. In real applications, this is rarely the case. Spring Portlet MVC provides a sophisticated exception-handling mechanism that allows you to gracefully handle exceptions that occur during request handling.
7.10. Handling exceptions
In Spring Portlet MVC, DispatcherPortlet catches exceptions thrown during request handling and uses registered handler exception resolvers to find the error view corresponding to the exception thrown. A handler exception resolver is a special bean that implements the HandlerExceptionResolver interface and is configured in the web application context XML like any other Spring bean.
The handler exception resolver defines resolveException methods that return ModelAndView objects. The returned ModelAndView object contains an error view and model information. DispatcherPortlet then uses ViewResolver to resolve the error view information and dispatches a request to ViewRendererServlet to render the error view.
Let’s look at how a request is handled when an exception is thrown during request processing.
7.10.1. Request handling with exceptions
Figure 7.12 is an extension of figure 7.5, showing how HandlerExceptionResolver is used in the Spring Portlet MVC framework.
Figure 7.12. DispatcherPortlet uses HandlerExceptionResolver to resolve exceptions that occur during the execution of the handler. HandlerExceptionResolver returns a ModelAndView object that is then forwarded by DispatcherPortlet to ViewRendererServlet to render the view.

DispatcherPortlet obtains the HandlerExecutionChain ![]() from HandlerMapping. DispatcherPortlet invokes the HandlerExecutionChain
from HandlerMapping. DispatcherPortlet invokes the HandlerExecutionChain ![]() , which results in an exception being thrown.
, which results in an exception being thrown.
DispatcherPortlet uses HandlerExceptionResolver ![]() to resolve the exception thrown by HandlerExecutionChain. The HandlerExceptionResolver returns a ModelAndView object, which contains information about the view to be rendered for the thrown exception along with the corresponding model
data.
to resolve the exception thrown by HandlerExecutionChain. The HandlerExceptionResolver returns a ModelAndView object, which contains information about the view to be rendered for the thrown exception along with the corresponding model
data.
ViewResolver is used to resolve the view to be rendered ![]() . DispatcherPortlet dispatches a request to the ViewRendererServlet
. DispatcherPortlet dispatches a request to the ViewRendererServlet ![]() and sends the model data as request attributes for rendering the view.
and sends the model data as request attributes for rendering the view.
Note
HandlerExceptionResolvers are detected by type; DispatcherPortlet autodetects handler exception resolvers based on the type of bean defined in the application context of the portlet, or in the root web application context, and applies them when an exception occurs.
You can create your own exception resolver either by directly implementing the HandlerExceptionResolver interface or by extending the AbstractHandlerExceptionResolver subclass, which allows you to control the handlers to which the HandlerExceptionResolver applies and to create a HandlerExceptionResolver chain.
Spring provides a concrete implementation of AbstractHandlerExceptionResolver—the SimpleMappingExceptionResolver—that allows you to map exception class names to view names.
7.10.2. Mapping exceptions to a view based on the exception class
The SimpleMappingExceptionResolver maps an exception class name to the view that is to be rendered when the exception occurs.
Code Reference
Refer to the portletModeParameterHandlerMapping-Example-portlet.xml web application context XML file in ch7_HandlerMappings to see a sample configuration for the SimpleMappingExceptionResolver bean.
Let’s take a close look at the properties supported by SimpleMappingExceptionResolver.
Exception Mappings
Exception mappings are specified with the exceptionMappings property, which defines the mapping of exception class names (not necessarily fully qualified class names) to view names. You can specify complete or partial exception class names using this property.
If you specify partial exception class names, the exception resolver maps all exception classes containing the partial class name to the same view name. For instance, consider the following definition of a SimpleMappingExceptionResolver bean in an application context:
<bean id="exceptionResolver"
  class="org.springframework.web.portlet.handler.
     SimpleMappingExceptionResolver">
  <property name="exceptionMappings">
   <map>
      <entry key="StateException" value="myExceptionView"/>
   </map>
  </property>
</bean>
In the preceding SimpleMappingExceptionResolver definition, the exceptionMappings property defines a single mapping from the StateException exception class to the myExceptionView view name. The preceding exception mapping maps all exception classes that contain StateException in their name to myExceptionView. For example, if your portlet class throws IllegalComponentStateException, IllegalMonitorStateException, IllegalPathStateException, IllegalStateException, IllegalThreadStateException (which are all built-in exceptions in Java), or MyUnknownStateException (which is a custom exception), all these exceptions are mapped to the myExceptionView view name.
If you want to specify exception mappings in a properties file, you can do so as shown here:
<util:properties  id="exceptionmappings"
     location="WEB-INF/exceptionmappings.properties"/>

<bean id="exceptionResolver"
  class="org.springframework.web.portlet.handler.
     SimpleMappingExceptionResolver">
  <property name="exceptionMappings" ref="exceptionMappings"/>
</bean>
If the mappedHandlers or mappedHandlerClasses property isn’t set, the exception resolver applies to all the handlers in the application context, as in the previous case.
Handler Mappings
You can specify the handlers to which the exception resolver applies by using the mappedHandlers and mappedHandlerClasses properties, as shown here:
<bean id="exceptionResolver"
  class="org.springframework.web.portlet.handler.
     SimpleMappingExceptionResolver">
  <property name="exceptionMappings">
   <map>
      <entry key="StateException" value="myExceptionView"/>
    </map>
   </property>
  <property name="mappedHandlers">
    <set>
      <ref bean="showBooksController"/>
    </set>
  </property>
</bean>
The mappedHandlers property specifies that showBooksController is the only handler to which the exception resolver applies; an exception thrown by any other handler won’t be resolved by this exception resolver.
Displaying a View When an Exception Mapping isn’t Found
If you want a particular view to be rendered if no exception mapping is found for the exception name or class, you can specify it with the defaultErrorView property. If the mappedHandlers or mappedHandlerClasses property is defined, the defaultErrorView name applies only to the mapped handlers.
The following bean definition shows how you can use the defaultErrorView property:
<bean id="exceptionResolver"
     class="org.springframework.web.portlet.handler.
        SimpleMappingExceptionResolver">
     <property name="exceptionMappings">
      <map>
         <entry key="StateException" value="myExceptionView"/>
       </map>
     </property>
     <property name="mappedHandlers">

       <set>
         <ref bean="showBooksController"/>
       </set>
     </property>
     <property name="defaultErrorView" value="defaultViewName"/>
</bean>
In the preceding definition of an exception resolver, if an exception that doesn’t contain StateException in its name is thrown by the showBooksController handler, the defaultViewName view is rendered.
The Handler-Exception-Resolver Chain
The order property defines the priority of the handler exception resolver. As with handler mappings, the order property is used for chaining handler exception resolvers. The exception resolver with the lowest order value is applied first for resolving the thrown exception. If the exception is resolved by an exception resolver in the chain, the execution of the chain is aborted and the ModelAndView object is returned to the DispatcherPortlet.
Accessing the Exception as a Model Attribute
The exceptionAttribute property specifies the name of the model attribute with which the exception is available as a request attribute. You can use this exception attribute in your JSP pages to show the message contained in the exception.
7.11. Summary
In this chapter, you saw how Spring Portlet MVC simplifies the development of multi-page portlets by abstracting complex activities like exception handling, view resolution, and request dispatching. You learned that when using Spring Portlet MVC, request-handling code is moved to controllers or request handlers. You saw that DispatcherPortlet is responsible for analyzing the portlet request and delegating request handling to an appropriate controller based on the handler mapping strategy defined in the application context. You saw how HandlerInterceptors can be used to pre- and post-process requests. If an exception occurs during request processing, the configured HandlerExceptionResolver is used to resolve the exception to a customized error view. In normal request processing or in the case of exception processing, ViewResolvers configured in the application context are used to resolve logical views to actual views, which are then rendered by ViewRenderServlet.
In the next chapter, we’ll discuss annotation support in Spring Portlet MVC, and you’ll see how to test Spring Portlet MVC portlets using mock objects and Spring’s TestContext framework.