
Chapter 14. Portlet bridges
- Introducing portlet bridges
- Using the iFrame portlet
- Developing with the JSF portlet bridge
- Developing with the Wicket portlet bridge
So far in this book, we’ve focused on creating portlets using the Portlet 2.0 API, but in some, if not all, portal development projects you may also want to expose an existing web application as a portlet. Let’s say that you have a Book Catalog web application for managing your book catalog, and it’s developed using the JSF, or Struts, or Wicket web application framework. You have the choice of rewriting the Book Catalog web application as a portlet or exposing it as a portlet by using an appropriate portlet bridge.
Think of a portlet bridge as a wrapper around your existing web application that’s responsible for converting portlet requests to something that your web application can understand and converting responses from the web application to something that your portlet environment can understand. Rewriting a web application as a portlet may be undesirable in many scenarios, mainly due to the learning curve associated with portlets, extra development and testing effort, and duplication of business logic. Rewriting an existing web application as a portlet may only be desirable if an appropriate portlet bridge doesn’t exist, or if the portlet bridge doesn’t support important portlet features, like using portlet events and public render parameters for inter-portlet communication.
In this chapter, we’ll first look at the concept of portlet bridges and how they expose a web application as a portlet. We’ll then move on to look at some specific portlet bridges, like Liferay Portal’s built-in iFrame portlet, PortletFaces Bridge for JavaServer Faces (JSF) web applications, and the Wicket framework’s WicketPortlet class, which acts as a portlet bridge for Wicket web applications. We’ll look at how a Book Catalog web application developed using JSF or Wicket is exposed using these portlet bridges. We’ll also look at how you can use a standard directory structure to keep artifacts specific to web and portlet applications separate.
This chapter assumes that you already have a working knowledge of the JSF and Wicket frameworks. If you want to learn about these frameworks, refer to an introductory text on these frameworks.
Note
The example JSF web application in this chapter makes use of JSF 2.0; the example Wicket web application uses Wicket 1.4.8.
Let’s now take a deeper look at what portlet bridges are.
14.1. What is a portlet bridge?
A portlet bridge is a component that sits between the portlet environment and a web application. It’s responsible for bridging the differences between the portlet environment and the environment in which the web application is designed to execute.
For instance, in the portlet world, a request has distinct lifecycle phases for processing user actions and rendering a response, whereas in the web application world, action processing and response generation are part of a single request lifecycle phase. Also, in the web application world, the response to a request is a complete web page, whereas in the portlet world, the response is a markup fragment that’s handed over to the portal server, which renders the portal page.
A portlet bridge abstracts the web application environment from the portlet environment and vice versa, which makes it possible to develop web applications without knowledge of portlet technology. You can use an appropriate portlet bridge at a later date to expose it as a portlet.
Figure 14.1 shows the flow of a portlet request and response when a portlet bridge is used to adapt a web application to the portlet environment.
Figure 14.1. The Portlet bridge plays the mediatory role in adapting a web application to the portlet environment.

A portlet request ![]() is received by the portlet container, and
is received by the portlet container, and ![]() the portlet container dispatches the request to the portlet instance for which the request is targeted. The portlet here
acts as a wrapper around the portlet bridge, which in turn acts as a wrapper around the underlying web application.
the portlet container dispatches the request to the portlet instance for which the request is targeted. The portlet here
acts as a wrapper around the portlet bridge, which in turn acts as a wrapper around the underlying web application.
The portlet dispatches a request ![]() to the portlet bridge for processing. The entry point into the bridge is generally through a bridge-specific class that extends
the GenericPortlet class and is configured as the portlet class in the portlet.xml file. The portlet bridge translates the incoming portlet
request to a request type that can be understood by the web application. For instance, if your web application is a Struts-based
web application, the portlet bridge uses the portlet request information to find and invoke the appropriate Struts Action.
to the portlet bridge for processing. The entry point into the bridge is generally through a bridge-specific class that extends
the GenericPortlet class and is configured as the portlet class in the portlet.xml file. The portlet bridge translates the incoming portlet
request to a request type that can be understood by the web application. For instance, if your web application is a Struts-based
web application, the portlet bridge uses the portlet request information to find and invoke the appropriate Struts Action.
The portlet bridge ![]() sends the portlet request context information to the web application for processing of the request. For instance, in a Struts-based
web application, the portlet bridge will send the portlet request context, request parameters, request attributes, session
attributes, and other information that’s required to process a Struts Action. Because servlet-based web applications don’t have the concept of multiple request-processing phases, the portlet bridge
is responsible for maintaining state, on behalf of the web application, across the multiple request phases of a request. For
instance, in the case of a Struts application, the portlet bridge will split a portlet action request processing into a Struts
Action invocation and the rendering of the view, making it look as if the web application also follows the portlet request-processing
phases.
sends the portlet request context information to the web application for processing of the request. For instance, in a Struts-based
web application, the portlet bridge will send the portlet request context, request parameters, request attributes, session
attributes, and other information that’s required to process a Struts Action. Because servlet-based web applications don’t have the concept of multiple request-processing phases, the portlet bridge
is responsible for maintaining state, on behalf of the web application, across the multiple request phases of a request. For
instance, in the case of a Struts application, the portlet bridge will split a portlet action request processing into a Struts
Action invocation and the rendering of the view, making it look as if the web application also follows the portlet request-processing
phases.
The portlet bridge ![]() receives a response from the web application. At this point, the bridge is responsible for translating the response for the
portlet environment. The translated response is sent to the portlet, which acts as a wrapper around the web application
receives a response from the web application. At this point, the bridge is responsible for translating the response for the
portlet environment. The translated response is sent to the portlet, which acts as a wrapper around the web application ![]() . Then the response from the portlet
. Then the response from the portlet ![]() is sent to the portlet container. The portlet container
is sent to the portlet container. The portlet container ![]() sends the response to the portal server.
sends the response to the portal server.
Portlet bridges for widely used web application frameworks exist, but there are situations in which you can’t use a preexisting portlet bridge:
- If the web application is remotely located
- If the web application was developed using a web framework for which a portlet bridge isn’t available
- If the web application doesn’t use a standard web framework for developing the web application (which means a portlet bridge can’t be developed)
If you have such a web application, you can still use a portlet that uses an HTML iFrame to provide access to it as a portlet.
Note
Most portal servers come with built-in portlets to provide access to web applications without using a portlet bridge. For instance, WebSphere Portal Server provides a WebClipping portlet (an iFrame-based portlet), which also allows you to clip the HTML page of the web application served by the portlet.
Let’s look at how a web application can become part of a web portal by using Liferay Portal’s built-in iFrame portlet.
14.2. iFrame portlets
The HTML <iframe> element is used to embed an HTML page within another HTML page. It defines an src attribute, which identifies the URL of the HTML document to be served by the <iframe> element. You can create a simple iFrame portlet by writing an HTML <iframe> element as the response generated by the portlet.
Liferay Portal comes with a built-in iFrame portlet that can be used to serve a web-based application via your web portal with minimal effort. This built-in iFrame portlet provides a lot more features than if you were to show a web-based application in an <iframe> element, so using it is recommended over developing your own iFrame portlet. For instance, Liferay Portal provides configuration options to authenticate against the external web application and control the attributes of the <iframe> element used by the portlet to display the web application.
Note
When a user interacts with the web application rendered by an iFrame-based portlet, the requests are sent directly to the web application; the iFrame portlet only plays the role of a proxy. Because of this, iFrame-based portlets are not considered to be portlet bridges in this chapter.
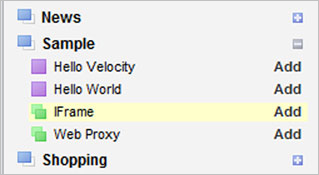
To use Liferay Portal’s built-in iFrame portlet, go to the Sample category of the preinstalled portlets and select the iFrame portlet, as shown in figure 14.2.
Figure 14.2. The iFrame portlet in the Sample category is used to display external web applications as portlets in a web portal.
After adding the iFrame portlet to a portal page, you must configure it to point to an external web application, as shown in figure 14.3.
Figure 14.3. Configuration options for the iFrame portlet. You can specify the URL of the external web application, the authentication details, and the attributes of the HTML <iframe> element that’s used by the iFrame portlet.

The Source URL field specifies the web application URL ![]() that you want to show using the iFrame portlet. If the external web application is deployed in the same Liferay Portal server, you can specify the source URL relative
to the context path and select the Relative to Context Path check box
that you want to show using the iFrame portlet. If the external web application is deployed in the same Liferay Portal server, you can specify the source URL relative
to the context path and select the Relative to Context Path check box ![]() . Select the check box labeled Authenticate
. Select the check box labeled Authenticate ![]() if the external web application requires basic or form-based authentication. You can modify the attributes of the <iframe> HTML element
if the external web application requires basic or form-based authentication. You can modify the attributes of the <iframe> HTML element ![]() that’s rendered by the iFrame portlet to show the external web application.
that’s rendered by the iFrame portlet to show the external web application.
Table 14.1 lists the benefits and drawbacks of using the built-in iFrame-based portlets available in most portal servers.
Table 14.1. Advantages and disadvantages of using the iFrame portlet
|
Advantages |
Disadvantages |
|---|---|
| It provides the simplest way to bring your web applications to a portal platform. | This simplicity comes at the loss of web portal features that are available to portlets that use a portlet bridge. For instance, when the user interacts with the web application, the request doesn’t pass through the web portal security infrastructure. |
| It allows you to authenticate against external web applications. | Authentication is limited to basic and form-based authentication mechanisms. |
| The external web application’s session timeout isn’t synchronized with that of the web portal. | |
| A page refresh invokes the render method of the iFrame portlet, which redisplays the initial page of the web application; the state of the web page isn’t maintained by the portlet. | |
| The look and feel of the web portal is generally poor because of the presence of menus and a header and footer in the external web application. Scrollbars in the iFrame portlet, allowing the user to see the complete content of the web page, further affect the user experience. |
As evident is from table 14.1, the iFrame portlet is well suited for scenarios where you don’t need most of the portal features, like inter-portlet communication, a consistent look and feel, portal security infrastructure, and so on.
Most portal servers provide portlet bridges for the standard frameworks, such as JSF, Struts, and Wicket. Let’s take a look at how a JSF portlet bridge can be used to expose an existing web application, developed using JSF 2.0, as a portlet.
14.3. JSF portlets
JSF is a popular web MVC framework that’s based on the concept of developing user interfaces as a tree of components. In JSF 2.0, the Facelets view technology is the preferred way to create JSF views.
In this section, we’ll look at how to create a simplified Book Catalog JSF web application, which we’ll expose as a portlet using PortletFaces Bridge. For more information about PortletFaces Bridge, see its official website (http://www.portletfaces.org/projects/portletfaces-bridge).
If you’re using JSF 1.2 for developing new applications, or your existing web applications use JSF 1.2, there are two JSRs that define standard JSF portlet bridges: JSR-301 (JSF 1.2 portlet bridge for Portlet 1.0) and JSR-329 (JSF 1.2 portlet bridge for Portlet 2.0). The Apache MyFaces portlet bridge (http://myfaces.apache.org/portlet-bridge/index.html) project provides implementations for both JSRs. As I write this book, there’s no JSR for developing a portlet bridge for JSF 2.0, but most portal server vendors provide a JSF 2.0 portlet bridge based on JSR-329.
Code Reference
You should now import the ch14_portletfaces-example Eclipse project. Before you build the project, set the liferay.portal.home property in the build.properties file to point to your Liferay Portal installation directory. If you want to test the JSF web application, set the tomcat.home directory to point to your Tomcat installation.
Let’s first look at the Book Catalog web application that we’ll use to demonstrate the use of the PortletFaces Bridge.
14.3.1. Book Catalog JSF web application requirements
Figure 14.4 shows the home page of the Book Catalog web application that we’ll expose as a portlet using PortletFaces Bridge.
Figure 14.4. The Book Catalog web application home page. The Remove hyperlink lets a user remove a book from the catalog, and the Add Book button show a form for adding a new book to the catalog.

In figure 14.4, if a user clicks the Add Book button, a form is displayed in which the user can add a new book to the catalog, as shown in figure 14.5.
Figure 14.5. The Add Book form is used to add a book to the catalog. This page makes use of JSF 2.0 Ajax support to validate the form.

As shown in figure 14.5, the Title, Author, and ISBN Number fields of the Add Book form are mandatory. An input field is validated when the focus is removed from that field; JSF 2.0 Ajax support is used to validate the fields.
Let’s now look at the directory structure used for developing the web and portlet applications. An important point to note here is that we’re using the same code base to develop web and portlet applications.
14.3.2. JSF web application project structure
Figure 14.6 shows the directory structure of the project. The directory structure has been designed such that you can create a JSF web application and the corresponding portlet application using the same code base, as you’ll see later in this section.
Figure 14.6. Directory structure for creating Book Catalog JSF web application and portlet application that uses PortletFaces Bridge

Figure 14.6 shows the important directories in the project structure for the Book Catalog JSF web application and portlet application. The directory structure is generic and can be reused in most JSF-based portlet projects.
Note
If you keep different code bases for web applications and the corresponding portlet applications, you’ll end up with a duplication of code and you’ll need to copy changes from one code base to the other. Using the same code base allows developers to test the web application before it’s moved to the portal environment or to compare the behavior of the web application in portal and nonportal environments.
Let’s look at each of the important directories shown in figure 14.6:
- build— Contains the web application and portlet application WAR files generated by the build process.
- portlet-xhtml— Contains the JSF web application’s XHTML files that have been modified for use within the portlet environment. For instance, the XHTML files in the portlet-xhtml folder don’t contain tags that generate <head>, <html>, and <body> HTML elements.
- web-xhtml— Contains the JSF web application XHTML files.
- resources— Contains resources used by the portlet application and the JSF web application, such as JavaScript, CSS, and images.
- xhtml— Used by the JSF web and portlet applications to serve views. This is an empty directory into which XHTML files are copied from the portlet-xhtml or web-xhtml folder during the build process. For instance, while creating a WAR file for the web application, the build process copies files from the web-xhtml folder to the xhtml folder; while creating a WAR file for the portlet application, the build process copies files from the portlet-xhtml folder to the xhtml folder.
Figure 14.6 shows the presence of an index.jsp file in the project. It’s packaged in the JSF web application WAR file and is the first page that’s accessed by the JSF web application user. The index.jsp page simply forwards the incoming request to the home page of the Book Catalog JSF web application.
Let’s now go through the important files of the Book Catalog JSF web application. We’ll look at how, with minimum modification to XHTML files and by adding portlet application–specific configuration files, you can expose the JSF web application with PortletFaces Bridge.
14.3.3. Developing the Book Catalog web application using JSF
A JSF web application consists of the following:
- faces-config.xml— This is a JSF-specific configuration XML file that contains managed beans declarations and page navigation information. As of JSF 2.0, a JSF application isn’t required to provide managed beans declarations and navigation information in the faces-config.xml file.
- XHTML files— Because we’re using the Facelets view technology, XHTML files represent JSF views that are responsible for generating the user interface of the web application. Alternatively, you can use JSP as the view technology, though Facelets is recommended. As of JSF 2.0, you don’t need to do anything special to use Facelets because JSF 2.0 uses Facelets as its view technology by default.
- Managed beans— These are form-backing beans used by a JSF application to store application state. As of JSF 2.0, you can specify a class as a managed bean by using the @ManagedBean class-level annotation.
- FacesServlet— The javax.faces.webapp.FacesServlet servlet component is configured in the JSF web application’s web.xml file, and it’s used to resolve JSF views and to manage the request lifecycle in the application.
- Resources— Like any other web application, a JSF web application consists of images, JavaScript, and CSS files. JSF 2.0 provides special tags—<outputScript> and <outputStylesheet>—as part of its core HTML tag library to include JavaScript and CSS files in a web page.
- Services and DAOs— A real-world JSF application usually has service and DAO layers for providing business services and data access logic, respectively.
Note
The Book Catalog JSF web application uses Mojarra JSF RI. For more information about Mojarra RI, refer to the official Project Mojarra website (http://javaserverfaces.java.net/). Alternatively, you can use Apache MyFaces RI to develop your JSF web application. For more information about Apache MyFaces RI, see the MyFaces project website (http://myfaces.apache.org/).
Now that you know what files and classes are involved in a JSF web application, let’s look at the managed beans and XHTML files in the Book Catalog JSF web application.
Managed Beans
The Book Catalog web application consists of two JSF-managed beans:
- BookCatalogBean—A session-scoped managed bean that defines validation and request-processing logic for the Book Catalog web application.
- BookService—An application-scoped managed bean that maintains catalog data and defines methods to retrieve books from the catalog, add a new book, and remove an existing book from the catalog.
The following listing shows some of the important properties and methods of the BookCatalogBean session-scoped managed bean.
Listing 14.1. The BookCatalogBean class
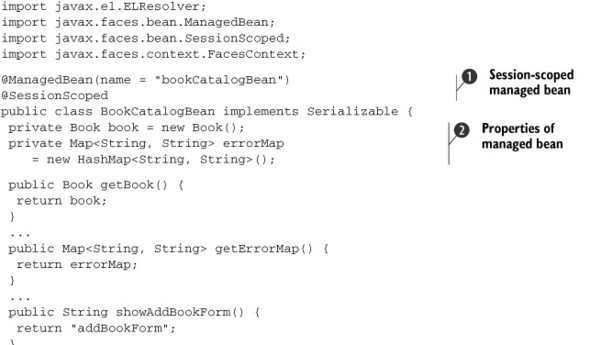

The @ManagedBean annotation ![]() indicates that BookCatalogBean is a managed bean in the JSF application. The name element identifies the name with which BookCatalogBean is registered in a scope. The @SessionScoped annotation specifies that the BookCatalogBean must be stored in session scope, which means it’s available until the HttpSession is invalidated.
indicates that BookCatalogBean is a managed bean in the JSF application. The name element identifies the name with which BookCatalogBean is registered in a scope. The @SessionScoped annotation specifies that the BookCatalogBean must be stored in session scope, which means it’s available until the HttpSession is invalidated.
The book and errorMap properties ![]() are defined. The book property identifies an empty Book object that’s populated when a user submits the Add Book form shown in figure 14.5. The errorMap property stores error messages corresponding to the input fields shown on the Add Book form.
are defined. The book property identifies an empty Book object that’s populated when a user submits the Add Book form shown in figure 14.5. The errorMap property stores error messages corresponding to the input fields shown on the Add Book form.
The getBooks method ![]() is invoked by the JSF data table (see listing 14.2) to retrieve the list of books in the catalog. Internally, the getBooks method retrieves the BookService application-scoped managed bean and invokes its getBooks method to retrieve the list of books.
is invoked by the JSF data table (see listing 14.2) to retrieve the list of books in the catalog. Internally, the getBooks method retrieves the BookService application-scoped managed bean and invokes its getBooks method to retrieve the list of books.
The removeBook method ![]() is invoked when a user clicks the Remove hyperlink shown in figure 14.4. Like the getBooks method, the removeBook method makes use of BookService to remove the selected book from the catalog.
is invoked when a user clicks the Remove hyperlink shown in figure 14.4. Like the getBooks method, the removeBook method makes use of BookService to remove the selected book from the catalog.
Note
If your managed bean includes calls to ExternalContext’s redirect method, you should remove such calls from your managed bean because it will attempt to redirect the portal user to somewhere outside the web portal. PortletFaces Bridge overrides the default behavior of the redirect method to do nothing, essentially ignoring calls to redirect.
XHTML Files
The XHTML files in the Book Catalog web application represent JSF views. The next listing shows the home.xhtml file, which generates the list of books in the catalog, as shown in figure 14.4.
Listing 14.2. The home.xhtml file

The <html>, <head>, and <body> HTML elements ![]() are rendered in the generated markup by the JSF HTML tag library tags. The <h:head> and <h:body> tags are new additions to the HTML tag library, and they provide the resource relocation feature in JSF 2.0; you can specify the location, in the generated markup, where a particular resource must be inserted.
are rendered in the generated markup by the JSF HTML tag library tags. The <h:head> and <h:body> tags are new additions to the HTML tag library, and they provide the resource relocation feature in JSF 2.0; you can specify the location, in the generated markup, where a particular resource must be inserted.
The <h:outputStylesheet> tag ![]() is used to insert a style sheet (a resource) into the web page. The target attribute of the <h:outputStylesheet> tag identifies the location in the generated markup where the style sheet needs to be inserted. In this example, the bookCatalog.css
style sheet is inserted in the <head> element. Alternatively, you can specify the value of the target attribute as body, which means that the style sheet will be inserted inside the <body> element of the generated markup. The library attribute of <h:outputStylesheet> identifies the location of the bookCatalog.css file in the resources directory of the project. The bookCatalog.css file is
located inside the resources/styles directory, so the value of the library attribute is specified as styles.
is used to insert a style sheet (a resource) into the web page. The target attribute of the <h:outputStylesheet> tag identifies the location in the generated markup where the style sheet needs to be inserted. In this example, the bookCatalog.css
style sheet is inserted in the <head> element. Alternatively, you can specify the value of the target attribute as body, which means that the style sheet will be inserted inside the <body> element of the generated markup. The library attribute of <h:outputStylesheet> identifies the location of the bookCatalog.css file in the resources directory of the project. The bookCatalog.css file is
located inside the resources/styles directory, so the value of the library attribute is specified as styles.
In section 3.3.5 of chapter 3, you saw that the use of <html>, <head>, <title>, and <body> elements is discouraged in the markup generated by the portlet because it can potentially break the portal page. The home.xhtml file contains these elements, so you must remove them to allow the Book Catalog JSF application to render correctly in the portal environment. This explains why there are separate sets of XHTML files for the JSF web application and for the portlet application.
If you remove the <head> and <body> elements from home.xhtml, the <h:outputStylesheet> tag is rendered useless, because you can no longer specify the target location in the markup where you want to insert the bookCatalog.css file. This is perfectly fine, because portlets use a portal server–specific approach to add JavaScript and CSS files to the head section of the HTML, or they make use of the RenderResponse’s MARKUP_HEAD_ELEMENT property, as described in section 3.3.5 of chapter 3. So you also need to remove the <h:outputStylesheet> tag from the home.xhtml file and use the liferay-portlet.xml configuration file to inject the bookCatalog.css file into the head section of the portal page.
Note
JSF 2.0 introduced the <h:outputScript> tag to insert JavaScript files into the generated markup. If your JSF view uses the <h:outputScript> tag, you must remove this tag from your JSF view and insert the JavaScript file using the mechanism supported by your portal server.
The Book Catalog JSF application also makes use of the JSF 2.0 Ajax feature to validate the fields in the Add Book form. The following listing shows the addBookForm.xhtml file which displays the Add Book form.
Listing 14.3. The addBookForm.xhtml file

<h:inputText> is used ![]() to render an HTML text field in which the user enters the book’s ISBN.
to render an HTML text field in which the user enters the book’s ISBN.
The <f:ajax> tag ![]() represents the Ajax tag of the JSF core tag library. Because it’s specified inside the <h:inputText> tag, it associates an Ajax action with the text field rendered by the <h:inputText> tag. The event attribute identifies the event with which the Ajax action is associated. The value blur indicates that the Ajax action is fired when the cursor moves out of the ISBN Number text field. The Ajax request processes
the ISBN Number text field component on the server, executes the validateIsbn method (refer to listing 14.1) corresponding to the valueChangeListener attribute, and renders the components identified by the render attribute of the <f:ajax> tag. If the user enters an ISBN that already exists in the catalog, an error message is stored in the errorMap property (see listing 14.1) with isbnNumber as the key.
represents the Ajax tag of the JSF core tag library. Because it’s specified inside the <h:inputText> tag, it associates an Ajax action with the text field rendered by the <h:inputText> tag. The event attribute identifies the event with which the Ajax action is associated. The value blur indicates that the Ajax action is fired when the cursor moves out of the ISBN Number text field. The Ajax request processes
the ISBN Number text field component on the server, executes the validateIsbn method (refer to listing 14.1) corresponding to the valueChangeListener attribute, and renders the components identified by the render attribute of the <f:ajax> tag. If the user enters an ISBN that already exists in the catalog, an error message is stored in the errorMap property (see listing 14.1) with isbnNumber as the key.
<h:message> ![]() represents a component that displays messages associated with the ISBN Number text field, and <h:outputText> represents a component that shows the value corresponding to the isbnNumber key in the errorMap property of the BookCatalogBean managed bean.
represents a component that displays messages associated with the ISBN Number text field, and <h:outputText> represents a component that shows the value corresponding to the isbnNumber key in the errorMap property of the BookCatalogBean managed bean.
In this section, you saw some important aspects of the Book Catalog JSF web application. Now the moment you’ve been waiting for—we’re ready to expose this web application as a portlet.
14.3.4. Developing the Book Catalog portlet using a JSF portlet bridge
In the previous section, we discussed how the Book Catalog web application makes use of new JSF 2.0 features, like resource relocation and Ajax. In this section, we’ll look at what you need to do to expose the Book Catalog web application as a portlet using PortletFaces Bridge.
You need to perform the following steps to expose the Book Catalog web application as a portlet:
1. Remove the <html>, <h:head>, <h:body>, <h:outputScript>, and <h:outputStylesheet> tags from all XHTML files in the web application.
2. Remove calls to the ExternalContext’s redirect method from the managed bean class. PortletFaces Bridge ignores calls to the redirect method, so this step can be considered optional.
3. Add the portlet.xml file to your web application to convert it into a portlet application. Later in this section, we’ll look at the Book Catalog portlet application’s portlet.xml file.
4. Add portal server–specific files to the portlet application. Because we’re using Liferay Portal, this includes the liferay-portlet.xml and liferay-display.xml files.
5. Add references to any CSS and JavaScript files that are required by the web application to the liferay-portlet.xml file.
6. Add the PortletFaces Bridge JAR files (portletfaces-bridge-api and portletfaces-bridge-impl) and dependencies to your web application’s WEB-INF/lib directory.
Let’s look at the Book Catalog portlet application’s portlet deployment descriptor (the portlet.xml file), which explains how PortletFaces Bridge is used in exposing a JSF web application.
Portlet Deployment Descriptor
The portlet deployment descriptor of a portlet that uses a portlet bridge relies on the portlet bridge to provide two things:
- The portlet implementation class
- The portlet initialization parameters to configure the portlet bridge for the portlet
The next listing shows how PortletFaces Bridge is configured for the Book Catalog portlet.
Listing 14.4. The Book Catalog portlet application’s portlet.xml file

org.portletfaces.bridge.GenericFacesPortlet ![]() is the portlet class that extends the Portlet API’s GenericPortlet class. GenericFacesPortlet is the entry point into the bridge framework, and it’s responsible for bridging the gap between the portlet and the JSF web
application environments. The javax.portlet.faces.defaultViewId.<portletMode> initialization parameter
is the portlet class that extends the Portlet API’s GenericPortlet class. GenericFacesPortlet is the entry point into the bridge framework, and it’s responsible for bridging the gap between the portlet and the JSF web
application environments. The javax.portlet.faces.defaultViewId.<portletMode> initialization parameter ![]() identifies the default JSF view for the <portletMode> portlet mode. For instance, the javax.portlet.faces.defaultViewId.view initialization parameter identifies the default JSF view for the VIEW portlet mode, and javax.portlet.faces.defaultViewId.edit identifies the default JSF view for the EDIT portlet mode.
identifies the default JSF view for the <portletMode> portlet mode. For instance, the javax.portlet.faces.defaultViewId.view initialization parameter identifies the default JSF view for the VIEW portlet mode, and javax.portlet.faces.defaultViewId.edit identifies the default JSF view for the EDIT portlet mode.
You’ve now seen the basics of using PortletFaces Bridge, but there’s more to it than just exposing an existing JSF web application as a portlet. A couple of questions arise when you use a portlet bridge to expose a web application as a portlet to a web portal:
- How will the portlet interact with other portlets on the portal page?
- How will the portlet make use of the portlet preferences feature that’s exclusively available to portlets?
JSR-329 did a pretty good job of defining JSF portlet bridge requirements to ensure seamless integration between JSF web applications and the portlet environment. And because it religiously follows JSR-329, PortletFaces Bridge helps you address inter-portlet communication and the personalization requirements of your portal-enabled JSF web application.
For instance, you can specify an event handler for your JSF portlet to process portlet events, as shown in the following portlet.xml file:
<portlet-app ...>
 <portlet>
  <portlet-name>bookCatalog</portlet-name>
  <portlet-class>
     org.portletfaces.bridge.GenericFacesPortlet
  </portlet-class>
  <init-param>
    <name>javax.portlet.faces.bridgeEventHandler</name>
    <value>ch11.code.listing.BookAddedEventHandler</value>
  </init-param>
 ...
</portlet-app>
In the preceding XML fragment, BookAddedEventHandler represents a portlet event handler for the Book Catalog portlet that receives an event when a book is added by some other portlet on the same portal page. The BookAddedEventHandler must implement the org.portletfaces.bridge.BridgeEventHandler interface.
Even though JSF applications aren’t capable of handling portlet events, Portlet-Faces Bridge makes it possible for the JSF-based portlet to process portlet events generated by other portlets. Similarly, a JSF portlet can access public render parameters set by other portlets and bind them to JSF-managed bean properties or access PortletPreferences objects associated with a JSF portlet to access or update the preferences of the portlet. For more information on how you can personalize a JSF portlet or access public render parameters, refer to the official PortletFaces Bridge website (http://www.portletfaces.org/projects/portletfaces-bridge).
Warning
At the time of writing, PortletFaces Bridge was in Beta2 release and the support for public render parameters was under development. Please refer to the PortletFaces Bridge website for the current state of the bridge.
We’ll now look at a web application that’s developed using the Wicket framework and that’s exposed as a portlet using the portlet bridge provided by Wicket.
14.4. Wicket portlets
The Wicket web application framework is similar to JSF in the sense that it’s also based on the concept of developing user interfaces as a tree of components. You can develop a Wicket web application and expose it as a portlet using the portlet bridge provided by the Wicket framework.
Let’s first look at the requirements of the Book Catalog web application that we’ll expose using the Wicket portlet bridge.
14.4.1. Book Catalog Wicket web application requirements
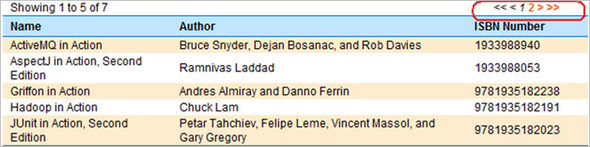
Figure 14.7 shows a simple Book Catalog web application that we’ll create using the Wicket framework and expose as a portlet. This figure shows a page of the Book Catalog web application, which displays books in a tabular format, sorted by book title, and lets you page through the complete list of books using the data scroller provided at the top-right corner of the table. When a user clicks a link in the data scroller, an Ajax request is sent to the server to asynchronously retrieve more books to display to the user, and the table is updated without refreshing the web page.
Figure 14.7. The Book Catalog web application developed using the Wicket web framework. It shows the books in the catalog in a tabular format and lets you page through the list.
Code Reference
You should now import the ch14_wicket-example Eclipse project so you can follow along with the code examples. Before you build the project, set the liferay.portal.home property in the build.properties file to point to your Liferay Portal installation directory. If you want to test the Wicket web application, set the tomcat.home directory to point to your Tomcat installation.
Now, let’s look at the directory structure for the Book Catalog web and portlet applications.
14.4.2. Wicket web application project structure
Figure 14.8 shows the directory structure of the project. The directory structure has been designed such that you can create a Wicket web application and the corresponding portlet application using the same code base, as you’ll see later in this section.
Figure 14.8. Directory structure for creating the Book Catalog Wicket web and portlet applications

Let’s now look at each of the important directories shown in figure 14.8.
- build— Contains the web and portlet application WAR files generated by the build process.
- html-portlet— Contains the HTML files of the Wicket web application that have been modified for use within the portlet environment. For instance, the HTML files in the html-portlet folder don’t contain tags that generate <head>, <html>, and <body> HTML elements.
- html-web— Contains HTML files for the Wicket web application.
Figure 14.8 shows an index.jsp file in the project, which is packaged in the Wicket web application WAR file. It’s the first page that’s accessed by the Wicket web application user, and it simply forwards the incoming request to the home page of the Book Catalog Wicket web application.
In Wicket applications, web pages are represented by HTML pages that specify placeholders for Wicket components (like HTML tables, text fields, and so on), and there’s a WebPage class corresponding to each HTML page that’s responsible for assigning Wicket components to the placeholders defined in the HTML page. By default, the Wicket framework expects that the HTML page and the corresponding WebPage class are in the same package.
If you need to develop a Wicket portlet and Wicket web application from the same code base, storing HTML pages in the same package as the corresponding WebPage class will limit you to using only a single HTML page for both the Wicket portlet and web application. You already know that HTML pages for the portlet shouldn’t contain certain HTML elements, so you need to have different HTML pages for the Wicket portlet and web application.
To address the requirement of having a different set of HTML pages for the Wicket portlet and the Wicket web application, there are html-portlet and html-webapp folders that contain the HTML pages for the portlet and web application, respectively.
Note
In this project structure, you don’t need to worry about putting an HTML page into the directory that contains the corresponding WebPage class because both the html-portlet and html-webapp directories mimic the package in which the corresponding WebPage class resides. For instance, in figure 14.8, the Home.html page is located in the chapter14/code/listing folder, which is the location of the corresponding WebPage class in the source folder. The build script in this example project simply copies the HTML pages to WEB-INF/classes directory, which ensures that each HTML page ends up in the same directory as the corresponding WebPage class.
Let’s now look at how you can go about creating the Book Catalog web application using Wicket.
14.4.3. Developing the Book Catalog web application using Wicket
A Wicket web application typically consists of the following:
- HTML pages that contain references to Wicket components, like tables, text fields, and so on.
- WebPage classes corresponding to each HTML page in the web application. A WebPage class is responsible for binding Wicket components to the component references defined in the HTML pages.
- A WebApplication class that defines the Wicket application and provides application-wide settings. For instance, if you want to keep the HTML pages of your Wicket application in a different package than the one in which the corresponding WebPage class is located, you can override this default behavior by extending the WebApplication class. As you’ll see shortly, you can also specify the home page of a Wicket application by overriding the getHomePage method of the WebApplication class.
- Services and DAOs.
Let’s look at some of the important files in the Book Catalog web application.
HTML Page
As mentioned earlier, HTML pages in a Wicket application contain references to Wicket components. The Home.html page, which displays the data table shown in figure 14.7, is shown next.
Listing 14.5. The Home.html page
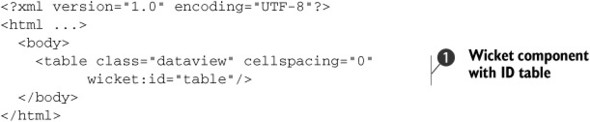
The wicket:id attribute ![]() references a Wicket component. The value of this attribute is table, which means that the WebPage class corresponding to the Home.html page will be responsible for describing the Wicket component associated with table.
references a Wicket component. The value of this attribute is table, which means that the WebPage class corresponding to the Home.html page will be responsible for describing the Wicket component associated with table.
Let’s now look at the Home class corresponding to the Home.html page, which sets the Wicket component identified with the wicket:id of table in the Home .html page.
Wicket Webpage
The Home class corresponding to the Home.html page associates the components referenced by the Home.html page, as shown next.
Listing 14.6. The Home class
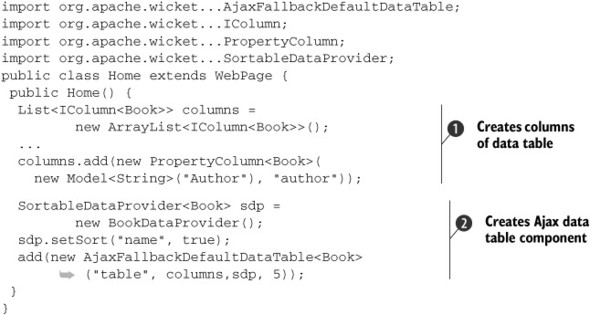
The columns of the data table are created ![]() . The arguments to the PropertyColumn<Book> class identify the header of the column and the name of the Book’s property whose value is displayed in the column.
. The arguments to the PropertyColumn<Book> class identify the header of the column and the name of the Book’s property whose value is displayed in the column.
SortableDataProvider acts as the provider of the data that will be displayed in the data table ![]() . AjaxFallbackDefaultDataTable is a Wicket component that renders an Ajax-based data table. Once the AjaxFallbackDefaultDataTable is created, it’s added to the component hierarchy maintained by the Home class for the Home.html page. The first argument to AjaxFallbackDefaultDataTable is a unique identifier of the component, and it must match a wicket:id value in the corresponding HTML page. In this example, the first argument to AjaxFallbackDefaultDataTable is table, which means it’s associated with the wicket:id="table" component reference defined in the Home.html page.
. AjaxFallbackDefaultDataTable is a Wicket component that renders an Ajax-based data table. Once the AjaxFallbackDefaultDataTable is created, it’s added to the component hierarchy maintained by the Home class for the Home.html page. The first argument to AjaxFallbackDefaultDataTable is a unique identifier of the component, and it must match a wicket:id value in the corresponding HTML page. In this example, the first argument to AjaxFallbackDefaultDataTable is table, which means it’s associated with the wicket:id="table" component reference defined in the Home.html page.
Let’s now look at the WebApplication object that defines the Wicket web application.
Wicket WebApplication
The WebApplication object that defines the home page of the Book Catalog web application is shown next.
Listing 14.7. The BookCatalogApp class

BookCatalogApp overrides the getHomePage method of WebApplication ![]() to return the WebPage class that corresponds to the home page of the Book Catalog web application. Because it returns Home.class, the home page
of the Book Catalog web application is the Home.html page.
to return the WebPage class that corresponds to the home page of the Book Catalog web application. Because it returns Home.class, the home page
of the Book Catalog web application is the Home.html page.
This is all you need to know about this example Wicket web application. Let’s now look at the steps involved in bringing this web application to a web portal.
14.4.4. Developing the Book Catalog portlet using a Wicket portlet bridge
You need to perform the following steps to expose the Book Catalog Wicket web application as a portlet:
1. Remove the <html>, <head>, and <body> elements from all HTML pages of the web application. The HTML pages tailored for the portlet environment are stored in the html-portlet directory.
2. Remove any calls to redirect requests outside of the Wicket application.
3. Set the WicketFilter’s detectPortletContext initialization parameter to true.WicketFilter is a servlet filter that’s configured in the web.xml file of the Wicket web application, and it’s responsible for intercepting Wicket requests to set off request processing. Setting detectPortletContext to true instructs WicketFilter to check for the presence of the PortletContext and, if it’s present, to override the default behavior of WicketFilter to suit the portlet environment.
4. Add the portlet.xml file to your web application to convert it into a portlet application.
5. Add the portal server–specific files to the portlet application. Because we’re using Liferay Portal, this includes the liferay-portlet.xml and liferay-display. xml files.
6. Add a reference to the CSS and JavaScript files that were required by the web application to the liferay-portlet.xml file.
As you can see, you need to make some changes to your existing Wicket web application to expose it as a portlet. This is similar to what we did to expose a JSF web application as a portlet. The good thing is that the changes to the web application are limited to its views and configuration.
Let’s now look at the Book Catalog portlet application’s web.xml and portlet.xml files, which use the same code base as the Wicket web application.
Web Application Deployment Descriptor
The following listing shows the web.xml file of the Book Catalog web application.
Listing 14.8. The web.xml file

detectPortletContext instructs the WicketFilter to run in a portlet mode ![]() if PortletContext is available. applicationClassName specifies the fully qualified class name of the WebApplication class
if PortletContext is available. applicationClassName specifies the fully qualified class name of the WebApplication class ![]() . The filterMappingUrlPattern parameter informs WicketFilter about the URL to which WicketFilter is mapped
. The filterMappingUrlPattern parameter informs WicketFilter about the URL to which WicketFilter is mapped ![]() using the <filter-mapping> element.
using the <filter-mapping> element.
Portlet Deployment Descriptor
The next listing shows that the portlet.xml file configures the WicketPortlet class as the portlet class for the Book Catalog portlet. The WicketPortlet class acts as a portlet bridge.
Listing 14.9. The Book Catalog portlet application’s portlet.xml file

The WicketPortlet class is responsible for bridging the gap between the portlet and Wicket environments. It accepts a wicketFilterPath initialization parameter, which points to the path of the WicketFilter, as defined in the web.xml file, except that it doesn’t have a trailing /*.
Listing 14.9 shows how the Wicket framework’s built-in WicketPortlet class allows you to use a Wicket web application as a portlet. Unlike PortletFaces Bridge, WicketPortlet doesn’t restrict you from redirecting a Wicket request outside the Wicket web application, so you must remove all redirect calls that point outside of the web application.
Note
As of Wicket 1.4.9, WicketPortlet doesn’t support the use of public render parameters and portlet events, which are required for inter-portlet communication. If you want to use inter-portlet communication with your Wicket portlets, you may have to wait until Wicket 1.5 is released. See the official Wicket website (http://wicket.apache.org/) for the latest updates on its support for portlet events and public render parameters.
You’ve now seen all you need to do to convert your Wicket web applications into portlet applications. You can now deploy the Book Catalog portlet application in Liferay Portal and use it like any other portlet.
14.5. Summary
In this chapter, we looked at how you can develop web applications using your favorite framework and expose them as portlets using a portlet bridge. We looked at two sample web applications—a JSF and a Wicket web application—and saw how portlet bridges simplify the process of bringing existing applications to a web portal. You also saw how you can expose an existing web application using Liferay Portal’s built-in iFrame portlet.
In most portal projects, you’ll come across scenarios where developing an existing web application as a portlet isn’t feasible, or the developers are well acquainted with a particular web framework but not with portlet technology. In such scenarios, using a portlet bridge can accelerate the development of portlets and bring existing web applications to web portals.
As you saw in the examples in this chapter, portlet bridges may not support all of the features that are available to portlets developed using Java portlet technology. It’s recommended that before choosing a web framework for developing portlets, you should check out the portlet bridges that are available for that web framework and make sure that it supports the features you need in your portlets.
In the next and last chapter, we’ll look at how you can access remotely deployed portlets using Web Services for Remote Portlets (WSRP).