Chapter 3. View fundamentals
- Providing data to the view
- Using strongly typed views
- Understanding view helper objects
- Developing with templates
The view’s responsibility can be deceptively simple. Its goal in life is to take the model given to it and use it to render content. Because the controller and related services already executed all the business logic and packaged the results into a model object, the view only needs to know how to take that model and turn it into HTML. Although this separation of concerns removes much of the responsibility that can plague traditional ASP.NET applications, views still need to be carefully and deliberately designed. Views require knowledge and understanding of the building blocks of the web, including HTML, CSS, and JavaScript.
In this chapter, we’ll examine how ASP.NET MVC renders views, how the default WebFormViewEngine functions, and how to structure and organize views. Then we’ll look at a couple of approaches for using the model to render content in a view. Finally, we’ll cover the templating features new to ASP.NET MVC 2.
3.1. Introducing views
A view’s responsibility is to render content. But how does the MVC framework decide which view to use? How do we control what gets rendered, and how do we organize our content? How do we even tell MVC to render a view?
In the ASP.NET MVC framework, the controller decides, based on user input, that a view should be rendered by returning a ViewResult object from a controller action. Listing 3.1 shows an action returning a ViewResult.
Listing 3.1. Using the ViewResult object to render a view
[Authorize]
public ActionResult ChangePassword()
{
    return View();
}
Although the method name seems to indicate that a view is rendered as the result of calling the View method, it’s merely a helper method in the Controller base class to create a ViewResult object. The ViewResult object contains all the information needed to render the view at a later time. This information includes the view name, the model, and other pertinent information an IViewEngine can use to render a view.
Internally, the ViewResult object delegates to the IViewEngine to render the content for a view. The IViewEngine implementation, commonly just called the view engine, is the class responsible for examining the ViewResult information as well as other context information and for locating the correct IView to render.
3.2. Examining the ViewDataDictionary
The main object used to pass model information to a view is the ViewDataDictionary class. Like other MVC frameworks, ASP.NET MVC exposes a dictionary to enable the controller action to pass any number of model objects and information to the view. With a dictionary object, we can pass as many items as need be for the view to render appropriately.
For example, consider a profile page where users can view other users’ profiles, but only the currently logged-in user can edit their profile. To display the profile information on the profile screen, we can pass in the Profile object, shown in listing 3.2, directly to the view.
Listing 3.2. The Profile class
public class Profile
{
    public Profile(string username)
    {
        Username = username;
    }

    public string Username { get; set; }
    public string FirstName { get; set; }
    public string LastName { get; set; }
    public string Email { get; set; }
}
Although our Profile class has all the information needed to display our Profile, it doesn’t include any information about the currently logged-in user, or specify whether the view should display the Edit link. We need to give the view more information than solely the Profile object to make this decision. We can use the ViewDataDictionary to provide this extra piece of information, as shown in listing 3.3.
Listing 3.3. The Show controller action
public ViewResult Show(string username)
{
    var profile = _profileRepository.Find(username);

    bool hasPermission = User.Identity.Name == username;

    ViewData["hasPermission"] = hasPermission;

    return View(profile);
}
In the Controller base class, we have access to the ViewDataDictionary object passed to the view in the ViewData property. We check the current user’s name, compare it to the profile to be shown in the username parameter, and place the result of the comparison into ViewData with a hasPermission key. Next, we use the helper View method to create a ViewResult object and set the ViewData’s Model property to our Profile object.
On the view side, we’ll pull the hasPermission information out of ViewData and use it to hide the Edit link, as shown in listing 3.4.
Listing 3.4. Using ViewData information to hide a link

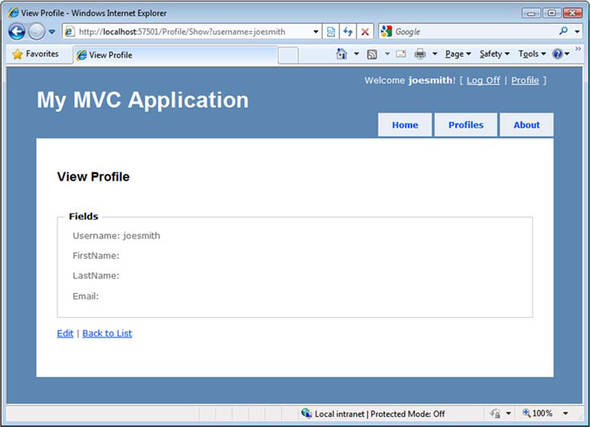
In our view, we extract the hasPermission information ![]() from ViewData. Next, we conditionally show the Edit link based on the hasPermission variable
from ViewData. Next, we conditionally show the Edit link based on the hasPermission variable ![]() . Finally, we display a link
. Finally, we display a link ![]() to take the user back to the profile list page. The final rendered page for showing the current user’s profile is shown in
figure 3.1.
to take the user back to the profile list page. The final rendered page for showing the current user’s profile is shown in
figure 3.1.
Figure 3.1. The current user’s profile page
The technique of utilizing the dictionary aspects of the ViewDataDictionary gives us a lot of flexibility, but it comes at a price. Because we create weak, compile-unsafe links in a dictionary, we open ourselves to problems in the future. For example, we might misspell hasPermission in the view, and only learn of our mistake at runtime. But our use of the Profile object as our view model gives us a strong link between controller action and view, compile-time safety, and IntelliSense in the view.
Using the loose-type semantics of a dictionary can also hinder us in more complex scenarios. Consider a login screen where the username and password are required fields. With an object to represent the model for this view, we can decorate our view model object with validation attributes. In the next section, we’ll look at taking advantage of view model types with strongly typed views.
3.3. Strongly typed views with a view model
When using the WebFormViewEngine, our views can inherit from two types: System.Web.Mvc.ViewPage or System.Web.Mvc.ViewPage<T>. The generic ViewPage<T> inherits from ViewPage but offers some unique additions not available in the nongeneric ViewPage class.
The skeleton member definition of ViewPage<T> is shown in listing 3.5.
Listing 3.5. Skeleton definition of ViewPage<T>

In addition to providing a strongly typed wrapper over ViewData.Model through the Model property ![]() , the ViewPage<T> class provides access to strongly typed versions of the associated view helper objects, AjaxHelper and HtmlHelper.
, the ViewPage<T> class provides access to strongly typed versions of the associated view helper objects, AjaxHelper and HtmlHelper.
To use a strongly typed view, we first have to ensure that our controller action sets the ViewData.Model properly. In listing 3.6, we retrieve all the profiles for display in a list page and pass the entire collection of profiles to the View method, which encapsulates setting the ViewData.Model property.
Listing 3.6. Passing a collection of profiles to our view
public ViewResult Index()
{
    var profiles = _profileRepository.GetAll();
    return View(profiles);
}
In the Index view used with this action, even the loose-typed ViewPage class can use the ViewData.Model property. But this property is only of type object, and we’d need to cast the result to use it effectively. Instead, we can make our view page inherit from ViewPage<T>, as shown in listing 3.7.
Listing 3.7. Inheriting from ViewPage<T> for a strongly typed view
<%@ Page Language="C#"
MasterPageFile="~/Views/Shared/Site.Master"
Inherits="System.Web.Mvc.ViewPage<AccountProfile.Models.Profile[]>" %>
By inheriting from ViewPage<T> instead of ViewPage, we now have a strongly typed view. In the next section, we’ll look at how we can use our view model object to display information in a view.
3.4. Displaying view model data in a view
Typically, to display information in a view, we’ll use the HtmlHelper object to help us use our view model to generate HTML. Consider listing 3.8, where we render a collection of profiles.
Listing 3.8. Displaying a list of profiles in our view

In our profile list screen, we want to iterate over the profiles passed in our model ![]() and display select information from each
and display select information from each ![]() . Because we’d rather not open ourselves to the myriad of scripting attacks possible when displaying unencoded user input
to the screen, we encode all user-entered information by using the Encode method on HtmlHelper, which is exposed through the Html property on our base ViewPage<T> (and ViewPage) class.
. Because we’d rather not open ourselves to the myriad of scripting attacks possible when displaying unencoded user input
to the screen, we encode all user-entered information by using the Encode method on HtmlHelper, which is exposed through the Html property on our base ViewPage<T> (and ViewPage) class.
In our login page, we use a view model object to represent the entire form, as shown in listing 3.9.
Listing 3.9. Our LogOnModel class

The LogOnModel class is simple, containing only auto properties. The attributes ![]() you see here are data annotations, and you’ll learn more about them in chapter 4. The logon screen shows input elements for each of these properties, as you can see in figure 3.2.
you see here are data annotations, and you’ll learn more about them in chapter 4. The logon screen shows input elements for each of these properties, as you can see in figure 3.2.
Figure 3.2. The logon screen

Because we opted for a strongly typed view for our logon screen, we can use the builtin helpers to render the HTML for each input element. Instead of loosely bound strings to represent the action parameters, we can take advantage of the expression-based HtmlHelper extensions to create various types of input elements, as shown in listing 3.10.
Listing 3.10. Rendering the account information input form
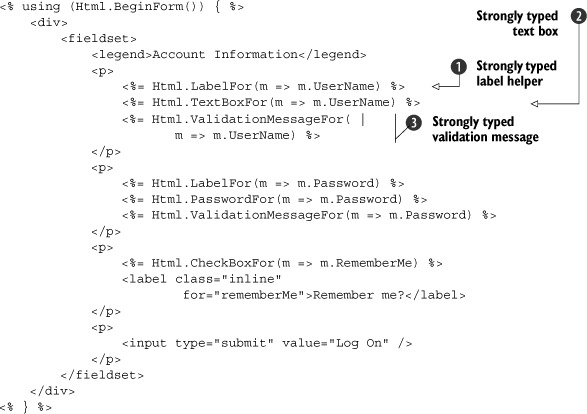
In listing 3.10, we take advantage of several of the HtmlHelper extension methods designed for strongly typed view pages, including methods for labels ![]() , input text boxes
, input text boxes ![]() , and validation messages
, and validation messages ![]() . Instead of a loose-typed string to represent properties, like those used in ASP.NET MVC version 1 (<%=Html.TextBox("UserName")%>), these helper methods utilize the C# 3.5 feature of expressions to generate HTML. Because these HTML elements need to be
generated to match properties on objects, it’s only fitting that the original types and objects are used with expressions
to generate the related HTML.
. Instead of a loose-typed string to represent properties, like those used in ASP.NET MVC version 1 (<%=Html.TextBox("UserName")%>), these helper methods utilize the C# 3.5 feature of expressions to generate HTML. Because these HTML elements need to be
generated to match properties on objects, it’s only fitting that the original types and objects are used with expressions
to generate the related HTML.
The Html.LabelFor and Html.TextBoxFor methods used for the UserName property in listing 3.10 generate the HTML shown in listing 3.11.
Listing 3.11. HTML generated from expression-based HtmlHelper methods
<label for="UserName">User name</label>
<input id="UserName" name="UserName" type="text" value="" />
For our page to pass accessibility validation, every input element (such as the first line in listing 3.11) needs to include a corresponding label element (such as the second line). Because our label and input elements are generated using expressions, we no longer need to worry about hard-coding label and input names.
The HtmlHelper extensions designed for strongly typed views (including those used in the preceding code) are listed in table 3.1.
Table 3.1. HTML helpers in ASP.NET MVC 2
|
HTML helper |
Description |
|---|---|
|
DisplayFor |
Returns HTML markup for each property in the object that’s represented by the expression |
|
DisplayTextFor |
Returns HTML markup for each property in the object that’s represented by the specified expression |
|
EditorFor |
Returns an HTML input element for each property in the object that’s represented by the specified expression |
|
CheckBoxFor |
Returns a check box input element for each property in the object that’s represented by the specified expression. |
|
DropDownListFor |
Returns an HTML select element for each property in the object that’s represented by the specified expression using the specified list items |
|
HiddenFor |
Returns an HTML hidden input element for each property in the object that’s represented by the specified expression |
|
LabelFor |
Returns an HTML label element and the property name of the property that’s represented by the specified expression |
|
ListBoxFor |
Returns an HTML select element for each property in the object that’s represented by the specified expression and uses the provided data for the list items |
|
PasswordFor |
Returns a password input element for each property in the object that’s represented by the specified expression |
|
RadioButtonFor |
Returns a radio button input element for each property in the object that’s represented by the specified expression |
|
TextAreaFor |
Returns an HTML text area element for each property in the object that’s represented by the specified expression |
|
TextBoxFor |
Returns a text input element for each property in the object that’s represented by the specified expression |
|
ValidateFor |
Retrieves the validation metadata and validates each data field that’s represented by the specified expression |
|
ValidationMessageFor |
Returns the HTML markup for a validation-error message for each data field that’s represented by the specified expression |
Because our form was generated using a strongly typed view, we can take advantage of this in the design of our action that the form posts to. Rather than enumerating every input field as a separate action method parameter, we can bind all the parameters to the same view model we used to render the view, as shown in listing 3.12.
Listing 3.12. The signature of the LogOn action using the view model as a parameter
public ActionResult LogOn(LogOnModel model, string returnUrl)
{
    // Action method body here
    ...
}
As you can see, our LogOn action method takes a single LogOnModel object, as well as the potential return URL, instead of a method parameter for each input element on our form.
As powerful as the HtmlHelper extensions for strongly typed views can be, we still introduce quite a bit of duplication in our views if we rely solely on these extensions for generating HTML. For example, if every input element requires a corresponding label, why not always include it? Every user interface is different, so the MVC team can’t predict the layout everyone wants to use for input and label elements. Instead, we can take advantage of a new feature in ASP.NET MVC 2—templates—to enforce a standardized approach to generating HTML.
3.5. Using strongly typed templates
As we move toward using strongly typed views based on a presentation model, we’ll start to see more and more patterns emerge. If a view model object has a Boolean property on a form, we’ll almost certainly want to display a check box on a form. Email addresses should always render the same way, as should password fields and so on. It’s rare that an input element won’t also include the corresponding validation message.
HtmlHelper extension methods work well for individual snippets of HTML elements, but tend not to scale when the generated HTML starts to become more complex and include more varieties of elements. ASP.NET MVC 2 gives us a way to start basing our rendering decisions on model metadata. An example of this is marking our view model with a RequiredAttribute so that it will be automatically validated. The framework also provides ways to generate snippets of HTML based on properties of our view model.
With ASP.NET MVC 2, the MVC team designed a view feature that tends to sit between HtmlHelper extension methods and full-blown partials in size and scope. This feature is templated helpers, and it’s designed to assist in generating HTML based on strongly typed views. Templated helpers can be used to generate HTML for the entire model or for one member at a time.
Because HTML for viewing and editing are radically different, generating templates for each is accomplished through two different sets of methods, with two different sets of templates.
3.5.1. EditorFor and DisplayFor templates
These two different sets of templates are separated into a set of editor and display templates. The editor and display templates are generated from the following methods:
- Html.Display("Message")
- Html.DisplayFor(m => m.Message)
- Html.DisplayForModel()
- Html.Editor("UserName")
- Html.EditorFor(m => m.UserName)
- Html.EditorForModel()
Although equivalent string-based methods exist for using templates against loosely typed views, we’ll prefer to use the expression-based methods to gain the benefits of using strongly typed views. If our model is simple, we can use the ForModel methods, which enumerate over every member in the model to generate the complete HTML.
Because our Change Password page is simple, we can use the EditorForModel method to generate an edit form, as shown in listing 3.13.
Listing 3.13. Using EditorForModel for a simple model
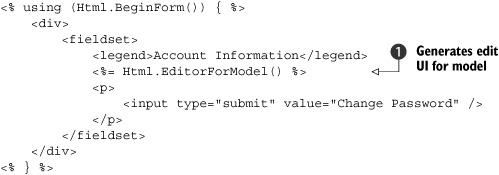
This EditorForModel method ![]() loops through all the members on our model for this view, generating the editor templates for each member. Each template
generated may be different, depending on the model metadata information on each member.
loops through all the members on our model for this view, generating the editor templates for each member. Each template
generated may be different, depending on the model metadata information on each member.
This HTML might suit our needs, but there’s only so much you can embed in your view model before you can no longer sanely emit HTML based solely on model metadata. The model for the Change Password screen, shown in listing 3.14, already has validation and label information.
Listing 3.14. The Change Password model

In this model, we include validation information (the Required attribute ![]() ) as well as display information (the DisplayName and DataType attributes
) as well as display information (the DisplayName and DataType attributes ![]() ), both of which can be used to influence the final HTML generated in our templates.
), both of which can be used to influence the final HTML generated in our templates.
But we may need more control over our HTML than what’s allowed or even desired in our model class through metadata information. For example, we might want to surround some of our elements with paragraph tags. For this level of individual control, where we want to lay out individual elements, we can use the EditorFor method, as shown in listing 3.15.
Listing 3.15. Using EditorFor for extra layout control
<p>
    <%= Html.EditorFor(m => m.OldPassword) %>
</p>
<p>
    <%= Html.EditorFor(m => m.NewPassword) %>
</p>
<p>
    <%= Html.EditorFor(m => m.ConfirmPassword) %>
</p>
Because templates are shared across our site, we may not want to force every editor to include a paragraph tag. For complex forms, we’re likely to include organizational elements such as horizontal rules, field sets, and legends to organize our elements, but for simple display and edit models, the EditorForModel and DisplayForModel will likely meet our needs.
3.5.2. Built-in templates
Out of the box, ASP.NET MVC 2 includes a set of built-in templates for both editor and display templates. The included display templates are shown in table 3.2.
Table 3.2. Display templates in ASP.NET MVC 2
|
Display template |
Description |
|---|---|
|
EmailAddress |
Renders a link with a mailto URL |
|
HiddenInput |
Conditionally hides the display value |
|
Html |
Renders the formatted model value |
|
Text |
Renders the raw content (uses the String template) |
|
Url |
Combines the model and formatted model value to render a link |
|
Collection |
Loops through an IEnumerable and renders the template for each item |
|
Boolean |
Renders a check box for regular Boolean values and a drop-down list for nullable Boolean values |
|
Decimal |
Formats the value with two decimals of precision |
|
String |
Renders the raw content |
|
Object |
Loops through all properties of the object and renders the display template for each property |
With the exception of the Collection and Object templates, each template renders a single value. The Object template iterates through every item in the ModelMetadata.Properties collection (which is, in turn, populated by inspecting the public properties on the item type), and displays the corresponding display template for each item. The Collection template iterates through every item in the model object, displaying the correct display template for each item in the list.
The display templates, as you’d expect, render display elements to the browser, such as raw text and anchor tags, whereas the editor templates render form elements. The default editor templates are listed in table 3.3.
Table 3.3. Editor templates in ASP.NET MVC 2
|
Editor template |
Description |
|---|---|
|
HiddenInput |
Uses the HtmlHelper.Hidden extension method to render a <input type="hidden" /> element |
|
MultilineText |
Uses the HtmlHelper.TextArea extension method to render a multiline input element |
|
Password |
Uses the HtmlHelper.Password extension method to render a password input element |
|
Text |
Uses the HtmlHelper.TextBox extension method to render a text input element |
|
Collection |
Loops through an IEnumerable and renders the template for each item, with correct index values |
|
Boolean |
Renders a check box for regular Boolean values and a drop-down list for nullable Boolean values |
|
Decimal |
Formats the decimal value with two decimals of precision inside a text box |
|
String |
Uses the HtmlHelper.TextBox extension method to render a text input element |
|
Object |
Loops through all properties of the object and renders the editor template for each property |
The Collection and Object templates behave identically to the display templates, with the exception that the editor templates are used instead of the display templates for each child item examined.
In the next section, we’ll examine how MVC decides which template to use.
3.5.3. Selecting templates
Internally, the editor and display template helper methods choose which template to display by looking for a template by name. The template name value can come from a variety of sources, but the template helper methods use a specific algorithm for choosing the template to render based on the name. Once a matching template is found by name, that template will be used to generate the appropriate content.
The template helper methods search for a template in specific locations before trying the next template name. The template search locations are the EditorTemplates and DisplayTemplates folders. Similar to partial and view names, the template methods will first look in the controller-specific view folder (or area- and controller-specific view folder) before moving on to the Shared view folder. If the template helper method is used inside an area-specific view, these folders include
- <Area>/<ControllerName>/EditorTemplates/<TemplateName>.ascx (or .aspx)
- <Area>/Shared/EditorTemplates/<TemplateName>.ascx (or .aspx)
If a template isn’t found in these folders, or if the view isn’t in an area, the default view search locations are used:
- <ControllerName>/EditorTemplates/<TemplateName>.ascx (or .aspx)
- Shared/EditorTemplates/<TemplateName>.ascx (or .aspx)
The template helper methods try each folder in sequence, and for each search folder they run through a list of template names to find a match. The template names also follow a particular algorithm:
|
Step |
Search location |
|
|---|---|---|
|
1 |
The template name passed in through the display or editor helper template methods (defaults to null) |
|
|
2 |
The ModelMetadata.TemplateHint value (populated from the [UIHint] attribute by default) |
|
|
3 |
The ModelMetadata.DataTypeName value (populated from the [DataType] attribute by default) |
|
|
4 |
The model type (if a nullable type, then the underlying type) |
|
|
5 |
If the model type is... |
The template used is |
|
Not a complex type (a type converter exists from the model type to String) |
String |
|
|
An IEnumerable |
Collection |
|
|
Any other interface |
Object |
|
|
6 |
Recursively search the base types, one by one, and search the Type.Name. If the item is an IEnumerable, search the name “Collection”, then “Object”. |
|
For example, suppose we want to display a custom ChangePasswordModel template for our model for the Change Password screen. We already have a complete model object, so we can define a template matching the name of the model type, ChangePasswordModel. Because this template is specific to our AccountController, we place the template in an EditorTemplates folder underneath the account-specific view folder, as shown in figure 3.3.
Figure 3.3. The ChangePasswordModel template in the EditorTemplates folder

If we want our template to be visible to all controllers, we’d need to place our template in the EditorTemplates folder in the Shared folder, as shown in figure 3.4.
Figure 3.4. Creating a global Object editor template in the Shared folder

Although our templates inherit from ViewUserControl (.ascx files), they can also inherit from ViewPage, which will allow us to use master pages for another level of templating. In the next section, we’ll examine the ways we can create custom templates and override the existing templates.
3.5.4. Customizing templates
In general, we’ll have two reasons to create a custom template:
- Create a new template
- Override an existing template
The template resolution rules first look in the controller-specific view folder, so it’s perfectly reasonable to first override one of the built-in templates in the Shared folder and then override that template in the controller-specific view folder. For example, we might have an application-wide template for displaying email addresses but then provide a specific template in an area or controller template folder.
For the most part, templates are equivalent to developing a partial for a type. The template markup for our ChangePasswordModel is shown in listing 3.16.
Listing 3.16. The template markup for our ChangePasswordModel template

Our template simply uses the existing EditorFor templates for each member ![]() , but wraps each in a paragraph tag
, but wraps each in a paragraph tag ![]() . But what’s the advantage of this model over a partial template?
. But what’s the advantage of this model over a partial template?
For one, partials need to be selected by name in the view. Templates are selected from model metadata information, bypassing the need for the view to explicitly specify which template to use. Additionally, templates are given extra information in the ViewDataDictionary that partials and other pages don’t receive, and that information is in the ViewData.ModelMetadata property. Only templates have the ModelMetadata property populated by ASP.NET MVC; for partials and views, this property is null.
With the ModelMetadata property, we’re able to get access to all the metadata information generated from the model metadata provider. This information includes model type information, properties, and metadata about the model.
Model type information includes the properties listed in table 3.4.
Table 3.4. Properties of the ModelMetadata class provided through reflection
|
ModelMetadata property |
Description |
|---|---|
|
Model |
The value of the model |
|
ModelType |
The type of the model |
|
ContainerType |
The type of the container for the model, if Model is the property of a parent type |
|
PropertyName |
The property name represented by the Model value |
|
Properties |
Collection of model metadata objects that describe the properties of the model |
|
IsComplexType |
Value that indicates whether the model is a complex type |
|
IsNullableValueType |
Value that indicates whether the type is nullable |
In addition to general model type information, the ModelMetadata object contains other metadata information, which by default is populated from attributes, as listed in table 3.5.
Table 3.5. Properties of the ModelMetadata class provided through data annotations
|
ModelMetadata property |
Source of value |
|---|---|
|
ConvertEmptyStringToNull |
System.ComponentModel.DataAnnotations.DisplayFormatAttribute |
|
DataTypeName |
System.ComponentModel.DataAnnotations.DataTypeAttribute |
|
DisplayFormatString |
System.ComponentModel.DataAnnotations.DisplayFormatAttribute |
|
System.ComponentModel.DisplayNameAttribute |
|
|
EditFormatString |
System.ComponentModel.DataAnnotations.DisplayFormatAttribute |
|
HideSurroundingHtml |
System.Web.Mvc.HiddenInputAttribute |
|
ReadOnly |
System.ComponentModel.ReadOnlyAttribute |
|
IsRequired |
System.ComponentModel.DataAnnotations.RequiredAttribute |
|
NullDisplayText |
System.ComponentModel.DataAnnotations.DisplayFormatAttribute |
In our custom template, we can examine these model metadata properties to customize the HTML rendered. In addition to the properties listed in tables 3.4 and 3.5, the ModelMetadata object exposes an AdditionalValues property of type IDictionary<string, object> that can contain additional metadata information populated from custom model metadata providers. For example, if we want to display an asterisk for required fields, we only need to examine the IsRequired property in our custom template. Or we could decorate our model with a DataType attribute having a value of DataType.DateTime, and we could create a custom template that renders dates with a custom date picker widget.
In practice, we’ll likely override existing templates, because the existing Object template may or may not suit our needs. The model metadata doesn’t include any styling information, so custom styling or other markup will be accomplished by overriding the built-in templates. But because many sites tend to standardize on general user interface layout, such as “always placing labels above inputs” or “always marking required fields with an asterisk,” we only need to override the template once to potentially affect the entire site.
For example, we might want to always place labels on the same line as fields but right-aligned in a column. To do so, we’d need to override the existing Object template, as shown in listing 3.17.
Listing 3.17. Creating a custom Object template

We create a for loop to loop all the ModelMetadata.Properties that should be shown for editing and have not been shown before, displaying the label ![]() , editor template
, editor template ![]() , and validation message
, and validation message ![]() for each property in a set of div tags. Finally, we include a cleaner div that resets the float styling applied to achieve a column layout. The final layout is shown in figure 3.5.
for each property in a set of div tags. Finally, we include a cleaner div that resets the float styling applied to achieve a column layout. The final layout is shown in figure 3.5.
Figure 3.5. The float-based layout enforced by our custom Object template

By placing common rendering logic in our global templates, we can easily standardize the display and editor layout for our views across the entire site. For areas that need customization, we can selectively override or provide new templates. By standardizing and encapsulating our rendering logic in one place, we have less code to write and one place we can use to affect our entire site. If we want to change our date-time picker widget, we can simply go to the one date-time template to easily change the look and feel of our site.
3.6. Summary
The MVC pattern reduces business logic clutter in a view. Unfortunately, views now bring their own complexities that must be handled. To manage that complexity and reduce the frequency of breakage, we examined how we can use strongly typed views and separated view models to increase the cohesion of our views. With the popularity of separated view models increasing, the concept of using templates to drive content from the metadata on these view models became possible. With separated view models, we can now keep the view concerns of our application isolated from our domain model.
Now that you understand how views work, we’ll explore the fundamentals of using controllers in chapter 4.