Chapter 6. Hosting ASP.NET MVC applications
- Understanding server environment requirements
- Revealing hosting options in IIS
- Configuring different environments
Running an ASP.NET MVC application in Visual Studio is as easy as hitting F5, but what about deploying the application? In a Windows-hosted environment, web applications are typically deployed to Internet Information Services (IIS). But several versions of IIS are on the market, each with different configurations and options for hosting an ASP.NET MVC application. With new features like routing in some versions of IIS, hosting presents new challenges that didn’t exist with Web Forms applications.
In this chapter you’ll learn options for hosting in the various IIS versions supported today.
6.1. Deployment scenarios
In most scenarios, deploying an ASP.NET MVC application involves deploying to a modern Windows Server OS environment. Occasionally, it’s necessary to deploy to older environments, such as Windows Server 2003 or Windows XP, with older versions of IIS. Table 6.1 shows Windows OSs and the versions of IIS available.
Table 6.1. Windows and IIS versions
|
Windows operating system |
IIS version |
|---|---|
|
Windows XP Professional |
IIS 5.1 |
|
Windows XP Professional x64 Edition |
IIS 6.0 |
|
Windows Server 2003 |
IIS 6.0 |
|
Windows Vista |
IIS 7.0 |
|
Windows Server 2008 |
IIS 7.0 |
|
Windows 7 |
IIS 7.5 |
|
Windows Server 2008 R2 |
IIS 7.5 |
For all practical purposes, we need to worry about only two types of hosting environments:
- IIS 7.0+
- IIS 6 and earlier
Deploying to an IIS 7 environment to support the routing features of ASP.NET MVC requires far less configuration than the older versions of IIS. Most of the configuration decisions for IIS 6 and older versions revolve around routing, where your deployment decision could affect how you configure your routes.
To deploy an ASP.NET MVC application, you’ll need to make sure IIS is installed on the target machine as well, as either .NET 3.5 with Service Pack 1 or .NET 4.
Next, we’ll see how to deploy to an IIS environment using XCOPY deployment.
6.2. XCOPY deployment
Regardless of the version of IIS used, not every file in your solution needs to exist in the final server destination. Those familiar with Web Forms deployments know not to deploy code-behind files. The same holds true for MVC deployments. For an MVC-only website, these are files needed:
- Global.asax
- Web.config
- Content files (JavaScript, images, static HTML, and so on)
- Views
- Compiled assemblies
- System.Web.Mvc.dll
Deployments themselves can be difficult. Add complexities like installers, and deployments can become even more difficult to execute and maintain. Installers usually need a person logged in to the target machine to run them, and automating installers is possible but still difficult. Log files from a botched installation usually consist of output from the MSI logger, which can be extremely verbose and indecipherable. Although there’s still no deployment solution built into the .NET Framework, you’ll mitigate many of these difficulties by scripting your deployments.
For many application deployment scenarios, an installer is unnecessary. Assuming the target machine is already configured correctly, simply copying over files is sufficient to deploy the application. This type of deployment is called “XCOPY deployment.” The term originated from the XCOPY DOS command, which allowed copying of multiple files in one command, along with many other options.
XCOPY deployment can significantly reduce the complexity of a deployment, because no one needs to perform a manual installation on the target server. Although the term XCOPY refers to a specific DOS command, any technology that copies files also applies.
Although an XCOPY deployment is the simplest choice, it’s not always the right choice. XCOPY deployments are designed to copy files to the destination machine and nothing more. Some IT environments require a specific deployment technology for a variety of reasons, such as traceability, logging, and reversibility.
XCOPY deployments work well for most web scenarios, but they provide no out-of-the-box uninstall capabilities. Although other mechanisms exist to roll back an installation, some IT governance teams prefer the reliability of an installer for rolling back changes.
In practice, though, an installer is only as good as the developer who created it. It’s still important to have test environments to ensure the installer works before trying it in production.
Modern installer products allow endless customization, such as IIS configuration, SQL configuration, and custom actions. The learning curve for these types of products isn’t trivial, so many teams assign one member to be the installer developer. If this person leaves the team for any reason, the installer tool and the actions it performs often need to be entirely rediscovered and relearned.
As mentioned earlier, XCOPY deployments don’t have to use a specific technology. Batch files, NAnt scripts, MSBuild scripts, and third-party products such as Final-Builder are all popular choices for creating XCOPY deployments. Particularly appealing are the latter choices, which include features that assist in automated deployments. Later in this chapter, we’ll look at taking advantage of NAnt to perform deployment tasks, in addition to copying files.
But first, let’s look at deploying an ASP.NET MVC application to an IIS 7 environment.
6.3. Deploying to IIS 7
Before we look at automating our deployments, we need to configure our server to host an ASP.NET MVC website.
An MVC website needs a location on the target machine’s hard drive. For this book, the location is unimportant, so we’ll choose something simple: C:websitesMVCSample. Our sample application will have no dependencies on a database, but later we’ll look at how to incorporate a database into our deployment strategy.
Our controller for this sample application will be simple, but it’ll incorporate some common routes, as shown in listing 6.1.
Listing 6.1. Our simple controller

Navigating to the List action renders the screen shown in figure 6.1.
Figure 6.1. Running the MVC application locally allows us to use “pretty” URLs, with no extensions.

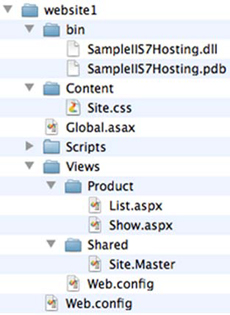
To deploy this ASP.NET MVC application to an IIS 7 box, we first need to create a local folder and move all our deployment files over. For this sample application, the folder structure is as follows:
Note
System.Web.Mvc.dll doesn’t need to be in the bin folder if the MVC2 installer has been run on the target server.
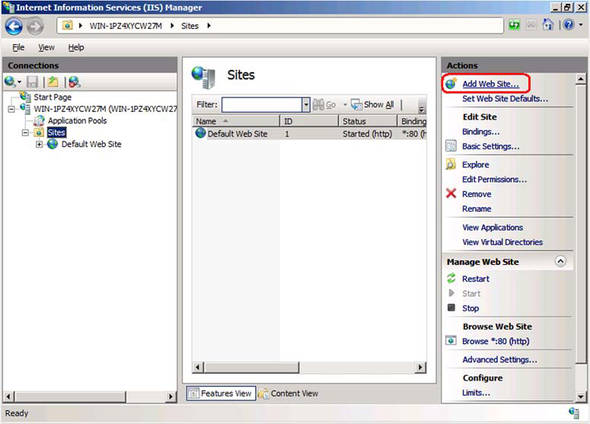
When the content is in place, we can configure a new website in the IIS Manager by clicking Add Web Site, as shown in figure 6.2.
Figure 6.2. Click Add Web Site in the IIS 7 Manager console.
In the Add Web Site dialog box that comes up, we need to configure the following:
- Site Name— For this, I chose an arbitrary name that didn’t exist: MVCSample.
- Application Pool— Any application pool will suffice, as long as it’s configured as either a .NET 2.0 or 4.0 application pool. In IIS 7 or 7.5, you should use Integrated mode, although you can make Classic mode work with a wildcard mapping. ASP.NET MVC isn’t supported to run on lower versions of ASP.NET, but it’s forward-compatible and runs on .NET 4 as well. We won’t look at application pool strategies, but with IIS 6 onward, IIS supports multiple websites, each with a shared or individual application pool.
- Physical Path— This will point to our C:WebsitesMVCSample directory.
- Binding— I chose simply to bind to port 81 for this website. You can choose any unused port.
Typically in production scenarios, the Host Name field would be configured. The final configuration values are shown in figure 6.3.
Figure 6.3. Final configuration values for the IIS 7 MVC deployment

Now that our website is configured and started, we can navigate to our MVC application, as seen in figure 6.4.
Figure 6.4. Our MVC application deployed in IIS 7

Unless we want to configure additional security or bindings, we don’t have to perform any additional steps to get our MVC application running under IIS 7. The new managed architecture of IIS 7 allows us to have simple deployments. Additionally, our URLs look exactly the same as they did when running locally out of Visual Studio, without .aspx or other extensions. IIS 7 supports “pretty” URLs out of the box, with no configuration necessary.
In the next section, we’ll examine configuration options available in IIS 6 and 5, and see how we can achieve the same effect of pretty URLs.
6.4. Deploying to IIS 6 and earlier
When we deploy our MVC application to IIS 6 and earlier, we can consider a few options concerning routes. IIS 6 and earlier use ISAPI filters, which map file extension requests to ISAPI handlers. Extensions, such as .aspx and .ascx, map to the ASP.NET ISAPI handler, but extensions in the pretty, extensionless MVC URLs don’t. By the time ASP.NET handles the request, IIS has already chosen an ISAPI handler for the request, and the selection may not be ASP.NET. Unfortunately, developing custom ISAPI filters requires C/C++ knowledge. Some open source projects exist for writing managed ISAPI filters, but it isn’t as easy as creating a custom IHttpHandler or IHttpModule implementation.
Out of the box, ASP.NET MVC applications won’t work in IIS 6. Getting an MVC application to run successfully in an IIS 6 environment requires either changes to our routes or extra configuration steps in IIS. We have four choices for deploying to IIS 6:
- Configure routes to use the .aspx extension
- Configure routes to use a custom extension (such as .mvc)
- Use a wildcard mapping with selective disabling
- Use URL rewriting
The last choice offers the most flexibility, but it requires the use of third-party software. Each option requires more configuration in IIS, which may not be available in your deployment environment.
First, let’s look at the easiest deployment option and configure our routes to use the .aspx extension.
6.4.1. Configuring routes to use the .aspx extension
When we install ASP.NET in IIS, the aspnet_isapi.dll ISAPI filter is set up to handle requests to .aspx extensions by default. By configuring our routes to use the .aspx extension, we’ll avoid needing to configure extra mapping settings in IIS for our MVC application.
To configure our routes to use the .aspx extension, we need to change the default route configuration to look like listing 6.2.
Listing 6.2. Route configuration with the .aspx extension

After the {controller} element, we insert the .aspx extension into the route configuration. Note that the extension is outside the brackets and before the first backslash.
Deploying the application with the route configuration changes produces the result shown in figure 6.5.
Figure 6.5. Using the .aspx configuration produces modified URLs.

Unfortunately, using this deployment option produces ugly, unintuitive URLs. Note that the URL, http://localhost:81/product.aspx/show/4, now has the extension immediately after the controller name. For those accustomed to extensions at the end of the URL, this URL can be confusing. Although we didn’t have to perform any additional configuration in IIS, the outcome is an ugly URL. The strategy introduced in chapter 12 for actions serving multiple formats (XML and JSON) becomes more challenging, because IIS may or may not have these extensions routing to ASP.NET. One of the benefits of using MVC over Web Forms is pretty URLs, which have been lost with this deployment strategy.
Our next option is to use a custom extension, which introduces a slight cosmetic change to the resulting URLs.
6.4.2. Configuring routes to use a custom extension
Instead of mapping our routes to the .aspx extension, a custom extension could reduce the confusion of users accustomed to Web Forms URLs. We’ll configure our routes to use the .mvc extension instead of .aspx, as seen in listing 6.3.
Listing 6.3. Route configuration using the custom .mvc extension
routes.MapRoute(
    "Default",
    "{controller}.mvc/{action}/{id}",
    new { controller = "Product", action = "List",
         id = UrlParameter.Optional }
);
This configuration differs from the previous .aspx route configuration in the extension only. When it comes to deploying this route configuration, we need to perform additional steps in IIS. Because IIS isn’t configured to handle requests from the .mvc extension, we need to add a mapping that will enable the ASP.NET ISAPI filter to handle the .mvc extension.
To map the new extension, follow these steps:
1.
Create the website with the default configuration.
2.
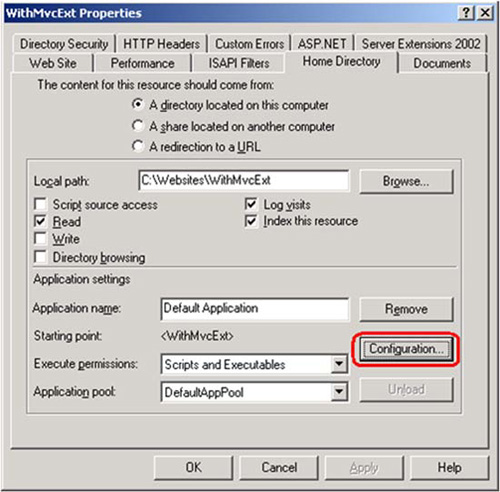
In the Home Directory tab in the Properties dialog box for the website, click Configuration, as shown in figure 6.6.
Figure 6.6. The website’s Properties dialog box
3.
In the Mappings tab in the Application Configuration dialog box, click Add.
4.
In the Add/Edit Application Extension Mapping dialog box, configure these settings, as shown in figure 6.7:
- Set the Executable value to the path to aspnet_isapi.dll. This is typically at C:WINDOWSMicrosoft.NETFrameworkv2.0.50727aspnet_isapi.dll. Use the .NET 2.0 version of the DLL.
- Set the Extension value to .mvc. Make sure the extension has the leading dot.
- Select All Verbs in the Verbs section. If you know the HTTP verbs you wish to support, provide a comma-separated list of the verbs in the Limit To section.
- Uncheck the Verify That File Exists option. The requested URLs won’t map to a location on disk, and IIS responds with a 404 error if you don’t uncheck this value.
Figure 6.7. Configuration values for the new .mvc IIS extension mapping

5.
Now that we’ve configured IIS to allow ASP.NET to handle requests for the .mvc extension, we can use the MVC application. Our new URL is http://localhost:82/product.mvc/show/4, which is only a slight cosmetic change from the previous option.
Although using the .mvc extension might prevent some users from getting confused between Web Forms .aspx URLs and .mvc URLs, these new URLs still go against normal URL conventions. In normal URL conventions, only query string parameters follow an extension.
Instead of using a custom extension, our next option uses a wildcard mapping.
6.4.3. Using wildcard mapping with selective disabling
We won’t have to perform any special route configuration for the next two options. In fact, we can deploy the same MVC application to both IIS 7 and IIS 6 and previous versions with the wildcard mapping option. We no longer need an extension in our route configuration, and the URLs used for development will be identical to the URLs used for production on IIS 6.
With wildcard mapping, all requests are routed to a single ISAPI filter. We’ll configure the aspnet_isapi.dll filter to be this single filter. To create the wildcard mapping, follow these steps:
1.
Create the website with the default configuration.
2.
In the Home Directory tab in the Properties dialog box for the website, click Configuration.
3.
In the Mappings tab in the Application Configuration dialog box, click Insert.
4.
In the Add/Edit Application Extension Mapping dialog box, configure these settings, as shown in figure 6.8:
- Set the Executable value to the aspnet_isapi.dll path. The path is typically C:WINDOWSMicrosoft.NETFrameworkv2.0.50727aspnet_isapi.dll. Use the .NET 2.0 version of the DLL.
- Uncheck the Verify That File Exists option.
Figure 6.8. Configuring wildcard mapping to map to ASP.NET.

5.
Click OK on all configuration dialog boxes.
After this configuration change, we can navigate to our MVC application without special extensions. Our URL is now http://localhost:81/product/show/4, matching the URL that we see in IIS 7 deployments.
This wildcard mapping has one unfortunate side effect: all requests are now handled by ASP.NET, which doesn’t perform as well as IIS for many file types. For example, static files such as images, CSS, and JavaScript files now pass through ASP.NET.
We can configure subdirectories to remove the wildcard mapping. Because all static content for deployed websites usually exists in subdirectories like Content, Scripts, and others, we can perform extra configuration steps to allow IIS to handle these static files instead of IIS. For each subdirectory, we’ll need to do the following:
1.
Right-click the subfolder and click Properties in the IIS Management Console.
2.
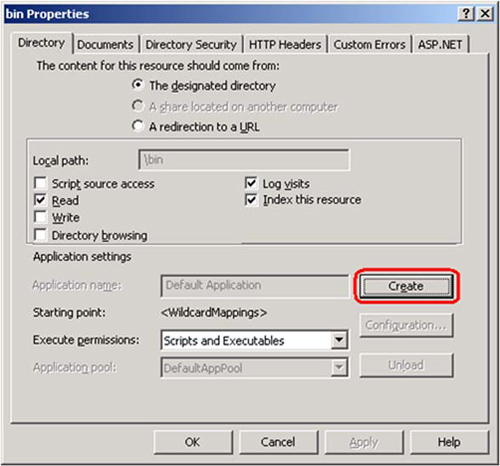
In the Directory tab in the Properties dialog box, click the Create button, shown in figure 6.9. This will create an application for this folder, and it will enable the Configuration button.
Figure 6.9. Creating an application for a subfolder temporarily
3.
In the Directory tab in the Properties dialog box, click the Configuration button.
4.
In the Mappings tab of the Application Configuration dialog box, click the Remove button in the Wildcard Application Maps section (see figure 6.10). This will remove the wildcard mapping we configured at the root earlier.
Figure 6.10. Removing the wildcard mapping from a subfolder

5.
Click OK to return to the Properties dialog box.
6.
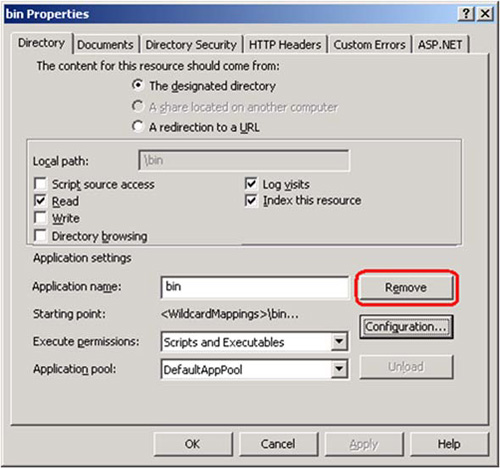
In the Directory tab in the Properties dialog box, click Remove, as shown in figure 6.11. This will remove the application from the subfolder.
Figure 6.11. Removing the application from the subfolder
7.
Click OK on all configuration dialog boxes.
When you repeat these steps for each subfolder, you prevent IIS from using the wildcard mapping in these subfolders. Because the only way to enable the Configuration button is to create an application, we have to temporarily configure the subfolder as an application. Removing the application after configuration doesn’t remove our custom configuration, however. Our changes are safe, but we had to perform extra temporary configuration to get there.
Although this option requires a bit of configuration in IIS, it doesn’t require any additional software. Our route mappings don’t need to change, and we get to keep our pretty, extensionless URLs. Whenever we add another subfolder, we’ll need to repeat the extra configuration steps to ensure that ASP.NET does not handle requests it doesn’t need to.
Sometimes we need more control over our URLs than IIS 6 and earlier versions allow right out of the box. In the next section, we’ll look at URL rewriting to handle both MVC requests and additional URL rewriting scenarios.
6.4.4. Using URL rewriting
URL rewriting is a sizable topic, covering resource management support, search engine optimization, and canonicalized URLs. In many other web application servers, URL rewriting is a first-class, built-in feature or an easily configured and customizable add-on.
In IIS 6 and earlier, there was no built-in URL rewriting ability. For IIS 7, Microsoft released an IHttpModule that allowed configuration directly from the IIS Manager. Regardless of the version of IIS used, URL rewriting is a vital function for many websites.
URL rewriting is a general term for the ability to intercept URL requests and transform them. For resource management, such as RSS links, URL rewriting can permanently redirect requests to the new RSS URL, while remaining transparent to the subscribers. In many ASP.NET websites, many URLs point to the same page. For example, all the following URLs resolve to the same page:
- http://codeplex.com
- http://codeplex.com/
- http://codeplex.com/default.aspx
- http://www.codeplex.com
- http://www.codeplex.com/
- http://www.codeplex.com/default.aspx
Yet they all resolve to different URLs, with a couple of exceptions.
Differing URL resolution has the potential to lower search engine results, because many pages point to the same content. With URL rewriting, all the preceding URLs could be redirected to one canonical URL. With URL rewriting, we can not only allow extensionless routes in our MVC application, but set ourselves up for further vital URL rewriting scenarios.
Because URL rewriting isn’t available for IIS 6 and earlier out of the box, we’ll need to use a third-party extension for rewrites. Two popular URL rewrite ISAPI extensions are
- Helicon Tech’s ISAPI Rewrite—www.isapirewrite.com/
- Ionic’s ISAPI Rewrite Filter—www.codeplex.com/IIRF/
Helicon Tech has one free and one fully supported edition of its product. The Ionic extension is free and open source, so we’ll configure our application using that.
First, we need to download the latest version of the filter from CodePlex. Once we have the latest binaries, we’re ready to configure our MVC application to use the ISAPI Rewrite module.
The general idea behind our URL rewriting strategy is to do the following:
- Configure ISAPI rewrite to add an .mvc extension to our URLs.
- Allow IIS to pass the request for the .mvc extension to ASP.NET.
- Configure our web application to remove .mvc extensions.
Because our web application removes the .mvc extension before the MVC route handler processes the request, we won’t need to change our routing configuration.
To configure ISAPI rewrite, follow these steps:
1.
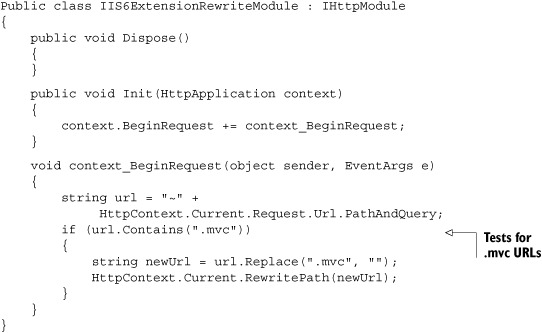
We need to modify our web application to remove the .mvc extension at the beginning of the request. Place the following code in a custom HTTP module:
2.
Wire up the HTTP module to our application by adding the following line to the Web.config file under the system.web/httpModules section:
<add name="IIS6ExtensionRewriteModule"
type="SampleIIS6WithISAPIFilter.IIS6ExtensionRewriteModule,
SampleIIS6WithISAPIFilter"/>
3.
Create the website with the default configuration, and deploy the application as normal.
4.
Create a folder to hold the ISAPI extension. We’ll use C:inetpubisapirewrite.
5.
Copy the IsapiRewrite4.dll to the newly created folder. (The most recent version is called IIRF.dll.)
6.
In the newly created folder, create an IsapiRewrite4.ini file and add the following line:
RewriteRule ^(?!/Content)(/[A-Za-z0-9_-]+)(/.*)?$ $1.mvc$2 [I]
Save this file when you’ve finished editing it.
7.
Open the Properties dialog box for the website containing the MVC application in IIS Manager.
8.
In the ISAPI Filters tab in the Properties dialog box, click Add.
9.
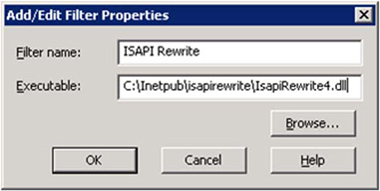
Enter a name for the Filter Name value, and enter the path to the IsapiRewrite4.dll for the Executable value, as shown in figure 6.12.
Figure 6.12. Configuring the ISAPI Rewrite filter
10.
Click OK on all of the IIS configuration dialog boxes.
11.
Restart IIS.
We can now navigate to our website with pretty URLs in the form http://localhost:84/product/show/4.
Note
For more detailed configuration options, consult the readme included with the download from CodePlex. The download includes configuration examples, as well as instructions for enabling logging and other advanced features.
Although we had to add an HTTP module, the routes remained the same, without any extensions. In addition, all URL-generating action helpers still generate pretty URLs, ensuring that no end user ever sees a URL with the .mvc extension. With the URL-rewriting extension in place, we can now employ its features to address canonical URLs, forwarding, and other rewriting concerns.
6.5. Summary
With the new routing abilities of ASP.NET MVC came new deployment challenges. Although IIS 7 supports extensionless, pretty URLs out of the box, earlier versions of IIS don’t. But we have a variety of deployment options for earlier versions of IIS, some of which enable pretty URLs. URL rewriting is the most powerful of these deployment options, because it opens up new scenarios in URL canonicalization and seamless resource management. In this chapter, you’ve learned how to deploy ASP.NET MVC applications on a number of different IIS configurations.
Next up in chapter 7, you’ll learn how to leverage the many existing ASP.NET runtime features in your applications so that you can get up to speed quickly.