Chapter 13. Controller factories
- Building custom controller factories
- Dependency injection with controllers
- Working with StructureMap
- Working with Ninject
- Working with Castle Windsor
One common technique when building applications is to pass application dependencies into the constructor of the controllers. By leveraging various tools, we can automatically wire up these dependencies and provide the arguments without having to write mundane, repetitive code.
To enable this for our controllers, we need to take responsibility for creating them. In this chapter, you’ll learn about controller factories and how you can use them to help enable such scenarios.
13.1. What are controller factories?
Controller factories are an important extension point in the ASP.NET MVC Framework. They allow you to take on the responsibility of creating controllers, which enables you to apply logic for every single controller in your application. You can use controller factories to apply a custom IActionInvoker instance to all your controllers, or perhaps to add custom logging. The most common case of a controller is to enable support for dependency injection tools.
Normally when code executes other code, there’s a linear flow of creation and execution. For instance, if I have a class that depends on another class, I will create that class with the new operator, and then execute the class by calling a method. If I used Inversion of Control (IoC), I’d still call methods on the class, but I’d require an instance of the class passed into my constructor. In this manner, I yield control of locating or creating my dependency to the calling code. Dependency injection (DI) is the act of injecting a dependency into a class that depends on it.
Often used interchangeably, IoC and DI yield loosely coupled code and are often used with interfaces. With interfaces, classes declare dependencies as interfaces in the constructor arguments. Calling code then locates appropriate classes and passes them in when constructing the class.
IoC containers come into play to assist with managing this technique when used through an application. There are plenty of IoC containers to choose from, but the favorites at this time seem to be StructureMap (http://structuremap.sourceforge.net), Ninject (http://ninject.org), and Castle Windsor (www.castleproject.org/container).
Controllers can leverage dependency injection by declaring their dependencies as constructor parameters. This inverts the control so that the caller is responsible for supplying the dependencies of a class, rather than the class constructing concrete instances itself. It allows you to decouple controllers from concrete instances of its dependencies (such as a repository or service). It’s quite liberating, not to mention that it helps facilitate decoupled unit testing.
When we ask for dependencies in the constructor, we call it constructor injection. There’s another technique called property injection, but it isn’t as apparent that these dependencies are required for the object to do its job. IoC tools can usually do both, but constructor injection is preferred for required dependencies.
If you were to define a constructor with a dependency, the framework (by default) would no longer be able to build up your controllers for you. If you try, you’re likely to get an error like in figure 13.1.
Figure 13.1. Trying to use constructor dependencies without replacing the controller factory

The reason for this error is that the DefaultControllerFactory uses Activator. CreateInstance to instantiate the controller and knows nothing about the controller’s constructor arguments. To fix this, you’ll need to create your own custom controller factory.
13.2. Creating a custom controller factory
To create a custom controller factory class, you simply derive from either ICon-trollerFactory or the more friendly base class, DefaultControllerFactory. Listing 13.1 shows a sample controller factory class.
Listing 13.1. A custom controller factory
public class MyCustomControllerFactory : DefaultControllerFactory
{
    protected override IController GetControllerInstance(
        RequestContext requestContext, Type controllerType)
    {
        /* implement controller creation logic */
    }
}
You could implement the IControllerFactory interface directly, but the Default-ControllerFactory has some logic for determining the controller’s type based on the name. You simply override the GetControllerInstance method and plug in your behavior.
Once you have a custom controller factory, it’s easy to use. At application startup, in your Global.asax.cs file, you can register your implementation like this:
ControllerBuilder.Current.SetControllerFactory(new
 MyCustomControllerFactory());
The framework will now use your class to build all instances of controllers. We can use this feature to implement IoC support in our controllers, but perhaps you’re wondering why this is even needed...
13.3. Enabling dependency injection in your controllers
One of the benefits of the ASP.NET MVC Framework is the separation of concerns that it allows. When you segment your code into controllers, models, and views, it becomes easy to understand and maintain. Separation of concerns is one of the best attributes your code can have if you wish it to be maintainable.
It’s not hard to imagine your controller growing and growing until it gets out of hand. Packing too many responsibilities into your controller is a surefire way to create a messy project that’s so difficult to work with it feels like you’re wading through mud.
Here’s a short list of things your controller should not do:
- Perform data access queries directly
- Talk to the filesystem directly
- Send emails directly
- Call web services directly
Notice a pattern? Any external dependency on some sort of infrastructure is a great candidate to extract out into an interface that can be utilized by your controller. This separation has a couple of benefits:
- The controller becomes thinner, and thus easier to understand
- The controller becomes testable—you can write unit tests and stub out the dependencies, isolating the class under test
We can also take this idea to any areas of the code where the controller performs complex business logic. This should be the responsibility of either the model or perhaps a domain service (which is just a stateless class that holds business logic that applies outside the context of a single entity).
It’s not uncommon to see a controller that looks like listing 13.2.
Listing 13.2. A controller that accepts dependencies in its constructor
public class ProductsController : Controller
{
    public ProductsController(IProductRepository repository,
        IShippingCalculator shippingCalculator,
        ITaxService taxService)
    {
        /* ... */
    }

     /* ... */
}
Creating controllers like this by hand would be an effort in extreme tedium, and luckily you don’t have to do it by hand. This is where IoC tools (also known as IoC containers) come in handy. There are quite a few to choose from, but currently these are the three most popular:
- StructureMap
- Ninject
- Castle Windsor
Each has its own strengths and weaknesses, and I encourage you to take a look at each to see which one feels best and fits the needs of your applications. We’ll briefly cover them all and create a custom controller factory for each one.
To demonstrate these IoC containers, we’ll use a sample application that has an interface called IMessageProvider. Our controller will depend on this interface (in the constructor), and the implementation of the interface won’t be known to the controller at all. In other words, it’s decoupled from the implementation.
We’ll start with StructureMap.
13.4. Creating a StructureMap controller factory
The first step is to download the StructureMap binaries (http://structuremap.sourceforge.net) and include them somewhere in your project, such as a lib folder. Then add a reference to StructureMap.dll in your ASP.NET MVC project.
StructureMap, like any IoC tool, needs to be initialized upon application startup. We could place the initialization code directly in Global.asax.cs in Application_Start, but this tends to be a breeding ground for tons of unrelated code. Instead, we’ll leverage a small class called a bootstrapper (which will be kicked off in Application_Start). The bootstrapper just abstracts initialization code away from the Global.asax.cs file to keep things clean and simple. Listing 13.3 shows this class implementation.
Listing 13.3. Initializing StructureMap in a bootstrapper class
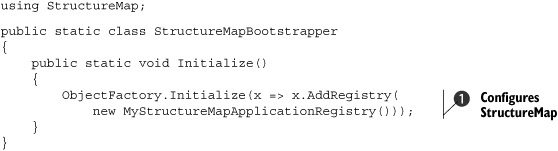
To initialize StructureMap and tell it about our components, we use the ObjectFactory.Initialize() method ![]() . This method accepts a lambda expression that we use to interact with the framework. In our case, we’re utilizing a registry (which we haven’t created yet). Other, more advanced, StructureMap scenarios exist where you can utilize conventions, but
that’s a subject for more advanced study. Listing 13.4 contains the definition of MyStructureMapApplicationRegistry.
. This method accepts a lambda expression that we use to interact with the framework. In our case, we’re utilizing a registry (which we haven’t created yet). Other, more advanced, StructureMap scenarios exist where you can utilize conventions, but
that’s a subject for more advanced study. Listing 13.4 contains the definition of MyStructureMapApplicationRegistry.
Listing 13.4. A StructureMap registry for our components
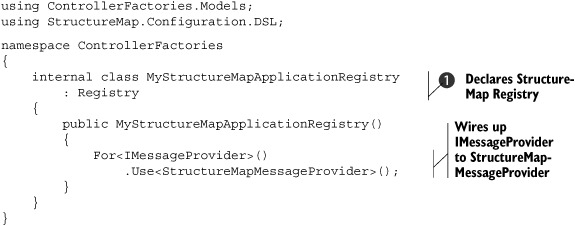
In a StructureMap registry ![]() , you’re given the ability to match up interfaces to their concrete implementations. You can also do advanced things like
set their behaviors (singleton, per-web request, transient, and so on) so that you can control how StructureMap builds it.
For now, we won’t worry about this, but it will become important later.
, you’re given the ability to match up interfaces to their concrete implementations. You can also do advanced things like
set their behaviors (singleton, per-web request, transient, and so on) so that you can control how StructureMap builds it.
For now, we won’t worry about this, but it will become important later.
One thing you’ll notice about StructureMap is that it reads very much like English. This can help, especially if you’re not familiar with the concept of dependency injection; it seems pretty obvious what is happening here. At times it can be a tad verbose, but that’s a matter of personal preference.
We’re not done yet. We still need to define the IMessageProvider interface and the StructureMapMessageProvider class. In your Models folder, go ahead and add these. They should look like listing 13.5.
Listing 13.5. A simple interface and concrete implementation
public interface IMessageProvider
{
    string GetMessage();
}

public class StructureMapMessageProvider : IMessageProvider
{
    public string GetMessage()
    {
        return "This message was provided by StructureMap";
    }
}
Let’s now make the HomeController dependent on this new IMessageProvider interface. To do this, we’ll add a constructor that accepts an argument, as shown in listing 13.6.
Listing 13.6. Dependencies accepted as constructor arguments
public class HomeController : Controller
{
    private IMessageProvider _messageProvider;

    public HomeController(IMessageProvider messageProvider)
    {
        _messageProvider = messageProvider;
    }

    ...
}
At this point, if we were to try to run the application, it would break. Why? Because the DefaultControllerFactory doesn’t know how to build this controller anymore, because it now requires an IMessageProvider.
Let’s create our StructureMapControllerFactory to solve this problem. Add a new class to the project (at the root is fine) and name it StructureMapController-Factory. Listing 13.7 shows the details.
Listing 13.7. A StructureMap controller factory
public class StructureMapControllerFactory : DefaultControllerFactory
{
    protected override IController GetControllerInstance(
            RequestContext requestContext, Type controllerType)
    {
        return ObjectFactory.GetInstance(controllerType) as IController;
    }
}
Notice that we inherit from DefaultControllerFactory. We don’t have to—at the very minimum we have to implement IControllerFactory—but by deriving from DefaultControllerFactory we’re given some easier methods to override.
The only method we need to override in this case is GetControllerInstance. We’ll use StructureMap’s ObjectFactory.GetInstance method to pull an object out of the container. StructureMap will notice that we have a constructor that accepts arguments and will try to fulfill those also. If you haven’t registered any types ahead of time, you’ll receive an error here.
The last step is setting the controller factory. The following line of code will reside in the Global.asax.cs file:
ControllerBuilder.Current.SetControllerFactory(
    new StructureMapControllerFactory()
);
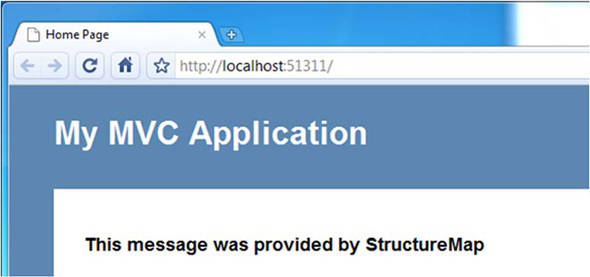
You’re done! The last step is to add a view to call this controller and display the dynamic message on the view. Figure 13.2 shows an example of this.
Figure 13.2. The IMessageProvider is invoked to display a message. The actual implementation is decoupled from the controller.
Next, we’ll tackle the same example but with a different IoC tool called Ninject.
13.5. Creating a Ninject controller factory
Using Ninject is similar to using StructureMap. The implementation and API are quite different, though, so as you read this section you might want to refer back and compare the code. See which one you find more understandable.
Ninject was created by Nate Kohari. This section will use the Ninject v2 library. Go ahead and download the binaries, and copy Ninject.dll into a folder inside your project.
Note
Ninject has out-of-the-box support for ASP.NET MVC. Unfortunately, if you don’t understand how Ninject works, this will just hide all the important details. In this section we’ll build the components we need from scratch. You can choose to utilize Ninject.Web.Mvc.dll on your own.
We know from the last section that we need to initialize dependencies on application startup. For Ninject, we accomplish that in what’s known as a module. Create a class called MyNinjectModule and edit it to look like listing 13.8.
Listing 13.8. A Ninject module used to register dependencies
public class MyNinjectModule : NinjectModule
{
    public override void Load()
    {
        Bind<IMessageProvider>()
             .To<NinjectMessageProvider>();
    }
}
Like the StructureMap registry, a Ninject module gives you the ability to wire a particular implementation to its concrete implementation.
We haven’t created our NinjectMessageProvider yet, so let’s do that now. In your Models folder, create a new class called NinjectMessageProvider. It has to implement the IMessageProvider interface, so make it look like listing 13.9.
Listing 13.9. A custom IMessageProvider for Ninject
public class NinjectMessageProvider : IMessageProvider
{
    public string GetMessage()
    {
        return "This message was provided by Ninject";
    }
}
Like StructureMap, Ninject doesn’t require instances to be explicitly registered in order to resolve them.
We’ll follow the same bootstrapper pattern from the last section. Create a class called NinjectBootstrapper. Enter the code in listing 13.10.
Listing 13.10. Bootstrapping Ninject
public static class NinjectBootstrapper
{
    public static IKernel Kernel { get; private set; }

    public static void Initialize()
    {
        Kernel = new StandardKernel(
            new MyNinjectModule()
            );
    }
}
Ninject’s core object is called the kernel. You typically create a kernel and keep it around for the life of the application. Because this class is static, you can refer to this Kernel property later on. We’ll call Initialize inside the Global.asax.cs file (under Application_Start):
NinjectBootstrapper.Initialize();
We’re almost done. The last remaining step is to create the controller factory. You already created one in the previous section, so this one should be straightforward. Listing 13.11 shows the details.
Listing 13.11. Creating a ControllerFactory for Ninject
public class MyNinjectControllerFactory : DefaultControllerFactory
{
    private IKernel _kernel;

    public MyNinjectControllerFactory(IKernel kernel)
    {
        _kernel = kernel;
    }

    protected override IController GetControllerInstance(
           RequestContext requestContext, Type controllerType)
    {
        return _kernel.Get(controllerType) as IController;

    }
}
The controller factory will need access to the kernel in order to resolve types, so we pass it to the constructor and hang on to it in a private member variable. You can see the naming convention that we defined earlier in action here. We take the controller’s type name, make it lowercase, remove the word “Controller,” and then use that to match the correct controller inside the kernel.
Can you guess what the last step is? Yep, we just need to wire up this new controller factory in Application_Start:
ControllerBuilder.Current.SetControllerFactory(
    new MyNinjectControllerFactory(NinjectBootstrapper.Kernel)
);
If you build and run the application now, you should see the new message, though all we did was change the IoC plumbing. Your screen should look something like figure 13.3.
Figure 13.3. Our controller is now provided with a Ninject-specific IMessageProvider, but the controller doesn’t know (or care).

There’s another popular IoC framework called Windsor that we’ll cover next.
IoC containers support the concept of lifestyles, which determine how long the container should retain an instance of a particular type. Three common lifestyles are singleton, transient, and per-web-request.
Using a singleton lifestyle means that the container will always return the same instance for a particular component type. For example, each time you ask the container to resolve an IMessageProvider, the same instance would be returned. If an object uses the transient lifestyle, a new instance will be constructed each time you ask the container to resolve a particular type. The per-web-request lifestyle will return the same instance, but only for the length of a single web request.
In a web application, most components should use the transient lifestyle to ensure that state is not shared across different web requests. Both StructureMap and Ninject will create instances as transient by default, but with Windsor the default lifestyle is singleton, so transient instances must be explicitly configured.
13.6. Creating a Castle Windsor controller factory
Windsor is part of the Castle Project, which can be found at www.castleproject.org. The Castle Project is an open source project for .NET that aspires to simplify the development of enterprise and web applications. It has a large following and supports some advanced concepts, such as aspect-oriented programming. It can be configured with XML or code (we prefer code).
You can download the binaries from www.castleproject.org/container/. Place the DLLs somewhere near your project. You’ll need to specifically add a reference to these DLLs:
- Castle.Core.dll
- Castle.DynamicProxy.dll
- Castle.MicroKernel.dll
- Castle.Windsor.dll
We’ve already gone through this exercise twice now, and this version is not much different. Let’s focus on the relevant parts of the code. First up is our WindsorBootstrapper, displayed in listing 13.12.
Listing 13.12. Bootstrapping Windsor

This is similar to Ninject, so we have to keep around an instance of IWindsorContainer. Notice our RegisterControllers method. It looks for all types in the assembly that implement IController and sets the lifestyle to Transient.
We’ll initialize this in Application_Start by calling
WindsorBootstrapper.Initialize();
Next up is to create the WindsorMessageProvider class. Listing 13.13 shows our implementation.
Listing 13.13. A Windsor-specific IMessageProvider
public class WindsorMessageProvider : IMessageProvider
{
    public string GetMessage()
    {
        return "This message was provided by Windsor";
    }
}
The next step is to create our Windsor controller factory. Listing 13.14 shows this.
Listing 13.14. A Windsor controller factory
public class WindsorControllerFactory : DefaultControllerFactory
{
    private readonly IWindsorContainer _container;

    public WindsorControllerFactory(IWindsorContainer container)
    {
        _container = container;
    }

    protected override IController GetControllerInstance(
         RequestContext requestContext, Type controllerType)
    {
        return _container.Resolve(controllerType) as IController;
    }
}
This should be familiar to you by now. All we’re doing is storing the IWindsorContainer instance and using it to resolve controller types at runtime.
The last step is to wire this up in Application_Start:
var container = WindsorBootstrapper.Container;
var controllerFactory = new WindsorControllerFactory(container);
ControllerBuilder.Current.SetControllerFactory(controllerFactory);
If you build and run the application, you’ll see the final message displayed, verifying that the functionality was provided by the WindsorMessageProvider. Figure 13.4 shows the expected results.
Figure 13.4. The final example shows the IMessageProvider interface being fulfilled by Windsor.

We purposely sped through this last section because the three frameworks are fairly similar. Which tool you choose is completely up to personal preference. We prefer StructureMap for its simplicity.
13.7. Summary
In this chapter, you learned about an important extension point: the controller factory. We leveraged it to provide runtime dependencies to our controllers, but you can also use it to swap out other pieces of the controller implementation (such as IActionInvoker or ITempDataProvider).
You also learned about the need for dependency injection and the value of IoC containers. As your applications grow, the need to manage application dependencies increases. You can use dependency injection with your controllers to simplify them. We implemented three major IoC frameworks: StructureMap, Ninject, and Windsor. Others exist, and having read this chapter, you should be able to adapt to any other IoC framework with little trouble.
In the next chapter, we’ll look at another advanced concept in ASP.NET MVC 2: model binders and value providers. Both of these allow you to build extra conventions around how you pull information from form values, the query string, and any other server resources.