Chapter 21. Organization with areas
- Organizing large applications with areas
- Creating links between areas
- Managing global, area-agnostic content
- Managing links and URLs
As ASP.NET MVC websites become larger and more complex, the number of controllers inevitably grows. With a large number of controllers, we start to notice many controllers that might logically belong together as a group. We might have administration sections of our application, product catalog sections, customer care sections, shopping cart and ordering sections, and so on. Each of these application areas will likely share nothing more than perhaps a common logon widget or a master page, but each application area probably has quite a lot of functionality in common with other controllers and views within that area.
To help tame large applications, ASP.NET MVC 2 introduces the concept of areas. Areas allow us to segregate controllers, models, and views into different physical locations, with the area-specific pieces in a single area folder. In this chapter, we’ll examine using areas to separate our application’s different concerns. We’ll also use T4MVC templates to help us generate our URLs and links between areas.
21.1. Creating a basic area
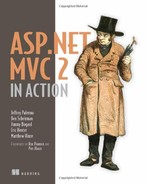
To create our first area, we can start by right-clicking the project in the Solution Explorer and selecting Add > Area, as shown in figure 21.1.
Figure 21.1. The Add > Area context menu option
Selecting Area brings up the Add Area dialog box, where we need to enter an Area Name, as shown in figure 21.2.
Figure 21.2. The Add Area dialog box

When the first area is created, a new top-level Areas folder is added to the MVC project. Inside this Areas folder, each area resides in its own folder, and in each Area folder, you’ll find folders for controllers, models, and views specific to that area. Finally, the Add Area Wizard also adds an area registration class.
The project shown in figure 21.3 includes three areas for administration, product catalog, and account information.
Figure 21.3. A project with three separate areas

The Add Area Wizard is included with the ASP.NET MVC 2 installer, but we aren’t forced to use the wizard. The wizard creates the correct folder structure and area registration class, but if the tooling weren’t available for some reason, we’d simply need to follow the same folder structure conventions.
In addition to the folder structure, the wizard creates an important area registration class. This class contains information describing the name and routing information for the area and allows us to modify the default area registration information. If we used the wizard, our area registration class would be similar to listing 21.1.
Listing 21.1. The default area registration class
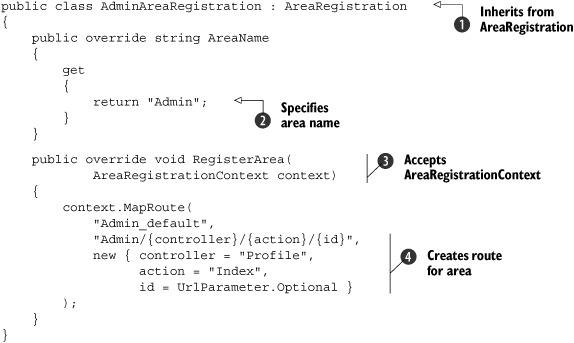
The AdminAreaRegistration class contains area registration information and inherits from the AreaRegistration MVC class ![]() . AreaRegistration is an abstract class with one abstract property, AreaName
. AreaRegistration is an abstract class with one abstract property, AreaName ![]() , and one abstract method, RegisterArea. The AreaName property is used later for routing purposes. The RegisterArea method accepts a single AreaRegistrationContext object
, and one abstract method, RegisterArea. The AreaName property is used later for routing purposes. The RegisterArea method accepts a single AreaRegistrationContext object ![]() , which contains properties and methods we can use to describe our area. In general, we can simply use the MapRoute method to describe the routes our area should use. In the example in listing 21.1, all route URLs starting with “Admin” will be directed to controllers in the Admin area
, which contains properties and methods we can use to describe our area. In general, we can simply use the MapRoute method to describe the routes our area should use. In the example in listing 21.1, all route URLs starting with “Admin” will be directed to controllers in the Admin area ![]() .
.
The AreaRegistrationContext allows us to construct routes as well as configure our area’s namespace. By default, the route’s Namespaces property will contain the namespace in which the AdminAreaRegistration class resides. Each of the namespaces added will be used for global route registration, so that the controllers in the area-specific namespace will be chosen by the routing engine correctly. If we decided to break the convention and place our controllers in a namespace that didn’t reside in the same base namespace as our AdminAreaRegistration type, we’d need to add these namespaces to the AreaRegistrationContext.
After we have our AreaRegistration classes set up, we must ensure that our areas are registered at application startup. Projects created with the default ASP.NET MVC 2 project template will have the registration code already present. If we’re migrating an existing MVC 1.0 project, we’ll have to add the code in listing 21.2 to the Application_Start method.
Listing 21.2. The application startup method with route and area registration
protected void Application_Start()
{
    AreaRegistration.RegisterAllAreas();

    RegisterRoutes(RouteTable.Routes);
}
The AreaRegistration.RegisterAllAreas method scans the assemblies in the application bin folder for types derived from the AreaRegistration class that have a constructor with no arguments.
When we have our area registration in place, we can add controllers, models, and views to our area-specific folders. In this example, we’ll have administration screens related to the current user’s profile. One of these screens will be controlled by a controller called ProfileController. Because these might be related to other administration screens, we’ll place this controller and its views in the Admin area folder, as shown in figure 21.4.
Figure 21.4. The ProfileController and views in the Admin area folder

Our ProfileController includes three actions: Edit, Index, and Show. Each of its views resides in the controller-specific view folder, the Profile folder. View resolution now searches the area-specific folder first, then moves to the area-specific Shared folder, and then on to the global Shared folder. Partials and master pages specific to this area can be placed in the area’s Shared folder, so that they’re only visible to this specific area. In this way, we can create a global master page that contains only a general site-wide template. Each area could then include area-specific master pages used only by views in that area. If our administration screens share a common layout, we can use a master page only for our administration screens.
Individual controller actions don’t need to specify the area name when selecting views. In listing 21.3, the Index action selects the Index view by leaving the view name blank.
Listing 21.3. The Index action in the ProfileController
public virtual ActionResult Index()
{
    var profiles = _profileRepository.GetAll();

    return View(profiles);
}
Controllers in an area-specific namespace (AreasExample.Areas.Admin) get a special route data token assigned: area. This route data value is populated from the area name specified in the area registration. When searching for views, the view engine uses this area token value to look for folders with that area name.
Inside our views, we don’t need to specify the area route data value when generating links to other controller actions inside that area. Listing 21.4 shows a link in the Edit screen that links back to the list of profiles.
Listing 21.4. Linking to an action within the same controller and area
<div>
    <%=Html.ActionLink("Back to List", "Index") %>
</div>
We only supply the action name, because the controller and area name will come from the existing route data for the current request. If we want to link to an outside area, we’ll need to supply that route data explicitly.
In figure 21.5, the Edit profile page contains menu items, as well as a logon widget. The Edit action resides in the ProfileController, which itself resides in the Admin area. In figure 21.5, the Home and About menu items link back to the root (or default) area. Additionally, the Log Off and Profile links navigate to the root and the Admin areas, respectively. But these items show up on pages throughout the website, not just inside the Admin area.
Figure 21.5. The Edit profile screen with links to outside areas

The Edit view inherits the Site.Master, as shown in listing 21.5.
Listing 21.5. The Edit view inheriting from the global master page
<%@ Page Title="" Language="C#"
  MasterPageFile="~/Views/Shared/Site.Master"
  Inherits="System.Web.Mvc.ViewPage<EditProfileInput>" %>
In our master page, we include links to the Profile controller, as well as a logon widget that links to multiple areas. In the Edit view, we didn’t need to specify the area when linking back to the ProfileController’s Index action, because this action was still logically in the same controller and area as the Edit view; but we need to make the global links and widgets resilient and area-agnostic. If we didn’t specify the area name for the Log Off link, it wouldn’t correctly render a request in the Admin area. The generated URL would contain incorrect area information, as shown in figure 21.6.
Figure 21.6. The incorrectly generated URL containing extra area parameters

Our AccountController resides in the root Controller folder, but the URL was generated as if it were in the Admin area. When generating URLs in global content shared by different areas and linking to different areas, we need to include the area route information.
In listing 21.6, our menu HTML contains area route data to ensure that the menu links correctly no matter what area the master page might be used from.
Listing 21.6. The menu HTML with area route information
<ul id="menu">
    <li>
       <%= Html.ActionLink("Home", "Index", "Home",
              new { area = "" }, null)%>
     </li>
     <li>
         <%= Html.ActionLink("Profiles", "Index", "Profile",
              new { area = "Admin" }, null)%>
     </li>
     <li>
         <%= Html.ActionLink("About", "About", "Home",
              new { area = "" }, null)%>
     </li>
</ul>
In each ActionLink method in listing 21.6, we specify the additional area route data for each link. The Home and About links are in the root Controllers folder, so we specify a blank area name. The Profile link directs to the Admin area, so we need to specify the "area" route value with AreaName : "Admin". The "area" route value needs to match the AreaName used in the AdminAreaRegistration class for the URL to generate correctly. We also need to change our shared logon partial, because this partial is used across all areas.
The links will now specify the areas explicitly, as shown in listing 21.7.
Listing 21.7. Our modified logon partial including area information
<%@ Control Language="C#" Inherits="System.Web.Mvc.ViewUserControl" %>
<%
if (Request.IsAuthenticated) {
%>
Welcome <b><%= Html.Encode(Page.User.Identity.Name) %></b>!
[
<%= Html.ActionLink("Log Off", "LogOff", "Account",
    new { area = "" }, null) %>
|
<%= Html.ActionLink("Profile", "Show", "Profile",
    new
    {
        area = "Admin",
        username = Html.Encode(Page.User.Identity.Name)
    }, null) %>
]
<% } else { %>
[
<%= Html.ActionLink("Log On", "LogOn", "Account",
    new { area = "" }, null) %>
]
<% } %>
Unfortunately, there isn’t an ActionLink overload that allows us to specify the area name without a RouteValueDictionary. In the next section, we’ll examine how we can take advantage of the T4MVC project to help generate route-based URLs in our application.
21.2. Managing links and URLs with T4MVC
Out of the box, ASP.NET MVC contains many opportunities to get tripped up with magic strings, especially with URL generation. Magic strings are string constants that are used to represent other constructs, but with an added disconnect that can lead to subtle errors that only show up at runtime. To provide some intelligence around referencing controllers, views, and actions, the T4MVC project helps by generating a hierarchical code model representation for use inside controllers and views.
In listing 21.8, our Edit action contains a BeginForm method call that references the Save action on the Profile controller, using magic strings to build the URL for the form element.
Listing 21.8. A brittle Edit view with magic strings
<% using (Html.BeginForm("Save", "Profile")) {%>

    <%= Html.EditorForModel() %>
    <p>
        <input type="submit" value="Save" name="SaveButton" />
    </p>

<% } %>
The magic strings in listing 21.8 lie in the Html.BeginForm method. The strings "Save" and "Profile" are route data that refer to a ProfileController class and Save method. If we were to change the name of our controller and action via built-in refactoring tools, our Edit view would then break. Ideally, all the places where we reference controllers, actions, views, and route values by magic strings could be replaced by something more resilient to the inevitable changes we see in most projects. In the previous section, we saw hard-coded route data values reference "area". If we were to accidentally mistype or misspell the area route entry or value, our application would break at runtime.
To eliminate these potential problems, we have two options. We can use constants and strongly typed, expression-based URL generation, or we can use a form of code generation that allows us to easily reference views, controllers, and actions. The T4MVC project, which is part of MvcContrib (http://mvccontrib.org), uses T4 (Text Template Transformation Toolkit) templates to generate extension methods, view name constants, and action link helpers to eliminate the pesky magic strings that would otherwise litter our application. The T4MVC templates use the T4 tem-plating technology introduced with Visual Studio 2008.
To use T4MVC, we first need to download the latest T4MVC release from http://mvccontrib.codeplex.com/wikipage?title=T4MVC and place the following two files in the root of our application:
- T4MVC.tt
- T4MVC.settings.t4
In figure 21.7, we see these two files added to the root of our MVC application.
Figure 12.7. Our application, including the two T4MVC template files

When the T4MVC templates are added to the project, or when the project is built or run, the templates are regenerated. In some environments, a security dialog box may pop up, as shown in figure 21.8.
Figure 21.8. The T4 template security dialog

You can check the Do Not Show This Message Again check box if you don’t want this dialog box showing up again, and click the OK button to run the template generation.
The T4MVC template modifies existing controllers, making them partial classes, and generates a set of helper files. These helper files, shown in figure 21.9, include a set of code-generated controller partial classes and extension methods.
Figure 21.9. Helper files generated from the T4MVC templates

With partial classes, the T4MVC templates generate a set of helper methods and properties that allow us to easily refer to controllers, actions, and views from anywhere in our application. For example, the original LogOff action in the AccountController was rife with magic strings, as shown in listing 21.9.
Listing 21.9. The original LogOff action
public virtual ActionResult LogOff()
{
    FormsService.SignOut();

    return RedirectToAction("Index", "Home");
}
Instead of referring to the Index action on the Home controller by strings, we can instead navigate the hierarchy created in the generated MVC class shown in listing 21.10.
Listing 21.10. Using the generated MVC class to refer to controllers and actions
public virtual ActionResult LogOff()
{
    FormsService.SignOut();

    return RedirectToAction(MVC.Home.Index());
}
Internally, the new RedirectToAction method lives on the generated partial controller class. The Index method in listing 21.10 records the controller and action name, allowing the generated RedirectToAction method to build the correct ActionResult. All of this is behind the scenes, and our existing controllers can start using the new generated overloads to generate ActionResult objects.
In our views, we’ll use some generated HtmlHelper extension methods for generating action links and URLs. Listing 21.11 shows our modified logon partial.
Listing 21.11. Using the generated HtmlHelper extension methods
<%@ Control Language="C#" Inherits="System.Web.Mvc.ViewUserControl" %>
<%
if (Request.IsAuthenticated) {
%>
Welcome <b><%= Html.Encode(Page.User.Identity.Name) %></b>!
[
<%= Html.ActionLink("Log Off", MVC.Account.LogOff()) %>
|
<%= Html.ActionLink("Profile",
    MVC.Admin.Profile.Show(Html.Encode(Page.User.Identity.Name)))%>
]
<% } else { %>
[ <%= Html.ActionLink("Log On", MVC.Account.LogOn())%> ]
<% } %>
Instead of supplying the area route information manually, we navigate a logical controller hierarchy structure. The ProfileController resides in the Admin area, and the generated helper class is located in an Admin property. The class hierarchy generated by T4MVC matches the area and controller layout of our project. If we were to rename an action method, we’d simply need to regenerate the templates, and our code would be updated accordingly. The methods referring to actions also include overloads that accept the original action parameters, allowing us to easily supply route information for action parameters. The Show action accepts a username parameter, which we pass in directly.
Code generation can be quite powerful, but it does come with some caveats. We need to remember to run the templates when our application changes, and running the code generation takes longer as our project grows. Although code generation helps prevent runtime errors, it moves them to compile time instead of eliminating them entirely. Code generation is still not resilient to refactoring, but T4MVC is a powerful tool that can eliminate much of the magic-string proliferation in ASP.NET MVC applications.
21.3. Summary
Large MVC applications can become unwieldy to manage. To tame the natural organization that sites with many different sections and areas have, we can use the new areas feature in ASP.NET MVC 2.0. These MVC areas allow us to segregate content into logical and physical folders, each with its own shared content hidden from other areas.
For global content, we can still take advantage of global shared content. With the added flexibility of areas comes some added work when generating URLs from routes to ensure that the URLs work across areas. To help with this URL generation, we can use the T4MVC project. T4MVC uses the T4 templating technology to generate code-beside partial classes for our controllers, providing easy access to a hierarchical structure describing the controllers, actions, and views in our site.
In the next chapter, we’ll take the componentization of areas to another level with portable areas.