
CHAPTER 21
EVENT HANDLING AND AWT
Older computing models revolved about the console input and output. In modern days we (most of the time) use GUI and various components like buttons, scroll bars, and textboxes. Programming model has also changed to event-driven programming. It has made events very important. In this chapter, we will be studying events and event handling.
Events are strongly associated with components. It will not be prudent to study event handling without studying the components. For this purpose, we have to get familiar to components. This requires that we study a very useful package called Advanced Window Toolkit known by the acronym “AWT”.
As of today, Java recommends using swing package for GUI. The majority of components are redefined (with prefix J) in swing. We will be discussing those components in detail in a chapter on swing. To avoid duplication, we have kept the discussion on AWT very brief. It may also be noted that only few classes like color are present only in AWT.
21.1 Abstract Window Toolkit
Java offers to its users a package called Abstract Window Toolkit.
This package contains all of the classes for creating user interfaces and for supporting graphics and images. A user-interface object such as a button or a scrollbar is called a component in AWT terminology. The Component class is the root of all AWT components.
Direct-known sub-classes are listed as follows:

To hold these components, we need a container. For this purpose, a class known as container is defined in Java AWT package. The container allows us to position the components it contains.
The sub-class of container known as panel is very useful. We can imagine a panel as a sort of screen component. It may be noted that it is a super-class of class Applet. Method add() is defined to add components to a panel.
Another sub-class of container is Window. An object of this is a top-level window with no borders and menu bar. The default layout for a window is BorderLayout. A window must have a frame, dialog, or another window defined as its owner when it is constructed. This is the reason why we normally do not use this class directly and use a class known as Frame.
We have studied a class called Frame earlier in Chapter 13 on “Graphics”. We will use this class Frame to hold the components. Frame is the main class of our program when we want to use GUI for our programs. Figure 21.1 describes the hierarchy of the components.
Class Canvas is a sub-class of class Component. It is useful for drawing. It is a rectangular area. For better results, we are advised to sub-class it and then use. It goes without saying that we override its paint method.
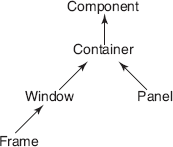
Figure 21-1 Class Hierarchy
With this much introduction, we are in a position to enter a new world. So far, our programming was console based. Now we are entering GUI-based programming. There are two main changes to be noticed.
- The display is no more monochrome text screen. It is colourful and capable of showing images as well as text in various fonts.
- The programming model changes to event-driven programming. The events decide the flow of the program.
Let us start our study with a simple component Button.
21.1.1 Using Button
Button is an important GUI component. It is supposed to trigger some specific action. When we click the button, it appears to have been pressed. Let us study it with a program.
Problem: Write a program to study Button.
Solution: See Program 21.1.
PROGRAM 21.1 Study of button
// button1.java
import java.awt.* ;
import java.awt.event.* ;
class button1 extends Frame implements ActionListener
{ Button bt1 ;
public button1()
{ super("***button1***") ;
setSize(400,300);
bt1 = new Button ("Quit");
add(bt1);
bt1.addActionListener(this);
setLayout(new GridLayout() ) ;
setVisible(true);
}
public void actionPerformed(ActionEvent ev)
{ String st = ev.getActionCommand();
if ( st.equals("Quit") )
{ System.exit(0);
}
}
public static void main( String args[])
{ button1 bt1 = new button1();
}
}
If you run this program, you will see the following window.
Output
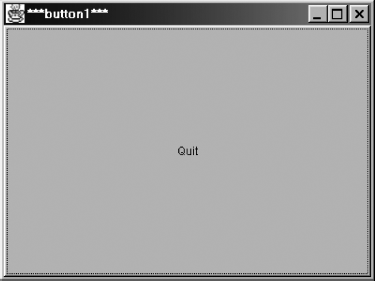
If you click on the button, the program will get closed. The reason is when we click the button, action event takes place. It is recognized as the quit command. The action set for this command is System. exit(0);. It closes the application.
21.1.2 Using TextField
The component for writing single line text is TextField. We can write a text at the time of initialization through constructor. At a later stage, we can use setText() method.
Text fields can be used for both input and output. We can type in text in the text field. Alternately, we can display some text in it. For typing in the TextField, we must first click it with a mouse. It brings this component in focus and a cursor appears in it. Now, we can type in our text.
Problem: Write a program to study TextField.
Solution: In this program, we will use one TextField as input and the other for output (see Program 21.2).
PROGRAM 21.2 TextField
// textfi1.java
// implements textfield
import java.awt.* ;
import java.awt.event.* ;
//import java.awt.Toolkit ;
//import javax.swing.* ;
class textfi1 extends Frame implements ActionListener
Button bt1 ;
public textfi1()
{ super(" text field demo") ;
setSize(400,300);
tx1 = new TextField(20) ;
add(tx1);
tx1.setText("");
tx2 = new TextField(25) ;
add(tx2);
bt1 = new Button ("copy"); // note 1
add(bt1);
bt1.addActionListener(this);
setLayout(new GridLayout() ) ; // note 2
setVisible(true);
}
public void actionPerformed(ActionEvent ev)
{ String st = ev.getActionCommand();
if ( st.equals("copy") ) // note 3
{ tx2.setText(tx1.getText());
}
}
public static void main( String args[])
{ textfi1 t1 = new textfi1();
}
}
When we run the program, we have to type something in the leftmost TextField. If we type “Hello World” and then press copy button, “Hello World” will be copied in the second TextField. We will get the following output. We have used grid layout in this program. We will discuss Layouts in detail in Chapter 22 on “Swing”.
Output
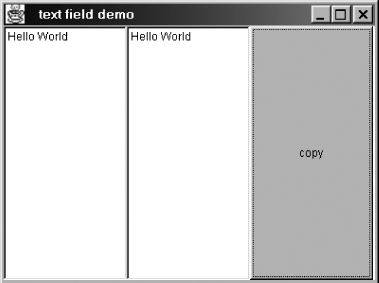
Please note the line marked note1. This creates a button with name “copy”. Mark the line note3. This checks whether the action command is copy.
21.1.3 Using checkbox
The component checkbox comes handy when user has to select zero or more choices. When we click a checkbox, it is marked. A small check symbol appears in the box. If we click once again, it becomes unmarked. Let us try a small program.
Problem: Write a program to study checkbox.
Solution: In this program, we will define a checkbox. To put up a simple application, we will test this checkbox in a loop. We will terminate the application the moment checkbox is found marked (see Program 21.3).
PROGRAM 21.3 Checkbox
// cb1
// program stops after box is checked.
import java.awt.*;
class myFrame extends Frame
{ Checkbox b1 ;
public myFrame()
{ super("***check box demo***") ;
setSize(400,300);
b1 = new Checkbox("abc");
add(b1);
setVisible(true);
}
}
class cb1
{ public static void main( String args[])
{ boolean flag = false;
myFrame fm = new myFrame();
while (flag == false) // this loop waits
{ flag = fm.b1.getState();
}
if (flag == true) System.exit(0);
} ;
};
If you run this program, you will see the following window.
Output
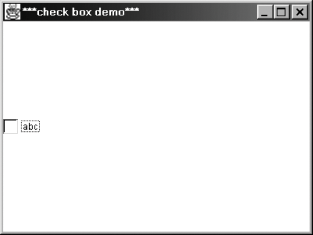
If you check the box (i.e. click it with mouse) named abc, the program will end. In this program, we are using a continuous loop to check the flag. The flag is set when the box is checked. In effect, this ends the program.
21.1.4 Using radio button
Radio buttons are groups of buttons. By convention, we can select only one button at a time. The concept of radio buttons is similar to checkboxes except one difference. By convention, there are no limits as to how many items can be selected at a time in case of checkboxes.
It is interesting to note that there is no component named as radio button. The general name checkbox is used for it. Java defines a class named CheckboxGroup. Checkboxes added in the group are nothing but radio buttons. Also note that the shape of a radio button is circular while that of a checkbox is square.
Problem: Write a program to study radio buttons.
Solution: In this program, we will loop till button C is selected. A method getState() tells us whether a radio button is selected or not (see Program 21.4).
PROGRAM 21.4 Radio Button
// rb1
// program stops after
// box c is checked.
import java.awt.*;
class myFrame extends Frame
{
CheckboxGroup g1 ;
Checkbox a,b,c;
static String AString = "A";
static String BString = "B";
static String CString = "C";
public myFrame()
{ super("***radio button demo***") ;
setSize(400,300);
setLayout( new GridLayout (3,1) ) ;
g1 = new CheckboxGroup();
a = new Checkbox(AString, g1, true);
b = new Checkbox(BString, g1, false);
c = new Checkbox(CString, g1, false);
add(a);
add(b);
add(c);
setVisible(true);
}
}
class rb1
{ public static void main( String args[])
{ boolean flag = false;
myFrame fm = new myFrame();
while (flag == false) // this loop waits
{ flag = fm.c.getState();
}
if (flag == true) System.exit(0);
} ;
};
If you run this program, you will see the following window.
Output
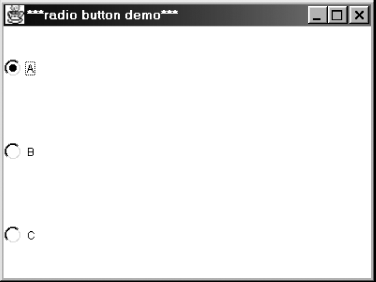
When we select button “C”, the program terminates.
21.1.5 Using canvas
As the name suggests, it is a component to draw things on. Earlier, we have drawn on the frame itself. Canvas is the most appropriate component to draw things on. To use it, we have to define a class which extends class Canvas. We should define method paint for this class. Whenever we want to refresh this canvas, we have to call the method paint().
Problem: Write a program to study class canvas.
Solution: In this program, we will use a canvas to draw a filled rectangle. We will define a button such that every click will increase the size of the rectangle by five pixels (see Program 21.5).
PROGRAM 21.5 Canvas
// canvas1.java
import java.awt.* ;
import java.awt.event.* ;
class myCanvas extends Canvas
{ static int x1 =30, y1= 30,x2 =50,y2=50;
public void paint(Graphics g)
g.fillRect(x1,y1,x2,y2);
}
public void inc()
{ x2=x2+5; y2 =y2+5;
paint( getGraphics());
};
}
class canvas1 extends Frame implements ActionListener
{ myCanvas c1 ;
Button b1;
public canvas1()
{ super(" ***canvas1*** ") ;
setSize(400,300);
c1 = new myCanvas();
add(c1);
b1 =new Button("button");
add(b1);
b1.addActionListener(this);
setLayout(new GridLayout() ) ;
setVisible(true);
}
public void actionPerformed(ActionEvent ev)
{ String st = ev.getActionCommand();
if ( st.equals("button") )
{ c1.inc();
}
}
public static void main( String args[])
{ canvas1 c = new canvas1();
}
}
If you run this program and click the button four to five times, you will see the following output.
Output
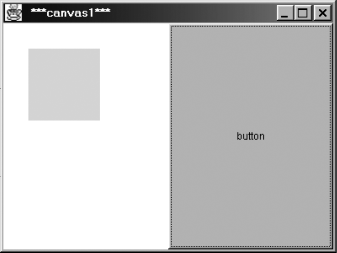
The most interesting point is that when you click the button, the size of the square increases by five pixels.
21.2 Event Handling
Events can be separated in two groups: higher-level events and lower-level events. The events generated by AWT components can be considered as higher-level events. Events generated by hardware devices like keyboard and mouse can be called lower-level events. Let us start our study with AWT component events.
Whenever we click a checkbox or click a button or type a key in a text field, an event occurs. This generates an object of a particular class. The system (or simply the application) transmits this object to those objects which have registered to receive this object.
Once this event object is received, the actionPerformed method is executed. A properly coded method takes appropriate action.
Let us have a close look at our program button1.java. Only relevant lines are reproduced for ready reference.
// button1.java
import java.awt.event.* ;
class button1 extends Frame implements ActionListener
bt1.addActionListener(this);
public void actionPerformed(ActionEvent ev)
String st = ev.getActionCommand();
if ( st.equals("Quit") ){ System.exit(0)};
The statement
class button1 extends Frame implements ActionListener
tells the program that class button1 wants to listen to events.
bt1 = new Button ("Quit");
bt1.addActionListener(this);
This statement creates an object of type button. It is labelled as Quit.
Whenever a button bt1 is clicked, an event object is generated. This object carries the string Quit with it. As the event occurs, it is notified to the class button1. Its method actionPerformed is executed. The first step of this method is to identify the event. This is done by the following statement:
st = ev.getActionCommand();
When it is executed and event is clicking of button bt1, st gets the value Quit.
Once we identify the event, an appropriate action can be easily taken. In this case, it is quitting the program.
Short Questions and Answers
Q. When is an event generated?
A. An event is generated on clicking an AWT component. When we press a key on the keyboard or click a mouse, an event is generated.
Q. What is an event object?
A. Java being a highly object-oriented language creates an object of an appropriate class, whenever an event occurs.
Q. To whom is this object delivered?
A. All the classes that have registered to listen to this event get this event.
A. The classes registering for events have a defined method actionPerformed which gets executed.
21.2.1 Delegation event model
Applications based on GUI are a bit different from ordinary console applications. A typical GUI application will have many different AWT components. Different events occur in an application. It is possible that every event reaches every component. But it will be a sheer waste of time and energy. Hence, a mechanism exists such that certain events reach only certain components. To achieve this, components tell the application which events they should be notified. These components will take cognizance of these events in their method actionPerformed. Components will not be delivered events in which they are not interested. The application will delegate events only as per the previously declared policy. This is known as the delegation event model. It may be noted that one event can be delegated to more than one component. See Box 21.1 for more details about event class in Java 1.0.
BOX 21.1 Events in Java 1.0
Event is a platform-independent class that encapsulates events from the platform’s GUI in the Java 1.0 event model. In Java 1.1 and later versions, the class Event is maintained only for backwards compatibility. In the text, we have used more powerful classes provided in later versions.
21.2.2 Event classes and event listener interfaces
Package java.awt.event provides interfaces and classes for dealing with different types of events fired by AWT components. The java.awt.AWTEvent class describes the AWT event model in detail. Events are fired by event sources. An event listener registers with an event source to receive notifications about the events of a particular type. This package defines events and event listeners, as well as event listener adapters, which are convenience classes to make the process of writing event listeners easier.
The following is a list of classes from Package java.awt.event.
ActionEvent, |
AdjustmentEvent, |
AWTEventListenerProxy, |
ComponentAdapter, |
ComponentEvent, |
ContainerAdapter, |
ContainerEvent, |
FocusAdapter, |
FocusEvent, |
HierarchyBoundsAdapter, |
HierarchyEvent, |
InputEvent, |
InputMethodEvent, |
InvocationEvent, |
ItemEvent, |
KeyAdapter, |
KeyEvent, |
MouseAdapter, |
MouseEvent, |
MouseMotionAdapter, |
MouseWheelEvent, |
PaintEvent, |
TextEvent, |
WindowAdapter, |
WindowEvent, |
Interfaces defined in Package java.awt.event are given at the end of the chapter.
So far we have discussed the events generated by the components. Input devices like the keyboard and mouse also generate events. These events are termed as low-level events. Let us have a close look at events generated by these devices.
21.2.3 KeyEvent
To work with keyboard, Java offers a class known as KeyEvent. Many text components generate this event when we press a key.
Those who have a little hardware knowledge will know that when we actually type a key, three different actions occur. First, the key is pressed; it remains in that stage for sometime and is then released.
To take cognizance of this event, keyListener interface has to be used. This interface has three methods:
keyTyped()
keyPressed()
keyReleased()
These methods are invoked when the corresponding action takes place. It goes without saying that a programmer has to define these methods as they are declared in an interface.
Problem: Write a program to study keyboard events.
Solution: In this program, we will use KeyListener interface. It requires us to define methods keyTyped, keyPressed, and keyReleased. The actions of these three methods will be displayed in separate lines. Whenever we press and release a key, we will get corresponding key code and print in a specific line. When our actions will invoke a keyTyped method, we will put the corresponding character in the line.
PROGRAM 21.6 Key Demo I
// key1.java
import java.awt.* ;
import java.awt.event.* ;
class myFrame extends Frame implements KeyListener
{ public static String str1 = "", str2 ="", str3="" ;
public static Graphics myG ;
public myFrame()
{ super("***key1***") ;
setSize(500,350);
setVisible(true);
myG = getGraphics() ;
}
public void keyTyped(KeyEvent ke)
{ char ch; // int n ;
ch = ke.getKeyChar();
str1 = str1 + ch ;
myG.drawString(str1,50,100);
}
public void keyPressed(KeyEvent ke)
{ int n;
n = ke.getKeyCode() ;
str2 = str2 + n +" ";
myG.drawString(str2,50,200);
}
public void keyReleased(KeyEvent ke)
{ int n;
n = ke.getKeyCode() ;
myG.drawString(str3,50,300);
}
public void paint(Graphics myG)
{ addKeyListener(this);
Font f1 = new Font("Arial" , Font.BOLD , 20);
myG.setFont(f1);
myG.drawString("Key Typed ",50,50 );
myG.drawString("key pressed",50,150 );
myG.drawString("key released",50,250 );
Font f2 = new Font("Arial" , Font.BOLD , 16);
myG.setFont(f2);
}
}
class key1
{ public static void main( String args[])
{ myFrame k1 = new myFrame();
}
};
When the program started running, we pressed the following keys in the following order.
a, Caps Lock, b, keypad 9, Num Lock, keypad 9, Tab, Escape, w,9.
The following output is received on screen
Output
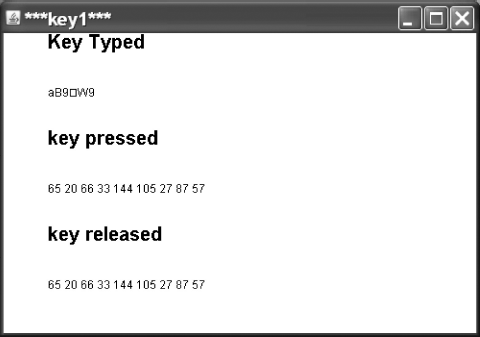
- Key pressed and released lines show nine integer key codes.
KeyTypedline shows only six characters.- Caps Lock, PgUp (= keypad 9), and Num Lock did not produced any character (
keyTyped). - Character generated by Escape is shown as square box.
- Character generated by Tab is not shown in any list.
On running this program in older versions of Java, keyTyped was shown by a square box. The value of the key pressed was 9.
After an application, let us write an applet responding to keys.
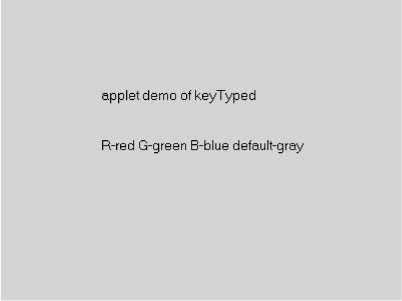
Problem: Write an applet to study keyboard events.
Solution: In this applet, we will sense a key. If a key is r, g, or b, the background colour of the applet will be changed as red, green, and blue. If we type any other key, we will set the background colour as grey. See the following applet.
PROGRAM 21.7 Key Demo II
// key2.java
import java.awt.event.*;
import java.awt.*;
import java.applet.*;
class key2 extends Applet implements KeyListener
{ static Color col1 = Color.yellow;
public void init()
{ addKeyListener(this);
// requestFocus();
}
public void paint(Graphics g)
{ setBackground(col1);
g.drawString("applet demo of keyTyped",100,100);
g.drawString("R-red G-green B-blue default-gray",100,150);
};
public void keyPressed(KeyEvent ke)
{ int n;
n = ke.getKeyCode() ;
}
public void keyReleased(KeyEvent ke)
{ char ch; int n ;
n = ke.getKeyCode() ;
}
public void keyTyped(KeyEvent ke)
{ char ch; int n ;
ch = ke.getKeyChar();
switch (ch) {
case 'r': col1 =Color.red; break;
case 'g': col1 =Color.green; break;
case 'b': col1 =Color.blue; break;
default :col1=Color.gray;
}
repaint();
}
}
If you run the aforementioned applet, you will get the following screen with yellow background. If you press keys r, g, or b, colour changes to red, green, or blue, respectively. Pressing any other key makes background grey. If you press key “g”, you will get the following screen output.
Output
Please note that keyPressed or keyReleased methods are not doing any useful work. We are forced to define them as they are declared in keyListener interface.
21.2.4 Mouse events
Mouse is another important input device. When we move the mouse or click a mouse button, a mouse event is generated. Mouse events are grouped in two categories: mouse events and mouse motion events.
Mouse Events: If we want to work with mouse events like press, release, click, enter, and exit on a component, we have to implement
MouseListenerinterface. It means that we have to define methods declared in this interface. When a mouse event occurs, the relevant method in the listener object is invoked, and theMouseEventis passed to it.Mouse Motion Events: If we want to work with movement of mouse (moved or dragged) on a component, we have to implement
MouseMotionListenerinterface. It means that we have to define methods declared in that interface. When a mouse movement occurs, the relevant method in the listener object is invoked, and theMouseEventis passed to it.
Tables 21.1 and 21.2 describe all the methods from both the interfaces.
Table 21.1 Methods Summary: Interface MouseListener
| Event | Method |
|---|---|
| Mouse is clicked on a component | mouseClicked(MouseEvent e) |
| Mouse enters a component | mouseEntered(MouseEvent e) |
| Mouse exits a component | mouseExited(MouseEvent e) |
| Mouse button is pressed on a component | mousePressed(MouseEvent e) |
| Mouse button is released on a component | mouseReleased(MouseEvent e) |
Table 21.2 Methods Summary: Interface MouseMotionListener
| Event | Method |
|---|---|
| Mouse button is pressed on a component and then dragged | mouseDragged(MouseEvent e) |
| Mouse button is moved on a component (with no button down) | mouseMoved(MouseEvent e) |
Please note that events are generated with respect to a component in Java, for example Frame.
Problem: Write a program to study methods from MouseListener interface.
Solution: In this program, we will demonstrate MousePressed method. Every time a mouse is clicked on the component that is Frame in this example, the colour of the frame will change (see Program 21.8).
PROGRAM 21.8 Interface MouseListener
// mouse1.java
import java.awt.* ;
import java.awt.event.* ;
import java.awt.Color ;
class myFrame extends Frame implements MouseListener
{ public static Graphics myG ;
static int ind=0;
static int max = 10;
static Font f1 = new Font("Arial" , Font.BOLD , 20);
Color fc,bc; // forground and background
Color[] col = { Color.white , Color.blue , Color.cyan ,
Color.gray , Color.green , Color.magenta,
Color.orange , Color.pink , Color.red ,
Color.yellow } ;
String[] name = { "white" , "blue" , "cyan" ,
"gray" , "green" , "magenta",
"orange" , "pink" , "red" ,
"yellow",/*"bye bye"*/ } ;
public myFrame()
setSize(400,300);
setVisible(true);
fc = Color.black;
bc= Color.white;
}
public void paint(Graphics g)
{ this.setBackground(bc);
g.setColor(fc);
g.setFont(f1);
g.drawString(name[ind],50,100);
}
public void init()
{ addMouseListener(this);
requestFocus();
}
public void mousePressed(MouseEvent e)
{ ind++;
if ( ind < max)
{ bc=col[ind];
this.repaint();
}
else System.exit(0);
}
public void mouseReleased(MouseEvent e) { }
public void mouseEntered(MouseEvent e) { }
public void mouseExited(MouseEvent e) { }
public void mouseClicked(MouseEvent e) { } }
class mouse1
{ public static void main( String args[])
{ myFrame k1 = new myFrame();
k1.init();
}
};
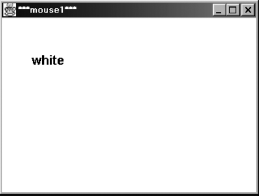
The screen at the start will be seen as follows. The background colour will change every time we click the mouse. The name of the colour will also be displayed.
Output
We have not actively implemented other methods like mouse entered. You can add a small code and test the concept yourself.
You can see the MouseMotionListener interface demo in a program on free-hand drawing in Chapter 26 on “Collection of Programs”.
21.2.5 Adapter classes
If we inspect Program 21.8, we will see lot of empty methods. The class myFrame implements MouseListener interface. We are required to define all the methods of this interface. In our program, we wanted to use only one method mousePressed(MouseEvent e). Still we have to define all other methods. To handle such situation, Java offers Adapter classes. An adapter class is essentially a hollow (in a way a dummy) class. It implements all methods of a given interface without any action. Instead of implementing an interface, we should extend the respective adapter class. In that case, we have to define only one or two required methods. No other method needs to be defined. Let us rewrite the aforementioned program using MouseAdapter class.
Problem: Write a program to class MouseAdapter.
Solution: As we are demonstrating the use of MouseAdapter class instead of MouseListener interface, we will use previous program and modify it suitably. See Program 21.9.
PROGRAM 21.9 Adapter Class
// adapt1.java
import java.awt.* ;
import java.awt.event.* ;
import java.awt.Color ;
class myFrame extends Frame
{ public static Graphics myG ;
static int ind=0;
static int max = 10;
static Font f1 = new Font("Arial" , Font.BOLD , 20);
Color fc,bc; // forground and background
Color[] col = { Color.white , Color.blue , Color.cyan ,
Color.gray , Color.green , Color.magenta,
Color.orange , Color.pink , Color.red ,
Color.yellow } ;
String[] name = { "white" , "blue" , "cyan" ,
"gray" , "green" , "magenta",
"orange" , "pink" , "red" ,
"yellow",/*"bye bye"*/ } ;
public myFrame()
{ super("***adapt1***") ;
setSize(400,300);
setVisible(true);
fc = Color.black;
bc= Color.white;
}
public void paint(Graphics g)
{ this.setBackground(bc);
g.setFont(f1);
g.drawString(name[ind],50,100);
}
public void init()
{ addMouseListener(new demo());
requestFocus();
}
void action()
{ repaint();
}
class demo extends MouseAdapter
{ public void mousePressed(MouseEvent e)
{ ind++;
if ( ind < max)
{ bc=col[ind];
action();
}
else System.exit(0);
}
}
}
public class adapt1
{ public static void main( String args[])
{ myFrame k1 = new myFrame();
k1.init();
}
};
If you run this program, you will get absolutely the same output as that of the Program 21.8.
For smooth running, we have to make minor changes. First, we define a new class. We have deliberately named it as “demo”. It extends MouseAdapter class and contains mouse pressed method. In the original program it contained the code this.repaint(). Here this stands for myframe. This part is handled by a new method action().
The following table lists various adapter classes.
Adapter classes |
ListenerInterface |
|---|---|
MouseAdapter |
MouseListener |
MouseMotionAdapter |
MouseMotionListener |
KeyAdapter |
KeyListener |
WindowAdapter |
WindowListener |
ComponentAdapter |
ComponentListener |
Container Adapter |
Container Listener |
Focus Adapter |
FocusListener |
21.2.6 Virtual key code constants
Table 21.3 illustrates the virtual key codes supported by Java.
Table 21.3 Virtual Key Code Constants
Table 21.4 illustrates the various interfaces from the Package java.awt.event.
Table 21.4 Interface Summary: Package java.awt.event
Table 21.5 illustrates various classes from Package java.awt.event.
Table 21.5 Class Summary: Package java.awt.event
Keywords
Abstract Window Toolkit, ActionListener, actionPerformed, AWT, button, canvas, Canvas, checkbox, Container, Delegation Event Model, event, Frame, getActionCommand(), KeyEvent, keyPressed(), keyReleased(), keyTyped(), low-level events, mouse event, MouseListener, MouseMotionListener, MousePressed, Panel, radio button, System.exit(), TextField, Virtual key code, Window
RuleBook
| Key events | Key events are generated when a user presses or releases a key on the keyboard |
| multiple listeners | A component can have multiple listeners for events of different type |
| graphics | Graphic class is defined in java.awt package. |
| container event | Container event class is generated when a component is added to or removed from a container. |
| add | The add method for attaching GUI components is a Container class method and not of class Component. |
Review Questions
- Describe the event-handling model in Java.
- Describe various methods from
KeyListenerinterface. What are the mouse event-handling interfaces and their corresponding methods? Explain in brief. - Describe various methods from
MouseListenerinterface. - Describe various methods from
MouseMotionListenerinterface. - What is delegation event model in Java? Explain in brief.
- Describe various interfaces and classes from package AWT.
Exercises
- Write a program to print the corresponding virtual key code when a key is typed.
- Write an applet which responds to mouse events.
- Write an AWT application with checkbox such that all cable TV channels will be displayed from the selected category.
- Write an AWT application with radio button such that first file lines are displayed from a selected file.
- An old kid’s game (named Briano) consisted of two lists: one of the names of states and the other that of the capital cities. Along the names, there were electric contacts. If you connect a wire between the correct names, a small bulb glows. Simulate this game using two sets of radio buttons. A bulb should be replaced by a
TextFieldshowing the string “you are right’’ in bold.