
CHAPTER 2
Creating an Application in Java
What are the requirements for creating a simple Java application? To create a simple Java application, we will need to use a text editor for entering the Java source code, and we would also need to have the Java Development Kit (JDK), which includes the Java Runtime Environment (JRE), installed on our machine. The JDK would be required for compiling the Java source code and JRE would be required to execute the compiled Java application. We can use any editor with which we are comfortable as long as it can create and save plain text files. The code included here is created using the gedit editor on the Open Solaris platform.
2.1 INSTALLING JDK
There is a JDK version available for almost all the platforms. The JDK can be downloaded from Sun’s Web site at http://java.sun.com/javase/downloads/index.jsp. Here we will find lots of different bundles of JDK as well as the plain JDK. For now, download the plain JDK. We may also download the documentation corresponding to the downloaded JDK. Follow the instructions on the Web site for installing the JDK.
Now let us look at the steps for creating, compiling and executing Java applications. We start by writing a sample Java application that displays Hello world on the standard output.
2.2 THE HelloWorld SAMPLE APPLICATION
A Java application is always defined in a main() method. In Java, methods are defined inside some class. Therefore, we need to define a class, which will contain the method main(). The classes in Java are always defined in a file with extension “java”. So for our first application we may start by creating a file called “Hello.java” in which we define the class as given in Listing 2.1.
Listing 2.1. Content of Hello.java
    1 class HelloWorld {
 2     public static void main(String[] args) {
 3         System.out.println("Hello world!");
 4     }
 5 }
2.3 COMPILING JAVA FILES
To compile the above code from the command line, we invoke the Java compiler by using “javac”. The “javac” command can be used as follows:
javac <java-file-name>
where <java-file-name> is the name of the Java source file, in this case Hello.java. Therefore, the command will be
javac Hello.java
A class file containing a bytecode is generated as a result of compilation. In this case the file HelloWorld.class will be generated. For each class definition a separate class file is created by the Java compiler. A single Java source file may contain more than one class definition, for example, the file Hello.java may also contain another class definition as given in Listing 2.2.
Listing 2.2. Hello.java with more than one class definition
    1 class HelloWorld {
 2     public static void main(String[] args) {
 3         System.out.println("Hello world!");
 4    }
 5 }
 6
 7 class AnotherHelloWorld {
 8     public static void main(String[] args) {
 9         System.out.println("Another Hello world!");
 10     }
 11 }
When we recompile the revised Hello.java file there will be two class files created, one for each class definition in the Java source file. The two class files will be HelloWorld.class and Another-HelloWorld.class. The method main(), with the method signature “public static void main(String[] args)” in each of these class definitions is a Java application. Java applications are always defined in a method called main(), which is declared as static and public, the return type is void and has a single parameter of type String[].
2.4 EXECUTING A JAVA APPLICATION
To execute a Java application we simply invoke the Java Runtime giving the name of the class containing the application. The Java Runtime can be invoked as follows:
java <application-class-name>
where <application-class-name> is the name of a class in which the application has been defined. Note that it is not the name of a file.
So, in this case to invoke the application defined in HelloWorld class, the command will be
java HelloWorld
and to invoke the application defined in AnotherHelloWorld class, the command would be
java AnotherHelloWorld
When we use the java command followed by the class name the Java Runtime loads the specified class and looks for the method main(), which is the application. If such a method is found in the class then the Java Runtime creates an array of String types from the command line arguments specified after the class name and invokes the application by passing the command line arguments to the main() method.
MISCONCEPTION NOTE
Misconception The name of the class must match the Java file name.
Fact The name of a public class must match the Java file name. The Java file may contain a non-public class, whose name may be different from the file name.
Misconception In a single Java file only one class can be defined.
Fact A Java file may contain any number of class definitions.
2.4.1 Using Command Line Arguments
The command line arguments are available to the application (method main) through the String[] parameter. An application would be able to access the command line arguments as an array of String objects available from the lone parameter in the method main(). Listing 2.3 illustrates how to access the command line arguments in a Java application.
Listing 2.3. Updated HelloWorld application using command line arguments
    1 class HelloWorld {
 2     public static void main(String[] args) {
 3         System.out.println("Hello world!");
 4         for (String name : args) {
 5              System.out.println("Hello " + name);
 6         }
 7     }
 8 }
when we invoke the above application by passing some command line arguments as given below:
java HelloWorld Tom Dick Harry
it would display the following on the standard output:
Hello world!
Hello Tom
Hello Dick
Hello Harry
If we want to include space in a command line argument, then we may use ‘"’ to encapsulate the entire argument as shown below:
java HelloWorld "James Gosling" "Joshua Bloch"
The above code would have only two command line arguments and the output would be:
Hello world!
Hello James Gosling
Hello Joshua Bloch
Sometimes, it might be required to pass the names of the files in a directory as command line arguments. This is also possible; we just use the wild card character ‘*’ to have file names as command line arguments. So if our current directory contains the following files:
Hello.java
HelloWorld.class
AnotherHelloWorld.class
and we use the command as follows:
java HelloWorld *
then the output will be as given below:
Hello world!
Hello Hello.java
Hello HelloWorld.class
Hello AnotherHelloWorld.class
The order of the last three lines may depend on the underlying platform.
TABLE 2.1 Common Java utilities
| Command | Description |
|---|---|
javac |
Java compiler |
java |
Java Runtime (available as part of JRE) |
jdb |
Java debugger |
javap |
Java disassembler |
javah |
Generates headers for writing native methods in C |
javadoc |
Java documentation |
jar |
Java archive |
rmiregistry |
Naming service for RMI (available as part of JRE) |
rmic |
RMI compiler, for generating stubs for remote objects |
appletviewer |
Utility for viewing applets in an HTML file |
keytool |
Maintain keystores for keys and certificates |
policytool |
Create and update policy files |
jarsigner |
Signing a jar file |
2.5 VARIOUS TOOLS, PART OF JDK
Here, we have only used the javac and the java commands from the JDK. The JDK is required to be installed only on the developer’s machine. The end-user, can make use of the compiled class files with just the JRE installed. Some of the common utilities that are a part of JDK and JRE are given in Table 2.1.
2.5.1 javadoc Utility and Documentation Comments
In a Java source file, we can define classes, interfaces, enums and annotations. A class in Java can have several kinds of methods. We have a utility in JDK that helps us to generate an HTML documentation for the various classes and the members of a class. The javadoc is a utility that generates the HTML documentation from the Java source file. The javadoc utility by default generates documentation only for the public classes. In this case we do not have a public class, and so javadoc by default would not find anything for which documentation can be generated. This can be changed by using the switch -package when using the javadoc command. Another useful switch for the javadoc utility is the -d switch, which can be used to specify the destination for the output. It would be a good idea to organize the source code, class files (the binaries) and the documentation into separate folders. So, we may, for example, create separate folders for the Java source code, Java class files and documentation in our home folder as src, bin and docs, respectively (Figure 2.1).
Now keep all the source files (files with Java extension) in the src folder. To compile the source file from the src folder we can use the -d switch as follows:
javac -d../bin Hello.java
The above command will generate compiled class files in the bin folder. Now to execute the Java application from within the src folder, we may use the java command with the -cp switch as follows:
java -cp../bin HelloWorld
The -cp switch is used to indicate the folder from where the classes can be loaded.
To generate documentation for the classes defined in the Hello.java file we may use the following command from the src folder:
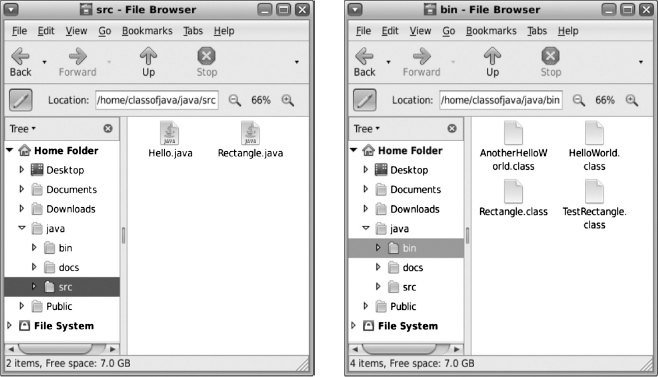
Figure 2.1 Organization of files
codejavadoc -d../docs Hello.java
The above command will result in the generation of HTML documentation for the classes defined in the file Hello.java, which is in the src folder. The HTML files will be generated in the docs folder. This documentation is generated for the public classes only. Currently we do not have any public classes defined in the Hello.java file, so no documentation will be generated. The documentation can be generated using the following command for the non-public classes using the -package switch as follows:
codejavadoc -d../docs -package Hello.java
After this command we may view the documentation by opening the index.html file in the docs folder. In a Java source file, we can put comments similar to C, i.e. we have single line comments and block comments. The single line comments start with //. Whenever in a Java source file any line contains // then the rest of the line from the point of the // is treated as a comment.
A block comment can be put in a Java source by inserting /* to indicate the start of the block comment and */ indicates the end of a comment. There is no nesting of the block comment. There is a special case of block comment that is known as the documentation comment when it appears before a class definition or before any of the member of the class, like methods, variables, constructors, etc. These documentation comments are used by the javadoc utility when it generates the documentation. Therefore, if we want some notes to be included for any of the elements described in the documentation then we can just place the documentation comment for that element. For example, if we want to have some notes for the main method in the HelloWorld class then the code listing for Hello.java may be updated as given in Listing 2.4, and then we can use the javadoc utility to regenerate the documentation. The difference between the block comment and the documentation comment is that we use /** instead of the /* to indicate the start of the documentation comment.
Listing 2.4. HelloWorld with documentation comments
    1 class HelloWorld {
 2     /**
 3         The main method prints Helloworld on the standard output.
              This method
 4         also takes command line arguments and prints Hello to each
              of the names
 5         in the command line argument.
 6     */
 7     public static void main(String[] args) {
 8         System.out.println("Hello world!");
 9         for (String name : args) {
 10             System.out.println("Hello " + name);
 11         }
 12     }
 13 }
In a documentation comment there are certain tags (start with @), which are used by the javadoc utility in special ways. These have been listed in Appendix C.
EXERCISE 2.1
Create a Java file named Hello.java and define two classes named HelloWorld and AnotherHelloWorld containing the main method for defining an application, the main method should have statements to print "Hello world!" and "Another Hello world!", respectively. Compile the Java file and check the output of the compilation (what files are generated). Now execute the application.
The content of the file can be as given in Listing 2.5.
Listing 2.5. Java file with multiple class definitions
    1 class HelloWorld {
 2     public static void main(String[] args) {
 3         System.out.println("Hello world!");
 4    }
 5 }
6
 7 class AnotherHelloWorld {
 8     public static void main(String[] args) {
 9         System.out.println("Another Hello world!");
 10     }
 11 }
The above code compiles without errors. The output of compilation is two class files named, HelloWorld.class and AnotherHelloWorld.class. Both the applications run and produce the output.
LESSONS LEARNED
- A single Java file may contain any number of class definitions.
- Each class defined in Java is compiled into a separate class file whose name matches the class name.
- The main method is used to create an application in Java, and an application is embedded in a class definition.
- A single Java file may contain any number of classes with the main method.
- Applications are executed by using the class name that contains the application (main method).
- Command line arguments may be passed to the Java application, which are available in the main method using its
String[]parameter.
EXERCISES
- State which of the following are true or false:
- A single Java file can contain only one Java application.
- The main method of a Java application is written inside a class.
- JRE cannot be installed independent of JDK.
jarcommand is part of JRE.- The command used to compile Java source files is
jcompile. - Java source code can be written in files with any extension.
- Fill in the blanks:
- Java applications begin at method __________.
- The command line arguments in Java application are available as an instance of __________.
- __________ is a utility program available with jdk for preparing the HTML documentation of Java classes.
- __________ begins a documentation comment in Java.
- The output of compiling a Java file has an extension of __________.
- __________ begins a single line comment in Java.
- __________ command is used to run a Java application.
- List the commonly found tools available as part of JDK, indicate which of these are not part of the JRE.
- Write a simple Java application to print a pyramid with five lines. The first line has one character, the second line has two characters and so on. The character to be used in the pyramid is taken as a command line argument.