
Now that you have a project started, let's take a step back and review the ways in which Eclipse helps you manage content and complexity as your projects grow. Each of your resource files (code, documentation, or anything else) is contained within a project, and each of your Eclipse projects is grouped within a workspace.
In the previous chapter, we created our first Java project for catalog management. The agile development process encourages us to get started as quickly as possible and to rely on testing and refactoring for adapting to evolving requirements.
In this chapter, you'll learn how to
Create multiple workspaces for independent work
Navigate and filter Java project views
Link project folders to directories outside the workspace
Plan the structure of your workspace and projects
Each instance of Eclipse is associated with exactly one workspace, but you can select the workspace that will be used for the current session.
The workspace launcher dialog, shown previously in Figure 2-1, allows you to pick the current workspace when you start Eclipse. Alternatively, you can type a directory path into the dialog field to create a new workspace or browse to an existing directory. The location is completely up to you, although it's best not to accept the default location embedded within the Eclipse installation folder. When you upgrade to a new version of Eclipse, such as moving from 3.0.0 to 3.1.0, you will unpack a new distribution ZIP and either replace the c:eclipse installation directory with a fresh copy or create a new installation directory, such as c:eclipse-3.1.0. If your workspace is not embedded within the installation directory, then you can simply delete the old version of Eclipse.
If you look in the workspace folder using your operating system file explorer or command prompt, you will see a child folder named .metadata—don't mess with this unless you know what you are doing! Also be certain to back this up along with your other workspace project folders because it contains important data about your workbench state and preferences.
You can rename or move your workspace folder at any time without ill effect, as long as you always keep the child folders, including the .metadata folder, intact within a given workspace.
If you create multiple workspace locations, then the project resources contained within each workspace should be independent of those in other workspaces. However, independent projects may be included in the same workspace. Some common reasons for multiple workspaces include the following:
Independent work topics, possibly managed in different version control repositories (although projects within one workspace can be associated with any number of repositories).
You are a consultant and need to maintain clear separation between client resources.
Two or more workspaces are used to distinguish concurrent work on maintenance branch versions in CVS.
To create a new workspace, simply start Eclipse and enter a new location in the Workspace Launcher dialog.
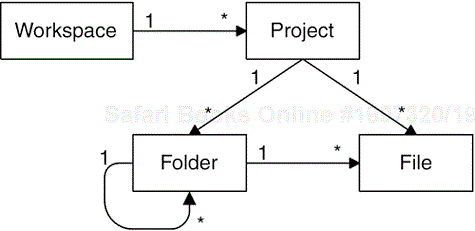
An Eclipse workspace is mapped to the file system directly and contains resources that represent your projects and their contents. This logical view is platform-independent and identical in structure whether running on Windows, Linux, Macintosh, or other operating systems.
The resources are contained in a hierarchical structure with a singleton workspace as its root. The primary resource types are shown in Figure 3-1.
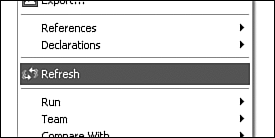
You can modify a resource on the file system directly or from within Eclipse. If you create or modify a resource from within Eclipse, then its counterpart is created immediately in the file system. If you create, delete, or modify a file system resource within a folder that is managed by Eclipse, then the Eclipse workspace must be refreshed to synchronize its state with that of the actual files.
Resources may be refreshed manually or automatically by a periodic background thread in Eclipse. If you are working on very large projects with thousands of files, automatic refreshing can become an excessive processing burden; otherwise it's very helpful. You can enable automatic refresh by checking the option for Refresh workspace automatically in the preferences dialog opened via the menu Window > Preferences > Workbench.
Manual refresh is invoked for projects, folders, or individual files via the context menu in either the Navigator view or the Java Package Explorer view, as shown in Figure 3-2.
Projects are special entities in your workspace. They carry metadata about project characteristics and contribute automatic behavior when their resources are modified. A project is a container that groups resources into buildable, reusable units.
Features of projects include the following:
A project collects together a set of files and folders.
A project's location controls where the project's resources are stored in the local file system.
A project's build spec controls how its resources are built.
A project can carry session and persistent properties.
A project can be open or closed; a closed project is passive and has a minimal in-memory footprint.
A project can refer to other projects.
A project can have one or more project natures.
The type of project is determined by its project natures (there can be more than one), which are assigned by a wizard when a project is created. Unless you are developing new plug-ins for Eclipse, you can generally ignore the details of how natures are assigned. If you have created a new Java project, you will see a J on top of the project folder icon in the Navigator or Package Explorer views.
What are the unique characteristics of Java projects? They record their build path in a .classpath file and add the Java incremental project builder to the project's build spec. In all other respects, they are just regular projects and can be configured with other natures and other incremental builders. Java project configuration is described in more detail in Chapter 6, “Java Project Configuration.”
If you are working with a large number of projects or a large number of folders within a project, you can narrow your current scope to a subset of workspace content. There are two ways to control your view content.
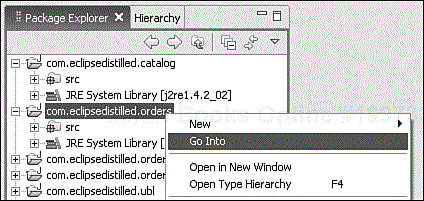
In either the Navigator view or the Package Explorer view, pick any project or package folder and select the Go Into context menu item, as shown in Figure 3-3. You can then use the Back, Forward, or Up toolbar icons on that view to move between a series of sub-folder focus areas. This creates a Web browser-like navigation through a series of project and folder contents. You navigate backwards and forwards through visited workspace “pages” or go “home” to the workspace root.
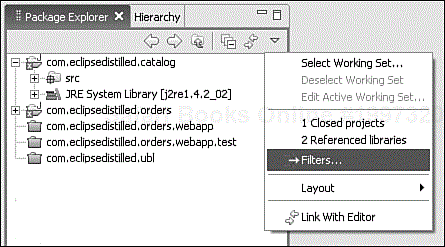
Alternatively, in the Package Explorer view, right-click on a project folder and select Close Project. Then filter your view as shown in Figure 3-4 to hide all closed projects (click the down-arrow icon on the view toolbar to get the view menu). This approach has an additional benefit of reducing Eclipse resource consumption by not caching or evaluating build state information for closed Java projects.
By default your workspace hierarchy is identical to the corresponding file system directory and file structure. You can, however, map parts of the Eclipse workspace hierarchy onto disjoint locations in the file system. Some reasons for doing this are as follows:
Including configuration or class file directories that are stored outside of the project, e.g., in a Tomcat or JBoss server installation
Accommodating inflexible file location requirements of other tools used in combination with Eclipse
Referencing shared network drive locations containing source or library files
Referencing other product installations on your file system
Linked folders and files appear as an integral part of your Eclipse project, but they must be located directly within a project, not nested within a subfolder.
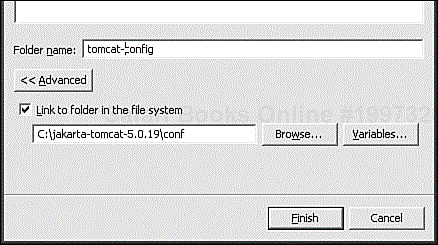
Right-click on the project where you want to create a linked resource and select New > Folder or New > File. As shown in Figure 3-5, specify the name of the folder as it will appear in the workbench and browse to the linked folder. The Eclipse folder name can be different from the name of the folder in the file system.
Linked resource locations can be specified relative to a path variable. Variables can ease the management of linked resources by reducing the number of places where hard-coded, absolute file system paths are used. They also make it easier to share projects containing linked resources with other team members by avoiding hard-coded absolute file system paths that may vary between machines. Click Variables… while creating the link and select or create a path variable, as shown in Figure 3-6.
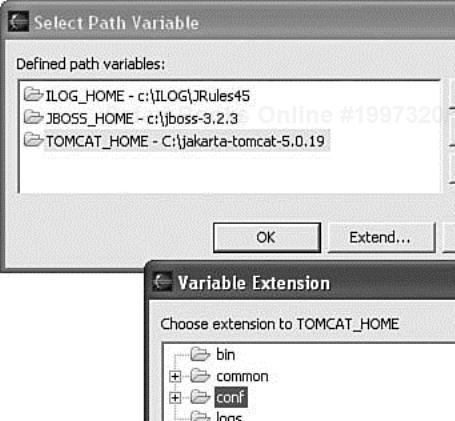
If the chosen variable defines the exact path of the linked resource, click OK. Otherwise, click Extend… to choose a file or folder below the location described by the path variable, and then click OK.
Path variables streamline the management of linked resources for users in several ways:
They allow a single reference to the absolute path when defining several linked resources under a common root.
They allow the location of several resources to be redefined by changing a single variable.
They allow users to share projects containing linked resources without updating the paths of each resource (because the absolute path can vary between machines).
The last item in this list requires explanation. When you create a linked resource in a project, a description of the linked resource is added to the project description file (.project) in the project's location. Using a path variable, you can share a project by copying the project's content or by using a repository and then redefine the variable to suit each individual workstation. For example, one user might store external resources under c:jboss-3.2.3, while another user running Linux might store the same resources in /usr/local/jboss. Defining a path variable on each workspace (JBOSS_HOME=c:jboss-3.2.3 and JBOSS_HOME=/usr/local/jboss) allows users to work around this difference and share projects with linked resources.
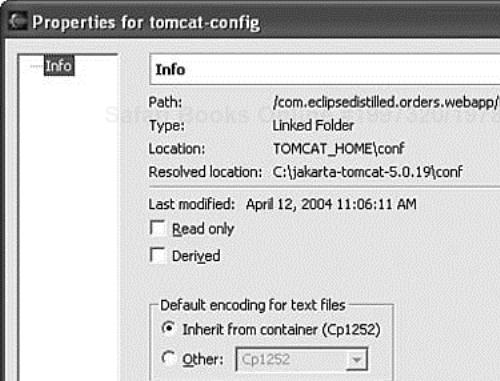
You can load a project that uses path variables even if you do not have all the path variables defined in your workspace. A linked resource that uses a missing path variable is flagged using a special decorator icon. In addition, the File > Properties > Info property page for a linked resource, shown in Figure 3-7, displays the variable and indicates whether or not it is defined. A path variable can also specify a location that does not exist on the file system.
The planned scope of our order management application includes a product catalog, order processing, and a Web-based user interface. Our initial design calls for five modular projects with dependencies as shown in Figure 3-8.
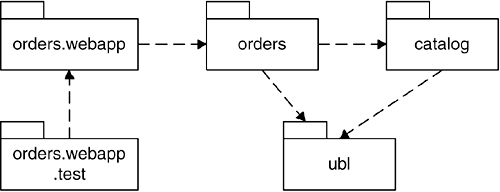
The ubl project has no other dependencies, whereas the orders.webapp.test project ultimately depends on all other projects. The projects are summarized as follows:
catalog. Domain model for product catalogs.
orders. Domain model for order management; depends on product catalog domain model.
ubl. The OASIS Universal Business Language (UBL) reusable components for electronic commerce. These components are used within both the catalog and orders domain models.
orders.webapp. A J2EE Web application interface for order processing; depends on the orders domain model.
orders.webapp.test. A separate project for unit and integration testing of the Web application.
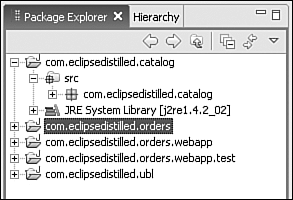
Your first Java project for the product catalog was created in Chapter 2, “Hello Eclipse.” Following the same approach, open the Java perspective and use the New Java Project wizard to create the remaining four projects. We'll continue with the convention of prefixing the project names with com.eclipse distilled to assure their names are unique in a shared version control repository. However, it's not necessary to create project names that are equal to the Java packages they contain. You should now have the Eclipse workspace projects as shown in Figure 3-9.
When creating new Java projects using the wizard, be sure to select the project layout option to Create separate source and output folders. You should click the button to Configure Defaults… and set this choice as the default folder configuration from this point forward. You can get to this same setting by going to the preferences dialog category, Java > Build Path.
Every Java project has at least one source folder and one output folder. The Eclipse default is to use the project itself as both the source and output folders, so every .java file is compiled and its .class file is saved within the same folder. For most projects, it is preferable to assign separate folders for source and output. With a separate output folder, you can simply delete its entire contents to clean and rebuild a project from scratch. Also, larger projects will include folders other than source or output, such as documentation, configuration files, and so on.
When a Java project's resources are displayed in the Package Explorer view, the source folder (named src by default) is shown as a folder icon with a nested package icon. This represents a project folder containing Java packages and source code files. Only the source folder is included in the project build path; other project folders, even if they contain .java files, will not be compiled. This is explained in detail in Chapter 6, “Java Project Configuration.”
The output folder (named bin by default) is hidden from view because you do not need to see its contents for most development activities. Similarly, every project contains a .project file, and every Java project contains a .classpath file, which are also hidden in this view.
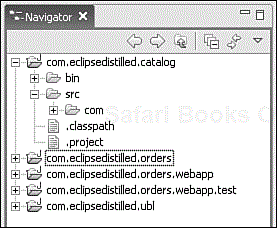
If you want to see the output folder and other hidden files, switch to the Resource perspective and use the Navigator view. This provides a general-purpose view of all workspace resources. This view is shown in Figure 3-10.
Project dependencies affect the visibility of imported classes in Java projects. It is possible to develop this entire application using a single Eclipse project, but the use of multiple projects provides additional benefits when reusing independent modules. Creating separate projects makes you think clearly about the dependencies between logical subsystems. For example, the UBL e-commerce components and product catalog may be used in other applications that are not part of order processing. For user interface components, placing the model and the view in separate projects helps prevent unnecessary coupling.
Configuration of Java project dependencies is described in detail in Chapter 6.
A workspace provides a complete view of all resources required by a set of related projects.
Eclipse resources provide a platform-independent, logical view of files and folders, but they must be synchronized with the file system if changes are made outside of the Eclipse workbench.
A Java project contains source and output folders (preferably separate locations). The project is automatically configured with an incremental builder that compiles all source files into the output folder. Non-Java projects do not include the incremental builder, but other than that, they could be arranged in the same way.
You can map parts of the Eclipse workspace hierarchy onto disjoint locations in the file system by using linked resource locations. This is especially helpful when using Eclipse in combination with other products and development tools that require specific file locations.
Configuring an application using multiple projects contributes long-term benefits that improve reuse of independent modules. Project dependencies control visibility of cross-project imported classes.