
Agile development requires adaptable processes and tools that can be customized to fit the needs of your organization and projects. The chapters in Part 1, “Getting Started,” described many ways in which the Eclipse IDE can be customized to fit your personal and project preferences. However, the greatest strength of Eclipse lies in its plug-in architecture that allows you to extend and update its capabilities with new features. This chapter explains how to add new and update existing features in your Eclipse IDE.
Most of the chapters in Part 2, “Getting Agile,” include a final section named Contributions that lists plug-ins related to the topics of that chapter. The Eclipse community is growing rapidly, and hundreds of open-source and commercial plug-ins are now available. See the Contributions at the end of this chapter for references to index sites that provide searchable plug-in registries.
In this chapter, we'll see how to
Review and modify your workbench plug-in configuration
Add bookmarks for remote and local update sites
Search for and install new features
Install plug-ins that are not packaged as features
Configure locations where features and plug-ins are installed on your computer
Set preferences for update site proxies and notifications
As you gain familiarity with Eclipse, your workbench becomes a dynamic environment where features are added, removed, enabled, or disabled. Members of your team may add features that are specific to their roles, such as modeling, database design, coding, or testing. You can disable features that are only used occasionally, which removes their menu items from the workbench when not needed, and then you can re-enable a feature when its functionality is required.
The Eclipse platform includes an update facility that helps you manage your workbench configuration, find and install new features, and update installed features. The Product Configuration window shown in Figure 9-1 is opened by selecting the workbench menu command Help > Software Updates > Manage Configuration….
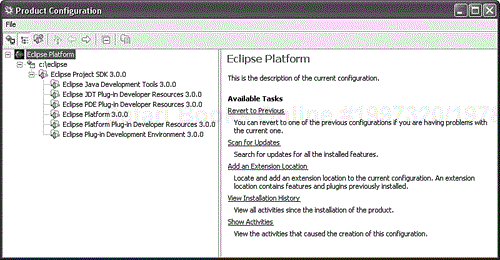
The workbench configuration is organized into a three-level hierarchy:
Install Location. A configuration's features may be installed at several disk locations. This workbench configuration has one location at
c:eclipse.Feature. This configuration contains one top-level feature named Eclipse Project SDK, which is version 3.0.0. A top-level feature may be disabled and re-enabled from this configuration window.
Nested Feature. A feature may include nested features that add functionality. Nested features cannot be disabled individually—they can only be disabled as part of their top-level feature. The choice of configuring a feature as top-level or nested is made by the development team, not by the user.
Although you can add individual plug-ins to your Eclipse configuration, the install/update facility is organized around the higher-level feature packaging. We'll see how to install individual plug-ins without a feature definition in the next section of this chapter.
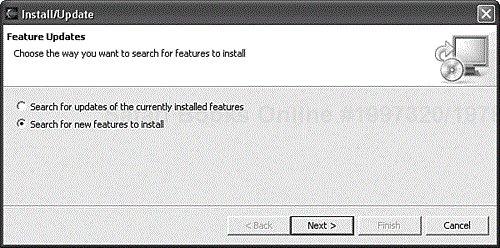
To search for new or updated features and install them, select the workbench menu command Help > Software Updates > Find and Install…. The dialog shown in Figure 9-2 is displayed. The first option in this dialog searches for updates to installed features, which are listed in the configuration shown in Figure 9-1. Choose the second option to search for new features to install and then press the Next button.
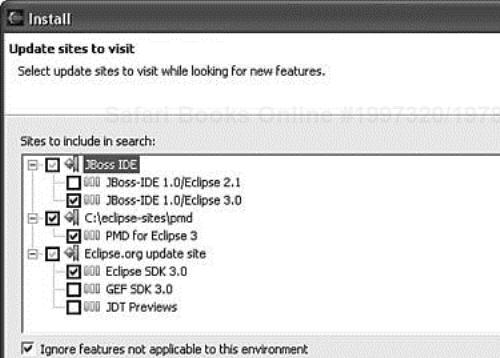
Eclipse will search for new features on one or more update sites. An update site may be located at either a remote URL or a local computer file path. Each update site includes an index file with category names and a list of features within each category, plus JAR files containing the features and plug-ins. One update site is listed when running the default Eclipse SDK configuration, as shown in Figure 9-3. This remote site, located at update.eclipse.org/updates/3.0, contains three categories of features that can be added to your workbench. (Note that the list of categories changes from time to time, so what you see may differ from this figure.)

You can add new bookmarks for other update sites not located on the Eclipse.org Web site. We'll add one remote site and one local site before starting a search for new features across all three update sites.
The JBoss project (www.jboss.org) created an Eclipse feature called the JBoss-IDE that adds preferences, views, and launch configurations for starting, stopping, and deploying applications to a JBoss J2EE server. To add this update site, do the following:
Press the New Remote Site… button shown in Figure 9-3.
Enter the site name “JBoss IDE”.
Enter the site URL
jboss.sourceforge.net/jbosside/updates/.
The PMD project (pmd.sourceforge.net) created an Eclipse feature that includes tools for finding problems in Java code. PMD analyzes your source code to enforce coding practices such as prohibiting empty try/catch blocks and unused local variables. PMD is described in more detail in the Contributions section of Chapter 12, “Continuous Integration with Ant.” The PMD project does not host a remote Eclipse update site, but their download archive contains the contents of an update site that you can unzip and access as a local site. Do the following to add this update site:
Open your Web browser to pmd.sourceforge.net.
Download the update site archive for Eclipse 3.0, e.g.,
pmd-eclipse3-site-2.0.5.zip.Create a directory location on your computer to hold this local update site, e.g.,
c:eclipse-sitespmd.Unpack the site archive into this directory.
In Eclipse, press the New Local Site… button shown in Figure 9-3.
Browse to the
c:eclipse-sitespmdfolder and press OK.
Your Install dialog should now look similar to that shown in Figure 9-4. The feature categories listed within each update site may be different, but similar choices will be available. Select the categories for your search; for this example, we have selected one category from each of the update sites.
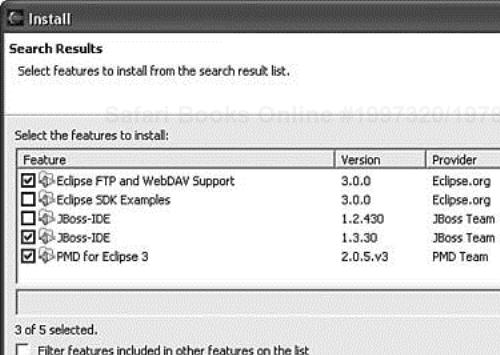
The search results are displayed, as shown in Figure 9-5. Select the features that you wish to install and press the Next button.
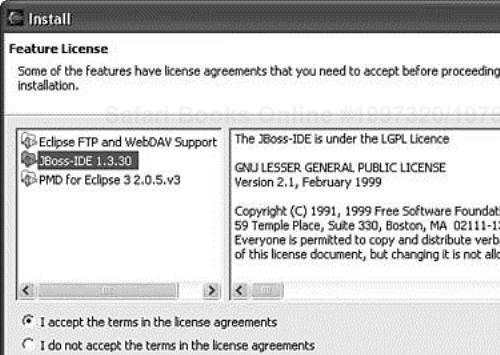
Select each feature in the list and review its license agreement, as shown in Figure 9-6. If you accept the terms of all agreements, then select the option to acknowledge your acceptance and press Next; otherwise press the Cancel button.
Your final choice is to select the install location for each feature. The primary install location for Eclipse is referred to as the product location. By default this is c:eclipse on Windows systems, but you may have chosen a different location when you unpacked the distribution. The product directory contains subdirectories named features and plugins. You can install the new features into the product directory, which will add new entries within features and plugins.
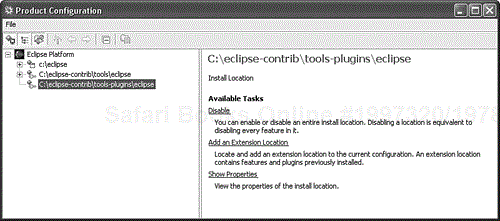
You can also create one or more additional install locations that are referred to as extension locations. As shown in Figure 9-7, press the Add Site… button and browse to a folder where the new features will be installed. In this figure, we created a new location c:eclipse-contrib ools. When the site is added, the update facility automatically creates a subdirectory named eclipse and adds a file named .eclipseextension within that directory.
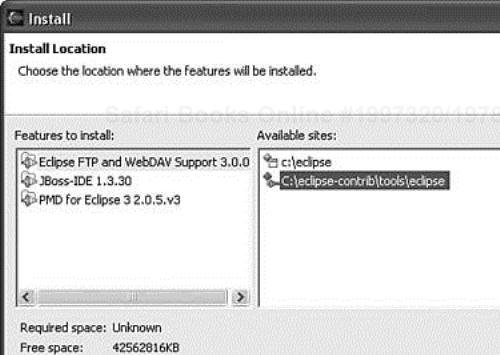
You must choose the install location separately for each feature on the installation list, or else features without a site selection will be installed in the primary Eclipse product directory. When installing several features at one time, it's not necessary to select the same location for all features. You can create any number of separate extension locations; for example, you might want to create different locations for programming tools and modeling tools.
After completing the installation, you will be prompted to restart the Eclipse workbench to activate the new features. Press Yes. Review the new configuration by selecting the workbench menu command Help > Software Updates > Manage Configuration…. As shown in Figure 9-8, we now have two install locations with the three new features in the extension location.
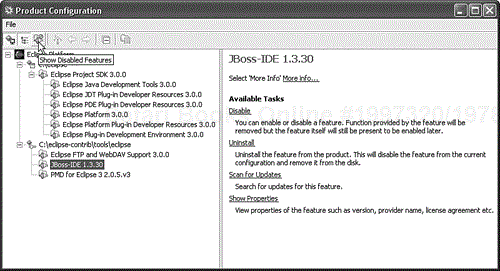
This configuration view also can be used to disable or uninstall a feature, or to scan the original update site for updates to a feature. If you are not using a feature for an extended period of time, it may be helpful to disable it and remove that feature's menus, views, and all other IDE appearance and resource consumption. Select a feature and click on the Disable task. You will be prompted to restart the workbench; press Yes unless you want to disable other features before restarting.
Disabled features are not listed in the configuration view by default. To see a complete list, press the view toolbar button Show Disabled Features, as shown in Figure 9-8.
If you remove and reinstall your Eclipse SDK distribution, then you can quickly reinstall the product extensions that were saved to other location directories. As shown previously in Figure 9-1, select the Eclipse Platform entry and click on Add an Extension Location. You can browse to any extension directory and add all of its features at one time, but this must be a valid extension directory with an eclipse subdirectory that contains an .eclipseextension file.
Several hundred Eclipse plug-ins have been created, and the pace of development continues to accelerate. However, these plug-ins are packaged and distributed in many different ways and with a few different folder structures. Some developers have created update sites as described in the previous section, but more often plug-ins are distributed as ZIP files that do not include feature definitions. A feature usually groups several related plug-ins, so it's not necessary to define a new feature for one plug-in.
We'll step through a simple approach for leveraging the Eclipse update facility to organize and install these plug-in distributions. To make this approach concrete, install an open-source plug-in that converts Java source code to formatted HTML with color syntax highlighting similar to that in the Eclipse Java editor.
Download the JavaToHtml converter from http://www.java2html.de/eclipse.html.
The ZIP file
java2html_eclipse_141.zip(or a more recent version) contains a directory and file list as follows:
de.java2html_1.4.1/plugin.xml
de.java2html_1.4.1/eclipselib.jar
de.java2html_1.4.1/java2html.jar
de.java2html_1.4.1/java2html_eclipse.jar
de.java2html_1.4.1/icons/java2html.gif
de.java2html_1.4.1/icons/source_browser.gif
The installation instructions tell you to unpack the ZIP file into c:eclipseplugins directory and restart Eclipse. This approach works fine and is similar to the instructions in many other plug-in projects, but with a minor change in the installation procedure, we can gain a more flexible organization that leverages the update facility.
Instead of installing the plug-in into the Eclipse product directory, you will create a new extension directory and add it to the configuration. You could unpack the plug-in into the extension directory created in the previous section, c:eclipse-contrib oolseclipseplugins, but you would not be able to disable the new plug-in without disabling the entire extension directory.
There is no way to create a new empty extension directory from within Eclipse except when installing from an update site, so we need to construct it manually. Create the following directory structure:
/eclipse-contrib
   /tools-plugins
      /eclipse
         .eclipseextension
         /plugins
Copy the .eclipseextension file from c:eclipse-contrib oolseclipse to c:eclipse-contrib ools-pluginseclipse. This marker file must be present to notify the Eclipse update facility that this is an extension directory. If you do not have another extension directory, copy the .eclipseproduct file from c:eclipse and rename it to .eclipseextension.
Now that you have the extension directory set up, install the plug-in:
Unpack the JavaToHtml ZIP file into
c:eclipse-contrib ools-pluginseclipseplugins.In Eclipse, open the Product Configuration view, select Eclipse Platform, and click on Add an Extension Location. Browse to your new extension directory and press OK.
Your configuration will now appear as in Figure 9-9. When prompted to restart Eclipse, press Yes.
Because the plug-in is not part of a feature, the configuration does not list anything within the extension location. You can disable and enable the entire extension directory, including all plug-ins within it, but you cannot disable individual plug-ins. If you install several different plug-ins in the same extension directory, then all will be disabled or enabled as a group. You could create a separate extension directory for each third-party plug-in if you prefer complete control over disabling and enabling each plug-in.
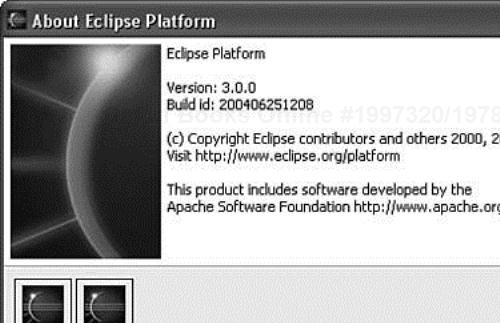
The About Eclipse Platform dialog, shown in Figure 9-10, includes a button Plug-in Details that lists all plug-ins installed and enabled within your workbench. Open this dialog using the workbench menu Help > About Eclipse Platform. This is the quickest way to verify successful installation of plug-ins that are not packaged as features.
When downloading plug-ins as ZIP archives (the most common approach used for packaging and distribution), you need to look at the ZIP folder structure for each plug-in that you intend to add. Sometimes the ZIP entry file paths for a plug-in include a plugins folder at the top level, in which case that plug-in would be unpacked into c:eclipse-contrib ools-pluginseclipse.
The workbench preferences include two pages that control the update facility. The Install/Update page, shown in Figure 9-11, includes preference settings that may be necessary when accessing update sites.
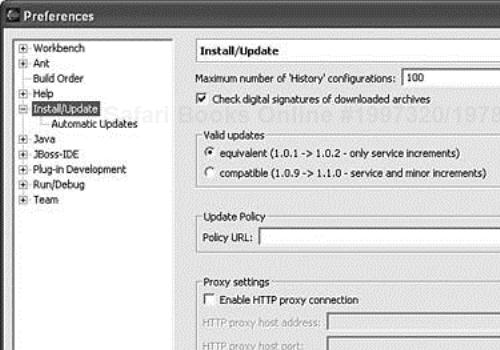
The Proxy settings are needed when running Eclipse behind a firewall that uses a proxy server for HTTP connections. If this is true in your workplace, check the option to Enable HTTP proxy connection and fill in the proxy host address and port number. Check your Web browser for its proxy configuration or ask your network administrator for the address and port. Without this setting, you will not be able to connect to remote update sites.
Eclipse allows you to search for updates to installed features. Each installed feature includes a URL that is used to connect to a server and search for new versions. If you have copied an update site from a remote site location to a local site location, as we did with the PMD feature, then the update URL in the feature definition will not refer to the correct local path. Your workbench should update its installed PMD feature from the local site when a newer version is downloaded.
This problem is resolved by creating an Update Policy file that redirects feature updates to the local site or to an alternative remote site behind your firewall. The update policy file is formatted as an XML document. To redirect updates to the PMD feature, create the following file and save it to C:eclipse-sitesUpdatePolicy.xml:
<update-policy>
   <url-map pattern="net.sourceforge.pmd"
            url="file:/C:/eclipse-sites/pmd/" />
</update-policy>
In the Policy URL field of Figure 9-11, enter this file URL:
file:/C:/eclipse-sites/UpdatePolicy.xml
This update policy file is used to override a URL in a feature manifest. When looking for new updates, Eclipse will check the update policy (if present) and check if a url-map for the matching feature prefix is specified. If a match is found, the mapped URL will be used instead of the one in the manifest. Using the policy file, you can configure Eclipse to search for updates on your computer or on a local server behind the firewall. Meanwhile, other features from remote update sites will continue to be updated using the default mechanism because they will not find matches in the policy document.
For more information on using update policy settings, including details on the policy document XML format, search Eclipse online help for the topic “Eclipse Update Policy Control.”
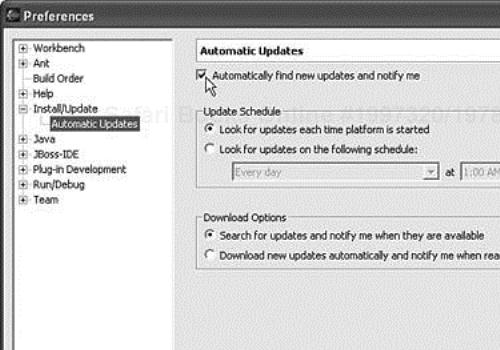
The preferences can also be used to search automatically for updates to installed features. As shown in Figure 9-12, check the option to automatically find new updates and set the schedule for when these searches will occur.
The Product Configuration dialog lists all install locations and all features within each location. When plug-ins are installed that are not packaged with feature definitions, they will not appear in the configuration list.
The About Eclipse Platform dialog includes a button that lists all plug-ins enabled in your workbench, whether or not they are packaged as part of a feature.
You can add bookmarks for remote or local update sites that are searched for new or updated features.
You should install new features into an extension location instead of the primary Eclipse product location. If you remove and reinstall Eclipse at a later date, you will not lose the third-party extensions.
Many plug-ins are packaged and distributed without feature definitions or update sites. Instead of unpacking their ZIP files into the primary Eclipse
pluginsdirectory, as is often recommended, use an extension directory that allows you to enable or disable these plug-ins.Preference settings may be required when a proxy server is used with your firewall, and update policy files allow you to redirect a feature URL to a locally cached site.
Eclipse allows considerable flexibility in how you organize product extensions and libraries used by your projects. In Chapter 6, “Java Project Configuration,” we configured external libraries for Apache Axis and log4j, and in this chapter we updated Eclipse with new features and plug-ins. The resulting file directory structure follows:
/eclipse
   .eclipseproduct
   /features
   /plugins

/eclipse-contrib
   /libraries
      /axis-1.2beta
      /jakarta-basic
   /tools
      /eclipse
         .eclipseextension
         /features
         /plugins
   /tools-plugins
      /eclipse
         .eclipseextension
         /plugins

/eclipse-sites
   /pmd
Many chapters in Part 2 include a Contributions section that lists third-party plug-ins related to the topics of each chapter. Index sites are also available that list several hundred contributions organized by category:
The community page at Eclipse.org lists many available resources (see www.eclipse.org/community/).
Eclipse Plug-in Central is an information portal and marketplace for the Eclipse ecosystem. It offers a plug-in directory, reviews, ratings, news, forums, listings for products and services, and support for the Eclipse Foundation (see www.eclipseplugincentral.com/).
A categorized registry of plug-ins is available at www.eclipse-plugins.info/.