
Continuous testing is an essential component of agile development practices. But writing and running software tests is often akin to taking medicine—an unpleasant but necessary task. However, if writing unit and functional tests becomes an integral part of your daily work, then it can accelerate your development and give you confidence in the outcome.
Writing unit test cases increases the quality of your deliverables by verifying successful completion of use cases and/or user stories. Don't wait until your development iteration is nearly complete before verifying whether you've met the requirements. Instead, you should write and run tests each day. This makes debugging easier because each unit test specifies the expected results, and a failed test tells you where the problem occurred and how your result is different from the required one. Refactoring can impact a lot of code written by many of your teammates. Without a unit test suite, you won't know if the refactoring changed the code's behavior.
But you can't achieve these benefits without committing to this strategy and investing the time to make it work, which can be difficult because you often don't reap the rewards until later in the project when requirements change and refactoring is in full-swing. The greatest reward may not come until a year later when your maintenance team takes over or when you begin working on the next release. But the return on this investment is significant.
The objective of the JUnit support built into Eclipse is to make it easier to write tests than not to write them. JUnit is a simple, flexible framework for writing and running unit tests in Java. Eclipse adds wizards for creating test cases and test suites, and it provides a view for running and viewing the details of test results.
We shall explore JUnit by writing tests for the UBL library of electronic business components. These tests include verifying and demonstrating the functionality of Java code generated from XML Schemas and testing the implementation of new code that computes the total of order line item prices spanning multiple currencies.
In this chapter, we'll see how to
Choose one or more strategies for adding JUnit testing to your development process
Configure Eclipse projects to organize your tests
Write test cases using the JUnit wizard
Run tests and analyze their results using the integrated JUnit view
Unit testing can support several general strategies for validating the behavior of your software. When developing new code, write tests that
The JUnit framework is also applicable to exercising any software APIs. You gain substantial benefit from writing tests that
Help you define the API for as-yet unwritten types. Although this might feel strange to start with, you'll soon find it liberating to be able to use the API before they are even written.
Help you understand or confirm your understanding of a new complex API, such as an XML parser, a business rules engine, or a JAX-RPC-compliant implementation for Web Services.
Verify correct operation of a library acquired from another team or vendor.
Verify expected results from classes produced by a code generator. Code generation is becoming more prevalent for large frameworks like J2EE and for database or XML data binding.
We apply these strategies to our order processing application while building a library based on the Universal Business Language (UBL) specification. See the sidebar “UBL Order Pricing Calculation” for a description of our tasks.
UBL Order Pricing Calculation
The Universal Business Language (UBL) specification was created by OASIS to enable global interoperability of e-commerce transactions. The specification does not include Java APIs, but it provides XML Schemas and associated documentation that defines the syntax and semantics for procurement data.
The global nature of UBL requires a flexible structure for handling international pricing and calculation of order and invoice amounts. The complexity of these data requires careful verification and testing of software that implements the specification.
Figure 10-1 shows a class diagram with the relevant types and attributes for computing total amounts on an order and each of its line items. This diagram was derived from the UBL XML Schemas. Our task is to design and implement a corresponding Java library.
Simplified pseudo code for the calculations is as follows:
LineItem amount =

    quantity ¶ baseQuantity * priceAmount

Order totalAmount = sum( LineItem amount )
The unit test implementation in this chapter is based on this UBL order pricing example. Complete schemas and UML class diagrams for the UBL specification are available at the OASIS Web site:
Our implementation of the order pricing calculation consists of two steps:
Our testing and verification follows two of the strategies described previously:
Write JUnit tests that verify correct operation of the data types and code lists generated from the XML Schemas.
Follow a test-first strategy and write unit tests for the order and line item amount calculations before implementing those methods.
Before proceeding with implementation of the tests, we'll quickly review the JUnit framework so that it is clear how the Eclipse wizards and commands work with this structure. JUnit tests are contained within a composite structure of arbitrary depth. You can run an entire test suite or any of its parts; the smallest part is one test method within a test case. A test suite may contain any class that implements the Test interface, including other suites. This structure is displayed in Figure 10-2.
The following definitions provide additional explanation of these framework classes:
Test Case. A test case, such as
AmountTest, collects a set of one or more related test methods and is usually a subclass of the framework classTestCase. Each test method name must start with “test” and has no arguments, e.g.,testSetCurrency().Test Suite. A test suite is a collection of tests that are run at the same time. A test suite is often constructed dynamically from selected test cases or may contain only a single test method.
Test Runner. A test runner is a utility used to run a suite of tests. The runner may provide a graphical presentation, such as an Eclipse view, or a command-line execution that is incorporated into automated build files.
A last bit of housekeeping is to review the ways in which you organize JUnit tests within an Eclipse project. The test cases are ordinary Java classes, so there are no fixed constraints on where you create them. You could co-mingle test case classes with the application code being tested, but this is not recommended. Instead, you should collect the test classes in a separate source folder or in a new project dedicated to unit tests. Clear separation enables you to easily omit tests from your production code distribution. Using a consistent configuration also allows other team members to quickly find and run the test suites.
The first configuration requirement is that the Eclipse project containing JUnit tests must include the junit.jar library in its Java build path. This configuration requirement is good justification for creating a separate project to contain your JUnit tests. When you use the Eclipse wizard to create new JUnit test cases, it automatically checks the build path and asks whether the library should be added for you. This is the easiest route; otherwise, you can manually add the library as described in Chapter 6, “Java Project Configuration.” If you add the library yourself, then you should extend the predefined classpath variable named JUNIT_HOME to avoid absolute file paths in your project configuration.
As you are getting to know JUnit, it's helpful to take advantage of Eclipse source code navigation and text hover tips to learn about the framework implementation. The source code for JUnit is included in the Eclipse distribution, so you can attach this source archive to the library. This procedure is also described in Chapter 6. When the Eclipse wizard automatically adds the junit.jar library, it also attaches the source for you. All Eclipse JDT plug-in sources can be found here, including those for JUnit:
/eclipse/plugins/org.eclipse.jdt.source_3.0.0/src
So where do you put your tests? Figure 10-3 illustrates two approaches that work well. The first option is to create a second source folder in your project that contains unit tests for the code within that project's primary source folder. To create the second source folder, select the com.eclipsedistilled.ubl project in the Package Explorer and then select File > New > Source Folder from the main menu bar. Enter test as the folder name.
A single project can have any number of separate source folders with names of your choosing. Just remember that a source folder is not the same as a regular project folder. This is described in more detail in Chapter 6, where Figure 6-1 shows the project source configuration tab.
The second option is to create a new project that is dedicated to testing. A common convention is to append .tests on the end of the project name whose code is tested. The second project named com.eclipsedistilled.ubl.tests contains the standard src folder for its Java source files.
Figure 10-3 includes both alternatives. Obviously, you would not do this in your own development—you should choose one or the other. It is quite reasonable, however, to combine these approaches for different projects. In our example order processing application, we created a separate project for testing the Web application, but we will use a second source folder for unit tests within the other projects.
A final recommendation when configuring your tests is to use the same Java package hierarchy for the unit tests and the code being tested. This package name is com.eclipsedistilled.ubl.datatypes in Figure 10-3. The reason is simple: this allows your unit test cases to access protected and package-protected methods in the classes being tested.
Because the package names are the same, your test case classes must have names that are different from the classes being tested. A common convention is to append Test onto the class name, so AmountTest is a test case for the methods in Amount.
We now have all of the concepts in place to proceed with writing and running our tests. Figure 10-4 shows a class diagram of the JUnit tests that we intend to implement. This is only a small fraction of the complete test suite; these examples were selected to illustrate a range of test strategies and techniques.
The UBL specification defines a set of XML Schemas for electronic business documents. One of those schemas includes data types for Amount, Measure, internationalized Text, and others. Because we anticipate building a Web Services interface for order processing, we will use the Apache Axis toolset to generate Java classes for some of these UBL schema types.
The details of Web Services and Axis are beyond the scope of this book, but see Building Web Services with Java (Graham, 2004) for a detailed explanation of Axis. In Chapter 12, “Continuous Integration with Ant,” we edit and run Ant build files within Eclipse to include the Axis code generation as part of continuous integration during development. For now, assume that another team member has already done this, and your task is to write unit tests for the generated code.
A relevant subset of the Amount class implementation is as follows:
public class Amount {
    private BigDecimal value;
    private CurrencyCodeContent currency;

    public Amount(String val, CurrencyCodeContent curr) {
        value = new BigDecimal(val);
        currency = curr;
    }

    public void setCurrencyID(String currencyID) {
        currency = CurrencyCodeContent
                       .fromString(currencyID);
    }

    public void setValue(BigDecimal value) {
        this.value = value;
    }
}
A test case is often associated with one application class that is being tested. Thus, AmountTest is associated with Amount, for example. This is not a requirement of JUnit, but it is a common practice. The Eclipse test case wizard supports this convention and also helps you generate a test case template from the methods in a class.
Three different new type wizards are available from the workbench toolbar in the Java perspective. We've used the new class wizard in previous chapters. Click the down-arrow beside this toolbar icon to get a menu of related wizards, as shown in Figure 10-5. Select JUnit Test Case to create a new test case. Of course, you can also create this class in the same way as any other Java class, but the JUnit wizard accelerates this process.
The JUnit Test Case wizard shown in Figure 10-6 is very similar to the standard new class wizard, but it includes options that are unique to JUnit and omits others that are not relevant. The unique options are as follows:
Superclass default is set to
junit.framework.TestCase. This will be the right choice in many circumstances, although you might subclass a specialized framework that in turn subclassesTestCase. See the final section of this chapter for a list of other specialized test frameworks used with databases or Servlets.Method stubs unique to JUnit. You will frequently select
setUp()andtearDown()methods. The staticmainmethod is usually not needed when running tests within Eclipse.Class under test. This is not required, but if specified, it enables the Next button on this wizard where you can select which methods are tested.
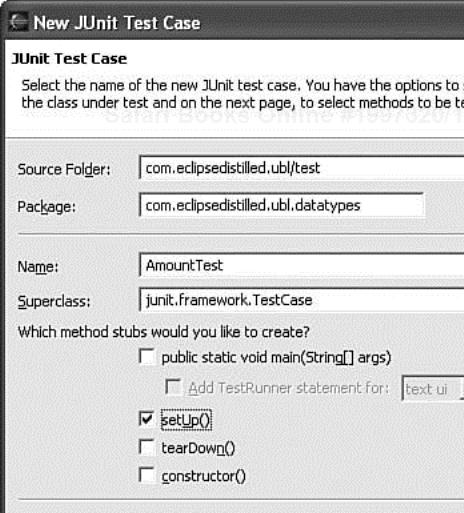
When creating our AmountTest test case, these choices are made in the wizard:
Select the application class under test before opening this wizard. Do this by either making that class the current open editor or selecting the class in the Java Package Explorer view. This pre-fills the Class Under Test field when the wizard is opened and also fills the test class name by appending
Testonto the application class name.Change the source folder from
srctotest. Thesrcfolder is chosen by default because the application class is in thesrcfolder. If your tests are located in a different project, press the Browse button and pick the appropriate project source folder for this test case.
Now press the Next button at the bottom of this wizard page and select the methods from Class Under Test that are included in the new JUnit test case. The next wizard page offers a list of all public and protected methods in the application class. For our Amount class, check the methods equals(Object) and setCurrencyID(String). The wizard generates a skeleton test case, as shown here:
package com.eclipsedistilled.ubl.datatypes;

import junit.framework.TestCase;

public class AmountTest extends TestCase {

    /*
     * @see TestCase#setUp()
     */
    protected void setUp() throws Exception {
        super.setUp();
    }

    /*
     * Class under test for boolean equals(Object)
     */
    public void testEqualsObject() {
        //TODO Implement equals().
    }

    public void testSetCurrencyID() {
        //TODO Implement setCurrencyID().
    }
}
Now fill in the test methods so that we can run the test case to verify correct operation of the Amount data type class. Our immediate purpose is to understand how Eclipse supports JUnit testing, so details of the Amount class implementation are omitted. Complete implementation of all example code is available for downloading from this book's companion Web site (www.EclipseDistilled.com). The test case implementation is shown on the following page.
A typical test case consists of three parts:
Code that creates the objects used by the tests. This testing context is referred to as a test's fixture. The
setUp()andtearDown()methods are part of the fixture. ThesetUp()method is run before every test method, and thetearDown()method is run after each test method. This assures a clean, repeatable test scenario.Code that exercises the application objects in the fixture.
Code that verifies the result.
public class AmountTest extends TestCase {
    private Amount usd10;
    private Amount usd15;
    private Amount eur10;
    private Amount eur25;

    protected void setUp() throws Exception {
        usd10 = new Amount(10d, CurrencyCodeContent.USD);
        usd15 = new Amount(15d, CurrencyCodeContent.USD);
        eur10 = new Amount(10d, CurrencyCodeContent.EUR);
        eur25 = new Amount(25d, CurrencyCodeContent.EUR);
    }

    public void testEqualsObject() {
        assertEquals(usd15, usd15);
        assertEquals(usd15,
                 new Amount(15d, CurrencyCodeContent.USD));
        assertEquals(usd10.toString(), eur10.toString());
        assertFalse("Amount is not equal to null",
                     usd10.equals(null));
        assertFalse("Amount values are not equal",
                     usd10.equals(usd15));
        assertFalse("Amount currency codes are not equal",
                     usd10.equals(eur10));
    }

    public void testSetCurrencyID() {
        usd10.setCurrencyID("AUS");
        usd10.setCurrencyID(null);

        try {
            usd10.setCurrencyID("XYZ");
            fail("Expected illegal currency for: XYZ");
        } catch (IllegalArgumentException e) {
            // expected
        }
    }

    public void testInvalidValue() {
        usd15.setValue(new BigDecimal(155.50d));
        usd15.setValue(new BigDecimal("155.50"));

        try {
            Amount amount = new Amount("10,500.50",
                    CurrencyCodeContent.USD);
            fail("Expected exception for: " + amount);
        } catch (NumberFormatException e) {
            // expected
        }
    }
}
These test conditions contain two intentional errors related to currency comparison. Can you spot them? If not, then this should reinforce the value of JUnit testing to ensure error-free code. Subtle errors are difficult to detect by scanning code or test data visually. When expected results are different from actual results, the offending tests are highlighted clearly in the JUnit view. Then you must determine whether the application code is wrong or whether you had incorrect expectations. Either way, it is an important discovery.
When applying a test-first strategy—writing the tests before implementing the code—it is still helpful to create an empty implementation of the intended methods. The JUnit wizard can then use this interface to generate test case stubs for the planned methods.
A subset of the LineItem class is shown below. Specify this as the Class Under Test in the JUnit wizard to generate a test case skeleton named LineItemTest that is similar to AmountTest. Write complete tests for the results that you expect when these methods are invoked and then work on the LineItem implementation until the tests pass.
public class LineItem {
    /**
     * @param quantity The quantity to set.
     */
    public void setQuantity(Measure quantity) {
    }

    /**
     * Compute the lineExtensionAmount for this LineItem.
     *
     * @return the computed amount
     */
    protected Amount computeExtensionAmount()
        throws PriceException {
    }
}
Notice that we have specified computeExtensionAmount() as a protected method. JUnit can test this only if the test case is contained in the same package as the application class.
A key to successful unit testing is to run your test frequently—several times per day for projects under active development and at least once per day for the complete application. The Eclipse workbench includes commands and views that make it easy to achieve this goal.
We already reviewed the composite structure of the JUnit test hierarchy, where a test case contains test methods and a test suite contains either test cases or other test suites. You can run tests at any level of this hierarchy. This makes it easy to select specific tests and run them after every code change. The primary commands used to run tests are as follows:
Run a test case. Right-click on a test case Java class within the Package Explorer view and select Run > JUnit Test.
Run a single test method. While editing a test case class, right-click on a test method in the Outline view and select Run > JUnit Test. This is very helpful while debugging the tests themselves.
Run all tests inside a package, source folder, or project. Right-click on package, folder, or project within the Package Explorer view and select Run > JUnit Test.
Each time you run a different test, it is added to the most recently used list of launch configurations. The Run icon on the main workbench toolbar includes a menu of recent tests (and other non-test programs). You can also simply click the toolbar button to re-run the last test. This is the fastest way to iterate during a test-first programming cycle. The run menu is shown in Figure 10-7.
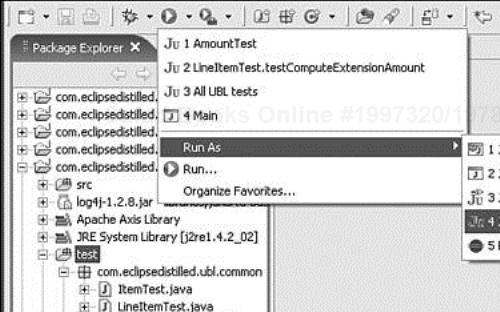
Figure 10-7. Run menu showing the most recent tests. Click the down-arrow beside the Run toolbar icon to get this menu. The Run As submenu can be used to run the current package explorer selection.
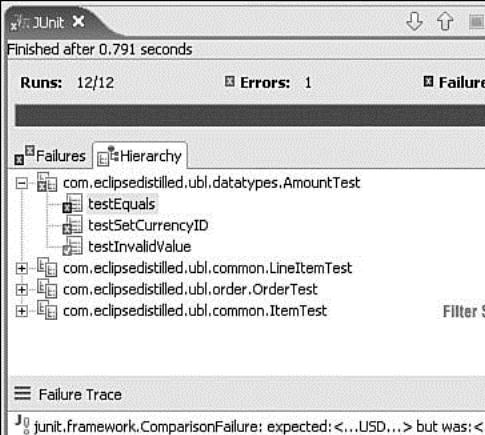
When you run JUnit tests, the results are displayed in a JUnit view. This view is shown automatically in the current perspective whenever you start a test run. Selecting the menu as shown in Figure 10-7 will run all tests within the test source folder and display the results shown in Figure 10-8.
A convenient arrangement for the JUnit view is to dock it as a fast view (see Chapter 4, “Customizing Your Workbench,” for a description of fast views). When you run tests, the view will pop up automatically if there are failures or errors; in any case, the fast view icon shows the test result at a glance. Three alternative icons are shown in Figure 10-9. When all tests are successful, the icon displays a green checkmark. Any failures or errors display a red X. As a reminder to rerun your tests, the view icon is decorated with an asterisk (*) whenever you change the workspace contents after a test run.
Figure 10-9. JUnit view icons: (a) successful, (b) failures, and (c) workspace contents changed since last test run.
Unsuccessful tests fall into two categories:
Our AmountTest test case produces one failure and one error. Double-clicking on a failure trace line causes Eclipse to open the offending Java class file and position the cursor on the test case line where the failure or error occurred. The failure is caused by this assertion:
assertEquals(usd10.toString(), eur10.toString());
When an assertion compares two string values, an additional comparison viewer is available to help diagnose the problem. Press the Compare Results icon to open the window shown in Figure 10-10. More complex comparisons are also possible where more text is displayed and several distinct differences are highlighted. The assertEquals() method also can be invoked with non-string values, but the result comparison view is not available for those failures.
The error in our test case produces this stack trace:
java.lang.IllegalArgumentException
    at com.eclipsedistilled.ubl.codelist.CurrencyCodeContent
        .fromString(CurrencyCodeContent.java:367)
    at com.eclipsedistilled.ubl.datatypes.Amount
        .setCurrencyID(Amount.java:112)
    at com.eclipsedistilled.ubl.datatypes.AmountTest
        .testSetCurrencyID(AmountTest.java:43)
It is caused by this line in our test:
usd10.setCurrencyID("AUS");
A quick investigation shows that AUS is not a valid currency code and that this method throws IllegalArgumentException. Replacing the code with AUD (for Australian Dollar) and rerunning the test eliminates this error.
You can toggle on/off the Filter Stack Trace option in the lower pane of the JUnit view. Many calls listed in the full stack trace are caused by JUnit framework methods or Java reflection methods. Because some methods are not helpful when diagnosing failures, the JUnit view allows you to configure a set of stack trace filter patterns. These patterns are defined on the Java > JUnit preference page. It's helpful to add two additional patterns if you are running Eclipse with the Sun JDK. Press the Add Filter button to add the following two patterns:
sun.reflect.*
junit.framework.TestResult$*
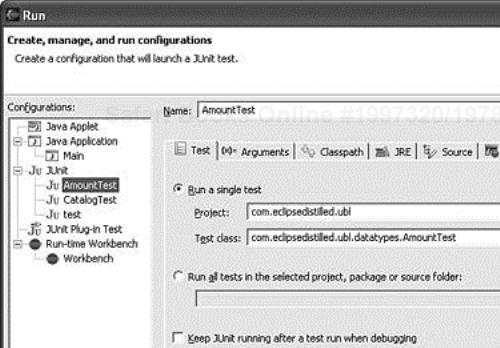
The tests we have run so far were configured by default using the project build path. However, it is sometimes necessary to customize the classpath, command-line parameters, or environment variables used by a test suite. You can even select a different Java runtime environment (JRE) version than the one used by Eclipse. These kinds of customizations may be needed when you import a Java project containing tests that were previously run outside of Eclipse, or when your test environment requires network or database connections.
To specify a custom configuration, select the Run… command under the toolbar submenu shown in Figure 10-7. This configuration dialog, as shown in Figure 10-11, is the same runtime configuration used for launching other applications. JUnit configuration includes an additional tab labeled Test. Here you can change the configuration name that appears on the Run menu, change the Test class that is run, or select a folder containing a set of test classes.
A test suite is a group of related JUnit tests. You can create an explicit Java class that defines which tests are in a suite, but it's often easier to use an Eclipse feature that automatically extracts all tests from a package, source folder, or project. This way, when you add a new test or test case, it is included in the test suite without any additional configuration, and there is no risk of accidentally omitting a new test from your suite. The test results shown in Figure 10-8 were produced by running all tests within the test source folder.
You can create one or more named suites that include specific test case classes. For example, your project may include several packages, where each contains many test cases. While developing part of this project, you might like to run all tests from one package but omit other package tests. This allows very frequent unit testing without taking too much time.
Eclipse includes a test suite wizard that makes suite maintenance very easy. Select the menu File > New > Other > Java > JUnit > JUnit Test Suite to open the wizard. When you pick the test cases from a package in our UBL project, the following test suite is generated. If you open the wizard again while this class is selected, then the lines between the two JUnit comments are replaced with a new selection.
public class AllTests {
    public static Test suite() {
        TestSuite suite = new TestSuite(
                 "Test for com.eclipsedistilled.ubl.common");
        //$JUnit-BEGIN$
        suite.addTestSuite(ItemTest.class);
        suite.addTestSuite(LineItemTest.class);
        //$JUnit-END$
        return suite;
    }
}
To run this suite, select this class and choose the Run > JUnit Test just as you did with other test case classes.
JUnit supports many different unit testing strategies, ranging from test-first processes advocated by agile development to writing unit tests that verify your understanding of third-party APIs.
JUnit tests are contained within a composite structure. You can run an entire suite or any of its parts; the smallest part is one test method.
Two alternatives are recommended for organizing your tests: create a second source folder in your project or create a new project dedicated to testing. For either configuration, write your test cases in the same Java package as the classes being tested so that tests have access to protected and package-protected methods.
The JUnit Test Case wizard accelerates your development by generating class templates with method stubs for the tests to be written.
The JUnit view is displayed automatically whenever any tests fail. It helps you to quickly identify points of failure and to compare expected with actual results.
These contributions are not written as Eclipse plug-ins, but they are very useful libraries for JUnit testing. Each contribution extends the JUnit framework and includes a specialized subclass of junit.framework.TestCase used for writing tests. Because the Eclipse JUnit view and commands work with any subclass of TestCase, these contributions work inside Eclipse without any modification.
HttpUnit. When testing Web applications, you need to bypass the browser and access your site from a program. HttpUnit makes this easy by emulating the relevant portions of browser behavior, including form submission, JavaScript, basic HTTP authentication, cookies, and automatic page redirection. It also allows test code to examine returned pages. See www.httpunit.org.
Cactus. A test framework for server-side Java code (Servlets, EJBs, Tag Libs, Filters). See jakarta.apache.org/cactus/.
DbUnit. A framework for writing tests using data from relational databases. This framework uses XML datasets (collections of data tables) and performs database operations before and after each test to assure that database content is in a known state. See www.dbunit.org.