
Team ownership is an essential part of agile development. All source code is available for contribution by any team member, and frequent, short iterations require that code be committed to the repository for continuous integration and testing. Eclipse supports this practice with generalized APIs for team repositories and a complete implementation of those APIs for the open source Concurrent Versions System (CVS).
This chapter explains how to share your projects using CVS team capabilities built into the workbench. Other repository client implementations are available as Eclipse plug-ins that work in a similar way and share common views for repository synchronization and code comparison; see the section entitled “Contributions” at the end of this chapter.
In this chapter, we'll see how to
Use best practices for successful code sharing with CVS
Add a new repository location and share your projects
Check out projects contributed by other team members
Synchronize changes between your local workspace and the repository
Assign tags and check out versions of a project
CVS is one of the most widely used team repositories and is especially well suited for distributed teams using the Internet for connectivity. It is easy to install on a server for small ad-hoc project teams that need to coordinate their development activities, or on a notebook computer for versioning private work. Because CVS is open source and used by many other open source projects—including Eclipse—many developers are already familiar with its use, and good documentation is available at no cost to you.
Team repositories use a client-server architecture for sharing files and coordinating interaction among users. The client side is built into the Eclipse workbench as plug-ins that provide views and preferences to
Configure one or more repository locations with protocols and user authentication for secure access
Share existing local projects by committing files to the repository
Browse repository contents and check out projects for local use
Synchronize your workspace contents with the repository by retrieving updates from others, committing your changes, and resolving conflicts
Compare the content of a local file with its counterpart in the repository
Review a history of revision dates and notes for each file
These tasks are explained in detail for CVS, although most of the activities are similar when using other repositories. We'll review CVS server installation and best practices before proceeding with sharing our product catalog and UBL component library projects.
A CVS server must be accessible by team members that want to share files. However, server connectivity is required only when committing or updating files, so you can still work successfully on a notebook computer with intermittent network access. Your Eclipse workspace contains a copy of all resources checked out from the repository. See the References at the end of this chapter for Web sites where you can download the CVS server and associated documentation.
CVS servers are most widely deployed on Linux, which is the primary platform used when developing CVS itself (www.cvshome.org). A CVS client is built into Eclipse and runs on any platform where the Eclipse workbench is available. Most organizations use a Linux CVS server for large projects, but a port to the Windows platform, called CVSNT, is gaining popularity. You can also realize significant benefits by installing a CVS or CVSNT server on your personal computer and versioning private, single-developer projects.
CVS installation and secure configuration on Linux is beyond the scope of this book, but see Open Source Development with CVS (Bar & Fogel, 2003) for an excellent guide to its installation and use Ask your administrator for connection information if CVS is already used in your organization. If you are new to CVS and want to follow along with this chapter while working on the Windows or Mac OS X platforms, a brief introduction to installing CVSNT is included here. The client side of CVS included with Eclipse works the same way, regardless of the operating system where the server is running.
CVSNT (www.cvsnt.org) is not officially supported by Eclipse (the Linux release of CVS from www.cvshome.org is supported), but many developers use it and get good results. CVSNT development began as simply a port of CVS 1.10 and then 1.11 to Windows. However, use of “NT” in the name is misleading because CVSNT is now available on Windows, Mac OS X, Solaris, HPUX, and Linux. The description here is based on CVSNT 2.0.51d for Windows.
(As this book was going to press, the Eclipse project announced that CVSNT will officially be supported, beginning with CVSNT version 2.0.58b and Eclipse version 3.1.)
Download and execute the Windows CVSNT setup program to install the server on your computer. It runs as a Windows service and includes an administration utility for starting or stopping the server and configuring its options. As shown in Figure 13-1, you must add a repository location before connecting from Eclipse. The first column is the alias name of the repository as seen by clients. The second column is the actual location of the repository root on the server machine. We chose an alias name that mimics a common convention used for repository locations on Linux servers. The repository root location can be anywhere on your file system; we use C:cvsroot in this configuration.
More detailed CVSNT installation instructions are available at www.cvsnt.org/wiki/InstallationTips.
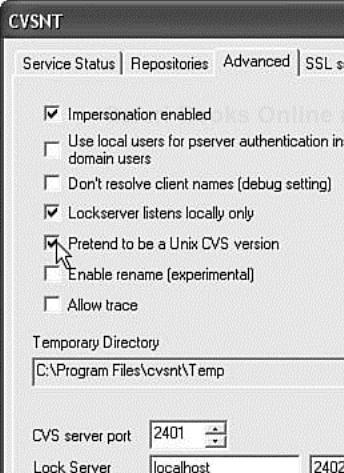
When using CVSNT with Eclipse, you must also check one option on the Advanced tab, as shown in Figure 13-2. The option Pretend to be a Unix CVS version allows Eclipse CVS clients to use repository alias names instead of absolute file path locations.
CVS uses an optimistic model for coordinating work among team members. Any member of the team can make changes to any resource to which he or she has access. Because two team members can commit changes to the same resource, conflicts can occur that must be resolved by the second committer. This system is called optimistic because it is assumed that these conflicts are rare.
The optimistic model works very well for most projects. Conflicts are rare when using good object-oriented design practices because it's unlikely that two developers will modify the same class responsibilities at one time. You will encounter minimal conflicting changes if you follow this workflow while using CVS:
Start fresh. Before starting work, update the resources in your workspace with the latest from the repository.
Run all unit tests. Run the unit tests and be sure that they all pass. If the system is broken when you start, you'll have more difficulty testing your own changes.
Make changes. Add, delete, and edit resources in your local workspace. If necessary, write new unit tests that exercise the new behavior. Debug until the new feature is working successfully.
Run all unit tests again. Run all unit tests again to ensure that none of the changes broke other components that you thought were unrelated.
Synchronize. When you are ready to commit your work, synchronize with the repository. First, examine incoming changes and add them to your local workspace. Resolve conflicts. Rerun unit tests to verify integrity of what you are about to commit. Finally, commit your changes.
Many developers synchronize with the repository several times per day, perhaps only to retrieve changes by others without committing work in progress. By doing so, you detect conflicts early in the cycle, and you can either merge changes with your own or discuss mutually agreeable modifications with the other committer.
The significance of unit testing in this workflow underscores the importance of having an automated test suite and adopting a strategy for continuous testing, as explained in Chapter 10, “Continuous Testing with JUnit.” A key part of successful team development is each member being committed to the quality of the whole project, not just his or her own lines of code. You run all tests for a module—whether or not you wrote the code or the test—before and after making modifications.
When you join an existing team, it's likely that all of the projects you will work on are already in a repository. Add that repository location to your workspace configuration and check out the relevant projects, or check out all of the projects required to perform an integration build when you test your code.
Alternatively, you may have developed a new project in your private workspace and may now be ready to share it with other team members. This is the case with our product catalog and UBL component library projects. In addition, you can share other projects containing JAR libraries and Eclipse configuration files needed by other members.
A CVS repository location is not a live connection to a server, but a description of the repository location and user authentication for establishing a connection. A connection is opened and maintained only as long as required to complete a single command, such as committing files or retrieving a file's status. This is similar to the way a Web browser connects to an HTTP server when retrieving a new page.
Open the CVS Repository Exploring perspective, where you will see the CVS Repositories view, as shown in Figure 13-3. Initially there are no locations available, so add a new one for your team's repository. Right-click within the view and select New > Repository Location… from the context menu.
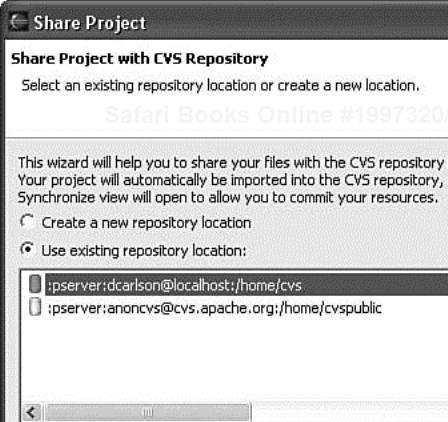
In the Add CVS Repository wizard, shown in Figure 13-4, enter the host, repository path, and user authentication as provided by your CVS server administrator. If you installed a local CVSNT server, then a localhost server will be used. The default pserver connection type is probably correct, unless your team uses another authentication protocol such as SSH.
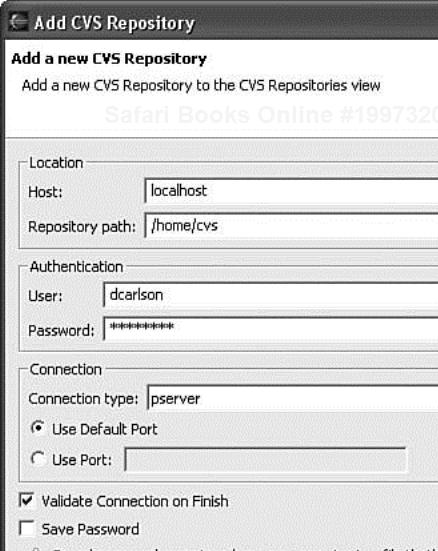
Click Finish to add this repository location, after which you will see it listed in the CVS Repositories view. Right-click on the location and select Properties to change the connection parameters at a later time.
The projects required for your work may be stored at more than one repository location. The primary location is usually managed by your organization to hold your team's work. However, it's becoming common to also work with one or more open source projects that are included as a library or component in your application.
You could download the binary or source file distribution for an open source project, as we did when incorporating Apache Axis into our work in Chapter 6, “Java Project Configuration.” However, if you are working with the latest revision of an active development stream, then it may be preferable to pull that project's code directly from its CVS repository and synchronize your workspace periodically to review and update changes. You can also create and submit patches for bug fixes and enhancements, even if you are not authorized as a committer to that repository location.
You will use an anonymous user name when connecting to most open source project repositories; this gives you read-only access to the repository contents. To connect to the Apache Jakarta CVS repository (see jakarta.apache.org/site/cvsindex.html), use these location parameters:
Host:                cvs.apache.org
Repository path:     /home/cvspublic
User:                anoncvs
Password:            anoncvs
Connection type:     pserver
Our next task is to share the product catalog and UBL component library projects in a CVS repository. Before committing any files to the repository, you should review the file types in each project. Each file stored in CVS is flagged as either ASCII or Binary (the term ASCII is misleading; it applies to any encoding of text files). This is significant because only ASCII files keep track of line-by-line differences in the revision history. In most cases, any file containing text should be configured as ASCII in the repository.
It's best to set the file content types before sharing a project because you can set global preferences by file extension. If you are sharing a Java project that contains only standard Eclipse configuration files and .java source code, then there is nothing to do; these file extensions are already configured properly. However, our UBL project contains other text files with extensions .xsd and .wsdl that are undefined. Undefined files are stored as Binary content and will not support line-by-line comparison or merging of conflict differences. Configure these file extensions as ASCII before sharing the UBL project.
Now we are ready to share the project. Right-click on the com.eclipsedistilled.ubl project in either the Navigator view or the Package Explorer view and select Team > Share Project…. On the first page of the wizard shown in Figure 13-5, select the repository location where this project will be stored. The Apache CVS location is listed in this view, but you would not be allowed to share your project here because you are authenticated for read-only access.
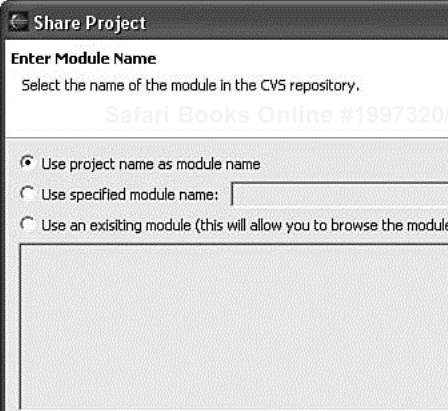
We will use the project name as the CVS module name, but you could enter a different module name in Figure 13-6. The CVS module name appears in the CVS Repositories view when browsing repository contents. It's not necessary for the Eclipse project name to equal the module name, but this is a convenient common practice. This is also a reason for using qualified project names in your workspace (e.g., com.eclipsedistilled.ubl instead of simply ubl), which assures unique and descriptive module names when shared in CVS.
Your final step is to select which project resources are committed to the repository. As shown in Figure 13-7, press the Commit All Changes… toolbar button, or select one or more resources (files or folders) in the left pane and select Commit… from the context menu. If you had chosen an existing repository module when sharing this project, the right pane would be filled with the module's contents, which might duplicate the project contents you are now committing. You could then compare individual files and commit only those that are new.
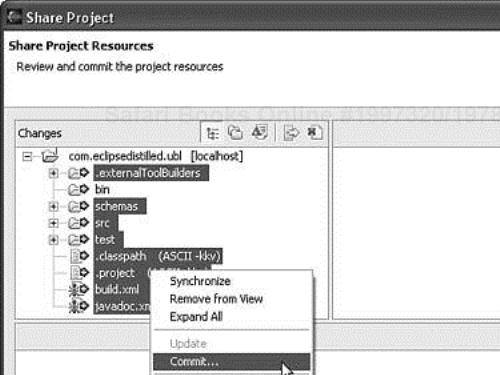
All of the bin folder contents are derived during a project build, so these files are not shared in the repository. When another team member checks out this project, it is built automatically and the bin folder is filled. Instead of omitting this folder each time you share or synchronize a project, it is easier to instruct CVS to ignore specified files or folders in your projects. You must make this selection before those files are committed to the repository. Select the bin folder in a project and choose Team > Add to .cvsignore… from the context menu. You can choose this command while sharing resources in Figure 13-7 or from the Navigator or Package Explorer views. The resulting dialog is shown in Figure 13-8.
When you click OK, a file named .cvsignore is added to the parent folder containing this resource. It is a simple text file, with each line containing the name or pattern of ignored resources in that folder. If you need to ignore resources in other folders, even if those resources have the same name and are in subfolders, each folder must contain its own .cvsignore file. You can easily edit the .cvsignore file from the Navigator view and add, remove, or modify ignored resources.
Alternatively, you can instruct CVS to ignore all resources fitting a specified pattern (e.g., “bin” or “*.log”) in the entire workspace by adding these patterns to the Team > Ignored Resources preferences page. The downside of this approach is that you cannot instruct CVS to not ignore a pattern in a special case. For example, you may have a library project where the bin folder contains binary files that you do want to save in the repository.
It's helpful to include project configuration files such as .project, .classpath, and .cvsignore when committing Eclipse projects to the repository. By following this approach, new team members check out projects that build successfully in Eclipse without additional configuration. Those new team members are productive in a short time, even when new to Eclipse and before reading Chapter 6 of this book.
You can also export and share Eclipse preferences and other configuration files that span the entire workspace. In the section of Chapter 6 entitled “Create Shared User Libraries,” we created a user library that groups together several Apache Axis JAR libraries for quick configuration and reference. To share this definition with other team members, create a new simple project in your workspace (it does not need to be a Java project) named eclipse-config. Then export the user library definitions into a file named EclipseDistilled.userlibraries and save that file in the new project. This project appears as in Figure 13-9.

Share eclipse-config to the CVS repository as a new module and notify other team members to check it out along with the Java projects. They can then import the user library definitions from this file.
One more dependency is required before others can build our projects. The Apache Axis libraries and the Jakarta log4j library are located in a separate project named libraries. In Chapter 6, we created the following file structure and added a new simple project linked to the libraries folder:
/eclipse-contrib/
    libraries/
        axis-1.2beta/
        j2ee/
        jarkata-basic/
        jakarta-j2ee/
We'll share the libraries project to CVS in the same way as the other projects. Other team members simply check out this project into a linked folder at /eclipse-contrib/libraries. Any projects that use a relative build path to JAR files in the libraries folder, as we did when referring to log4j-1.2.8.jar in the com.eclipsedistilled.catalog project, will be intact in others' workspaces.
It becomes increasingly difficult to get new team members started when the number of projects in your workspace grows. In addition, large repositories may contain dozens or hundreds of modules, and it's difficult for others to find the projects necessary to fulfill all dependencies. This problem is resolved by using a team project set.
Select File > Export… > Team Project Set from the workbench menu. In the resulting wizard dialog, choose the projects from your workspace that are part of a team project set and save the project set definition to a file named, by default, projectSet.psf. Save this file into the eclipse-config project created in the previous section and commit it to CVS. Other team members simply check out the eclipse-config project and use the project set file to import all other project dependencies in a single step, using the menu File > Import… > Team Project Set.
When you share a project with CVS, additional subfolders and files are added to contain metadata used by CVS operations. These metadata files are not unique to Eclipse; they are also used by other CVS client tools, including the command-line CVS programs available from www.cvshome.org. If you perform CVS operations from the command line or from an Ant build file, the metadata file changes will be recognized the next time you synchronize with the repository in Eclipse. Similarly, if you perform CVS operations in Eclipse, the metadata changes will be recognized when using the command-line tool at a later time.
Eclipse views are designed to hide these CVS metadata, so you will not see the files from the Package Explorer or the Navigator. However, you will see the metadata when viewing files from your operating system. As shown in Figure 13-10, a folder named CVS is added within each folder committed to the CVS repository.
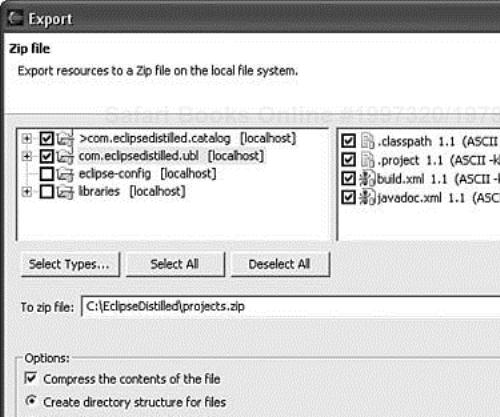
These CVS metadata folders can be a problem if you want to create a ZIP or JAR archive from shared project files. For example, you may want to create a ZIP file of your project source files to share with developers who do not have access to your repository or a JAR file of your bin folder contents. Eclipse includes an export wizard that filters out CVS metadata while creating archives.
Select File > Export… from the workbench menu and then select Zip file,JAR file , or File system. The export wizard displays the page shown in Figure 13-11, and the resulting ZIP file will not include the CVS metadata files.
After you have shared all necessary projects, libraries, and configuration files to a version control repository, other team members can check these out to review, contribute, and test the application. When checking out a module from CVS, you copy all files from a selected branch into a corresponding project in your Eclipse workspace. Eclipse creates the necessary CVS metadata in your project to remember the repository location, branch, and dates used to synchronize changes back to the server.
It's best to work through the remainder of this chapter with another team member. However, you can also use two separate workspaces on your computer that represent two independent views of the repository state. In the following examples, the first user name is dcarlson, and the second user name is mrichards. CVS keeps track of each revision made by these two users. After mrichards checks out the files shared originally by dcarlson, we'll synchronize independent changes made by each user.
The second user named mrichards should create a new Eclipse workspace following the directions in Chapters 2 and 3. Start the Eclipse workbench with that workspace, add a repository location, and use the CVS import wizard to populate the projects.
Add a repository location in the CVS perspective, as in the previous section entitled “Adding a Repository Location,” except the user name is
mrichardsinstead ofdcarlson.Select File > Import… from the workbench menu and pick Checkout Projects from CVS as the import source. The first page of the checkout wizard is shown in Figure 13-12. Choose or create the repository location where your team project is stored.
The next checkout wizard page shown in Figure 13-13 prompts you to select the module to be checked out from CVS. It's usually best to browse the repository modules for your choice, although another member of your team may have provided the exact module name, in which case the first option can be used.
Check out the module as a new project in your workspace having the same name as in CVS, as shown in Figure 13-14. You could specify a project name that is different from the corresponding CVS module, but it's usually best to keep these names the same.
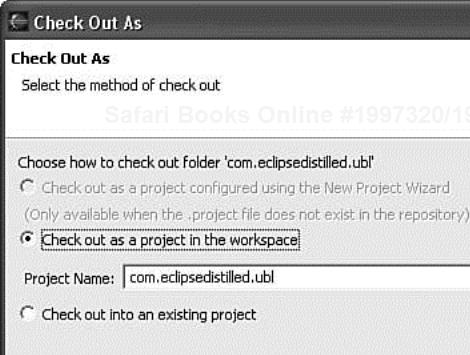
We included the .project file when sharing the projects with CVS. This file contains Eclipse metadata about the project nature (e.g., Java) and configuration details required to build its output. When the project is checked out, the .project file is also retrieved and used to create an identical configuration.
If you check out CVS modules that were not created by Eclipse, or where the .project file was not checked in, then the first option in Figure 13-14 can be used to invoke the New Project Wizard, where you specify the kind of project that will contain these files. You can also use the third option to check out the files into a folder of an existing project in your workspace.
Select the project location on your computer, as shown in Figure 13-15. The default location is within the workspace folder, although you can assign a different path outside of the workspace. A similar option exists whenever you create a new project.
Sometimes you want to check out a module representing a particular released version or as of a certain date. Versions in CVS are tagged with a label that captures a snapshot on the tag date. However, most of the time you want the latest revision of each file; this is called the HEAD tag in CVS.
Choose the HEAD tag in Figure 13-16 to get the latest revision of each file in our project.
Click Finish to create a new project and check out the files.
There is an alternative approach to selecting which project and version you want to check out from CVS. Expand the HEAD tag for a repository location in the CVS Repositories view, right-click on a module, and choose Check Out As… from the menu, as shown in Figure 13-17. This opens the wizard directly to Figure 13-14, and the process continues the same from there. Using the Check Out command is even simpler; it immediately checks out the HEAD tag of the selected CVS module into a project with the same name.
Figure 13-17. An alternative approach to checking out a project from CVS. Use Check Out or Check Out As… commands from the context menu in CVS Repositories.
You will now see com.eclipsedistilled.ubl as the only project in your workspace. Because the .project file was included in the files retrieved from the repository, Eclipse will try to build this Java project immediately after checkout is complete. However, you will see errors listed in the Problems view that are caused by missing dependencies. This project requires the log4j JAR library and the Apache Axis user-defined library in its build path.
We shared the libraries project in CVS; check it out to get the complete set of third-party JAR files used by your team. As described in Chapter 6, we also downloaded source code and Javadoc files for each of these libraries, so this project contains everything needed to gain maximum benefit from Eclipse navigation and Content Assist features. When new versions of these third-party libraries are released, one team member downloads and commits the changes to CVS, and all others synchronize their libraries project to receive updates.
If you want to use these JAR libraries in several Eclipse workspaces, then it's helpful to assign the project path to a physical location that is outside of the workspace. We set up our original project this way in Chapter 6, where the libraries project is located at C:eclipse-contriblibraries. You also have the option of setting a different location when creating a new project while checking out a CVS module. In Figure 13-15, uncheck the default option and enter C:eclipse-contriblibraries.
If you've already checked out the libraries project for one workspace and now want to reuse it in a second workspace, don't import it from CVS; instead, import the existing project on your computer. Use the workbench menu File > Import… > Existing Project into Workspace. One project is now shared by two workspaces.
Finally, check out the eclipse-config project from CVS. This project contains the EclipseDistilled.userlibraries file used to define the Apache Axis user library. After retrieving it from CVS, use the Java > Build Path > User Libraries preference page to import the user library definition into your workspace.
One additional configuration issue may arise if you've made a different choice for the libraries project location. As explained in the “Create Shared User Libraries” section of Chapter 6, a user library definition uses absolute file paths for the JARs contained in it. If your JAR file locations are different from the team member who defined the user library, you'll need to edit the EclipseDistilled.userlibraries file to modify the paths for your computer.
After completing these steps, the com.eclipsedistilled.ubl project has all the required dependencies and will build successfully. You may need to clean the project's output in the workspace to force it to rebuild after finishing the user library configuration—select Project > Clean… from the workbench menu. If you knew these dependencies in advance, you could have imported the libraries and eclipse-config projects before importing the UBL project. Or better yet, you could use a team project set as explained in the “Team Project Sets” section earlier in this chapter.
The primary reason for using a source control repository is to share and coordinate the simultaneous work of several developers. As explained in the “CVS Workflow” section earlier in this chapter, CVS uses an optimistic model for coordinating work. Synchronization is the combined activities of updating, committing, and resolving conflicts between your workspace and the repository. A basic workflow was described for using CVS successfully while minimizing conflicts. The commands built into Eclipse support this workflow and many other variations that might be required for large, complex projects.
These synchronization capabilities are based on CVS client commands, but their realization in a graphical interface that maximizes developer productivity is an especially strong feature of the Eclipse IDE. We'll work through one set of tasks where mrichards will synchronize her workspace to update changes committed by dcarlson and then will resolve one conflicting change before committing her other work.
First, let's take a look at mrichard's workspace, shown in Figure 13-18. Eclipse includes a general capability for adding label decorations to resources in several of its views. The CVS decorations give you information about synchronization status at a glance while working. However, they do not show you the status of repository updates made by others.
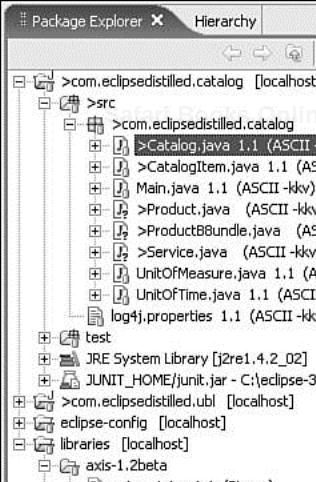
The CVS decoration icons and labels are summarized as follows:
Repository host name. Each project is suffixed with the repository host name where it is shared. The suffix “[localhost]” is shown here.
Files not shared. Files that are not shared with the repository (typically new files created and not yet committed) are shown with a “?” overlaid on the file icon. The catalog project contains three such files. Files that are shared have a cylinder-shaped decorator icon.
Files changed locally. Files that have been modified since they were last checked out (sometimes referred to as “dirty”) are prefixed with “>”. To make changes obvious when packages are collapsed, all containing packages, folders, and projects are also prefixed. Two files were modified in this project, in addition to the three new files.
Revision number. The CVS revision number is appended to each file name.
ASCII vs. Binary. Each file stored in CVS is flagged as either ASCII or Binary (the term ASCII is misleading; it applies to any encoding of text files). This is significant because only ASCII files keep track of line-by-line differences in the revision history.
You can turn these label decorations on or off using the CVS checkbox on the Workbench > Label Decorations preference page. You can also customize the CVS decorations on the Team > CVS > Label Decorations preferences page. For example, you can remove the revision number or the ASCII/Binary keyword suffix to reduce clutter in the labels.
We've now determined that local changes were made that must be committed to the repository. What we don't know yet is whether other developers have changed files in this project, possibly in conflict with changes made by mrichards. Open the context menu for the com.eclipsedistilled.catalog project, and you'll see three commands in the submenu under Team:
Synchronize with Repository…. Open the Team Synchronizing perspective with this selection.
Commit…. Commit the changed files in this selection to the repository. This command will fail if another developer has committed a conflicting change.
Update…. Receive updates to files in this selection. If you also changed one of the updated files, CVS will automatically merge the changes.
Using these Commit and Update commands can yield unexpected results when conflicting changes exist in the repository. It's generally better to use the Synchronize with Repository command and review all incoming and outgoing changes. An alternative approach is to open the Team Synchronizing perspective from the workbench toolbar and specifically select the resources to be synchronized.
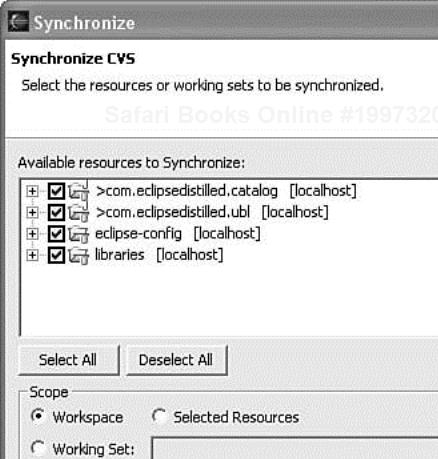
While in the Team Synchronizing perspective, you will find a synchronize command button on both the workbench toolbar and the Synchronize view toolbar. The drop-down list on the toolbar button contains a Synchronize… command that opens a dialog shown in Figure 13-19. Select the resources that you want to be included in the Synchronize view. In this example, we selected the Workspace scope that includes all projects. Press Finish to refresh the view with this selection.
The Team Synchronizing perspective is shown in Figure 13-20. If any resources within the selected scope contain incoming or outgoing changes, then they are displayed in the Synchronize view. A benefit of using the workspace scope is that this view is refreshed automatically to show all shared files in your local workspace that have changed. To synchronize your workspace at any future time, switch to the Team Synchronizing perspective and review pending commits. Press the Synchronize toolbar button to refresh all remote changes coming from the repository, or select Synchronize from the context menu of one project to refresh only those remote changes.
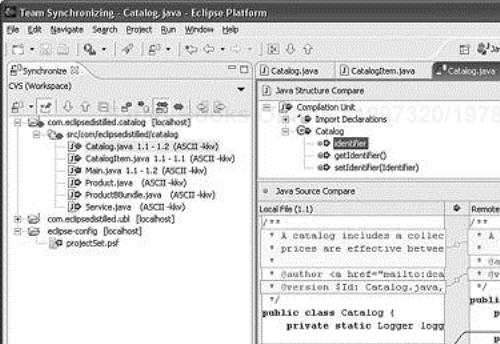
Figure 13-20. Team Synchronizing perspective showing incoming and outgoing changes, plus a Compare Editor for one file with conflicts.
For large projects, the number of incoming and outgoing files can become very large. Use the Synchronize view toolbar buttons to switch between four modes that filter displayed resources:
Incoming. Changes in the repository that you have not yet updated to your workspace.
Outgoing. Changes in your workspace that you are committing to the repository.
Incoming/Outgoing. Show incoming and outgoing changes.
Conflict. Both you and the repository have modifications to the same resource. Conflicts are displayed in all four modes, but this mode displays only conflicts.
Let's zoom in on part of the Synchronize view to analyze the icons that display repository status, shown in Figure 13-21. We are reviewing both incoming and outgoing changes. There is one conflicting change on the Catalog.java class; this is shown with a red, double-headed arrow icon. When a conflict occurs, the red conflict icon is propagated up to all containing folders and project. If the project folder is collapsed, you can still see at a glance that one or more of its resources contain a conflict.

This project contains three new files that must be added to the repository; these are indicated by an arrow icon pointing from left to right and annotated with a “+” symbol. If a file had been deleted, there would be a “-” symbol on the arrow, meaning that it will be removed from the repository. In addition to the conflict, which is both incoming and outgoing, the Main.java file is an incoming change from the repository, indicated by an arrow pointing from right to left, and CatalogItem.java is an outgoing change.
The preferred workflow is as follows: first, examine incoming changes and add them to your local workspace. Then resolve conflicts. Next, rerun unit tests to verify the integrity of what you are about to commit. Finally, commit your changes.
The context menu on selected resources in the Synchronize view contains these commands:
Update. All selected incoming and automergable conflicting changes are processed by updating local files with repository content. Conflicts that are not automergable will not be updated.
Override and Update. This command operates on conflicts by replacing the local resources with the remote contents. Use this command with caution—use it only on conflicts where you want to throw away your local changes.
Commit…. All selected outgoing files with no conflicts are committed to the repository.
Override and Commit…. This command operates on conflicts by replacing the remote repository resources with the local contents. Use this command with caution—use it only on conflicts where you want to ignore changes made in the repository by another developer.
When files are processed successfully by these commands, they are removed from the view. Files remaining will need manual attention. It is important to understand the difference between three kinds of incoming changes:
A non-conflicting change occurs when a file has been changed remotely but has not been modified locally.
An automergable conflicting change occurs when an ASCII file has been changed both remotely and locally (i.e., it has non-committed local changes) but the changes are on different lines.
A non-automergable conflicting change occurs when one or more of the same lines of an ASCII file or any part of a binary file has been changed both remotely and locally (binary files are never automergable).
When you select Team > Update on resources in the Navigator or Package Explorer views, the contents of the local resources will be updated with incoming changes of all of these three types. For non-conflicting and automergable conflicts, no additional action is required (for automergable conflicts, the changed local resource is moved to a file prefixed with “.#” just in case the automerge wasn't what the user wanted). However, for non-automergable conflicts, the conflicts are either merged into the local resource using special CVS specific markup text (for ASCII files), or the changed local resource is moved to a file prefixed with “.#” (for binary files). This matches the CVS command-line behavior but can be problematic when combined with the Eclipse auto-build mechanism. Also, it is often desirable to know what incoming changes there are before updating any local resources.
For all of these reasons, it's best to use the Team Synchronizing perspective for all repository updates. Running the Update command from the Synchronize view will never apply the CVS automerge operation to overlapping conflicts.
Resolve non-automergable conflicts by merging the remote differences into your local file manually, as follows:
Open a Compare Editor by double-clicking on the conflicted resource or selecting Open in Compare Editor from the context menu. The local workspace file is shown on the left, and the repository file is shown on the right. Examine the differences between the two.
In the text area of the editor, copy changes from the repository revision of the file to the local copy of the file. Select a change and use the toolbar button to Copy Current Change from Right to Left, or edit the local file manually by cutting and pasting content from the remote file.
Save the merged local file by selecting Save from the context menu in the left pane.
After you have merged all desired changes from the remote file into the local file, choose Mark as Merged from the context menu on this file in the Synchronize view. This will mark the local file as having been updated and will allow your changes to be committed.
In our Catalog.java class, the only conflict is in the class comment text, indicated by a red box around these changes in the Compare Editor. Merge these comments following the previous steps and then commit the file to CVS.
Before deciding whether to accept changes from the repository, you may want to review the date, author, and comments about those changes. Select a file in the Synchronize view and select Show in Resource History from the context menu. The CVS Resource History view, shown in Figure 13-22, is opened or refreshed with the selected file. The row starting with a “*” indicates the file revision in your workspace. Here you can see that the class comments were modified and a new property was added. You can enable the Link with Editor toolbar button to have the history displayed automatically for the current editor. This allows a quick review of comments while browsing repository updates.
For more detail on CVS synchronization, search the Eclipse online help for the topic “Synchronizing with the repository.”
CVS can substitute some keyword patterns in your files, allowing you to keep revision information automatically up-to-date in your files. These keyword patterns are surrounded by dollar signs in your files. For example
/**
 * @version $Id$
 */
in a Java file comment expands to the revision identification from CVS:
/**
 * @version $Id: Catalog.java,v 1.1 2004/09/02 02:12:21 dcarlson Exp $
*/
CVS substitutes this keyword automatically whenever a new revision is committed to the repository. For a detailed explanation of CVS keyword substitution, and especially the alternative kinds of substitution, see page 291 of Open Source Development with CVS (Bar & Fogel, 2003).
It's often helpful to assign a version to a project or set of related projects at the end of each development iteration and on the release date. This allows anyone to check out the correct revision for each file corresponding to a particular version milestone. They can then rebuild the entire system in that state. In CVS, each file has a revision number that is incremented independently of other files, so you cannot use those numbers as the basis for checking out milestone versions.
A CVS version is marked by a tag assigned to all related files on a particular date. A tag assigns a label to the collection of revisions represented by the files in one developer's workspace. Those files should be completely up-to-date with repository changes so that the tag name is attached to the latest tested revisions.
Creating a CVS version does not freeze the tagged files or otherwise prevent you from committing and updating those files in the HEAD stream of the CVS module. In CVS, you can assign any number of version tags to files in the HEAD stream of a module to help you identify related sets of files at project milestone dates.
CVS has strict rules about what constitutes a valid tag name. The rules are that it must start with a letter and contain letters, digits, hyphens (“-”), and underscores (“_”). No spaces, periods, colons, commas, or any other symbols may be used.
Version a project by following these steps:
Select one or more projects from the Navigator or Package Explorer view in your workspace.
Select Team > Tag as Version… from the context menu.
When the Tag Resources dialog opens, enter the version name, e.g., “Iteration_2004-06-30”.
Select the CVS Repositories view in the CVS perspective. Expand Versions and then one of the projects just versioned. Observe that there is now a version of this project named “Iteration_2004-06-30”.
Checking out a project version is the same as explained previously, except that now we choose a version tag instead of HEAD—the HEAD label is a special tag in CVS representing the “trunk” of a (possibly) branched revision tree.
To check out a version, start out with an empty workspace and use the file import wizard as before, but expand the Versions node in Figure 13-16 and select the version you want to check out. Alternatively, expand the Versions in the CVS Repositories view, shown in Figure 13-17, and select a project listed under the desired version. In most cases you'll want to check out all of the projects listed under that version in the repository to get a consistent configuration.
When you check out files representing a version, you cannot commit changes back to the HEAD stream. This is because other changes may have been made after the version tag was assigned. Instead, you must create a branch for changes to a version, or you must work with files checked out from the HEAD stream. If you do modify a file checked out from a version and attempt to commit it without creating a branch, you will receive a general CVS error message. Unfortunately, Eclipse does not return a message explaining why this is not allowed, and it does not prevent you from attempting the commit action.
Creating and working with a branch is similar to working with versions, except that changes committed to a branch remain independent of the HEAD (i.e., the “trunk”) until they are merged back in. In fact, the HEAD is a special kind of main branch, and branches can split off of other branches at multiple levels.
Why would you want to use branches? Creating a branch and committing resources to that branch is useful in situations where you want to isolate a set of changes, but you still want to manage and share those changes in the source control repository. For example
Adding bug-fix changes to an old product version while the next release is under active development in the HEAD. Later, these bug fixes may need to be merged back in to the next release. This way you don't need to make duplicate changes in both the HEAD and bug-fix branch.
You may need to prototype a significant design change in a branch but only merge it back into the HEAD if the redesign is successful.
If we wanted to prototype the use of JAXB specifications instead of Apache Axis (which implements JAX-RPC) for generating Java classes from UBL schemas, we can create a branch as shown in Figure 13-23. Open this dialog by selecting all affected projects in your workspace and picking Team > Branch… from the context menu. When creating a branch, you must specify an existing version tag or create a new version at the same time. A branch always starts from a version tag in the repository.
Other developers can check out a branch from the repository in the same way they check out a version. Figures 13-16 and 13-17 contain a list of Branches immediately above the list of Versions. Changes made to files checked out from a branch are committed back to that branch in CVS, not to the HEAD.
You should consult other CVS documentation and user guides if you need to work with CVS branches. In particular, it's important to have a deeper understanding of best practices for branching and merging to be prepared for complexities that may arise. A good introduction to CVS branching in Eclipse is available online: “Branching with Eclipse and CVS” (Glezen, 2003).
A patch is a plain text file that contains differences between project files and the last revision checked out from the repository. These differences are not complete files (except in the case of new files), but only incremental add or delete notations for lines modified in the files. Patch files are not unique to Eclipse; they are available in most CVS clients and servers. However, the workbench support in Eclipse makes patches very easy to create and apply.
Patches allow developers to share work without storing it in a repository. This is helpful when you want to contribute to a project that is shared through a repository but do not have write access to the repository. You may have privileges for writing to the repository but don't have access while traveling. In this situation, you can create a patch and either email it to a developer who does have write access or attach it to a bug in the bug reporting system, depending on the process defined by the project. A developer who does have write access can then apply the patch to the project and commit the changes.
To create a patch, select the resource that contains modifications and choose Team > Create Patch…. The dialog shown in Figure 13-24 is opened, where you choose how to save the patch and, on the next page, whether to recurse into subfolders or to include new files in the patch.
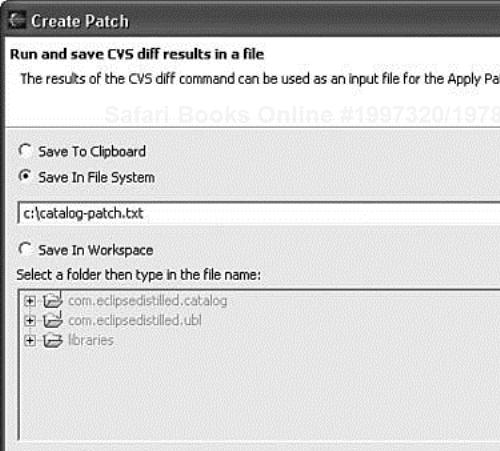
Although you can create a patch from any folder or individual file, it is easiest to select the project itself because the patch must be applied to the same resource from which it is generated. The patch should also be applied to the same file revisions that it is generated on, so steps should be taken to ensure that the patch is applied to the same resource line-up (the easiest way to do this is to create the patch on top of a version).
To apply a patch, select the resource from which the patch was generated and choose Team > Apply Patch…. The Resource Patcher wizard will open and indicate whether the patch can be successfully applied to files in your workspace. You can then choose which patches you want to apply by checking or unchecking them in the wizard. For more details on how patches are applied to files and ways to correct problems, search the Eclipse online help for “Working with patches.”
Eclipse includes a generic team API for supporting the client side of source control repositories. A complete CVS client is included, and other vendors have written Eclipse plug-ins for their repositories.
CVS uses an optimistic model for coordinating work among team members. This works best when following a workflow where you stay current with CVS updates and synchronize frequently to resolve conflicts as they occur.
Add CVS repository locations and browse available modules using the CVS Repository Exploring perspective.
When you share projects, include the configuration files, such as
.projectand.classpath,so that other team members check out a complete Eclipse project definition.Also share third-party libraries and global workspace preference settings in CVS so that new team members can check out all required dependencies.
Synchronization is the combined activity of updating, committing, and resolving conflicts between your workspace and the repository. The Team Synchronizing perspective is provided to support all of these activities.
The Compare Editor allows you to review all incoming and outgoing changes and is essential for merging conflicts.
A project version is created by assigning a CVS version tag to a set of files in the repository. You can later check out all related files having the same tag.
Creating a branch tag is similar to creating a version, with the added capability of merging changes from the branch back into the main HEAD (i.e., the “trunk”) at a later time.
Use CVS patches to exchange project differences with others when the CVS server is not available or when you do not have commit privileges.