
Chapter 5. Unit Testing with JUnit
JUnit is a regression testing framework written by Kent Beck and Erich Gamma. Since Erich is the project leader for Eclipse’s Java toolkit, it’s only natural that JUnit is well integrated into the IDE.
A Simple Factorial Demo
To try out unit testing in Eclipse, first create a project called Factorial containing a class called Factorial. Inside that class, create a factorial() method as follows:
public classFactorial {public static doublefactorial(intx) {if(x == 0)return1.0;returnx + factorial(x - 1); } }
Creating Test Cases
To test this class, you’ll need to create a test case for it. A test case is a class that extends the JUnit TestCase class and contains test methods that exercise your code. To create a test case, right-click on Factorial.java in the Package Explorer and select New →
JUnit Test Case.
A dialog window will come up with the name of the test case (FactorialTest) already filled in, along with the name of the class being tested. Click Next to show the Test Methods dialog, select the factorial(int) method, and click Finish to generate the test case. Eclipse will then generate some code for you, similar to the following:
public classFactorialTestextendsTestCase {public voidtestFactorial() { } }
Now, all you need to do is supply the contents of the testFactorial() method. JUnit provides a number of static methods that you call in your tests to make assertions about your program’s behavior. See Table 5 for a list.
To test the factorial() method, call the method with a few sample values and make sure it returns the right results. Now, insert a blank line and press Ctrl+Space (this brings up the
code assist feature, which is discussed in Part VI); you will discover that JUnit supplies a version of assertEquals() that takes three arguments. The first two are the values to compare, the last is a “fuzz factor;” assertEquals() will fail if the difference between the supplied values is greater than the fuzz factor. Supply the value you expect the method to return as the first parameter; use the method call itself as the second. For example,
	public void testFactorial() {
		assertEquals(1.0,
			Factorial.factorial(0), 0.0);
		assertEquals(1.0,
			Factorial.factorial(1), 0.0);
		assertEquals(120.0,
			Factorial.factorial(5), 0.0);
	}
Feel free to insert a few more assertions in this method or add additional test methods.
You can also override the setUp() and tearDown() methods, respectively, to create and destroy any resources needed by each test, such as a network connection or file handle.
Running Tests
To run the test case, right-click on FactorialTest.java and select Run As → JUnit Test. The JUnit view appears, and your tests are off and running. In this case, a red progress bar and a special icon next to the view title indicate that something went wrong (see Figure 22).
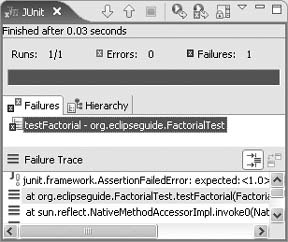
If you double-click on the test class or method name in the Failures list, Eclipse will open that test in the editor. Double-click on a line in the Failure Trace to go to a specific line number.
Tip
The best practice if a test fails is to set a breakpoint on the failing line and then use the debugger to diagnose the problem. Just select Debug instead of Run to run the debugger.
When you examine the test, you can see that the factorial function is not being calculated correctly, due to an error in the formula. To correct the error, replace the + with a *:
return x * factorial(x - 1);Now, rerun your tests (Ctrl+F11). You shouldn’t see any failures; instead, you should see a green bar, indicating success.
Test First
Having a good suite of tests is important—so important, that many developers advocate writing the tests for new code before a single line of the code itself! This is called test driven development, or TDD for short. Such tests represent the requirements that your code must satisfy in order to be considered correct.
To see how Eclipse makes TDD simple, keep the unit test you just created, but delete the Factorial.java file (select it in the Package Explorer and press Delete). The editor for the FactorialTest class will shown an error immediately because the Factorial class is not defined anymore. This simulates the state you would be in if you had written your test class first.
Put the text cursor on the first line that has an error and press Ctrl+1 (Edit → Quick Fix). Select the “Create class ‘Factorial’” option and press Enter. When the New Java Class dialog appears, press Enter to accept the defaults.
Now, go back to the FactorialTest editor and note that the compiler complains that there is no factorial(int) method. Press Ctrl+1 to create one.
Unfortunately, the current version of Eclipse is not always smart enough to figure out the right return type, so you may need to change the generated return type to be a double. Use a dummy return value (0.0) for now. At this point, Factorial.java should look something like this:
public static doublefactorial(inti) {return0.0; }
Tip
Of course, this is not the right way to calculate a factorial, but all you want to do at this point is get the program to compile again.
Now you have a test case, a little bit of code, and no errors—so try running the tests. Unsurprisingly, they fail. At this point in actual TDD, you would go back to the code being tested and fix it so that it passes the tests, then add another test, make that work, and repeat the process until done.
Compare this technique with what most people typically do. They write a bunch of code first, then write a trivial little test program to exercise that code (maybe something with a main() method and a few println() statements). Once that test is working, they throw the test away and assume their class will never break again.
Don’t ever throw tests away! Nurture them, slowly add to them, and run them often, preferably as part of an automated build and test system. Techniques even exist to create unit tests for user interfaces.
Tip
When you get a bug report from your users, your first impulse may be to fix the bug. Instead, stop and write a unit test that fails because of the bug. Then, change the code so the test works. This ensures your fix actually solves the problem and helps improve your tests over time.
The JUnit view is covered in more detail in Part VII. If you want to learn more about unit testing best practices, see:
- http://www.junit.org
JUnit home page
- http://www.testdriven.com
Resource for test driven development