
Chapter 29. Package Your Programs as Gems
Once you get past the occasional pet project or the odd bit of experimental programming, there are really only two kinds of software projects: those that ship and those that no one cares about. Shipping software, whether to paying customers or to a grateful open source community, is the ultimate goal of virtually every programmer.
In this chapter we will look at Ruby gems, the Ruby solution to packaging up your masterpiece so that it not only goes out the door, but also arrives on your user’s system with all the fragile bits intact. We’ll start with a brief look at how gems work from the point of view of a user. From there we will dive right into the details of building your own gem. We will also look at some of the things you can do to ensure that your gem actually does arrive intact. Finally, we’ll look at some recursively useful gems whose purpose in life is to help you package up your own code as a gem.
Consuming Gems
If you’ve been programming in Ruby for any length of time then chances are that you are already familiar with being a gem consumer. Not that there is much to it; I am, for example, a very happy user of the ruby-mp3info gem, a wonderful chunk of code that lets you read and write the informational tags hidden inside MP3 files:
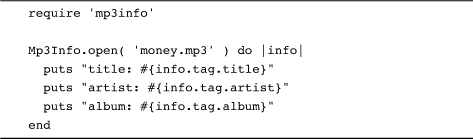
As a gem, ruby-mp3info is fairly typical. To use it, first you need to install it:
gem install ruby-mp3info
Depending on your operating system and exactly how your Ruby is installed, you may need special permissions to do the install. On various Unix and Linux systems as well as on OS X, you can do this by running gem with sudo:
$sudo gem install ruby-mp3info
Once you get the gem installed, you can use the code it supplies just like any other bit of Ruby.1
Gem Versions
A really useful feature of the gem system is its complete versioning support. Every gem is tagged with a version number and, since coders are forever fixing bugs and adding features, most gems exist in multiple versions. You can see what versions are available for any given gem with the gem list command, so that if you run:2
gem list -a --remote ruby-mp3info
You will discover that there have been lots of versions of the ruby-mp3info gem:

When you install a gem, you will get the latest version unless you ask for something earlier. Thus, if for some reason you needed the very first version of ruby-mp3info, you can ask for it with the --version option:
gem install --version 0.4 ruby-mp3info
Keep in mind that RubyGems is perfectly happy having multiple versions of the same gem installed on your system. There is, for example, no problem with pulling down several more versions of ruby-mp3info:

If you do have more than one version of a gem installed, the default when you ask for the gem in your code is the latest version. Thus, since 0.6.13 is the latest version of ruby-mp3info I have on my machine, this is the version I’ll get with a simple require 'mp3info'. If your code depends on a specific gem version, you can ask for it with the gem method:
![]()
The version number argument on the gem method even supports more general expressions like '>0.4' or '<=0.5' so that you don’t have to be quite so explicit with your version numbers.
The Nuts and Bolts of Gems
The technology behind RubyGems is pretty simple: The gem developer (the folks behind ruby-mp3info, for example) package up their work into a single file, a standardized archive containing not only the code but also lots of useful metadata, like the gem version number and the other gems on which this gem depends. Once the code is packed tidily into its gem file, the developer uploads it to a well-known repository, which is where gem install will find it.
Considering the immense amount of good it does by making code widely available and preventing most cases of VCIS,3 the gem file is actually a simple and familiar thing. Well, familiar if you happen to be a Unix user. It turns out that the gem file is just a TAR file.4 Open a gem file with your favorite archive tool—virtually all of them can handle TAR files—and you will discover that inside each gem is two more TAR files!5 Presumably this Russian doll, TARs within a TAR, organization makes it easier for the gem software to do its thing.
Inside the first inner TAR file is where you will finally find the real contents of the gem, including the README file, all of the Ruby source files, as well as any executables—the stuff that really makes the gem go. Inside the second inner TAR file is the metadata—all of that version, authorship, and dependency information that makes a gem more than just a pile of random software.
When you install a gem, Ruby will unpack it to a well-known directory, and from then on Ruby will ensure that the directory containing the code for that gem is searched when you do a require or a load. Although there are endless details (What if I have more than one version of the gem? What if the gem has more than one directory full of code?), that is the simple story behind gems.
Building a Gem
For any Ruby developer worthy of the name, knowing how to use gems is only half of the story. You also need to be able to create them. Happily, there are only two key things you need to do to create a gem. The first is to organize your project directories to match the standard gem layout. So, if you wanted to release the Document class as a gem,6 you would need to create a directory structure like that shown in Figure 29-1.
Figure 29-1 Simple Gem Directory structure

As you can see from the figure, convention calls for a top-level directory whose name matches the name of the gem, in this case document. Under that you have a README file, a directory for unit tests, and, most important of all, the lib directory that will hold the Ruby code.7 Since the document gem is very simple, there is only a single Ruby file in the lib directory, document.rb. It’s no accident that the name of the Ruby file matches the name of the gem—this is yet another convention, one that allows users of your gem to easily deduce that if they want to get at the good stuff in the document gem, they only need to code:
require 'document'
Naming your main Ruby file after gem is polite, but not absolutely required. The ruby-mp3info gem, for example, more or less honors the convention by calling its main Ruby file mp3info.rb.
If your gem is more complicated and carries around multiple source files, don’t simply drop them in the lib directory. Instead, create a directory under the lib directory, whose name matches the name of the gem, and put your code there. For example, the text gem, which we used a few chapters back, carries around a fair number of files. As you can see in Figure 29-2, most of those Ruby files do indeed live one directory down from the lib directory.
Figure 29-2 Text Gem Directory structure
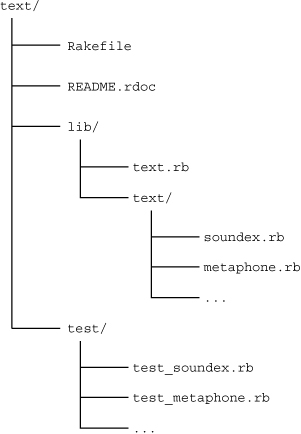
Notice there is still a text.rb file in the lib directory. The convention is that this top-level Ruby file requires the files buried a directory down. So, if we peek into text.rb, we see:
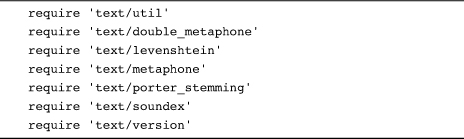
The nice effect of doing things this way is that the gem user doesn’t have to care how complicated your gem is. Whether your gem is simple or Byzantine, your user simply says require 'text' and they get what they need.
The second thing we need for our document gem is the metadata. We need to tell RubyGems the name of our gem, its version and the like. We do this by creating a gemspec file. A gemspec file is nothing more than a file full of Ruby code that creates an instance of the Gem::Specification class.8 Here’s the gemspec for the document gem:
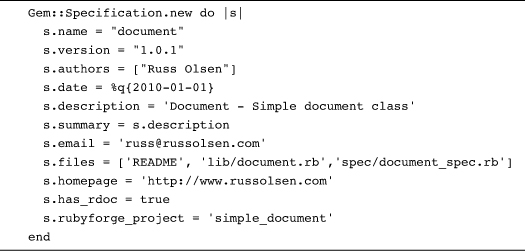
If your gem depends on having other gems installed in order to work, you can say that in the gemspec file too. Perhaps the document gem depends on the text gem. If so, you would add:
s.add_dependency('text' )
You can even depend on a specific version or range of versions:
s.add_dependency('text', '= 0.1.13' )
If your gem includes executable scripts—snippets of Ruby code that users can run from the command line, like the rake command from the Rake gem or spec from RSpec—you can specify that too. Here’s how we might specify that our document gem has a spell-checking command:
![]()
Once you have all of your Ruby files in place under lib, your README file written, and your gemspec file built, creating the actual gem file is easy: Just run the gem build command and call out the gemspec file:
gem build document.gem
This command will create a file called document-1.0.1.gem, a tidy little package of document goodness. You can install your new gem on your system by simply specifying the gem file:
gem install document-1.0.1.gem
Uploading Your Gem to a Repository
If you are creating gems for your own—or perhaps your company’s—private consumption, then you are done. Your newly minted gem file rolls up your code into an easily transportable unit that you can install into any Ruby environment. If, however, you are working on an open source project, something that will be available to the general public, then there is one more step. You need to put your gem where other people can get at it. In fact, you will probably want to put it in the place where the gem command will look by default when someone uses the gem install command.
Under the covers, the gem command turns to http://gems.rubyforge.org when it goes looking for gems to install. Behind this URL is the open source project, Gemcutter,9 which is devoted to being the place to get gems. Getting your gem into the Gemcutter repository could not be easier. You only need to go to http://gemcutter.org and set up a free account. You will also need to install the gemcutter gem:
gem install gemcutter
Now you are ready to push your gem up to the Gemcutter repository:
gem push document-1.0.0.gem
The push command will ask for your Gemcutter account information and then upload your gem to the repository. It really is that simple. A few minutes after running the push command your gem will be available to anyone who wants to use it.
Automating Gem Creation
The trouble with building and uploading your gem by hand is that someone, probably you, needs to supply the hand. It’s much better to automate the whole process, and the best way is to build a Rakefile that takes care of all the details:
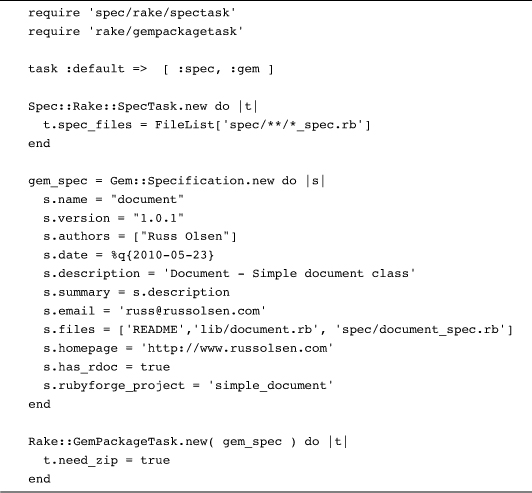
This Rakefile takes advantage of the built-in tasks that will build a gem for you. All you need to do is specify the gemspec information in the Rakefile.
Rake doesn’t have a built-in task to push the final gem file up to Gemcutter,10 but it’s easy enough to create one ourselves:

Add this task to the bottom of your Rakefile and you are ready to release your masterpiece with a simple rake push.
In the Wild
In the real world we automate everything that can be automated, including things like making directories and writing Rakefiles. Fortunately there are a number of gems available whose purpose is to make it easy for you to build your gem.
Among the most popular is hoe.11 Hoe tries to automate everything that could possibly be automated when building a gem. For example, if you are starting from scratch with a new gem, you can have hoe generate the whole gem directory structure for you.12 To do this you run the sow command, which comes with hoe:
sow document
The sow command will generate the gem directory structure, including the lib and test directories, a skeletal README.txt file and a Rakefile. It will even tell you what to do next:
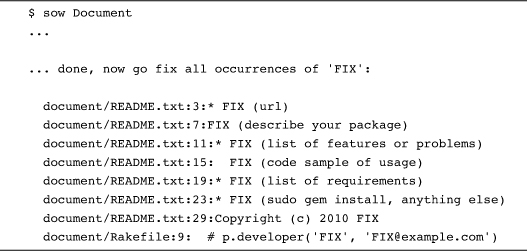
The only thing left for you to do is to fill in the appropriate blanks in README.text and the Rakefile and supply the actual code for your gem.
When you are done you can build your gem:
rake gem
Hoe also supports plug-ins that will help you upload your gem to Gemcutter.
Staying Out of Trouble
A key danger in using gems is the possibility of name collisions which, unfortunately, come in two nasty flavors. The first is the classic “my class has the same name as your class” problem: If your application already includes a class called Document, you are going to have a problem trying to use the Document class from the document gem. To lessen the chance of this sort of thing, the wise gem builder will reread Chapter 15 and wrap his or her work in a module:
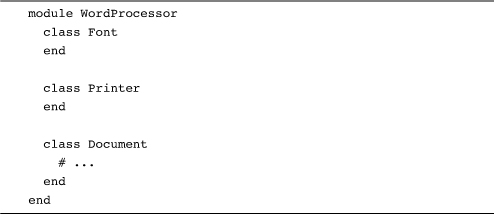
Using modules reduces, but doesn’t completely eliminate, the chance of a name collision; after all, there is always the chance of running into two WordProcessor modules.13
The second collision risk is the possibility of filename collisions. What happens if I’m using the document gem, with its document.rb file, and I also happen to have another document.rb file somewhere in my application? The short answer is nothing good. The longer answer is that whenever your program tries to load document.rb, it will end up loading the gem version of the file.
Fortunately, all is not lost. You can usually work your way around a filename collision by specifying the full path for the local file. If you happen to have a local file called document.rb and also want to load a local file called document.rb, you can load it with the full path:
![]()
Unsurprisingly, there are also some ways to screw up gem creation. Fortunately, the vast majority of gem construction errors are of the easily avoided variety. For example, make sure that you include all the other gems on which your gem depends in the dependency list. Missing a dependency is easier than it seems. Remember, if you happen to have that required but unlisted gem installed on your system, then everything will work fine for you. It will be a different story when your masterpiece arrives on some computer that happens to be missing that critical gem. It’s always a good idea to test your newly minted or modified gem by trying it out on a clean install of Ruby.
The flip side of this is that your gem should avoid claiming that it uses some gem that it does not. This kind of thing usually happens when you stop using a gem but forget to remove it from the list of dependencies. The best defense against this kind of thing is to do two things: (1) stop, and (2) think. Pause every now and then to consider whether you still really need that ActsAsSnafu gem.
Finally, you need to keep your gems location independent. One of the best things about the gem system is that once a gem is installed, any application that wants to use the gem doesn’t have to worry about where the gem lives—the gem system simply handles that part. So, if you install the widget gem, your application can say require 'widget' without having to know where the widget.rb file is to be found. Your job, as the author of a gem, is to avoid screwing up this location independence.
Unfortunately, it is fairly easy to build a very location-dependent gem. To see how easy, imagine that your gem depends on some supporting, non-Ruby files. The document package, for example, might need a font file. You might naively march ahead and read in the font:
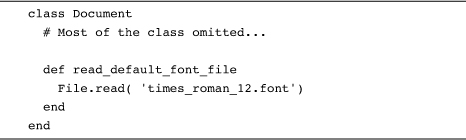
Sadly, this is one of those situations where the simple thing does not actually work, or at least does not work very often. The problem with this code is that it is looking for the font file in the current directory. That font file might well be in your current directory when you are developing the document gem, but the users of your gem, working out of their own directories, are not going to be so lucky. Once you know there is a problem, the solution is not hard to find. As we have seen, you can always get the full path to your Ruby file with __FILE__:

The message here is that you should always test your gems in as realistic a setting as possible. Fixing this kind of location independence problem is cheap; knowing that you have the problem in the first place is priceless.
Wrapping Up
There is an almost infinite number of ways that software can go wrong. It can simply be broken, or just buggy. It can be too slow. It can be completely incomprehensible to the people it is supposed to help. Any of these things is enough to bring a tear to the coder’s eye. There is, however, something especially heartbreaking about code that might be great, might run like the wind, might speak to its users like poetry—but will not install. In this chapter we looked at the Ruby gem system, software that will help you avoid having your code come to a dismal “I just couldn’t install it” end. We’ve seen that the gem system lets you package up your code into a bundle, along with its documentation and a list of other gems on which it depends. We’ve also seen how, by uploading your gem to a public repository like GemCutter, you can make it widely available. Finally, we’ve looked at hoe, a gem that eases some of the pain of building your own gem.
Now that we have seen how to package up your code, in the next chapter we will turn to getting to know the Ruby implementation that will run your code.