Network-Mounting the root Filesystem
tbdevarm's root filesystem, generated by the buildrootfilesystem script, contains the cross-compiled version of helloworld and gdbserver. Changing the helloworld source code would require completely rebuilding the root filesystem, rebooting the MediaEngine, and then downloading the kernel and root filesystem again. Even though the MediaEngine boots quickly, taking this approach over time would become tedious and time-consuming.
Instead of transferring the root filesystem, you can mount it over the Ethernet network by using NFS. With a network-mounted root filesystem, you can generate the ARM cross-compiled version of helloworld.c on tbdev1. Then you can directly execute it or remotely debug it without regenerating the MediaEngine root filesystem or rebooting. The buildrootfilesystem script creates the minimum root filesystem in the /tftpboot directory and can be NFS-mounted directly.
The Unix world commonly uses NFS to mount hard disks on remote computers. For example, a server can share its /home directory for user workstations or the /tftpboot directory for diskless workstations to mount their root filesystem. (Note that diskless workstations and the Project Trailblazer target platforms use TFTP, not NFS, to download their kernels.) The Linux kernel itself contains NFS code, which allows the kernel to mount its own root filesystem during the boot process.
In this section, you'll learn how to configure tbdev1 to act as an NFS server and configure the target board's kernel options for network-mounting their root file systems.
Configuring the NFS Server
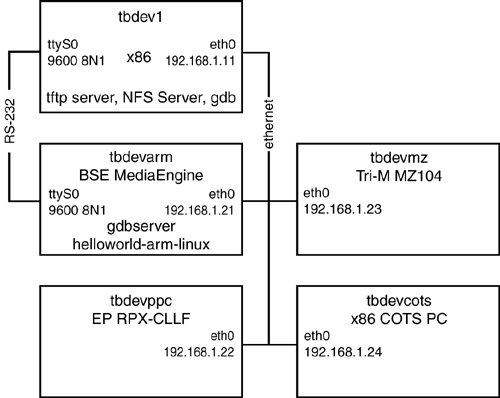
tbdev1 serves as the Project Trailblazer target root filesystem NFS server. You can configure it to serve the i386 files to the i386 target (MZ104 and COTS PC), the ARM files to the ARM target (MediaEngine), and the PowerPC files to the PowerPC target (RPX-CLLF). As you can tell, it's important to serve the correct files to each architecture. Figure 5.2 shows the Project Trailblazer development computers and their IP addresses.
Figure 5.2. The Project Trailblazer development stations and their IP addresses.
Here are the steps to install, configure, and run the NFS server on tbdev1:
1. |
Install the NFS server on tbdev1: root@tbdev1[501]: apt-get install nfs-server
|
2. |
Configure tbdev1's NFS server by adding an entry to its configuration file, /etc/exports, for each target platform. Each entry contains a directory, an IP address, and mounting permission options. To do so, add these lines to /etc/exports: /tftpboot/arm-rootfs 192.168.1.21(rw,no_root_squash) /tftpboot/powerpc-rootfs 192.168.1.22(rw,no_root_squash) /tftpboot/i386-rootfs 192.168.1.23(rw,no_root_squash) /tftpboot/i386-rootfs 192.168.1.24(rw,no_root_squash) The mounting permissions shown here are rw and no_root_squash. rw allows the clients (the target boards) to mount their root filesystems with read and write permissions. The no_root_squash option allows the clients to mount their root filesystems as user root on tbdev1. See the exports man page for more information. Line 1 of the /etc/exports configuration file says that the MediaEngine with an ARM processor at IP address 192.168.1.21 now has NFS read and write mounting access to the /tftpboot/arm-rootfs directory. Similarly, the RPX CLLF with a PowerPC processor at IP address 192.168.1.22 has NFS read and write mount access to the /tftpboot/powerpc-rootfs directory. Finally, the Tri-M and COTS PC with i386 processor at IP addresses 192.168.1.23 and 192.168.1.24 have NFS read and write access to the /tftpboot/i386-rootfs directory. |
3. |
Make /etc/exports readable by all: root@tbdev1[502]: chmod 444 /etc/exports
|
4. |
The NFS server reads the /etc/exports configuration file at startup, so you need to tell it to reload its configuration: root@tbdev1[503]: /etc/init.d/nfs-server reload
|
The NFS server is now configured and ready for NFS mounting by the targets.
Configuring the Target Kernels
During the boot process, the bootloader passes the root filesystem location to the kernel, using the boot prompt mechanism. The ARM and PowerPC bootloaders are configured during the kernel configuration process. On x86 platforms, the Linux loader (lilo) is configured to pass the root filesystem location to the kernel.
lilo is configured using the /etc/lilo.conf file. Both kernel compilation and lilo configuration result in the root filesystem location being passed to the kernel. Without root filesystem location information, the kernel can't mount its root filesystem and stops, with a “kernel panic.”
TIP
You can supercede the root filesystem location by entering new location information at the Linux boot: prompt. See the Linux BootPrompt HOWTO6 for more information. This section does not use the boot prompt because of the length of the NFS server root filesystem location information.
In the following steps, you'll compile the MediaEngine ARM kernel for NFS mounting of the ARM root filesystem; the other platforms are similarly configured, except that their IP addresses and root filesystem paths are different:
You can now run the cross-compiler and gdb on the host, tbdev1. The target, with an NFS-mounted root filesystem, can run gdbserver and then execute cross-compiled programs. With this combination, you can dramatically reduce development time by decreasing the compile/run/debug cycle time.