
Chapter 3. Access and secure data
Most web applications require static or dynamic data. Static data is written directly into the HTML markup, not altered or loaded by code such as JavaScript. It’s rendered and displayed to users without any way for the data to change. Dynamic data can change. Dynamic data can update a ticker on a webpage from a news feed, capture user data to perform an operation and provide results, or perhaps even store just a user’s registration information in a database.
Both approaches to data have benefits as well as disadvantages. Static data is quite secure because it doesn’t provide much of an attack surface for a malicious user. However, as a website transitions into a more dynamic site, with live updates of data and the ability for users to enter information into various fields, an attack surface opens and the site can become less secure.
Knowing how to prevent malicious users from causing harm to your application and possibly your users is important. You can implement the same mechanisms used to prevent malicious usage to simplify the user experience and to keep your data generally clean. Certain data elements, such as phone numbers and email addresses, can be provided in different formats. Because such information can be very important, you want to make it as easy as possible for users to enter it. Having complete address information and ensuring that all the necessary fields are populated also can be very important. HTML5 supports constructs such as regular expressions and required attributes to support implementing these types of rules. Throughout the objectives in this chapter, validating user input both declaratively via HTML5 and also by using JavaScript is covered.
In other scenarios, data coming to and from the website is either consuming data feeds or providing data to another destination. Websites today commonly have a direct link to social networking updates. In these cases, the retrieving and sending of the data is invisible in that users aren’t engaged with the process. These processes should be streamlined and not interfere with the website’s user experience. In this chapter’s objectives, consuming data from external sources, transmitting data, and serializing and deserializing data are all covered.
Objectives in this chapter:
![]() Objective 3.1: Validate user input by using HTML5 elements
Objective 3.1: Validate user input by using HTML5 elements
![]() Objective 3.2: Validate user input by using JavaScript
Objective 3.2: Validate user input by using JavaScript
![]() Objective 3.4: Serialize, deserialize, and transmit data
Objective 3.4: Serialize, deserialize, and transmit data
Objective 3.1: Validate user input by using HTML5 elements
This objective examines the user interface elements made available by HTML5 that allow users to provide input. The ability to capture information from users is a great feature. However, you must ensure that user privacy and safety are protected as best as possible. You also must ensure that the website doesn’t open any holes that an attacker can exploit to disrupt the site’s services. Part of protecting the site is choosing the correct user input controls for the job and setting the appropriate attributes on those controls to ensure that the data is validated. For the exam, you need to know these input controls and the attributes they use for this purpose.
This objective covers how to:
![]() Choose input controls and HTML 5 input types
Choose input controls and HTML 5 input types
![]() Implement content attributes
Implement content attributes
Choosing input controls
HTML5 provides a wide assortment of controls to make capturing user input simple and secure. In this section, you explore the user input controls in greater detail and see examples of their usage. A simulation of a survey form will be created to demonstrate when each type of control should be used. Listing 3-1 shows the entire markup for the survey.
LISTING 3-1 HTML5 markup for a customer survey,
<form>
<div>
<hgroup>
<h1>Customer Satisfaction is #1</h1>
<h2>Please take the time to fill out the following survey</h2>
</hgroup>
</div>
<table>
<tr>
<td>Your Secret Code:
</td>
<td>
<input type="text" readonly="readonly" value="00XY998BB"/>
</td>
</tr>
<tr>
<td>Password:
</td>
<td>
<input type="password"/>
</td>
</tr>
<tr>
<td>First Name:
</td>
<td>
<input type="text" id="firstNameText" maxlength="50"/>
</td>
</tr>
<tr>
<td>Last Name:
</td>
<td>
<input type="text" id="lastNameText"/>
</td>
</tr>
<tr>
<td>
Your favorite website:
</td>
<td>
<input type="url"/>
</td>
</tr>
<tr>
<td>
Your age in years:
</td>
<td>
<input type="number"/></td>
</tr>
<tr>
<td>
What colors have you colored your hair:
</td>
<td>
<input type="checkbox" id="chkBrown" checked="checked"/>
Brown
<input type="checkbox" id="chkBlonde"/>
Blonde
<input type="checkbox" id="chkBlack"/>
Black
<input type="checkbox" id="chkRed"/>
Red
<input type="checkbox" id="chkNone"/>
None
</td>
</tr>
<tr>
<td>Rate your experience:
</td>
<td>
<input type="radio" id="chkOne" name="experience"/>
1 - Very Poor
<input type="radio" id="chkTwo" name="experience"/>
2
<input type="radio" id="chkThree" name="experience"/>
3
<input type="radio" id="chkFour" name="experience"/>
4
<input type="radio" id="chkFive" name="experience" checked="checked"/>
5 - Very Good
</td>
</tr>
<tr>
<td>How likely would you recommend the product:
</td>
<td>
<br/>
<br/>
<br/>
<br/>
<input type="range" min="1" max="25" value="20"/>
</td>
</tr>
<tr>
<td>
Other Comments:
</td>
<td>
<textarea id="otherCommentsText" rows="5" cols="20" spellcheck="true">
</textarea>
</td>
</tr>
<tr>
<td>
Email address:
</td>
<td>
<input type="email" placeholder="[email protected]" required/>
</td>
</tr>
<tr>
<td>
<input type="submit"/>
<input type="reset"/>
<input type="button" value="Cancel"/>
</td>
</tr>
</table>
</form>
Note: Input Controls
The HTML5 specification defines many more input controls than are explained in this book. This book focuses specifically on the controls now supported by Internet Explorer, followed by smaller examples to demonstrate some of the other controls as supported by other browsers such as Google Chrome.
The <input> element in HTML denotes input controls. This element contains a type attribute that specifies the type of input element to render. The exceptions to the <input type=’’> rule are the <textarea> and <button> elements, which have their own element support. Table 3-1 outlines the input elements supported in HTML5 and indicates whether an element is now supported in Internet Explorer. The additional attributes available to an <input> element are discussed in later sections.
Using text and textarea input types
The text and textarea input controls are the most flexible. By using these controls, you allow users to enter any text that they want into a regular text box. A text box provides a single-line text entry, whereas a textarea allows for a multiline data entry. The following HTML shows the markup for both types of controls:
<table>
<tr>
<td>
First Name:
</td>
<td>
<input type="text" id="firstNameText"/>
</td>
</tr>
<tr>
<td>
Last Name:
</td>
<td>
<input type="text" id="lastNameText"/>
</td>
</tr>
...
<tr>
<td>Other Comments:
</td>
<td>
<textarea id="otherCommentsText" rows="5" cols="20"></textarea>
</td>
</tr>
</table>
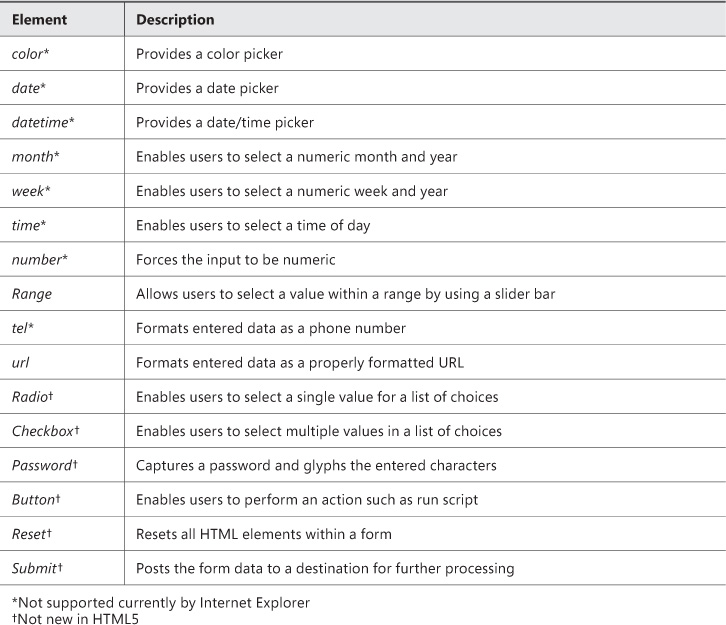
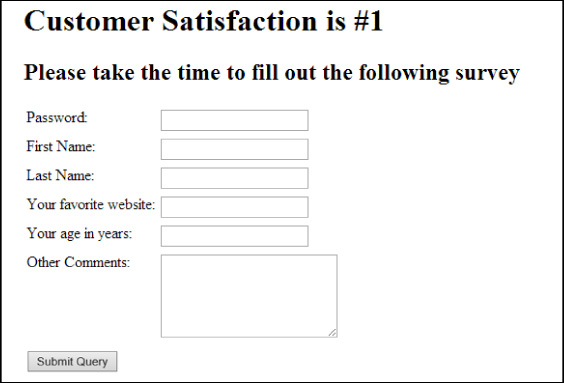
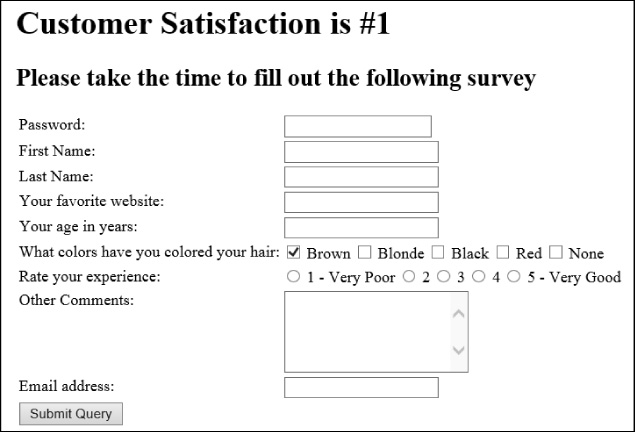
Figure 3-1 shows the output of this code.
This code adds text boxes to capture information such as first name, last name, and additional comments. For the first and last names, the input is a standard text box as denoted by type=“text”. This tells the renderer to display an input field into which users can enter free-form text. However, this type of input field is limited to a single line. The Other Comments text box provides a multiline text area for users to enter text into. The rows and cols attributes define the viewable size of the text area. In this case, users can enter many lines of text into the text area.
Other attributes that help with controlling how much information is entered into the text fields is the maxlength attribute:
<input type="text" id="firstNameText" maxlength="50"/>
Users can’t enter any more than 50 characters into the text field with the maxlength set to a value of 50.
In some cases, you might want to ensure that users enter only certain information in a certain format.
url input type
The <input> type of url displays a text box similar to what the <input> type of text provides. However, the renderer is instructed that the input type is url, so when users try to submit a form with this type of information on it, it validates that the text in the box matches the format of a valid URL.
 Exam Tip
You can validate data in many ways. Even more options become available in HTML5, such as the url input type. Also available are the pattern attribute and the use of regular expressions in JavaScript. Both of these are discussed later in this chapter.
The following code demonstrates a url type added to the survey:
<tr>
<td>Last Name:
</td>
<td>
<input type="text" id="lastNameText"/>
</td>
</tr>
<tr>
<td>
Your favorite website:
</td>
<td>
<input type="url"/>
</td>
</tr>
<tr>
<td>
Other Comments:
</td>
<td>
<textarea id="otherCommentsText" rows="5" cols="20"></textarea>
</td>
</tr>
...
<tr>
<td>
<input type="submit"/>
</td>
</tr>
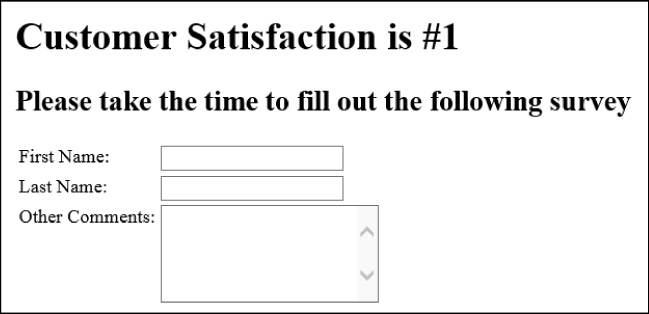
This code produces the output shown in Figure 3-2 to the HTML page making up the survey. This HTML code also adds an input button, as discussed later in the section, “Using the button input type.”
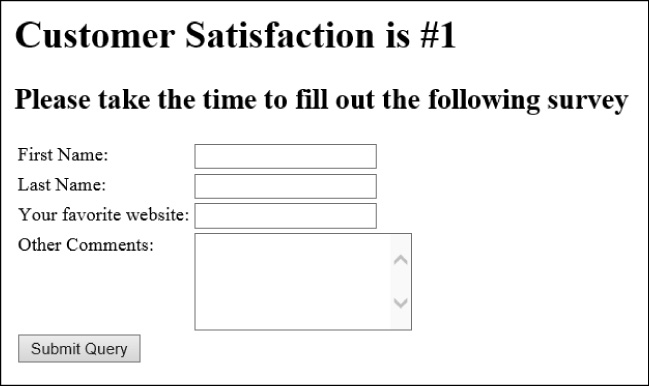
This code demonstrates the power of the url input type in validating that the text a user entered is indeed a valid URL format. If a user typed something other than a URL or an incomplete URL into the Your Favorite Website box, such as contoso.com, and then clicked the Submit Query button, the result would be similar to the output shown in Figure 3-3.
Click the button to invoke the validation. The url box is outlined in red, and a tooltip pops up to explain the validation error. In this case, it has detected that a valid URL hasn’t been entered. If the user corrects the data by specifying the URL as http://www.contoso.com, the validation error doesn’t occur and the input can be submitted successfully.
If you require more flexibility and want to accept partially entered URL information, such as contoso.com, don’t use the url input box. A regular text input with a pattern specified would be more appropriate.
Using the password input control
The password input control is the standard method of prompting users for sensitive information. As you type your password, each character is replaced with a glyph so that any onlookers can’t see your password.
Exam Tip
You can’t specify default text in a password box or write to it via JavaScript. This is a security safeguard to help ensure the safety of passwords. However, the browsers provide a mechanism to store a password should a user choose to have the password remembered by the browser.
You can add a password text box to the survey to provide a way to retrieve a survey if a user wants to complete it later. The password could be stored in a server for later retrieval. The following markup is added to the HTML:
<tr>
<td>
Password:
</td>
<td>
<input type="password"/>
</td>
</tr>
With this HTML added, the survey now appears as shown in Figure 3-4.
Again, the password text box doesn’t look any different than any other text box. However, typing into the box provides a different experience, as shown in Figure 3-5.
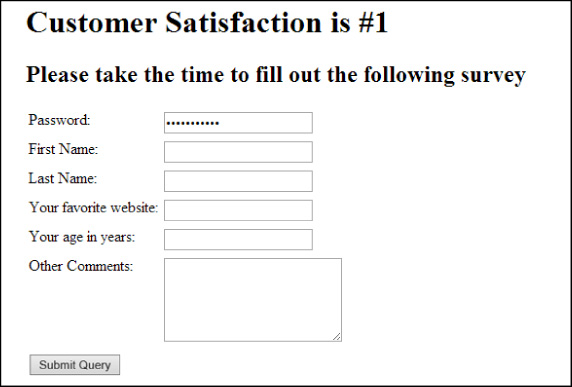
The password input type captures information securely. Users typing this information don’t want others who are nearby to be able to see what they’ve been typing and hence compromise their data.
Using the email input type
You can use the email input type to ensure that the format of the text entered into the text box matches that of a valid email address. Being able to capture an email address is often important to enable further follow up with a user. This control helps ensure that the information entered matches what’s expected in the form of an email address.
Exam Tip
Validation of the email input type confirms only that the information entered matches the expected format of a valid email address. It in no way verifies that the email address itself is a valid mailbox that can receive messages.
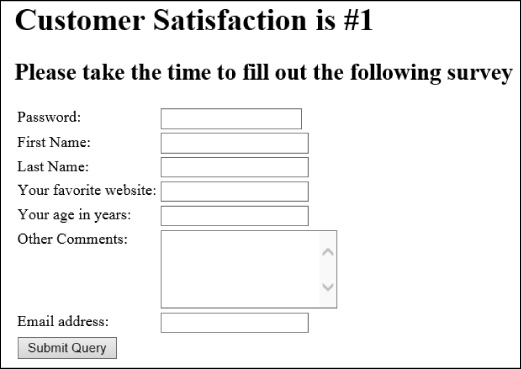
The following HTML adds an email address input type to the survey:
<tr>
<td>
Email address:
</td>
<td>
<input type="email"/>
</td>
</tr>
<tr>
<td>
<input type="submit"/>
</td>
</tr>
Figure 3-6 shows the output of this HTML.
Just as with the url input type, if you type text that doesn’t match the format of an email address, you receive a warning message (see Figure 3-7).
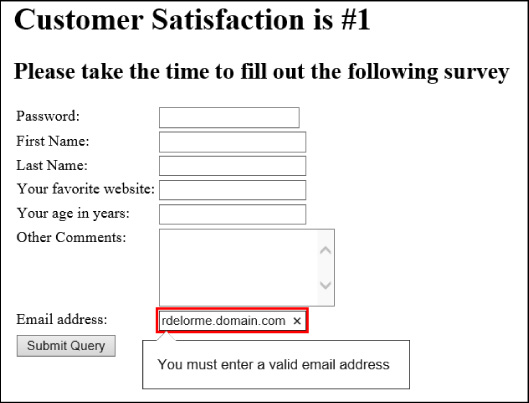
This validation helps ensure that you don’t mistype your email address. Of course, it doesn’t prevent you from entering an invalid email address, only one where the format doesn’t match correctly to what would be expected such as having the @ symbol and ending with a .com or other domain suffix.
Using the checkbox input type
In some cases when capturing information from users, you need to be able to capture more than one choice as it relates to a specific question. In this case, the checkbox input control is the best choice. You can provide a series of check boxes and allow users to select all that apply.
The survey will now add a question where users can select multiple items, as follows:
<tr>
<td>Your age in years:</td>
<td><input type="number" /></td>
</tr>
<tr>
<td>
What colors have you colored your hair:
</td>
<td>
<input type="checkbox" id="chkBrown"/> Brown
<input type="checkbox" id="chkBlonde"/> Blonde
<input type="checkbox" id="chkBlack"/> Black
<input type="checkbox" id="chkRed"/> Red
<input type="checkbox" id="chkNone"/> None
</td>
</tr>
In this HTML example, users see a list of hair colors that they might have used. Because a user possibly might have used more than one, she has the option to choose more than one. Figure 3-8 shows the output of this HTML.

An additional attribute available on the check box is the checked attribute. This attribute provides a way to default a check box to the “checked” (or selected) state. By default, check boxes aren’t selected. However, by adding the attribute as follows, the check box defaults to the “checked” state when the page is loaded:
<input type="checkbox" id="chkBrown" checked="checked"/> Brown
In other cases, when presented with a list of items, users might be able to choose only a single item from the list.
Using the radio input type
The radio button is similar to the check box in that it provides a list of options for users to select from. The difference from the check box is that users can select only a single item from the list. An example would be asking users to rate something on a scale from 1 to 5. To add this type of question to the survey, incorporate the following HTML beneath the check boxes:
<tr>
<td>
Rate your experience:
</td>
<td>
<input type="radio" id="chkOne" name="experience"/> 1 - Very Poor
<input type="radio" id="chkTwo" name="experience"/> 2
<input type="radio" id="chkThree" name="experience"/> 3
<input type="radio" id="chkFour" name="experience"/> 4
<input type="radio" id="chkFive" name="experience"/> 5 - Very Good
</td>
</tr>
Notice that as with all HTML elements, each radio input type needs a unique id. However, the name attribute ties all the radio buttons together. With the same name specified for each radio type, the browser knows that they are part of a group and that only one radio button of the group can be selected. Figure 3-9 shows the output of the radio buttons added to the survey.
In this output, the radio buttons are shown from left to right and enable users to select only one option. When a user changes the selection to a different option, the previously selected option is automatically cleared.
Like with the checkbox input types, defaulting the state of the radio input to selected is possible. This is done in exactly the same way, by specifying the checked attribute:
<input type="radio" id="chkFive" name="experience" checked="checked"/> 5 - Very Good
In this case, the rating of 5 - Very Good defaults to selected for the group of radio buttons.
You can have multiple groups of radio buttons on the same page by specifying a different name for each group of buttons. Another way to provide users with the ability to specify a single value within a group of values is with the use of the range control.
Using the range input type
Using the range input type enables users to specify a value within a predefined range by using a slider bar. This type can be used in cases where a wider range of values is required to choose from but using radio buttons would be too unwieldy. Add another rating question to the survey, as shown in the following HTML after the radio buttons:
<tr>
<td>How likely would you recommend the product:
</td>
<td>
<input type="range" min="1" max="25" value="20"/>
</td>
</tr>
This HTML markup provides users with a slider bar that they can use to specify a value between 1 and 25. The min attribute specifies the minimum value of the range; the max attribute specifies the maximum value. The value attribute specifies a default value. If you omit the value attribute, the range defaults to the minimum value. This HTML displays the output shown in Figure 3-10.
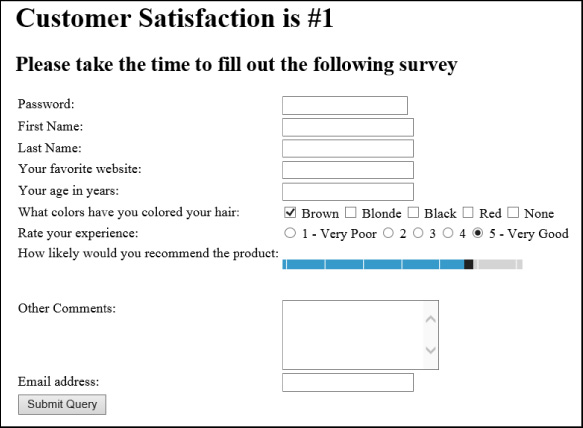
In this output, the range control is displayed as a slider bar. The bar defaults to the value of 20 as specified in the markup. Users can grab the black endpoint of the slider and change the value lower or higher by dragging it left or right. As a user changes the value, a tooltip shows the current value where the slider resides. In this case, the user is now at the value 17 (see Figure 3-11).

After users enter all the needed information, they need a way to submit or save the information. The submit button has already been previewed.
Using the button input type
The input type that allows users to submit the form or clear it is button. The button input isn’t new to HTML5 but is an essential piece to the data-capture puzzle. Buttons are what tell the website when a user finishes doing something and that they want to perform an action. The <input> element supports three types of button controls: submit, reset, and button.
Anything can be a “button.” Because most DOM elements have a click event or at least a mousedown and mouseup event, the concept of clicking can be captured and custom actions processed. This can inherently turn any part of the DOM into a “button.”
The submit input type tells the HTML form to post its information to the server (or, in some cases, to another site or webpage). The reset type automatically clears all form elements to their default values. The button type provides a generic button with no predefined functionality. It can be used to provide a custom function, such as cancel out from this page and return to the home page. All three button types are added to the bottom of the survey page as follows:
<tr>
<td>
<input type="submit"/>
<input type="reset"/>
<input type="button"/>
</td>
</tr>
That’s all that’s required to add the functionality to the page for each button. Of course, type=“button” requires some JavaScript to be wired up to actually do something. However, the submit and reset buttons come with the described functionality built in. The HTML provides the output on the form as shown in Figure 3-12.
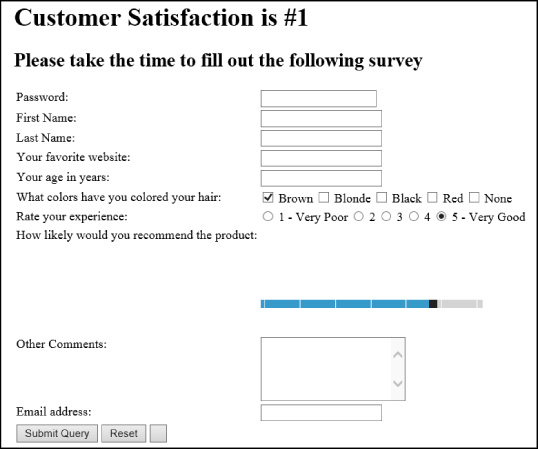
The text on the buttons is the default text. The submit button comes with the text Submit Query, and the reset button comes with the text Reset. This can’t be changed. However, the button type doesn’t have any text on it because none was specified and the button doesn’t come with any predetermined behavior. To specify text for this button, add the value attribute:
<input type="button" value="Cancel"/>
This produces a button as shown in Figure 3-13.
That’s what you get with the input type of button. However, in some cases, more flexibility in the button’s content is desired. This is where the button element comes in handy.
Using the button element
The button element provides a button on the user interface, just as the name implies. However, from a graphical perspective, this element behaves very differently.
The button element also supports a type attribute, like as the ones seen previously: submit, reset, and button. This example steps away from the survey and demonstrates these buttons on a stand-alone page. The following HTML is added to a page, and the subsequent output is shown in Figure 3-14:
<button type="button"/>
<button type="reset"/>
<button type="submit"/>
This output displays three buttons, as expected. However, it doesn’t provide any text on the buttons. The button element provides only the desired click behavior, such as submitting, resetting, or providing a custom behavior like with type=“button”. Everything else must be specified in the HTML, including the label or text that goes on the button. In this way, you have much more control over what’s put on the button. Instead of Submit Query as with the <input> element, the text can be set as Submit Survey or Save Data. The following HTML shows the text on the buttons, and Figure 3-15 shows the output:
<button type="button">Go Home</button>
<button type="reset" >Reset</button>
<button type="submit">Submit Survey</button>
You can take the button element even further. The element’s contents don’t have to be just plain text. You can embed images within the element by using the <img> element in addition to text, or embed an entire clickable paragraph. You also can apply cascading style sheets (CSS) to the button to change its appearance, as shown in Figure 3-16. The HTML is as follows:
<button type="button" style="border-radius: 15px;">
<p>Something exciting lies behind this button</p>
<img src=".myimage.jpg"/>
</button>

Within the button element lies the capability to create a highly customized button and get default behavior from the browser.
In addition to what’s provided by the various input types, such as range, email, and url, other attributes are available and common across most of the input controls and provide additional flexibility in how the fields are validated. This is covered next.
Implementing content attributes
Input controls provide content attributes that allow you to control their behavior in the browser declaratively rather than have to write JavaScript code.
Making controls read-only
Part of the specification for the HTML input controls includes a readonly attribute. If you want to present information to users in elements such as text boxes but don’t want them to be able to alter this data, use the readonly attribute. When readonly is specified, the renderer won’t allow users to change any of the data in the text box. The following HTML demonstrates the readonly property:
<tr>
<td>
Your Secret Code:
</td>
<td>
<input type="text" readonly value="00XY998BB"/>
</td>
</tr>
In this code, at the top of the survey form, users are provided a secret code to correspond with their survey. They can’t change this because the readonly attribute is specified.
Where fields aren’t read-only and users can type whatever they want into the text box, providing them with the capability to check spelling is a good idea.
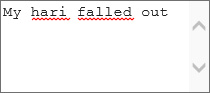
Providing a spelling checker
Checking spelling is another method available to validate user input. The spellcheck attribute helps provide feedback to users that a word they’ve entered is misspelled. Again, this attribute is applied to the input element:
<textarea id="otherCommentsText" rows="5" cols="20" spellcheck="true"></textarea>
In this HTML, the spellcheck option has been turned on for the Other Comments text area because users can type whatever they want and might make spelling errors.
The output of a text box with spellcheck isn’t any different until a user starts typing and enters a spelling error. Figure 3-17 shows the red underlining for the words that are detected as spelled incorrectly.
In some cases, the built-in validation provided by the input controls isn’t sufficient, and providing a custom pattern to validate is better, as explored in the next section.
Specifying a pattern
As you saw with the email and url input types, built-in validation is fairly thorough in ensuring that the information entered is accurate and as expected. However, in some cases you might require looser or stricter validation. Suppose that you don’t want users to have to specify the HTTP protocol in a url type, but you want to allow only .com or .ca websites. This can be achieved by using the pattern attribute, which allows the use of a regular expression to define the pattern that should be accepted.
Exam Tip
The pattern attribute applies only to text boxes. It can’t be used to override the validation built into the email or url types.
The following code shows the pattern attribute used to achieve the desired validation:
<input type="text" title="Only .com and .ca are permitted."
pattern="^[a-zA-Z0-9-.]+.(com|ca)$"/>
Plenty of regular expressions are available to validate a URL; this one is fairly simple. When specifying the pattern attribute, you should specify the title attribute as well. The title attribute specifies the error message to users in the tooltip when validation fails.
To ensure that users enter the data in the correct format, you should show them a sample of what the data should look like. This is achieved with the placeholder attribute.
Using the placeholder attribute
The placeholder attribute enables you to prompt users with what’s expected in a certain text box. For example, an email text box might show placeholder text such as [email protected]. More importantly, this placeholder text doesn’t interfere with users when they start typing their information into the text box. The placeholder attribute achieves this, as shown in the following HTML and subsequent output in Figure 3-18.
<input type="email" placeholder="[email protected]" /></td>
The placeholder text is slightly lighter in color. As soon as a user puts the mouse cursor into the box to type, the placeholder text disappears and the user’s typing takes over.
HTML fields can be validated in many ways. In some cases, it’s not so much what is put into the field, but that the field is indeed filled in. The required attribute controls this for the HTML elements.
Making controls required
To ensure that a user fills in a field, use the required attribute with the <input> element. Doing so ensures that users will be told that the field is required. In this example, the email address will be made a required text box:
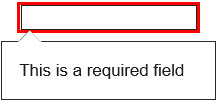
<input type="email" placeholder="[email protected]" required/>
With the required control specified, if users try to submit the form without specifying an email address, they get an error message (see Figure 3-19). Now users can’t submit until they specify a valid email address.
The capabilities of the input controls can provide quite a robust validation framework. However, more needs to be done to ensure that the website is safe and secure.
![]() Thought experiment: Creating dynamic forms
Thought experiment: Creating dynamic forms
Objective summary
![]() Input controls such as text and textarea allow users to type information into a webpage.
Input controls such as text and textarea allow users to type information into a webpage.
![]() Some input controls provide built-in validation, such as for URLs and email addresses.
Some input controls provide built-in validation, such as for URLs and email addresses.
![]() Radio buttons and check boxes provide controls for users to select items in a list.
Radio buttons and check boxes provide controls for users to select items in a list.
![]() Reset and submit buttons control behavior of the HTML form.
Reset and submit buttons control behavior of the HTML form.
![]() Users can’t modify the content of a control that has the readonly attribute assigned.
Users can’t modify the content of a control that has the readonly attribute assigned.
![]() You can add a spelling checker to a text box to help users avoid spelling errors.
You can add a spelling checker to a text box to help users avoid spelling errors.
![]() The pattern attribute helps define a regular expression for custom validation of formatted data.
The pattern attribute helps define a regular expression for custom validation of formatted data.
![]() The required attribute ensures that a field is populated before users can submit the form.
The required attribute ensures that a field is populated before users can submit the form.
Objective review
1. Which input control is better suited for allowing users to make multiple selections?
A. radio button
B. textarea
C. checkbox
D. radio or checkbox
2. Which input control is designed to allow users to enter secure information in a way that keeps others from seeing what’s typed?
A. text
B. textarea
C. url
D. password
3. Which input control posts form data to a server?
A. button
B. Submit
C. Reset
D. radio
4. Which of the following declarations are valid ways to make a text control non-editable?
A. <input type=“text” edit=“false”/>
B. <input type=“text” editable=“false”/>
C. <input type=“text” readonly=“yes”/>
D. <input type=“text” readonly/>
5. How can you ensure that all necessary fields are populated before a form can be submitted?
A. Write a JavaScript function to evaluate all the controls on the form for content.
B. On the server, evaluate all the controls for data and return an error page for missing content.
C. Add the required attribute on each control so that users get a message that the field is required.
D. Add a label to the page to let users know which controls they must fill in.
Objective 3.2: Validate user input by using JavaScript
The new HTML controls discussed in Objective 3.1 provide some great functionality to validate user data. However, this functionality has some limitations. This is where further validation performed in JavaScript comes in handy. JavaScript provides additional functionality that’s not readily available in the core HTML controls. Although some controls aren’t yet available in all browsers, you might need to validate user input such as dates, telephone numbers, or alphanumeric postal codes. This objective demonstrates how to use regular expressions to validate the input format and how to use the JavaScript built-in functions to ensure that data is the correct data type. This objective also adds a layer of security by demonstrating how to prevent malicious code injection.
This objective covers how to:
![]() Evaluate regular expressions
Evaluate regular expressions
![]() Validate data with built-in functions
Validate data with built-in functions
![]() Prevent code injection
Prevent code injection
Evaluating regular expressions
You saw the use of regular expressions in Objective 3.1. In fact, the core HTML input controls support a pattern attribute that allows you to apply a regular expression to validate user input. In some cases, though, validating user input in JavaScript can be more effective than inline with attributes. This section introduces regular expressions. The basic syntax of a regular expression is explained, as is how to use the expression in JavaScript.
Regular expressions have a unique syntax of their own. They can be daunting to use but can also be very powerful. Although a full instruction on regular expressions is beyond the scope of this book, a brief introduction is provided to support the later examples.
Exam Tip
Regular expressions tend to make their way onto the exams. You should prepare by studying them in more detail. An Internet search should yield many resources freely available on the topic. Be familiar with how to read an expression for such things as email addresses, URLs, and phone numbers, among other things.
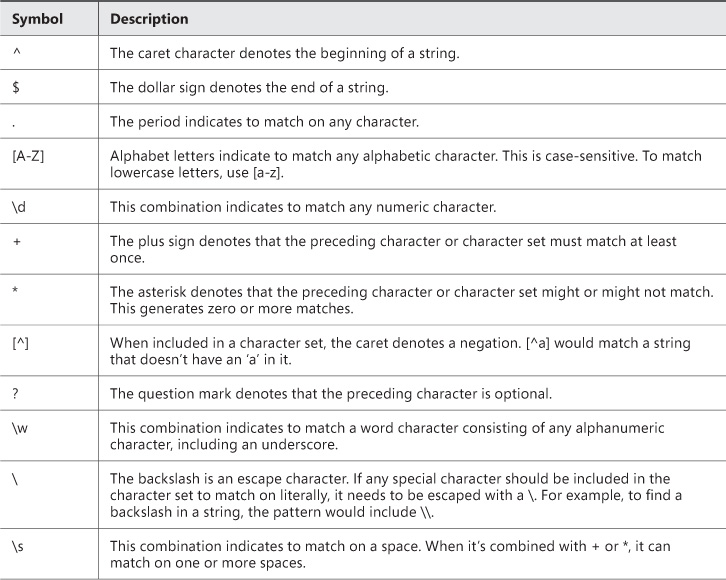
Regular expressions are a mix of special characters and literal characters that make up the pattern that someone would want to match. Table 3-1 lists the special characters and their meaning.
This list encompasses the main functions available when string matching with regular expressions. Building regular expressions requires taking the definition of those characters and essentially creating a mask out of them to be used by the regular expression engine to interpret and decide whether there is a match. For example, a Canadian postal code is comprised of the format A1A 1A1—that is, alternating alphabetic characters and numeric characters with a space in the middle. Some characters aren’t used in postal codes because the machines confuse them with other characters (for example, Z and 2). Also, the space isn’t mandatory. When you need to enforce the data format of the user input, deciding how you want the data to be captured and how flexible you want it to be is important. Then build your regular expression to match this.
Now, build the regular expression for a postal code. You first need to denote the beginning of the string, because it helps eliminate unnecessary white space at the lead of the string:
^
The first part of the expression is the caret. The next character must be alphabetic:
^[A-Z,a-z]
Because postal codes aren’t case sensitive, the expression allows the first character to be either uppercase or lowercase. The next character in the postal code must be a digit:
^[A-Z,a-z]d
Because the postal code accepts all digits 0-9, d is used to specify any digit. However, [0-9] could have been used as well. And now the pattern continues, letter-number-letter number-letter-number:
^[A-Z,a-z]d[A-Z,a-z]d[A-Z,a-z]d
As was indicated earlier, the space in the middle of the postal code, while common convention, is optional. This is where deciding how flexible the data validation should be is required. The expression as it is won’t allow for any space in the middle because the expression is set to match on consecutive alternating letter-number-letter. Perhaps, for formatting purposes, a space should be required. In this case, s would require that a space is included:
^[A-Z,a-z]d[A-Z,a-z]sd[A-Z,a-z]d
Now, users would be required to enter the postal code with a space in the middle of the two sets of three characters. But maybe the website doesn’t care about the space in the middle, because it doesn’t really affect anything. In this case, the s can be denoted with the *:
^[A-Z,a-z]d[A-Z,a-z]s*d[A-Z,a-z]d
Now, the expression allows for alternating letter-number-letter and one or more spaces can occur in the middle. The space is now optional, but a problem has been introduced. The user can now enter any number of spaces and still pass the validation, such as:
A1A 1A1
That would pass the validation because one or more spaces is required by the s*. The desired outcome here is to allow only one space or no spaces. For this, a new element is added to limit the number of occurrences to just one. This is accomplished by specifying the maximum length allowed for the character set being matched:
^[A-Z,a-z]d[A-Z,a-z]s{1}d[A-Z,a-z]d
The {1} says to match the previous character only the specified number of times—in this case, one time. Now the expression is back to functionality that’s no different than just specifying the s. What is needed next is something to make the single space optional, as denoted with the ?. To achieve this effect, the space segment is wrapped in square brackets to make it a set and followed by the ? to make it optional:
^[A-Z,a-z]d[A-Z,a-z][s{1}]?d[A-Z,a-z]d
Now you have a regular expression that requires the correct alphanumeric pattern for a Canadian postal code with an optional space in the middle.
This simple example demonstrates the key elements to a regular expression. Although this regular expression can be placed into the pattern attribute of the <input> element, this next section discusses how to use the JavaScript framework to perform pattern matching with regular expressions.
Evaluating regular expressions in JavaScript
Just like with strings and integers, regular expressions are objects in JavaScript. As such, they can be created and can provide methods to evaluate strings. Regular expression objects are created in a similar fashion as strings; however, rather than use “ to encapsulate the expression, use the forward slash /<expression>/ instead. JavaScript knows that text surrounded by forward slashes in this way is a regular expression object. Going back to the postal code example, the following HTML is provided:
<script type="text/javascript">
function CheckString() {
try{
var s = $('#regExString').val();
var regExpression = /^[A-Z,a-z]d[A-Z,a-z][s{1}]?d[A-Z,a-z]d/;
if (regExpression.test(s))
alert("Valid postal code.");
else
alert("Invalid postal code.");
} catch (e) {
alert(e.message);
}
}
</script>
<body>
<form>
<input type="text" id="regExString" />
<button onclick="CheckString();" >Evaluate</button>
</form>
</body>
This HTML provides a very basic page with a text box and a button. The button does nothing more than call a function to validate whether the entered text matches the format desired for a postal code. This page shouldn’t contain anything that you haven’t seen already, except the line in which the regular expression object is created:
var regExpression = /^[A-Z,a-z]d[A-Z,a-z][s{1}]?d[A-Z,a-z]d/;
With this line, a regular expression object is created and, as a result, methods are available. The string is extracted from the text box and passed to the test method of the regular expression. The test method returns a Boolean to indicate whether the input string matches the regular expression that was created.
The regular expression object also provides a method called exec. This method returns the portion of the input string that matches the expression. The following code example illustrates this by adding another button and function to use the exec method instead of test:
function CheckStringExec() {
var s = $('#regExString').val();
var regExpression = /^[A-Z,a-z]d[A-Z,a-z][s{1}]?d[A-Z,a-z]d/;
var results = regExpression.exec(s);
if(results != null)
alert("Valid postal code." + results[0]);
else
alert("Invalid postal code.");
...
<button onclick="CheckStringExec();" >Evaluate with Exec</button>
With this button, the expression is evaluated just like it was with the test method, except the match is returned as a string array. That the return result is a string array is important to note because using regular expressions can result in multiple matches. If a match isn’t made, the return result will be null. In this example, the results are evaluated by checking whether the array isn’t null; if it’s not, the postal code is valid and shown back to the user. If the match isn’t made, the return value will be null.
The string object also provides regular expression methods. The string could be used directly to evaluate the expression. The string provides the search and match methods. The search method returns the index of the character in the string where the first match occurred. The match method returns the part of the string that matches the pattern, much like the exec method. In addition to these two methods, many of the other string methods accept a regular expression object, such as indexOf, split, and replace. This provides some advanced functionality for manipulating strings in JavaScript.
Exam Tip
The example uses a regular expression to validate user input of data entered into the webpage. Keep in mind that data can come from anywhere, such as an RSS feed or back-end server providing JavaScript Object Notation (JSON). In this context, where a website is expecting specifically formatted data, you can use regular expressions to validate the incoming data and prevent the possible crashing of the website or at least errors being presented to users.
Although regular expressions provide a great deal of power in evaluating strings for patterns and ensuring that the data is in the desired format, JavaScript also provides built-in functions to evaluate the type of data received.
Validating data with built-in functions
JavaScript provides built-in functions to evaluate data type. Some functions are provided directly within JavaScript; others are provided by the jQuery library.
The isNaN function provides a way to evaluate whether the value passed into it isn’t a number. If the value isn’t a number, the function returns true; if it is a number, it returns false. If the expected form of data being evaluated is numeric, this function provides a defensive way to determine this and handle it appropriately:
if (isNan(value)) {
//handle the non number value
}
else {
//proceed with the number value
}
The opposite of the isNaN function is the isFinite function. The isFinite function is used in the same way but returns true if the value is a finite number and false if it’s not.
Being able to validate data is very important as previously outlined. Equally important to validating the data explicitly is ensuring that data-entry fields prevent users from injecting script. Code injection is a widely discussed topic in website security. The next section discusses preventing code injection.
Preventing code injection
Code injection is a technique that attackers use to inject JavaScript code into your webpage. These attacks usually take advantage of dynamically created content to have additional script run so that malicious users can try to gain some sort of control over the website. Their intentions can be many, but among those intentions might be to trick other site users into providing sensitive information. Depending on the content of the page, different measures need to be considered.
Protecting against user input
A web application accepting user input opens up a potential attack surface for malicious users. The size of the attack surface depends on what’s done with the entered data. If the website takes data and doesn’t do anything with it outside the scope of the current webpage, such as send it to another server or store it in a database, the effects are limited to the current page and browser session. Little can be accomplished except to disrupt the design of the website for this particular user. However, if the captured data includes an account creation form or survey, for example, a malicious user has much more potential to do harm—especially when that information is later rendered to the webpage dynamically. This inherently allows anyone to add script to the site, which can open up the site to behavior such as phishing. As a webpage developer, you need to ensure that all user input is scrubbed of script elements. For example, don’t allow < > text to be entered into the form. Without those characters, a script block can’t be added.
Using the eval function
The eval function is used to run JavaScript dynamically. It takes a string as a parameter and runs it as a JavaScript function. Never use the eval function against any data provided by an external source over which you don’t have 100 percent control.
Using iFrames
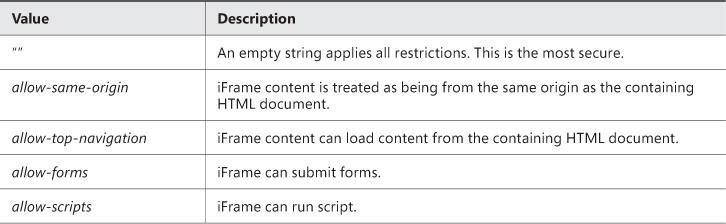
iFrames open up a new opportunity to attackers. Search engines provide a plethora of results dealing with exploits regarding the use of iFrames. The sandbox attribute should always be used to restrict what data can be placed into an iFrame. The sandbox attribute has four possible values, as listed in Table 3-2.
![]() Thought experiment: Encoding input data
Thought experiment: Encoding input data
Objective summary
![]() Regular expressions are strings of special characters that an interpreter understands and uses to validate text format.
Regular expressions are strings of special characters that an interpreter understands and uses to validate text format.
![]() Regular expressions are objects in JavaScript that provide methods for testing input data.
Regular expressions are objects in JavaScript that provide methods for testing input data.
![]() isNaN is a built-in function to determine whether a value isn’t a number, whereas isFinite validates whether the value is a finite number.
isNaN is a built-in function to determine whether a value isn’t a number, whereas isFinite validates whether the value is a finite number.
![]() Code injection is a technique that attackers use to inject malicious code into your application.
Code injection is a technique that attackers use to inject malicious code into your application.
![]() iFrames and dynamic JavaScript are dangerous if not used properly in a webpage.
iFrames and dynamic JavaScript are dangerous if not used properly in a webpage.
Objective review
1. Which of the following regular expression characters denote the end of the string?
A. $
B. %
C. ^
D. &
2. Which of the following sandbox attributes allows the iFrame to load content from the containing HTML document?
A. allow-script-execution
B. allow-same-origin
C. allow-forms
D. allow-top-navigation
E. allow-top-document
3. Which function should never be used to run JavaScript?
A. execute
B. JSDynamic
C. eval
D. evaluate
Objective 3.3: Consume data
This objective covers how to consume data in an HTML5 web application. The ability to consume data from external sources is more popular than ever. Website mash-ups and social integration are major catalysts for this.
This objective covers how to:
![]() Consume JSON and XML data by using web services
Consume JSON and XML data by using web services
![]() Use the XMLHTTPRequest object
Use the XMLHTTPRequest object
Consuming JSON and XML data by using web services
The two data formats commonly used in data transmission are JSON and XML. JSON is unstructured data, whereas XML is structured. JSON uses a special syntax that allows the definition of name value pairs in a lightweight string format. XML, as a relative of HTML, is more structured than JSON with named tags and opening and closing tags. Tags can have attributes. The following are examples of what a person object might look like in both formats where the person object has a first name, last name, hair color, and eye color:
![]() JSON:
JSON:
{firstName: "Rick", lastName: "Delorme", hairColor: "brown", eyeColor: "brown" }
![]() XML (Elements):
XML (Elements):
<Person>
<firstName>Rick</firstName>
<lastName>Delorme</lastName>
<hairColor>Brown</hairColor>
<eyeColor>Brown</eyeColor>
</Person>
![]() XML (attributes):
XML (attributes):
<Person firstname="Rick" lastName="Delorme" hairColor="Brown" eyeColor="Brown"/>
When publishing data services such as Web Services or a REST API, you can control how you publish the data. When consuming third-party resources, you won’t have control over how they’ve published the data.
Using the XMLHttpRequest object
JavaScript provides built-in support for receiving HTML data via the XMLHttpRequest object. The object makes a call to a web service, REST API, or other data provider services. The advantage of doing this via JavaScript on the client side is to be able to reload portions of the page from an external source without having to post the entire page back to the server.
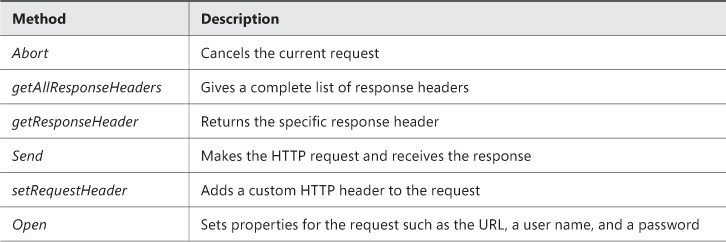
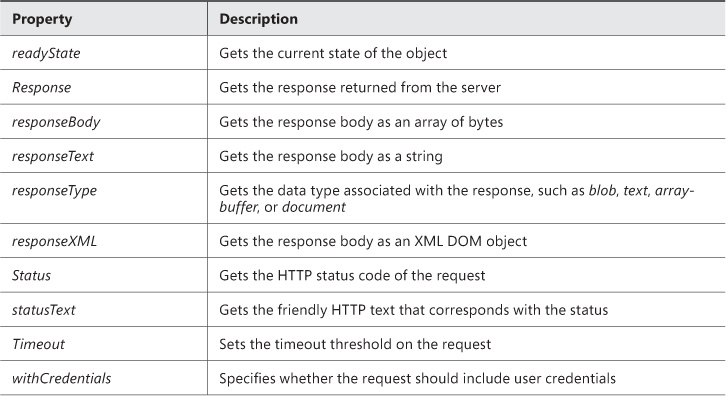
XMLHttpRequest makes an HTTP request and expects to receive back data in XML format. Both synchronous and asynchronous calls are supported. Table 3-3, Table 3-4, and Table 3-5 list the available events, methods, and properties of the XMLHttpRequest object.

In its simplest form, a request to the server using the XMLHttpRequest object looks like this:
<script>
$("document").ready(function () {
$("#btnGetXMLData").click(function () {
var xReq = new XMLHttpRequest();
xReq.open("GET", "myXMLData.xml", false);
xReq.send(null);
$("#results").text(xReq.response);
});
});
</script>
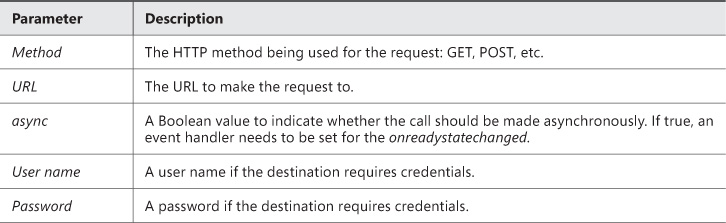
This script assumes a button on the HTML form and a div to show the results. A new XMLHttpRequest object is created. The open method is called to specify the request type, URI, and whether to make the call asynchronous. Table 3-6 lists all the parameters to the open method.
Exam Tip
The open method doesn’t make any server requests. If the user name and password is specified, it doesn’t send this information to the server in the open method. When the send method is called, the user name and password aren’t passed to the server either. The credentials are passed to the server only in response to a 401 security response from the server.
The XMLHttpRequest object provides some mechanisms for handling errors. The most common error to account for is a timeout error. By default, the value of the timeout is zero, which is infinite. A timeout value should always be specified. The code is updated as follows:
var xReq = new XMLHttpRequest();
xReq.open("GET", "myXMLData.xml", false);
xReq.timeout = 2000;
xReq.ontimeout = function () {
$("#results").text("Request Timed out");
}
xReq.send(null);
$("#results").text(xReq.response);
This results in not allowing the call to take any more than two seconds. The timeout is expressed in milliseconds. After the timeout period, the ontimeout event handler is called to allow for this condition to be handled appropriately in the webpage.
An additional consideration for this code is whether to make the call synchronously or asynchronously. Ideally, you should ensure that the call to the service to get the data won’t interfere with users and won’t block them, unless of course they need to wait on the reply before taking any further action. Synchronous calls, as the examples so far have shown, block the user interface while the request is being made. To prevent this, the call should be asynchronous, as shown here:
var XMLHTTPReadyState_COMPLETE = 4;
var xReq = new XMLHttpRequest();
xReq.open("GET", "myXMLData.xml", true);
xReq.timeout = 2000;
xReq.ontimeout = function () {
$("#results").text("Request Timed out");
}
xReq.onreadystatechange = function (e) {
if (xReq.readyState == XMLHTTPReadyState_COMPLETE) {
if (xReq.status = "200") {
$("#results").text(xReq.response);
} else {
$("#results").text(xReq.statusText);
}
}
}
xReq.send(null);
The onreadystate event is assigned a function to run when the state of the XMLHttpRequest object is changed. When the request is complete, the readyState changes to complete (readyState == 4). At this point, the HTTP return status can be evaluated for a success value such as 200, and then the processing of the XML data can occur.
The same code that has been used so far to retrieve XML data can also be used to make a request for JSON data. The following update to the code shows this:
var XMLHTTPReadyState_COMPLETE = 4;
var xReq = new XMLHttpRequest();
xReq.open("GET", "myJSONData.json", true);
xReq.timeout = 2000;
xReq.ontimeout = function () {
$("#results").text("Request Timed out");
}
xReq.onreadystatechange = function (e) {
if (xReq.readyState == XMLHTTPReadyState_COMPLETE) {
if (xReq.status = "200") {
$("#results").text(xReq.response);
} else {
$("#results").text(xReq.statusText);
}
}
}
xReq.send(null);
The only difference to this code is the name of the URL being passed. In this case, the endpoint is a data source that returns JSON-formatted data instead of XML. The JSON is displayed to the screen in the same way that the XML is displayed.
When the data is received via the XMLHttpRequest object, the data will need to be deserialized into a more user-friendly format. You also might want to submit data to the server in response to user actions. The next objective examines these concepts.
![]() Thought experiment: Creating a webpage with a stock ticker
Thought experiment: Creating a webpage with a stock ticker
Objective summary
![]() JSON and XML are the most common formats used for data exchange.
JSON and XML are the most common formats used for data exchange.
![]() JSON consists of name/value pairs.
JSON consists of name/value pairs.
![]() XML is a structured element-based document.
XML is a structured element-based document.
![]() JavaScript provides built-in support for receiving data via the XMLHttpRequest object.
JavaScript provides built-in support for receiving data via the XMLHttpRequest object.
Objective review
1. Which of the following is a valid JSON string?
A. {firstName, Rick, lastname, Delorme, hairColor, brown, eyeColor, brown}
B. {firstName: Rick; lastname: Delorme; hairColor: brown; eyeColor: brown}
C. {firstName: “Rick”; lastname: “Delorme”; hairColor: “brown”; eyeColor: “brown”}
D. {firstName: “Rick”, lastname: “Delorme”, hairColor: “brown”, eyeColor: “brown”}
2. With the XMLHttpRequest object, which of the following properties provides the response in a human readable format?
A. Response
B. responseBody
C. responseText
D. responseXML
3. At which stage during an XMLHttpRequest are user credentials sent to the server?
A. When the connection is opened
B. When the request is sent
C. When the ready state is complete
D. When the server sends a security response requesting the credentials
Objective 3.4: Serialize, deserialize, and transmit data
Data can be received and sent in many forms. In the preceding objective, JSON and XML were examined specifically. The notion of presenting JSON or XML data directly to users isn’t ideal. Users would appreciate receiving the data in a more usable or readable and meaningful way. For this, you need to have the data converted from an XML string or JSON string into something else. The concept of converting the data from one form to another is called serialization or deserialization.
With serialization, the data is put into a format for transmission. With deserialization, the transmitted data is converted into something that can be worked with, such as a custom object. In addition to working with string data, applications can work with binary data. An application might capture drawings or pictures on a canvas and send that data back to the server. The data needs to be serialized into a binary stream to achieve this.
This objective reviews the serialization, deserialization, and transmission of binary and text data. The ability to submit data via the HTML Form and sending data with the XMLHttpRequest object is also reviewed.
This objective covers how to:
![]() Send data by using XMLHttpRequest
Send data by using XMLHttpRequest
![]() Serialize and deserialize JSON data
Serialize and deserialize JSON data
![]() Serialize and deserialize binary data
Serialize and deserialize binary data
Sending data by using XMLHttpRequest
Sending data to the server is similar to receiving data. The code examples in the preceding objective used the XMLHttpRequest object to receive data. The XMLHttpRequest object itself is agnostic to sending or receiving. It can accomplish both tasks based on how the object is set up. To send data, the send method must have data passed into it, and that data can be transmitted to the endpoint specified in the URL of the open method. The following code sends the XML data to the server:
var xmlData = "<Person firstname='Rick' lastName='Delorme' hairColor='Brown'
eyeColor='Brown' /> ";
var xReq = new XMLHttpRequest();
xReq.open("POST", "/ReceiveXMLData.aspx", false);
xReq.responseType
xReq.send(xmlData);
When data is transmitted to the server, it needs to be serialized into a format that the URL endpoint can understand. If the endpoint is expecting XML, the data must be XML; if it’s expecting binary data, the data must be in a binary format.
Serializing and deserializing JSON data
The browser provides native support for working with JSON and XML. The JSON object is available for converting a JSON string to and from an object (serialize/deserialize). The following code shows how this is accomplished:
var person = {
FirstName: "Rick",
HairColor: "Brown"
};
var jsonPerson = JSON.stringify(person);
The person object has been serialized into a JSON string that can be sent to an endpoint URL for processing. To return the person back to a person object from a JSON string, the object can be deserialized by using the parse method:
var req = new XMLHttpRequest();
req.open("GET", "MyJsonData.json", false);
req.send(null);
var jsonPerson = JSON.parse(req.responseText);
When this code runs, the person object is reconstructed from the JSON string.
Serializing and deserializing binary data
Capturing dynamic image data follows a similar pattern as with the other techniques reviewed. The key difference is now the responsetype property must be set to blob. The following code demonstrates retrieving a binary image object and deserializing it into the webpage:
var xReq = new XMLHttpRequest();
xReq.open("GET", "orange.jpg", false);
xReq.responseType = 'blob';
xReq.send(null);
var blob = xReq.response;
document.getElementById("result").src = URL.createObjectURL(blob);
The XMLHttpRequest object’s responseType property has been set to blob. Then by using the response property to extract the binary data, the BLOB is passed to the URL.createObjectURL method. The createObjectURL method gives the img element a URL linking to the BLOB, and the image is displayed in the browser. For the inverse, the data can also be submitted to the server as soon as it’s serialized into a BLOB:
var xReq = new XMLHttpRequest();
xReq.open("POST", "saveImage.aspx", false);
xReq.responseType = 'blob';
xReq.send(data);
Using the Form.Submit method
The form element of an HTML page is the area of the form that contains elements that are typically input controls to gather information from users. The form element contains an action attribute that tells the form where to submit its data. Submitting the data in this way submits the entire HTML page back to the server for processing. However, another available mechanism is to hook up to the form’s submit event and handle the submission through JavaScript. This is useful for submitting the form’s data through an AJAX request so that users don’t have to leave the current page while the request is being processed. The form element at its simplest is as follows:
<form id="signupForm" action="processSignUp.aspx">
</form>
The form in this case will post its data to the processSignUp server page for processing, which in turn should redirect users back to a confirmation page of some sort. The other option for handling the form’s submission is to wire up the event in JavaScript:
$("document").ready(function () {
$("form").submit(function () {
});
});
Iterating over all the form elements, capturing the data out of them, and constructing a query string for use with an AJAX call would be possible inside the click event. The following code reviews this concept:
$("form").submit(function () {
var fName = $("#firstName").val();
var lName = $("#lastName").val();
var qString = "Last Name=" + lName + "&First Name=" + fName;
$.ajax({
url: 'processSignUp.aspx',
type: "POST",
data: qString,
success: function (r) {
}
});
return false;
});
The data from each field in the form is extracted and concatenated into a query string to submit to the server from the AJAX call. Although this method is functional, it has some drawbacks. First, a form with many elements will cause this code to get long. As new elements are added, the code will need to be updated. There is another option in the form of a jQuery method called serialize().
Using the jQuery.serialize method
jQuery provides a seamless way to encode data from an HTML form by traversing the form that’s passed into it and looking for input boxes to construct and return a query string. Then the query string can be posted to the server for processing. The preceding code is rewritten like this:
$("form").submit(function () {
var qString = $(this).serialize();
alert(qString);
$.ajax({
url: 'processSignUp.aspx',
type: "POST",
data: qString,
success: function (r) {
}
});
return false;
});
In this case, the jQuery.serialize method handles the extraction of the data from all the input elements and creates the query string. The advantage of using this method—beyond saving a lot of code—is that the query string is also encoded.
Exam Tip
The serialize method requires that all elements have the name attribute specified. The preceding code works with the HTML modified as such:
<form id="signupForm">
First Name:
<input type="text" id="firstName" name="firstName"/><br/>
Last Name:
<input type="text" id="lastName" name="lastName"/><br/>
<button type="submit">Submit</button>
</form>
The serialize method acts on any results from the selector that’s passed into the $() segment of the jQuery. However, the serialize method has some limitations that you should know about. Only successful controls are serialized—meaning, only controls that are in a valid state. For input controls such as check boxes and radio buttons, only the ones that are in a selected state are considered. For radio buttons, because the name attribute must be the same for them all to be considered in a radio button group, you would specify the value attribute to differentiate them in the query string:
<input type="radio" name="gender" value="m"/>Male
<input type="radio" name="gender" value="f"/>Female
The jQuery.serialize method makes the code involved to generate a query string of the parameters from a form much simpler to create and less error prone.
![]() Thought experiment: Saving a form
Thought experiment: Saving a form
Objective summary
![]() Browsers provide native support via the JSON object to work with serializing and deserializing JSON strings.
Browsers provide native support via the JSON object to work with serializing and deserializing JSON strings.
![]() The JSON.parse method deserializes a JSON string into an object, and the JSON.stringify method serializes an object into a JSON string.
The JSON.parse method deserializes a JSON string into an object, and the JSON.stringify method serializes an object into a JSON string.
![]() By setting the XMLHttpRequest responseType property to the value ‘blob’, you can retrieve binary data.
By setting the XMLHttpRequest responseType property to the value ‘blob’, you can retrieve binary data.
![]() By default, the form submit action sends the entire page to the server (based on the action attribute) for processing.
By default, the form submit action sends the entire page to the server (based on the action attribute) for processing.
![]() Handling the submit event allows you to customize how the form data is posted to the server.
Handling the submit event allows you to customize how the form data is posted to the server.
![]() The jQuery.serialize method provides a convenient shortcut to convert specified input controls into a query string.
The jQuery.serialize method provides a convenient shortcut to convert specified input controls into a query string.
Objective review
1. Which of the following code lines is the correct way create an object from a JSON string stored in a variable called jsonString?
A. var o = JSON.split(jsonString);
B. var o = JSON.stringify(jsonString);
C. var o = JSON.parse(jsonString);
D. var 0 = JSON.join(jsonString);
2. Which of the following code lines allows an XMLHttpRequest to return binary data?
A. request.responseType = ‘binary’;
B. request.responseType = ‘image/jpg’;
C. response.type = ‘blob’;
D. request.responseType = ‘blob’;
3. How do you control what’s sent to the server when submitting a form?
A. Add a submit button to the form.
B. Handle the submit event of the form.
C. Specify the action attribute of the form element.
D. Ensure that all elements on the form have a name.
Answers
This section contains the solutions to the thought experiments and answers to the objective review questions in this chapter.
Objective 3.1: Thought experiment
You’ve already seen how to get access to the DOM and modify elements through JavaScript. By using these techniques, you can get a reference to the input controls on the form and, based on user input in certain elements, this can trigger modification to the validation rules (for example, change the regular expression validation dynamically). You can get regional context about a user from the Geolocation API. From this you can derive what part of the world the user is in and apply the exact validation on the input controls.
Objective 3.1: Review
1. Correct answer: C
A. Incorrect: A radio button is suited for allowing a single selection.
B. Incorrect: A text area is suited for a multi-line text box.
C. Correct: Check boxes allow multiple selections.
D. Incorrect: A radio button doesn’t allow more than one selection.
2. Correct answer: D
A. Incorrect: A text box allows data entry but is plainly visible.
B. Incorrect: A text area allows data entry but is plainly visible.
C. Incorrect: url is a type of text box with special validation rules.
D. Correct: A password input type hides the characters being entered.
3. Correct answer: B
A. Incorrect: A button is generic and must have an event handler to perform custom logic.
B. Correct: The submit button invokes the forms submit action.
C. Incorrect: The reset button clears all input fields on the form.
D. Incorrect: A radio button is used for a selection list.
4. Correct answer: C
A. Incorrect: You can do this with a custom event, but that’s more work than necessary.
B. Incorrect: The goal is to validate the data before submitting the form.
C. Correct: The required attribute ensures that a field contains a value before being submitted.
D. Incorrect: A label would be informative but doesn’t guarantee that all the required fields are populated before submitting.
Objective 3.2: Thought experiment
The safest approach to restricting input data is to restrict the characters that a user can enter into a specific field. If a field is designed to accept only numeric data, ensure that the validation on that input control will allow only numeric data. The same is true for dates, text, and any other input that a user can freely type into. Regular expressions simplify this type of validation by verifying that only the expected characters are entered. If a text box is expecting a person’s name, don’t allow HTML characters such as the < or > symbols to be input into the field. Also, restrict the field length so that it matches the type of the data expected. A field expecting the age of a person doesn’t need to be 500 characters; you can probably get away with allowing only 3 characters.
Objective 3.2: Review
1. Correct answer: A
A. Correct: The $ sign denotes the end of the string.
B. Incorrect: The % sign doesn’t denote the end of the string.
C. Incorrect: The ^ character denotes the start of the string.
D. Incorrect: The & character doesn’t denote the end of the string.
2. Correct answer: D
A. Incorrect: Allows scripts to run
B. Incorrect: Only allows content from the same origin
C. Incorrect: Allows forms
D. Correct: Allows content from the containing HTML document
E. Incorrect: Not a valid option
3. Correct answer: D
A. Incorrect: Credentials aren’t passed with the open method.
B. Incorrect: Credentials aren’t passed with the request method.
C. Incorrect: Ready state is a property that indicates the current state of the connection.
D. Correct: Credentials are passed only if the server requests them with a return code 401.
Objective 3.3: Thought experiment
The task assigned here to build a scroll across the top of the page is seen in many websites today. A stock price ticker is a typical application of this. This solution would potentially incorporate different technologies. At its core, you can implement the XMLHttpRequest object to make a call to an API that provides stock data. When the data is retrieved, you can display in the browser. Because the solution calls for not posting the entire page, you would need to use dynamic DOM manipulation to display the results and have them scroll across the top of the page. Because the quotes must be updated regularly, you would likely include the use of a timer to poll for the results at a regular interval.
Objective 3.3: Review
1. Correct answer: D
A. Incorrect: A JSON string isn’t just a comma-separated list.
B. Incorrect: A JSON string isn’t a list delimited by semi-colons.
C. Incorrect: A JSON string isn’t a list delimited by semi-colons.
D. Correct: A JSON string is a series of name/value pairs where the name of the property is followed by a colon and a quoted string. Multiple name value pairs are comma separated.
2. Correct answer: C
A. Incorrect: Response doesn’t provide any direct information.
B. Incorrect: responseBody provides the result in binary format.
C. Correct: responseText provides the result as text that’s human readable.
D. Incorrect: responseXML isn’t a valid property.
3. Correct answer: D
A. Incorrect: Credentials aren’t passed with the open method.
B. Incorrect: Credentials aren’t passed with the request method.
C. Incorrect: Ready state is a property that indicates the current state of the connection.
D. Correct: Credentials are passed only if the server requests them with a return code 401.
Objective 3.4: Thought experiment
In this application, you now need to know when users finish entering information into a field. You can use the onblur event for this. By hooking up onblur to the email field, you can use the XMLHttpRequest object to send a request to the server to validate that the address is unique and hasn’t been used before. The results of the data evaluation on the server are passed back in the response and can be used to highlight to users that the data isn’t unique. This provides a much better user experience in that users don’t need to wait until they fill out the entire form to have all the fields validated. Did you remember to encode the data before submitting it to the server to prevent an injection attack?
Objective 3.4: Review
1. Correct answer: C
A. Incorrect: This isn’t a valid method on the JSON object.
B. Incorrect: This method is used to serialize an object into a JSON string.
C. Correct: This method is used to deserialize a JSON string into an object.
D. Incorrect: This isn’t a valid method on the JSON object.
2. Correct answer: D
A. Incorrect: ‘binary’ isn’t a valid option for the responseType.
B. Incorrect: ‘image/jpg’ isn’t a valid option for the responseType.
C. Incorrect: type isn’t a valid property name on the response object.
D. Correct: The response object’s responseType property must be set to ‘blob’.
3. Correct answer: B
A. Incorrect: A submit button submits the entire form to the server by default.
B. Correct: Handling the submit event on the form allows you to intercept the form before submitting and perform custom actions with it.
C. Incorrect: The action attribute indicates what server-side page the form should submit.
D. Incorrect: All elements on the form should have a name to use jQuery to serialize them. However, this has no effect on form submission.