
Chapter 2. Implement program flow
Being able to manipulate the Document Object Model (DOM), create animations, and use the various application programming interfaces (APIs) provided by the JavaScript library is a great skill to have. To leverage the power of the user experience fully, however, you need to provide users with certain website functions only under certain conditions, a concept known as program flow. Without program flow, JavaScript programs would process from top to bottom in the order in which the code was written. This is useful in some cases, but in most situations in which a dynamic user experience is required, logic needs to be processed conditionally. Program flow can be conditional, iterative, or behavioral:
![]() Conditional program flow is based on evaluating state to make a decision as to which code should run.
Conditional program flow is based on evaluating state to make a decision as to which code should run.
![]() Iterative flow is the ability to process lists or collections of information systematically and consistently.
Iterative flow is the ability to process lists or collections of information systematically and consistently.
![]() Behavioral flow can be defined as an event or callback in which specific logic should be applied based on user engagement with the web application or the completion of another task.
Behavioral flow can be defined as an event or callback in which specific logic should be applied based on user engagement with the web application or the completion of another task.
Flow can—and almost always will—include a combination of all three.
Another special type of program flow involves exception handling. Exception handling constructs provide the ability to run specific logic in the case of an error in the program.
Objectives in this chapter:
![]() Objective 2.1: Implement program flow
Objective 2.1: Implement program flow
![]() Objective 2.2: Raise and handle an event
Objective 2.2: Raise and handle an event
![]() Objective 2.3: Implement exception handling
Objective 2.3: Implement exception handling
![]() Objective 2.4: Implement a callback
Objective 2.4: Implement a callback
![]() Objective 2.5: Create a web worker process
Objective 2.5: Create a web worker process
Objective 2.1: Implement program flow
For the exam, you need to understand both conditional and iterative program flow. Conditional program flow enables an application to examine the state of an object or variable to decide which code path to process. The commands you use to apply the concept of conditional flow are the if...else statement, the switch statement, and the ternary operator.
This objective covers how to:
![]() Evaluate expressions, including using switch statements, if/then statements, and operators
Evaluate expressions, including using switch statements, if/then statements, and operators
![]() Work with arrays
Work with arrays
![]() Implement special types of arrays
Implement special types of arrays
![]() Use advanced array methods
Use advanced array methods
![]() Implement iterative control flow
Implement iterative control flow
Evaluating expressions
To use a conditional flow statement, you must evaluate some data against some condition, which you do by using conditional operators. You can use logical operators to combine conditional operators. Combining operators is useful when more than one condition must be met—or at least one condition from a set of conditions must be met—before processing specific logic. Table 2-1 outlines the available operators.
Use these operators to evaluate data and to make decisions. For example, if a website requires that its users be a minimum age to sign up for an account, the logic on the sign-up page might include something like this:
if(users age >= minimum age)
{
//allow sign-up.
}
Using if statements
Use the if statement to evaluate state to control the direction in which the code will run. The if statement can stand alone, as shown in the preceding snippet, or be combined with else to form more complex constructs:
if(exp1, exp2, exp3...expn){
//true logic
}else {
//false logic
}
This if statement starts on a new line with the keyword if. In parentheses following the if statement is a series of one or more expressions, separated by logical operators when more than one expression is provided. The code block immediately following the if statement conditional expression runs only when the expression evaluates to true. When the expression evaluates to false, the block immediately following the else keyword runs.
The else keyword is optional. An if statement can exist as a standalone statement when no logic is available to run when the expression evaluates to false.
 Exam Tip
Two conditional operators are available for checking equality: == (equality operator) and === (identity operator). Checking for equality with the == operator will ignore the underlying data type, whereas the === identity operator will consider data type. Look at the following example:
var n = 2000, s = '2000';
alert(n == s);
alert(n === s);
The first expression, which uses the equality operator, evaluates to true because the string is cast to a number for the purpose of the evaluation. The second expression, which uses the identity operator, evaluates to false because the string ‘2000’ isn’t equal to the integer 2000.
Conditional statements such as the if statement can be nested, like in the following example:
var userAge = 10, gender = 'M';
var minimumAge = 11;
if (userAge > minimumAge) {
if (gender == 'M') {
//do logic for above age male
}
else {
//do logic for above age female.
}
} else if (gender == 'M') {
//do logic for underage male
} else {
//do logic for underage female.
}
In this example, the logic tests whether a user is older than a specified age. If the user is over the specified age, the logic in the true branch runs. At that point, another if statement evaluates the user’s gender. If the user’s age is younger than the required minimum, the false branch is processed. Here an else if statement performs additional conditional processing on the false branch based on the gender. Again, the code processes a specific branch depending on whether the user is male or female.
You aren’t limited in how deeply you can nest if statements, but nesting them too deeply can make the code quite messy and difficult to read.
The following example examines the background color of an element and processes specific behavior based on the color:
var canvas = document.getElementById("canvas1");
if (canvas.style.backgroundColor == 'green') {
alert('proceed'),
} else if (canvas.style.backgroundColor == 'yellow') {
alert('slow down/safely stop'),
} else if (canvas.style.backgroundColor == 'red') {
alert('stop'),
}
This code retrieves a reference to a page element called canvas1 and then evaluates that element’s background color to determine an appropriate action to take. In some places, whether by law or preference, yellow sometimes means “proceed faster.” In that case, the code could be adapted to use the OR logical operator:
var canvas = document.getElementById("canvas1");
if (canvas.style.backgroundColor == 'green' || canvas.style.backgroundColor == 'yellow') {
alert('proceed'),
} else if (canvas.style.backgroundColor == 'red') {
alert('stop'),
}
This code provides the “proceed” instruction when the color is green OR yellow.
Exam Tip
When using the logical OR operator in an if statement, the JavaScript engine knows that it can proceed if any of the statements are true. As such, it evaluates the expressions from left to right until it finds one that’s true. As soon as it does, it won’t evaluate any further expressions but will immediately jump into the true code block. In the preceding example, if the background is green, the check for whether the background is yellow would never be evaluated.
Structuring code this way is syntactically correct. However, lengthy if statements can prove difficult to read and even harder to maintain. If your if statements are becoming quite long—for example, if the previous code example had to test for 15 different colors—a switch statement might be more appropriate.
Using switch statements
The switch statement provides a construct in which you can test a list of values for equality (as with the == operator). The following example demonstrates a switch statement:
switch (canvas.style.backgroundColor) {
case 'yellow':
alert('slow down'),
break;
case 'green':
alert('proceed'),
break;
case 'red':
alert('stop'),
break;
default:
alert('unknown condition'),
break;
}
The switch statement consists of several parts. The first is the switch keyword itself, followed by parentheses surrounding an expression to evaluate. This particular example evaluates the background color of the canvas element.
Following the switch line is a series of case statements enclosed in braces. The case statement provides the values to evaluate against. This example provides three cases to evaluate: one for each of the possible red, green, and yellow background colors.
Each case statement contains a required break keyword. This keyword denotes the end of that particular case statement. Only the first case that evaluates to true in a switch statement will be processed. Omitting the break keyword will cause unexpected behavior.
The last piece of the switch statement is the optional default keyword, which serves as a failsafe. If none of the case statements evaluate to true, the default statement provides a way to handle the situation. You might not want to take any action when none of the case statements evaluates to true—in which case you can omit the default statement. However, it does enable you to handle the scenario where one of the conditions should have been reached but wasn’t, possibly due to bad data being passed into a method or a valid case being missed. Including a default to account for both of those scenarios is good practice.
You can’t force logical flow in a switch statement to move from one case to the next by omitting the break keyword; in other words, only one conditional block is processed within a switch statement. This means that logically, you can’t use the AND logical operator. However, you can leverage the OR logical operator. The following code demonstrates a case in which you want the same code to run for both the green and yellow background conditions:
switch (canvas.style.backgroundColor) {
case 'yellow':
case 'green':
alert('proceed'),
break;
case 'red':
alert('stop'),
break;
default:
alert('unknown condition'),
break;
}
In this code, multiple case statements are stacked onto each other. If any of the stacked case statements evaluates to true, the code block following that case statement is processed, thus implying a logical OR. You don’t need to explicitly use the logical OR operator (||) to leverage logical OR semantics.
Important: A Valid switch Statement
The values used in the case statement for the purposes of the evaluation must be expressed as a constant. For example, switching on an integer value to determine whether it’s divisible by another number won’t work because the case would require an expression instead of a constant value. For example, case x / 10: would be an invalid case statement. However, the switch statement itself can accept an expression to evaluate against all cases inside the switch block.
Using ternary operators
The ternary operator is essentially a shorthand mechanism for an if statement. The syntax of the ternary operation is
<expression> ? <true part>: <false part>
When the expression evaluates to true, the true part runs; otherwise, the false part runs. This code demonstrates using the ternary operator to check the background color of the canvas:
canvas.style.backgroundColor == 'green' ? document.write('proceed') :
document.write('stop'),
Working with arrays
Arrays are JavaScript objects and are created just like any other JavaScript object, with the new keyword:
var anArray = new Array();
var anArray = new Array(5);
var anArray = new Array('soccer', 'basketball', ..., 'badminton'),
This code example shows an Array object being instantiated and demonstrating the three available constructors. The first line creates an empty Array object without a default size. The second line creates an Array object with a default size. Each value in the array is undefined because nothing is assigned to it yet. The last example creates an array initialized with data. In addition to the object constructors, you can create an array as follows:
var anArray = ['soccer', 'basketball', ...,'badminton'];
Under the hood, JavaScript converts the anArray variable to the Array object type. After creating an array, you can access its elements by using square brackets following the variable name, as shown in this example:
var anArray = new Array(5);
anArray[1] = 'soccer';
alert(anArray[1]);
You access elements within an array by their indexed position. This example accesses the element at index position 1 and assigns a value to it. Arrays in JavaScript are zero-based, which means that the first element in the array is at index zero, not at index one. The last element is at index Array.length –1—in the preceding example, 5–1=4. Hence, the array element indexes are 0, 1, 2, 3, and 4.
Exam Tip
Sizing arrays is very dynamic. In the preceding example, even though the array is initially declared to have a length of 5, if you try to access the 10th element, the array automatically resizes to accommodate the requested length. The following example demonstrates this concept:
var anArray = new Array(5);
alert(anArray.length);
anArray[9] = 'soccer';
alert(anArray.length);
A multi-dimensional array can contain other arrays. The following code demonstrates this:
var multiArray = new Array(3);
multiArray[0] = new Array(3);
multiArray[1] = new Array(3);
multiArray[2] = new Array(3);
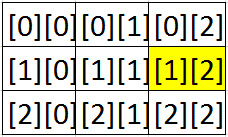
This example creates a two dimensional 3 × 3 array. Each array isn’t required to be the same size; this example was just coded that way. Accessing the elements of a two-dimensional array is much the same as accessing a one-dimensional array, but you use two indexes:
multiArray[1][2] = 'ball sport';
This example assigns a value to the first index of the first dimension and the second index of the second dimension, as illustrated in Figure 2-1.
Because arrays are objects, they expose a number of powerful methods to make working with them easier. The following sections explain each available method and property.
Using the length property
The length property provides information on how long the array is—that is, how many elements the array has allocated at the time the property is evaluated. This property is useful for situations in which you need to iterate over an array or to show users how many items are in the array at a specific point in time, such as in a queue. The following example shows how to access the length property:
var anArray = new Array(5);
alert(anArray.length);
Many functions enable you to manipulate array contents quickly and easily.
Exam Tip
Some array methods affect the Array object directly, whereas other methods return a new Array object. For the exam, you must understand when each case is applicable.
Using the concat method
The concat method combines two or more arrays into one array:
var sports = new Array( 'football', 'cricket', 'rugby', 'tennis', 'badminton'),
var moreSports = new Array('soccer', 'basketball', 'hockey'),
var combinedSports = sports.concat(moreSports);
The array returned by the concat method and stored in the combinedSports variable contains all the elements from both arrays in sequence. The contents of the moreSports array appear after the elements of the sports array in this example.
Using the indexOf and lastIndexOf methods
The indexOf method provides a way to find the index of a known element. The following code sample demonstrates this:
var sports = new Array('soccer', 'basketball', 'hockey', 'football', 'cricket', 'rugby',
'tennis', 'badminton'),
var index = sports.indexOf('football', 0);
This example calls the indexOf method to determine the index of the element ‘football’. The indexOf method accepts two parameters: what to search for and the index at which to begin searching. This example searches the entire array, so the search starts at index 0. The result from this call to the indexOf method is 3, because the element is found in the fourth position. If the element being sought isn’t found, the method returns a value of –1.
The indexOf method uses the identity operator to check for equality, which means that if an array contains strings such as ‘1’, ‘2’, and ‘3’ and you’re searching for the integer 3, the result is –1 because the equality operation returns false for all elements in the array. The indexOf method searches in ascending index order. To search in descending order—that is, to search from the end of the array to the beginning—use the lastIndexOf method, which accepts the same parameters.
Using the join method
The join method joins all the elements in an array into a single string separated by a specified string separator. For example, to convert an array of strings into a comma-separated list, you could use the following code:
var sports = new Array('soccer', 'basketball', 'hockey', 'football', 'cricket', 'rugby',
'tennis', 'badminton'),
var joined = sports.join(','),
The join method accepts a string as a parameter, which is the string used as a delimiter to separate the values in the array. The result is a string of all the elements separated by the string passed into the join method.
Using the reverse method
The reverse method reverses the sequence of all elements in the array. This example reverses the sports array:
var sports = new Array('soccer', 'basketball', 'hockey', 'football', 'cricket', 'rugby',
'tennis', 'badminton'),
sports.reverse();
The method reverses all the items so that ‘soccer’ becomes the last item in the array and ‘badminton’ becomes the first item.
Using the sort method
The sort method sequences the items in the array in ascending order. In the sports array, the sort would be alphabetical, as shown in the following example:
var sports = new Array('soccer', 'basketball', 'hockey', 'football', 'cricket', 'rugby',
'tennis', 'badminton'),
alert(sports.indexOf('soccer'));
sports.sort();
alert(sports.indexOf('soccer'));
The result is that the sports array is now sorted. The alert boxes show the index of the ‘soccer’ element before and after the sort, demonstrating that the element has moved from position 0 to position 6 in the array.
Using the slice method
The slice method takes out one or more items in an array and moves them to a new array. Consider the following array with the list of sports:
var sports = new Array('soccer', 'basketball', 'hockey', 'football', 'cricket', 'rugby',
'tennis', 'badminton'),
var someSports = sports.slice(1, 2);
The slice method takes two parameters: the indexes where the slice operation should begin and end. The ending index isn’t included in the slice. All copied elements are returned as an array from the slice method. In this example, because ‘basketball’ is at index 1 and the ending index is specified at index 2, the resulting array someSports contains only one element: ‘basketball’.
Using the splice method
The splice method provides a way to replace items in an array with new items. The following code demonstrates this:
var sports = new Array('soccer', 'basketball', 'hockey', 'football', 'cricket', 'rugby',
'tennis', 'badminton'),
var splicedItems = sports.splice(1, 3, 'golf', 'curling', 'darts'),
The splice method returns an array containing the items that are spliced out of the source array. The first parameter is the index in the array where the splice operation should start. The second parameter is the number of items to splice, starting from the index specified in the first parameter. The optional last parameter lists items that are to replace the items being spliced out. The list doesn’t have to be the same length as the items being spliced out. In fact, if the last parameter is omitted, the spliced items are simply removed from the array and not replaced. In this example, three items are replaced, starting at index 1. So, ‘basketball’, ‘hockey’, and ‘football’ are replaced with ‘golf’, ‘curling’, and ‘darts’.
Implementing special types of arrays
JavaScript doesn’t natively provide a custom object to represent specialized collections or arrays. Instead, methods are provided on the Array object that allows you to implement various types of specialized collections such as a queue or a stack.
A queue is essentially a first-in-first-out type of collection. Whenever items are added to the list, they should go at the end of the line. In contrast, a is a last-in-first-out type of collection in which the last item put on the stack is the first item you can take out of the stack. The array methods that facilitate this type of behavior are pop, push, shift, and unshift.
Using the pop and push methods
The pop and push methods provide stack functionality. The push method appends the specified items to the end of the array. The pop method removes the last item from the array. The following code demonstrates the push method:
var sports = new Array();
sports.push('soccer', 'basketball', 'hockey'),
sports.push('football'),
This code creates an Array object, and then inserts (pushes) three items into the array. The items are added to the stack in the same order in which they appear in the parameter list. Next, the code pushes one additional item onto the stack. The pop method removes and returns the last item in the array:
var nextSport = sports.pop();
When this code runs, the nextSport variable holds the value ‘football’ because that was the last value added to the array.
Note: Using push and pop on any Array
You can use the pop and push methods in any context to add and remove items from the end of an array. The stack concept is useful but isn’t a confining mechanism that limits use of these methods to just stack arrays.
Using the shift and unshift methods
The shift and unshift methods work in the exact opposite way from the pop and push methods. The shift method removes and returns the first element of the array, whereas the unshift method inserts new elements at the beginning of the array. The following code uses the shift and unshift methods:
var sports = new Array();
sports.unshift('soccer', 'basketball', 'hockey'),
sports.unshift('football'),
var nextSport = sports.shift();
The net result of this code is exactly the same as for the pop and push code, except the operations occur at the front of the array instead of the end. In other words, this example still illustrates the stack functionality of “last in, first out.”
Taken together, the two concepts you’ve just seen (pop/push and shift/unshift) can be combined to create the concept of a first-in-first-out queue. The following code demonstrates using a queue in which the front of the line is the beginning of the array and the end of the line is the end of the array:
var sports = new Array();
sports.push('soccer'),
sports.push('basketball'),
sports.push('hockey'),
var get1 = sports.shift();
sports.push('golf'),
var get2 = sports.shift();
This code first pushes some items into the array. This means that each item is added to the end of the array. When an item is needed from the array, the shift method gets the first item out of the beginning of the array—the item at index 0. You can easily implement the opposite mechanism by using the unshift and pop methods, which would achieve the same results but enter and retrieve items from the opposite ends of the array from this example.
Using advanced array methods
This section examines some of the more advanced array methods. These methods all involve the use of a callback, which you’ll examine in more detail in Objective 2.4, “Implement a callback.” If callbacks are a new concept to you, you should study that objective before completing this section.
The Array object exposes methods that enable you to process custom logic on every single element in the array. The following sections demonstrate each method.
Using the every method
The every method lets you process specific logic for each array element to determine whether any of them meet some condition. Look at following code:
var evenNumbers = new Array(0, 2, 4, 6, 8, 9, 10, 12);
var allEven = evenNumbers.every(evenNumberCheck, this);
if (allEven) {
...
} else {
...
}
function evenNumberCheck(value, index, array) {
return (value % 2) == 0;
}
In this code, assume that the evenNumber array is created with a list of what you expected to be all even numbers. To validate this, you can use the every method.
The every method takes two parameters:
![]() The name of the function that should be processed for each element
The name of the function that should be processed for each element
![]() An optional reference to the array object
An optional reference to the array object
The evenNumberCheck function called for each item in the array returns true or false for each item, depending on whether it meets the desired criteria. In this example, the value is tested to ensure that it’s an even number. If it is, the function returns true; otherwise, it returns false. As soon as the every method gets the first false result for any item in the array, it exits and returns false. Otherwise, if all elements in the array return true, the every method returns true. In the preceding code sample, an if statement was added to evaluate the return value of the every method and take an appropriate action. In this example, the evenNumberCheck function returns false on the sixth item in the array, because 9 is an odd number, so the test for even fails.
Using the some method
The some method works very much like the every method. The difference is that some checks only whether any item in the array meets the criteria. In this case, the some method returns true if the called function returns true for any single element. If all elements in the array return false, the some method returns false. By this definition, you can use some to achieve the exact opposite of the every method when the some method returns false. The following code is updated from the previous example so that it uses the some method:
var evenNumbers = new Array(0, 2, 4, 6, 8, 9, 10, 12);
var allEven = evenNumbers.some(evenNumberCheck, evenNumbers);
if (allEven) {
...
} else {
...
}
function evenNumberCheck(value, index, array) {
return (value % 2) == 0;
}
With the code updated to use the some method, the return result isn’t true, because some of the values in the array are even numbers. Had this result returned false, you would know that all the elements in the array were odd numbers.
Using the forEach method
The forEach method enables an application to process some logic against each item in the array. This method runs for every single item and doesn’t produce a return value. forEach has the same signature as the other methods you’ve seen so far in this section. The following code demonstrates the forEach method:
var sportsArray = ['soccer', 'basketball', 'hockey', 'football', 'cricket', 'rugby'];
sportsArray.forEach(offerSport);
function offerSport(value, index, array) {
var sportsList = document.getElementById("sportsList");
var bullet = document.createElement("li");
bullet.innerText = value;
sportsList.appendChild(bullet);
}
In this sample, the code assumes that a list element on the HTML page is ready to be filled with the list of sports, each formatted as a child node. Each element in the list is passed to the function and added as an <li> element. The array elements aren’t sorted in this case. You can chain the methods together to ensure that the elements are, for example, alphabetized:
sportsArray.sort().forEach(offerSport);
Like with all the advanced methods shown thus far, the elements are passed to the function in ascending index order. So you could call the sort method and chain it together with the forEach method to ensure that the elements are displayed to the user in order.
Using the filter method
The filter method provides a way to remove items for an array based on some processing done in the callback function. The filter method returns a new array containing the elements that are included based on a return value of true or false from the callback function. In the even number example, you can use the filter method to scrub the array and ensure that the program continues to use only an array that contains even numbers, as demonstrated here:
var evenNumbers = new Array(0, 2, 4, 6, 8, 9, 10, 12);
var allEven = evenNumbers.filter(evenNumberCheck, evenNumbers);
//work with the even numbers....
function evenNumberCheck(value, index, array) {
return (value % 2) == 0;
}
In this example, the evenNumberCheck method is the same as the one used previously. However, rather than use the every or any method to determine the quality of the data with respect to containing only even numbers, the filter method simplifies the removal of the odd numbers. You can use any logic in the callback function to process the element and determine whether it should be included in the returned array, such as pattern matching or a database lookup.
Using the map method
The map method enables you to replace values in the array. Every element in the array is passed to a callback function. The callback function’s return value replaces the value for the position in the array that was passed in. The following example demonstrates having every number in an array rounded off appropriately:
var money = [12.8, 15.9, 21.7, 35.2];
var roundedMoney = money.map(roundOff, money);
...
function roundOff(value, position, array) {
return Math.round(value);
}
This example provides the square of a series of numbers:
var numbers = [1, 2, 3, 4, 5, 6, 7, 8];
var squares = numbers.map(squareNumber, numbers);
...
function squareNumber(value, position, array) {
return value * value;
}
Using the reduce and reduceRight methods
The reduce and reduceRight methods are recursive. Each result of the callback function is passed back into the callback method as the previous return value along with the current element to be passed in. This provides some interesting scenarios. The reduce method processes the elements of the array in ascending order, whereas the reduceRight processes the elements of the array in descending order. The following example demonstrates using the reduce method to calculate a factorial:
var numbers = [1, 2, 3, 4, 5, 6, 7, 8, 9, 10];
var factorials = numbers.reduce(factorial);
function factorial(previous, current) {
return previous * current;
}
In this function, the factorial for 10 is calculated. In the math world, it’s denoted as 10!
Exam Tip
Some advanced functions enable you to change the source array, whereas others don’t. This is an important aspect to keep clear.
Implementing iterative control flow
You’ve seen how to use if statements to control program flow. Another concept you can use to control the flow of JavaScript programs is iterative flow control, which enables you to loop over a block of code many times. You’ve already seen some iterative operations when you reviewed the advanced methods on the array object that use callbacks. There, the iterative flow control was built into the various array methods. In this section, you’ll examine the native iterative control statements, including for and while loops.
Using the for loop
The for loop is useful in cases in which a block of code should run based on a deterministic number of items. In some cases, you might want to iterate over a list of items in an array or list; in other cases, you might want to run a block of code a specific number of times to perform some type of animation or to create a specific number of objects.
The syntax of the for loop is as follows:
for(<counter>;<expression>;<counter increment>)
{
<code to run>
}
The for loop needs three elements: a counter, an expression, and an increment.
![]() The counter variable holds the current number of times the loop has run. You need to initialize the counter appropriately, such as to 1 or 0.
The counter variable holds the current number of times the loop has run. You need to initialize the counter appropriately, such as to 1 or 0.
![]() The expression element evaluates the counter against some other value. Its purpose is to set a limit to the number of times the for loop runs. For example, if you wanted the loop to run 10 times, you could initialize the counter to 0, and the expression would be counter < 10. Doing so would ensure that the loop would run only while the expression returns true, that is, while the counter variable is less than 10. As soon as the counter equals 10, loop processing would stop, and code processing would continue after the for loop.
The expression element evaluates the counter against some other value. Its purpose is to set a limit to the number of times the for loop runs. For example, if you wanted the loop to run 10 times, you could initialize the counter to 0, and the expression would be counter < 10. Doing so would ensure that the loop would run only while the expression returns true, that is, while the counter variable is less than 10. As soon as the counter equals 10, loop processing would stop, and code processing would continue after the for loop.
![]() With the counter increment, the for loop must be told how to adjust the counter variable after each loop iteration. The increment can be positive or negative depending on how the loop is set up. You can set the increment so that the loop counts sequentially, or use mathematical operators to increment by a different value.
With the counter increment, the for loop must be told how to adjust the counter variable after each loop iteration. The increment can be positive or negative depending on how the loop is set up. You can set the increment so that the loop counts sequentially, or use mathematical operators to increment by a different value.
The code or body of the loop is a block of code surrounded by curly braces. This code section runs for each loop iteration. The following code samples demonstrate various ways to use a for loop.
First, here’s a simple for loop that runs a block of code 10 times:
for (var i = 0; i < 10; i++) {
document.write(i);
}
Notice that because the counter is starting at 0, the expression is to be less than 10. If the counter is to start at 1, the expression would be <= 10. This is important to keep an eye on. The counter increment uses the addition shorthand ++ to increase the counter by one on each iteration. The following code goes in the reverse order:
for (var i = 10; i > 0; i--) {
document.write(i);
}
In addition to using the increment or decrement operators, you can multiply or divide the counter value. The following code prints out a set of numbers that increase by a factor of 2 up to 100:
for(var i= 1; i<100;i*=2){
document.write(i);
document.write("<br />");
}
The expression piece of the for loop doesn’t need to be a hard-coded value, like what has been shown so far. Instead, you can derive the expression from the length of an object or another variable, as in this example:
var alphabet = 'abcdefghijklmnopqrstuvwxyz';
for (var i = 0; i < alphabet.length; i++) {
document.write(alphabet[i]);
document.write("<br />");
}
Because a string is just an array of characters, this code can iterate over the string and print each character to the screen. The length of the string determines how many times the loop runs.
Using the for...in loop
The for...in loop is a method for iterating over an object’s properties. Take the following example:
var person = { firstName: "Jane", lastName: "Doe", birthDate: "Jan 5, 1925", gender:
"female" };
for (var prop in person) {
document.write(prop);
}
This for loop prints out the name of each property on the custom person object. If you want the loop to print the property values instead, each property needs to be accessed via the property indexer of the object, as in this example:
var person = { firstName: "Jane", lastName: "Doe", birthDate: "Jan 5, 1925", gender:
"female" };
for (var prop in person) {
document.write(person[prop]);
}
Using the while loop
The while loop lets you run a code block until some condition evaluates to false. The construct of the while loop is as follows:
while(<expression>){
<code block>
}
The expression is something that evaluates to a Boolean. While the expression is true, the while loop continues to run. The code that runs is contained within the code block inside the braces. The condition must be true for the while loop to run at all. Because the while loop doesn’t use an incrementer like the for loop does, the code inside the while loop must be able to set the expression to false as appropriate; otherwise, the loop will be an endless loop. You might actually want to use an endless loop, but you must ensure that the processing of the loop doesn’t block the application’s main thread. The following code demonstrates a while loop:
var i = 0;
while (i < 10) {
//do some work here.
i++;
}
In this code, the while loop runs until the variable i equals 10. The expression can hold just about anything as long as it evaluates to a Boolean.
The preceding example is fairly deterministic in that you know the loop will run 10 times. However, in some situations a block of code should run until something else changes that could be outside the loop’s control. Suppose that an application is moving traffic through an intersection. This type of application could move traffic as long as the traffic signal is green. The following code demonstrates this:
var canvas = document.getElementById("canvas1");
while (canvas.styles.backgroundColor == 'green') {
//move traffic
}
This while loop will never end until the canvas background is no longer green. The loop depends on logic elsewhere in the application to change the background color of the canvas, such as a timer that controls how long the traffic signal stays green or red.
One other form of the while loop is the do...while loop.
Using the do...while loop
The key difference between the while loop and the do...while loop is that do...while always runs at least the first time. In contrast, the while loop first evaluates the expression to determine whether it should run at all, and then continues to run as long as the expression evaluates to true. The do...while loop always runs once because in this form of loop, the expression logic is at the bottom. The do...while loop achieves this with the following structure:
do{
<code block>
}while(<expression>)
This code processes the code block, and then while an expression is true, continues to process this code block. The following code segment demonstrates this:
var canvas = document.getElementById("canvas1");
do {
//stop traffic
}while(canvas.styles.backgroundColor == 'red')
In this code segment, the logic to stop traffic runs one time. Then, it evaluates the expression that checks whether the background of the canvas is red. The loop continues to run as long as this expression evaluates to true.
Short-circuiting the loops
Two mechanisms enable you to short-circuit a loop. The break keyword exits the current loop completely, whereas the continue keyword breaks out of the code block and continues to the next iteration of the loop.
Exam Tip
The break keyword breaks out of only the currently running loop. If the loop containing the break is nested inside another loop, the outer loop continues to iterate as controlled by its own expression.
![]() Thought experiment: Identifying subtleties in syntax
Thought experiment: Identifying subtleties in syntax
1. When is a for loop better than a while loop?
2. How is the readability of the code affected?
Objective summary
![]() The for and for...in iterate for a known length of values.
The for and for...in iterate for a known length of values.
![]() The while and do...while loops run until a Boolean condition is set to false.
The while and do...while loops run until a Boolean condition is set to false.
![]() Arrays provide a mechanism in which to create lists of things.
Arrays provide a mechanism in which to create lists of things.
Objective review
1. Which of the following keywords provide iterative control flow?
A. if statement
B. switch statement
C. for
D. break
2. Which of the following array methods combines two arrays?
A. join
B. combine
C. split
D. concat
3. Which iterative control syntax can guarantee that the loop is processed at least once?
A. for...in loop
B. while loop
C. do...while loop
D. for loop
4. Which keyword is used to exit a loop?
A. continue
B. break
C. stop
D. next
Objective 2.2: Raise and handle an event
The browser provides dynamic behavior through events. Actions processed by the browser user can trigger an opportunity for your code to react and create an experience for the user. This opportunity is presented in the form of an event. The DOM elements natively provide events that can be handled, and you can implement custom events on custom objects.
Events typically follow a naming convention. When looking at what events are available on a particular object, you can identify those events as properties that start with the prefix on. For example, some common events are onkeypress or onblur. For events to function, you need to “wire them up” by assigning an event handler. The event handler is a JavaScript function that’s called when an action triggers the event. Events are firing all the time in the browser; however, it is whether or not a handler is assigned that determines whether or not you can run your own code when the event is triggered.
This objective covers how to:
![]() Use events, including handling an event by using an anonymous function and declaring and handling bubbled events
Use events, including handling an event by using an anonymous function and declaring and handling bubbled events
![]() Handle DOM events, including OnBlur, OnFocus, and OnClick
Handle DOM events, including OnBlur, OnFocus, and OnClick
![]() Create custom events
Create custom events
Using events
The reason an API provides events is so that developers can inject their own processing amid all the action taking place in a program. JavaScript enables you to do exactly this throughout the DOM. This section discusses the ability to hook up to these events.
The idea of hooking up an event is to tell the browser that when a certain event occurs, it should call a specified function. The function assigned to an event is said to be an event listener listening for that event. The need, then, is to assign a function to an event to listen for when that event occurs.
You can hook up an event in three ways:
![]() Declare it directly in the HTML markup.
Declare it directly in the HTML markup.
![]() Assign the function to the event property of the element object through JavaScript.
Assign the function to the event property of the element object through JavaScript.
![]() Use the newer add and remove methods on the element object to associate event handlers.
Use the newer add and remove methods on the element object to associate event handlers.
When assigning event handlers through JavaScript, you have two choices: provide a named function and assign an anonymous function. The difference between these two will be examined.
To get started, you need to understand the concept of a single object common to all DOM event handlers, and that’s the event object itself.
Event objects
In general, the event object is a common object available within event handlers that provides metadata about the event. For example, if keyboard events are being handled, you might want to know which key was pressed. If mouse events are being handled, you might want to know which mouse button was pressed. The event object contains all these properties.
The event object is accessed within an event handler function, using the window object as shown:
var evnt = window.event;
The event object is a property of the window object. In this example, a reference to the event object is assigned to a variable but also can be used directly. Within the context of the current event handler, the event object contains the pertinent information—that is to say, the respective properties are set. For example, in a keydown event, the details of the keyboard state are available, but the mouse buttons aren’t because they aren’t relevant to a keydown event.
Note: Accessing the Event Context
In Internet Explorer, the window event is the method required to access the event object. However, in some browsers, the event object is passed to the event function as a parameter.
Declarative event handling
Handling events declaratively in the HTML markup is possible by setting up an event handlers line within the HTML elements. This is effectively no different than assigning a value to any other property or attribute of the HTML element. Look at the following HTML sample:
<html>
<head>
<script>
function onloadHandler() {
alert("hello event.");
}
</script>
</head>
<body onload="onloadHandler();">
...
</body>
</html>
In this HTML markup, the onload attribute of the body element is assigned JavaScript to run. The onload event fires when the document itself is fully loaded into the browser. When the document is loaded, the onload event fires, which calls the onloadHandler function and in turn shows the alert box. Any events that will be looked at through this objective can be set up this way directly in the HTML markup. Next, you see how to set up events programmatically by assigning the function to the event property in JavaScript.
Assignment event handling
Assigning the event function to the event property through JavaScript is another way to set up event handlers. This method has been around for a long time and is still widely used. For the preceding example of the onload event, the following changes are required to reflect assigning an event handler through JavaScript:
<html>
<head>
<script>
window.onload = onloadHandler();
function onloadHandler() {
alert("hello event.");
}
</script>
</head>
<body >
...
</body>
</html>
In this code, the HTML element for the body is cleaned up and the onload event is assigned in JavaScript. The window object isn’t the same as the body element, but it demonstrates the concept of assigning code that needs to run as soon as the page is loaded. Notice that the assignment of the onloadHandler is in the script block but not inside any function. For this to succeed, the window object must exist. Since the window object is a global object it will exist. However, to access elements of the page, the page must be loaded or the script must run after the renderer processes the HTML. For example, if the page has a canvas and the functionality to enable users to draw on it with a mouse, the event handlers for the mouse activities would have to be assigned either at the bottom of the page or within the window’s onload event. The onload event is triggered when the entire page is loaded, so it’s possible to get a reference to the page elements and hook up the event handlers.
A more common way to do this is to assign an anonymous function to the window’s onload event and hook up all the necessary events. The concept of an anonymous function is discussed shortly. It’s used throughout the book as shown here:
window.onload = function () {
//do event setup in here.
}
Using the addEventListener and removeEventListener methods
addEventListener and removeEventListener are the two preferred methods to hook up a function to an event and then to remove it later as needed. The addEventListener method accepts two required parameters and one optional parameter:
addEventListener(<event name>,<event function>,<optional cascade rule>)
The event name is the name of the event to be handled. The event name will be as you’ve seen in the previous examples except without the on prefix. For example, the name of the onload event is just load. The event function is the one that should run when the event occurs, the listener. The optional cascade rule provides some flexibility in how the events move through nested DOM elements. This is examined in more detail later in the discussion on event bubbling.
The removeEventListener takes exactly the same parameters. What this implies is that more than one event listener can be added for the same event and then removed. Thinking in the context of a complicated program such as a game, you might need to turn on and off specific event handlers for the same event. Consider the following example:
<script>
window.addEventListener("load", onloadHandler, false);
window.addEventListener("load", onloadHandler2, false);
window.addEventListener("load", onloadHandler3, false);
function onloadHandler() {
alert("hello event 1.");
}
function onloadHandler2() {
alert("hello event 2.");
}
function onloadHandler3() {
alert("hello event 3.");
}
</script>
Each event fires in the order in which it was added when the window is finished loading. To remove the onloadHandler2 event, all that’s needed is a call to the removeEventListener:
window.removeEventListener("load", onloadHandler2, false);
When handling DOM events, the custom events you create are not a replacement for the built-in functionality provided by the DOM element. The handling of the event allows you to do some custom logic or manipulation, but when event handling is complete, the processing returns back to the JavaScript API, which processes its own implementation for the event. If this isn’t desirable, you can stop the event processing.
Using anonymous functions
In the examples so far, event handlers have been assigned via named functions. The advantage to using named functions is that you can later remove event listeners as needed. You can’t identify anonymous functions after they are assigned as event listeners to manipulate them. In the example in the preceding section, three event listeners were added to the same event, and then one event was removed. This was possible only because the name of the event listener function was known.
As expected, an anonymous function has no name. It’s completely anonymous and can’t be called from other code segments. Look at the following example:
window.onload = function () {
}
This example is used throughout the book to ensure that the page is fully loaded before accessing elements in the DOM; otherwise, the elements wouldn’t be available. The onload event for the window object is being assigned an anonymous function. This function doesn’t have a name and can’t be called by any other code. The inner implementation of the window object runs this function when raising the onload event.
In JavaScript, functions are objects that can be assigned to variables. This is how the anonymous function event listener works. It assigns a function object to the onload property of the window object, which in turn handles the event when the window is completely loaded. You can use anonymous functions in most cases where a function is expected as a parameter also. Take the following code sample:
window.addEventListener("load",
function () {
document.getElementById("outer").addEventListener("click", outerDivClick, false);},
false);
In this sample, the addEventListener method is used. But instead of passing in the function name to call when the event is triggered, an anonymous function is passed in. The only potential problem with this approach is the ability to later remove the event listener with the removeEventListener method. That the following code would work might seem logical:
window.removeEventListener("load",
function () {
document.getElementById("outer").addEventListener("click", outerDivClick, false); },
false);
But this isn’t the case. Because the event listeners that the addEventListener method adds are stored by their signatures, this removeEventHandler method can’t know the signature of the previous anonymous function. Even passing in the exact same anonymous implementation doesn’t work because this isn’t the same anonymous function; it’s a new one and therefore doesn’t match the signature of the added one.
Canceling an event
The ability to cancel event processing can be useful when you want to completely override the implementation of the native functionality of a DOM element. A perfect example is if it was required to override the inherent functionality of an anchor element. An event listener would be set up for the click event. Then in the click event, via the event object, the returnValue property is set to false or the function itself can return false. This tells the runtime to stop any further processing of the event. The following code demonstrates this:
window.onload = function () {
var a = document.getElementById("aLink");
a.onclick = OverrideAnchorClick;
}
function OverrideAnchorClick() {
//do custom logic for the anchor
window.event.returnValue = false;
//or
//return false;
}
In this case, when the anchor is clicked, the custom event handler runs but no further logic is processed. Hence, the navigation typically provided by the <a> element is prevented from running. Another aspect to consider is the order in which events run when you are working with a nested DOM element. In this case, the concept that is dealt with is event bubbling.
Declaring and handling bubbled events
Event bubbling is the concept that applies when the HTML document has nested elements. Consider the following HTML example:
<style>
#outer {
width: 200px;
height: 200px;
background-color: red;
}
#middle {
width: 50%;
height: 50%;
position: relative;
top: 25%;
left: 25%;
background-color: green;
}
#inner {
width: 50%;
height: 50%;
position: relative;
top: 25%;
left: 25%;
background-color: blue;
}
</style>
<script>
window.onload = function () {
document.getElementById("outer").addEventListener("click", outerDivClick, false);
document.getElementById("middle").addEventListener("click", middleDivClick, false);
document.getElementById("inner").addEventListener("click", innerDivClick, false);
document.getElementById("clearButton").addEventListener("click", clearList);
}
function outerDivClick() {
appendText("outer Div Clicked");
}
function middleDivClick() {
appendText("middle Div Clicked");
}
function innerDivClick() {
appendText("inner Div Clicked");
}
function appendText(s) {
var li = document.createElement("li");
li.innerText = s;
document.getElementById("eventOrder").appendChild(li);
}
function clearList() {
var ol = document.createElement("ol");
ol.id = "eventOrder";
document.getElementById("bod").replaceChild(ol,document.
getElementById("eventOrder"));
}
</script>
<body id="bod">
<div id="outer">
<div id="middle" >
<div id="inner">
</div>
</div>
</div>
<ol id="eventOrder"> </ol>
<button type="button" id="clearButton">Clear</button>
</body>
When this HTML is rendered in the browser, the result is three nested div elements, as shown in Figure 2-2. In this code are three div elements stacked on top of each other. The styling is applied to provide a visual distinction between the boxes. When a div box is clicked, the click event fires. The event listener code in the assigned handler outputs the name of the clicked div to an ordered list so that the order in which the events are clicked is identified.
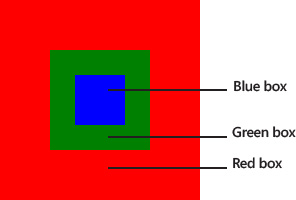
The last parameter of the addEventListener method accepts an optional Boolean parameter. This parameter allows you to specify the cascading or bubbling effect of the event—that is to say, in which order the event processing occurs. The click event for each div has an event listener assigned. In the preceding example, the three div elements are nested. A user who clicks the inside or middle div also clicks the parent div because the div elements share the same physical space on the screen. When the blue inside box is clicked, the following output is displayed:
1. inner Div Clicked
2. middle Div Clicked
3. outer Div Clicked
One click event triggered all three events to fire. This concept is called event bubbling. Clicking directly on the middle green div produces the following output:
1. middle Div Clicked
2. outer Div Clicked
Finally, clicking the red outer div produces this output:
1. outer Div Clicked
The event has bubbled up to the top. If you prefer to have the events handled in the opposite order—that is, to have them cascade down—the last parameter specified by the addEventListener method is specified as true. With this change made, as follows,
document.getElementById("outer").addEventListener("click", outerDivClick, true);
document.getElementById("middle").addEventListener("click", middleDivClick, true);
document.getElementById("inner").addEventListener("click", innerDivClick, true);
the screen output is now as follows:
1. outer Div Clicked
2. middle Div Clicked
3. inner Div Clicked
The order of the event processing has reversed to be cascading instead of bubbling.
The cascading or bubbling effect of the events is convenient when you want it. However, the design of the webpage could involve nested elements, but each element’s click event should run only if the element is directly clicked. In this case, you can use a property of the event object called cancelBubble. If this property is set to true, the event bubbling or cascading stops with the event listener that sets it. This stops only the bubbling or cascading behavior. The code to cancel the bubbling of the event is added to the inner div element’s event listener:
function innerDivClick() {
appendText("inner Div Clicked");
window.event.cancelBubble = true;
}
Now, when the inner div is clicked, the output is as follow:
1. inner Div Clicked
The bubbling of the event up to the middle div and outer div has been prevented.
Handling DOM events
The DOM provides a large number of built-in events. The most common events used on a more day-to-day basis are covered in this section. The DOM provides these events via the JavaScript API. Functions can be specified as event listeners, and custom behavior can be implemented onto webpages based on the event occurring. These events apply to most DOM elements.
Change events
A change event occurs when the value associated with an element changes. This most commonly occurs in input elements such as text-based inputs and others such as the range element. An example of the change event in action is shown here:
<script>
window.onload = function () {
document.getElementById("aRange").addEventListener("change", rangeChangeEvent);
}
function rangeChangeEvent() {
document.getElementById("rangeValue").innerText = this.value;
}
</script>
...
<body>
<input id="aRange" type="range" max="200" min="0" value="0"/>
<div id="rangeValue"></div>
</body>
In this example, as the range slider control changes with the mouse dragging it from one side to the other, the div displays the value of the slider bar.
Exam Tip
This example uses the this keyword. In this context, the this keyword provides a direct reference to the element that created the event. In this way, this provides shortcut access to the element rather than gets a reference via one of the document search methods.
With the text input control, the same type of code can be processed:
...
document.getElementById("aText").addEventListener("change", rangeChangeEvent);
...
<body>
<input id="aRange" type="range" max="200" min="0" value="0"/>
<input id="aText" type="text"/>
<div id="rangeValue"></div>
</body>
Now when the text value of the text box changes, the div shows the value. The text box change event is raised when the cursor leaves the text box, not as each character is typed.
Focus events
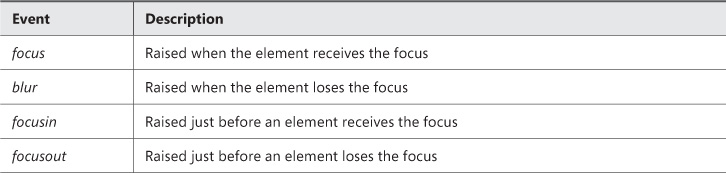
Focus events occur when an element receives or loses the focus. Table 2-2 lists the available events related to focus.
The number of focus events provide very good flexibility in how the focus of any particular DOM element is handled with respect to the timing. The blur event is commonly used to validate form fields. You can use the focus() method to set the focus to any element that causes the focus event hierarchy to occur. The following code shows how to use the blur event:
<script>
window.onload = function () {
document.getElementById("firstNameText").focus();
document.getElementById("firstNameText").addEventListener("blur", function () {
if (this.value.length < 5) {
document.getElementById("ruleViolation").innerText =
'First Name is required to be 5 letters.';
document.getElementById("ruleViolation").style.color = 'red';
this.focus();
}
});
}
</script>
Keyboard events
Keyboard events occur when keys are pressed on the keyboard. The keyboard events in Table 2-3 are available to be captured.

The following example listens for the keydown event on the text box and shows the keycode for the pressed key:
document.getElementById("firstNameText").addEventListener("keydown", function () {
document.getElementById("outputText").innerText = window.event.keyCode;
});
Code such as this can be used to filter out invalid characters from being entered into a text box. With keyboard events, extra properties are available on the event object to help out. For example, you might need to know whether the Shift key or Control key was also being pressed. Table 2-4 lists the event object properties for keyboard events.

Exam Tip
In some cases, depending on the key, only the keydown event fires. The arrow keys are such an example: keydown fires but not keyup or keypress.
You can use properties such as ctrlKey with the keyCode event to give the users something similar to hotkey functionality to automatically navigate the focus to specific fields:
document.onkeydown = function () {
if (window.event.ctrlKey && String.fromCharCode(window.event.keyCode) == 'F')
document.getElementById("firstNameText").focus();
if (window.event.ctrlKey && String.fromCharCode(window.event.keyCode) == 'L')
document.getElementById("lastNameText").focus();
return false;
}
Mouse events
The DOM provides extensive exposure to mouse activity through the mouse events. Table 2-5 describes the available mouse events.
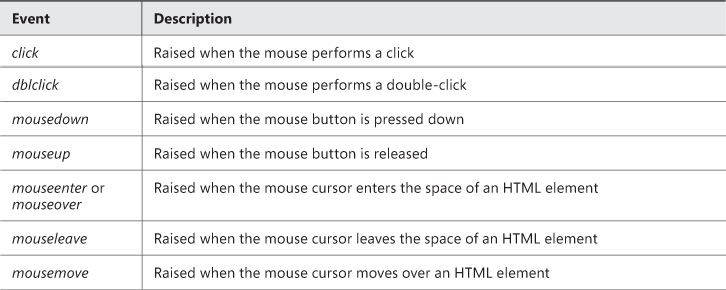
The mouse events provide additional information on the event object. Table 2-6 lists the applicable properties of the event object.
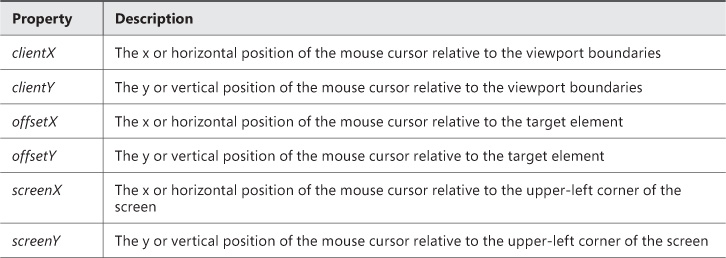
The following code demonstrates capturing each coordinate set:
window.onload = function () {
document.getElementById("yellowBox").addEventListener("click", yellowBoxClick);
}
function yellowBoxClick() {
document.write("Client X: " + window.event.clientX + " ClientY: "
+ window.event.clientY);
document.write("<BR />");
document.write("offsetX: " + window.event.offsetX + " offsetY: "
+ window.event.offsetY);
document.write("<BR />");
document.write("screen X: " + window.event.screenX + " screenY: "
+ window.event.screenY);
}
This code assumes a div called yellowBox that raises its click event when the mouse clicks it. You can easily change the event to mousedown or mouseup to achieve the same outcome.
The mouseenter and mouseleave events indicate when the mouse cursor position has entered or left the area covered by a particular element, respectively. The following code demonstrates applying a transformation to the div element on the mouseenter and removing it on the mouseleave:
<style>
.scale {
transform:scale(1.5);
}
</style>
<script>
window.onload = function () {
document.getElementById("yellowBox").addEventListener("mouseenter",
yellowBoxEnter);
document.getElementById("yellowBox").addEventListener("mouseleave",
yellowBoxLeave);
}
function yellowBoxEnter() {
this.classList.add("scale");
}
function yellowBoxLeave() {
this.classList.remove("scale");
}
</script>
<body>
<div id="yellowBox" style="width: 50%;height:50%;margin: 0 auto;
background-color:yellow;"></div>
</body>
When the mouse moves over the yellow-filled div, the div scales up. When the mouse is moved off the div, it returns to the original size.
Drag-and-drop functionality
Drag-and-drop functionality enables users to pick up an element with the mouse and place it in another location. Table 2-7 lists the events related to drag-and-drop functionality.
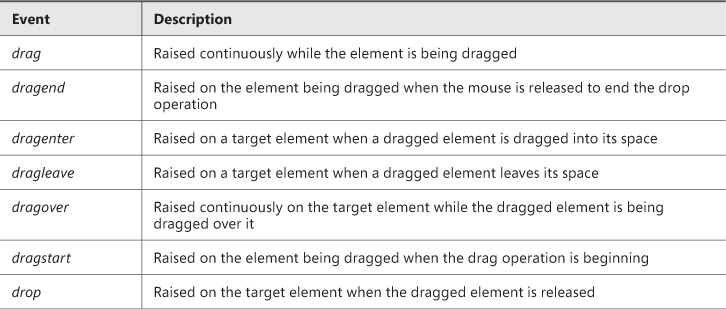
A lot happens in a drag-and-drop operation, starting with the dragstart event. The drag event continues to fire while the element is being dragged. As the element is dragged over other elements, each of those other elements’ dragenter, dragover, and dragleave events fire. When the element finishes being dragged, its dragend event fires and the drop event of a target element fires. You can use all these events in combination to provide visual feedback to users that the drag operation is occurring and what might be a potentially valid drop location.
The following HTML demonstrates this functionality:
<head>
<style>
.dropped {
width: 50%;
height: 50%;
position: relative;
top: 25%;
left: 25%;
background-color:black;
}
.over {
transform: scale(1.1);
}
.bucket {
width: 100px;
height: 100px;
margin: 10px 10px 10px 10px;
position:absolute;
}
.chip {
width:20px;
height:20px;
position:absolute;
}
div:first-of-type {
background-color: red;
}
div:nth-of-type(2) {
background-color: green;
left:25%;
}
div:nth-of-type(3) {
background-color: blue;
left:50%;
}
#chip {
background-color: black;
width:50px;
height:50px;
}
.begin {
position:absolute;
left: 150px;
top: 150px;
}
</style>
</head>
<body>
<div id="bucket1" class="bucket"></div>
<div id="bucket2" class="bucket"></div>
<div id="bucket3" class="bucket"></div>
<div id="chip" draggable="true" class="chip"></div>
</body>
The concept is that three buckets are defined by using div elements, and a chip is defined. The user can drag the chip into any one of the three buckets. For the chip to be able to be dragged, it must be draggable.
To begin the drag event, the dragstart must be handled:
var chip = document.getElementById("chip");
chip.addEventListener("dragstart", function ()
{ window.event.dataTransfer.setData("Text", this.id); });
In this handler, the dataTransfer object setData method is used to store what exactly is being transferred. In this case, the ID of the source object is specified.
Next, the desired target element’s event listeners must be set up. The following code shows this:
var b1 = document.getElementById("bucket1");
b1.addEventListener("dragenter", function () {
b1.classList.add("over");
window.event.returnValue = false;
});
b1.addEventListener("dragleave", function () {
b1.classList.remove("over");
});
b1.addEventListener("dragover", function () {
window.event.returnValue = false;
});
b1.addEventListener("drop", function () {
window.event.returnValue = false;
var data = event.dataTransfer.getData("Text");
var d = document.getElementById(data);
d.classList.remove("begin");
d.classList.add("dropped");
this.appendChild(d);
});
In this code, the dragenter event listener is established so that the user gets a visual cue with a transform that the element can be dropped onto. In the same token, the dragleave event listener is set up to remove the effect. The dragover event is set to be ignored by canceling it. This is only because div elements can’t be dragged and dropped by default.
The last piece is the drop event handler. With this event handler, the drop is received. The dataTransfer object’s getData method is called to retrieve what’s being dropped. The ID of the source element gets a reference to the element and places it inside the target. The same code can be repeated for the other two buckets, and then the chip can be dragged into each bucket.
For elements that don’t support drag-and-drop functionality by default, the default event mechanism must be canceled. This is why event.returnValue is set to false.
Creating custom events
DOM events provide a great deal of functionality. In some cases, you might want to create a custom event to use more generically. To create a custom event, you use the CustomEvent object.
To use custom events, you first need to create one by using the window.CustomEvent object:
myEvent = new CustomEvent(
"anAction",
{
detail: { description: "a description of the event",
timeofevent: new Date(),
eventcode: 2 },
bubbles: true,
cancelable: true
}
);
The CustomEvent object constructor accepts two parameters:
![]() The first parameter is the name of the event. This is anything that makes sense for what the event is supposed to represent. In this example, the event is called anAction.
The first parameter is the name of the event. This is anything that makes sense for what the event is supposed to represent. In this example, the event is called anAction.
![]() The second parameter is a dynamic object that contains a detail property that can have properties assigned to it containing information that should be passed to the event handler. Also, the parameter provides the ability to specify if the event should bubble and whether the event can be canceled.
The second parameter is a dynamic object that contains a detail property that can have properties assigned to it containing information that should be passed to the event handler. Also, the parameter provides the ability to specify if the event should bubble and whether the event can be canceled.
The next step is to assign the event to an element on the page by using the addEventListener method:
document.addEventListener("anAction", customEventHandler);
Finally, the event is raised by using the dispatchEvent method:
document.dispatchEvent(myEvent);
A function called customEventHandler must exist for all this to work:
function customEventHandler() {
alert(window.event.detail.description);
}
As of this writing, Internet Explorer doesn’t support this functionality. Custom events work correctly in other browsers, though. Be aware of how custom events work for the exam, however, because they are part of the official skills being measured.
![]() Thought experiment: Creating an event-full webpage
Thought experiment: Creating an event-full webpage
Objective summary
![]() Events provide a way to interact with users when they perform actions on the webpage.
Events provide a way to interact with users when they perform actions on the webpage.
![]() Events cascade or bubble through the entire DOM hierarchy.
Events cascade or bubble through the entire DOM hierarchy.
![]() Focus events occur when an object gets or loses focus.
Focus events occur when an object gets or loses focus.
![]() Keyboard events occur when keyboard keys are pressed on a focused object.
Keyboard events occur when keyboard keys are pressed on a focused object.
![]() Mouse events occur when the mouse clicks an object or the pointer is moved over or off an object.
Mouse events occur when the mouse clicks an object or the pointer is moved over or off an object.
![]() Drag-and-drop functionality provides a way to move elements from one container to another.
Drag-and-drop functionality provides a way to move elements from one container to another.
Objective review
1. Which of the following isn’t a supported way to add an event handler to a DOM element?
A. Declaring within the HTML element by assigning the event attribute to a JavaScript function
B. Setting the attribute in CSS to a valid JavaScript function
C. Dynamically through JavaScript by assigning a JavaScript function to the object's event property
D. Dynamically through JavaScript via the assign/remove event listener methods
2. Which of the following isn’t an attribute of an anonymous function?
A. Anonymous functions can’t be called by any other code.
B. Anonymous functions have a clearly defined name.
C. Anonymous functions can be passed as parameters.
D. Anonymous functions can’t be assigned to a DOM element declaratively.
3. Which code line would successfully cancel an event?
A. window.event.returnValue = false;
B. return false;
C. window.event.Return();
D. window.Stop();
4. Which event occurs when a DOM element receives the cursor?
A. focus
B. change
C. keydown
D. mouseleave
5. Which option provides the correct sequence of events in a drag-and-drop operation?
A. dragstart, drag, dragenter, drop
B. dragstart, drag, dragenter, dragstop
C. drag, dragstart, drop, dragenter
D. drag, dragstart, dragenter, dragstop
Objective 2.3: Implement exception handling
That a program can deal with errors and unknown conditions is critical in any software development. JavaScript is no exception and provides structured error-handling constructs to deal with these situations.
Structured error handling in JavaScript is achieved with the try...catch...finally construct. Good defensive programming also includes checking for null values, where appropriate, to prevent errors. In addition to handling errors, code can raise custom errors as needed to send error information back to a running program from custom objects or libraries.
This objective covers using the try...catch...finally construct, evaluating for the null condition, and raising custom errors.
This objective covers how to:
![]() Implement try-catch-finally blocks, including setting and responding to error codes and throwing exceptions
Implement try-catch-finally blocks, including setting and responding to error codes and throwing exceptions
![]() Check for null values
Check for null values
Implementing try...catch...finally constructs
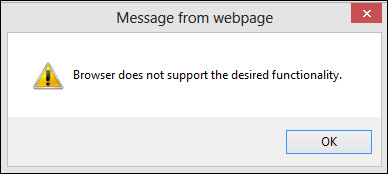
The try...catch...finally construct handles exceptions that occur during program processing. It enables you to see what kind of error occurred and to do what’s appropriate with it. If try...catch...finally isn’t implemented in the program, the errors would be treated as unhandled and could cause the browser to crash or, at a minimum, display many annoying message boxes to users, such as this one shown in Figure 2-3 that is caused from this code:
window.dosomeunsupportedmethod();
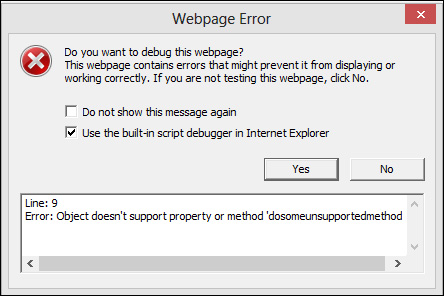
With errors like this, users will likely stop coming to the website or using the application. To prevent such issues, you need to wrap the code in a try block:
try{
window.dosomeunsupportedmethod();
} catch (e) {
alert("Browser does not support the desired functionality.");
}
By using the try...catch block, you can handle the error condition gracefully. The users see a standard alert and the webpage continues to run as usual. This example code results in the message shown in Figure 2-4.
The try...catch block is divided into two parts. The first part, the try portion, says, “Try to do this work.” If anything goes wrong when trying to do the work, the catch block receives an exception object with information about the error. Any code inside the try portion of the try...catch block is protected against encountering an unhandled error.
The catch block is where the error can be handled as appropriate for the application. The catch block receives a parameter that is an exception object. Table 2-8 shows the properties for the exception object.

You can use the information provided in the exception object to decide what to do in terms of overall program flow. For example, if the program needs access to a resource that it can’t have and an exception is thrown, the program can fall back to a different process to achieve the desired functionality or simply tell the user that something needs to be changed—for example, if cookies or another HTML5 API are required for the site to work. Other ways to check for this type of thing are demonstrated shortly.
Another part to the try...catch block is the finally block. This block is added directly after the catch block. The significance of the finally block is that the code inside it runs all the time. This isn’t to say that the code in the finally block can’t have its own errors resulting in exceptions, but whether or not the code in the try block has an error, the code in the finally block still runs. Consider the following code:
function WorkthroughArray() {
var canvas = document.getElementById("myCanvas");
var context = canvas.getContext("2d");
context.fillStyle = "blue";
contxt.arc(50, 50, 25, 0, 360);
context.fill();
context.strokeStyle = "red";
context.stroke();
}
This function contains an intentional spelling error, contxt, which results in an exception. Nothing after the line that causes the exception runs. However, placing a try...catch...finally block around this code provides more control over the flow:
try{
var canvas = document.getElementById("myCanvas");
var context = canvas.getContext("2d");
context.fillStyle = "blue";
contxt.arc(50, 50, 25, 0, 360);
context.fill();
context.strokeStyle = "red";
context.stroke();
}
catch (e) {
console.log(e.message);
}
finally {
//do any final logic before exiting the method
}
Now, with the structured error handling in place, when the line with the typo is hit, processing jumps into the catch block. In this block, the error could be logged for future diagnostics. After the catch block completes, the finally block runs. If any cleanup or variable resetting needs to be done, it can be done here even though an exception occurs. The finally block also runs. If the typo is fixed so that no exceptions occur in the try block, the catch doesn’t occur because of nothing to catch, but the finally block still runs. The finally block always runs as the last part of a try...catch...finally block.
Variable scope applies to each block within the try...catch block. If a variable is declared within the try portion, it won’t be accessible from the catch of the finally. If you want to have access in those blocks, the variables need to be declared outside the try block. Look at this example:
var canvas;
var context;
try {
document.getElementById("myCanvas");
context = canvas.getContext("2d");
contxt.arc(50, 50, 25, 0, 360);
context.fillStyle = "blue";
context.fill();
context.strokeStyle = "red";
context.stroke();
}
catch (e) {
context.strokeText(e.message, 50, 50);
console.log(e.message);
}
finally {
//do any final logic before exiting the method
}
The declaration for the reference to the canvas and the canvas context is moved outside the try block so that it can be accessible in the catch block. The catch block can now write the error to the canvas.
Note: Using Debugging Tools
A call to console.log was added to the catch block. This is a great way to add information that can be viewed in the client debugger. For example, in Internet Explorer, you can access the debugger tools by pressing F12.
Exceptions bubble up the call stack, a special stack in the processing environment that represents the functions currently being processed in sequential order. Take the following code sample:
window.onload = function () {
try {
WorkWithCanvas();
} catch (e) {
console.log(e.message);
}
}
function WorkWithCanvas() {
var canvas = document.getElementById("myCanvas");
var context = canvas.getContext("2d");
contxt.arc(50, 50, 25, 0, 360);
context.fillStyle = "blue";
context.fill();
context.strokeStyle = "red";
context.stroke();
}
Because the WorkWithCanvas method has no exception handling, the exception bubbles up to the calling method, the next method in the stack. This continues through the stack until either an exception handler is met or the browser receives the exception and treats it as an unhandled exception. Of course, in this case, the variables in the WorkWithCanvas method can’t be accessed, so if anything needed to be done in a finally block, the try...catch...finally block should be either moved into the WorkWithCanvas method, or the WorkWithCanvas method can handle the error and rethrow it for further processing.
The concept of raising an error is also known as throwing an exception. Custom objects and libraries throw exceptions as needed to the consumers of the libraries. The objects or libraries expect you to meet certain conditions and if those conditions aren’t met, they can throw an exception for the consumer to deal with. To continue with the example, the exception is handled in the WorkWithCanvas method and then rethrown. An exception is thrown using the throw keyword:
function WorkWithCanvas() {
try {
var canvas = document.getElementById("myCanvas");
var context = canvas.getContext("2d");
contxt.arc(50, 50, 25, 0, 360);
context.fillStyle = "blue";
context.fill();
context.strokeStyle = "red";
context.stroke();
} catch (e) {
//handle the exception as appropriate
throw e;
} finally {
}
}
In this example, the exception can be handled in the catch block as needed, and then thrown back up the call stack to be handled again at another level.
More commonly when working with custom libraries, you can create custom exceptions to give users information specific to the situation that occurred:
var ball = {
x: -1,
y: -1,
draw: function DrawBall(c) {
if (this.x < 0)
throw new Error(25, "Invalid X coordinate");
}
}
window.onload = function () {
try {
var canvas = document.getElementById("myCanvas");
var context = canvas.getContext("2d");
ball.draw(context);
} catch (e) {
alert(e.message);
}
}
In this code, a custom object to represent a ball is created. It has a draw method that expects a canvas context to draw itself on. However, if the coordinates for the ball aren’t initialized, the ball object throws a custom error. The calling code has a try...catch block so that it can handle any unexpected errors. In this example, the consumer of the ball object would get a meaningful message that the x-coordinate needs to be set to something valid.
A new object, Error, is used here to create the exception. The Error object constructor takes two parameters, in this order: the error number followed by an error description. This information should be as specific as possible to provide as much detail as possible to the calling code.
Checking for null values
One way to prevent many errors is to check for null values before using something. A null value in a JavaScript program is what a variable equals before it’s initialized. JavaScript knows about the variable’s existence but doesn’t yet have a value.
A common place to ensure that variables have values is in functions that accept parameters. Consider the following function:
window.onload = function () {
try {
var a, b, c;
a = 5;
b = 10;
var result = multiplyNumbers(a, b, c);
alert(result);
} catch (e) {
alert(e.message);
}
}
function multiplyNumbers(first, second, third) {
if (first == null || second == null || third == null)
{
throw new Error(5, "Forgot to initialize a number.");
}
return first * second * third;
}
In this code, the developer forgot to initialize the variable c, resulting in a null value. In the multiplyNumbers method, the parameters are evaluated for a null value and, if found, an error is thrown. If this method didn’t check for null values and assumed that every developer calling it would never make a mistake, the results would be unexpected to the consumer of the method. In this case, the result would be NaN (not a number), a special JavaScript type. This is because of the attempt to perform a mathematical operation against a null value.
Objective summary
![]() Structured error handling is provided by the JavaScript language in the form of the try...catch...finally block.
Structured error handling is provided by the JavaScript language in the form of the try...catch...finally block.
![]() The try...catch...finally block provides a way to try some logic, catch an error and handle it appropriately, and finally do some clean up.
The try...catch...finally block provides a way to try some logic, catch an error and handle it appropriately, and finally do some clean up.
![]() The finally block always runs whether or not an exception is thrown.
The finally block always runs whether or not an exception is thrown.
![]() Checking for a null value before accessing any objects to ensure that they are initialized is good practice.
Checking for a null value before accessing any objects to ensure that they are initialized is good practice.
Objective review
1. Which statement correctly describes the proper error handling using try...catch...finally blocks?
A. Proper error handling allows code processing to continue and to provide appropriate user feedback.
B. Proper error handling allows users to fix problems with the webpage.
C. Proper error handling allows you to debug the application at run time.
D. Proper error handling allows you to suppress all the bugs in your scripts.
2. Which of the following isn’t a property of the exception object?
A. message
B. description
C. number
D. name
3. Why is checking for null a good practice?
A. Checking for null prevents the use of an object before it’s initialized.
B. Checking for null prevents errors resulting in NaN.
C. Checking for null prevents the need to throw custom errors.
Objective 2.4: Implement a callback
Callbacks are a design pattern to implement when you are working with multiple threads or just needing to have something work asynchronously. The concept of the callback is quite straightforward and is used throughout this book quite heavily. The idea of a callback is to call a function to run but when it’s done, to call back a specified function with usually some sort of result or status of the operation. The “Using advanced array methods” section earlier in this chapter demonstrates a few of the functions available on the array object that take a callback as a parameter. The general pattern is shown here:
<script>
window.onload = function () {
WillCallBackWhenDone(MyCallBack, 3, 3);
}
function WillCallBackWhenDone(f, a, b) {
var r = a * b;
f(r);
}
function MyCallBack(result) {
alert(result);
}
</script>
In this code example, two functions are declared: WillCallBackWhenDone and MyCallBack. One parameter to the WillCallBackWhenDone function is a function followed by two other variables, which in this case are numbers that will be multiplied. The product of the multiplication is passed to the callback function. This case is a bit over the top for the usage of callbacks, but it does demonstrate the pattern involved. Anytime a function is called that expects a function as a parameter, this is what it’s doing. Knowing what parameters the callback function will receive is important so that they can be specified in the parameter list.
Another common use for callbacks is as events. Whenever a DOM event is fired, it’s using a callback pattern. A function is provided as a parameter or property to indicate that when specific things occur, such as a mouseover, to call back to the specified function to run some custom logic related to the end-user action.
Many APIs that JavaScript and the browser expose as part of the HTML5 specification involve the use of callbacks. In this objective, the WebSocket API is examined. Also, the use of jQuery is introduced as it applies to making Asynchronous JavaScript and XML (AJAX) calls. The ability to wire up an event and implement a callback using anonymous functions is also discussed. Finally, this objective covers the use of the this pointer.
This objective covers how to:
![]() Implement bidirectional communication with the WebSocket API
Implement bidirectional communication with the WebSocket API
![]() Make webpages dynamic with jQuery and AJAX
Make webpages dynamic with jQuery and AJAX
![]() Wire up an event with jQuery
Wire up an event with jQuery
![]() Implement a callback with an anonymous function
Implement a callback with an anonymous function
![]() Use the this pointer
Use the this pointer
Implementing bidirectional communication with the WebSocket API
The WebSocket API provides bidirectional communication support to your web applications. WebSocket has greatly simplified the way data can be sent and received. Traditional methods, such as long polling, have existed for a long time and are widely used all over the web today. However, traditional techniques use the heavier HTTP mechanisms, which make the application inherently less efficient. The use of the WebSocket API allows the connection directly to a server over a socket. This is a much lighter weight connection and is fully bidirectional; both binary and text-based data can be sent and received.
Note: Accepting Socket Connections
The full implementation of a WebSocket API requires that a webserver have a proper server-side implementation that can accept socket connections. Technologies such as Node.js work well for this purpose. Implementation of such technologies is beyond the scope of this book, and these code samples assume such an implementation exists.
The use of the WebSocket API is ideal for real-time applications such as messenger/chat applications, server-based games, and more advanced scenarios, such as WebRTC (Web Real-Time Communication) video conferencing. The data transmitted over WebSockets can be text based or binary. The code in Listing 2-1 demonstrates the WebSocket API.
LISTING 2-1 Implementation of the WebSocket API
<script type="text/javascript">
window.onload = function (){
var wsConnection;
var chatBox = document.getElementById("chatWindow");
var disconnectButton = document.getElementById("Disconnect");
var connectButton = document.getElementById("Connect");
var sendButton = document.getElementById("Send");
var msgToSend = document.getElementById("msgSendText");
disconnectButton.onclick = function () {
wsConnection.close();
}
connectButton.onclick = function () {
//Or the use of wss for secure WebSockets. IE: wss://studygroup.70480.com
//Opens the WebSocket
wsConnection= new WebSocket('ws://studygroup.70480.com', ['soap', 'xmpp']);
}
sendButton.onclick = function () {
//check the state of the connection
if (wsConnection.readyState == WebSocket.OPEN) {
//send message to server.
wsConnection.send(msgToSend.value);
}
else
return;
//show message in chat window.
NewLine();
chatBox.value = chatBox.value + "You: " + msgToSend.value;
//clear message text box
msgToSend.value = '';
}
// event handler for when the WebSocket connection is established
wsConnection.onopen = function () {
chatBox.textContent = chatBox.textContent +
"System: Connection has been established";
}
//event handler for when the WebSocket encounters an error
wsConnection.onerror = function (err) {
//write an error to the screen
NewLine();
chatBox.value = chatBox.value + "System: Error Occurred. ";
}
wsConnection.onclose = function () {
//write the connection has been closed.
NewLine();
chatBox.value = chatBox.value + "System: Connection has been closed.";
}
wsConnection.onmessage = function (msg) {
//write message
NewLine();
chatBox.value = chatBox.value + "Them: " + msg.data;
}
//helper functions.
function NewLine()
{
chatBox.textContent = chatBox.textContent + '
';
}
}
</script>
<body>
<div align="center">
<div>
70-480 Study Group Chat Forum
</div>
<div>
<textarea id="chatWindow" style="height: 500px; width: 300px">
</textarea>
</div>
<div>
<input type="text" id="msgSendText" style="width: 300px"/>
</div>
<div>
<button id="Disconnect">Disconnect</button>
<button id="Connect">Connect</button>
<button id="Send">Send</button>
</div>
</div>
</body>
The primary object that you will work with is the WebSocket object, which connects to the socket when its constructor is invoked. In Listing 2.1, a variable is declared but not instantiated until a user invokes the connect button. When the user clicks the button, the WebSocket is instantiated with the appropriate connection information:
wsConnection= new WebSocket('ws://studygroup.70480.com', ['soap', 'xmpp']);
The WebSocket constructor accepts two parameters:
![]() The URL of the server-side socket to connect to, which is always prefixed with ws or wss for secure WebSocket connections
The URL of the server-side socket to connect to, which is always prefixed with ws or wss for secure WebSocket connections
![]() An optional list of subprotocols
An optional list of subprotocols
When the WebSocket constructor is called, the WebSocket API establishes a connection to the server. One of two things can happen at this stage. The WebSocket will successfully connect to the server or the connection will fail, resulting in an error. Both cases should be handled so that the proper feedback is provided to the application user. The WebSocket API provides an event for each, called onopen and onerror, as shown earlier in Listing 2-1:
// event handler for when the WebSocket connection is established
wsConnection.onopen = function () {
chatBox.textContent = chatBox.textContent +
"System: Connection has been established";
}
//event handler for when the WebSocket encounters an error
wsConnection.onerror = function (err) {
//write an error to the screen
NewLine();
chatBox.value = chatBox.value + "System: Error Occurred.";
}
In this example, both event handlers are providing feedback in the chat window to let users know of either a successful connection or the occurrence of an error. The error event could happen at any time, not just when establishing the initial connection.
When a successful connection is established, you can send and receive messages over the socket. To send messages, the WebSocket API provides the Send function. To receive messages, the WebSocket API provides the onmessage event handler. These two methods show the functions and events that handle the bidirectional communication:
wsConnection.onmessage = function (msg) {
//write message
NewLine();
chatBox.value = chatBox.value + "Them: " + msg.data;
}
sendButton.onclick = function () {
//check the state of the connection
if (wsConnection.readyState == WebSocket.OPEN) {
//send message to server.
wsConnection.send(msgToSend.value);
}
else
return;
//show message in chat window.
NewLine();
chatBox.value = chatBox.value + "You: " + msgToSend.value;
//clear message text box
msgToSend.value = '';
}
The first method is an event handler for the send button provided in the HTML. Users click this button to send messages to other users of the chat application. The WebSocket API provides a mechanism to check the current status of the connection. To prevent an error, the readyState property is evaluated to ensure that it’s now open. readyState provides four possible values, as described in Table 2-9.
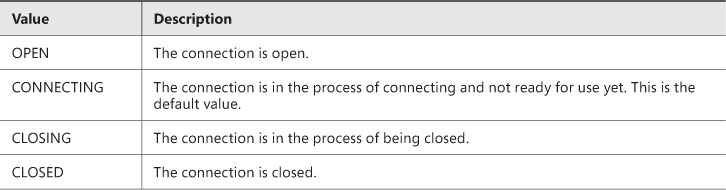
After confirming that the connection is in the appropriate state for sending a message, the send method is called with the text that the user entered into the chat application. Also, so that each user can see that his/her message is indeed part of the chat, the message is added to the chat window.
When other users of the chat application send messages into the system, the server calls the event handler specified in onmessage. The onmessage event receives a message parameter with the data property that contains the message. This message is extracted and displayed in the chat window for users to see.
When finished with a chat session, a user should be able to exit cleanly. This is accomplished by calling the close method of the WebSocket object. The close method can be called with no parameters. It also allows the use of two optional parameters. A numerical code and a reason can be provided but isn’t mandatory. In this example, the connection is closed with no parameters. When a connection is closed, the onclose event handler is raised:
disconnectButton.onclick = function () {
wsConnection.close();
}
wsConnection.onclose = function () {
//write the connection has been closed.
NewLine();
chatBox.value = chatBox.value + "System: Connection has been closed.";
}
When the user clicks the close button, the close method is called. Then, the subsequent call to the onclose event handler is implemented so that a message can be provided to the user that the connection has indeed been closed.
Making webpages dynamic with jQuery and AJAX
So far throughout the book, you’ve seen some great ways to make webpages dynamic by using JavaScript. JavaScript is the language that the webpage browser understands. In some cases, using plain JavaScript or the standard JavaScript library available in the browser can be cumbersome. This is where jQuery can be helpful. jQuery is a JavaScript library that specializes in working with the DOM to make webpages dynamic.
In the preceding section, you explored how to use the WebSocket API to open a bidirectional communication channel with the server. In this section, you examine using jQuery and AJAX to make server requests to retrieve updated content for your pages. In traditional web development, when content needs to be updated on a page, a request is made to the server for the page itself where the server-side code can run to get the new content, perhaps from a database, and re-render the page with updated information. The user experience is a flicker as the entire page needs to be refreshed. The use of AJAX has solved this issue by allowing you to make server-side requests via JavaScript without having to request a full page refresh. You can implement AJAX without jQuery; however, because of the popularity and ease of use that jQuery provides, using jQuery to implement this type of functionality is much more desirable.
By requesting data from a server with JavaScript via jQuery and AJAX, you can retrieve data behind the scenes and then use the various DOM manipulation techniques that you’ve learned to update specific areas of the page that need to be updated. This prevents the need to send a request for the entire page back to the server and creates a much more pleasant user experience.
For this example, you will create a fictitious website for searching fruit. The page consists of a box to enter an adjective about fruit and return any fruit that match the results. The webpage is set up as shown in Listing 2-2.
LISTING 2-2 The Fruit Finder webpage
<html>
<head>
<script src="jquery-2.0.3.min.js" type="text/javascript"></script>
<script type="text/javascript">
window.onload = function () {
$('#searchButton').click(function () {
var searchPath;
$('#searchResults').empty();
switch ($('#searchFruit').val()) {
case 'long':
searchPath = "Fruit/Long.xml";
break;
case 'round':
searchPath = "Fruit/Round.xml";
break;
case 'orange':
searchPath = "Fruit/Orange.xml";
break;
default:
InvalidSearchTerm();
}
$.ajax({
url: searchPath,
cache: false,
dataType: "xml",
success: function (data) {
$(data).find("fruit").each(
function () {
$('#searchResults').append($(this).text());
$('#searchResults').append("<BR />");
})
}
});
});
}
function InvalidSearchTerm() {
$('#searchResults').empty();
$('#searchResults').append('Invalid Search Term. Please try again.'),
}
</script>
</head>
<body>
<div>
Enter search term: <input type="text" id="searchFruit"/>
<input type="button" id="searchButton" value="Search"/>
</div>
<div>
<h1>Results:</h1>
</div>
<div id="searchResults">
</div>
</body>
</html>
In this listing, users are presented with a very simple user interface in which they can enter a search term and retrieve a result set based on that search term. In this case, users can enter one of the supported search terms and get back the data from the server. The data request is made using AJAX and as such the entire page doesn’t need to refresh, only the area that displays the results. The part of the page where the data is needed is the only part of the page that is affected by the new data being received.
The first thing that this code does is set up an event listener for the search button click event. All the magic occurs in this function. The search term is evaluated to ensure that it matches one of the supported search terms. If it doesn’t, the user is presented with a message indicating this. If it does, the code proceeds to make an AJAX call to the server for the correct data set that matches the search term. In this case, it’s a hard-coded XML file. However, the data source is irrelevant as long as the returned XML matches the schema that the webpage expects so that it can be parsed and displayed.
The AJAX call has a few important parameters that you can set. Look at the AJAX call from Listing 2-2:
$.ajax({
url: searchPath,
cache: false,
dataType: "xml",
success: function (data) {
$(data).find("fruit").each(
function () {
$('#searchResults').append($(this).text());
$('#searchResults').append("<BR/>");
})
}
});
The first parameter being set is the url that the AJAX call will be requesting. For security reasons, to prevent cross-site scripting, this URL must be within the same domain as the webpage itself.
The next parameter, cache, is optional and indicates whether the call can use a cached copy. The third parameter, datatype, indicates the expected data type, which could be XML or JavaScript Object Notation (JSON), for example.
The last parameter set in this example is the success property. This parameter takes a function that the results of the AJAX calls should be passed into for the webpage to do some work with. In this example, the results are parsed and added to the DOM so that users can see the results.
Another property that can be set on the AJAX call, as good practice, is the error property so that any error conditions can be handled gracefully. This is the listing updated with an error function set:
$.ajax({
url: searchPath,
cache: false,
dataType: "xml",
success: function (data) {
$(data).find("fruit").each(
function () {
$('#searchResults').append($(this).text());
$('#searchResults').append("<BR />");
})
},
error: function (xhr, textStatus, errorThrown) {
$('#searchResults').append(errorThrown);
}
});
The error function is passed three useful parameters:
![]() The HTTP request itself
The HTTP request itself
![]() The HTTP error number (such as 404)
The HTTP error number (such as 404)
![]() The error text (such as Not Found)
The error text (such as Not Found)
You can mimic a 404 error by changing one of the search words to return an invalid path.
The jQuery AJAX toolkit supports not only getting data, but also posting data to the server. The default request type is GET. To change a call to a post, you change the value of the property to POST:
$.ajax({
url: searchPath,
cache: false,
dataType: "xml",
type: "POST",
success: function (data) {
...
},
error: function (xhr, textStatus, errorThrown) {
$('#searchResults').append(errorThrown);
}
});
Perhaps the site user knows of additional fruit that fit into a certain category. The page can be enhanced to allow users to enter the name of a fruit and submit it to the XML file so that subsequent searches include it. Ideally in this case, you would use the POST method to a server-side function that would accept this data and store it in the XML file.
Wiring up an event with jQuery
In Objective 2.2, “Raise and handle an event,” you saw how to set up event listeners for various actions that the DOM or a user’s interaction with the DOM could invoke. One of the most common issues encountered by web developers is cross-browser compatibility. Although this topic is large and this book doesn’t have the space to go into great detail about cross-browser compatibility, jQuery is one of the toolkits available to help bridge the issue. In Listing 2-2, you saw an example of jQuery syntax to wire up an event:
$('#searchButton').click(function () {
...
}
In this sample, the jQuery selector syntax is used to find the search button on the page by its name. Then the click event is assigned a function that runs when the button is clicked.
This syntax is quite powerful. Aside from being cross-browser friendly, it includes much flexibility in how event handlers are assigned to objects. This jQuery selector syntax supports all the same type of searches that the document object exposes. But the part that differentiates jQuery from the document object is that jQuery can assign styles or events to everything in the result set in one line.
Assume the following HTML makes up the markup for a webpage:
<body>
<table>
<tr>
<td id="door1">Door 1</td>
<td id="door2">Door 2</td>
<td id="door3">Door 3</td>
</tr>
</table>
</body>
The following script is the more traditional method to assign event handlers to the DOM elements:
<script type="text/javascript">
window.onload = function () {
document.getElementById("door1").onclick = function () { };
document.getElementById("door2").onclick = function () { };
document.getElementById("door3").onclick = function () { };
}
This fairly simple script has only three cells to add a click event to. But if the page is to get more complex and have up to 20 or 50 doors, this code becomes tedious. This is where jQuery can simplify things. The preceding code can be replaced with this code:
$("document").ready(function () {
$("td").click(function () { });
});
Notice how much easier this code is. In one line, all <td> elements are assigned a click event. This code applies to all <td> elements on the page. So, if some <td> elements aren’t part of the page, you need to ensure that the selector is unique to the required elements. This can be accomplished with cascading style sheets (CSS) or by using the DOM hierarchy, as in this example:
$("document").ready(function () {
$("#GameRow td").click(function () {
alert( $(this).text());
});
});
...
<table>
<tr id="GameRow">
<td id="door1">Door 1</td>
<td id="door2">Door 2</td>
<td id="door3">Door 3</td>
</tr>
</table>
<table>
<tr id="SomeOtherRow">
<td id="cell1">Not a Door 1</td>
<td id="cell2">Not a Door 2</td>
<td id="cell3">Not a Door 3</td>
</tr>
</table>
The click events are assigned only to the <td> elements that are children of an element named GameRow. jQuery provides advanced selector capabilities that allow fine control over how the DOM is manipulated.
Implementing a callback with an anonymous function
Callback functions are used everywhere. The concept of a callback is the basis for how events work. It’s the mechanism by which asynchronous operations return to the caller. In traditional programming languages, a callback is achieved by passing a pointer to a function to another process so that when that process completes or is at specified stages of the process, the function is called to advise the caller of a status of some sort. This could be when the operation completes and could be passing data back to the caller. An example of this would be an asynchronous web service call that returns data. The principle is the same in JavaScript.
In JavaScript, functions are considered objects and are often noted as first-class citizens. This means that a variable can be assigned a function, or a function can be passed into another function as a parameter. Seeing functions used in this way is a common convention in JavaScript. Functions used in this way are called anonymous functions.
A function is considered anonymous when it doesn’t have a name. The following function declaration has a name, so wouldn’t be considered anonymous:
function SubmitClick() {
//do some logic here
}
Here a function is declared that can be used throughout the page. This function has a name: SubmitClick. Because this function has a name, it’s not an anonymous function. However, a named function like this can be assigned to as many button events as you want:
$("#Button1").click(SubmitClick);
$("#Button2").click(SubmitClick);
$("#Button3").click(SubmitClick);
With a named function, the convenience of reuse is there. However, in some cases this is more overhead than is necessary. This also can make the code more difficult to follow in terms of being able to easily see what’s actually happening in the click event handler. In a situation that specifies distinct behavior for each button, anonymous functions simplify things greatly. The following code demonstrates using anonymous functions instead of the named function:
$("#Button1").click(function () { ... });
$("#Button2").click(function () { ... });
$("#Button3").click(function () { ... });
Each button is given its own function inline, where the implementation can be customized for each button click. In that example, the use of anonymous function is apparent because the function doesn’t have a name. The syntax for an anonymous function is as follows:
function (n,n,...,n) { body };
The anonymous function declaration must begin with the function keyword, which must be followed by closed parentheses. The parentheses can include zero or more parameters. The parentheses are followed by closed braces in which the code block that makes up the implementation of the function is coded.
The only difference between an anonymous function and a named function is the name portion of the function signature. That the anonymous function accepts parameters is an important concept when dealing with callbacks.
When working with an API, either your own or a third party’s, functionality often is provided that includes the use of callbacks. As discussed earlier, callbacks are functions that are processed when the transfer of control returns to the caller. For example, in the previous section using jQuery with AJAX, the following code sample was used:
$.ajax({
url: searchPath,
cache: false,
dataType: "xml",
error: function(hdr, num, txt){...}
success: function (data) {
...
}});
In this sample, the AJAX call enables you to specify some functions to call back for different circumstances that can occur. The error and success properties allow you to specify a function that the AJAX framework calls after it either successfully completes the request or encounters an error. In each case, parameters are specified to receive the data that accompanies each callback.
Callback functions can also be used in the form of a parameter to another function. Consider the following example that accepts a user’s input to evaluate if a score is a pass or a fail:
$("document").ready( function () {
$("#Button1").click( function () {
DoLongTask($("#inputValue").val(),
function (result, data) {
if (result == "SUCCESS")
alert(data + " is a Success");
else
alert(data + " is a fail");
});
});
} );
function DoLongTask(n,f)
{
if (n < 10)
f("SUCCESS", n);
else
f("FAIL", n);
}
This code makes heavy use of anonymous functions and callbacks. The first instance is the document ready callback. In this case, you ask the renderer to call back to an anonymous function after it reaches the ready state:
$("document").ready( function () {...
Next, you want to handle a click event. In this case, you indicate to the renderer that, when it receives a click from a specific button, to call back to your anonymous function:
$("#Button1").click( function () {...
Next, in your button click is where you are coding your own logic for the page. User input is taken from the input box and passed to a function that evaluates it. The function does nothing more than evaluate the value and produce the result. Any caller that’s interested in the result can provide a callback function to get the result.
DoLongTask($("#inputValue").val(),
function (result, data) {
if (result == "SUCCESS")
alert(data + " is a Success");
else
alert(data + " is a fail");
});
The call to DoLongTask accepts two parameters: the value to evaluate and a callback function to pass the results to when it’s done. An anonymous function is passed into the DoLongTask function as the callback to run. In this case, the callback is known to provide two parameters, so the callback function accepts two parameters: the original value and the result of the evaluation. The callback then provides information to users about what the calculation result was.
Callback functions are very useful and widely used in JavaScript development. Callback functions can exist statically with a name or be provided inline dynamically as anonymous.
Using the this pointer
The this pointer is a special object provided by the jQuery framework. When running selections against the DOM using jQuery, this refers to the object that it finds or the collection of objects that it finds. It provides a shortcut to accessing the item within the current context of jQuery filter. In a simple example, the this keyword can be demonstrated as follows:
$("document").ready(
function () {
$('#floorDiv').click(function () {
$(this).css("background-color", "red");
})
}
);
In this sample, the floorDiv element is assigned an anonymous function to run when it’s clicked. Within the function, rather than query the DOM for the element again to do something with it, the this keyword provides a reference to the element that initiated the event. In this case, $(this) provides a reference to the floorDiv element, and you can do whatever you want with that element. In this case, you are only changing the background color style property of the div. In more advanced scenarios, the result of the selector can return more than one element. The following example demonstrates this:
$("document").ready(
function () {
$('#floorDiv').click(function () {
$("div").each(function () { $(this).css("background-color", "red");
});
})
}
);
In this example, when floorDiv is clicked, $(“div”) finds all the div elements in the page. Then it calls the each operator, which calls the callback function passed into it for each element that’s returned. Then, $(this) is used to modify the background color of each div. In this way, the use of the this keyword is extremely efficient because it provides quick direct access to each element with very little code.
![]() Thought experiment: Creating a chat application
Thought experiment: Creating a chat application
Objective summary
![]() WebSockets provide bidirectional communication with a server.
WebSockets provide bidirectional communication with a server.
![]() WebSockets support both non-secure (ws) and secure (wss) connections to the server.
WebSockets support both non-secure (ws) and secure (wss) connections to the server.
![]() The jQuery AJAX framework provides a mechanism to make asynchronous web requests.
The jQuery AJAX framework provides a mechanism to make asynchronous web requests.
![]() You can wire up events by using the jQuery selector syntax.
You can wire up events by using the jQuery selector syntax.
Objective review
1. Which of the following is a valid WebSocket instantiation?
A. wsConnection = new WebSocket(‘http://studygroup.70480.com’);
B. wsConnection = new WebSocket(‘tcp://studygroup.70480.com’,[‘soap’,’xmpp’]);
C. wsConnection = new WebSocket(‘wss://studygroup.70480.com’,[‘soap’,’xmpp’]);
D. wsConnection = new WebSocket(‘ftp://studygroup.70480.com’,[‘soap’,’xmpp’]);
2. Which of the following statements properly handles the reception of data from a WebSocket?
A. wsConnection.onpost = function(msg){..};
B. wsConneciton.onreceive = function(msg){...};
C. wsConnection.onmessage = function(msg){...};
D. wsConnection.ongetdata = function(msg){...};
3. Which list identifies the properties that need to be set up to make an AJAX call?
A. cache, datatype, success
B. url, cache, datatype, success
C. url, datatype, onsuccess
D. url, datatype, oncomplete
4. Why is wiring up events with jQuery easier?
A. It allows you to assign the event listener to many elements at once via the selector syntax.
B. There is no difference wiring up events with jQuery versus addEventListener method.
C. jQuery works more efficiently in a loop.
D. jQuery allows both named and anonymous functions to be used as event listeners.
Objective 2.5: Create a web worker process
Web workers present a way of developing multithreaded JavaScript applications. JavaScript is a single-threaded environment. Everything run in JavaScript is queued up synchronously. This might not be evident in most applications because the available processing power on client computers usually far exceeds what’s required by a webpage on a client computer. However, in more intense web applications, you have seen warning messages from the browser that the scripts are running and taking a long time to complete. In fact, these warnings give users the option to stop running scripts on the page immediately. This type of user experience won’t have users coming back to the website. This is where the Web Worker API is useful.
This objective covers how to:
![]() Get started with a web worker process
Get started with a web worker process
![]() Create a worker process with the Web Worker API
Create a worker process with the Web Worker API
![]() Use a web worker
Use a web worker
![]() Understand web worker limitations
Understand web worker limitations
![]() Configure timeouts and intervals
Configure timeouts and intervals
Getting started with a web worker process
The Web Worker API enables you to specify that pieces of work should be processed on their own thread. Doing so has many advantages but also some pitfalls that you need to respect. In this objective, you learn how to use the Web Worker API to take advantage of the flexibility this brings to web applications. You also learn about the disadvantages and cautions that come with using web workers.
This objective uses the bouncing ball example to demonstrate the use of a web worker. Listing 2-3 shows the basic code for the bouncing ball. It will be adjusted as you work through the sections within this objective to achieve moving work to a web worker process.
<html>
<head>
<script>
window.requestAnimFrame = (function (callback) {
return window.requestAnimationFrame || window.webkitRequestAnimationFrame
|| window.mozRequestAnimationFrame || window.oRequestAnimationFrame ||
window.msRequestAnimationFrame ||
function (callback) {
window.setTimeout(callback, 1000 / 30);
};
})();
window.setTimeout(getDirection, 30000);
var x = 176, y = 176, w = 600, h = 600, r = 26;
var d,c,s;
var rColor,gColor,bColor;
var hd = "r";
var horizontal = true;
window.onload = function () {
try{
c = document.getElementById("c");
w = c.width;
h = c.height;
s = parseInt( document.getElementById("speedy").value);
getDirection();
drawBall();
document.onkeydown = function () {
switch (window.event.keyCode) {
case 40:
horizontal = false;
hd = "d";
break;
case 37:
horizontal = true;
hd = "l";
break;
case 38:
horizontal = false;
hd = "u";
break;
case 39:
horizontal = true;
hd = "r";
break;
}
}
} catch (e) {
alert(e.message);
}
}
function increaseSpeed() {
s++;
document.getElementById("speedy").value = s;
}
function decreaseSpeed() {
s--;
document.getElementById("speedy").value = s;
}
function changeDirection() {
var cx = window.event.offsetX;
var cy = window.event.offsetY;
x = cx;
y = cy;
document.getElementById("speedy").value = s;
}
function setNewPoint(d) {
try{
switch (horizontal) {
case true:
if (x < (w - r) && hd == "r")
x += s;
else if(x > r && hd == "l")
x -= s;
break;
case false:
if (y < (h - r) && hd == "d")
y += s;
else if (y > r && hd == "u")
y -= s;
break;
}
if (x >= (w - r))
hd = "l";
if (x <= r)
hd = "r";
if (y >= (h - r))
hd = "u";
if (y <= r)
hd = "d";
} catch (e) {
alert(e.message);
}
}
function getDirection() {
horizontal = !horizontal;
var d = Math.ceil(Math.random() * 2);
if (horizontal) {
if (d == 1) {
hd = "r";
} else {
hd = "l";
}
} else {
if (d == 1) {
hd = "u";
} else {
hd = "d";
}
}
}
function drawBall() {
try {
var rgbFill = "rgb(0,0,0)";
var rgbStroke = "rgb(128,128,128)";
setNewPoint(d);
var ctxt = c.getContext("2d");
ctxt.clearRect(0, 0, c.width, c.height);
ctxt.beginPath();
ctxt.lineWidth = "5";
ctxt.strokeStyle = rgbStroke;
ctxt.arc(x, y, r, 0, 360);
ctxt.fillStyle = rgbFill;
ctxt.fill();
ctxt.stroke();
s = parseInt( document.getElementById("speedy").value);
requestAnimFrame(function () {
drawBall();
});
} catch (e) {
alert(e.message);
}
}
</script>
</head>
<body>
<canvas id="c" width="1200" height="800" style="border: 2px solid black;
position: absolute; top: 50px; left: 50px;"></canvas>
<input id="intensiveWork" type="button" value="Do Work" /><span
id="workResult"></span>
<input id="speedy" type="range" min="0" max="10" value="10"
style="position:relative; visibility:hidden;" step="1"/>
</body>
</html>
This code simply displays a small ball bouncing around inside a canvas. Users can use the arrow keys to change the ball’s direction. Users would expect a smooth experience. Now you can introduce an intensive mathematical operation to occur at the click of a button. The button is on the form already and is called intensiveWork. Add the following function to the bottom of the script block to do some intense math:
function DoIntensiveWork() {
var result = document.getElementById("workResult");
result.innerText = "";
var work = 10000000;
var i = 0;
var a = new Array(work);
var sum=0;
for (i = 0; i < work; i++) {
a[i] = i * i
sum += i * i;
}
result.innerText = sum;
}
This function does nothing more than calculate the sum of a series of squares and display the result to users. The amount of work to do is hard coded in this example but could be extended to get the information from users as well.
Next, add the click event handler to the button:
<script>
...
getDirection();
drawBall();
document.getElementById("intensiveWork").onclick = function () { DoIntensiveWork(); };
...
</script>
Now, users can click a button and get the sum of the squares for a series of sequential numbers.
The problem with this code is that although the math work is occurring, the ball interaction is blocked completely. The ball stops moving and user input is seemingly ignored until the math call returns. The call to run the calculations takes too long and interferes. You can experiment with smaller numbers and see that eventually the number can be small enough so the work happens fast enough that the ball isn’t stopped. This doesn’t mean that the application is doing work concurrently, although visibly no interruption occurs.
Creating a worker process with the Web Worker API
The Web Worker API is based on the JavaScript messaging framework. This underlying structure enables your code to send parameters to a worker and have the worker send results back. A basic web worker is established by creating a separate file to contain the script that will be processed on the separate thread. The Worker object is available from the global namespace and is created like so:
var webWorker = new Worker("workercode.js");
This instantiates a new worker process and specifies what file contains the code to be run on the worker thread. The Worker object supports the functionality described in Table 2-10.
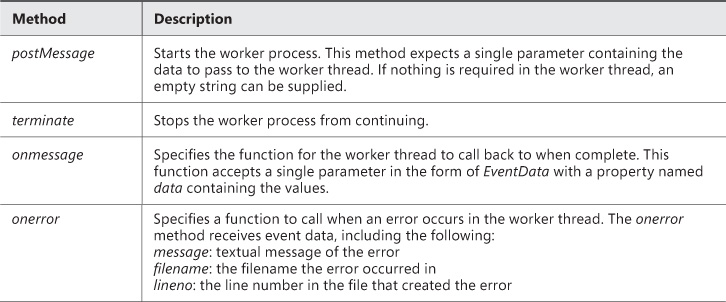
As soon as the Worker object is instantiated, it’s available for use at any time. All that’s needed to start the process is to call the postMessage method:
webWorker.postMessage("");
As soon as the webWorker is running, the main application continues as usual. If something occurs that the worker process should be canceled, a call to the terminate method would achieve this:
webWorker.terminate();
After the worker process completes and results need to be processed, the onmessage function is called from the worker. This should be set up before starting the worker:
webWorker.onmessage = function(evt) {...}
That’s everything required on the calling side or in the web application to create and manage a worker process. Next, you need to create the worker code itself. For this, you create the workercode.js file that was used in the constructor. The first line of the file will be the onmessage property being assigned a function to process:
onmessage = function(e){...}
This tells the runtime the entry point to the work to be run within the worker process. Somewhere in the worker process, where a result should be sent back to the calling application, the postMessage method is called:
onmessage = function(e){
...
self.postMessage(result);
}
That’s what’s involved in creating a worker process. In the last piece, notice the user of the self keyword. The self keyword is similar to the this keyword. The worker process runs in its own context, meaning that it has its own global namespace. The self keyword gives access to the global namespace within the worker process.
Using web workers
Now that you’ve examined the foundation of web workers, you can go back to the bouncing ball example and move the intensive math operations over to a worker process so that it doesn’t interfere with the bouncing ball activity. To do this, create a new JavaScript file called CalculateWorker.js with the following code in it:
onmessage = function (evt) {
var work = 10000000;
var i = 0;
var a = new Array(work);
var sum = 0;
for (i = 0; i < work; i++) {
a[i] = i * i;
sum += i * i;
}
self.postMessage(sum);
}
This code starts with assigning the onmessage handler a function to run when spawned within the context of a worker. At the end of the message, it calls postMessage to return a result back to the caller. Save this file, and then change the click event handler for the intensiveWork button in the bouncing ball code as follows:
document.getElementById("intensiveWork").onclick = function () {
var result = document.getElementById("workResult");
result.innerText = "";
var worker = new Worker("CalculateWorker.js");
worker.onmessage = function (evt) {
try {
result.innerText = evt.data;
} catch (e) {
alert(e.message);
}
}
worker.onerror = function (err) {
alert(err.message + err.filename + err.lineno);
}
worker.postMessage("");
};
In this code, the pattern described in the previous section is implemented. A new Worker object is instantiated with CalculateWorker.js specified. Then the onmessage is assigned a function to handle the result of the worker thread. The onerror is assigned a function to handle any error conditions. Finally, the postMessage is called to invoke the worker.
Run this code and click the Do Work button. The ball now continues to move on the screen and is responsive to the arrow keys. To make the worker process take longer, simply increase the size of the number it needs to work with.
To provide an option to stop the worker process, you need to implement the terminate method. Add a button to the page like so:
<input id="stopWorker" type="button" value="Stop Work" />
And add the following script beneath the postMessage call:
document.getElementById("stopWorker").onclick = function () {
worker.terminate();
}
Next, click the Do Work button followed by the Stop Work button to see that the work is terminated and no result is returned.
Understanding web worker limitations
Web workers are very convenient. They can solve many processing problems in intensive web applications. However, be aware of the limitations imposed on workers as well.
Passing parameters
The postMessage method accepts a parameter that enables it to pass data to the worker that it might need to operate on or with. The postMessage parameter is a string—it can take any serializable object such as native data types, JSON objects, or XML. The parameter can’t be a function.
In the bouncing ball example, the input for what number to work with could come from users. An input box can be added to the HTML and the entered value can be passed to the worker. This would look like this:
var value = document.getElementById("inputValue").value;
worker.postMessage(value);
Then in the worker, the value would be accessed like this:
onmessage = function (evt) {
var work = evt.data;
...
}
The function receives an event object with a property called data that contains whatever was passed into the worker.
Number of workers
Although no limit is imposed on how many workers can be processed or created concurrently, the number of workers used is something that you need to be pay attention to. Creating workers is a heavy operation. Each worker creates threads at the operating system level and their use should be managed accordingly. If you want a high volume of workers, consider creating a pool that can be used in a round-robin fashion so that not too many workers are created.
DOM access
Workers operate in their own global context, which means that they don’t have access to the DOM of the page that invoked them. The DOM shouldn’t be manipulated from a worker process. The worker context has no access to the window object, document object, or any parent object.
Subworkers
Following the same patterns as for a worker from the main webpage, a worker can create workers as well. All constructs must be followed for passing data and getting data returned. However, knowing how many total workers will be created becomes increasingly important.
Configuring timeouts and intervals
You can set up a web worker to run on a specified interval in the background. This is done by using any existing setTimeout or setInterval methods. The setTimeout method calls a specified function after the specified delay. The setInterval calls the specified function repeatedly after each specified time interval. For example, the following code runs the worker after 3 seconds:
var work = new Worker("workerFile.js");
setTimeout(function(){
work.postMessage("");
},3000);
However, the following code runs the worker every 3 seconds:
var work = new Worker("workerFile.js");
setInterval(function(){
work.postMessage("");
},3000);
![]() Thought experiment: Creating a page that performs a fireworks show
Thought experiment: Creating a page that performs a fireworks show
1. Would a larger firework show be too intensive? Why or why not?
2. Would web workers help make it more fluid? Why or why not?
Objective summary
![]() Web workers allow the JavaScript runtime to provide multithreading.
Web workers allow the JavaScript runtime to provide multithreading.
![]() Web workers can have sub-workers.
Web workers can have sub-workers.
![]() The number of workers that you can use is limitless, but too many workers can hinder performance.
The number of workers that you can use is limitless, but too many workers can hinder performance.
![]() Web workers can receive a single parameter containing any data needed for the worker.
Web workers can receive a single parameter containing any data needed for the worker.
![]() Web workers don’t have access to the DOM of the calling page.
Web workers don’t have access to the DOM of the calling page.
![]() Use setTimeout to delay before running a script function. Use setInterval to repeat a script function after every specified interval.
Use setTimeout to delay before running a script function. Use setInterval to repeat a script function after every specified interval.
Objective review
1. Which of the following isn’t a valid web worker operation?
A. postMessage
B. onmessage
C. close
D. terminate
2. Which method cancels a web worker?
A. close
B. terminate
C. suspend
D. sleep
3. Where must you place the JavaScript code to run in the context of a web worker?
A. Between the <head></head> elements
B. In any <script> block in the page
C. In its own JavaScript file
D. As a dynamic function assigned to the self.worker
4. How many web workers/subworkers can run concurrently?
A. A multiple of four web workers including subworkers, per processor
B. 16 workers by default, but you can change that number via self.configuration
C. A limitless number of workers
D. A limit of eight workers, each with a maximum of eight subworkers
5. To have a script run continually every 30 seconds, which line of code should be used?
A. wsConnection.repeatWork(“workerFile.js”,30000);
B. setTimeout(function(){ worker.postMessage(“”);}, 30000);
C. setTimeout( worker.postMessage(“”), 30000);
D. setInterval(function(){ worker.postMessage(“”);}, 30000);
Answers
This section contains the solutions to the thought experiments and answers to the objective review questions in this chapter.
Objective 2.1: Thought experiment
Writing clean JavaScript comes with some clear advantages. Choosing the correct construct to handle a problem is imperative to achieving the goal of clean script.
A for loop and while loop can both get the same jobs done interchangeably, but some semantic differences make one more preferable over the other in various situations. When you know how many times a loop must run, the for loop is ideal. It has all the built-in semantics to handle a counter to iterate a known number of times. It can be replaced with a while loop, but the while loop requires extra variables and code added to the loop to take care of the counting of the number of times the loop runs.
The while loop is better when you don’t know the number of times a loop will run; it’s indeterminate. This is where the loop runs until the logic within the loop achieves a certain state; hence, why the while loop evaluates on a Boolean expression.
You can apply the same logic when choosing between an if statement and a switch statement. Although a switch statement can easily be replaced by an if statement, the inverse isn’t true. Checking single values for equality in an if...else construct can become long and cumbersome. if statements allow for more complex evaluations, including compound evaluations using AND and OR logic. switch statements are more useful for evaluating a single value against a long list of possible values such as enumeration. Choosing the correct construct for the problem is imperative to readable and maintainable script.
Objective 2.1: Review
1. Correct answer: C
A. Incorrect: The if statement provides branch flow control.
B. Incorrect: The switch statement provides branch flow control.
C. Correct: The for loop provides iterative flow control.
D. Incorrect: The break keyword is used to exit an iterative control block such as a for or while loop.
2. Correct answer: D
A. Incorrect: The join method joins all the elements of an array into a string.
B. Incorrect: combine isn’t a valid method.
C. Incorrect: The split method is used to split a string into an array of substrings.
D. Correct: The concat method combines the elements of two arrays into one array.
3. Correct answer: C
A. Incorrect: The for...in loop runs only if the target list contains at least on element.
B. Incorrect: The while loop runs only if the Boolean condition evaluates to true.
C. Correct: The do...while loop runs a Boolean condition after it runs once.
D. Incorrect: The for loop runs only if the values specified in the conditions are true.
4. Correct answer: B
A. Incorrect: The continue keyword exits the current iteration but continues to the next iteration if the conditional values are still true.
B. Correct: The break keyword exits an iterative control loop.
C. Incorrect: stop isn’t a valid statement.
D. Incorrect: next isn’t a valid statement.
Objective 2.2: Thought experiment
This interesting scenario can lead to a complex chain of event handling in which one event triggers other events. This requires deciding on the flow of the events through the page. Good practice is to do this on paper or workflow software to design the workflow of the events. This will require knowing when to cancel the event chain or allow it to continue processing further down the controls.
Objective 2.2: Review
1. Correct answer: B
A. Incorrect: This is a valid method.
B. Correct: CSS doesn’t provide a way to assign events handlers.
C. Incorrect: This is a valid method.
D. Incorrect: This is a valid method.
2. Correct answer: D
A. Incorrect: Anonymous functions can’t be called.
B. Incorrect: Anonymous functions don’t have a name.
C. Incorrect: Anonymous functions can be passed as parameters.
D. Correct: Anonymous functions can’t be assigned to a DOM element declaratively.
3. Correct answer: A
A. Correct: window.event.returnValue = false; cancels the event.
B. Incorrect: return false; doesn’t cancel the event.
C. Incorrect: window.event.Return(); isn’t valid.
D. Incorrect: window.stop(); isn’t valid.
4. Correct answer: A
A. Correct: The focus event fires when an element receives the focus.
B. Incorrect: The change event fires when the value of an element is changed.
C. Incorrect: The keydown event fires when a keyboard key is pressed down.
D. Incorrect: The mouseleave event fires when the mouse pointer leaves the area of an element.
Objective 2.3: Thought experiment
Implementing a try...catch block in every function at the top of the call stack is an important way to catch unforeseen scenarios that result in the application getting into a bad state. However, this error handling routine might include situations from which you want to be able to recover. Nesting try...catch blocks allow this to happen. You can implement as many try...catch blocks as you want. Nesting them allows you to catch a specific scenario within the outer block, handle it, correct data and/or assumptions, and allow the script to continue running.
Objective 2.3: Review
1. Correct answer: A
A. Correct: By using structured error handling, you can provide feedback to users and handle unknown situations properly.
B. Incorrect: Proper error handling allows users to fix problems with the webpage.
C. Incorrect: Proper error handling allows you to debug the application at run time.
D. Incorrect: Proper error handling allows you to suppress all the bugs in your scripts.
2. Correct answer: B
A. Incorrect: message is a valid property that gives the textual description of the error.
B. Correct: description isn’t a valid property.
C. Incorrect: The number property provides the number associated with the error.
D. Incorrect: The name property provides the name of the exception object.
3. Correct answer: A
A. Correct: Checking for null prevents the use of an object before it initializes and prevents unexpected results.
B. Incorrect: NaN is a different construct than null.
C. Incorrect: Custom errors aren’t related to checking for null. Throwing a custom error can be used in many different scenarios.
Objective 2.4: Thought experiment
The concept of real-time chat or real-time communications isn’t new. However, HTML5 WebSockets make the concept easier than ever to implement in HTML5 webpages. Implementing this type of application is beyond the scope of the book but is very useful in understanding the power that WebSockets provide. The following URL provides many search results that provide examples: http://www.bing.com/search?q=WebSocket+JavaScript+chat+application.
AJAX provides asynchronous communication but doesn’t provide a bidirectional functionality that can deliver real-time communications.
Objective 2.4: Review
1. Correct answer: C
A. Incorrect: http isn’t a valid WebSocket protocol.
B. Incorrect: tcp isn’t a valid WebSocket protocol.
C. Correct: wss or ws is a valid protocol to create a WebSocket.
D. Incorrect: ftp isn’t a valid WebSocket protocol.
2. Correct answer: C
A. Incorrect: wsConnection.onpost isn’t a method.
B. Incorrect: wsConneciton.onreceive isn’t a method.
C. Correct: wsConnection.onmessage receives the resulting data.
D. Incorrect: wsConnection.ongetdata isn’t a method.
3. Correct answer: C
A. Incorrect: cache isn’t required.
B. Incorrect: cache isn’t required.
C. Correct: url, datatype, and onsuccess are required.
D. Incorrect: oncomplete isn’t a property.
4. Correct answer: A
A. Correct: Wiring up events with jQuery allows you to assign the event listener to many elements at once by using the selector syntax.
B. Incorrect: jQuery provides much more flexibility.
C. Incorrect: jQuery doesn’t work differently inside a loop.
D. Incorrect: This isn’t unique to jQuery.
Objective 2.5: Thought experiment
For an application such as this, you must consider the amount of work required to get it done. The larger the show, the more intense the application will be. You could use setInterval and setTimeout to control the show’s flow. However, the actual delivery of the firework display and explosion would be suited nicely for a web worker. This allows the user interface thread to continue to work uninterrupted while the complex logic of animating the fireworks occurs on a worker.
Objective 2.5: Review
1. Correct answer: C
A. Incorrect: postMessage initiates the script to run in the worker.
B. Incorrect: onmessage is the event handler used to receive the messages across the worker boundaries.
C. Correct: close isn’t a method on the web worker.
D. Incorrect: terminate is used to cancel a web worker.
2. Correct answer: B
A. Incorrect: close doesn’t cancel a web worker.
B. Correct: terminate cancels a web worker.
C. Incorrect: suspend isn’t a valid method.
D. Incorrect: sleep isn’t a valid method.
3. Correct answer: C
A. Incorrect: The code must be in its own file.
B. Incorrect: The code can’t be inside a <script> block.
C. Correct: The code must be in its own JavaScript file, and the name of the file is passed to the web worker as a parameter.
D. Incorrect: There is no such property as self.worker.
4. Correct answer: C
A. Incorrect: There is a limit associated with processors.
B. Incorrect: There is no such property as self.configuration.
C. Correct: There is no limit on the number of workers that can be created. However, too many will result in performance issues.
D. Incorrect: There is no such limitation.
5. Correct answer: D
A. Incorrect: wsConnection.repeatWork(“workerFile.js”,30000); isn’t valid code.
B. Incorrect: setTimeout(function(){ worker.postMessage(“”);}, 30000); delays for 30 seconds before running the anonymous function once.
C. Incorrect: In setTimeout( worker.postMessage(“”), 30000);, setTimeout waits for the specified delay before running the passed-in function. In this case, the parameter isn’t a function.
D. Correct: setInterval(function(){ worker.postMessage(“”);}, 30000); calls the passed-in function every interval as specified by the second parameter in milliseconds.