
Chapter 2. Manage backup and restore of databases
An organization’s data is one of its most important assets and in the twenty-first century data loss is not an option. In Chapter 1, “Configure data access and auditing,” we looked at the skills required to protect sensitive data through encryption, control data access and configure auditing for data governance reasons. We continue this data protection journey in this chapter where we learn how to help minimize data loss through the development and implementation of a Disaster Recovery Plan (DRP). Since a DRP is typically not sufficient to prevent data loss by itself, SQL Server supports a number of High-Availability (HA) technologies. We will look at the different High-Availability (HA) technologies in Chapter 4, “Manage high availability and disaster recovery.”
Data loss comes in many forms, including hardware failure, database corruption, malicious activity, and user error, and you need to develop a DRP to protect against all of these eventualities. It is common for organizations to have data governance requirements, so you will need to factor these into your data disaster strategy.
Skill 2.1 starts with the development of your backup strategy. We will examine the different requirements and considerations that you must take into account before you are ready to design your backup strategy. In Skill 2.2 we will turn to how you restore databases. Although your restore strategy is determined by your backup strategy, there are commonly different paths that you can take to restoring your database. In the exam you will be tested on your ability to assess what data has been lost as a result of a disaster and the appropriate restore path that you should take to make the database available again in the least possible time. Finally, in Skill 2.3, we deal with how you manage database integrity and recover from database corruption. Although database corruption is rare, you need to be prepared with an action plan just in case.
Skill 2.1: Develop a backup strategy
A correct backup strategy helps ensure that you incur minimal or no data loss. Developing this correct backup strategy is probably the most important task you will have as a database administrator. Do not make assumptions about what your organization requires, but instead engage the relevant stakeholders within your organization.
In Skill 2.1 we cover how you design your backup strategy by engaging your organization to determine a particular database’s data loss and recovery requirements. We will then look at the backup operations that can be used to translate the backup strategy into a set of scheduled backup operations. To minimize data loss you need to understand the internals of the backup operation and how a database’s transaction log operates, which we cover next. Finally, we will look at how to operationalize your backup operations and related tasks.
Design a backup strategy
To design a backup strategy a database administrator typically starts by engaging management within their organization to determine the amount of data loss that is acceptable and how quickly a database needs to be recovered from a disaster. Some organizations have hundreds of databases, so you will need to prioritize which ones are more important. Without such feedback from your organization it is very difficult to design a backup strategy.
A backup strategy is typically made up of the following elements:
![]() A set of backup operations.
A set of backup operations.
![]() There will potentially be different types of backup operations.
There will potentially be different types of backup operations.
![]() A schedule or frequency of when the backup operations will be performed.
A schedule or frequency of when the backup operations will be performed.
Although it sounds counter-intuitive, a backup strategy is really determined by your restore strategy or specifically how long it will take to restore your database when a disaster occurs. That is why it is critical to engage your business to determine what the recovery objectives for the database are. Without these recovery objectives it is impossible for you to design a backup strategy that will meet your organization’s business requirements. Make sure you document your backup (and restore) strategies so that both yourself, and other database administrators, can recover the database in a timely manner.
Define recovery objectives
To design a disaster recovery plan your organization’s management or business stakeholders will need to define the following three main requirements:
![]() Recovery Time Objective (RTO) The RTO defines the maximum allowable downtime following a disaster incident. The goal for the database administrator is to restore normal business operations within this time frame.
Recovery Time Objective (RTO) The RTO defines the maximum allowable downtime following a disaster incident. The goal for the database administrator is to restore normal business operations within this time frame.
![]() Recovery Point Objective (RPO) The RPO defines the maximum acceptable amount of data loss following a disaster incident. The RPO is commonly expressed in minutes.
Recovery Point Objective (RPO) The RPO defines the maximum acceptable amount of data loss following a disaster incident. The RPO is commonly expressed in minutes.
![]() Recovery Level Objective (RLO) The RLO defines granularity of the data that needs to be restored following a disaster incident. For SQL Server it could be a SQL Server instance, group of databases, a database, a set of tables, or a table.
Recovery Level Objective (RLO) The RLO defines granularity of the data that needs to be restored following a disaster incident. For SQL Server it could be a SQL Server instance, group of databases, a database, a set of tables, or a table.
Although there is an implied relationship between the RPO and RTO, the RPO is not always less than the RTO, as most people intuitively think. For example, one company might have a RTO of one hour, but a RPO of 24 hours. In other words, they need to restore normal business processes as soon as possible. They are willing to lose a day’s worth of data. Resumption of normal operations is paramount. Potentially, the lost data can be added after the resumption of normal operations through paper records, or other data sources.
All stakeholders need to understand that zero data loss is very difficult to achieve, if not impossible for most organizations. A backup strategy is not sufficient by itself. Typically, some sort of high availability technology also needs to be used. It is important to stress to management and other relevant stakeholders that your backup strategy is not a substitute for high availability. We will cover high availability in Chapter 4, “Manage high availability and disaster recovery.”
The RTO, RPO, and RLO form part of your service level agreements (SLAs). The SLAs represent an agreement between the business and IT operations on how your IT infrastructure is managed and what services are delivered.
Remember that the restore operation is typically asymmetric to the backup operation. For example, a backup that takes four hours to complete might take twenty hours to restore. As an alternative, a four hour backup might take two hours to restore. That is why it is you should periodically test your restore procedure. Yes, you need to ensure that it works. But more importantly you need to gather various metrics, such as how long it takes.
That is why the restore process drives your backup strategy. Once you have your RTO, RPO, and RLO defined, you can determine what backup operations and their frequency will make up your backup strategy.
Review backup operations
Your backup strategy will consist of a number of scheduled backup operations. These backup operations will potentially perform different types of backups, which we need to review for the exam. SQL Server supports the following types of backups.
![]() Full A full backup captures everything in the database.
Full A full backup captures everything in the database.
![]() Differential A differential backup captures everything in the database since the last full backup.
Differential A differential backup captures everything in the database since the last full backup.
![]() Incremental An incremental backup captures everything since the last incremental backup. In SQL Server it is called a log backup. You need to perform a full backup before you can perform log backups.
Incremental An incremental backup captures everything since the last incremental backup. In SQL Server it is called a log backup. You need to perform a full backup before you can perform log backups.
To design a backup strategy, you need to take into account a number of factors including:
![]() The size of your database A larger database will take longer to backup. Your database might grow to a size where the backup operation can no longer be completed within an appropriate maintenance window. At that stage you might have to use different hardware or redesign your database and backup strategy.
The size of your database A larger database will take longer to backup. Your database might grow to a size where the backup operation can no longer be completed within an appropriate maintenance window. At that stage you might have to use different hardware or redesign your database and backup strategy.
![]() The structure of your database files A database that consists of a single primary data file will be difficult to back up within an appropriate maintenance window as it gets larger. You have no choice but to back up the database in its entirety. As an alternative, if the database consists of multiple secondary data files these files can be backed up individually at different frequencies.
The structure of your database files A database that consists of a single primary data file will be difficult to back up within an appropriate maintenance window as it gets larger. You have no choice but to back up the database in its entirety. As an alternative, if the database consists of multiple secondary data files these files can be backed up individually at different frequencies.
![]() The speed/throughout of the network and storage subsystems involved The underlying hardware and networking infrastructure can substantially impact the duration your backup and restore operations. This will in turn impact your RTO.
The speed/throughout of the network and storage subsystems involved The underlying hardware and networking infrastructure can substantially impact the duration your backup and restore operations. This will in turn impact your RTO.
![]() How heavily utilized is the processor subsystem If your SQL Server instance is using all of the processor subsystem you might not be able to take advantage of backup compression. Backup compression consumes additional processor resources.
How heavily utilized is the processor subsystem If your SQL Server instance is using all of the processor subsystem you might not be able to take advantage of backup compression. Backup compression consumes additional processor resources.
![]() The volume of data modifications in the database A database that is heavily modified might have substantial transaction log growth. This in turn might force you to perform log backups more frequently so that the transaction log does not grow out of control.
The volume of data modifications in the database A database that is heavily modified might have substantial transaction log growth. This in turn might force you to perform log backups more frequently so that the transaction log does not grow out of control.
![]() The size of the data modifications in the database Similar to the above point, large transactions might also result in the transaction log growing to an unacceptable size. Again, you might have to perform more frequent log backups to remedy this scenario.
The size of the data modifications in the database Similar to the above point, large transactions might also result in the transaction log growing to an unacceptable size. Again, you might have to perform more frequent log backups to remedy this scenario.
![]() The type of data modifications in the database, for example, if they are predominantly update, or insert operations This will impact the size of your differential and log backups. If the same records within a database are continually updated, your differential backups will not increase in size and represent a good candidate for your backup strategy. As an alternative, if all the records within a database get modified, the differential backup might be the same size as a full database backup. Understanding the types of data modifications will help you optimize your backup strategy.
The type of data modifications in the database, for example, if they are predominantly update, or insert operations This will impact the size of your differential and log backups. If the same records within a database are continually updated, your differential backups will not increase in size and represent a good candidate for your backup strategy. As an alternative, if all the records within a database get modified, the differential backup might be the same size as a full database backup. Understanding the types of data modifications will help you optimize your backup strategy.
![]() How compressible the data in the database is Backup compression consumes additional processor resources. If the data within your database is not very compressible there will be no point in using backup compression in your backup operations.
How compressible the data in the database is Backup compression consumes additional processor resources. If the data within your database is not very compressible there will be no point in using backup compression in your backup operations.
![]() Whether point-in-time recovery is required If your organization requires a database to be recovered to a specific point-in-time you will have no choice but to implement log backups. Furthermore, the database will have to use the full recovery model.
Whether point-in-time recovery is required If your organization requires a database to be recovered to a specific point-in-time you will have no choice but to implement log backups. Furthermore, the database will have to use the full recovery model.
![]() The recovery objectives defined by your organization Quantifying your RPO, RTO, and RLO are critical to your backup strategy.
The recovery objectives defined by your organization Quantifying your RPO, RTO, and RLO are critical to your backup strategy.
![]() How the transaction log is managed Some databases experience substantial transaction log growth. You might also have limited storage dedicated to the transaction log. As a result, you might have to take more frequent log backups than planned to manage the transaction log.
How the transaction log is managed Some databases experience substantial transaction log growth. You might also have limited storage dedicated to the transaction log. As a result, you might have to take more frequent log backups than planned to manage the transaction log.
![]() The database’s recovery model Different recovery models impact whether transaction log backups can be taken. If your database is using the simple recovery model, you will not be able to leverage log backups.
The database’s recovery model Different recovery models impact whether transaction log backups can be taken. If your database is using the simple recovery model, you will not be able to leverage log backups.
![]() The importance of the data within the database Some databases might not be important to your organization, they may be used in a staging or development environment, or they can be a replica of a production system. In such cases there might be no business requirement to back up the database at all.
The importance of the data within the database Some databases might not be important to your organization, they may be used in a staging or development environment, or they can be a replica of a production system. In such cases there might be no business requirement to back up the database at all.
In the exam you might be given a scenario where you will have to determine the RTO and the RPO. Watch out for statements in the questions that stipulate that only “fifteen minutes’ worth of data can be lost,” or that “the database needs to be recovered in two hours.” Pay attention to the factors discussed above, and in particular the sizes of the databases and the implied duration of any backup operations, because this will help you in the formulation of the backup strategy.
Evaluate potential backup strategies
Let’s examine a number of simple scenarios and what backup strategy could potentially be used for them. The purpose of these scenarios is to show you the types of considerations that help you design your backup strategy.
The first scenario is for a data warehouse solution where a read-only database is used for analytical and reporting purposes. At the end of each day a process changes the database to read/write mode, populates the database with that day’s transactions, and then changes the database back to read-only mode. This process starts at midnight and takes 1-2 hours to complete. The database uses the simple recovery model. Users query the database between 08:00 and 18:00. Management has stipulated a RTO of 4 hours and a RPO of 0 minutes.
For this data warehouse solution a full database backup at 03:00 every day can be used as the backup strategy. Our full backup completes within 2 hours. There is no need for differential backups.
The second scenario is for a transactional database used by a customer relations management (CRM) solution. Users are continually modifying the database during business hours (08:00 and 18:00) by adding new customer, activity, and opportunity records. Management requires a RTO of 4 hours and a RPO of 2 hours. The database will also potentially need to be recovered to any specific point in time. A number of re-indexing jobs start at midnight and take 2 hours to complete. You notice that after 75 minutes, the transaction log fills up 95% of the storage allocated to it.
For this CRM solution the following strategy can be used. Although management requires a RPO of 2 hours, the transaction log will consume all of its allocated storage within that time frame. Differential backups cannot be used, because they do not support point-in-time recovery.
![]() Full database backup at 03:00 every day
Full database backup at 03:00 every day
![]() Incremental backups every hour during business hours from 08:00 and 18:00
Incremental backups every hour during business hours from 08:00 and 18:00
The final scenario is for a large, mission-critical, 24x7 database used in a manufacturing context. The existing tables are continually being updated by a variety of sensors in the manufacturing process. The transaction log grows rapidly in size. Although new records are also added to the database, it does not grow substantially in size. A full database backup cannot be performed daily since there is insufficient storage. The database needs to be restored to any point-in-time up to 3 months back. Management has indicated a RTO of 5 minutes.
For this manufacturing database the following backup strategy can be used. Differential backups are used to minimize the amount of storage consumed by backups. Transaction log backups allow you to recover to a point-in-time and only lose 5 minutes’ worth of data.
![]() Full database backup at 03:00 every Monday
Full database backup at 03:00 every Monday
![]() Incremental backups every five minutes
Incremental backups every five minutes
![]() A differential backup at the end of each day at 23:00
A differential backup at the end of each day at 23:00
Back up databases
Earlier we discussed the different high-level backup operations that potentially make up your backup strategy. In reality, SQL Server supports more types of backup operations. These different types of backup operations allow you to further customize your backup strategy and potentially capture any data modifications made to the database since the last backup operation after a disaster incident.
In this section we will cover the different types of database backup operations supported by SQL Server. We will also have a look at various techniques that can be used to back up larger databases where you might not have an appropriate maintenance window.
SQL Server supports the following types of backup operations:
![]() Full This contains the entire contents of the database and any changes made to the database during the backup operation. Consequently, a full backup represents the database at the point in time when the backup operation finished.
Full This contains the entire contents of the database and any changes made to the database during the backup operation. Consequently, a full backup represents the database at the point in time when the backup operation finished.
![]() Differential This contains only the differences between the last full database backup and the point in time when the differential backup operation was executed.
Differential This contains only the differences between the last full database backup and the point in time when the differential backup operation was executed.
![]() Log This contains all of the log records that were performed since the last log backup.
Log This contains all of the log records that were performed since the last log backup.
![]() File This contains either a file or filegroup that makes up the database.
File This contains either a file or filegroup that makes up the database.
![]() Partial This is similar to a full backup, but it excludes all read-only filegroups by default. For a read-write database, a partial backup contains the primary filegroup and all read-write filegroups. For a read-only database, a partial backup contains only the primary filegroup.
Partial This is similar to a full backup, but it excludes all read-only filegroups by default. For a read-write database, a partial backup contains the primary filegroup and all read-write filegroups. For a read-only database, a partial backup contains only the primary filegroup.
![]() Tail-Log This contains all the transaction log records that have not been backed up since the last log backup. A tail-log backup operation is typically performed as the first task in a disaster recovery process. This ensures that no data is lost up to the point-in-time when the disaster incident occurred. For the tail-log backup to be successful the database’s transaction log file must be available.
Tail-Log This contains all the transaction log records that have not been backed up since the last log backup. A tail-log backup operation is typically performed as the first task in a disaster recovery process. This ensures that no data is lost up to the point-in-time when the disaster incident occurred. For the tail-log backup to be successful the database’s transaction log file must be available.
The exam will most likely cover only full, differential, and log backups. However, you need to be prepared for some of the less commonly used backup operations that are designed more for edge and border cases. Make sure you understand the use cases of where file and partial backups are used.
When you perform a backup operation you need to specify a backup destination. Although tape devices are supported they are rarely used in the industry today due to their speed. Most organizations back up directly to a disk based destination and then potentially backup these database backups to tape.
Unfortunately, the legacy of using tapes as a destination still exists in the backup operation. Consequently, for the exam you will need to understand the following concepts used by SQL Server backup operations:
![]() Backup device A disk or tape device to which the database engine performs a backup operation.
Backup device A disk or tape device to which the database engine performs a backup operation.
![]() Media family A backup created on a single non-mirrored device, or a set of mirrored devices in a media set.
Media family A backup created on a single non-mirrored device, or a set of mirrored devices in a media set.
![]() Backup set This represents a successful backup operation’s content.
Backup set This represents a successful backup operation’s content.
![]() Media set A set of backup media that contains one or more backup sets.
Media set A set of backup media that contains one or more backup sets.
![]() Log sequence number (LSN) An internal numbering sequence used for each operation within the transaction log. This is used internally by the database engine and typically not used by database administrators.
Log sequence number (LSN) An internal numbering sequence used for each operation within the transaction log. This is used internally by the database engine and typically not used by database administrators.
![]() Sequence number This indicates the order of the physical media within a media family. Also, media families are numbered sequentially according to their position within the media set.
Sequence number This indicates the order of the physical media within a media family. Also, media families are numbered sequentially according to their position within the media set.
Need more Review? Log sequence number (LSN)
To learn about log sequence numbers visit https://docs.microsoft.com/en-us/sql/relational-databases/backup-restore/recover-to-a-log-sequence-number-sql-server.
Backing up to an explicitly created backup device is not commonly used in the industry today. They represent more of a legacy architecture in earlier versions of SQL Server where you created a backup device before backing up to it. It is more common now to backup directly to disk without creating an explicit backup device first.
Every backup device starts with a media header that is created by the first backup operation and remains until the media is reformatted. The media header contains information about the backup device’s contents and the media family it belongs to. The information includes:
![]() The name of the media
The name of the media
![]() The unique identification number of the media set
The unique identification number of the media set
![]() The number of media families in the media set
The number of media families in the media set
![]() The sequence number of the media family containing this media
The sequence number of the media family containing this media
![]() The unique identification number for the media family
The unique identification number for the media family
![]() The sequence number of this media in the media family
The sequence number of this media in the media family
![]() Whether the media description contains an MTF media label or a media description
Whether the media description contains an MTF media label or a media description
![]() The Microsoft Tape Format media label or the media description
The Microsoft Tape Format media label or the media description
![]() The name of the backup software that wrote the label
The name of the backup software that wrote the label
![]() The unique vendor identification number of the software vendor that formatted the media
The unique vendor identification number of the software vendor that formatted the media
![]() The date and time the label was written
The date and time the label was written
![]() The number of mirrors in the set (1-4); 1 indicates an un-mirrored device
The number of mirrors in the set (1-4); 1 indicates an un-mirrored device
![]() Exam Tip
Exam Tip
Make sure you understand what sequence numbers are represented in backup devices and how they are ordered. The exam might ask you to restore a series of backups in order using Transact-SQL and the sequence number will be important to the answer.
Consider the following series of backup operations that perform a full, differential, and incremental backup to four backup devices concurrently as shown in Listing 2-1.
LISTING 2-1 Multiple backups to four backup devices
-- Initial full backup
BACKUP DATABASE AdventureWorks TO
DISK = 'R:SQLBackupAdventureWorks_BackupDevice1.bak''
DISK = 'R:SQLBackupAdventureWorks_BackupDevice2.bak ''
DISK = 'R:SQLBackupAdventureWorks_BackupDevice 3.bak ''
DISK = 'R:SQLBackupAdventureWorks_BackupDevice 4.bak '
WITH
FORMAT'
MEDIANAME = ' AdventureWorksMediaSet1';
GO
-- Differential backup
BACKUP DATABASE AdventureWorks TO
DISK = 'R:SQLBackupAdventureWorks_BackupDevice1.bak''
DISK = 'R:SQLBackupAdventureWorks_BackupDevice 2.bak ''
DISK = 'R:SQLBackupAdventureWorks_BackupDevice 3.bak ''
DISK = 'R:SQLBackupAdventureWorks_BackupDevice 4.bak '
WITH
NOINIT'
MEDIANAME = 'AdventureWorksMediaSet1''
DIFFERENTIAL;
GO
-- Incremental backup
BACKUP LOG AdventureWorks TO
DISK = 'R:SQLBackupAdventureWorks_BackupDevice1.bak''
DISK = 'R:SQLBackupAdventureWorks_BackupDevice 2.bak ''
DISK = 'R:SQLBackupAdventureWorks_BackupDevice 3.bak ''
DISK = 'R:SQLBackupAdventureWorks_BackupDevice 4.bak '
WITH
NOINIT'
MEDIANAME = 'AdventureWorksMediaSet1';
GO
These three backup operations result in the following media set, as shown in Figure 2-1.

FIGURE 2-1 Backup media set
Now that we have covered the different types of backup operations and destinations let’s look at these operations in more detail. Understanding how these backup operations work will help you design an appropriate backup strategy.
Performing full backups
Full backups form the baseline of your backup strategy. Differential and log backups do not work unless they have a baseline full database backup. If a full backup is corrupted or lost you will not be able to restore any subsequent differential and log backups. This highlights the need to periodically perform a full database backup.
A full backup contains a copy of the database and the transaction log operations performed during the database backup phase. The backup operation only backs up the allocated pages within the database. Unallocated pages are not backed up. For a 100GB database that only has 10GB of data, the full database backup is only approximately 10GB in size uncompressed.
Need more Review? SQL Server internal architecture
Understanding the database engine’s internal architecture will help you understand how the different backup operations work internally. To learn about extents and pages visit https://docs.microsoft.com/en-us/sql/relational-databases/pages-and-extents-architecture-guide.
With a full database backup, the database engine performs the following high-level actions:
![]() Checkpoint Performs a database checkpoint. The checkpoint process flushes all dirty data from the buffer pool to disk to minimize the amount of work required by the restore process.
Checkpoint Performs a database checkpoint. The checkpoint process flushes all dirty data from the buffer pool to disk to minimize the amount of work required by the restore process.
![]() Record backup start LSN Examines the transaction log and records the log sequence number (LSN) of when the backup operation started.
Record backup start LSN Examines the transaction log and records the log sequence number (LSN) of when the backup operation started.
![]() Backup data Backs up all the extents (unit of eight physically contiguous 8KB pages) from the data files in the database to the backup destination.
Backup data Backs up all the extents (unit of eight physically contiguous 8KB pages) from the data files in the database to the backup destination.
![]() Record backup end LSN Re-examines the transaction log and records the LSN of the start of the oldest active transaction and re-examines the transaction log and records the LSN of when the backup operation started.
Record backup end LSN Re-examines the transaction log and records the LSN of the start of the oldest active transaction and re-examines the transaction log and records the LSN of when the backup operation started.
![]() Calculate minimum LSN Determines the minimum LSN required for the log backup by taking the earliest in time between the backup end LSN and the oldest active transaction’s LSN. The oldest active transaction could have started before the backup statement was executed.
Calculate minimum LSN Determines the minimum LSN required for the log backup by taking the earliest in time between the backup end LSN and the oldest active transaction’s LSN. The oldest active transaction could have started before the backup statement was executed.
![]() Backup log Backs up the transaction log between the calculated minimum LSN and the backup end LSN. This ensures that the recovered database will be consistent as of the time of the backup operation’s completion.
Backup log Backs up the transaction log between the calculated minimum LSN and the backup end LSN. This ensures that the recovered database will be consistent as of the time of the backup operation’s completion.
Consider the following sequence of events, as shown in Figure 2-2.
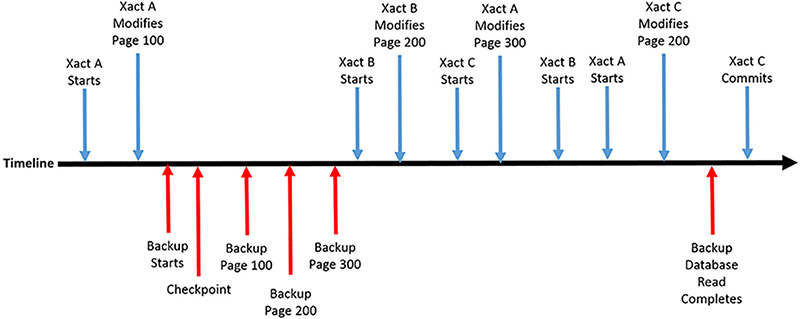
FIGURE 2-2 Backup example timeline
2. Transaction A changes page 100
3. A full backup begins
4. Backup checkpoint occurs
5. Backup reads page 100
6. Backup reads page 200
7. Backup reads page 300
8. Transaction B begins
9. Transaction B changes page 200
10. Transaction C begins
11. Transaction A modifies page 300
12. Transaction B commits
13. Transaction A commits
14. Transaction C modifies page 200
15. Backup database read ends
In this example, the Backup Data phase captures the modification to page 100 by transaction A, but not the subsequent modification to pages 200 and 300 made by transactions A, B, and C. The Backup Data phase neither re-reads pages that have been backed up but then modified, nor does it block transactions by reading the page before allowing the modification. The Backup Log phase has to read enough of the transaction log so as to be able to recover the database to a consistent state as of the end of the Backup Data phase. Consequently, the Backup Log phase would have to capture the modifications made to pages 200 and 300. If you were to restore this database backup it would not include the changes made to page 200 by transaction C, because it did not commit before the Backup Data phase completed. This modification would be undone (rolled back) by the recovery phase of the restore operation.
![]() Exam Tip
Exam Tip
It is very likely that the exam will have a question with a similar timeline of scheduled backup operations and what has gone wrong. For you to be able to answer the exam question correctly you will have to understand the importance of events and incidents in the time line and be able to formulate the correct recovery plan. Watch out in particular of when transactions commit.
Figure 2-3 shows the internal operations that were performed during a full database against a timeline. You can see how the database engine initially allocates a number of resources to the backup operation. You can control some of these resources such as the maximum transfer size and buffer count. Note how the full backup operation clears the differential bitmaps before performing the initial backup discussed above. It then scans the allocation bitmaps so as to predict the size of the backup file. This estimation is used to create the backup destination file before it can start writing to it. At the very end, after the data copy phase it backups up the transaction log and closes off the backup set. The resultant backup set file can be shorter than the initial estimation.

FIGURE 2-3 Backup media set
Use the following statement to perform a full backup:
BACKUP DATABASE { database_name | @database_name_var }
TO <backup_device> [ '...n ]
[ <MIRROR TO clause> ] [ next-mirror-to ]
[ WITH <general_WITH_options> [ '...n ] ] ]
[;]
Performing differential backups
Differential backups represent a delta within the database between the time of the differential backup and the last full backup. The database engine keeps track of all changes made to the database, at the extent level, via an internal bitmap called a Differential Change Map (DCM). Performing a full database backup clears the DCM by default.
Although a single row in a table might be modified, the differential backup will back up the entire 64KB extent. This is done for performance reasons, but results in backup sizes being larger than they strictly need to be. Figure 2-4 shows how a differential backup backs up Database Extents via the DCM.

FIGURE 2-4 Differential backup high-level internals
Typically, differential backups get larger in size as more time passes between subsequent differential backup operations and the baseline full backup. At some point in time this size increase impacts your RTO. Don’t forget that it takes longer to restore the full and differential backups when compared to restoring a standalone full backup.
Perform differential database backups when any of the following apply:
![]() You want to reduce the time taken by the backup operation as compared to the full backup and you do not need point-in-time recovery.
You want to reduce the time taken by the backup operation as compared to the full backup and you do not need point-in-time recovery.
![]() You want to reduce the size of the database set as compared to the full backup and you do not need point-in-time recovery.
You want to reduce the size of the database set as compared to the full backup and you do not need point-in-time recovery.
Use the following statement to perform a differential backup:
BACKUP DATABASE { database_name | @database_name_var }
TO <backup_device> [ '...n ]
[ <MIRROR TO clause> ] [ next-mirror-to ]
WITH DIFFERENTIAL
[ WITH <general_WITH_options> [ '...n ] ] ]
[;]
The size, or potential size of the differential backup will be the determining factor in any potential exam question. So pay attention to how records are being modified in any exam questions. A lot of insert operations within the database imply that the differential backups will get larger in size as time progresses. A lot of update operations to existing data implies that a “steady state” will be achieved with respect to the size of the differential backups as time elapses. You will need to compare both the size and recovery impact of differential backups to transaction log backups, and we will look at them next.
Performing log backups
Log backups represent an incremental backup as discussed earlier as they capture all changes made to the database since the last full or previous log backup. By default, the log backup also reclaims the space within the transaction log by removing records that are no longer required for recovery purposes. This is typically called “truncating the log”. A log backup cannot be performed unless the database is in full recovery model and an initial full backup has been performed. We will cover recovery models in detail later in the “Configure database recovery models” section in this chapter.
Log backups are the primary mechanism used to manage the transaction log so that it does not grow too large. For busy databases, it is common to back up the transaction log more frequently. The log backup frequency directly impacts your RPO. Backing up the log every 15 minutes means that you lose a maximum of 15 minutes of committed transaction in the worst case scenario, where you cannot perform a tail-log backup. Tail-log backups are discussed in more detail later in the “Perform tail-log backups” section of this chapter.
Important Controlling logging of successful backup operations
By default, every successful backup operation records an entry in the database engine’s error log. If log backups are performed very frequently, these messages can result in excessive error log growth and make troubleshooting errors more difficult due to the size of the error log. Consider suppressing these messages using trace flag 3226. This trace flag applies to all backup operations. Unsuccessful backup operations are still logged to the error log.
For more information on trace flags and trace flag 3226 visit https://docs.microsoft.com/en-us/sql/t-sql/database-console-commands/dbcc-traceon-trace-flags-transact-sql
Perform transaction log backups when any of the following apply.
![]() Your database has smaller RPO than the frequency of your full/differential backups.
Your database has smaller RPO than the frequency of your full/differential backups.
![]() You need to recover the database up until the time that it crashed.
You need to recover the database up until the time that it crashed.
![]() You need point-in-time recovery.
You need point-in-time recovery.
![]() You need to ensure that the database’s transaction log does not grow too large.
You need to ensure that the database’s transaction log does not grow too large.
Use the following statement to perform a log backup:
BACKUP LOG { database_name | @database_name_var }
TO <backup_device> [ '...n ]
[ <MIRROR TO clause> ] [ next-mirror-to ]
[ WITH { <general_WITH_options> | <log-specific_optionspec> } [ '...n ] ]
[;]
For most databases a combination of full, differential and log backups are sufficient. However, for more “exotic” use cases you can leverage file backups that do not backup the entire database. Such use cases make great exam questions although they are not commonly “seen in the wild.” Let’s have a look at how you can perform file and partial backups of your databases next. Remember that they typically all require log backups so as to synchronize the database to a consistent state.
Performing file backups
File backups are typically used where a multi-file database is very large and cannot be completely backed up in the existing maintenance window. Consequently, you rotate the backup of the various files that make up your database at different time intervals.
Perform file backups in the following scenarios:
![]() You have a very large database and plan to rotate the backups of the files that make up the database.
You have a very large database and plan to rotate the backups of the files that make up the database.
![]() Your database is made up of different files, some of which might contain read-only data, or data that is rarely modified. In this case you can back up the different files at different frequencies.
Your database is made up of different files, some of which might contain read-only data, or data that is rarely modified. In this case you can back up the different files at different frequencies.
Use the following statement to perform a file/filegroup backup:
BACKUP DATABASE { database_name | @database_name_var }
<file_or_filegroup> [ '...n ]
TO <backup_device> [ '...n ]
[ <MIRROR TO clause> ] [ next-mirror-to ]
[ WITH { DIFFERENTIAL | <general_WITH_options> [ '...n ] } ]
[;]
File backups have been supported in SQL Server for a very long time and were probably designed for large databases. We will examine how you can backup very large databases in the”Backup VLDBs” section later in this chapter.
Performing partial backups
Partial backups were introduced in SQL Server 2012 to make backing up very large databases that contain one or more read-only filegroups easier. By default, partial backups do not backup up the read-only filegroups, although read-only file groups can be optionally added to a partial backup. SQL Server Management Studio and the Maintenance Plan Wizard do not support partial backups.
A typical scenario is a very large database that has a read-only filegroup used to store archive data. That archive data is substantial in size and modified only annually. As a result there is no need to back up the read-only filegroup at the same frequency as the full backups.
Use the following statement to perform a partial backup:
BACKUP DATABASE { database_name | @database_name_var }
READ_WRITE_FILEGROUPS [ ' <read_only_filegroup> [ '...n ] ]
TO <backup_device> [ '...n ]
[ <MIRROR TO clause> ] [ next-mirror-to ]
[ WITH { DIFFERENTIAL | <general_WITH_options> [ '...n ] } ]
[;]
Use backup options
Now that we have covered the different types of backups supported in SQL Server we need to examine the important backup options. The exam is going to test your ability to understand these options and use them in the appropriate circumstances. Backup questions in the exam typically have Transact-SQL statements as answer choices and not screen captures.
The BACKUP statement has a large number of WITH options. For the exam, make sure you understand what the following options do and when to use them:
![]() CHECKSUM | NO_CHECKSUM These options help ensure that your backup can be successfully restored without errors. The CHECKSUM option specifies that the backup operation verifies that each page of the database does not have a checksum or torn page error, if those database options are enabled and available. It also generates a checksum for the entire backup. The default behavior is NO_CHECKSUM, which does not validate pages and does not generate a backup checksum. Page validation and checksum generation consumes more processor resources during the backup operation. But their value is important in disaster recovery scenarios.
CHECKSUM | NO_CHECKSUM These options help ensure that your backup can be successfully restored without errors. The CHECKSUM option specifies that the backup operation verifies that each page of the database does not have a checksum or torn page error, if those database options are enabled and available. It also generates a checksum for the entire backup. The default behavior is NO_CHECKSUM, which does not validate pages and does not generate a backup checksum. Page validation and checksum generation consumes more processor resources during the backup operation. But their value is important in disaster recovery scenarios.
![]() CONTINUE_AFTER_ERROR | STOP_ON_ERROR These options tell the database engine what to do in the case of a backup operation encountering a page checksum error. The CONTINUE_AFTER_ERROR option tells the backup operation to continue on if it encounters any page validation errors. The default option is STOP_ON_ERROR, which instructs the backup operation to stop.
CONTINUE_AFTER_ERROR | STOP_ON_ERROR These options tell the database engine what to do in the case of a backup operation encountering a page checksum error. The CONTINUE_AFTER_ERROR option tells the backup operation to continue on if it encounters any page validation errors. The default option is STOP_ON_ERROR, which instructs the backup operation to stop.
![]() COPY_ONLY This specifies that the backup is a copy only backup, which means your backup sequence is not affected. For all intents and purposes the backup operation did not occur. For a full backup, a copy only option does not reset the DMC, so subsequent differential backups are not affected. For a log backup the copy only option does not truncate the transaction log, so the log chain is not broken. Copy only backups are typically used to refresh non-production environments with production backups when the existing backup sequence should not be impacted. A copy only backup is still recorded in the ERRORLOG.
COPY_ONLY This specifies that the backup is a copy only backup, which means your backup sequence is not affected. For all intents and purposes the backup operation did not occur. For a full backup, a copy only option does not reset the DMC, so subsequent differential backups are not affected. For a log backup the copy only option does not truncate the transaction log, so the log chain is not broken. Copy only backups are typically used to refresh non-production environments with production backups when the existing backup sequence should not be impacted. A copy only backup is still recorded in the ERRORLOG.
![]() COMPRESSION | NO_COMPRESSION Backup compression has been available since the SQL Server 2008 Enterprise Edition and the SQL Server 2008 R2 Standard Edition. The COMPRESSION option enables backup compression. The NO_COMPRESSION option explicitly disables backup compression. The compression level cannot be controlled. Backup compression can consume extra processor resources so be careful with its usage in high-performance environments. The default behavior of the database engine is not to use backup compression. Setting the backup compression default server configuration option can change this default.
COMPRESSION | NO_COMPRESSION Backup compression has been available since the SQL Server 2008 Enterprise Edition and the SQL Server 2008 R2 Standard Edition. The COMPRESSION option enables backup compression. The NO_COMPRESSION option explicitly disables backup compression. The compression level cannot be controlled. Backup compression can consume extra processor resources so be careful with its usage in high-performance environments. The default behavior of the database engine is not to use backup compression. Setting the backup compression default server configuration option can change this default.
![]() DESCRIPTION This option allows you to describe the backup set using up to 255 characters.
DESCRIPTION This option allows you to describe the backup set using up to 255 characters.
![]() ENCRYPTION | NO_ENCRYPTION These options controls whether the backup should be encrypted. The default behavior is the same as the NO_ENCRYPTION option, which is not to encrypt. When you encrypt a backup you need to specify which encryption algorithm to use. The following encryption algorithms are supported:
ENCRYPTION | NO_ENCRYPTION These options controls whether the backup should be encrypted. The default behavior is the same as the NO_ENCRYPTION option, which is not to encrypt. When you encrypt a backup you need to specify which encryption algorithm to use. The following encryption algorithms are supported:
![]() AES_128
AES_128
![]() AES_192
AES_192
![]() AES_256
AES_256
![]() TRIPLE_DES_3KEY
TRIPLE_DES_3KEY
When you encrypt a backup you also have to specify the encryptor using one of the following options:
![]() SERVER CERTIFICATE = Encryptor_Name
SERVER CERTIFICATE = Encryptor_Name
![]() SERVER ASYMMETRIC KEY = Encryptor_Name
SERVER ASYMMETRIC KEY = Encryptor_Name
![]() EXPIREDATE | RETAIN_DAYS These two options allow you to control when the backup set expires and can be subsequently overwritten. RETAINSDAYS takes precedence over EXPIREDATE.
EXPIREDATE | RETAIN_DAYS These two options allow you to control when the backup set expires and can be subsequently overwritten. RETAINSDAYS takes precedence over EXPIREDATE.
![]() FORMAT | NO FORMAT The FORMAT option is destructive as it causes a new media set to be created. All existing backup sets are unrecoverable. If you format a single tape that belongs to an existing striped media set, the entire media set is useless. The default option, NOFORMAT, preserves the existing media header and backup sets on the media volumes used by the backup.
FORMAT | NO FORMAT The FORMAT option is destructive as it causes a new media set to be created. All existing backup sets are unrecoverable. If you format a single tape that belongs to an existing striped media set, the entire media set is useless. The default option, NOFORMAT, preserves the existing media header and backup sets on the media volumes used by the backup.
![]() INIT | NOINIT The INIT option specifies that all backup sets should be overwritten. The media header is preserved. The existing backup sets are not overwritten if the EXPIRYDATE/RETAINDAYSA have not expired, or if the backup set name provided does not match the one in the backup media. The NOINIT option, which is the default, specifies that the backup set be appended to the existing ones in the media set.
INIT | NOINIT The INIT option specifies that all backup sets should be overwritten. The media header is preserved. The existing backup sets are not overwritten if the EXPIRYDATE/RETAINDAYSA have not expired, or if the backup set name provided does not match the one in the backup media. The NOINIT option, which is the default, specifies that the backup set be appended to the existing ones in the media set.
![]() NAME This option gives the backup set a name. Up to 128 characters can be used.
NAME This option gives the backup set a name. Up to 128 characters can be used.
![]() MEDIADESCRIPTION This option allows you to describe the media set. It is limited to 255 characters.
MEDIADESCRIPTION This option allows you to describe the media set. It is limited to 255 characters.
![]() MEDIANAME This allows you to use up to 128 characters to give the media set a name.
MEDIANAME This allows you to use up to 128 characters to give the media set a name.
![]() RETAINDAYS This option allows you to control when the backup set expires and can be subsequently overwritten.
RETAINDAYS This option allows you to control when the backup set expires and can be subsequently overwritten.
![]() SKIP | NOSKIP The SKIP option specifies that the backup operation should ignore the “safety check” that normally checks the backup set’s expiration date or name before overwriting it.
SKIP | NOSKIP The SKIP option specifies that the backup operation should ignore the “safety check” that normally checks the backup set’s expiration date or name before overwriting it.
![]() STATS This controls at what percentage intervals the database engine should display a message indicating the progress of the backup operation. The default value is 10, which means you are notified whenever another 10 percent of the backup operation completes.
STATS This controls at what percentage intervals the database engine should display a message indicating the progress of the backup operation. The default value is 10, which means you are notified whenever another 10 percent of the backup operation completes.
Furthermore, the BACKUP statement supports the ability to back up the same data/log to a number of mirrored backup devices via the MIRROR TO clause. The MIRROR TO clause must have the same type and number of the backup devices as the TO clause. A maximum of three MIRROR TO clauses can be used, so a total of four mirrors is possible per media set. The primary reason for using mirrored media sets is to provide redundancy at the backup device level.
Listing 2-2 shows a full backup operation that has been mirrored to a number of different servers.
LISTING 2-2 Mirrored backups
BACKUP DATABASE WorldWideImporters
TO DISK = 'B:SQLBackupWorldWideImporters.bak'
MIRROR TO DISK = '\DEVSERVERSQLBackupSQLBackupWorldWideImporters.bak''
MIRROR TO DISK = '\TESTSERVERSQLBackupSQLBackupWorldWideImporters.bak''
MIRROR TO DISK = '\STAGINGSERVERSQLBackupSQLBackupWorldWideImporters.bak''
WITH FORMAT;
When backing up a large database it can be useful to know how far an executing backup operation has come and how long it will take to complete. You can query the [sys].[dm_exec_requests] dynamic management view (DMV) to monitor a backup operation’s progress. Use the query in Listing 2-3 to show the progress of a running BACKUP operation:
LISTING 2-3 Progress of backup operation
SELECT session_id' db_name(database_id) as database_name'
start_time' command' percent_complete' estimated_completion_time
FROM sys.dm_exec_requests
WHERE command LIKE 'backup %';
Perform database snapshots
Database snapshots are a read-only, static view of a database at the point-in-time when the database snapshot was taken. A database snapshot is a sparse file that is created separately from the database. This snapshot file holds the old versions of the database’s pages as data in the database is modified. A database can have multiple database snapshots, and each database snapshot has a unique name. Database snapshots have to be removed explicitly.
Database snapshots make great questions in the exam. If you don’t know how database snapshots work at the database engine level, you might easily choose them as an answer when they are clearly not the correct answer choice. Database snapshots work at the page level. Whenever a page is modified its pre-modified version is written to the snapshot file. Consequently, the database snapshot will consume more disk space as more data is modified within the database. A database can have multiple database snapshots. Although the predominant use case for database snapshots is for reporting purposes, they can be used for safeguarding against user mistakes. Reverting a database snapshot is quicker in most cases than restoring a database and replaying all log backups, up until the user mistake is made. For example, you might want to take a database snapshot before you execute some sort of end-of-day batch process. If an error occurs, or you decide you need to roll back this batch process, you can simply revert the database back to the time of the database snapshot. All data modifications after the database snapshot are to be expunged.
Important Database snapshot dependency
Database snapshots are dependent on the parent database. If the parent database’s data files are corrupted or lost, queries against the database snapshot will not work.
Listing 2-4 shows how to create a database snapshot. Ensure you provide a unique, meaningful name to the database snapshot.
LISTING 2-4 Create a database snapshot
CREATE DATABASE WorldWideImporters_20160917
ON (
NAME = WorldWideImporters_Data'
FILENAME = 'R:SQLDataWorldWideImporters_20160917.ss')
AS SNAPSHOT OF [WorldWideImporters];
![]() Exam Tip
Exam Tip
Watch out for any exam items that include database snapshots. If the underlying database files are unavailable you will not be able to revert the database snapshot.
Back up databases to Azure
There are a number of compelling reasons for backing up your database to the cloud, including triple redundancy, off-site location, and cost-effectiveness. SQL Server supports the following tools and features:
![]() Backup to URL
Backup to URL
![]() Backup to Microsoft Azure tool
Backup to Microsoft Azure tool
![]() Managed backup to Microsoft Azure
Managed backup to Microsoft Azure
SQL Server 2012 Service Pack 1 Cumulative Update 2 introduced the capability to back up directly to (and restore from) Microsoft Azure Blob Storage. Both the Backup Task in SQL Server Management Studio and the Maintenance Plan Wizard support backups to Microsoft Azure Blob Storage.
Backing up databases to Microsoft Azure Blob Storage is great if your databases are hosted in Microsoft Azure. For on-premise database solutions, however, you need to take into account your database size, volume of modifications, and upload/download bandwidth.
To back up to Microsoft Azure Blob Storage with the BACKUP statement, use the TO URL clause as show in Listing 2-5.
LISTING 2-5 Backup to URL
-- Create storage account identity and access key
CREATE CREDENTIAL MyCredentialName
WITH IDENTITY = 'MyStorageAccountName',
SECRET = '<MyStorageAccountAccessKey>';
GO
-- Backup database to URL using storage account identity and access key
BACKUP DATABASE MyDB
TO URL = 'https://<MyStorageAccountName>.blob.core.windows.net/<MyStorageAccountContainerN
ame>/MyDB.bak'
WITH CREDENTIAL = 'MyCredentialName'
Need more Review? SQL Server backup to URL
To learn how to configure Microsoft Azure Blob Storage to support SQL Server backup operations to URL visit https://docs.microsoft.com/en-us/sql/relational-databases/backup-restore/sql-server-backup-to-url.
Introduced in SQL Server 2014, the SQL Server Managed Backup to Microsoft Azure feature automatically manages your backups to Microsoft Azure. This feature can be enabled at the instance or database level, through the [smart_admin].[sp_set_instance_backup] or [smart_admin].[sp_set_db_backup] system stored procedures respectively. The database engine then automatically performs full and log backups automatically. Backups are retained for up to 30 days.
Full backups are performed whenever any of the following are true:
![]() The last full backup is over a week old.
The last full backup is over a week old.
![]() The log has grown more than 1GB since the last full backup.
The log has grown more than 1GB since the last full backup.
![]() Log chain is broken.
Log chain is broken.
Log backups are performed whenever any of the following are true:
![]() More than two hours have expired since the last log backup.
More than two hours have expired since the last log backup.
![]() The log has grown in 5MB.
The log has grown in 5MB.
![]() The log backup is behind the full backup.
The log backup is behind the full backup.
Listing 2-6 shows an example of how to configure SQL Server Managed Backup to Microsoft Azure at the instance level.
LISTING 2-6 SQL Server Managed Backup to Microsoft Azure at the instance level
USE [msdb];
GO
EXEC [smart_admin].[sp_set_instance_backup]
@enable_backup=1
,@storage_url = 'https://mystorageaccount.blob.core.windows.net/'
,@retention_days=30
,@credential_name='MyCredential'
,@encryption_algorithm ='AES_256'
,@encryptor_type= 'ServerCertificate'
,@encryptor_name='MyBackupCertificate';
GO
Listing 2-7 shows an example of how to configure SQL Server Managed Backup to Microsoft Azure at the database level.
LISTING 2-7 SQL Server Managed Backup to Microsoft Azure at the instance level
USE [msdb];
GO
EXEC [smart_admin].[sp_set_db_backup]
@database_name='MyDB'
,@enable_backup=1
,@storage_url = 'https://MyStorageAccount.blob.core.windows.net/'
,@retention_days=30
,@credential_name='MyCredential'
,@encryption_algorithm ='NO_ENCRYPTION';
GO
The Microsoft SQL Server Backup to Microsoft Azure Tool is an externally available tool that enables backup to Azure Blob Storage and encrypts and compresses SQL Server backups stored locally or in the cloud. It works with all versions and editions of SQL Server, even if they do not support compression and encryption.
Need more Review? Microsoft SQL Server Backup to Microsoft Azure Tool
You can learn about and download the Microsoft SQL Server Backup to Microsoft Azure Tool from https://www.microsoft.com/en-au/download/details.aspx?id=40740.
Back up VLDBs
As your database grows in size, the backup times, and more importantly the restore times, increase because both the backup and restore duration is dependent on the speed of your I/O subsystems. There are a number of techniques that can be used to decrease the time taken:
![]() Potentially implement data compression on tables within the database to reduce the size of the database. In most cases PAGE compression is superior to ROW compression.
Potentially implement data compression on tables within the database to reduce the size of the database. In most cases PAGE compression is superior to ROW compression.
![]() Assess taking advantage of columnstore indexes, which may substantially reduce the size of the tables. With columnstore indexes the table size can be potentially substantially reduced, as an example, from 120GB to 4GB. Be aware that columnstore indexes are designed primarily for data warehouse workloads where queries scan large volumes of data. For an On-Line Transaction Processing (OLTP) database you might still be able to use columnstore indexes on large tables that are rarely, if ever, queried. Examples of tables that fit this profile include auditing and logging tables.
Assess taking advantage of columnstore indexes, which may substantially reduce the size of the tables. With columnstore indexes the table size can be potentially substantially reduced, as an example, from 120GB to 4GB. Be aware that columnstore indexes are designed primarily for data warehouse workloads where queries scan large volumes of data. For an On-Line Transaction Processing (OLTP) database you might still be able to use columnstore indexes on large tables that are rarely, if ever, queried. Examples of tables that fit this profile include auditing and logging tables.
![]() Consider moving old data out of your very large database into an archive database. Old data is infrequently queried and should not live in your OLTP database forever.
Consider moving old data out of your very large database into an archive database. Old data is infrequently queried and should not live in your OLTP database forever.
![]() Take advantage of backup compression to reduce the size of the backup set.
Take advantage of backup compression to reduce the size of the backup set.
![]() Back up your database to multiple backup devices. The database engine is able to consume up to 64 threads to concurrently back up the extents of your database to 64 backup devices, one thread per device. You also need to maximize the I/O throughput at the database’s storage subsystem level.
Back up your database to multiple backup devices. The database engine is able to consume up to 64 threads to concurrently back up the extents of your database to 64 backup devices, one thread per device. You also need to maximize the I/O throughput at the database’s storage subsystem level.
Most of these techniques focus on reducing the size of your database, which in turn reduces the duration of your backup and restore operations. At some point in time these techniques are not sufficient because your database evolves into what is sometimes referred to as a very large database or VLDB.
A VLDB can be defined as a database whose restore or backup time SLAs cannot be easily met through faster networking/storage hardware resources, or by using any of the techniques discussed above. Additional consideration needs to be given to designing a backup strategy for such VLDBs.
For example, a 4TB database can easily take longer than one day to restore, due to the backup size, storage subsystem speed, networking infrastructure, backup compression, and the number and size of transaction log backups that also need to be to restored. (This is why you should periodically test the time taken by your restore procedure to ensure that your RTO can be met.)
Although VLDBs are not really that common in the field, expect the exam to have some questions about how to best backup and restore a VLDB. You will most likely be either asked to design a backup strategy for a VLDB or provide the series of restore steps that need to be performed to recover a VLDB in the shortest period of time.
The most common and easiest technique to reduce your backup (and restore) times for VLDBs is to take advantage of filegroups and re-architect your VLDB from a single primary file into multiple data files. Each secondary data file, or set of data files, would be contained in its own filegroup. Each file should ideally be located on a separate disk. That way if any single disk fails, the damage is contained to that file/filegroup. To recover from the disaster, restore just the damaged file/filegroup, as opposed to the entire database. This technique can substantially reduce the time it takes to recover from a disaster, depending on what has failed. It should also reduce the backup duration because you do not backup the same volume of data.
Important Configuring the primary data file for a VLDB
When creating a VLDB it is best practice to have no data within the primary data file of the database. This primary data file only contains the schema and code modules of our database. This ensures that the primary data file can be restored as quickly as possible when needed in a disaster recovery scenario. A database is never available until its primary data files are restored.
One commonly used technique is to simply spread your VLDB across a number of files. You would then back up only one of the files in your VLDB nightly, and rotate between the files over subsequent nights.
Let’s consider the following scenario of 4TB VLDB that has six separate data files as shown in Listing 2-8. The VLDB has a filegroup called [DATA] that consists of four 1TB secondary data files. This [DATA] filegroup is configured as the default filegroup. This helps ensure that there’s no data in the [PRIMARY] file group. Notice how these six data files are located on separate drives to help ensure that we do not lose two 1 TB data files at once. (Let’s assume that there is no need to perform file backups on the weekend because this organization only operates during weekdays.)
LISTING 2-8 Creating a VLDB
CREATE DATABASE [VLDB]
ON [PRIMARY]
(NAME = N'VLDB_System'' FILENAME = N'D:SQLDataVLDB_System.mdf'' SIZE = 100MB)'
FILEGROUP [DATA]
(NAME = N'VLDB_Data1'' FILENAME = N'E:SQLDataVLDB_Data1.ndf'' SIZE = 1TB)'
(NAME = N'VLDB_Data2'' FILENAME = N'F:SQLDataVLDB_Data2.ndf'' SIZE = 1TB)'
(NAME = N'VLDB_Data3'' FILENAME = N'G:SQLDataVLDB_Data3.ndf'' SIZE = 1TB)'
(NAME = N'VLDB_Data4'' FILENAME = N'H:SQLDataVLDB_Data4.ndf'' SIZE = 1TB)'
(NAME = N'VLDB_Data5'' FILENAME = N'I:SQLDataVLDB_Data5.ndf'' SIZE = 1TB)
LOG ON
(NAME = N'VLDB_log'' FILENAME = N'L:SQLLogVLDB_Log.ldf' ' SIZE = 100GB) ;
GO
ALTER DATABASE [VLDB] MODIFY FILEGROUP [DATA] DEFAULT;
The VLDB in this scenario could potentially use the following backup strategy:
![]() Back up the primary data file nightly.
Back up the primary data file nightly.
![]() Back up the [VLDB_Data1] file on Monday.
Back up the [VLDB_Data1] file on Monday.
![]() Back up the [VLDB_Data2] file on Tuesday.
Back up the [VLDB_Data2] file on Tuesday.
![]() Back up the [VLDB_Data3] file on Wednesday.
Back up the [VLDB_Data3] file on Wednesday.
![]() Back up the [VLDB_Data4] file on Thursday.
Back up the [VLDB_Data4] file on Thursday.
![]() Back up the [VLDB_Data5] file on Friday.
Back up the [VLDB_Data5] file on Friday.
![]() Back up the transaction log every 15 minutes.
Back up the transaction log every 15 minutes.
If a single data drive failed, it would be sufficient to replace the damaged disk, restore the failed data file, and replay the transaction log until the data file is synchronized with the rest of the database.
The problem with this approach is that all of the data would be spread across all of the files. If a single data file is lost in a disaster, nobody can access any of the data within the VLDB until the restore and recover have completed. So you have improved your backup duration, and your RPO potentially, but not necessarily your availability (or RTO).
SQL Server supports a feature called partial availability. With partial availability users can still access portions of the database even though certain filegroups are unavailable. For partial availability to work, the primary data file and transaction log files must always be available. This approach also works with partitioning where a single table is split into multiple partitions, and each partition is stored in a separate filegroup.
Consequently, a better technique is to locate your data more intelligently on the filegroups within the VLDB. This requires more domain knowledge about the database and how your organization uses the VLDB.
It is common for VLDBs to have very large tables that contain the following types of data:
![]() Archive/historical data
Archive/historical data
![]() Audit information
Audit information
![]() Logging information
Logging information
![]() Read-only data
Read-only data
![]() Reference data
Reference data
These tables might take up the majority of the capacity within the database. This data might not be as important as the rest of the data and can consequently be restored last. Also, it might not need to be backed up as frequently. In these cases, place these tables onto their own separate filegroups. Again, back up these filegroups at a separate frequency from the rest of the database. Back up read-only filegroups only when they are modified.
An alternative technique in deciding what tables should be split into their own filegroups takes into account the relative importance of the tables in the database.
Consider an online shopping VLDB with hundreds of tables that have the following tables:
![]() [Orders]
[Orders]
![]() [OrderHistory]
[OrderHistory]
![]() [Products]
[Products]
![]() [Customers]
[Customers]
In the case of a disaster incident it is critical to get these tables restored as soon as possible. You want to minimize the downtime for customer shopping! The database could be restored in the following order:
1. Primary data file
2. Products
3. Customers
4. Orders (at this stage customers could begin placing new orders)
5. Order history
6. The rest of the database
At some point in time a database can be too large to fail. At that stage, you need to consider implementing the appropriate high availability technology, such as Availability Groups and/or Log Shipping. These high availability technologies maintain multiple, separate copies of the database, which protects against instance and storage failure
Manage transaction log backups
So far we have looked at how you perform database backups and the different backup operations supported. Remember, no database backup operation automatically manages the transaction log for you by truncating it. In most cases the transaction logs for all your databases are typically co-located on the same disk. You don’t want the transaction log of an unimportant database filling up the disk and effectively crashing all your mission-critical databases as a result. Consequently it is important to manage the transaction log to both minimize the amount of data loss in the event of a disaster incident, and to ensure that the transaction log does not grow out of control and fill up the disk on which it is located.
In this section we will examine how you perform log backups and what to do in the case of an incident where your transaction log fills up. We will also look at some transaction log configuration options and how they will impact your disaster recovery strategy. But before we can look at how to perform log backups we need to look at the crucial concept of database recovery models, which control how much information is logged to the transaction log and potentially what amount of data you will lose in the case of a disaster occurring.
In the exam you should expect questions on what recovery models to use in given scenarios, how to deal with a full transaction log incidents and broken log chains. An exam question on tail-logs is virtually guaranteed, so make sure you understand what tail-logs, how to back them up and the recovery scenarios in which they are used.
Configure database recovery models
Understanding the different recovery models that are supported by SQL Server is critical because they directly impact your disaster recovery planning and how much data you can potentially lose in the case of a disaster. They also impact your high-availability solution design, capacity planning, and transaction log management.
SQL Server supports the following recovery models:
![]() Full Under the FULL recovery model the database engine fully logs every operation in the transaction log for recoverability purposes. Transaction log backups have no dependency on the database’s data files. Under normal operations on a correctly managed SQL Server instance, no data loss occurs. The full recovery model is typically used in production environments.
Full Under the FULL recovery model the database engine fully logs every operation in the transaction log for recoverability purposes. Transaction log backups have no dependency on the database’s data files. Under normal operations on a correctly managed SQL Server instance, no data loss occurs. The full recovery model is typically used in production environments.
![]() Bulk-Logged The BULK_LOGGED recovery model reduces the amount of logging information written to the transaction log during minimally logged operations by only recording the extents that were modified. Consequently, transaction log backups rely on the database’s data files that were modified by the minimally logged operations being available during the backup operation. The bulk logged recovery model is not typically used in production environments.
Bulk-Logged The BULK_LOGGED recovery model reduces the amount of logging information written to the transaction log during minimally logged operations by only recording the extents that were modified. Consequently, transaction log backups rely on the database’s data files that were modified by the minimally logged operations being available during the backup operation. The bulk logged recovery model is not typically used in production environments.
![]() Simple With the SIMPLE recovery model the database engine automatically reclaims the space used by operations in the transaction log. No transaction log backups are possible. The simple recovery model is typically used in non-production environments, such as development, user acceptance, and testing.
Simple With the SIMPLE recovery model the database engine automatically reclaims the space used by operations in the transaction log. No transaction log backups are possible. The simple recovery model is typically used in non-production environments, such as development, user acceptance, and testing.
The default recovery model of a database is determined by the [model] database’s recovery model at the time of the database’s creation. The [model] database’s recovery model is full by default. The [master], [msdb], and [tempdb] system databases use the simple recovery model by default. You can change the [msdb] system database recovery model to full if you want the benefits of transaction log backups.
With the FULL recovery model, the transaction log continues to grow in size until it either fills up the disk, or reaches the transaction log’s maximum size limit. If this occurs, the database engine generates a 9002 error. Users are no longer able to modify any data within the database. That is why you need to back up the transaction log periodically as it has the effect of reclaiming space from the log. As an alternative, the transaction log can be truncated, but this is uncommon.
Use the full recovery model when any of the following apply:
![]() You want to recover all of the data up to the point in time when the database crashed.
You want to recover all of the data up to the point in time when the database crashed.
![]() You need to recover to a specific point in time.
You need to recover to a specific point in time.
![]() You need to recover to a marked transaction.
You need to recover to a marked transaction.
![]() You need to be able to restore individual pages.
You need to be able to restore individual pages.
![]() Your database contains multiple filegroups and you want to take advantage of piecemeal recovery.
Your database contains multiple filegroups and you want to take advantage of piecemeal recovery.
![]() You are going to implement any of the following high availability technologies:
You are going to implement any of the following high availability technologies:
![]() Availability Groups
Availability Groups
![]() Database Mirroring
Database Mirroring
![]() Log Shipping
Log Shipping
The BULK_LOGGED recovery model minimally logs bulk operations such as BCP, BULK INSERT, INSERT … SELECT, and SELECT INTO. It also applies to indexing operations such as CREAT INDEX, ALTER INDEX, and DROP INDEX. Otherwise the database operates exactly like it would under the FULL recovery model.
Minimal logging involves logging only the information that is required to recover the transaction without supporting point-in-time recovery to when the bulk operation executed. The database engine only logs the extents that were modified during the minimally logged operations as opposed to the entire operation. This results in substantially less logging and consequently a much faster bulk operation.
Need more Review? Minimally logged operations
You can learn more about the benefits of minimal logging and the prerequisites for setting up minimal logging for a minimally logged bulk-import operation at https://docs.microsoft.com/en-us/sql/relational-databases/import-export/prerequisites-for-minimal-logging-in-bulk-import.
Importantly, data loss is possible until you next back up your transaction log. This is because the database engine does not back up the extents that were modified until the next log backup. Figure 2-5 shows at a high-level how the log backup operation saves the modified extents to the log backup, by referencing the Bulk Change Map (BCM). The database engine uses the BCM as a bitmap to record which extents were modified by bulk operations.

FIGURE 2-5 Log backups under bulk-logged recovery model
If you lose the data files that were modified by the bulk operation before you perform your next backup, you have lost all of the data that was modified since the bulk operation. That is why it is recommended to perform a backup after your bulk operation under the bulk-logged recovery model. A full, differential, or log backup is sufficient.
Use the BULK_LOGGED recovery model temporarily when any of the following apply:
![]() You want to perform a bulk operation with the best performance.
You want to perform a bulk operation with the best performance.
![]() You do not have sufficient transaction log space, or you want to use the least amount of transaction log space.
You do not have sufficient transaction log space, or you want to use the least amount of transaction log space.
With the SIMPLE recovery model, the database engine automatically manages the transaction log by safely deleting operations that are no longer needed for recovery purposes. This mechanism does not guarantee that the transaction log will never fill up. The transaction log can still fill up 100 percent if there is a long running transaction for example. The main benefit for using the SIMPLE recovery model is that that there are no transaction logs to manage, and it is less likely that the transaction log is going to fill up.
Use the SIMPLE recovery model when any of the following apply:
![]() You are willing to lose all data modifications since the last full or differential database backup.
You are willing to lose all data modifications since the last full or differential database backup.
![]() The database is being used for non-production purposes, or as a read-only copy of a production database.
The database is being used for non-production purposes, or as a read-only copy of a production database.
![]() You are relying on non-SQL Server based disaster recovery, such as through snapshotting technology that is typically available in virtualization or SAN technology.
You are relying on non-SQL Server based disaster recovery, such as through snapshotting technology that is typically available in virtualization or SAN technology.
Use the ALTER DATABASE statement to change a database’s recovery model:
ALTER DATABASE { database_name | CURRENT }
SET RECOVERY { FULL | BULK_LOGGED | SIMPLE }
The Database Properties page in SQL Server Management Studio allows you to change the recovery model, as shown in Figure 2-6.

FIGURE 2-6 Database properties page
You can switch the recovery model of any database at any time. When you switch to the simple recovery model, however, you break the log backup chain. We will look at log chains shortly in the section, “Understand log chains.” Consequently, it is recommended that you perform a log backup before switching to the simple recovery model. Furthermore, when you switch from the simple recovery model it is recommended to perform a full or differential backup so as to initialize the log backup chain. A differential backup is typically smaller. Although you have switched recovery models, the database continues operating in the simple recovery model until you perform this initial backup operation.
If you want to determine what recovery model all your databases are using, you can query the [sys].[databases] system catalog as shown in Listing 2-9.
LISTING 2-9 Query the recovery model of all databases
USE master;
GO
SELECT name' recovery_model_desc
FROM sys.databases;
Under the FULL and BULK_LOGGED recovery models the database’s transaction log will continue to grow until it fills up the disk drive it is located on. One of the primary responsibilities of the database administrator is to manage the transaction logs for their databases. This is typically done by backing up the log, and we will turn our attention there next.
Back up transaction logs
The primary technique of transaction log management is to periodically perform transaction log backups. A secondary technique is to simply truncate the transaction periodically, typically after a full database backup, although it is not commonly used as most organizations want a backup of the log for recoverability purposes.
Transaction log backups are not possible under the simple recovery model because the database engine automatically truncates the log.
Transaction log backups are also not possible in the full or bulk-logged recovery models until a full database backup has been performed. The database engine automatically truncates the log in this scenario because there is no point in retaining transaction log records until the first full database backup.
The BACKUP LOG statement has the following options:
![]() NO_TRUNCATE This option does not truncate the transaction log at the end of the log backup operation. It also allows the database engine to attempt a log backup in situations where the database is damaged.
NO_TRUNCATE This option does not truncate the transaction log at the end of the log backup operation. It also allows the database engine to attempt a log backup in situations where the database is damaged.
![]() NORECOVERY This option backs up the tail-log and leaves the database in the RESTORING state. Tail-logs are discussed later on in this chapter. The NORECOVERY option is useful when you need to fail over to a secondary database in an Availability Group. It is also useful when you need to back up the tail-log before your RESTORE operations.
NORECOVERY This option backs up the tail-log and leaves the database in the RESTORING state. Tail-logs are discussed later on in this chapter. The NORECOVERY option is useful when you need to fail over to a secondary database in an Availability Group. It is also useful when you need to back up the tail-log before your RESTORE operations.
![]() STANDBY This option backs up the tail of the log and leaves the database in a read-only and STANDBY state. This STANDBY state effectively creates a second transaction log that allows the database to be read, but also allows log backups to be restored. When the next log backup is applied, the second transaction log is rolled back so as to bring the database back into the NORECOVERY state.
STANDBY This option backs up the tail of the log and leaves the database in a read-only and STANDBY state. This STANDBY state effectively creates a second transaction log that allows the database to be read, but also allows log backups to be restored. When the next log backup is applied, the second transaction log is rolled back so as to bring the database back into the NORECOVERY state.
Although these BACKUP LOG options are rarely used in the field they will most likely be tested in the exam. So make sure you know the difference between them and the when to use them. The exam might contain some recovery scenario where one of these BACKUP LOG options needs to be sued.
The STANDBY option is equivalent to the BACKUP LOG WITH NORECOVERY operation followed by a RESTORE WITH STANDBY operation.
Note NO_TRUNCATE BACKUP LOG option
The NO_TRUNCATE option is equivalent to both the COPY_ONLY and CONTINUE_AFTER_ERROR options.
Use both the NO_TRUNCATE and NORECOVERY options to perform a best-effort log backup that does not truncate the log and changes the database into the RESTORING state in a single atomic operation.
Understand transaction log chains
We now turn our attention to transaction log chains, which are always tested in the exam. You must understand log chains to be able to answer recovery questions in the exam, especially for questions that require you to correctly sequence the correct answer choices.
A log chain is the continuous set of transaction log backups performed on a database after a full backup is performed. If a log chain is unbroken, the database can be recovered to the point in time when the disaster incident occurred. If the log chain is broken, you are not able to restore the database past the break in the log chain.
Consider the following scenario where the following backup strategy is used:
![]() A full backup is performed on Sunday at 23:00.
A full backup is performed on Sunday at 23:00.
![]() A log backup is performed every hour from Monday till Saturday during business hours (08:00 – 18:00).
A log backup is performed every hour from Monday till Saturday during business hours (08:00 – 18:00).
Assume the following sequence of events happens:
1. Sunday’s full backup completes successfully.
2. All the log backups complete successfully.
3. The database crashes on Saturday at 20:00.
4. Tuesday’s 15:00 transaction log backup is lost or corrupted.
In this case the log chain is broken and the database can only be restored till Tuesday at 14:00. Although all log backups after Tuesday at 14:00 are fine, they cannot be restored until the Tuesday 14:00 log backup is restored.
One way to mitigate against this kind of a scenario is to take a periodic differential backup. Assume that the above backup strategy also performed a differential backup from Monday to Saturday at 23:00.
In this case the database can be restored with no data loss by bypassing Tuesday’s 15:00 log backup. It is simply the case of performing the following actions:
1. Restore Sunday’s full backup.
2. Restore Monday’s differential backup.
3. Restore all log backups from Tuesday through Saturday.
An alternative, and potentially quicker restore would involve the following actions:
1. Restore Sunday’s full backup.
2. Restore Friday’s differential backup.
3. Restore all log backups from Saturday.
Another way to mitigate against this kind of scenario is to mirror the log backup to another backup destination using the MIRROR TO clause discussed earlier. If one of the log backups is corrupted or lost, the mirrored one can be used.
This highlights the importance of ensuring that you have an unbroken log chain. It also highlights the importance of potentially designing multiple restore paths for your mission-critical database solutions.
![]() Exam Tip
Exam Tip
Watch out for broken log chains in the exam. It’s a great way for the exam to catch out exam takers who won’t recognize a broken log chain and won’t know the appropriate corrective action.
Perform tail-log backups
The tail-log backup captures all log records that have not yet been backed up. Unless you can perform a tail-log backup you incur data loss in the case of a disaster incident. With a tail-log backup, you are able to restore the database to the point in time when it failed.
That is why it is important to architect your databases to have redundancy at the transaction log. The easiest way is to provide redundancy at the disk or volume level. Hardware RAID 1 or Windows Server mirroring is sufficient.
In the case of a disaster incident, the first thing that you should always think about is whether the transaction log still exists, and whether a tail-log backup can be performed. This ensures that you minimize your data loss because all committed transactions are recoverable through the tail-log backup.
A tail-log backup is not required where you do not need to restore the database to the point in time of the disaster incident.
Consider the following experiment in Listing 2-10 that performs the following actions:
1. Creates a new database.
2. Creates a new table.
3. Inserts the first record into the table.
4. Performs a full database backup.
5. Inserts the second record into the table.
6. Performs a log backup.
7. Inserts the third record into the table.
8. Simulates a disaster by deleting the database’s primary (MDF) data file.
LISTING 2-10 Orphaned log experiment
-- Set up experiment: Run selectively as and if required
/* You might have to enable xp_cmdshell by running the following:
EXEC sp_configure 'show advanced'' 1;
RECONFIGURE;
GO
EXEC sp_configure 'xp_cmdshell'' 1;
RECONFIGURE;
GO
-- Create directory for experiment
EXEC xp_cmdshell' 'md C:Exam764Ch2';
GO
*/
-- Create database
CREATE DATABASE TailLogExperimentDB
ON PRIMARY (NAME = N'TailLogExperimentDB_data'' FILENAME = N'C:Exam764Ch2
TailLogExperimentDB.mdf')
LOG ON (NAME = N'TailLogExperimentDB_log'' FILENAME = N'C:Exam764Ch2
TailLogExperimentDB.ldf')
GO
-- Create table
USE [TailLogExperimentDB]
GO
CREATE TABLE [MyTable] (Payload VARCHAR(1000));
GO
-- Insert first record
INSERT [MyTable] VALUES ('Before full backup');
GO
-- Perform full backup
BACKUP DATABASE [TailLogExperimentDB] TO DISK = 'C:Exam764Ch2TailLogExperimentDB_FULL.
bak' WITH INIT;
GO
-- Insert second record
INSERT [MyTable] VALUES ('Before log backup');
GO
-- Perform log backup
BACKUP LOG [TailLogExperimentDB] TO DISK = 'C:Exam764Ch2TailLogExperimentDB_LOG.bak'
WITH INIT;
GO
-- Insert third record
INSERT [MyTable] VALUES ('After log backup');
GO
-- Simulate disaster
SHUTDOWN;
/*
Perform the following actions:
1. Use Windows Explorer to delete C:Exam764Ch2TailLogExperimentDB.mdf
2. Use SQL Server Configuration Manager to start SQL Server
The [TailLogExperimentDB] database should now be damaged as you deleted the primary data
file.
*/
At this stage, you have a full and log backup that contains only the first two records that were inserted. The third record was inserted after the log backup. If you restore the database at this stage, you lose the third record. Consequently, you need to back up the orphaned transaction log.
Listing 2-11 shows the attempt to back up the orphaned transaction log.
LISTING 2-11 Attempted log backup
USE master;
SELECT name' state_desc FROM sys.databases WHERE name = 'TailLogExperimentDB';
GO
-- Try to back up the orphaned tail-log
BACKUP LOG [TailLogExperimentDB] TO DISK = 'C:Exam764Ch2TailLogExperimentDB_
OrphanedLog.bak' WITH INIT;
The database engine is not able to back up the log because it normally requires access to the database’s MDF file, which contains the location of the database’s LDF files in the system tables. The following error is generated:
Msg 945' Level 14' State 2' Line 56
Database 'TailLogExperimentDB' cannot be opened due to inaccessible files or
insufficient memory or disk space. See the SQL Server errorlog for details.
Msg 3013' Level 16' State 1' Line 56
BACKUP LOG is terminating abnormally.
Listing 2-12 shows how to correctly back up the orphaned transaction log with the NO_TRUNCATE option.
LISTING 2-12 Orphaned log backup with NO_TRUNCATE option
-- Try to back up the orphaned tail-log again
BACKUP LOG [TailLogExperimentDB] TO DISK = 'C:Exam764Ch2TailLogExperimentDB_
OrphanedLog.bak' WITH NO_TRUNCATE;
The backup of the orphaned transaction log succeeds. You can now restore the database without any data loss. The next section will cover how to restore databases.
To clean up this experiment run the code in Listing 2-13.
LISTING 2-13 Orphaned log experiment cleanup
-- Cleanup experiment: Run selectively as and if required
/*
EXEC xp_cmdshell 'rd /q C:Exam764Ch2';
GO
EXEC sp_configure 'xp_cmdshell'' 0;
RECONFIGURE;
GO
EXEC sp_configure 'show advanced'' 0;
RECONFIGURE;
GO
USE [master];
DROP DATABASE [TailLogExperimentDB];
*/
A tail-log backup is recommended in the following situations:
![]() If the database is online and you plan to perform a restore operation on the database. Start with a tail-log backup to avoid data loss. Don’t forget that you might want to save all transactions, even though you might be restoring to an earlier point in time.
If the database is online and you plan to perform a restore operation on the database. Start with a tail-log backup to avoid data loss. Don’t forget that you might want to save all transactions, even though you might be restoring to an earlier point in time.
![]() If a database is offline and fails to start, and you plan to restore the database. Again, start with a tail-log backup to avoid data loss.
If a database is offline and fails to start, and you plan to restore the database. Again, start with a tail-log backup to avoid data loss.
![]() If a database is damaged and you want to recover all the transaction in the orphaned transaction log a tail-lo backup should be considered.
If a database is damaged and you want to recover all the transaction in the orphaned transaction log a tail-lo backup should be considered.
Important Tail-log backups on damaged databases
Tail log backups on damaged databases only succeed if the log file is undamaged, the database state supports tail-log backups, and there are no bulk logged operations in the transaction log. If these criteria are not met, all committed transactions after the last successful log backup are lost.
![]() Exam Tip
Exam Tip
In the exam, with any question dealing with disaster recovery, always be on the lookout for the orphaned tail-log and whether a tail-log backup can be performed to minimize the data loss.
Manage full transaction log incident
If your log backups are infrequent enough, or there is an unanticipated volume of data manipulation transactions, the database’s transaction log might completely fill up. As an alternative, another database or some other external process might fill up a disk on which the transaction log is located and it will not be able to automatically grow. When the database cannot write to the transaction log because it is full it generates the 9002 error:
Msg 9002' Level 17' State 2' Line 91
The transaction log for database 'database_name' is full due to 'LOG_BACKUP'.
Because a database’s transaction log can become full due to a myriad of reasons, it is important to determine the root cause of the error. Here are the common reasons for the 9002 error:
![]() There is no more free space in the transaction log and it has reached its maximum size limit.
There is no more free space in the transaction log and it has reached its maximum size limit.
![]() There is no more free space in the transaction log and it cannot grow because there is no more free space left on the disk.
There is no more free space in the transaction log and it cannot grow because there is no more free space left on the disk.
![]() A long running transaction is preventing log truncation.
A long running transaction is preventing log truncation.
To determine what is preventing log truncation, execute the query shown in Listing 2-14 and examine the [log_reuse_wait_desc] column.
LISTING 2-14 Querying the database’s transaction log reuse wait
USE master;
GO
SELECT [database_id], [name] as 'database_name', [state_desc], [recovery_model_desc],
[log_reuse_wait_desc]
FROM [sys].[databases];
Table 2-1 shows you how to interpret the [log_reuse_wait_desc] column.
TABLE 2-1 Description of LOG_REUSE_WAIT_DESC column for [sys].[databases]
log_reuse_wait |
log_reuse_wait_desc |
Description |
0 |
NOTHING |
There is one or more reusable virtual log files (VLFs). |
1 |
CHECKPOINT |
|
2 |
LOG_BACKUP |
Log backup is required to move the head of the log forward. |
3 |
ACTIVE_BACKUP_OR_RESTORE |
Database backup or a restore is in progress. |
4 |
ACTIVE_TRANSACTION |
Transaction is preventing log truncation:
|
5 |
DATABASE_MIRRORING |
Database mirroring is preventing log truncation:
|
6 |
REPLICATION |
Transactions relevant to replication publications have not been delivered to the distribution database. |
7 |
DATABASE_SNAPSHOT_CREATION |
A database snapshot is being created. |
8 |
LOG_SCAN |
A log scan is occurring. |
9 |
AVAILABILITY_REPLICA |
An Always On Availability Groups secondary replica is applying transaction log records of this database to a corresponding secondary database. |
10 |
|
For internal use only. |
11 |
|
For internal use only. |
12 |
|
For internal use only. |
13 |
OLDEST_PAGE |
Indirect checkpoint is preventing log truncation. The oldest page in the database might be older than the checkpoint LSN. |
14 |
OTHER_TRANSIENT |
This value is currently not used. |
15 |
|
|
16 |
XTP_CHECKPOINT |
An in-memory checkpoint is preventing log truncation. |
To manage a full transaction log, the most common corrective actions include:
![]() Adding a second transaction log to the database Although the database engine can only use one LDF file at a time, a database can have multiple LDF files. By creating a second empty log file you allow the database engine to start writing log records again.
Adding a second transaction log to the database Although the database engine can only use one LDF file at a time, a database can have multiple LDF files. By creating a second empty log file you allow the database engine to start writing log records again.
![]() Backing up the transaction log As discussed, whenever you back up the log, the database engine automatically truncates the log, freeing up space.
Backing up the transaction log As discussed, whenever you back up the log, the database engine automatically truncates the log, freeing up space.
![]() Freeing up disk space on the disk volume This allows the transaction log to grow in size if automatic growth is enabled.
Freeing up disk space on the disk volume This allows the transaction log to grow in size if automatic growth is enabled.
![]() Increasing the size of the disk volume It is common for SQL Server to be deployed in virtualized environments. In such environments, it is easy to increase the size of the virtual disks without incurring any outage.
Increasing the size of the disk volume It is common for SQL Server to be deployed in virtualized environments. In such environments, it is easy to increase the size of the virtual disks without incurring any outage.
![]() Increasing the size of the log The database might have a size limit configured for the transaction log.
Increasing the size of the log The database might have a size limit configured for the transaction log.
![]() Killing a long running transaction A long running query can be holding up the truncation operation, which in turn causes the transaction to fill up. Use the KILL statement to end the process using its Server Process ID (SPID).
Killing a long running transaction A long running query can be holding up the truncation operation, which in turn causes the transaction to fill up. Use the KILL statement to end the process using its Server Process ID (SPID).
![]() Moving the log to another disk that has sufficient capacity This involves detaching the database, moving the log files, and re-attaching the database. This might not be an option in scenarios where the database cannot be taken offline.
Moving the log to another disk that has sufficient capacity This involves detaching the database, moving the log files, and re-attaching the database. This might not be an option in scenarios where the database cannot be taken offline.
![]() Truncating the transaction log This is not recommended because it breaks your log-chain. If you need to truncate the log, it is highly recommended that you immediately perform a full backup so as to re-initialize your log chain.
Truncating the transaction log This is not recommended because it breaks your log-chain. If you need to truncate the log, it is highly recommended that you immediately perform a full backup so as to re-initialize your log chain.
To kill a long running transaction query the [sys].[dm_tran_database_transactions] DMV to determine what transactions are currently executing in the database and how long they have been executing. As an alternative, execute the DBCC OPENTRAN command within the database. The DBCC OPENTRAN command displays information about the oldest active transaction within the transaction log of a database:
Transaction information for database 'WideWorldImporters'.
Oldest active transaction:
SPID (server process ID): 69
UID (user ID) : -1
Name : user_transaction
LSN : (34:12:7)
Start time : Sep 30 1984 12:13:21:666AM
SID : 0x01060000000000051500000820672ae6c43f9eb9788953c9e9030000
DBCC execution completed. If DBCC printed error messages' contact your system
administrator.
Use the KILL statement to kill the offending transaction. Listing 2-15 show an example of how to kill the server process ID (SPID) identified by the DBCC OPENTRAN command.
KILL 69;
Be careful killing processes because they might be running important transactions. You cannot kill your own process. You should not kill system processes, including the following:
![]() AWAITING COMMAND
AWAITING COMMAND
![]() CHECKPOINT SLEEP
CHECKPOINT SLEEP
![]() LAZY WRITER
LAZY WRITER
![]() LOCK MONITOR
LOCK MONITOR
![]() SIGNAL HANDLER
SIGNAL HANDLER
In the exam you might get asked what corrective action to take when the transaction log become full in a specific scenario. Use the techniques in this section to work out the best corrective action in the exam.
Manage log with delayed durability
In the last couple of releases of SQL Server, Microsoft has added some functionality to the configuration and architecture of the transaction log. Consequently, these changes might be tested in the exam. Remember, they might not be tested directly, but will be part of the scenario, and as such will impact the answer choices.
With the release of SQL Server 2014, the database engine supports a feature called delayed durability. This feature potentially impacts the amount of data that is lost in the event of a disaster incident.
By default, when operations are recorded to the transaction log, they are initially written to the log cache (log buffers), which is located in memory. As part of the write ahead logging (WAL) protocol, the log cache is flushed to disk whenever one of the following occurs:
![]() A commit transaction record is written.
A commit transaction record is written.
![]() The 60KB log block/buffer is filled.
The 60KB log block/buffer is filled.
![]() A CHECKPOINT operation is performed.
A CHECKPOINT operation is performed.
![]() The [sys].[sp_log_flush sysem] stored procedure is executed.
The [sys].[sp_log_flush sysem] stored procedure is executed.
When delayed durability is enabled, the database engine no longer flushes the log buffers when the commit transaction occurs. It tries to wait until 60KB of records are written to the log buffer before flushing the buffer. This can improve performance where you have a transactional database solution that commits a large volume of small transactions.
Important Possibility of data loss with delayed durability
Data loss is possible with delayed durability because you might lose committed transactions. If SQL Server crashes after a transaction commits, but before the 60KB buffer is filled, that transaction cannot be recovered because it is lost.
Use the ALTER DATABASE statement to enable delayed durability:
ALTER DATABASE database_name
SET DELAYED_DURABILITY = DISABLED | ALLOWED | FORCED ;
Setting delayed durability to FORCED forces all transactions to use delayed durability. Setting delayed durability to ALLOWED requires the developer to explicitly invoke delayed durability using the COMMIT TRANSACTION WITH (DELAYED_DURABILITY = ON) statement.
The next change made to the transaction log architecture is how it can use the latest generation of flash storage. We will now examine how SQL Server supports persistent memory for transaction logs.
Manage log with persistent memory
With the release of SQL Server 2016 Service Pack 1, the database engine officially supports non-volatile memory (NVDIMM) on Windows Server 2016. NVDIMM memory is also referred to as storage class memory (SCM) or persistent memory (PM). NVDIMM memory provides performance at memory speeds and survives a server crash or reboot. Table 2-2 shows the performance benefits of NVDIMM over traditionally used storage.
TABLE 2-2 Typical storage I/O response times
Storage Type |
Response Time |
Disk Drives (HDD) |
4+ milliseconds (ms) |
Solid State Drive (SSD) |
<4 milliseconds (ms). |
PCI NVMe SSD |
microseconds (μs) |
NVDIMM |
nanoseconds (ns) |
Due to current capacity limits of NVDIMM you cannot place the entire transaction log onto this SCM. Your transaction log size might easily exceed the maximum NVDIMM capacity. Also, it would not be cost effective for most customers.
Consequently, with the initial support for NVDIMM you can only place the transaction log’s cache (or log buffers that live in memory) onto this new memory type. The main benefit is that the log cache contains multiple commit records. Normally the log cache is flushed as soon as a commit record is written. On high performance transactional databases this can become a bottleneck, with high WRITELOG waits. Figure 2-7 shows how the log buffer is stored in NVDIMM memory and contains multiple commit records.

FIGURE 2-7 Log buffer NVDIMM support
As the log records are fully durable as soon as they are copied into the log buffer there is no exposure to data loss, as in the case of delayed durability that was discussed in the previous section. Consequently, you do not need to back up the log more frequently to minimize potential data loss.
To take advantage of NVDIMM-N memory you need to perform the following tasks:
1. Install NVDIMM memory in your server.
2. Format the NVDIMM memory as a Direct Access (DAX) volume in Windows Server 2016.
3. Create a second 20MB transaction log for the database using the ALTER DATABASE statement:
ALTER DATABASE database_name
ADD LOG FILE (
NAME = logical_file_name'
FILENAME = os_file_name'
SIZE = 20 MB)
The database engine automatically detects that the second transaction log file is located on a DAX volume and creates a 20MB log file. This second log file on the DAX volume is always 20MB in size, irrespective of the size specified in the ALTER DATABASE statement. This might change in the future.
NVDIMM support for the log buffer is only available for SQL Server installed on physical machines. Virtualized SQL Server instances and failover clusters are not supported. Only secondary replicas are supported in Availability group architectures.
Configure backup automation
The final section of this skill will show you how to automate your backup strategy that we have discussed so far. One of SQL Server’s strengths has always been how easy it is to schedule automation tasks and to be notified when a task succeeds or fails. We will first look at how to schedule scripts to automatically run before looking at the capabilities of maintenance plans. Finally, we will look at how you can configure alerting so that you will be notified if a scheduled job fails.
Backups can be scheduled to occur automatically in SQL Server through the SQL Server Agent. We will cover SQL Server Agent in more detail in Chapter 3, “Manage and monitor SQL Server instances.”
The following steps show how to automate a full database backup through the SQL Server Agent. In this example, the backup of the [master] and [msdb] system databases are scheduled to be executed nightly at 02:00.
1. Open SQL Server Management Studio.
2. Expand the SQL Server Agent folder.
3. Right-click the Jobs folder, and select New Job.
4. In the New Job dialog box, on the General page, provide a Name and Description for the backup, as shown in Figure 2-8. It is best practice to configure the Owner as sa. You can create your own categories through the sp_add_category stored procedure located in the [msdb] system database.

FIGURE 2-8 New Job: General page
6. Click the New button to create a new step for the job.
7. In the New Job Step dialog box, on the General page, provide a name for the step and the BACKUP command that is performed to back up the [master] system database, as shown in Figure 2-9.

FIGURE 2-9 New Job Step: General page
8. Click the Parse button to ensure the T-SQL command is syntactically correct.
9. Click the OK button to close the Parse Command Text dialog box.
10. Click the Advanced page.
11. In the New Job Step dialog box, on the Advanced page, configure the job step to perform the next step on failure, as show in Figure 2-10. This ensures that the job attempts to back up the [msdb] database, even though the [master] database backup failed.

FIGURE 2-10 New Job Step: Advanced page
13. Click the New button as shown in Figure 2-11 to create another job step.

FIGURE 2-11 New Job: Add second job step
14. In the New Job Step dialog box, on the General page, provide a name for the step and the BACKUP command for the backup of the [msdb] system database, as shown in Figure 2-12.

FIGURE 2-12 New Job Step: Add command for second job step
16. In the New Job Step dialog box, on the Advanced page, ensure the job steps are performed in the correct order, as show in Figure 2-13. Note how you can configure the job to perform any step in the job first.

FIGURE 2-13 New Job: Completed multiple job steps
18. In the New Job Step dialog box, on the Schedules page, click the New button to schedule when you want the database backup to execute.
19. In the New Job Schedule dialog box, configure the name, frequency, and duration required, as shown in Figure 2-14.
FIGURE 2-14 New Job Schedule dialog box
21. Confirm that the schedule has been saved correctly, as shown in Figure 2-15.

FIGURE 2-15 New Job’s schedule
22. Click the Notifications page.
23. In the New Job Step dialog box, on the Notifications page, configure who needs to be notified if a job fails, succeeds, or completes, as shown in Figure 2-16. We will look at how you create operators in the “Create and manage operators” section in Chapter 3.

FIGURE 2-16 New Job: Notification page
24. Click the OK button to schedule the backup operation. The job is created in the Jobs folder of SQL Server Management Studio.
25. To document the scheduled job, right-click the job, select Script Job As, then CREATE TO, and finally New Query Editor Window.
Listing 2-16 shows the T-SQL script created for the scheduled backup job.
LISTING 2-16 Scheduling a backup through SQL Server Agent
USE [msdb ]
GO
/****** Object: Job [Full Backup - System Databases] Script Date: 26/09/2017
11:56:45 PM ******/
BEGIN TRANSACTION
DECLARE @ReturnCode INT
SELECT @ReturnCode = 0
/****** Object: JobCategory [DBA] Script Date: 26/09/2017 11:56:45 PM ******/
IF NOT EXISTS (SELECT name FROM msdb.dbo.syscategories WHERE name=N'DBA' AND category_
class=1)
BEGIN
EXEC @ReturnCode = msdb.dbo.sp_add_category @class=N'JOB'' @type=N'LOCAL'' @name=N'DBA'
IF (@@ERROR <> 0 OR @ReturnCode <> 0) GOTO QuitWithRollback
END
DECLARE @jobId BINARY(16)
EXEC @ReturnCode = msdb.dbo.sp_add_job @job_name=N'Full Backup - System Databases''
@enabled=1'
@notify_level_eventlog=0'
@notify_level_email=2'
@notify_level_netsend=0'
@notify_level_page=0'
@delete_level=0'
@description=N'Perform a full database backup of the following system databases:
- master
- msdb
Schedule:
- Nightly at 2:00AM''
@category_name=N'DBA''
@owner_login_name=N'sa''
@notify_email_operator_name=N'Victor Isakov'' @job_id = @jobId OUTPUT
IF (@@ERROR <> 0 OR @ReturnCode <> 0) GOTO QuitWithRollback
/****** Object: Step [Backup master database] Script Date: 26/09/2017 11:56:45 PM
******/
EXEC @ReturnCode = msdb.dbo.sp_add_jobstep @job_id=@jobId' @step_name=N'Backup master
database''
@step_id=1'
@cmdexec_success_code=0'
@on_success_action=3'
@on_success_step_id=0'
@on_fail_action=3'
@on_fail_step_id=0'
@retry_attempts=3'
@retry_interval=5'
@os_run_priority=0' @subsystem=N'TSQL''
@command=N'BACKUP DATABASE master
TO DISK = ''R:SQLBackupmaster.bak''
WITH INIT;''
@database_name=N'master''
@flags=0
IF (@@ERROR <> 0 OR @ReturnCode <> 0) GOTO QuitWithRollback
/****** Object: Step [Backup msdb database] Script Date: 26/09/2017 11:56:45 PM
******/
EXEC @ReturnCode = msdb.dbo.sp_add_jobstep @job_id=@jobId' @step_name=N'Backup msdb
database''
@step_id=2'
@cmdexec_success_code=0'
@on_success_action=1'
@on_success_step_id=0'
@on_fail_action=2'
@on_fail_step_id=0'
@retry_attempts=0'
@retry_interval=0'
@os_run_priority=0' @subsystem=N'TSQL''
@command=N'BACKUP DATABASE msdb
TO DISK = ''R:SQLBackupmsdb.bak''
WITH INIT;''
@database_name=N'master''
@flags=0
IF (@@ERROR <> 0 OR @ReturnCode <> 0) GOTO QuitWithRollback
EXEC @ReturnCode = msdb.dbo.sp_update_job @job_id = @jobId' @start_step_id = 1
IF (@@ERROR <> 0 OR @ReturnCode <> 0) GOTO QuitWithRollback
EXEC @ReturnCode = msdb.dbo.sp_add_jobschedule @job_id=@jobId' @name=N'Nighty @ 02:00''
@enabled=1'
@freq_type=4'
@freq_interval=1'
@freq_subday_type=1'
@freq_subday_interval=0'
@freq_relative_interval=0'
@freq_recurrence_factor=0'
@active_start_date=20170926'
@active_end_date=99991231'
@active_start_time=20000'
@active_end_time=235959'
@schedule_uid=N'47e87563-0e09-4856-821d-eec181839d09'
IF (@@ERROR <> 0 OR @ReturnCode <> 0) GOTO QuitWithRollback
EXEC @ReturnCode = msdb.dbo.sp_add_jobserver @job_id = @jobId' @server_name = N'(local)'
IF (@@ERROR <> 0 OR @ReturnCode <> 0) GOTO QuitWithRollback
COMMIT TRANSACTION
GOTO EndSave
QuitWithRollback:
IF (@@TRANCOUNT > 0) ROLLBACK TRANSACTION
EndSave:
In the exam you might get asked about the stored procedures highlighted in Listing 2-16 and their parameters. Make sure you are familiar with them for the exam.
This section showed you how to schedule Transact-SQL statements via SQL Server Agent jobs. If your SQL Server instance has a large number of databases this will be cumbersome to set up and difficult to manage. A better approach might be to take advantage of maintenance plans and we will look at their capabilities next.
Configure a maintenance plan
A more popular and easier technique to configure backup automation is to create a maintenance plan for your databases. The capabilities of maintenance plans change in subsequent releases of SQL Server. Even though you might have discounted their use in the past, make sure you are familiar with their capabilities in the latest version of SQL Server for the exam.
Use the Maintenance Plan Wizard to create a basic maintenance plan. You can then customize the maintenance plan further by opening up the maintenance plan in SQL Server Management Studio. We will go through such an exercise in this section.
Maintenance plans support the following tasks:
![]() Back Up Database This task allows you to specify the source databases, destination files or tapes, and overwrite options for a transaction log backup. It supports the following types of backups:
Back Up Database This task allows you to specify the source databases, destination files or tapes, and overwrite options for a transaction log backup. It supports the following types of backups:
![]() Full
Full
![]() Transaction Log
Transaction Log
![]() Check Database Integrity This task performs internal consistency checks of the data and index pages within the database.
Check Database Integrity This task performs internal consistency checks of the data and index pages within the database.
![]() Clean Up History This task deletes historical data associated with Backup and Restore, SQL Server Agent, and maintenance plan operations. This task allows you to specify the type and age of the data to be deleted.
Clean Up History This task deletes historical data associated with Backup and Restore, SQL Server Agent, and maintenance plan operations. This task allows you to specify the type and age of the data to be deleted.
![]() Execute SQL Server Agent Job This task allows you to select SQL Server Agent jobs to run as part of the maintenance plan.
Execute SQL Server Agent Job This task allows you to select SQL Server Agent jobs to run as part of the maintenance plan.
![]() Execute T-SQL Statement Task This task allows you to run any T-SQL script.
Execute T-SQL Statement Task This task allows you to run any T-SQL script.
![]() Maintenance Cleanup Task This task removes files left over from executing a maintenance plan.
Maintenance Cleanup Task This task removes files left over from executing a maintenance plan.
![]() Notify Operator Task This task sends an email to any SQL Server Agent operator.
Notify Operator Task This task sends an email to any SQL Server Agent operator.
![]() Rebuild Index This task reorganizes data on the data and index pages by rebuilding indexes. This improves performance of index scans and seeks. This task also optimizes the distribution of data and free space on the index pages, allowing faster future growth.
Rebuild Index This task reorganizes data on the data and index pages by rebuilding indexes. This improves performance of index scans and seeks. This task also optimizes the distribution of data and free space on the index pages, allowing faster future growth.
![]() Reorganize Index This task defragments and compacts clustered and non-clustered indexes on tables and views. This improves index-scanning performance.
Reorganize Index This task defragments and compacts clustered and non-clustered indexes on tables and views. This improves index-scanning performance.
![]() Shrink Database This task reduces the disk space consumed by the database and the log files by removing empty data, index, and log pages.
Shrink Database This task reduces the disk space consumed by the database and the log files by removing empty data, index, and log pages.
![]() Update Statistics This task ensures the query optimizer has up-to-date information about the distribution of data values in the tables. This allows the optimizer to make better judgments about data access strategies.
Update Statistics This task ensures the query optimizer has up-to-date information about the distribution of data values in the tables. This allows the optimizer to make better judgments about data access strategies.
Important Do not shrink databases
Do not schedule the Shrink Database task in production environments because it substantially degrades the database’s query performance. The database shrink operation results in heavily fragmented tables and indexes.
It is common to perform optimization tasks and integrity checks with your database backups. This helps ensure that your database backup contains no corruptions and that the database will run optimally straight away if it ever has to be restored. At the very least, configure the following maintenance tasks for all databases to minimize data loss and ensure optimal performance:
![]() Perform database backups to meet your RPO and RTO SLAs.
Perform database backups to meet your RPO and RTO SLAs.
![]() Perform database consistency checks to detect and potentially fix database corruptions.
Perform database consistency checks to detect and potentially fix database corruptions.
![]() Rebuild and reorganize indexes to ensure optimal query performance and efficient storage usage.
Rebuild and reorganize indexes to ensure optimal query performance and efficient storage usage.
![]() Update statistics to ensure optimal query performance.
Update statistics to ensure optimal query performance.
For simpler environments, it is common to create a single maintenance plan to perform all of these maintenance tasks. For more complex requirements, schedule multiple customer job steps.
The following steps demonstrate how to create a maintenance plan for all user databases that automatically performs a full database backup, consistency check, and index optimization tasks weekly on Sunday at 01:00:
1. Open SQL Server Management Studio.
2. Expand the Management folder.
3. Right-click the Maintenance Plans folder, and select the Maintenance Plan Wizard.
4. On the welcome screen, click the Next button, as show in Figure 2-17.

FIGURE 2-17 Maintenance Plan Wizard
5. In the Select Plan Properties screen, provide a name and description as shown in Figure 2-18.
FIGURE 2-18 Maintenance Plan Wizard: Plan properties
6. Click the Change button to schedule your maintenance plan.
7. Define your desired schedule, as show in Figure 2-19, and click the OK button.

FIGURE 2-19 Maintenance Plan Wizard: Schedule
9. In the Select Maintenance Tasks screen, check the following options, as show in Figure 2-20:
![]() Check Database Integrity
Check Database Integrity
![]() Rebuild Index
Rebuild Index
![]() Update Statistics
Update Statistics
![]() Clean Up History
Clean Up History
![]() Back Up Database (Full)
Back Up Database (Full)
![]() Maintenance Cleanup Task
Maintenance Cleanup Task

FIGURE 2-20 Maintenance Plan Wizard: Select maintenance tasks
10. In the Select Maintenance Task Order screen, reorder the tasks so that the Clean Up History task is last, as shown in Figure 2-21.

FIGURE 2-21 Maintenance Plan Wizard: Select maintenance task order
11. In the Define Database Check Integrity Task, select the Database drop-down list.
12. In the drop-down list, select All User Databases (Excluding master, model, msdb), as show in Figure 2-22.

FIGURE 2-22 Maintenance Plan Wizard: Database selection drop-down list
13. Select the Ignore Databases When The State Is Not Online to ensure that there are no backup errors. Databases that are offline cannot be backed up.
14. Click the OK button.
15. In the Define Database Check Integrity Task, ensure the following options are checked, as shown in Figure 2-23:
![]() Include Indexes
Include Indexes
![]() Physical Only
Physical Only

FIGURE 2-23 Maintenance Plan Wizard: Define database check integrity task
17. In the Define Rebuild Index Task, select All User Databases, and configure the following options, as shown in Figure 2-24:
![]() Configure a fillfactor of 100% by selecting 0% free space to ensure that all data pages are filled 100 percent.
Configure a fillfactor of 100% by selecting 0% free space to ensure that all data pages are filled 100 percent.
![]() Use the [tempdb] system database for sorting operations.
Use the [tempdb] system database for sorting operations.
![]() Perform an online index operation for all possible tables.
Perform an online index operation for all possible tables.
![]() Rebuild indexes offline for tables that do not support online index operations.
Rebuild indexes offline for tables that do not support online index operations.
![]() Use a low priority for the index rebuild operations.
Use a low priority for the index rebuild operations.
![]() If the index operation experiences blocking, abort the operation after five minutes.
If the index operation experiences blocking, abort the operation after five minutes.

FIGURE 2-24 Maintenance Plan Wizard: Define database check integrity task
18. Click the Next button.
19. In the Define Update Statistics Task, select All User Databases, and configure the following options, as shown in Figure 2-25:
![]() Update column statistics only. There is no need to update index statistics because the previous task performs that.
Update column statistics only. There is no need to update index statistics because the previous task performs that.

FIGURE 2-25 Maintenance Plan Wizard: Define update statistics task
20. Click the Next button.
21. In the General tab of the Define Back Up Database (Full) Task screen, select All User Databases, as shown in Figure 2-26.

FIGURE 2-26 Maintenance Plan Wizard: General tab of define back up database (full) task
22. Click the Destination tab.
23. In the Destination tab of the Define Back Up Database (Full) Task screen, configure the destination folder and the following options, as shown in Figure 2-27.
![]() Select the Create A Sub-Directory For Each Database option. This option makes it easier to manage the database backups.
Select the Create A Sub-Directory For Each Database option. This option makes it easier to manage the database backups.

FIGURE 2-27 Maintenance Plan Wizard: Destination tab of define back up database (full) task
25. In the Options tab of the Define Back Up Database (Full) Task screen, configure the following options, as shown in Figure 2-28.
![]() Enable backup compression.
Enable backup compression.
![]() Perform checksum on the database. This helps check that the database contains no errors and can be restored.
Perform checksum on the database. This helps check that the database contains no errors and can be restored.
![]() Verify the backup integrity. This helps check that the backup contains no errors and can be restored.
Verify the backup integrity. This helps check that the backup contains no errors and can be restored.

FIGURE 2-28 Maintenance Plan Wizard: Options tab of define back up database (full) task
26. In the Define Maintenance Cleanup Task, specify the backup location and configure the following cleanup options, as shown in Figure 2-29.
![]() Include first-level options. This matches our configuration in the Define Backup Database Destination screen.
Include first-level options. This matches our configuration in the Define Backup Database Destination screen.
![]() Delete backup files older than 5 weeks. This helps ensure that we do not run out of space in our backup store.
Delete backup files older than 5 weeks. This helps ensure that we do not run out of space in our backup store.

FIGURE 2-29 Maintenance Plan Wizard: Define maintenance cleanup task
28. In the Define History Cleanup Task, change the Remove Historical Data Older Than configuration option to 18 months, as shown in Figure 2-30.

FIGURE 2-30 Maintenance Plan Wizard: Define history cleanup task
30. In the Select Report Options screen, change the report folder location, as shown in Figure 2-31. It is important to change it from the default directory, otherwise you will potentially generate thousands of small report files in SQL Server error log directory.

FIGURE 2-31 Maintenance Plan Wizard: Select report options
32. In the Complete The Wizard screen, review your configuration, as shown in Figure 2-32.

FIGURE 2-32 Maintenance Plan Wizard: Complete The wizard
33. Click the Finish button to create the maintenance plan.
34. In the Maintenance Plan Wizard Progress screen, ensure that all of the actions have run successfully, as shown in Figure 2-33.

FIGURE 2-33 Maintenance Plan Wizard: Maintenance plan wizard progress
It is a common mistake not to configure alerting for when scheduled backup operations fail. If the SQL Server Agent crashes or is not restarted by a database administrator after a manual restart of SQL Server, no scheduled backup operations will execute. Without any alerting or notification this could lead to substantial data loss if a disaster occurs. We will examine how you can configure altering for failed backup operations next.
Configure alerting for failed backups
As we have seen, backups can be easily scheduled via a SQL Server Agent job, or a maintenance plan. Once a backup job is scheduled, however, you cannot assume that it will always execute successfully. At a minimum you need to configure some form of notification or alerting for failed backups. Ideally you should be notified of both failed and successful backups to ensure that backup operations are being completed successfully.
To configure alerting you need to perform the following high level steps:
1. Configure Database Mail.
2. Configure SQL Server Agent to use Database Mail.
3. Define operators.
4. Configure notifications when a job fails.
We will look at how you configure Database Mail in Chapter 3. In this section we will focus more on how to create an operator and configure alerting.
To configure an operator, perform the following steps:
1. Open SQL Server Management Studio.
2. Expand the SQL Server Agent folder.
3. Right-click the Operators folder, and select New Operator.
4. Configure the following properties for the operator, as shown in Figure 2-34.
![]() Name
Name
![]() E-mail Name
E-mail Name

FIGURE 2-34 New operator
SQL Server Agent jobs easily allow you to be alerted when a job fails, succeeds, or completes. Be careful configuring jobs only to alert you when they fail. If the SQL Server Agent service is shutdown, or a job does not run for any reason, you will not be notified at all. As said earlier, it is better to configure important jobs to notify you when they complete either way.
As an example we will configure alerting for the “Full Backup – System Databases” SQL Server Agent job that we created earlier in this section. To configure alerting, perform the following steps:
1. Open SQL Server Management Studio.
2. Expand the Jobs folder.
3. Right-click the backup job that you want to configure an email notification for, and click Properties.
4. Click the Notifications page in the Job Properties dialog box.
5. Configure the operator that you want to be notified when the job completes, as shown in Figure 2-35.

FIGURE 2-35 SQL Server Agent Job properties: Notification page
You can also configure notifications for maintenance plans. The Maintenance Plan Wizard does not provide that functionality in its setup beyond the ability to email the maintenance plan report. However, you can customize a maintenance plan to notify you if with a different email depending on whether a backup fails or succeeds.
In the following example we will customize the “Full Backup & Optimization – User Databases” maintenance plan we created earlier in this section. To configure a notification in an existing maintenance plan, perform the following steps:
1. Open SQL Server Management Studio.
2. Expand the Management folder.
3. Expand the Maintenance Plans folder.
4. Double-click the maintenance plan you want to configure. The maintenance plan is opened up in the Maintenance Plan Designer, as shown in Figure 2-36.

FIGURE 2-36 Maintenance plan designer
5. Drag a Notify Operator Task from the Toolbox onto the design surface below the Back Up Database (Full) task, as shown in Figure 2-37.

FIGURE 2-37 New notify operator task
6. Click on the name in the notify operator task and rename it to “Notify Operator of Success” as shown in Figure 2-38.

FIGURE 2-38 Renaming the notify operator task
7. Double-click the renamed Notify Operator of Success task, and configure the following properties, as shown in Figure 2-39.
![]() Specify which operators are notified in the Operators To notify check box.
Specify which operators are notified in the Operators To notify check box.
![]() Provide an email subject in the Notification Message Subject text box to indicate the backups have completed successfully.
Provide an email subject in the Notification Message Subject text box to indicate the backups have completed successfully.
![]() Provide an email body in the Notification Message Body text box to indicate the backups have completed successfully.
Provide an email body in the Notification Message Body text box to indicate the backups have completed successfully.

FIGURE 2-39 Notify operator task properties
8. Click the OK button.
9. Click the Back Up Database (Full) task, and drag the green arrow onto the Notify Operator of Success task, as shown in Figure 2-40. The green arrow indicates that the Notify Operator of Success task performs only if the Back Up Database (Full) task is executed successfully.
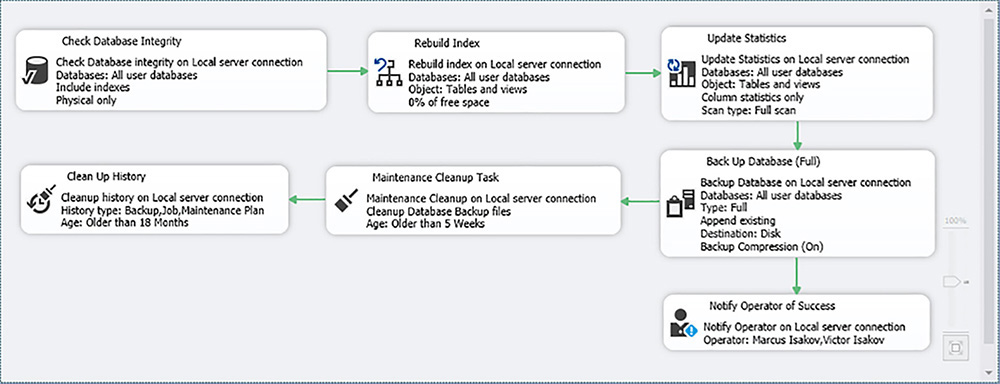
FIGURE 2-40 Creating success precedence
10. Drag a second Notify Operator Task from the Toolbox onto the design surface to the left of the Notify Operator of Success task, and rename the task to “Notify Operator Of Failure.”
11. Double-click on the renamed Notify Operator of Failure task and configure the following properties:
![]() Specify which operators are notified in the Operators To notify check box.
Specify which operators are notified in the Operators To notify check box.
![]() Provide an email subject in the Notification Message Subject text box to indicate that backups have failed.
Provide an email subject in the Notification Message Subject text box to indicate that backups have failed.
![]() Provide an email body in the Notification Message Body text box to indicate that the backups have failed.
Provide an email body in the Notification Message Body text box to indicate that the backups have failed.
12. Click the Back Up Database (Full) task and drag the green arrow onto the Notify Operator of Failure task.
13. Right-click the green arrow between the Back Up Database (Full) task and the Notify Operator of Failure task.
14. Select the Failure precedence, as shown in Figure 2-41.
FIGURE 2-41 Task precedence
15. Ensure that there is a red arrow between the Back Up Database (Full) task and the Notify Operator of Failure task, as shown in Figure 2-42. The red arrow indicates that the Notify Operator of Failure task only executes if the Back Up Database (Full) task fails.

FIGURE 2-42 SQL Server Agent Job properties: Notification page
16. Close the maintenance plan in SQL Server Management Studio to save the changes.
Another alternative is to configure alerts for failed backups by taking advantage of SQL Server Agent alerts. SQL Server Agent has the capability of notifying operators whenever a SQL Server event alerts occurs. SQL Server event alerts are raised based on one of the following:
![]() An error number
An error number
![]() An error’s severity level
An error’s severity level
![]() When the error message contains a particular string
When the error message contains a particular string
The benefit of using alerts is that they can catch all backup errors, irrespective of how the backup statement was executed. For an alert to fire you need to know what error number is generated when a backup fails. The database engine maintains all the error messages in the [sys].[messages] table in the [master] system database. So you can query it to find the specific error you are interested in.
To configure an alert when a backup fails, perform the following steps:
1. Open SQL Server Management Studio.
2. Connect to your SQL Server instance.
3. Click the New Query button in the Standard tool bar to open a new query window.
4. Run the query, as shown in Figure 2-43 in the [master] database. The [sys].[messages] system table contains the error messages used by the database engine. You can use error number 3041 for your backup failure alert.

FIGURE 2-43 Querying the [sys].[messages] system table
6. Right-click the Alerts folder, and select New Alert.
7. In the General page of the New Alert dialog box, configure the following properties, as shown in Figure 2-44.
![]() Provide a name for the alert in the Name text box.
Provide a name for the alert in the Name text box.
![]() Specify 3041 in the Error Number text box.
Specify 3041 in the Error Number text box.

FIGURE 2-44 New Alert: General page
8. Click the Response page of the New Alert dialog box, and configure the following properties, as shown in Figure 2-45.
![]() Select the Notify Operators check box.
Select the Notify Operators check box.
![]() Select the Email check box for all the operators you want the alert sent to.
Select the Email check box for all the operators you want the alert sent to.

FIGURE 2-45 New Alert: Response page
9. Click the Options page of the New Alert dialog box and configure the following properties, as shown in Figure 2-46.
![]() Select the Email check box for the Include Alert Error Text in options.
Select the Email check box for the Include Alert Error Text in options.
![]() Configure the Delay Between Responses option for 5 minutes. This prevents too many emails being sent if an alerts fires multiple times within the 5 minute interval.
Configure the Delay Between Responses option for 5 minutes. This prevents too many emails being sent if an alerts fires multiple times within the 5 minute interval.

FIGURE 2-46 New Alert: General page
10. Click the OK button to create the alert.
Listing 2-17 shows how to create the same alert in T-SQL.
LISTING 2-17 Create [Backup Error] alert
USE [msdb]
GO
EXEC msdb.dbo.sp_add_alert @name=N'Backup Error''
@message_id=3041'
@severity=0'
@enabled=1'
@delay_between_responses=300'
@include_event_description_in=1'
@category_name=N'[Uncategorized]''
@job_id=N'00000000-0000-0000-0000-000000000000'
Skill 2.2 Restore databases
When a disaster occurs, you need to decide which course of corrective action to take. This might involve restoring the database. In this case you might have multiple paths that you may take. It is important to take a path that restores the database in the quickest possible time with minimal or no data loss. Alternatively, you might choose the repair the database. We will look at how you repair databases in Skill 2.3.
In Skill 2.1 we looked at how to develop a backup strategy. The backup strategy that you use as a result of those skills and your experience will very much dictate what options you have available when a disaster occurs. This, in turn, dictates your restore strategy. So the skills in this section will closely match what was covered in Skill 2.1.
In this section we will look at the skills required to restore a database correctly and in a timely fashion. Be careful when restoring a database as you do not want to accidently delete data that is critical to your restore strategy, such as with the tail-log.
This section covers how to:
![]() Perform point-in-time recovery
Perform point-in-time recovery
![]() Develop a plan to automate and test restores
Develop a plan to automate and test restores
Design a restore strategy
It is important to design your restore strategy before performing any restore operations to ensure that you restore your database correctly, that you do not lose any data, and that you perform the restore within your RTO. The success of a restore strategy is dictated by such planning, as opposed to jumping in and potentially deleting the tail-log or other important data, evidence or information.
In the exam you might get a restore question that has a complex backup strategy, specific details as to what has gone wrong during a disaster and a business requirement to restore the crashed database. Always make sure you read the business requirements to ensure you understand whether you need to restore the database as quickly as possible, or with no data loss or with minimal data loss. You might then be as asked what order of restore statements will be required to meet your business objectives. Watch out for broken log chains!
Real World Disaster recovery documentation
You should design and document your disaster recovery plan (DRP) before they are actually required. Your DRP should take into account all possible failures and design procedures to recovery from all of them. Ideally you should also periodically test you DRP to ensure it is correct and so that you can gauge the time that it will take when required.
There are multiple reasons why you need to initiate a restore procedure, including:
![]() Recover from a disaster incident.
Recover from a disaster incident.
![]() Recover from user error.
Recover from user error.
![]() Refresh a database in a non-production environment from a production database backup.
Refresh a database in a non-production environment from a production database backup.
![]() Test your disaster recovery procedures.
Test your disaster recovery procedures.
![]() Set up a high-availability solution such as Log Shipping or Availability Groups.
Set up a high-availability solution such as Log Shipping or Availability Groups.
![]() Perform an upgrade of a database between different versions of SQL Server.
Perform an upgrade of a database between different versions of SQL Server.
In the case of a disaster incident, or user error, it is easy to panic and make mistakes. Consequently, to recover from a disaster incident, or user error, use the following procedure:
1. Do not panic.
2. Assess the situation. Start thinking about the people, processes, and recovery assets required.
3. Stop access to the database, if necessary.
4. Check to see if the tail-log exists.
5. Back up the tail-log, if it exists.
6. Assess the damage/corruption in the database.
7. Assess whether a restore strategy is required.
8. Assess whether point-in-time recovery is required.
9. Assess what backups exist.
10. Verify that the backups are current and valid.
11. Plan your restore strategy.
12. Initiate your restore process.
Important Tail-log backups
Whenever a disaster occurs and you need to initiate your disaster recovery procedures you should ALWAYS see if the database’s orphaned transaction log exists and perform a tail-log backup. This ensures you are able to recover the database to the point-in-time of the disaster. No data is lost.
When planning your restore strategy, you need to ensure that all the required backups exist and are valid. You do not want to initiate a restore sequence of 10 log backups only to find that the ninth log backup is missing or corrupt.
Before you initiate a restore process, ensure that your backup devices have no errors and can be restored. The RESTORE statement has a number of options that allow you to investigate and check the backup media and backup set:
![]() FILELISTONLY This statement returns a list of the database and log files contained in the backup set. This only lists the files without validating their contents.
FILELISTONLY This statement returns a list of the database and log files contained in the backup set. This only lists the files without validating their contents.
![]() HEADERONLY This statement returns the backup header information for all backup sets on a particular backup device. This lists the header information without further validation.
HEADERONLY This statement returns the backup header information for all backup sets on a particular backup device. This lists the header information without further validation.
![]() LABELONLY This statement returns information about the backup media identified by the given backup device. This lists the media information without further validation.
LABELONLY This statement returns information about the backup media identified by the given backup device. This lists the media information without further validation.
![]() VERIFYONLY This statement verifies the backup, but it does not perform the restore operation. It checks whether the backup set is complete and the entire backup is readable. The aim of the RESTORE VERIFYONLY operation is to be as close to an actual restore operation as practical. The RESTORE VERFIYONLY performs a number of checks that include:
VERIFYONLY This statement verifies the backup, but it does not perform the restore operation. It checks whether the backup set is complete and the entire backup is readable. The aim of the RESTORE VERIFYONLY operation is to be as close to an actual restore operation as practical. The RESTORE VERFIYONLY performs a number of checks that include:
![]() Checking some header fields of database pages, such as the Page ID.
Checking some header fields of database pages, such as the Page ID.
![]() The backup set is complete and all volumes are readable.
The backup set is complete and all volumes are readable.
![]() The checksum is correct, if present.
The checksum is correct, if present.
![]() There is sufficient space on the destination disks.
There is sufficient space on the destination disks.
Important RESTORE VERIFYONLY
The RESTORE VERIFYONLY operation does not guarantee that the restore succeeds because it does not verify the structures of the data contained in the backup set.
Listing 2-18 shows an example of how to verify the backups.
LISTING 2-18 Verifying a backup set
RESTORE VERIFYONLY
FROM DISK = 'B:SQLBackupWordWideImporters_FULL.bak'
Don’t forget that you might have multiple restore sequences for a database. These different restore sequences might have substantially different restore durations. Different restore sequences might also protect against backup set damage or corruption.
Let’s assume you have an On-Line Transactional Processing (OLTP) database that is 400GB in size. The database is only used during weekdays between 09:00 and 17:00. The database has the following backup strategy:
![]() A full backup is performed every Sunday at 20:00.
A full backup is performed every Sunday at 20:00.
![]() The full backup is 250GB in size (due to compression).
The full backup is 250GB in size (due to compression).
![]() The full backup takes under two hours to complete.
The full backup takes under two hours to complete.
![]() A differential backup is performed every Monday, Tuesday, Wednesday, Thursday, and Friday at 23:00.
A differential backup is performed every Monday, Tuesday, Wednesday, Thursday, and Friday at 23:00.
![]() These differential backups take under one hour to complete.
These differential backups take under one hour to complete.
![]() These differential backups typically start off being 5GB in size, and grow to 9GB in size by Friday.
These differential backups typically start off being 5GB in size, and grow to 9GB in size by Friday.
![]() Log backups are performed every hour from 09:00 to 18:00.
Log backups are performed every hour from 09:00 to 18:00.
![]() These log backups are on average 1GB in size, and take 15 minutes to complete.
These log backups are on average 1GB in size, and take 15 minutes to complete.
If the database’s data files crash on Friday at 10:30 you could use the following restore sequence:
1. Perform a tail-log backup.
2. Restore the full backup.
3. Restore Monday’s 10 log backups.
4. Restore Tuesday’s 10 log backups.
5. Restore Wednesday’s 10 log backups.
6. Restore Thursday’s 10 log backups.
7. Restore Friday’s 9:00 and 10:00 backup.
8. Restore the tail log.
All the log restores would involve replaying 42GB of log backups. It would be quicker to use the following restore sequence:
1. Perform a tail-log backup.
2. Restore the full backup.
3. Restore Thursday’s differential backup.
4. Restore Friday’s 9:00 and 10:00 backup.
5. Restore the tail log.
Because this restore sequence would involve restoring an 8GB differential backup followed by 2GB worth of log backups, it would be much quicker.
If the differential backups grew by 15GB each day, Thursday’s differential backup would be 60GB in size. In this case, it would probably be quicker to restore all 42 log backups.
Important Testing restores
It is important for you to test restores in an environment similar to your production environment so that you can measure how long it takes to perform the various steps of your restore sequence.
Now let’s assume that Thursday’s differential failed due to a lack of disk space. In this case you would use the following restore sequence:
1. Perform a tail-log backup.
2. Restore the full backup.
3. Restore Wednesday’s differential backup.
4. Restore Thursday’s 10 log backups.
5. Restore Friday’s 9:00 and 10:00 backup.
6. Restore the tail log.
Take advantage of both differential and log backups to give your disaster recovery plan both flexibility and resilience.
Restore a database
Restoring a database is not as complex as backing up a database because you are constrained by your backup strategy and your available backup sets. We covered the backup operations in detail in Skill 2.1 and you should not be surprised that the restore operations mirror them. SQL Server supports a number of different restore operations:
![]() Restore the entire database.
Restore the entire database.
![]() Restore a part of a database (perform a partial restore).
Restore a part of a database (perform a partial restore).
![]() Restore a transaction log.
Restore a transaction log.
![]() Restore specific files of a database.
Restore specific files of a database.
![]() Restore a specific filegroup of a database.
Restore a specific filegroup of a database.
![]() Restore specific pages of a database.
Restore specific pages of a database.
![]() Revert a database snapshot.
Revert a database snapshot.
We will cover all of these restore operations in this section and give examples of the syntax. The exam will be testing your knowledge of the syntax and the various options used to restore a database and its log.
The RESTORE statement is used to perform all restore operations. Use the following statement to restore a database:
RESTORE DATABASE { database_name | @database_name_var }
[ FROM <backup_device> [ '...n ] ]
[ WITH
{
[ RECOVERY | NORECOVERY | STANDBY =
{standby_file_name | @standby_file_name_var }
]
| ' <general_WITH_options> [ '...n ]
| ' <replication_WITH_option>
| ' <change_data_capture_WITH_option>
| ' <FILESTREAM_WITH_option>
| ' <service_broker_WITH options>
| ' <point_in_time_WITH_options—RESTORE_DATABASE>
} [ '...n ]
]
[;]
Use the following statement to restore a log:
--To Restore a Transaction Log:
RESTORE LOG { database_name | @database_name_var }
[ <file_or_filegroup_or_pages> [ '...n ] ]
[ FROM <backup_device> [ '...n ] ]
[ WITH
{
[ RECOVERY | NORECOVERY | STANDBY =
{standby_file_name | @standby_file_name_var }
]
| ' <general_WITH_options> [ '...n ]
| ' <replication_WITH_option>
| ' <point_in_time_WITH_options—RESTORE_LOG>
} [ '...n ]
]
[;]
As with the BACKUP statement, let’s turn our attention to the various options supported by the RESTORE operation.
Use restore options
Now that we have covered the two RESTORE command we can turn to the options, as we did with the BACKUP command in Skill 2.1. The RESTORE statement has a number of WITH options, but not as many as the BACKUP statement. For the exam, make sure you understand what the following options do and when to use them:
![]() MOVE This option is used to relocate the database’s set of files during the restore operation. It is commonly used when restoring a database to a different SQL Server instance that has a different storage layout.
MOVE This option is used to relocate the database’s set of files during the restore operation. It is commonly used when restoring a database to a different SQL Server instance that has a different storage layout.
![]() NORECOVERY This option specifies the restore operation to not roll back any uncommitted transactions. The database remains unavailable. Committed transactions are committed to the database. Uncommitted transactions are replayed/rolled forward. The database engine “assumes” that subsequent log restores commit these uncommitted transactions.
NORECOVERY This option specifies the restore operation to not roll back any uncommitted transactions. The database remains unavailable. Committed transactions are committed to the database. Uncommitted transactions are replayed/rolled forward. The database engine “assumes” that subsequent log restores commit these uncommitted transactions.
![]() RECOVERY This option specifies the restore operation to roll back any uncommitted transactions before making the database available for use. All committed transactions are included within the database. RECOVERY is the default behavior.
RECOVERY This option specifies the restore operation to roll back any uncommitted transactions before making the database available for use. All committed transactions are included within the database. RECOVERY is the default behavior.
![]() REPLACE This option bypasses the database engine’s internal safety check that helps you by automatically preventing you from overwriting existing database files. The safety checks include:
REPLACE This option bypasses the database engine’s internal safety check that helps you by automatically preventing you from overwriting existing database files. The safety checks include:
![]() Overwriting existing files.
Overwriting existing files.
![]() Restoring over a database that is using the full or bulk-logged recovery model where a tail-log backup has not been taken, and the STOPAT option has not been specified.
Restoring over a database that is using the full or bulk-logged recovery model where a tail-log backup has not been taken, and the STOPAT option has not been specified.
![]() Restoring over an existing database with a backup of another database.
Restoring over an existing database with a backup of another database.
![]() STANDBY This option creates a second transaction log that allows the database to be read, but also allows subsequent log backups to be restored. This can be useful in recovery situations where you want to inspect the database between log restores. When the subsequent log is restored, the database engine rolls back all the operations from the second transaction log so that the database is back in the NORECOVERY mode when the STANDBY option is specified.
STANDBY This option creates a second transaction log that allows the database to be read, but also allows subsequent log backups to be restored. This can be useful in recovery situations where you want to inspect the database between log restores. When the subsequent log is restored, the database engine rolls back all the operations from the second transaction log so that the database is back in the NORECOVERY mode when the STANDBY option is specified.
Note Restoring multiple log files
When restoring multiple log files use the WITH NORECOVERY for all RESTORE statements in a multi-step restore sequence. You can execute a separate RESTORE DATABASE with the WITH RECOVERY operation at the end to make the database available to users.
![]() Exam Tip
Exam Tip
Use the RECOVERY option on the very last restore operation that you plan to perform. After the database has been recovered and brought online, you are no longer able to perform additional restore operations.
Listing 2-19 shows an example of a restore sequence that restores the following from a share:
![]() Initial full backup, to a new location
Initial full backup, to a new location
![]() Differential backup
Differential backup
![]() Last three transaction log backups that occurred after the differential backup
Last three transaction log backups that occurred after the differential backup
Note the use of the recovery options throughout the code. Also note the sequence numbers use in the FILE option. This is what the exam might test you on.
LISTING 2-19 Restoring a database
USE [master];
GO
-- Restore full backup
RESTORE DATABASE [WorldWideImporters]
FROM DISK = '\SQLBACKUPSSQLBackupWordWideImportersWordWideImporters_FULL.bak'
WITH NORECOVERY '
MOVE 'WorldWideImporters_Data' TO 'D:SQLDataWorldWideImporters_Data.mdf''
MOVE 'WorldWideImporters_Log' to 'L:SQLLogWorldWideImporters_Log.ldf';
GO
-- Restore differential backup
RESTORE DATABASE [WorldWideImporters]
FROM DISK = '\SQLBACKUPSSQLBackupWordWideImportersWordWideImporters_DIFF.bak'
WITH NORECOVERY ;
GO
-- Restore last 3 log backups
RESTORE LOG [WorldWideImporters]
FROM DISK = '\SQLBACKUPSSQLBackupWordWideImportersWordWideImporters_LOG.bak'
WITH FILE = 11' NORECOVERY ;
GO
RESTORE LOG [WorldWideImporters]
FROM DISK = '\SQLBACKUPSSQLBackupWordWideImportersWordWideImporters_LOG.bak'
WITH FILE = 12' NORECOVERY ;
GO
RESTORE LOG [WorldWideImporters]
FROM DISK = '\SQLBACKUPSSQLBackupWordWideImportersWordWideImporters_LOG.bak'
WITH FILE = 13' NORECOVERY ;
GO
-- Make database available
RESTORE DATABASE [WorldWideImporters]
WITH RECOVERY;
GO
It would be equivalent to restore the last log backup using the WITH RECOVERY option instead, as show in Listing 2-20.
LISTING 2-20 Restoring last log backup
RESTORE LOG [WorldWideImporters]
FROM DISK = '\SQLBACKUPSSQLBackupWordWideImportersWordWideImporters_LOG.bak'
WITH FILE = 13' RECOVERY;
Revert a database snapshot
As discussed in earlier in the “Perform database snapshots” section, reverting a database snapshot is only possible if the database is undamaged and the database contains only the single database snapshot that you plan to revert. You need to drop all other database snapshots.
Reverting a database overwrites the data files, overwrites the old transaction log file, and rebuilds the transaction log. Therefore, it is recommended to perform a log backup before reverting a database. It is further recommended to perform a full backup after the revert operation completes to initialize the log chain again.
Listing 2-21 shows an example of how to revert a database snapshot.
LISTING 2-21 Revert a Database Snapshot
USE master;
GO
RESTORE DATABASE [WorldWideImporters]
FROM DATABASE_SNAPSHOT = 'WorldWideImporters_20160917';
Perform piecemeal restores
A piecemeal restore allows you to restore a database in stages, and can only be used for databases that have multiple filegroups. SQL Server Enterprise Edition supports online piecemeal restores, which means that as you restore and recovery filegroups within the database, you can make them available to users. This is a very important feature for VLDBs that have a small RTO as we saw in the “Back up VLDBs” section. Users can start using the database while you are still restoring other less important filegroups.
Restructure your database to use filegroups if you want to take advantage of this feature. Make sure you engage your business to determine the relative priority of the tables within the databases.
A piecemeal restore starts with an initial restore sequence called the partial-restore sequence. The partial-restore sequence must restore and recover the primary filegroup. During the partial-sequence sequence the database goes offline.
Important Memory-optimized filegroup
For piecemeal restores the memory-optimized filegroup must be backed up and restored together with the primary filegroup.
Use the following statement to start a partial-restore sequence:
RESTORE DATABASE { database_name | @database_name_var }
<files_or_filegroups> [ '...n ]
[ FROM <backup_device> [ '...n ] ]
WITH
PARTIAL ' NORECOVERY
[ ' <general_WITH_options> [ '...n ]
| ' <point_in_time_WITH_options—RESTORE_DATABASE>
] [ '...n ]
[;]
After the partial-restore sequence, perform one or more filegroup-restore sequences. Each filegroup-restore sequence restores and recovers on or more filegroups. At the end of each filegroup-restore sequence, the restored filegroups are available to users. Prioritize the filegroups according to their importance to the users and how long they take to restore, until the entire database has been recovered and is online.
Piecemeal restores work with all recovery models, although there are limitations with the SIMPLE recovery model.
For a database that is using the full or bulk-logged recovery model, use the following steps to perform a piecemeal restore:
1. Perform the partial-restore sequence on the primary filegroup and any other important file groups.
2. Perform a filegroup-restore sequence on the remaining secondary file groups in order of their importance.
For a database that is using the simple recovery model, use the following steps to perform a piecemeal restore:
1. Perform the partial-restore sequence on the primary filegroup and all read/write secondary filegroups.
2. Perform a filegroup-restore sequence on the remaining read-only secondary file groups in order of their importance.
Assume you have a database named [OnlineStore] that is used by an online shopping website that has the following structure, as shown in Listing 2-22:
![]() A primary filegroup contains no user tables and is only 100MBs in size.
A primary filegroup contains no user tables and is only 100MBs in size.
![]() A [Orders] secondary filegroup that has all the critical tables (like [Customers], [Products], [Orders], and [OrderDetails]) that enables customers to place orders. The [Sales] filegroup is 20GB in size.
A [Orders] secondary filegroup that has all the critical tables (like [Customers], [Products], [Orders], and [OrderDetails]) that enables customers to place orders. The [Sales] filegroup is 20GB in size.
![]() A [CompletedOrders] secondary filegroup that contains historical tables such as [CompletedOrders], [CompletedOrderDetails] that holds completed orders for the last two years. The [CompletedOrders] filegroup is 200GB in size.
A [CompletedOrders] secondary filegroup that contains historical tables such as [CompletedOrders], [CompletedOrderDetails] that holds completed orders for the last two years. The [CompletedOrders] filegroup is 200GB in size.
![]() A [Data] default secondary filegroup that contains the remainder of the operational tables used in the database. The [Data] filegroup is 10GB in size.
A [Data] default secondary filegroup that contains the remainder of the operational tables used in the database. The [Data] filegroup is 10GB in size.
![]() An [Archive] secondary filegroup that holds data that is older than two years. The [Archive] group is 1TB in size because it goes back 10 years.
An [Archive] secondary filegroup that holds data that is older than two years. The [Archive] group is 1TB in size because it goes back 10 years.
LISTING 2-22 [OnlineStore] database definition
CREATE DATABASE [OnlineStore]
ON PRIMARY
( NAME = N'OnlineStore_Primary', FILENAME = N'D:SQLDataOnlineStore_Primary.mdf'
, SIZE = 100MB),
FILEGROUP [Archive]
( NAME = N'OnlineStore_Archive', FILENAME = N'E:SQLDataOnlineStore_Archive.ndf'
, SIZE = 1TB),
FILEGROUP [CompletedOrders]
( NAME = N'OnlineStore_CompletedOrders', FILENAME = N'F:SQLDataOnlineStore_
CompletedOrders.ndf' , SIZE = 200GB),
FILEGROUP [Data]
( NAME = N'OnlineStore_Data', FILENAME = N'G:SQLDataOnlineStore_Data.ndf' , SIZE
= 10GB),
FILEGROUP [Orders]
( NAME = N'OnlineStore_Orders', FILENAME = N'H:SQLDataOnlineStore_Orders.ndf' ,
SIZE = 20GB)
LOG ON
( NAME = N'OnlineStore_Log', FILENAME = N'L:SQLLogOnlineStore_Log.ldf' , SIZE =
1GB)
GO
ALTER DATABASE [OnlineStore]
MODIFY FILEGROUP [Data] DEFAULT;
Assume you have taken the following backups:
![]() Full backup
Full backup
![]() Differential backup
Differential backup
![]() Log backup
Log backup
Assume that the D, E, F, G, and H drives have all failed. Only the L drive that contains the transaction log has survived. You need to recover the database ASAP so that users can place orders.
Use the following steps to perform a piecemeal restore off the [OnlineStore] database:
1. Perform a tail-log backup, restore the primary file group, and bring the database online, as shown in Listing 2-23.
LISTING 2-23 Partial-restore sequence
-- Back up orphaned transaction log to minimize data loss
USE [master];
GO
BACKUP LOG [OnlineStore] TO DISK = 'B:SQLBackupOnlineStore_ORPHANEDLOG.bak' WITH
NO_TRUNCATE;
-- Start partial-restore sequence
USE [master]
GO
RESTORE DATABASE [OnlineStore]
FILEGROUP = 'PRIMARY' FROM DISK = 'B:SQLBackupOnlineStore_FULL.bak' WITH
NORECOVERY, PARTIAL;
GO
RESTORE DATABASE [OnlineStore]
FILEGROUP = 'PRIMARY' FROM DISK = 'B:SQLBackupOnlineStore_DIFF.bak' WITH
NORECOVERY;
GO
RESTORE DATABASE [OnlineStore]
FILEGROUP = 'PRIMARY' FROM DISK = 'B:SQLBackupOnlineStore_LOG.bak' WITH
NORECOVERY;
GO
RESTORE DATABASE [OnlineStore]
FILEGROUP = 'PRIMARY' FROM DISK = 'B:SQLBackupOnlineStore_ORPHANEDLOG.bak' WITH
NORECOVERY;
GO
RESTORE DATABASE [OnlineStore] WITH RECOVERY;
2. Restore and recover the [Orders] file group and bring it online, as shown in Listing 2-24.
LISTING 2-24 [Orders] filegroup-restore sequence
USE [master];
GO
-- Restore Orders filegroup and bring it online
RESTORE DATABASE [OnlineStore]
FILEGROUP = 'Orders' FROM DISK = 'B:SQLBackupOnlineStore_FULL.bak' WITH
NORECOVERY;
GO
RESTORE DATABASE [OnlineStore]
FILEGROUP = 'Orders' FROM DISK = 'B:SQLBackupOnlineStore_DIFF.bak' WITH
NORECOVERY;
GO
RESTORE DATABASE [OnlineStore]
FILEGROUP = 'Orders' FROM DISK = 'B:SQLBackupOnlineStore_LOG.bak' WITH
NORECOVERY;
GO
RESTORE DATABASE [OnlineStore]
FILEGROUP = 'Orders' FROM DISK = 'B:SQLBackupOnlineStore_ORPHANEDLOG.bak' WITH
NORECOVERY;
GO
RESTORE DATABASE [OnlineStore] WITH RECOVERY
3. Check to make sure that the [Orders] filegroup is online and that users can query the [Orders] table, as shown in Listing 2-25.
LISTING 2-25 Check partial availability of database files
USE [OnlineStore];
GO
-- Check to see if [Orders] filegroup is online
SELECT file_id, name, type_desc, state_desc
FROM sys.database_files
GO
-- Ensure users can query the critical tables
SELECT * FROM [Orders]
Figure 2-47 shows the result set of the query that checks to see what filegroups are available within the database.

FIGURE 2-47 Testing partial availability
4. Restore and recover the [Data] and [CompletedOrders] filegroups, as shown in Listing 2-26
LISTING 2-26 [Data] and [CompletedOrders] filegroup-restore sequence
USE [master];
GO
RESTORE DATABASE [OnlineStore]
FILEGROUP = 'Data', FILEGROUP = 'CompletedOrders' FROM DISK = 'B:SQLBackup
OnlineStore_FULL.bak' WITH NORECOVERY;
GO
RESTORE DATABASE [OnlineStore]
FILEGROUP = 'Data', FILEGROUP = 'CompletedOrders' FROM DISK = 'B:SQLBackup
OnlineStore_DIFF.bak' WITH NORECOVERY;
GO
RESTORE DATABASE [OnlineStore]
FILEGROUP = 'Data', FILEGROUP = 'CompletedOrders' FROM DISK = 'B:SQLBackup
OnlineStore_LOG.bak' WITH NORECOVERY;
GO
RESTORE DATABASE [OnlineStore]
FILEGROUP = 'Data', FILEGROUP = 'CompletedOrders' FROM DISK = 'B:SQLBackup
OnlineStore_ORPHANEDLOG.bak' WITH NORECOVERY;
GO
RESTORE DATABASE [OnlineStore] WITH RECOVERY
GO
5. Restore and recover the final 1TB [Archive] filegroup, as shown in Listing 2-27.
LISTING 2-27 [Archive] filegroup-restore sequence
USE [master];
GO
RESTORE DATABASE [OnlineStore]
FILEGROUP = 'Archive' FROM DISK = 'B:SQLBackupOnlineStore_FULL.bak' WITH
NORECOVERY;
GO
RESTORE DATABASE [OnlineStore]
FILEGROUP = 'Archive' FROM DISK = 'B:SQLBackupOnlineStore_DIFF.bak' WITH
NORECOVERY;
GO
RESTORE DATABASE [OnlineStore]
FILEGROUP = 'Archive' FROM DISK = 'B:SQLBackupOnlineStore_LOG.bak' WITH
NORECOVERY;
GO
RESTORE DATABASE [OnlineStore]
FILEGROUP = 'Archive' FROM DISK = 'B:SQLBackupOnlineStore_ORPHANEDLOG.bak' WITH
NORECOVERY;
GO
RESTORE DATABASE [OnlineStore] WITH RECOVERY
GO
Alternatively, assume that only the E drive that contains the [CompletedOrders] has failed. The rest of the [OnlineSales] database is fine and accessible.
1. In this case recover and restore the [CompletedOrders] filegroup while the rest of the database is available, as shown in Listing 2-28. This is referred to as partial availability.
LISTING 2-28 [CompletedOrders] filegroup-restore sequence for a partially available database
USE [master];
GO
-- Take the [CompletedOrders] file offline
ALTER DATABASE
MODIFY FILE (name = OnlineStore_CompletedOrders' OFFLINE);
GO
-- Back up orphaned transaction log to minimize data loss
BACKUP LOG [OnlineStore] TO DISK = 'B:SQLBackupOnlineStore_ORPHANEDLOG.bak' WITH
NO_TRUNCATE;
GO
--
RESTORE DATABASE [OnlineStore]
FILEGROUP = 'CompletedOrders' FROM DISK = 'B:SQLBackupOnlineStore_FULL.bak' WITH
NORECOVERY;
GO
RESTORE DATABASE [OnlineStore]
FILEGROUP = 'CompletedOrders' FROM DISK = 'B:SQLBackupOnlineStore_DIFF.bak' WITH
NORECOVERY;
GO
RESTORE DATABASE [OnlineStore]
FILEGROUP = 'CompletedOrders' FROM DISK = 'B:SQLBackupOnlineStore_LOG.bak' WITH
NORECOVERY;
GO
RESTORE DATABASE [OnlineStore]
FILEGROUP = 'CompletedOrders' FROM DISK = 'B:SQLBackupOnlineStore_ORPHANEDLOG.
bak' WITH NORECOVERY;
GO
RESTORE DATABASE [OnlineStore] WITH RECOVERY
GO
As you can see from this section, performing a piecemeal restore is complicated and can involve substantial downtime. What happens if only a small number of pages in your database were corrupted? Ideally, you would not have to restore large data files, but could instead restore just the damaged pages. Fortunately, SQL Server supports the ability to restore just the damaged pages in a database and we will look at that next.
Perform page recovery
SQL Server has improved page corruption detection over earlier versions. All newly created databases by default use checksum page verification. Various database engine processes and features check to see that the checksum is correct. If a page’s checksum is invalid that means that the page has been corrupted for some reason. The database engine keeps track of page corruptions in the [msdb] system database’s [suspect_pages] table.
Important Page corruption detection
The database engine can only detect corrupt pages in a database whose page verification has been set to CHECKSUM (or TORN_PAGE_DETECTION) and the page has been written after this option was set. Do not use TORN_PAGE_DETECTION because CHECKSUM is a superior method for page corruption detection. TORN_PAGE_DETECTION predates CHECKSUM, and is included for backward compatibility.
To obtain a list of the corrupted pages, you can query a number of sources, including:
![]() The [msdb] system database’s [suspect_pages] table
The [msdb] system database’s [suspect_pages] table
![]() The database engine’s ERRORLOG
The database engine’s ERRORLOG
![]() The output of a DBCC command
The output of a DBCC command
If your database only has a small number of isolated pages that are damaged, you can take advantage of the page restore process. It is quicker to restore a small number of pages than to restore an entire database.
Ideally you should determine what kind of a page has been damaged. If the damaged pages are in a nonclustered index for example, it could be substantially easier to drop the index and recreate it, than to initiate a page recovery process.
Important Page corruption root cause analysis
It is important to perform a root cause analysis on why your database is experiencing page corruption. Without understanding what has caused the page corruption, you risk it occurring again, with potentially greater damage. Page corruption could be indicative of impeding hardware failure.
Page restore only works for read/write files in databases that are using the full or bulk-logged recovery models. Page restore cannot be used for corruptions in the transaction log. Furthermore, page restore does not work for the following types of database pages:
![]() Database Boot Page (Page 1:9)
Database Boot Page (Page 1:9)
![]() File Boot Page (Page 0 of all data files)
File Boot Page (Page 0 of all data files)
![]() Full-text catalog
Full-text catalog
![]() Global Allocation Map (GAM)
Global Allocation Map (GAM)
![]() Page Free Space (PFS)
Page Free Space (PFS)
![]() Secondary Global Allocation Map (SGAM)
Secondary Global Allocation Map (SGAM)
Use the following RESTORE statement to restore pages within the database:
--To Restore Specific Pages:
RESTORE DATABASE { database_name | @database_name_var }
PAGE = 'file:page [ '...n ]'
[ ' <file_or_filegroups> ] [ '...n ]
[ FROM <backup_device> [ '...n ] ]
WITH
NORECOVERY
[ ' <general_WITH_options> [ '...n ] ]
[;]
Page restore works with all editions of SQL Server. Only SQL Server Enterprise Edition supports online page restore. However, online page restore might not be possible in certain cases where critical pages have been damaged. With all other editions, excluding the Developer Edition, the database has to be offline.
Use the following process to perform a page restore:
1. Restore a full database with the PAGE restore option.
2. List all the Page IDs to be restored.
3. Restore any differential backups, if appropriate.
4. Restore the log chain after the full backup.
5. Perform a new log backup that includes the final LSN of the restored pages.
6. Restore this new log backup.
Listing 2-29 shows an example of a page restore process.
LISTING 2-29 Page restore
USE [msdb];
GO
-- Determine corrupted pages
SELECT database_id' file_id' page_id' event_type' error_count' last_update_date
FROM dbo.suspect_pages
WHERE database_id = DB_ID('WorldWideImporters');
GO
-- Restore 4 corrupt pages
USE [master];
GO
RESTORE DATABASE [WorldWideImporters] PAGE='1:300984' 1:300811' 1: 280113' 1:170916'
FROM WideWorldImporters_Backup_Device
WITH NORECOVERY;
GO
RESTORE LOG [WorldWideImporters]
FROM WideWorldImporters_Log_Backup_Device
WITH FILE = 1' NORECOVERY;
GO
RESTORE LOG [WorldWideImporters]
FROM WideWorldImporters_Log_Backup_Device
WITH FILE = 2' NORECOVERY;
WITH NORECOVERY;
GO
BACKUP LOG [WorldWideImporters]
TO DISK='B:SQLBackupPageRecovery.bak';
GO
RESTORE LOG <database>
FROM DISK='B:SQLBackupPageRecovery.bak'
WITH RECOVERY;
GO
In the exam, if you get a question on performing page recovery, it will most likely test you on the specific order of steps that must be taken to restore pages and get them transactionally consistent with the rest of the database. So make sure you understand the order of the high-level steps discussed in this section.
Perform point-in-time recovery
In certain disaster incidents, there’s no hardware failure or database corruption, but some sort of accidental user error. Perhaps a user accidentally deletes or truncates a table. In this case, you need to restore the database to a particular point in time.
With point-in-time recovery you need to know the precise time to which you want to restore the database. Importantly, any need to understand that any transactions that were committed after this point in time is lost.
That is why point-in-time recovery is not commonly used in the industry. If point-in-time recovery is required, it is more common to restore your database into a separate non-production database to the required point in time and then for the appropriate table(s) to be transferred to the production database.
The RESTORE statement supports point-in-time recovery. SQL Server supports recovery to these different types of point in times:
![]() Date/Time A specific date and time.
Date/Time A specific date and time.
![]() Log Sequence Number (LSN) An internal numbering sequence used for each operation within the transaction log. This is used internally by the database engine and typically not used by database administrators.
Log Sequence Number (LSN) An internal numbering sequence used for each operation within the transaction log. This is used internally by the database engine and typically not used by database administrators.
![]() Marked Transaction An explicitly named explicit transaction.
Marked Transaction An explicitly named explicit transaction.
Typically, a point-in-time recovery is performed from a log backup, but it can be used with database backups as well. Remember, a database backup contains a portion of the transaction log. Use the STOPAT clause for point-in-time-recovery.
The STOPAT clause supports the following variations when restoring from a database backup:
<point_in_time_WITH_options—RESTORE_DATABASE>::=
| {
STOPAT = { 'datetime'| @datetime_var }
| STOPATMARK = 'lsn:lsn_number'
[ AFTER 'datetime']
| STOPBEFOREMARK = 'lsn:lsn_number'
[ AFTER 'datetime']
The STOPAT clause supports the following variations when restoring from a log backup:
<point_in_time_WITH_options—RESTORE_LOG>::=
| {
STOPAT = { 'datetime'| @datetime_var }
| STOPATMARK = { 'mark_name' | 'lsn:lsn_number' }
[ AFTER 'datetime']
| STOPBEFOREMARK = { 'mark_name' | 'lsn:lsn_number' }
[ AFTER 'datetime']
}
The STOPATMARK clause rolls the transaction log forward to the mark and includes the marked transaction. The STOPBEFOREMARK clause rolls the transaction log forward to the mark, but excludes the marked transaction.
Listing 2-30 restores a database to a particular point in time using the BACKUP LOG statement.
LISTING 2-30 Point-in-time recovery with a date/time
RESTORE LOG WideWorldImporters
FROM WideWorldImporters_Log_Backup_Device
WITH FILE=6' RECOVERY'
STOPAT = 'Sep 17' 2016 2:30 AM' ;
Sometimes you do not know precisely when a particular event happened. In this case, you can query the transaction log using undocumented commands and potentially work out when the particular event occurred. The database engine writes all database modifications serially to the transaction log, and timestamps all records using the Log Sequence Number (LSN).
The undocumented [fn_dblog] function can be used to query the database’s transaction log. If you can work out what operation caused the incident, you determine the corresponding LSN. This LSN can be used to restore the transaction log to its point in time.
Consider the following experiment that performs the following high-level steps:
1. Inserts three records into a table.
2. Performs a database backup.
3. Inserts a record into a table.
4. Examines the transaction log’s operations and their LSNs (Figure 2-48 shows the partial output).
![]() Record the last LSN
Record the last LSN

FIGURE 2-48 Differential backup high-level internals
5. Simulates a mistake by updating all the records in the table.
6. Drops the database.
7. Restores the full backup.
8. Restores the log backup stopping at the LSN recorded at Step 4.
9. Confirms the database has been restored to before the mistake was simulated.
Listing 2-31 demonstrates how to restore to a particular LSN.
LISTING 2-31 Restoring a database to a LSN
-- Set up experiment
/* You might have to enable xp_cmdshell by running the following:
EXEC sp_configure 'show advanced'' 1;
RECONFIGURE;
GO
EXEC sp_configure 'xp_cmdshell'' 1;
RECONFIGURE;
GO
*/
USE [master];
EXEC xp_cmdshell 'md C:Exam764Ch2';
GO
-- Create database
CREATE DATABASE [RestoreToLSNExperimentDB]
ON PRIMARY (
NAME = N'RestoreToLSNExperiment_data''
FILENAME = N'C:Exam764Ch2RestoreToLSNExperiment.mdf')
LOG ON (
NAME = N'RestoreToLSNExperiment_log''
FILENAME = N'C:Exam764Ch2RestoreToLSNExperiment.ldf')
GO
USE [RestoreToLSNExperimentDB]
GO
-- Create table
CREATE TABLE [MyTable] (Payload VARCHAR(1000))
GO
-- Step 1: Insert 3 records
INSERT [MyTable] VALUES ('Record 1')' ('Record 2')' ('Record 3')
GO
-- Step 2: Perform full backup
BACKUP DATABASE [RestoreToLSNExperimentDB]
TO DISK = 'C:Exam764Ch2RestoreToLSNExperimentDB_FULL.bak'
WITH INIT;
GO
-- Step 3: Insert 1 record
INSERT [MyTable] VALUES ('Record 4');
GO
SELECT * FROM [MyTable]
-- Step 4: Query the transaction log
SELECT * FROM fn_dblog(NULL'NULL);
-- Record the last LSN: 0x00000025:000000a9:0007
GO
-- Step 5: Accidentally update all 4 records (simulating a mistake)
UPDATE [MyTable] SET Payload = 'MISTAKE'
GO
SELECT * FROM [MyTable]
SELECT * FROM fn_dblog(NULL'NULL);
-- Perform log backup
BACKUP LOG [RestoreToLSNExperimentDB]
TO DISK = 'C:Exam764Ch2RestoreToLSN_LOG.bak'
WITH INIT;
GO
-- Step 6: Drop database
USE master;
DROP DATABASE [RestoreToLSNExperimentDB];
-- Step 7: Restore full backup
RESTORE DATABASE [RestoreToLSNExperimentDB]
FROM DISK = 'C:Exam764Ch2RestoreToLSNExperimentDB_FULL.bak'
WITH NORECOVERY;
-- Step 8: Restore lob backup at LSN recorded above
RESTORE LOG [RestoreToLSNExperimentDB]
FROM DISK = 'C:Exam764Ch2RestoreToLSNExperimentDB_LOG.bak'
WITH RECOVERY' STOPATMARK = 'lsn:0x00000025:000000a9:0007' ;
-- Step 9: Confirm restore doesn't include "mistake"
USE [RestoreToLSNExperimentDB];
SELECT * FROM [MyTable];
-- Cleanup experiment
/*
USE master;
DROP DATABASE [RestoreToLSNExperimentDB];
GO
EXEC xp_cmdshell 'rd /s /q C:Exam764Ch2;
GO
EXEC sp_configure 'xp_cmdshell'' 0;
RECONFIGURE;
GO
EXEC sp_configure 'show advanced'' 0;
RECONFIGURE;
GO
*/
Using the date/time, or LSN as a recovery point can be imprecise because it requires you to know exactly what happened when. If you want to potentially roll back a significant modification, such as an end-of-day process, you might want to take advantage of marked transactions.
A marked transaction is an explicit marker that you can record in the transaction log to effectively create a recovery point.
Marked transactions can also be used to create a consistent recovery point across multiple databases. This is a common requirement for multi-database solutions such as Microsoft BizTalk, Microsoft SharePoint, or Microsoft Team Foundation Server (TFS).
Listing 2-32 shows you how to create a marked transaction.
LISTING 2-32 Create a transaction log mark
USE [WideWorldImporters];
GO
BEGIN TRANSACTION PriceIncrease
WITH MARK 'PriceIncrease';
UPDATE [Warehouse].[StockItems]
SET [RecommendedRetailPrice] = [RecommendedRetailPrice] * 1.25;
COMMIT TRANSACTION PriceIncrease;
GO
You can query the [msdb] database’s [logmarkhistory] to see all marked transactions, as show in Listing 2-33.
LISTING 2-33 Query all marked transactions
SELECT [database_name]' [mark_name]' [description]' [user_name]' [lsn]' [mark_time]
FROM [msdb].[dbo].[logmarkhistory];
Listing 2-34 shows the RESTORE LOG statement that restores the database to the marked transaction created in Listing 2-33.
LISTING 2-34 Restore database to marked transaction
USE [WorldWideImporters];
GO
RESTORE LOG [WideWorldImporters]
FROM DISK = 'B:SQLBackupWideWorldImporters_LOG.bak'
WITH RECOVERY'
STOPATMARK = 'PriceIncrease';
GO
For the exam make sure you understand the use cases for when you would create and use the different marks in the transaction log. Make sure you also understand the difference between the STOPATMARK and STOPBEFOREMARK options and when to use them. So read the exam question carefully to know which one potentially represents the correct answer.
Restore a filegroup
In Skill 2.1 we looked at how you potentially configure VLDBs to use multiple files/filegroups and then design your backup strategy around them. In this section we will look at how you restore such VLDBs, depending on what has failed. Otherwise, there is no need to restore the entire database if only a single file or filegroup is damaged. It is sufficient to restore the file or filegroup and perform log recovery so that it is consistent with the rest of the database.
Separating your database into a number of files or filegroups allows you to reduce your RTO because there is less data to restore in the case of a single file or filegroup being damaged.
If you are restoring a read/write filegroup, perform the following steps:
1. Perform a tail-log backup, if necessary.
2. Restore the filegroup.
3. Restore any different backups, if necessary.
4. Restore the log-chain to bring the filegroup into sync with the rest of the files in the database.
5. Stop at a point in time if necessary.
6. Recover the filegroup and bring it online.
If you are restoring a read-only filegroup, it may be unnecessary to apply the log chain. If the file was marked as read-only after the backup, additional restore operations need to be applied.
All editions of SQL Server support offline file restore. With offline file restore the entire database is unavailable for the duration of the file restore operation.
SQL Server Enterprise Edition supports online file restore. With online file restore only the restoring file group is unavailable until it is restored and recovered.
Use the following syntax to restore a filegroup:
--To Restore Specific Files or Filegroups
RESTORE DATABASE { database_name | @database_name_var }
<file_or_filegroup> [ '...n ]
[ FROM <backup_device> [ '...n ] ]
WITH
{
[ RECOVERY | NORECOVERY ]
[ ' <general_WITH_options> [ '...n ] ]
} [ '...n ]
[;]
Listing 2-35 shows an example of a file restore operation.
LISTING 2-35 Filegroup restore example
USE master;
GO
-- Restore filegroup
RESTORE DATABASE [WordWideImporters]
FILEGROUP = 'WordWideImporters_OrderHistory''
FROM WordWideImporters_Backup_OrderHistory_Device
WITH NORECOVERY'
REPLACE;
GO
-- Restore first log backup
RESTORE LOG [WordWideImporters]
FROM WordWideImporters_Log_Device
WITH FILE = 1' NORECOVERY;
GO
-- Restore second log backup and recover database
RESTORE LOG [WordWideImporters]
FROM WordWideImporters_Log_Device
WITH FILE = 2' RECOVERY;
GO
Develop a plan to automate and test restores
It is important to periodically test your restore strategy. This can be easily automated using PowerShell or T-SQL jobs scheduled through the SQL Server Agent.
You need to test your restore strategy for the following reasons:
![]() To test that your backups are restorable.
To test that your backups are restorable.
![]() To make sure that all stakeholders understand the restore process.
To make sure that all stakeholders understand the restore process.
![]() To time the length that your restore process takes.
To time the length that your restore process takes.
The backup and restore operations’ duration are dependent on the following:
![]() The size of your database
The size of your database
![]() The speed of your database’s storage subsystem
The speed of your database’s storage subsystem
![]() The speed of your backup destination’s storage subsystem
The speed of your backup destination’s storage subsystem
![]() The speed of your network
The speed of your network
![]() The speed and number of processor cores being used
The speed and number of processor cores being used
![]() How compressible the data being backed up is
How compressible the data being backed up is
A restore operation is not necessarily symmetrical with a backup process. In other words, if a full backup takes 200 minutes, it might take 300 minutes to restore that same backup. Do not rely on the backup duration to predict your restore duration.
Important Testing restores
It is important to time the duration of your restore process. Without knowing its duration, you cannot guarantee that you can meet your SLAs. Testing your restores periodically might reveal that you need to change your backup strategy because the existing one cannot meet your SLAs.
Skill 2.3 Manage database integrity
Although rare, it is possible for a database to become corrupted. Database corruption typically occurs as a result of hardware issues, but can also occur due to virtualization technologies. For a database administrator it is always important to identify the root cause of a database corruption to prevent its re-occurrence.
In this skill we will examine how you can identify database corruption before repairing a corrupt database. Microsoft always recommends restoring a database from a last known good backup over database repair techniques. That is why you should ensure that your backups are completing successfully and can be restored. Performing period database consistency checks helps ensure backups can be restored and this skill will show you how to perform these checks.
Implement database consistency checks
It is important to implement database consistency checks as part of your database management strategy. We saw how easy it was to implement that through maintenance plans in the earlier in the “Configure maintenance plan” section. It is critical to detect any database corruptions as early as possible as typically you have to stop users using a corrupt database. Use Database Console Command (DBCC) to perform your database consistency checks.
Note DBCC command
DBCC supports a large number of commands that can be used by the database administrator. This chapter focuses on the DBCC commands that perform consistency checks and repair operations.
The following DBCC commands perform consistency checks on a database:
![]() DBCC CHECKALLOC Checks the consistency of disk space allocation structures with a database.
DBCC CHECKALLOC Checks the consistency of disk space allocation structures with a database.
![]() DBCC CHECKCATALOG Checks the consistency of the system tables with a database.
DBCC CHECKCATALOG Checks the consistency of the system tables with a database.
![]() DBCC CHECKDB Checks the logical and physical integrity of all the objects of a database.
DBCC CHECKDB Checks the logical and physical integrity of all the objects of a database.
![]() DBCC CHECKFILEGROUP Checks the allocation and structural integrity of all tables and indexed views in a filegroup.
DBCC CHECKFILEGROUP Checks the allocation and structural integrity of all tables and indexed views in a filegroup.
![]() DBCC CHECKTABLE Checks the allocation and structural integrity a table.
DBCC CHECKTABLE Checks the allocation and structural integrity a table.
Important In-memory table consistency checks
The DBCC command does not support consistency checks on in-memory tables. DBCC CHECKDB ignores any in-memory tables in the database.
When you perform any of these DBCC commands, the database engine automatically creates a transactionally consistent internal database snapshot. DBCC operates on this database snapshot. The snapshot minimizes false errors and allows DBCC to run as an online operation that prevents blocking and concurrency problems.
Note DBCC TABLOCK option
The DBCC does not create an internal option if you specify the TABLOCK option.
DBCC is not able to create an internal database snapshot and uses table locks in certain situations, including when the database is located on:
![]() A disk formatted using the FAT file system
A disk formatted using the FAT file system
![]() A disk filesystem that does not support named streams, such as ReFS
A disk filesystem that does not support named streams, such as ReFS
![]() A disk filesystem that does not support alternate streams, such as ReFS
A disk filesystem that does not support alternate streams, such as ReFS
Use the DBCC CHECKDB command to implement your database consistency checks. Use the other DBCC CHECK commands when you want to fine-tune your database consistency check, such as in the case when you need to perform them against a VLDB.
The DBCC CHECKDB command has the following syntax.
DBCC CHECKDB
[ ( database_name | database_id | 0
[ ' NOINDEX
| ' { REPAIR_ALLOW_DATA_LOSS | REPAIR_FAST | REPAIR_REBUILD } ]
) ]
[ WITH
{
[ ALL_ERRORMSGS ]
[ ' EXTENDED_LOGICAL_CHECKS ]
[ ' NO_INFOMSGS ]
[ ' TABLOCK ]
[ ' ESTIMATEONLY ]
[ ' { PHYSICAL_ONLY | DATA_PURITY } ]
[ ' MAXDOP = number_of_processors ]
}
]
]
The DBCC CHECKDB operation performs the following operations:
![]() DBCC CHECKALLOC
DBCC CHECKALLOC
![]() DBCC CHECKTABLE on every table within a database
DBCC CHECKTABLE on every table within a database
![]() DBCC CHECKCATALOG
DBCC CHECKCATALOG
![]() Performs a consistency check on all indexed views within a database
Performs a consistency check on all indexed views within a database
![]() Performs a consistency check on FILESTREAM data within a database
Performs a consistency check on FILESTREAM data within a database
![]() Performs a consistency check on the Service Broker data within a database
Performs a consistency check on the Service Broker data within a database
DBCC CHECKDB supports a number of different options:
![]() DATA_PURITY This option specifies that column values should be checked to ensure that they are valid for the domain and not out of range.
DATA_PURITY This option specifies that column values should be checked to ensure that they are valid for the domain and not out of range.
![]() ESTIMATEONLY This option causes DBCC not to perform any checks, but to estimate how much [tempdb] space is consumed instead.
ESTIMATEONLY This option causes DBCC not to perform any checks, but to estimate how much [tempdb] space is consumed instead.
![]() NO_INFOMSGS This option specifies that no information messages are reported. DBCC only reports errors.
NO_INFOMSGS This option specifies that no information messages are reported. DBCC only reports errors.
![]() NOINDEX This option specifies that comprehensive checks should not be performed on nonclustered indexes.
NOINDEX This option specifies that comprehensive checks should not be performed on nonclustered indexes.
![]() PHYSICAL_ONLY This option limits DBCC to checking the allocation consistency, physical structure of the pages, and record headers. It detects checksum and torn pages errors, which are typically indicative of a hardware problem with your memory or storage subsystem.
PHYSICAL_ONLY This option limits DBCC to checking the allocation consistency, physical structure of the pages, and record headers. It detects checksum and torn pages errors, which are typically indicative of a hardware problem with your memory or storage subsystem.
![]() TABLOCK This option specifies that the internal database snapshot should not be taken and that table lock be used instead. This can improve performance in certain cases. Use the TABLOCK when you know there is no user activity. The TABLOCK option causes the DBCC CHECKCATALOG and Service Broker checks not to run.
TABLOCK This option specifies that the internal database snapshot should not be taken and that table lock be used instead. This can improve performance in certain cases. Use the TABLOCK when you know there is no user activity. The TABLOCK option causes the DBCC CHECKCATALOG and Service Broker checks not to run.
![]() MAXDOP This option controls the degree of parallelism that the DBCC operation uses. The DBCC operation typically dynamically adjusts the degree of parallelism during its execution.
MAXDOP This option controls the degree of parallelism that the DBCC operation uses. The DBCC operation typically dynamically adjusts the degree of parallelism during its execution.
Important Page verification
To ensure database consistency and allow DBCC to comprehensively check your database, ensure that you have page verification set to checksum. Page checksums are only generated when a database page is written.
A complete DBCC CHECKDB operation can take a substantial period of time on a large database in later versions of SQL Server. Microsoft has introduced more comprehensive logical checks; internal database structures are more complex and there is more functionality in the database engine.
Use the following techniques to reduce the overall time that DBCC takes:
![]() Use the NOINDEX option to direct the database engine to skip checking nonclustered indexes for user tables. This can substantially reduce the time taken in data warehouse use cases, where there might be a substantial number of nonclustered indexes. If a nonclustered index becomes corrupt you can drop and re-create it.
Use the NOINDEX option to direct the database engine to skip checking nonclustered indexes for user tables. This can substantially reduce the time taken in data warehouse use cases, where there might be a substantial number of nonclustered indexes. If a nonclustered index becomes corrupt you can drop and re-create it.
![]() Use the PHYSICAL_ONLY option to direct the database engine to skip all logical checks. This can substantially reduce the take that DBCC CHECKDB takes. It is the goal of Microsoft to make DBCC CHECKDB WITH PHYSICAL ONLY to run as quickly as a BACKUP to a nul device operation. In this instance the duration of the DBCC operation is totally dependent on your storage subsystem’s performance.
Use the PHYSICAL_ONLY option to direct the database engine to skip all logical checks. This can substantially reduce the take that DBCC CHECKDB takes. It is the goal of Microsoft to make DBCC CHECKDB WITH PHYSICAL ONLY to run as quickly as a BACKUP to a nul device operation. In this instance the duration of the DBCC operation is totally dependent on your storage subsystem’s performance.
![]() Take advantage of DBCC CHECKFILEGROUP to check a subset of the database’s filegroups. Rotate these operations between all the filegroups in your database to ensure that there are no database consistency problems. Consider not running consistency checks against read-only filegroups that are consistent.
Take advantage of DBCC CHECKFILEGROUP to check a subset of the database’s filegroups. Rotate these operations between all the filegroups in your database to ensure that there are no database consistency problems. Consider not running consistency checks against read-only filegroups that are consistent.
![]() Take advantage of DBCC CHECKTABLE and rotate the consistency checks across all the tables in the database across successive nights, similarly to DBCC CHECKFILEGROUP.
Take advantage of DBCC CHECKTABLE and rotate the consistency checks across all the tables in the database across successive nights, similarly to DBCC CHECKFILEGROUP.
Important DBCC CHECKDB WITH PHYSICAL_ONLY
If you take advantage of DBCC CHECDB WITH PHYSICAL_ONLY as a means of reducing the overall time taken by the DBCC operation, you should still periodically run a full DBCC CHECKDB operation to ensure that there are no consistency problems.
In the exam you might get asked a question on how to reduce the time taken by DBCC CHECKDB to complete for a VLDB in a given scenario. Use the guidance in the above bullet points to help you in the exam.
Be aware that DBCC is not linear in its execution. If, at any point in time the DBCC operation detects a potential corruption, it triggers extra checks that perform a deeper analysis and consistency check of the database.
Use the T-SQL query in Listing 2-36 to show the progress of a running DBCC operation.
LISTING 2-36 DBCC operation progress
SELECT session_id' db_name(database_id) as database_name'
start_time' command' percent_complete' estimated_completion_time
FROM sys.dm_exec_requests
WHERE command LIKE 'dbcc%';
Listing 2-37 shows an example of a database consistency check that includes the extended logical checks, uses a table lock, and does not generate information messages:
LISTING 2-37 DBCC consistency check
DBCC CHECKDB ([AdventureWorksDW])
WITH EXTENDED_LOGICAL_CHECKS' TABLOCK' NO_INFOMSGS;
GO
Use SQL Server Agent or maintenance plans to schedule period database consistency checks. Keep track of how long the consistency checks take and whether they are increasing in duration as you might have to optimize their execution time using some of the techniques discussed in this section.
Although you might have schedule database integrity checks you might still experience a database corruption. It is important to identify and diagnose the database corruption before attempting recovery. We will look at how you do these next.
Identify database corruption
Scheduling regular database consistency checks through SQL Server Agent jobs or maintenance plans helps identify database corruption. Otherwise user applications potentially will receive a database corruption message if they try to access a corrupt portion of the database.
The database engine automatically logs database consistency errors in certain places:
![]() The database engine’s ERRORLOG captures any DBCC CHECK operations. Additional information is written in the event of a database corruption.
The database engine’s ERRORLOG captures any DBCC CHECK operations. Additional information is written in the event of a database corruption.
![]() The Windows Application Log should also capture the same DBCC error.
The Windows Application Log should also capture the same DBCC error.
![]() The [msdb] system database also tracks suspect pages in the [suspect_pages] table. The database engine records any suspect pages encountered during operations such as:
The [msdb] system database also tracks suspect pages in the [suspect_pages] table. The database engine records any suspect pages encountered during operations such as:
![]() A query reading a page.
A query reading a page.
![]() A DBCC CHECKDB operation.
A DBCC CHECKDB operation.
![]() A backup operation.
A backup operation.
![]() The database engine creates a dump file in the LOG directory whenever a DBCC CHECKDB detects a consistency problem. The dump file uses the SQLDUMPnnnn.txt naming convention. The dump file contains the results of the DBCC CHECKDB operation and additional diagnostic output. This dump file is automatically sent to Microsoft via the Feature Usage data collection and Error Reporting feature of SQL Server.
The database engine creates a dump file in the LOG directory whenever a DBCC CHECKDB detects a consistency problem. The dump file uses the SQLDUMPnnnn.txt naming convention. The dump file contains the results of the DBCC CHECKDB operation and additional diagnostic output. This dump file is automatically sent to Microsoft via the Feature Usage data collection and Error Reporting feature of SQL Server.
You should periodically check these repositories so that you can identify any database corruption as soon as possible. This can be automated through SQL Server Agent jobs or external programs.
You should also schedule SQL Server Agent alerts on the following error messages:
![]() 823 This error message is generated whenever the Windows environment issues a cyclic redundancy check. It represents a disk error. It typically indicates that there is a problem with the storage subsystem, hardware, or driver that is in the I/O path.
823 This error message is generated whenever the Windows environment issues a cyclic redundancy check. It represents a disk error. It typically indicates that there is a problem with the storage subsystem, hardware, or driver that is in the I/O path.
![]() 824 This error message is generated when a logical consistency check fails after reading or writing a database page. It also typically indicates that there is a problem with the storage subsystem, hardware, or driver that is in the I/O path.
824 This error message is generated when a logical consistency check fails after reading or writing a database page. It also typically indicates that there is a problem with the storage subsystem, hardware, or driver that is in the I/O path.
![]() 825 This error message is called the Read Retry error and is generated whenever the database engine has had to retry a read or write operation. The database engine retries the I/O operation up to four times before failing it.
825 This error message is called the Read Retry error and is generated whenever the database engine has had to retry a read or write operation. The database engine retries the I/O operation up to four times before failing it.
![]() 832 This error message is generated when a page in memory has been corrupted. In other words, the checksum has changed since it was read from disk into memory. It is a rare error. It possibly indicates bad memory.
832 This error message is generated when a page in memory has been corrupted. In other words, the checksum has changed since it was read from disk into memory. It is a rare error. It possibly indicates bad memory.
Table 2-3 shows the different error messages for these four different 8xx errors:
TABLE 2-3 SQL Server I/O Errors
Error Number |
Message |
823 |
The operating system returned error %ls to SQL Server during a %S_MSG at offset %#016I64x in file ‘%ls’. Additional messages in the SQL Server error log and system event log may provide more detail. This is a severe system-level error condition that threatens database integrity and must be corrected immediately. Complete a full database consistency check (DBCC CHECKDB). This error can be caused by many factors; for more information see SQL Server Books Online. |
824 |
SQL Server detected a logical consistency-based I/O error: %ls. It occurred during a %S_MSG of page %S_PGID in database ID %d at offset %#016I64x in file ‘%ls’. Additional messages in the SQL Server error log or system event log may provide more detail. This is a severe error condition that threatens database integrity and must be corrected immediately. Complete a full database consistency check (DBCC CHECKDB). This error can be caused by many factors; for more information, see SQL Server Books Online. |
825 |
A read of the file ‘%ls’ at offset %#016I64x succeeded after failing %d time(s) with error: %ls. Additional messages in the SQL Server error log and system event log may provide more detail. This error condition threatens database integrity and must be corrected. Complete a full database consistency check (DBCC CHECKDB). This error can be caused by many factors; for more information, see SQL Server Books Online. |
832 |
A page that should have been constant has changed (expected checksum: %08x, actual checksum: %08x, database %d, file ‘%ls’, page %S_PGID). This usually indicates a memory failure or other hardware or operating system corruption. |
Make sure you remember what these error numbers mean for the exam It is expected that a database administrator should remember these error numbers, along with 9002 (transaction log full) and 1105 (database full).
Important Root cause analysis
It is important and critical to perform a root cause analysis on why your database has been corrupted. Without understanding what has caused the database corruption, you risk it occurring again, with potentially greater damage. Database corruption could be indicative of impeding hardware failure.
Once you have identified a database corruption incident you need to take corrective action. We will examine the options you have with recovering from database corruption next.
Recover from database corruption
When a DBCC operation runs and detects any corruption it describes the corruptions encountered and recommends a course of action and the minimum level of repair that is required. In subsequent versions of SQL Server Microsoft have attempted to make it easier to identify and dealt with database corruption. The output of the DBCC CHECKDB command tries to be as explicitly clear as it can be.
Figure 2-49 shows an example of a database corruption. Notice how the DBCC CHECKDB recommends the minimum repair commands that are required to fix the errors encountered.

FIGURE 2-49 Backup example timeline
The first step in dealing with a database corruption incident is to obtain as much information as possible about what has been corrupted, before planning a course of action.
Use the OBJECT_NAME system function to identify the database object that has been corrupted. An Index ID value of 0 represents a heap. An Index ID value of 1 represents a clustered index. An index value greater than 1 represents a nonclustered index.
If the database corruption is contained to a nonclustered index, you may choose to simply drop and rebuild the nonclustered index.
Otherwise, Microsoft recommends that you should restore the database from a backup instead of performing a repair with one of the repair options. The repair options do not consider any constraints that may exist between the tables when performing their repair operations.
Important DBCC repair operations
The primary purpose of DBCC’s repair operations is to get a corrupted database into a non-corrupted state, not to protect your data. If that means DBCC has to get rid of your data, it does so. That is why Microsoft recommends that in the case of a database corruption your primary corruption recovery path should be to restore the database from the last good backup.
Real World DBCC CHECKCONSTRAINTS
Perform a DBCC CHECKCONSTRAINTS operation on any table that was repaired by the DBCC repair process. DBCC CHECKCONSTRAINTS checks the integrity of a specified constraint or all constraints on a specified table.
In some circumstances, and especially for databases that have been upgrade from an earlier version of SQL Server, the values stored in a column might not be valid for that column. Execute the DBCC CHECKDB with the DATA_PURITY option on all the databases that have been upgrade from an earlier version of SQL Server. This only ever needs to be performed once per database. Any detected errors have to be updated manually because the database engine cannot know what the valid value should be.
Most DBCC repair operations are fully logged in the transaction. Consequently, it is recommended that you perform repairs in a transaction by using the BEGIN TRAN statement. If a repair is completed successfully, you can commit this repair transaction.
Consider backing up your corrupt database at the database or file level before attempting any repair operations. You can use the backup to attempt a repair on another SQL Server instance.
Set the corrupted database to single user mode before performing any repair operations. You don’t want users accessing a database that has corrupt data. Nor do you want them interfering with your repair attempts.
The REPAIR_REBUILD repair operation is generally considered safe to use. The REPAIR_REBUILD repair process guarantees that there is no possibility of data loss. The REPAIR_REBUILD repair typically involves small repairs, such as repairing missing rows in a nonclustered index, or more time consuming operation such as rebuilding an entire nonclustered index on a table.
Important In-memory table consistency checks
The DBCC repair commands are not available for memory-optimized tables. Consequently, it is important to regularly perform backups and test your backups. Consider keeping your backups for a longer retention period if you are not testing your backups regularly. If a memory-optimized table experiences corruption, you must restore from the last good backup.
Listing 2-38 shows an example of how to set a database to single user mode.
LISTING 2-38 Repairing a database using the REPAIR_REBUILD operation
USE [master];
-- Change database to single user mode
ALTER DATABASE [WideWorldImporters] SET SINGLE_USER WITH ROLLBACK IMMEDIATE;
GO
-- Perform safe repair
DBCC CHECKDB ([WideWorldImporters]) WITH REPAIR_REBUILD;
GO
The DBCC command can fail during its operation, in which case it generates an error message. The state value of the error message helps you to troubleshoot what went wrong. Use Table 2-4 to troubleshoot any DBCC execution errors.
TABLE 2-4 DBCC error states
State |
DESCRIPTION |
0 |
Error number 8930 was raised. This indicates a corruption in metadata that terminated the DBCC command. |
1 |
Error number 8967 was raised. There was an internal DBCC error. |
2 |
A failure occurred during emergency mode database repair. |
3 |
This indicates a corruption in metadata that terminated the DBCC command. |
4 |
An assert or access violation was detected. |
5 |
An unknown error occurred that terminated the DBCC command. |
Perform an emergency repair
Perform an emergency repair using the REPAIR_ALLOW_DATA_LOSS option as an absolute last resort when you need to recover from a database corruption incident. Somebody has “goofed up” if you find yourself in this situation. Hopefully it was not you!
The goal of the REPAIR_ALLOW_DATA_LOSS option is to get the database into a transactionally consistent state. A REPAIR_ALLOW_DATA_LOSS repair most likely results in a loss of data. Compare the amount of data lost by using this emergency repair method versus how much data would be lost if you restored the database through your backups, which might be out of date, corrupt, or lost.
The emergency repair process cannot be rolled back. It is a one-way operation.
Important File level backup
Before performing a repair with the REPAIR_ALLOW_DATA_LOSS, it is highly recommended that you perform a file level backup of a database. Or even at the virtual machine level if you using a virtualized environment. Do not forget to include all files associated with the database, including any containers that are being used by FILESTREAM, full text indexes, and memory-optimized tables.
The REPAIR_ALLOW_DATA_LOSS repair operation differs in that it can use database pages that have been marked as inaccessible because of I/O or checksum errors. It performs the following operations:
![]() Forces recovery to run on the transaction log to salvage as much information as possible.
Forces recovery to run on the transaction log to salvage as much information as possible.
![]() Rebuilds the transaction log if it is corrupt. At this stage, you have lost your full ACID guarantee.
Rebuilds the transaction log if it is corrupt. At this stage, you have lost your full ACID guarantee.
![]() Runs DBCC CHECKDB with the REPAIR_ALLOW_DATA_LOSS option on the database.
Runs DBCC CHECKDB with the REPAIR_ALLOW_DATA_LOSS option on the database.
![]() If the DBCC CHECDB operation succeeds, set the database state to online.
If the DBCC CHECDB operation succeeds, set the database state to online.
The recovered database is now in a consistent state, but there is no guarantee of any data consistency.
If the emergency repair process fails, the database cannot be repaired by DBCC.
Important DBCC cannot repair all errors
There is no guarantee that DBCC is able to fix all errors. In some cases, critical sections of a database have been corrupted, preventing DBCC from repairing the database. In other cases the repair logic would be too complicated, or the chance of a specific error is so rare that Microsoft has not implemented the repair logic in DBCC.
Listing 2-39 shows an example of an emergency repair process performed on a database.
LISTING 2-39 Repairing a database using the REPAIR_ALLOW_DATA_LOSS operation
USE [master];
GO
ALTER DATABASE [WideWorldImporters] SET EMERGENCY;
GO
ALTER DATABASE [WideWorldImporters] SET SINGLE_USER;
GO
DBCC CHECKDB ('WideWorldImporters'' REPAIR_ALLOW_DATA_LOSS)
WITH NO_INFOMSGS;
GO
For any database corruption questions in the exam make sure you first determine what database object has been corrupted. There might be no need to initiate a restore or perform an emergency database repair. If, for example, the corruption is on a nonclustered index, or an indexed view, it will be sufficient to simply drop and recreate the corrupted object.
Thought experiment
In this thought experiment, demonstrate your skills and knowledge of the topics covered in this chapter. You can find answers to this thought experiment in the next section.
You work as a database administrator for World Wide Importers. You need to design a backup strategy for their mission critical 4TB database that is used as an online store. The SQL Server instance is using a SAN that can read/write 1,000MB/sec.
The database structure is as follows:
![]() The primary data file is 1GB in size and does not contain any data.
The primary data file is 1GB in size and does not contain any data.
![]() The [AuditHistory] table is 1.5TB in size and located on its own [FG_Audit] read-only filegroup.
The [AuditHistory] table is 1.5TB in size and located on its own [FG_Audit] read-only filegroup.
![]() The [OrderHistory] table is 1.5TB in size and located on its own [FG_OrderHistory] read-only filegroup.
The [OrderHistory] table is 1.5TB in size and located on its own [FG_OrderHistory] read-only filegroup.
![]() The default [FG_Data] filegroup contains the rest of the tables used by the online store.
The default [FG_Data] filegroup contains the rest of the tables used by the online store.
The database has the following characteristics:
![]() The [AuditHistory] and [OrderHistory] tables are updated at the end of the month when a process runs that moves the oldest month’s worth of audit, and orders data into these tables.
The [AuditHistory] and [OrderHistory] tables are updated at the end of the month when a process runs that moves the oldest month’s worth of audit, and orders data into these tables.
![]() The online store website predominantly inserts new records.
The online store website predominantly inserts new records.
![]() Page verify = NONE.
Page verify = NONE.
You are responsible for designing their backup strategy. Management has given you the following requirements:
![]() The RPO is 15 minutes for the tables used by the online website.
The RPO is 15 minutes for the tables used by the online website.
![]() The RTO is one hour.
The RTO is one hour.
![]() The backup storage usage should be minimized.
The backup storage usage should be minimized.
![]() The backup set needs to be retained for 18 months.
The backup set needs to be retained for 18 months.
An important end-of-week business process runs on Saturday at 17:00 that takes five hours to complete. This process initially commits a marked transaction. It then updates a substantial amount of data into the database. A database snapshot is performed before the process starts.
1. Management wants you to create a backup strategy that meets their requirements. What backup strategy should you use?
A. Use the following backup strategy:
![]() Perform a full backup every Sunday.
Perform a full backup every Sunday.
![]() Perform differential backups nightly.
Perform differential backups nightly.
![]() Perform log backups every hour.
Perform log backups every hour.
B. Use the following backup strategy:
![]() Perform a file backup of the primary filegroup daily.
Perform a file backup of the primary filegroup daily.
![]() Perform a file backup of the [FG_Data] filegroup daily.
Perform a file backup of the [FG_Data] filegroup daily.
![]() Perform file backup of the [AuditHistory] and [FG_OrderHistory] at the end of the month after they are updated.
Perform file backup of the [AuditHistory] and [FG_OrderHistory] at the end of the month after they are updated.
![]() Perform log backups every 15 minutes.
Perform log backups every 15 minutes.
C. Use the following backup strategy:
![]() Perform a filegroup backup of the primary filegroup daily.
Perform a filegroup backup of the primary filegroup daily.
![]() Perform a filegroup backup of the [FG_Data] filegroup daily.
Perform a filegroup backup of the [FG_Data] filegroup daily.
![]() Perform filegroup backup of the [AuditHistory] and [FG_OrderHistory] filegroups at the end of the month after they are updated.
Perform filegroup backup of the [AuditHistory] and [FG_OrderHistory] filegroups at the end of the month after they are updated.
![]() Perform differential backups every 15 minutes.
Perform differential backups every 15 minutes.
D. Use the following backup strategy:
![]() Perform a file backup of the primary filegroup daily.
Perform a file backup of the primary filegroup daily.
![]() Perform a file backup of the [FG_Data] filegroup daily.
Perform a file backup of the [FG_Data] filegroup daily.
![]() Perform file backup of the [AuditHistory] and [FG_OrderHistory] filegroups daily.
Perform file backup of the [AuditHistory] and [FG_OrderHistory] filegroups daily.
![]() Perform log backups every 15 minutes.
Perform log backups every 15 minutes.
2. Management discovers that Saturday’s process crashed and wants you to recovery the database to 17:00, before the process ran. Upon further investigation, you discover that the process crashed because the disk that stored the [FG_Data] filegroup failed at 17:15. Management wants you to restore the database as soon as possible. What recovery strategy should you use?
A. Revert the database using the database snapshot
B. Use the DBCC REPAIR_REBUILD command to repair the damaged portions of the database.
C. Initiate a restore process from your backup set. Use the STOPAT restore option to stop at 17:00 on Saturday
D. Discover the damaged pages. Perform a page recovery process
3. A scheduled DBCC CHECKDB on the database generates the following error:
Msg 8978, Level 16, State 1, Line 1
Table error: Object ID 6341281, index ID 5, partition ID 54039787910657209, alloc
unit ID 92740571204375891 (type In-row data). Page (1:3126) is missing a reference
from previous page (1:3972). Possible chain linkage problem.
Msg 8939, Level 16, State 98, Line 1
Table error: Object ID 6341281, index ID 5, partition ID 54039787910657209, alloc
unit ID 92740571204375891 (type In-row data), page (1:3256). Test (IS_OFF (BUF_
IOERR, pBUF->bstat)) failed. Values are 25611328 and -69.
Msg 8976, Level 16, State 1, Line 1
Table error: Object ID 6341281, index ID 5, partition ID 54039787910657209, alloc
unit ID 92740571204375891 (type In-row data). Page (1:3972) was not seen in the
scan although its parent (1:16777) and previous (1:5612) refer to it. Check any
previous errors.
Management wants you to repair the database corruption as quickly as possible. What database corruption recovery technique should you perform?
A. Perform an emergency repair after setting the database to single user mode.
B. Perform a tail-log backup. Restore the last full, differential backups. Restore the log chain including the tail-log.
C. Restore the last full, differential backups. Restore the log chain and stop at the time of when the DBCC CHECKDB ran.
D. Rebuild the damaged nonclustered index.
Thought experiment answers
This section contains the solution to the thought experiment. Each answer explains why the answer choice is correct.
1. Correct answer: B
A. Incorrect: You cannot meet your RPO with hourly log backups.
B. Correct: The RTO requirements are met with log backups every 15 minutes. Backup storage usage is minimized with month backups of the [AuditHistory] and [FG_OrderHistory] filegroups.
C. Incorrect: You cannot meet your RTO by performing differential backups every 15 minutes.
D. Incorrect: You cannot meet the requirement to minimize the backup storage usage by backing up the [AuditHistory] and [FG_OrderHistory] filegroups daily.
2. Correct answer: C
A. Incorrect: You cannot revert a database where the underlying files have been lost.
B. Incorrect: DBCC cannot repair database files that have been lost.
C. Correct: A restore process with the STOPAT option recovers the database to Saturday at 17:00.
D. Incorrect: Page recovery cannot be performed because the database file has been lost. Furthermore, the database does not have checksums on the pages so it cannot detect corruption.
3. Correct answer: D
A. Incorrect: An emergency repair is not required. It is considered a last resort, plus it will take the database offline.
B. Incorrect: Restoring a database does not recover the database in the shortest period of time.
C. Incorrect: Restoring a database does not recover the database in the shortest period of time.
D. Correct: An index ID of 5 indicates a nonclustered index was damaged.
Chapter summary
![]() The full recovery model captures all the modifications made to a database in its transaction log.
The full recovery model captures all the modifications made to a database in its transaction log.
![]() The simple recovery model automatically truncates the database’s transaction log when the transaction log records are no longer required for recovery purposes.
The simple recovery model automatically truncates the database’s transaction log when the transaction log records are no longer required for recovery purposes.
![]() The bulk-logged recovery model optimizes bulk modification in the database by only recording the extents that had been modified by the bulk operation.
The bulk-logged recovery model optimizes bulk modification in the database by only recording the extents that had been modified by the bulk operation.
![]() A full backup operation backup backs up the entire database.
A full backup operation backup backs up the entire database.
![]() A differential backup operation backs up the extents that have been modified since the last full backup.
A differential backup operation backs up the extents that have been modified since the last full backup.
![]() A log backup operation backs up the transaction log, and then truncates it.
A log backup operation backs up the transaction log, and then truncates it.
![]() A full backup is required before you can perform log backups.
A full backup is required before you can perform log backups.
![]() When switching from the full recovery model to the bulk-logged recovery model, and then back to the full recovery model, perform a log (or differential) backup to maintain your log chain.
When switching from the full recovery model to the bulk-logged recovery model, and then back to the full recovery model, perform a log (or differential) backup to maintain your log chain.
![]() The NORECOVERY restore option allows further backups to be restored and keeps the database unavailable.
The NORECOVERY restore option allows further backups to be restored and keeps the database unavailable.
![]() The RECOVERY performs recovery on the database, rolling back all uncommitted transactions and makes the database available.
The RECOVERY performs recovery on the database, rolling back all uncommitted transactions and makes the database available.
![]() Use the DBCC command to periodically check a database’s consistency checks.
Use the DBCC command to periodically check a database’s consistency checks.
![]() Microsoft recommends restoring backups as a primary means of recovering from a database corruption.
Microsoft recommends restoring backups as a primary means of recovering from a database corruption.
![]() The DBCC repair operation with the REPAIR_REBUILD option does not lose any data within the database.
The DBCC repair operation with the REPAIR_REBUILD option does not lose any data within the database.
![]() The DBCC repair operation with the REPAIR_ALLOW_DATA_LOSS option results in data loss.
The DBCC repair operation with the REPAIR_ALLOW_DATA_LOSS option results in data loss.
![]() Use the emergency repair mode as an absolutely last resort to recover from database corruption.
Use the emergency repair mode as an absolutely last resort to recover from database corruption.