
Chapter 1. Manage Azure subscriptions and resources
An Azure subscription, which forms the core of an Azure environment, is a foundational component of every Azure implementation. Every resource that you create in Azure resides in an Azure subscription, which is a billing boundary for Azure resources with per-resource role-based access controls.
Important Have you read page xix?
It contains valuable information regarding the skills you need to pass the exam.
In this chapter, you will learn how to manage Azure subscriptions. This includes how to:
Assign permissions to Azure resources
Govern cost through quotas and resource tags
Configure Azure policy to ensure your Azure environment is governed in an effective way while maintaining the agility of the cloud
You will also learn how to analyze consumption and resource utilization within your
subscriptions. This includes how to:
View metrics for your Azure resources through Azure Monitor and create alerts based on metrics and logs
Monitor and report on resource spend
Perform deep analysis with Azure Log Analytics
Finally, you will learn how to manage Azure resource groups. This includes how to:
Apply governance to Azure resource groups and their child resources through Azure policy
Create and manage resource locks
Manage the lifecycle of the resources that reside in resource groups
By understanding the controls that are available in Azure for subscription and resource management, you enable your organization for success across your Azure estate.
Skills covered in this chapter:
Skill 1.1: Manage Azure Subscriptions
Azure subscriptions have controls available that govern access to the resources within a subscription, govern cost through quotas and tagging, and govern the resources that are allowed in an environment with Azure policy.
A subscription is a logical unit of Azure services linked to an Azure account, which is an identity in Azure Active Directory (Azure AD). Azure AD is an identity provider for Azure and provides authentication to resources in an Azure subscription. The resources themselves then have role-based access controls applied to them which provide authorization to the resources. (see Figure 1-1).
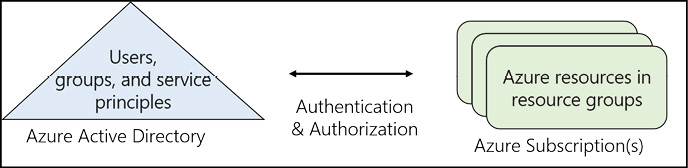
Figure 1-1 Azure AD and Azure Subscription relationship
There are multiple ways to obtain an Azure subscription, and a wide range of subscription types (or offers). Some of the cost common types include:
Free trial
Pay-As-You-Go/Web Direct
Visual Studio/MSDN subscriptions
Microsoft Resellers
Cloud Solution Provider
Microsoft Open Licensing
Enterprise Agreements
The capabilities of each subscription are similar, in that each subscription type allows you to create and manage resources. Some subscription types have restrictions on supported resource types and locations. For example, Visual Studio subscriptions typically do not have a credit card associated with them, which prevents you from purchasing services from the Azure Marketplace, such as network virtual appliances. Visual Studio subscriptions for Azure only have access to a limited number of Azure regions. The regional restrictions for each offer can be viewed at https://azure.microsoft.com/regions/offers/.
This section covers how to:
Assigning administrator permissions
Azure has many different roles for managing access to Azure resources. These include classic subscription administrative roles like Account Administrator, Service Administrator, or Co-Administrator, as well as Azure role-based access controls (RBAC) that are available in Azure Resource Manager (ARM). When managing access to Azure subscriptions and resources, it is recommended to use Azure RBAC roles whenever possible.
Classic subscription administrators have full access to an Azure subscription. They can manage resources through the Azure Portal, Resource Manager APIs (including through PowerShell and the CLI), and the classic deployment model APIs. By default, the account that is used to sign up for an Azure subscription is automatically set as both the Account Administrator and the Service Administrator. Once the subscription has been created, more Co-administrators can be added. Users assigned the Service Administrator and Co-administrator roles have the same access as a user who is assigned the Azure RBAC Owner role at the subscription scope (see Table 1-1).
Table 1-1 Azure subscription administrative roles
| Administrative Role | Limit | Summary |
| Account Administrator | 1 per Azure account | Authorized to access the Account Center (create subscriptions, cancel subscriptions, change billing for a subscription, change Service Administrator, and more). |
| Service Administrator | 1 per Azure subscription | Authorized to access the Azure Management Portal for all subscriptions in the account. By default, it’s the same as the Account Administrator when a subscription is created. |
| Co-administrator | 200 per subscription | Same as the Service Administrator but cannot change the association of subscriptions to Azure directories. |
In the Azure Portal, you can view the current assignments for the Account Administrator and Service Administrator roles by browsing to a subscription in the Azure Portal and selecting the Properties blade as seen in Figure 1-2.
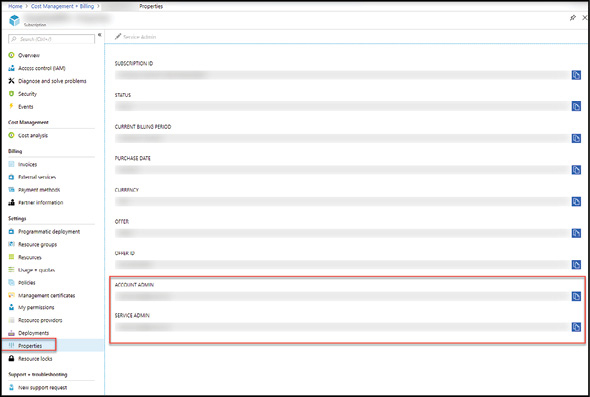
Figure 1-2 Azure subscription properties
Azure RBAC roles can also be used to grant rights to principals, including user and service principals. A user principal is an identity that is associated with a user, or a group of users. An example is a developer who is granted direct access to manage their web application. A service principal is an identity that exists in Azure AD that is associated with an application. Service principals allow applications in Azure AD to interact with Azure resources just a like a user principal. This can be beneficial when you have resources or applications that need to manage other resources in Azure. For example, an Azure Kubernetes Service (AKS) cluster needs to manage a load balancer and a VM scale set. The use of a service principal allows the cluster to manage the resources directly.
Azure RBAC roles are more flexible than classic administrator roles and allow for more fine-grained access management. Azure RBAC has more than 70 built-in roles, but there are four foundational roles, as shown in Table 1-2.
Table 1-2 Azure RBAC roles
| Azure RBAC role | Permissions | Notes |
| Owner |
|
|
| Contributor |
|
|
| Reader |
|
|
| User Access Administrator |
|
The Owner, Contributor, Reader, and User Access Administrator roles can be applied to all resource types. The other 70+ roles allow the management of specific Azure resources. It is also important to know that only the Azure Portal and the ARM APIs support Azure RBAC. User, groups, or service principals assigned to Azure RBAC roles cannot use the classic deployment APIs when only assigned to an Azure RBAC role as RBAC roles only exist in Azure Resource Manager. For example, to grant a user access to your subscription in the Classic deployment model, you would need to add that user as a Co-administrator, granting them rights to everything in the subscription.
When applying RBAC to Azure resources, access is applied (or granted) to a scope. Valid scopes include subscription, resource group, or a resource. RBAC in Azure is inherited from a parent resource. This means that if a principal is granted Contributor rights to a resource group, that principal would have Contributor rights on all of the child resources automatically.
To add a new administrator to an Azure subscription using Azure RBAC, browse to the Subscriptions blade in the Azure Portal
(https://portal.azure.com/#blade/Microsoft_Azure_Billing/SubscriptionsBlade) and select the subscription that you want to grant access to. Open the Access Control (IAM) blade and click Add Role Assignment. Select the Owner role in the Role box and in the Select box type the user name or identifier for the target user, group, or service principal. When complete, click Save. An example is shown in Figure 1-3.

Figure 1-3 Add an Azure subscription Owner
If required, you can also grant Co-Administrator rights for the classic deployment model after adding an account as an Owner.
![]() Exam Tip
Exam Tip
You would only make another user a Co-administrator of an Azure subscription if the needed to manage Classic resources. If all the resources you deploy are in the Resource Manager model, RBAC should be used to grant access to the appropriate scope.
Note that only accounts with Azure RBAC Owner rights can be granted Co-Administrator permissions. Users with the Contributor or Reader roles cannot be added as Co-Administrators to an Azure subscription.
To add a user as a Co-administrator, browse to the Access Control (IAM) blade of an Azure subscription. Click +Add and then Add co-administrator as shown in Figure 1-4.
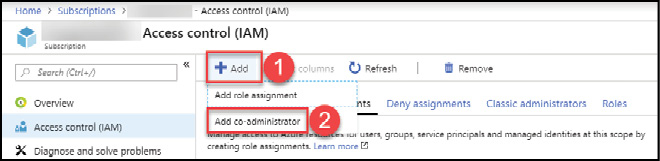
Figure 1-4 Add an Azure subscription Co-Administrator
In the blade that opens, select a user from the directory and click Add.
Management Groups can also be used to apply Azure RBAC to a subscription. Management Groups allow you to apply governance consistently across subscriptions, including the application of common RBAC controls and the application of Azure policy, as discussed later in this chapter.
Management groups allow subscriptions to be organized in a multi-level hierarchy, providing a number of tangible benefits:
Reduced overhead No need to apply governance on every subscription.
Enforcement Company admins can apply governance at the Management Group level, outside the control of the subscription admin and the controls implemented at the management group can be applied to both existing and new subscriptions. This eliminates inconsistencies in the application of governance as the same controls are applied the same way to the desired subscriptions.
Reporting The Standard tier SKU for Azure Policy provides reports of compliance; with Management Groups that reporting can span multiple/all subscriptions in an organization.
Management Groups form a hierarchy that is up to six levels deep, excluding the root and subscription levels. Each group has exactly one parent group and can have multiple child groups. An example hierarchy is shown in Figure 1-5. In such a hierarchy, one common set of policy could be applied at the root management group which all child management groups and subscriptions would inherit. Then, as needed, those children can have additional controls applies.
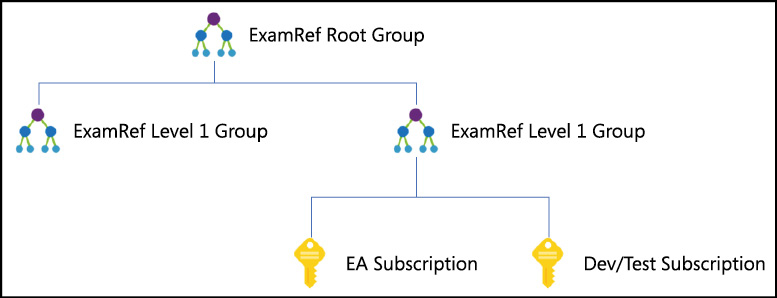
Figure 1-5 Example Management Group hierarchy
There is a single root Management Group at the root of the hierarchy. This management group is associated with the Azure AD tenant that is then associated with an Azure subscription. It cannot be moved or deleted. Individual subscriptions, including new subscriptions, are added to a Management Group.
In a manner similar to RBAC, Azure Policy is also applied at a scope. Recall that these are the subscription, a resource group, or an individual resource. For example, when Policy is applied at the subscription scope, it applies to all the resource groups and resources in the subscription as shown in Figure 1-6.

Figure 1-6 Example Policy applied at the subscription scope
Management Groups introduce an additional scope above a subscription. When applied at the Management Group scope, each subscription under the management group inherits the RBAC and Policy assignments of the management group as shown in Figure 1-7.

Figure 1-7 Example Policy applied at the management group scope
To add a role assignment to a Management Group, browse to the Management Groups service in the Azure Portal. Select a Management Group and then the Details of that group. Select the Access control (IAM) blade and add role assignments just as you would to an Azure subscription as shown in Figure 1-8.

Figure 1-8 Access control (IAM) blade for an Azure Management Group
Important RBAC and Management Groups
RBAC applied at the Management Group level is inherited by all of the child resources within the scope of the management group (subscriptions, resource groups, and resources). For instance, if you add a user as an Owner at the Management Group scope, that user will become an Owner in all the subscriptions associated with the Management Group.
When planning the application of RBAC and Policy through Management Groups, you should consider how administrative operations can be limited to privileged users by applying Owner rights through a Management Group. Also consider that there is a built-in role which can be used for managing Policy which is named Resource Policy Contributor. This role includes access to most Policy operations and should be considered privileged as well. By applying RBAC at the Management Group, you will ensure consistent application of tenant-wide security.
Configure cost center quotas and tagging
In Azure there are several types of quotas that are applicable to subscriptions, including resource quotas and spending quotas. With Azure resource quotas (or limits), Azure administrators can view the current consumption and usage of resources within an Azure subscription and understand how that consumption may be affected by Azure resource limits. Administrators can also request quota increases for certain resource types. For instance, the number of cores available for virtual machines is limited to 20 per region by default. This limit can be increased by submitting a request to Microsoft support.
There are also spending quotas in Azure. Spending quotas allow administrators to set alerts within an Azure subscription by configuring budgets to inform the business when their Azure spending has hit a certain threshold. These differ slightly from limits. Where a resource limit can stop resources from being created (e.g. there are not enough cores available to the subscription in the desired region) a spending quota acts as an alerting mechanism and does not stop resources from being created or consumed. While an alert can be generated from a spending quota, resources can still be created and consumed which could cause the spending quota to be exceeded.
Tags in Azure Resource Manager allow consumers of Azure to logically categorize Azure resource groups and Azure resources. As resources are tagged, they can then be queried and tracked based on the associated tags. Tags are a crucial component to implementing chargeback (or showback) within an Azure subscription. For example in organizations where an Azure subscription is shared by multiple business units or departments there may be a need to understand how resources are used for individual departments and show the cost associated with each department, either to bill that department for their Azure consumption (chargeback) or to help that department understand their spend in Azure (showback).
Configure resource quotas
To view the existing resource quotas (or service limits) for your Azure subscription, browse to the Azure subscription in the Azure Portal and select the Usage + quotas blade. From this blade, you can view existing quotas by service, resource provider, and location. You also filter the list by resource types you have deployed.
To increase a quota, click the Request Increase button as shown in Figure 1-9.
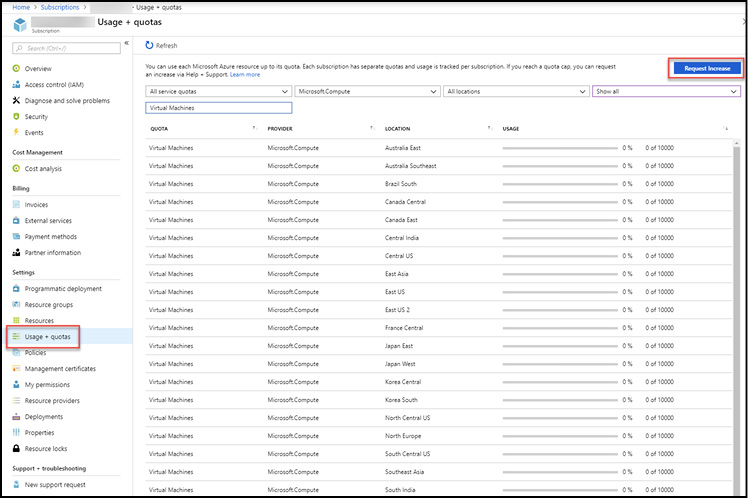
Figure 1-9 Azure subscription resource quotas
Clicking the Request Increase button will begin the process to open a new support request. As a part of the request, you must select the quota type (e.g. Compute/VM cores or Machine Learning service) and provide a description of your request.
Important Quota Increase
Submitting a request to increase a quota is only submitting a support request to Microsoft. Microsoft Support must respond to the request, and while most requests are granted, it is not guaranteed that a quota increase will be granted.
The consumption of resources within a subscription against a resource quota can also be viewed with PowerShell. There are multiple cmdlets available in the Az (formerly AzureRm) PowerShell modules for querying per-service quota usage. For example, to view the current usage of vCPU quotas, use the Get-AzVMUsage, and to view the current resource usage for the storage service use Get-AzStorageUsage.
![]() Exam Tip
Exam Tip
In this chapter and throughout the remaining reference, PowerShell cmdlets are referenced using the new Az module. You may see examples on the web and in other reference materials that refer to the AzureRm cmdlets. The Az module can use AzureRm aliases with the command Enable-AzureRmAlias for compatibility with existing scripts. See: https://docs.microsoft.com/powershell/azure/overview?#about-the-new-az-module for more detail.
Configure cost center quotas
One of the key factors in managing an Azure subscription is being able to plan for and drive organizational accountability for Azure spend. One of the best ways to drive accountability is to make sure that the consumers of Azure resources understand their cost, including current usage and forecasting future spend based on current resource consumption.
Budgets in Azure Cost Management provide Azure customers subscriptions under many offer types with the ability to proactively manage cost and monitor Azure spend over time at a subscription level.
![]() Exam Tip
Exam Tip
The full list of supported accounts and offers for Azure Cost Management can be found at:
https://docs.microsoft.com/azure/cost-management/understand-cost-mgt-data.
Budgets are a monitoring mechanism only, allowing users to create budgets with set thresholds and notification rules. When a budget threshold is exceeded a notification is triggered but resources continue to run.
To use Budgets with an Azure subscription, that subscription must be a supported offer type as previously stated. Users must have at least read access (Reader rights) to a subscription to view budgets and must have Contributor (or higher) rights to create and manage budgets. There are also specialized roles that can be used to grant principals access to Cost Management data including Cost Management contributor and Cost Management reader.
To create a budget in the Azure Portal, navigate to Cost Management + Billing, then Subscriptions, select a subscription, and then Budgets.
Note Subscription Budgets
By default, you will be creating a budget at the subscription scope, but budgets can also be created at the resource group scope as well if necessary. You must select the desired scope before clicking the +Add button.
Click +Add and in the Create budget blade, enter a budget name and budget amount. Choose the duration period (Monthly, Quarterly, or Annual) and an expiration date. Budgets require at least one cost threshold (% of budget) and an email address for the alert recipient. Figure 1-10 shows an example for a monthly budget for $10,000 with a threshold set at 90% of the budget ($9,000).

Figure 1-10 Azure budgets
Note Budget Alerts
Budget alerts can also leverage the same Action Groups that Azure Monitor supports.
After your budgets have been created, they can be viewed through the Budgets blade. When viewing the subscription scope, you will see the budgets for both the subscription and any resource group scoped budgets in a single view as shown in Figure 1-11.

Figure 1-11 Azure budgets
For customers on non-EA subscriptions, Azure also has a Billing Alert Service, which can be configured by Account Administrators through the Account Portal at: https://account.azure.com/subcriptions. Select the desired subscription and then click on the Alerts (preview) tab as shown in Figure 1-12. You can create up to five billing alerts for a single subscription, each with a distinct threshold, and up to two email recipients per alert.
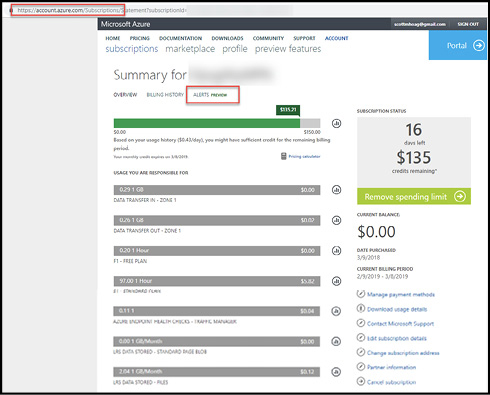
Figure 1-12 Azure Billing Alerts
When creating a billing alert, you can alert for either the billing total for the month or a monetary credit. For a billing total alert, an alert is sent when the subscription spend exceeds the threshold. For monetary credit alerts, an alert is sent when monetary credits drop below the defined limit (monetary credits usually apply to Visual Studio subscriptions and Free Trial subscriptions). An example of this screen is shown in Figure 1-13.
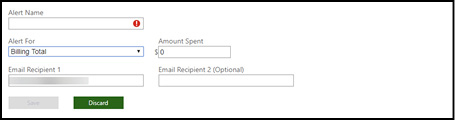
Figure 1-13 Azure Billing Alert creation
Configure resource tags
Resource tags allow you to apply custom metadata to your Azure resources to logically organize them and build out custom taxonomies. A tag is a name and a value pair. For example, as you deploy resources in Azure, you want to track the environment the resource is associated with. To do this, you can create a tag called Environment and the value Production to all resources in production. For downstream environments such as development or test, you can use the same Environment tag with the Dev/Test value. Common tags include the environment a resource is associated with, a cost center or billing code, and resource owner.
As tags are applied, you can query the resources in your subscription using your tags, even across resource groups. This allows you to understand related resources across resource groups for both billing and management. Tags are also included in the billing data for Azure EA subscriptions through the EA Portal, and for non-EA subscriptions through the Account Portal at: https://account.azure.com/subscriptions. Billing exports give clear line of sight for chargeback/showback to understand resource usage and cost. Figure 1-14 shows an example of an export with resource tags from an EA subscription.

Figure 1-14 Azure Detailed Usage CSV
Note Tags and Usage Reports
Tags must be applied at the resource scope to be visible in detailed usage exports. Tags applied at the resource group scope are not inherited by child resources. This means that as you are applying tags to your resources in Azure, you should think about applying tags to each individual resource to have the clearest line of sight into your usage based on your organizational tags.
When planning for resource tags, any taxonomy should include a strategy for both on-demand (or self-service) tagging, as well as automatic tagging through Azure policy. In this section you will learn how to create tags and apply them to resources manually, while in Skill 1.3 you will learn how to automatically apply tags.
As you plan your tagging taxonomy, be mindful of the limitations of tags in Azure as detailed in Table 1-3.
Table 1-3 Azure Tag Limits
| TaG LIMIT | Notes |
| Resource support |
|
| Number of tags |
|
| Tag name |
|
| Tag value |
|
| Virtual machine tags |
|
| Tag inheritance |
|
| Classic resources |
|
| Illegal characters |
|
To apply tags to a resource group or a resource, the user applying the tag must have write access to the resource (Contributor role or higher access).
Tags can be created and applied to Azure resources through:
The Azure Portal
Azure PowerShell
The Azure CLI
Resource Manager templates
Resource Manager REST APIs
This means tags can be applied both in an imperative manner and declaratively through Resource Manager templates. When working with tags, especially for creation, it is often the case that many tags need to be created and applied at the same time. While this can be done through the Azure Portal, often at the time of resource creation, it is better suited to use PowerShell, the CLI, or Resource Manager templates.
Tags can be applied at the resource group and/or the resource level. Note again that there is no inheritance for tags. If you need a tag to be applied to all resources in a resource group, each resource must be tagged individually.
To apply a tag to a resource group with no existing tags with PowerShell, you can use the Set-AzResourceGroup cmdlet.
Set-AzResourceGroup -Name hrgroup -Tag @{ CostCode=1001; Environment=Production }
When applying tags to a resource group with existing tags, you can retrieve the Tags collection from the existing resource group and use the .Add() method to append a new tag.
$tags = (Get-AzResourceGroup -Name hrgroup).Tags
$tags.Add("Owner", "[email protected]")
Set-AzResourceGroup -Tag $tags -Name hrgroup
Working with resources in a resource group is similar. To tag a resource with no existing tags you can use the Set-AzResource cmdlet.
$r = Get-AzResource -ResourceName hrvm1 -ResourceGroupName hrgroup
Set-AzResource -Tag @{ CostCode="1001"; Environment="Production" } -ResourceId
$r.ResourceId -Force
To add tags to a resource with existing tags you can retrieve the existing tags and add to the Tags collection using the .Add() method.
$r = Get-AzResource -ResourceName hrvm1 -ResourceGroupName hrgroup
$r.Tags.Add("Owner", "[email protected]")
Set-AzResource -Tag $r.Tags -ResourceId $r.ResourceId -Force
To remove tags from an existing resource, pass an empty hash table to the -Tag switch with the Set-AzResourceGroup or Set-AzResource cmdlets.
Set-AzResourceGroup -Tag @{} -Name hrgroup
Once tags have been applied, you can query for resource groups and resources by tag. To retrieve all the resource groups with a specific tag, you can use the Get-AzResourceGroup cmdlet with the -Tag switch.
(Get-AzResourceGroup -Tag @{ Owner="[email protected]" }).ResourceGroupName
To retrieve resources with a specific tag, use:
(Get-AzResource -Tag @{ Owner="[email protected]"}).Name
You can also retrieve resources based on a tag name, and not a specific tag value. For example, to find all the resources with the tag CostCode applied, use:
(Get-AzResource -TagName CostCode).Name
Configure Azure subscription policies
Azure Policy is an Azure service that can be used to create, assign, and manage policies that enforce governance in your Azure environment. This includes the application of rules that allow or deny a given resource type, apply tags automatically, and even enforce data sovereignty. Where Azure RBAC controls individual user, group access, and rights to your Azure environments at a specific scope, Azure policy provides a mechanism to express how the environment is governed for all users at a specified scope regardless of any RBAC assignments. Another way to state this is that Azure RBAC is a default deny mechanism with explicit allow, whereas policy is a default allow with an explicit deny system.
To implement policy, a policy definition must first be authored. That policy definition is then assigned a specific scope using a policy assignment. Recall that scope refers to what your RBAC or Policy is assigned to with valid scopes including a management group, a subscription, a resource group, or a resource.
Policy definitions can also be packaged together using initiative definitions and applied to a scope using initiative assignments. Policy and initiative definitions both support parameter sets, which help simplify the re-use of policy at multiple scopes.
A policy definition describes your desired behavior for Azure resources at the time resources are created or updated. Through a policy definition, you declare what resources and resource features are considered compliant within your Azure environment and what should happen when a resource is non-compliant. For example, you can create a policy that states that resources can only be created in the East US and West US regions for an entire subscription. If a user attempts to create a resource in East US, Azure policy can deny the creation of the resource, because it does not meet the stated compliance goal for allowed regions. In this example, policy is used to deny the creation of a resource and enforce organizational standards. As we further explore policy, you will learn that policy can be used as not just a deny mechanism, but also an auditing and creation mechanism.
Policy definitions are authored in JSON. The schema for Azure Policy can be downloaded from: https://schema.management.azure.com/schemas/2018-05-01/policyDefinition.json. A policy definition contains elements for:
mode
parameters
display name
description
policy rule
logical evaluation
effect
Note Policy Defnition
While you do not need to memorize the schema, it is worthwhile to understand the elements of a policy definition and how to build your own policies from a blank template when necessary. Microsoft offers a number of built-in policy definitions and maintains a repository of samples at https://docs.microsoft.com/azure/governance/policy/samples/ and https://github.com/Azure/azure-policy.
Policy definitions can be created through the Azure Portal by browsing to the Policy service at All Services, then Policy, and Definitions. From this blade you can manage both built-in policies and any custom policies that you create. Figure 1-15 shows an example of the Definitions blade.

Figure 1-15 Azure Built-in Policies
For the remainder of this section, we will examine a basic policy that limits the creation of virtual machines to only a pre-determined list of virtual machine SKUs. Such a policy could be combined with a location policy to enforce data storage compliance based on geography (e.g. restrict the creation of resources such as storage accounts to only certain regions) and can be used as a cost control measure (e.g. restrict the creation of virtual machines to known sizes to prevent the creation of machines that are not needed or cost too much).
Note that the list of virtual machine SKUs is a parameter to the policy, allowing it to be dynamic in nature. For example, you may use virtual machines that are one set of sizes in one subscription (e.g. Production) and smaller machines in downstream environments (e.g. Dev/Test). With a single policy definition leveraging parameters, that list of allowed SKUs can be applied via the policy assignment. The use of parameters in policy reduces redundancy and simplifies policy management by allowing policy definitions to be re-used at multiple scopes.
{
    "mode": "all",
    "policyRule": {
       "if": {
          "allOf": [
             {
                "field": "type",
                "equals": "Microsoft.Compute/virtualMachines"
             },
             {
                "not": {
                   "field": "Microsoft.Compute/virtualMachines/sku.name",
                   "in": "[parameters('listOfAllowedSKUs')]"
                }
             }
          ]
       },
       "then": {
          "effect": "deny"
       }
    },
    "parameters": {
       "listOfAllowedSKUs": {
          "type": "array",
          "metadata": {
             "displayName": "Allowed VM SKUs",
             "description": "The list of allowed SKUs for virtual machines.",
             "strongType": "vmSKUs"
          }
       }
    }
}
The mode of this policy is set to all. The mode of a policy determines which resources are evaluated by the policy. A value of all evaluates both resource groups and all resource types while a value of indexed only evaluates resource types that support tags and location. If you are creating policies through the Azure Portal, they will default to all but can be changed to indexed later. The mode indexed is used when you are creating policies that enforce tags or locations. This is used for controlling which resources appear in any compliance reports. Recall that not all resources support tags, so you would not want a resource appearing on a compliance report as non-compliant if you do not actually have any control over the resource functionality. The same is true for location support. There are resources in Azure that are considered global and are not bound to a single region or geography.
Next is the policyRule. This is the heart of a policy definition–effectively "if this, then that" blocks. The "if" block defines one or more conditions with logical operators available for when more than one condition is required. The "then" block defines the effect if the conditions are fulfilled.
{
    "if": {
        <condition> | <logical operator>
     },
    "then": {
       "effect": "deny | audit | append | auditIfNotExists | deployIfNotExists |
  disabled"
     }
}
Supported logical operators are:
"not": {condition or operator}
"allOf": [{condition or operator},{condition or operator}]
"anyOf": [{condition or operator},{condition or operator}]
A condition evaluates whether a field meets certain criteria. The supported conditions are:
"equals": "value"
"notEquals": "value"
"like": "value"
"notLike": "value"
"match": "value"
"notMatch": "value"
"contains": "value"
"notContains": "value"
"in": ["value1","value2"]
"notIn": ["value1","value2"]
"containsKey": "keyName"
"notContainsKey": "keyName"
"exists": "bool"
You can nest multiple logical operators as well. For example, you could create a policy rule above to only allow the creation of virtual machines from a known set of images in an existing resource group.
"if": {
   "allOf": [
      {
         "field": "type",
         "equals": "Microsoft.Compute/virtualMachines"
      },
      {
         "not": {
            "field": "Microsoft.Compute/imageId",
            "contains": "[concat('resourceGroups/',parameters('resourceGroupName'))]"
         }
      }
   ]
},
"then": {
   "effect": "deny"
}
Conditions use fields to evaluate the type of resource in the request and the state of that resource. For example, the field type used in the preceding examples represents the type of resource being created based on the resource provider it belongs to. There are a number of fields that are supported in policy, including the resource name, the location of the resource, and the tags associated with a resource. These fields are used in combination with logical operators to define the logic for your policy.
Note Supported Fields
The full list of supported fields can be found at:
https://docs.microsoft.com/azure/governance/policy/concepts/definition-structure#fields.
When conditions are fulfilled, effects are evaluated. Policy supports the following types of effect:
Deny Generates an event in the activity log and fails the request
Audit Generates a warning event in activity log but doesn’t fail the request
Append Adds the defined set of fields to the request
AuditIfNotExists Enables auditing if a resource doesn’t exist
DeployIfNotExists Deploys a resource if it doesn’t already exist
Disabled Doesn’t evaluate resources for compliance to the policy rule
In the example policy, a parameter is used to represent the list of allowed virtual machine SKUs ("[parameters('listOfAllowedSKUs')]").
Parameters make policy definitions reusable, which reduces the number of definitions that need to be managed. Parameter properties provide a single parameter’s definition and a policy definition can have multiple parameters. An example parameter is provided:
"parameters": {
   "listOfAllowedSKUs": {
      "type": "array",
      "metadata": {
         "displayName": "Allowed VM SKUs",
         "description": "The list of allowed SKUs for virtual machines.",
         "strongType": "vmSKUs"
      },
      "defaultValue": "Standard_D2s_v3",
      "allowedValues": [
         "Standard_D2s_v3",
         "Standard_F2s_v2"
      ]
   }
}
Parameters in a template are in the parameters property of a policy definition and each parameter is defined by a set of sub-properties that begins with a name (in the example above, listOfAllowedSKUs). The type property defines the if the parameter is a string or an array. For parameter validation, the sub-properties defaultValue and allowedValues are available. The metadata property is used by the Azure Portal display user-friendly information for parameters and has sub-properties where a displayName, description, and optional strongType can be defined. When strongType is defined, a multi-select list or options is generated with the Azure Portal when assigning the policy and the types are enforced when creating policies with PowerShell or the Azure CLI. In the example policy, the vmSKUs strongType has been defined which means when the policy is assigned in the Azure Portal a dynamically generated list of current virtual machine SKUs will be provided to select from.
The allowed values for strongType are:
location
resourceTypes
storageSkus
vmSKUs
existingResourceGroups
omsWorkspace
After a policy has been authored, you will need to determine where the policy will be stored (or located). Policy definitions can be located in a subscription or a Management Group, but not both. The location of the definition determines the scopes at which the policy can be assigned. If a definition is located in a subscription, only resources within that subscription can be assigned the policy. If the definition is in a Management Group, only resources within child management groups and child subscriptions can be assigned the policy. To re-use a policy across multiple subscriptions without duplicating the policy definition, the location must be a Management Group that contains the target subscriptions.
With the structure of a policy defined, you can then apply that policy through a policy assignment at a given scope. In this example, we’ll use the Azure CLI to create a new policy, and then assign that policy to a subscription through a policy assignment.
Prior to creating a policy, make sure the Microsoft.PolicyInsights resource provider is registered in the target subscription. To register the provider, you can use the az provider register command.
az provider register --namespace 'Microsoft.PolicyInsights'
After the provider has been registered, the az policy definition create command can be used to create a policy.
az policy definition create --name 'allowedVMs' --description 'Only allow virtual
 machines in the defined SKUs' --mode All
    --rules '{
       "if": {
          "allOf": [
             {
                         "field": "type",
                         "equals": "Microsoft.Compute/virtualMachines"
                      },
                      {
                         "not": {
                            "field": "Microsoft.Compute/virtualMachines/sku.name",
                            "in": "[parameters('"'"'listOfAllowedSKUs'"'"')]"
                         }
                      }
                   ]
                },
                "then": {
                   "effect": "deny"
                }
             }'
    --params '{
       "listOfAllowedSKUs": {
          "type": "array",
          "metadata": {
             "displayName": "Allowed VM SKUs",
             "description": "The list of allowed SKUs for virtual machines.",
             "strongType": "vmSKUs"
          }
       }
    }'
With the policy created, it can be applied to a scope through the az policy assignment create command. In this example, take the previously created policy definition and assign it to a subscription. Note that the -p parameter allows you to pass in parameters that are required by a policy definition. In this example, you will assign a policy that only allows two SKUs of virtual machines to be created in the target subscription.
az policy assignment create --policy allowedVMs --name 'deny-non-compliant-vms' --scope
 '/subscriptions/<Subscription ID>' -p '{

         "listOfAllowedSKUs": {

            "value": [


               "Standard_D2s_v3",

               "Standard_F2s_v2"

             ]

          }

      }'
To delete the policy assignment, use az policy assignment delete.
az policy assignment delete --name deny-non-compliant-vms
Another common use case for Azure Policy is to apply default tags to the resources that are created in your Azure subscriptions. This means you can use Azure Policy to apply governance and ensure environmental compliance for resource metadata without user interaction. As previously stated, policy can be used to control what resources can be created and how those resources are modeled regardless of the user requesting the resource and their rights within the environment (see Figure 1-16).
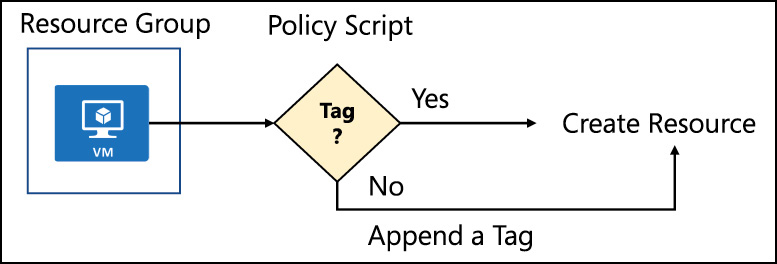
Figure 1-16 Policy flow chart
The logic for applying a default tag (or appending a tag) is shown in Figure 1-16. To create a policy to apply default tags, begin with the rules of the policy. To allow for flexibility in policy assignment, use parameters as needed. Note that in this example, the "effect” of the policy is an "append” action. This allows for the desired tag to be appended only when one has not been supplied at the time the resource is created. The following sample rules can be used with Azure PowerShell or the Azure CLI when automating policy creation.
To apply this policy with PowerShell, create a new file called AppendDefaultTag.json with the following content:
{
   "if": {
      "field": "[concat('tags[', parameters('tagName'), ']')]",
      "exists": "false"
   },
   "then": {
      "effect": "append",
      "details": [
         {
            "field": "[concat('tags[', parameters('tagName'), ']')]",
            "value": "[parameters('tagValue')]"
         }
      ]
   }
}
The following is the JSON that defines the policy parameters used by Azure PowerShell and the CLI. Save the contents in a file called AppendDefaultTagParams.json.
{
   "tagName": {
      "type": "String",
      "metadata": {
         "description": "Name of the tag, such as Environment"
      }
   },
   "tagValue": {
      "type": "String",
      "metadata": {
         "description": "Value of the tag, such as Production"
      }
   }
}
To create add the new definition, use the New-AzPolicyDefinition cmdlet and make a policy assignment with New-AzPolicyAssignment. Note the use of the scope parameter. In this example, the scope is all resources in the subscription. The parameters for the assignment are passed in to the assignment definition using the -PolicyParameter parameter.
$definition = New-AzPolicyDefinition -Name 'appendEnvironmentTag' -DisplayName
'Append Environment Tag' -Policy 'AppendDefaultTag.json'
-Parameter 'AppendDefaultTagParams.json'

$scope = '/subscriptions/<Subscription ID>'

$policyparam = '{ "tagName": { "value": "Environment" }, "tagValue": { "value":
 "Production" } }'

$assignment = New-AzPolicyAssignment -Name 'append-environment-tag' -DisplayName
'Append Environment Tag' -Scope $scope -PolicyDefinition $definition
-PolicyParameter $policyparam
To remove the policy assignment and the definition, you can use the Remove-AzPolicyAssignment and Remove-AzPolicyDefinition cmdlets.
Remove-AzPolicyAssignment -Id $assignment.ResourceId
Remove-AzPolicyDefinition -Id $definition.ResourceId
Keep in mind that Policy can also be managed and applied at the Management Group scope. By associating policies with Management Groups, policy definitions and policy assignments can be shared across multiple subscriptions. This includes the ability to monitor multiple subscriptions for compliance when using the Standard tier of Azure Policy. It also allows you to secure the management of organization wide policy at a level above a single subscription.
Skill 1.2: Analyze resource utilization and consumption
As you being to deploy services into your Azure subscriptions, how the environment will be monitored is one of the first questions you will need to answer and to answer it you must think about all of the services in your deployment. You will most likely have a number of services deployed, including Infrastructure-as-a-Service services, such as virtual machines, which include compute, storage, and networking. And even without services deployed today, over time you may have Platform-as-a-Service services for hosting applications. You will also be using the services that drive your virtual machines in more meaningful ways, such as implementing advanced configurations in Azure storage and Azure identity.
You will need to account for all these services, along with the Azure platform itself in your monitoring strategy. This includes all of your infrastructure, applications, and networking.
By developing a proactive monitoring strategy, you will be able to understand the operation of your environment at a component level, including resource health, and resource spend. Implementing a robust strategy will help you increase your uptime through proactive notifications, so you can resolve issues before they become problems, and optimize your resources for optimal performance, allowing you to increase your ROI with the services you deploy.
As you develop your strategy, there are three areas you should consider:
Visibility into services and the Azure Platform This is all about understanding how an application or set of services is performing across the board. You will need to understand what metrics you need to monitor, and how those can be acted on in Azure through both alerts and visualizations in dashboards.
Deeper insights into applications This is particularly with service or dependency maps and advanced tracing. You may even use these insights to drive automation and remediations within your environments.
Resource optimization You need to understand which metrics are important to not just the health of your application, but also the impact to users or systems that consume those application. By using the visibility and insights you extract from the Azure platform, you can directly correlate the impact of remediations in your environment.
Azure includes multiple services that perform specific roles for monitoring and optimization. It is critical that you understand both the out-of-the-box monitoring capabilities of Azure and the scenario-specific monitoring capabilities within the platform. This section will focus on out-of-the-box monitoring and optimization through both Azure Monitor and Azure Advisor, as well as scenario-specific monitoring with Azure Monitor logs and log data that is stored in Log Analytics).
Azure Monitor helps you track performance, maintain security, and identify trends, by ingesting metrics and telemetry from multiple areas, including applications and the operating systems of virtual machines. It also allows you to query your Azure resources which emit performance counters, your Azure subscriptions, Azure AD tenant, and event custom sources.
The data from your Azure resources is ingested into either metrics stored within the Azure platform and accessible by the monitor service, or as logs into Log Analytics.
Important Log Analytics
Log Analytics must be enabled and configured before insights can be extracted or visualizations can be created that are dependent on that data.
There is a difference between metric and logs. Metrics are always numerical values while logs are numerical or textual values that describe a resource at a point in time. Logs can be strongly typed (for example, a string or a datetime). Metrics are continuously collected provide near real-time access to performance data while logs can vary widely in the amount of time it takes for them to be collected and make available for query.
Once the data is collected, Azure Monitor provides a single pane of glass, or entry point, to interacting with your metrics and logs. Interactions can include querying and alerting, building visualizations and dashboards, or even automated responses based on telemetry for functionality like autoscaling in virtual machines. Querying data that is stored in a Log Analytics workspace through Azure Monitor is referred to as Azure Monitor logs.
Data stored in Log Analytics can also be queried directly through a Log Analytics workspace where you will have access to the same query interfaces as you have through Azure Monitor, but also the ability to make customizations to the configuration of the workspace and access workspace-specific solutions, including visualizations and queries.
All of the data that you can access through Azure Monitor can be used to create alerts within Azure Monitor with alert rules. Alert rules are built based on target resources or resource types such as virtual machines, storage account, and even PaaS services and your custom conditions. Alerts allow to be proactively notified of the health of the resources you deploy in Azure and you are not limited to notifications – alert rules leverage actions groups that allow you to even implement automation based on an alert condition.
Azure Advisor is a free, personalized guide to Azure best practices. It provides recommendations to help you optimize resources for high availability, security, performance, and cost. You can implement these recommendations easily right in the tool, and they’re personalized based on the Azure workloads and configurations deployed within your subscriptions. The optimizations are available at no additional cost, although some recommendations do have cost implications. Figure 1-17 shows an example of the Azure Advisor primary dashboard.
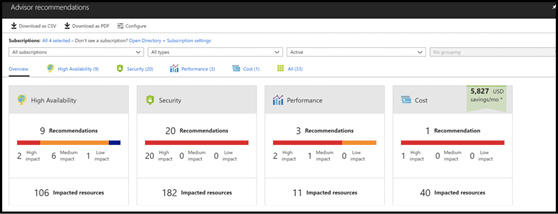
Figure 1-17 Azure Advisor recommendations
This section covers how to:
Create action groups
View alerts in Log Analytics
Configure diagnostic settings on resources
While the resources you deploy in Azure create metrics automatically, many of them also offer richer diagnostics logs which can be configured to send their log data to another location such as a Storage Account or a Log Analytics workspace. In addition to resource logs, there are also tenant-level services such as Azure Active Directory which exist outside of a subscription from which you may need to collect log data.
Diagnostics logs are one type of log data. There is also log data within the Azure Activity log and there is log data that can be obtained from virtual machines with the use of diagnostics agents that is separate from diagnostic logs associated with a tenant-level service or an Azure resource. It is important to understand the differences between the types of log data that are available and where that log data can be stored.
Important Resource and Tenant Logs are Diagnostic Logs
Both resource logs and tenant logs are considered diagnostics logs. Diagnostics logs that you configure for a tenant service or a resource are separate from the Azure Activity log and guest telemetry obtained with diagnostics agents.
The Azure Activity log surfaces data at the subscription level and can be useful for understanding actions that occur within your environment against the Resource Manager APIs. For example, when a new deployment is submitted, the events associated with that deployment such as the time it was submitted, the resources that were created, and the user that submitted the request are all tracked within the Activity Log. However, at the subscription level, you are missing any resource-level logs. For example, the Activity log can show when a Network Security Group (or NSG) was created, but it cannot show when an NSG rule was applied to traffic that was subject to the NSG such as when a port or protocol is blocked. Diagnostic logs are the feature that provide this functionality.
Note Retained for 90 Days
Events in the Activity Log are retained for 90 days. You can retain the data for a longer period by enabling archival and sending the logs to Azure storage and / or a Log Analytics workspace.
Diagnostic logs will need to be enabled for each resource that you wish to collect additional telemetry from. Note that metrics are resource-specific and captured automatically so you only need to enable diagnostic logs to capture log data or to send metrics to another service.
Important Support for )Diagnostic Logs
Not all Azure resource types support diagnostic logs. A full list of services that support logs and their service-specific log schemas can be found at:
https://docs.microsoft.com/azure/monitoring-and-diagnostics/monitoring-diagnostic-logs-schema.
To enable diagnostic logs through the Azure Portal, you can browse to the resource itself to create the settings. The alternative and recommended method is to browse to the Azure Monitor and Diagnostic Settings blade. From this blade, you can view all the resource types eligible for diagnostic logs and view the status (Enabled or Disabled) for log collection on each resource. You also have options from this blade to filter by Subscription, Resource Group, Resource Type, and Resource. An example is shown in Figure 1-18.
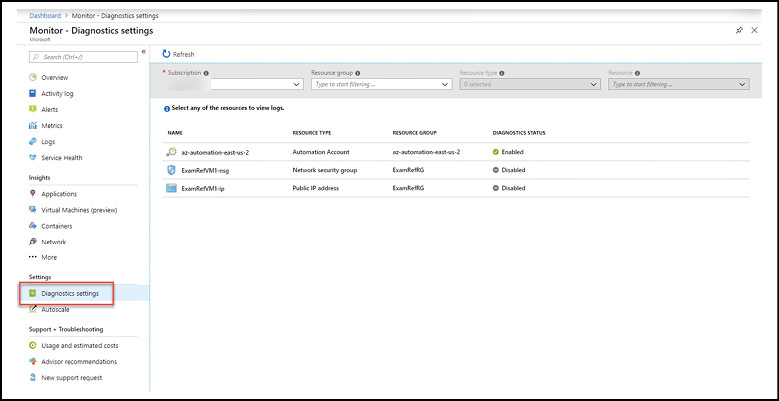
Figure 1-18 Azure Monitor Diagnostic settings
To enable diagnostic settings, click on a resource with a status of Disabled. In the blade that opens, you will see a link to Turn On Diagnostics (see Figure 1-19).
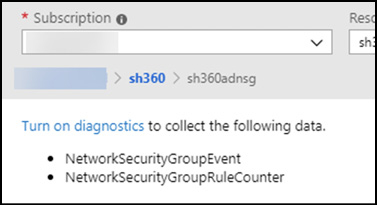
Figure 1-19 Azure Monitor Diagnostic settings for a resource
Click the link to open the configuration blade. Configure the settings as required and provide a Name for the setting. Click Save to persist the configuration. Note that retention can be configured independently for each log and the retention rule only applies to logs in storage as shown in Figure 1-20.

Figure 1-20 Azure Monitor Diagnostic settings configuration for a resource
Note Diagnostic Logs
Each resource or tenant service that you enable diagnostic logs for will have varying controls (or settings). For example, not all resources support a retention policy in the diagnostic settings and not all resources support sending metric data to another location.
When configuration diagnostics settings, you will select where the logs (and optionally metrics) are sent. Valid locations to send data will be to Archive To A Storage Account, Stream To An Event Hub, or Send To Log Analytics. As you select each location, additional configuration will be required. For example, to Archive To A Storage Account, you will need to select an existing storage account or create a new storage account.
For diagnostics logs that support retention with storage, you will be able to select a retention period in days. A retention period of zero days means the logs will be retained forever. Valid numeric values for the number of days is any number between 1 and 2147483647. If you set the retention period and have only selected an Event Hub or a Log Analytics workspace but have not selected a storage account, the retention settings will be ignored.
As you configure each resource or service, you can send the data from multiple log sources to the same destination. For example, you can send the diagnostic logs from a tenant service like Azure Active Directory to a Log Analytics workspace and you can send the diagnostics logs from a resource like a Network Security Group to the same Log Analytics workspace.
It may take several moments for the setting to appear in the list of settings for the resource. Note that even though the setting has been configured, diagnostic data will not be collected until a new event is generated.
All of these settings can be configured through the Azure Portal, Azure PowerShell, the Azure CLI, or through the Azure Monitor REST API.
To enable collection of diagnostic logs with Azure PowerShell, use the Set-AzDiagnosticSetting cmdlet. To use this cmdlet, you will need to know the resource ID of the resource you are enabling. You can find the resource ID with the Get-AzResource cmdlet. When sending diagnostics to storage, the -StorageAccountId parameter is used. This value will be the resource ID of the destination storage account which can also be found with Get-AzResource.
In the following example, diagnostic settings will be enabled for a Network Security Group and sent to Azure storage. Examples have also been provided for enabling streaming to an Event Hub and a Log Analytics workspace.
$resource = Get-AzResource -Name [resource name] -ResourceGroupName [resource group
 name]
$storage = Get-AzResource -Name [resource name] -ResourceGroupName [resource group name]
Set-AzDiagnosticSetting -ResourceId $resource.ResourceId -StorageAccountId
 $storage.ResourceId -Enabled $true
To enable streaming of diagnostic logs to an Event Hub:
$rule = Get-AzServiceBusRule -ResourceGroup [resource group name] -Namespace [namespace]
 -Topic [topic] -Subscription [subscription] -Name [rule name]
Set-AzureRmDiagnosticSetting -ResourceId $resource.ResourceId -ServiceBusRuleId
$rule.Id -Enabled $true
To enable streaming of diagnostic logs to a Log Analytics workspace:
$workspace = Get-AzOperationalInsightsWorkspace -Name [workspace name]
|-ResourceGroupName [resource group name]
Set-AzureRmDiagnosticSetting -ResourceId $resource.ResourceId -WorkspaceId
 $workspace.ResourceId -Enabled $true
The parameters for -StorageAccountId, -ServiceBusRuleId, and -WorkspaceId can be combined to enable any combination of the three.
When enabling diagnostic logs with the Azure CLI, you will use the az monitor diagnostic-settings create command. To obtain the Resource ID you can use the az resource show command and capture the resource identifier in a variable that you can use in your script. For example:
resourceId=$(az resource show –resource-group [resource group name] –name [resource
 name] --resource-type [resource type] --query id --output tsv)
Note Resource Types
Note the use of the resource-type parameter in this command. You will need to know the Resource Provider and type of resource you are querying. You can query all your resources first with the az resource list command to find the resource type for your specific resource.
To enable collection with a storage account, implement the following:
   az monitor diagnostic-settings create --name <diagnostic name>
  --storage-account <name or ID of storage account>
  --resource <target resource object ID>
  --resource-group <storage account resource group>
  --logs '[
  {
      "category": "<category name>",
      "enabled": true,
      "retentionPolicy": {
          "days": "<# days to retain>",
          "enabled": true
      }
  }]'
To enable streaming to an Event Hub:
   az monitor diagnostic-settings create --name <diagnostic name>
  --event-hub <event hub name>
  --event-hub-rule <event hub rule ID>
  --resource <target resource object ID>
  --logs '[
  {
      "category": "<category name>",
      "enabled": true
  }
  ]'
To enable collection of diagnostic logs in a Log Analytics workspace:
   az monitor diagnostic-settings create --name <diagnostic name>
  --workspace <log analytics name or object ID>
  --resource <target resource object ID>
  --resource-group <log analytics workspace resource group>
  --logs '[
  {
      "category": "<category name>",
      "enabled": true
  }
  ]'
You can combine the storage-account, event-hub, and workspace parameters to enable multiple output options.
Tenant-level logs are enabled in each tenant service and cannot be configured from Azure Monitor. The configuration for each tenant service varies and you should refer to the service-specific documentation for detailed configuration instructions.
After you have captured the diagnostic logs, you will need to work with the data that is sent to your selected location. Each resource outputs different logs in varying formats based on the selected outputs, including the selection of categories.
Note Service and Category Diagnostic Schemas
Service and category-specific diagnostic schemas can be found at:
https://docs.microsoft.com/azure/azure-monitor/platform/diagnostic-logs-schema#service-specific-schemas-for-resource-diagnostic-logs.
Create and test alerts
Alerts proactively notify you when important conditions are found in your monitoring data. They allow you to identify and address issues before the users of your system notice them.
Azure Monitor brings a unified alerting experience to Azure, with a single pane of glass for interacting with metrics, the Activity Log, Log Analytics, service and resource health and service-specific insights that provide out-of-the-box dashboards with visualizations and queries for:
Custom applications with Application Insights
Virtual Machines (preview)
Containers
Networking
Log Analytics monitoring solutions
![]() Exam Tip
Exam Tip
Microsoft is adding new services and operational insights consistently. The current list of services can be found at: https://docs.microsoft.com/azure/azure-monitor/overview#insights.
Alerts have multiple notification options, including:
Email
SMS
Push notifications to the Azure mobile app
Voice
Integration with automation services.
Alerts that are generated within Azure Monitor alerts can invoke Azure Automation runbooks, Logic Apps, Azure Functions, and even generate incidents in third-party IT Service Management tools such as ServiceNow.
Alerts in Azure Monitor are centered around alert rules. Alert rules contain the following components:
A target resource (or resource type)
A signal emitted by the target
Conditional logic for the alert with criteria based on the available signals for the target resource
An action group, or what should happen when the alert rule condition is met
A name and description for the alert rule
A severity ranging from 0 to 4
Note Azure Monitor Alert Rules
Alert rules in Azure Monitor are not the same as alerts. They are the criteria used to evaluate when an alert should be generated. An alert is generated based on the rule and then the alerts themselves are acted upon separately, even maintaining their own state (such as New or Closed).
An example of an alert rule being created is show in Figure 1-21 where you can see these components. In this example, an alert rule is being created to generate an alert for a target resource that is a virtual machine. The conditional logic for the alert is using a metric signal provided by the Azure platform called Percentage CPU.
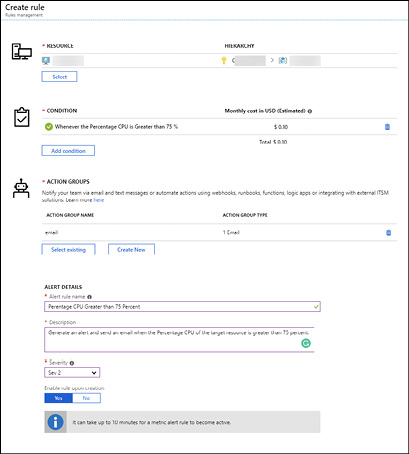
Figure 1-21 Azure Monitor Create Alert Rule
The target resource defines the scope and signals available for the alert. A target resource is an Azure resource that generates signals (e.g. metrics or the Activity Log) such as a virtual machine or storage account. The signal types that are available for monitoring vary based on the selected target (or targets as you can select more than one target) and the available signal types are:
Metrics
Log search queries
Activity logs
As you select your target resource, you will be able to view the signals that will be available for your conditional logic. In Figure 1-22, an example is provided where a virtual machine has been selected. Note that both Metric and Activity Log signals are available for this resource type.

Figure 1-22 Azure Monitor Target Selection
Target resources can also include a Log Analytics workspace or an Application Insights resource. Some resource types allow you to specify multiple resources as the target for an alert rule. For example, when you are configuring your target resource logic, you could construct an alert rule that will evaluate all the resources in all of the resource groups in a subscription, regardless of the resource type This would limit your condition logic to signals from the Activity Log but would allow you to create an alert across all of the resources in the subscription.
The condition, or criteria for an alert rule combine the signal and a logical test to the target resource(s). For example, if you had a critical service running a on virtual machine and wanted to be alerted when that virtual machine is stopped or restarted, you could use the Restart Virtual Machine (virtualMachines) signal from the Administrative category in the monitor service as your logic as shown in Figure 1-23.
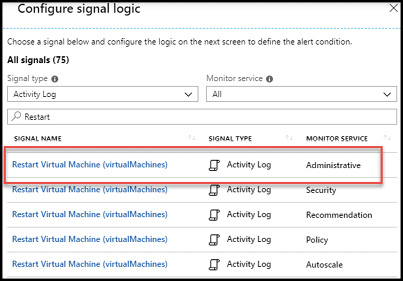
Figure 1-23 Azure Monitor Condition Logic
Alert rules also have an alert name, an alert description, a severity ranging from 0 to 4, and define the action that is taken when the alert fires through one or more Action Groups that are associated with the alert rule.
An Action Group provides the definition for what will happen when the conditional logic of the alert rule is met by grouping together one or more actions. Each action group is an Azure resource itself (meaning it is located in an Azure subscription and a resource group) and has a:
Name This is the name of the Action Group resource in the Resource Group. Action Group names must be unique within a Resource Group.
Short name The short name is used to identify the Action Group in emails and SMS messages and is limited to 12 characters.
Actions Actions define the configuration for a specific action type.
Each action has a type with each type having a specific configuration. For example, using the type Email/SMS/Push/Voice means that generated alerts can be sent to any (or all) of those endpoints.
Available action types include:
Email/SMS/Push/Voice
Azure Function
Logic App
Webhook
ITSM
Automation Runbook
Note Action Groups
Action groups are separate resources and are independent of the alert rule. This means that the same action group can be used across multiple alert rules.
To create an alert rule, browse to Azure Monitor in the Azure Portal, select the Alerts blade and select +New Alert Rule as shown in Figure 1-24.
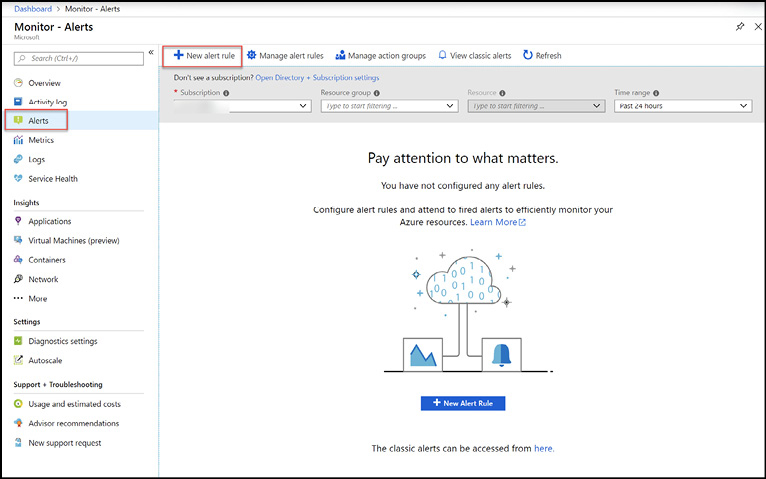
Figure 1-24 Azure Monitor Alerts
Note Azure Monitor Services
The Azure Monitor service can be found in the list of services in the left-navigation of the Azure Portal. If you do not see Monitor in the default list of services, browse to All services and search for Monitor.
Pick the target for the alert, which determines the available signals by clicking the Select button as shown in Figure 1-25.
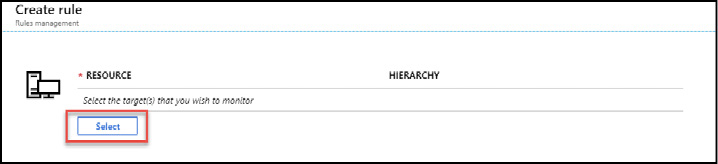
Figure 1-25 Azure Monitor Create alert rule
For instance, selecting Subscription will allow you to select Activity Log signals. Selecting a single resource like a virtual machine will allow you to select signals that include both the Activity Log and metrics as shown in Figure 1-26.
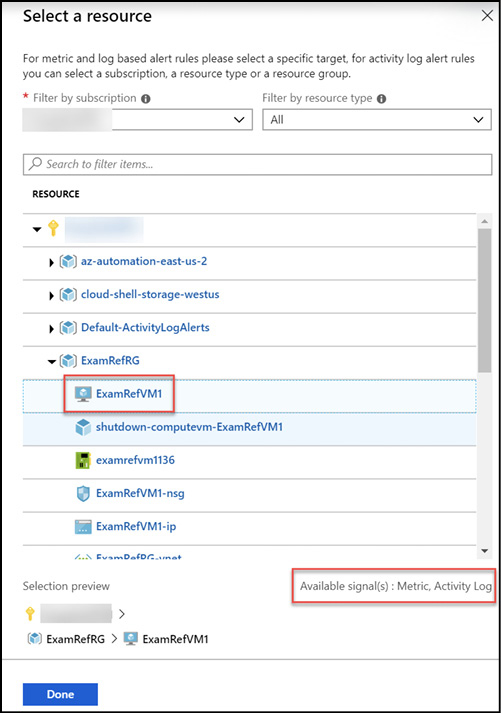
Figure 1-26 Azure Monitor alert target
Next, add a condition using the Add condition button as shown in Figure 1-27.

Figure 1-27 Azure Monitor Add condition
The condition will allow you to select the signal from the available signals for the target and define the logic test that will be applied to the data from the signal. For example, for a virtual machine you can use the Percentage CPU metric to generate an alert based on a custom threshold for CPU usage as shown in Figure 1-28. The alert logic conditions are different for Activity Log signals or metric signals.
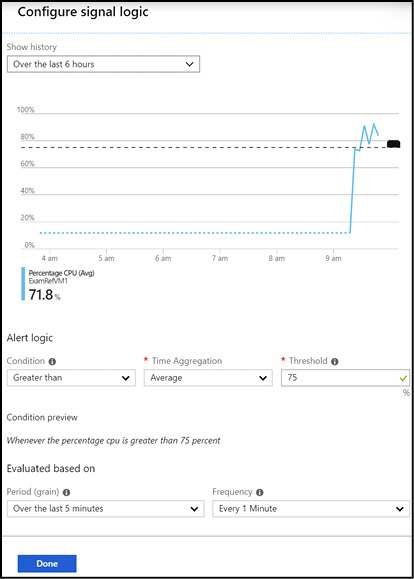
Figure 1-28 Azure Monitor alert condition
Configure one or more conditions for the alert rule. After the conditions are defined, proceed to Actions Groups and use the Select existing button if you have an existing action group you want to use or the Create New button to create a new action group as shown in Figure 1-29.
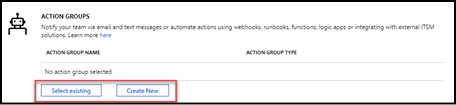
Figure 1-29 Azure Monitor Action Groups
When creating a new Action Group, define the Action Group Name, a Short Name, Subscription, and Resource Group the Action Group will be created in (Figure 1-30).
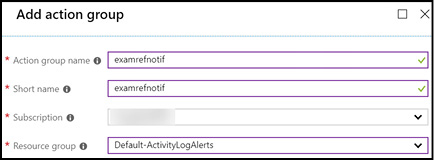
Figure 1-30 Azure Monitor new action group blade
The group’s short name is included in Email and SMS notifications to identify which Action group was the source of the notification. If a user unsubscribes, they are unsubscribing from the specific Action Group identified by the Short Name. When an action is configured to notify a person by Email or SMS, the person will receive a confirmation indicating that he or she has been added to the action group as shown in Figure 1-31.

Figure 1-31 Azure Monitor action group notification
You can now define a list of actions for the action group. Each action has a name, an action type (Email/SMS/Push/Voice, Logic App, Webhook, ITSM, or Automation Runbook), and details (see Figure 1-32).
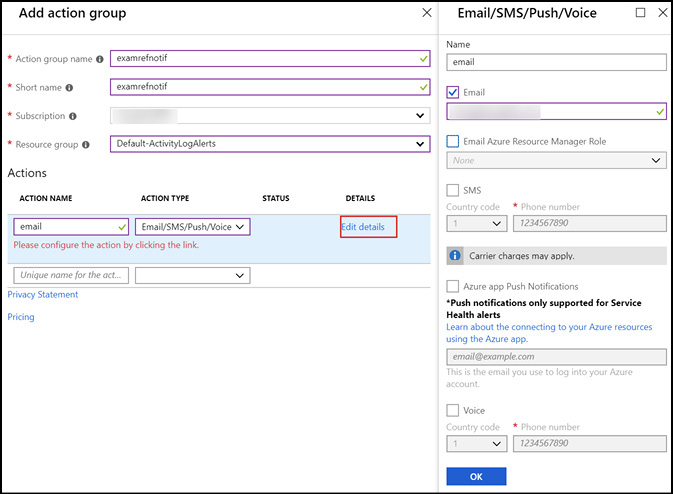
Figure 1-32 Azure Monitor new action group blade Email/SMS/Push/Voice configuration
Define one or more actions to complete the configuration of the action group. You can now specify the remaining alert details, including the Alert Rule Name, Alert Description, Severity, and whether the rule will be enabled upon creation as shown in Figure 1-33.

Figure 1-33 Azure Monitor new action alert rule details
Important Active Alerts
When creating a new alert rule based on a metric signal, it can take up to 10 minutes for the alert rule to become active.
After an alert rule has been created, the alert rule and action group can be managed through Azure Monitor from the Alerts blade by selecting Manage Alert Rules. Alerts can be managed across multiple subscriptions and can be filtered by Resource Group, Resource Type, Signal Type, and Status (see Figure 1-34).
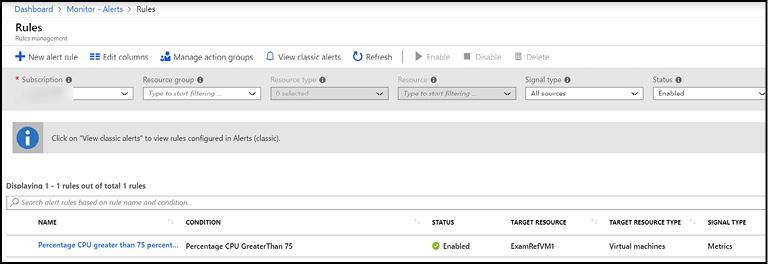
Figure 1-34 Azure Monitor new action alert rule details
Note Alert Rules
You can enable and disable alert rules as needed to meet your requirements.
Recall that alert rules do not generate alerts immediately and can take up to 10 minutes in the case of metric alerts. When alerts are generated, they will be distributed based on the actions defined in the action group. For example, when an email is sent, the defined users will receive a message with the alert details and a link to view the alert in the Azure Portal as shown in Figure 1-35.

Figure 1-35 Azure Monitor alert notification email
When an alert is resolved by the state of the monitor condition and changed to Resolved, notifications are sent as well. An example of a resolution email is shown in Figure 1-36.
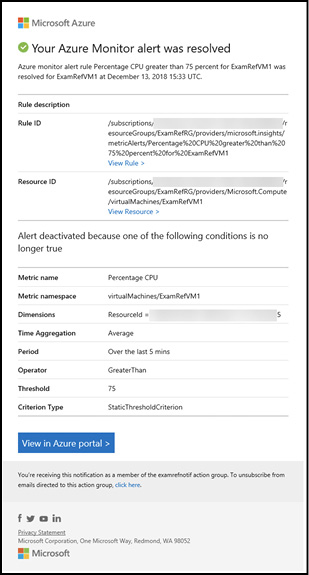
Figure 1-36 Azure Monitor alert resolution email
Analyze alerts across subscriptions
When an alert rule is created, the alert rule targets resources in a single subscription and the alerts that are generated based on the alert rules are associated with the subscription they are generated from. Azure operators are not limited to viewing alerts from only a single subscription through Azure Monitor which again provides a single pane of glass for not only managing alert rules across multiple subscriptions, but also managing the generated alerts as well.
Recall that alert rules and action groups are separate entities. The alerts that are generated based on the conditional logic of an alert rule are separate entities as well. This means that they are managed independently of alert rules and maintain their own state.
Alerts can have one of three states:
New The alert is new and has not been reviewed
Acknowledged The issue that generated the alert is being actioned by an administrator
Closed The issue that generated the alert has been resolved and the alert has been marked as closed
The state of an alert is updated by the user who is interacting with the alert and is not updated automatically by the Azure platform.
Note Alert State
Alert state is not the same as the monitor condition of an alert. When the Azure platform generates an alert based on an alert rule, the alert’s monitor condition is set to fired and when the underlying condition clears, the monitor condition is set to resolved.
As alerts are generated, they will appear on the Alerts blade in Azure Monitor. From the Alerts blade can you view alerts for all subscriptions, and drill into one or more specific Subscriptions, Resource Groups, and Resources. You can also filter by time range with supported values of the Past Hour, the Past 24 Hours, the Past 7 Days, and the Past 30 Days (see Figure 1-37).
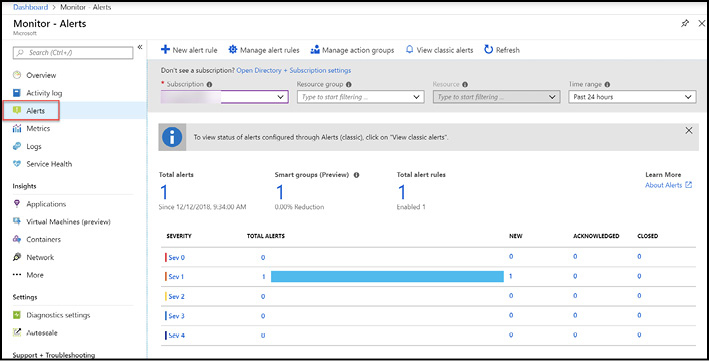
Figure 1-37 Azure Monitor Alerts dashboard
Selecting one of the links on the dashboard (e.g. Total Alerts) will open the All Alerts blade as shown in Figure 1-38.

Figure 1-38 Azure Monitor All alerts blade
The view on this page can be filtered through the dropdowns on the page and you can also filter, sort, and edit the columns that are displayed with the following limitations:
When you filter by subscription, you are limited to selecting a maximum of 5 subscriptions
When filtering by resource group, you can only select one resource group at a time
The Resource Type filter is dynamic and is based on the selection of the resource group. You will not be able to select resource types that are not deployed to the selected resource group you are filtering with.
The time range filter shows only alerts fired within the selected time window and supported values are the past hour, the past 24 hours, the past 7 days, and the past 30 days.
Selecting an alert will open the alert details (see Figure 1-39). From this blade you can view Alert History, including any changes to monitor condition state. This is also where you can alter the alert state to New, Acknowledged, or Closed. If the state of an alert is changed, that change is included in the alert history for audit purposes.

Figure 1-39 Azure Monitor alert details
Analyze metrics across subscriptions
Recall that metrics are the numerical values output by resources and services within Azure. Metrics are available for a number of Azure resources, but not all resources support metrics at this time.
Metrics includes platform metrics, which are created by Azure resources and made available in Azure Monitor for querying and alerting. You can also query application metrics from Application Insights if the service is enabled and you have instrumented your applications, whether that application is hosted on a virtual machine or even a PaaS service such as Azure App Service. Virtual machines in Azure can also push custom metrics to the monitor service using the Windows Diagnostic extension on Windows servers and Linux VMs through the InfluxData Telegraf Agent. There is also an opportunity to push custom metrics from other sources through a REST API.
An example of a metrics chart displaying Percentage CPU for a virtual machine is shown in Figure 1-40.
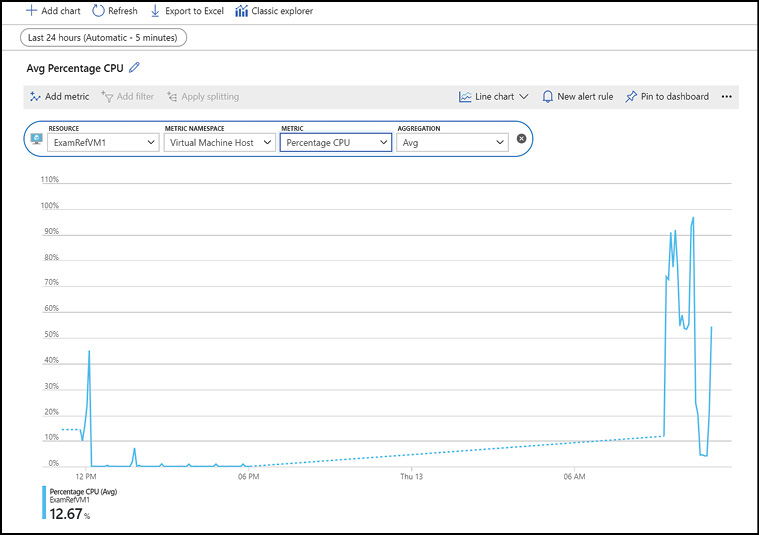
Figure 1-40 Azure Metrics
Important Numerical Values in Azure
In this case, we are only referring to the numerical values that the resources in Azure generates, not the logs, or text-based values, such as the value of an event log that may be stored in a storage account or a Log Analytics workspace.
Azure metrics are collected at one-minute intervals (unless otherwise specified) and are identified by a metric name and a namespace (or category). Azure metrics are retained for 93 days within Azure Monitor.
![]() Exam Tip
Exam Tip
For longer term retention, metrics can optionally be sent to Azure storage for select resources and retained up to the configured retention policy or the storage limits of the account. They can also be sent to Log Analytics and stored for up to two years.
As metrics are collected, each metric has the following properties:
The time the value was collected.
The type of measurement the value represents.
The resource the value is associated with.
The value itself.
Metrics can be one dimensional or multi-dimensional with up to 10 dimensions. A non-dimensional metric can be thought of as the metric name and the value of the metric output and collected in the Monitor service over time. A multi-dimensional metric (both from an Azure resource or a custom metric) is the metric name and an additional name-value pair with additional data. For example, imagine a storage account with multiple blob containers where you need to track the consumption of storage by container. A non-dimensional metric would provide only the total consumed storage for the blob service in the storage account where a multi-dimensional metric would provide the consumption by container as it has the additional data stored in the metric record.
To interact with metrics, browse to the Metrics blade of Azure Monitor in the Azure Portal. You will be presented with a blank chart (see Figure 1-41).
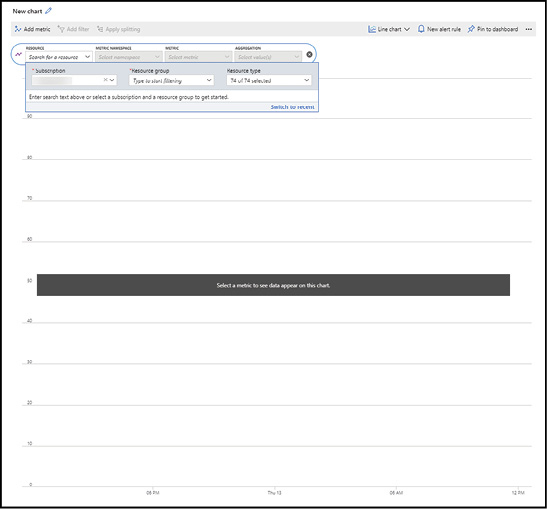
Figure 1-41 Azure Metrics blank chart
To begin populating the chart, you need to select a metric. To select a metric, you must select a subscription and a resource group. You can optionally filter by resource type as well. Selecting a resource will then allow you to select a metric namespace (or category), a metric, and an aggregation if applicable. For example, to view the Ingress metric for a storage account, select the storage account, the Metric Namespace Account, the Metric Ingress, and the Aggregation Sum as shown in Figure 1-42.

Figure 1-42 Azure Metrics selection
You can add multiple metrics to the chart, even mixing Resources, Namespaces, Sums, and Aggregations as required (see Figure 1-43).

Figure 1-43 Azure Metrics selection for multiple resources
The chart will be rendered as you complete your resource selection. The period for the query can be changed, up to the retention limits of the metrics service, and the chart can be rendered as a Line Chart (default), Area Chart, Bar Chart, or Scatter Chart. An example of a line chart is shown in Figure 1-44.
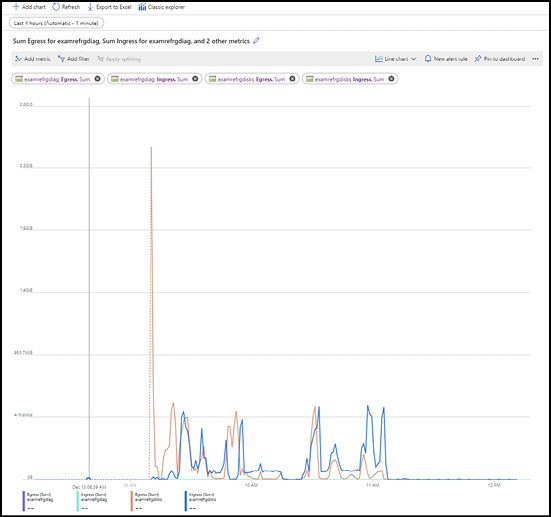
Figure 1-44 Azure Metrics line chart
Note that you are not limited to charting resources from the same subscription. You can select metrics for resources of any available type across all of the subscriptions you have access to.
From the Metrics blade, you can also create a new Alert Rule based on the metric query that is visualized. If you need to perform deeper analysis, the raw metric data can also be exported to Excel.
Note Azure Dashboards
Each chart or visualization that you create in Azure Monitor can also be pinned to an Azure Dashboard. You can have multiple Dashboards in Azure and you can even share a Dashboard with others in your organization.
You also are not limited to creating a single chart. Selecting the Add Chart button in the Metrics explorer will allow you to stack multiple charts, so existing charts can be cloned and then customized.
Note Metrics and Visual Response Times
If you are evaluating a web application, you may want to use multiple charts for visualization response times (in milliseconds) and response size (in kilobytes). This is especially useful when you are working with metrics that have different units of measure of where the scale of the metrics you are evaluating varies widely.
Utilize log search query functions
Azure Monitor stores and surfaces two types of data: metrics and logs. Metrics are numerical values such as performance counters, while logs can be either numerical data or text. For instance, the full text of an exception that is raised in an application or even the text of an application log from a Windows or Linux server is one example.
Comparing metrics and logs surfaces some key differentiators:
Retention Metrics are retained for 93 days within the Azure service, while logs stored in Log Analytics can be retained for up to two years. There are opportunities to do long term retention of metrics by storing metrics in Log Analytics as well.
Properties Metrics have a fixed set of properties (or attributes). These are time, type, resource, value, and dimensions (optional). Logs have different properties for each log type and even support rich data types such as date and time.
Data availability Metrics are gathered over time (like once a minute) and available for immediate query. Logs are often gathered after being triggered by an event (such as an event is written to an application log) and can take time to process before they are available for query. While both offer near real-time query capabilities, metrics will typically be used for fast alerts, and logs used for more complex analysis.
Before you can interact with resource logs and tenant logs in Azure Monitor, you must configure Log Analytics. Log Analytics helps you collect, correlate, search, and act on log and performance data generated by operating systems, applications, and Azure services. It gives you operational insights using rich search and visualizations. Log Analytics provides a single pane of glass for interacting with the data from the entire platform and the workloads you host on it including both Linux and Windows servers.
A Log Analytics workspace is where logs are collected and aggregated. The logs can also be queried and visualized through Log Analytics or through Azure Monitor. A workspace is an Azure resource, meaning that RBAC can be applied for granular access to the service and the data stored within it. This also means that workspaces can be in regions that meet your organization’s regulatory requirements, data isolation, and scope. You can create multiple workspaces in a single subscription.
A workspace can be created through the Azure Portal, Azure PowerShell, the Azure CLI, and Resource Manager templates. To create a workspace through the Azure Portal, browse to the Azure Marketplace and search for Log Analytics. Select Create to open the workspace configuration blade (see Figure 1-45).
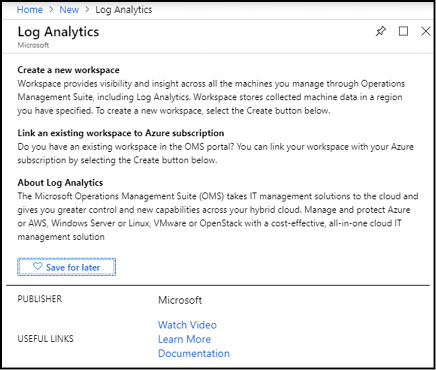
Figure 1-45 Log Analytics create blade
To configure a workspace, you will need to provide (Figure 1-46):
A name for the workspace
The subscription the workspace will be associated with
A resource group
A location
A selection for pricing tier
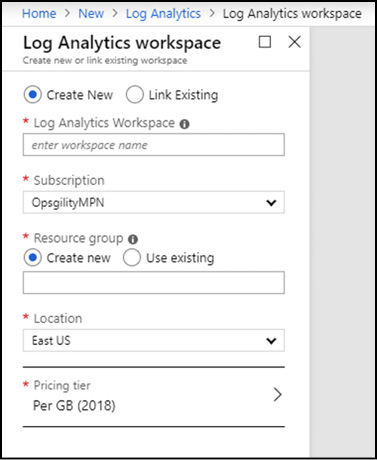
Figure 1-46 Log Analytics workspace configuration
Note Log Analtics Pricing
Details on pricing for Log Analytics can be found at
https://azure.microsoft.com/pricing/details/monitor/. This page also includes the pricing details for other services related to Azure Monitor such as Application Insights and Alert rules.
Note that Log Analytics is not available in all regions. You can use the Azure Products by Region documentation, at https://azure.microsoft.com/global-infrastructure/services/, to select an appropriate region.
To select the appropriate pricing tier, review the pricing documentation at https://azure.microsoft.com/pricing/details/monitor/. A new workspace will default to the Free tier which includes 5 GB of log storage per month (31 days) with per GB pricing and per GB charges for additional storage and retention.
To create a workspace with Azure PowerShell or the Azure CLI you can use a Resource Manager template. For example,, the sample template provided below will create a new Log Analytics workspace in the region selected through the location parameter and with the pricing tier selecting through the sku parameter.
{
"$schema": "http://schema.management.azure.com/schemas/2014-04-01-
preview/deploymentTemplate.json#",
"contentVersion": "1.0.0.0",
"parameters": {
    "workspaceName": {
        "type": "String",
        "metadata": {
          "description": "Specifies the name of the workspace."
        }
    },
    "location": {
       "type": "String",
       "allowedValues": [
         "eastus",
         "westus2"
       ],
       "defaultValue": "eastus",
       "metadata": {
         "description": "Specifies the location in which to create the workspace."
       }
   },
   "sku": {
      "type": "String",
      "allowedValues": [
        "Standalone",
        "PerNode",
        "PerGB2018"
      ],
      "defaultValue": "PerGB2018",
      "metadata": {
      "description": "Specifies the service tier of the workspace: Standalone,
 PerNode, Per-GB"
    }
      }
},
"resources": [
    {
        "type": "Microsoft.OperationalInsights/workspaces",
        "name": "[parameters('workspaceName')]",
        "apiVersion": "2017-03-15-preview",
        "location": "[parameters('location')]",
        "properties": {
            "sku": {
                "Name": "[parameters('sku')]"
             },
             "features": {
                "searchVersion": 1

   }
         }
      }
   ]
}
The template above when used with the New-AzResourceGroupDeployment cmdlet or the az group deployment command will provision a new workspace based on the supplied parameters. Save the template above as azuredeploy.json and execute the following script to create a new Log Analytics workspace with the Per GB pricing model in the East US region:
$params = @{
   workspaceName = "ExampleLA"
   location = "eastus"
   sku = "PerGB2018"
}

New-AzResourceGroup -Name ExamRefRG -Location "East US"
New-AzResourceGroupDeployment -ResourceGroupName ExamRefRG -TemplateFile
'azuredeploy.json' -TemplateParameterObject $params -Verbose
After a workspace has been provisioned, you must enable data collection and configure both resource and tenant logs to store their logs within the service.
To collect event and performance data from Windows and Linux machines, open the workspace and configure the Advanced settings (see Figure 1-47). From this blade, you can obtain the Workspace ID, Primary Key, and Secondary Key for associating machines with the service through the monitoring agent. You can use this information when onboarding clients manually to the workspace.

Figure 1-47 Log Analytics workspace advanced settings
From the Data settings you can configure the Windows Event Logs, Windows Performance Counters, Linux Performance Counters, Syslog, IIS Logs, and Custom Fields and Custom Logs (see Figure 1-48).
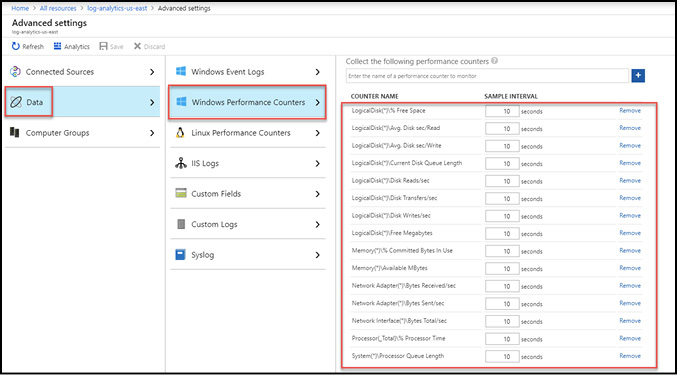
Figure 1-48 Log Analytics workspace advanced settings for data
Important Azure Monitor Logs
The settings shown in Figure 1-49 apply to the entire workspace and cannot be configured per computer group.
After the workspace has been configured, you can begin to onboard machines. For machines to report telemetry to Log Analytics, they must be running the Azure Log Analytics (OMS) agent. This agent was previously referred to as the Microsoft Monitoring Agent (MMA) or the OMS Linux agent. The agent binds to a workspace to collect the data defined in the workspace settings or any installed solutions.
The method for installing the agent varies based on the machine operating system, where it is hosted, and how it is managed.
Azure Virtual Machines can be onboarded manually through the Azure Portal, automatically through a Log Analytics workspace associated with Azure Security Center, or programmatically through the Log Analytics VM extension for Windows or Linux using Azure PowerShell, the Azure CLI, or a Resource Manager template.
Hybrid Windows computers (server or client) can be onboarded manually by downloading the agent and installing locally or through Azure Automation DSC when using hybrid workers.
Hybrid Linux computers (server only) can by onboarded manually by downloading the agent and installing locally.
Machines managed with System Center Operations Manager (SCOM) can be integrated directly with Log Analytics by configuring SCOM to forward logs to the service.
Note Agent Deployment and Installation
For specific guidance on how you should deploy and install the agent based on your scenario, refer to the documentation at:
https://docs.microsoft.com/azure/azure-monitor/platform/log-analytics-agent#install-and-configure-agent.
You must also ensure that the required ports are available and required URIs are whitelisted for the agent to send telemetry. The agent utilizes port 443 for all outbound communication. The required URIs are shown in Table 1-4.
Table 1-4 Log Analytics Agent ports and protocols
| Agent Resource | Ports | Direction | Bypass HTTPS inspection |
| *.ods.opinsights.azure.com | Port 443 | Inbound and outbound | Yes |
| *.oms.opinsights.azure.com | Port 443 | Inbound and outbound | Yes |
| *.blob.core.windows.net | Port 443 | Inbound and outbound | Yes |
| *.azure-automation.net | Port 443 | Inbound and outbound | Yes |
After the workspace has been configured, tenant logs, resource logs, and machines have been onboarded, you can begin to analyze and visualize data. To interact with the data in Log Analytics you use log queries, which are used to:
Perform interactive analysis of log data through the Azure Portal in Azure Monitor and a Log Analytics workspace.
Build custom alert rules based on the logs in a workspace.
Generate visualizations to can be shared through Azure Dashboards.
Export custom data sets to Excel or Power BI.
Perform automation based on log data with PowerShell or the Azure CLI.
Note Log Query Usage
To learn more about all the ways that log queries can be used, refer to the documentation at: https://docs.microsoft.com/azure/azure-monitor/log-query/log-query-overview#where-log-queries-are-used.
The query language used by Log Analytics is called Kusto. Kusto queries are used to generate read-only requests to process data and return results. This means that the logs stored in Log Analytics are immutable and are only removed from a workspace based on the retention configuration. Queries are authored in plain-text and the schema used by Log Analytics is like SQL’s with databases and tables composed of columns and rows. In each table, data is organized in columns with different data types as indicated by icons next to the column name. Column data types include text, numbers, and datetime.
Authored queries in Log Analytics can take many forms, from basic queries to very advanced queries with multiple aggregates and summarizations. Queries can be used to search terms, identify trends, analyze patterns, and provide many other insights. Queries search tables and can start with either a table name or a search command that defines scope. The pipe (|) character separates commands, and you can add as many commands as required.
In the following example query the Heartbeat table is queried to summarize the count of computers (by IP) and by a time value (TimeGenerated) to render a chart to track the number of computers reporting a workspace each hour.
// Chart the number of reporting computers each hour
Heartbeat
| summarize dcount(ComputerIP) by bin(TimeGenerated, 1h)
| render timechart
To run this query, browse to Azure Monitor and select Logs to open the query interface. This query will not return data if you do not have any virtual machines deployed and running. Those machines must also be associated with the Log Analytics workspace you are querying.
The query shown above is a table-based query. Queries always begin with a scope–either a table or search-based query. Kusto queries are case-sensitive. Language keywords are typically written in lower-case. When using the names of tables and columns in queries, you must ensure you are using the correct case. Table-based queries target a single table in a Log Analytics workspace (or database) while search-based queries target all tables by default.
Table-based queries start by scoping the query, and therefore tend to be very efficient and generally faster than search queries. Search queries are less structured by nature, which makes them the better choice when searching for a specific value across columns or tables. In other words, search can scan all columns in a given table, or in all tables across an entire workspace, for the defined value.
The amount of data being processed by a query could be enormous, which is why these queries can take longer to complete and might return large result sets which are limited by the Log Analytics service to 10,000 results.
To author queries in the Azure Portal, browse to Azure Monitor and select the Logs blade. From this blade, you can access all the subscriptions and workspaces you have rights to read from. Azure Monitor offers many sample queries for heartbeats, performance, and usage across your machines and services tracked in Log Analytics (see Figure 1-49).

Figure 1-49 Azure Monitor logs
In addition to sample queries, you can browse the schema for the currently selected workspace. This is useful for determining the proper case for table and column names as Kusto is a case-sensitive query language. Authored queries can be saved for later and/or favorited where they can be retrieved later using the Query explorer.
The query interface also gives to the ability to easily create alert rules based on your query logic. Using the +New alert rule button will pre-populate an alert rule with the resource target already configured and a single condition pre-populated as well (see Figure 1-50). The condition log can be refined, and the query can be updated if needed.
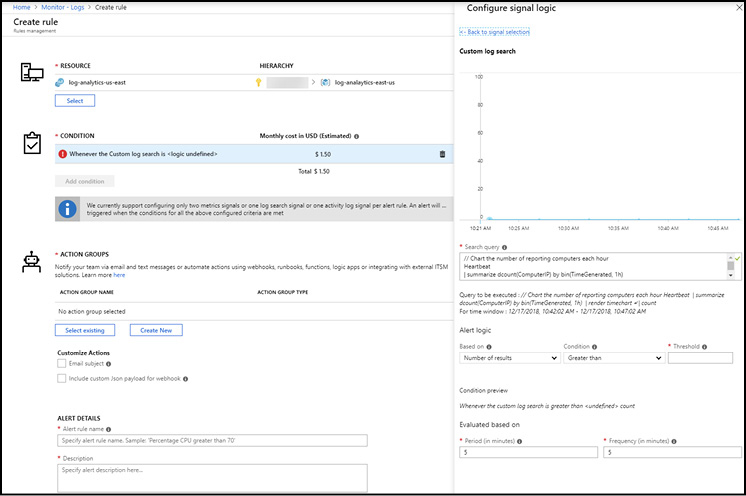
Figure 1-50 Azure Monitor Log Analytics new alert rule
Monitor for unused resources
There are several approaches to monitoring for unused resources in Azure. You can use a service like Azure Monitor and Alerts to monitor for resource consumption below a threshold to use your own logic criteria or you can leverage Azure Advisor and its built-in optimization recommendations.
Azure Advisor is a service in Azure that offers personalized recommendations to consumers of Azure based on the resources that are used in your subscriptions. An example of the Azure Advisor dashboard is shown in Figure 1-51.
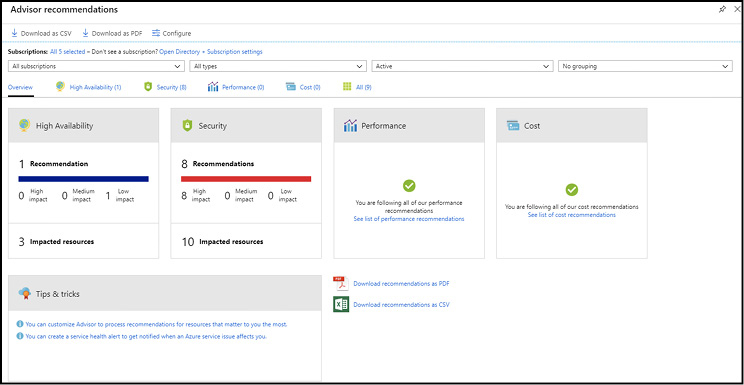
Figure 1-51 Azure Advisor
Azure Advisor creates recommendations across four domains:
High availability To improve the high-availability and business continuity of your applications hosted on Azure.
Security To detect configurations that may lead to breaches.
Performance To improve the speed of your applications.
Cost To optimize and reduce your overall Azure spending by identifying underused and idle resources like virtual machines.
As the recommendations in Azure Advisor are personalized, the value gained from Azure Advisor depends on the services you deploy and how those services and resources are configured.
Azure Advisor cost recommendations can help you with optimizing the cost and resource consumption for virtual machines, ExpressRoute circuits, and virtual network gateways.
Virtual machines can be one of the most expensive resources in a cloud implementation and are also one of the easiest resources to control for cost. There are several ways to accomplish this:
Deallocating compute when it is not in use or not needed. For example, shutting down and deallocating development virtual machines in off-hours means you will not be charged for the CPU and RAM consumption normally associated with running a virtual machine.
Deleting unused virtual machines. It may sound obvious, but many organizations leave virtual machines in place. If you take the time to automate the provisioning and configuration of your environments, you can tear them down when not needed and stand them up on demand. For example, if you have a user-acceptance environment that is short-lived, it should only be allocated when testing is occurring.
Right-sizing virtual machines to ensure full-utilization of virtual machine resources such as CPU.
Azure Advisor monitors your virtual machines through Azure metrics to identify low-utilization VMs. This is done by monitoring CPU usage over 14 days and identifying VMs whose CPU consumption is 5 percent or less, and network usage is 7 MB or less for four or more days. Advisors shows under-utilized VMs on the Cost Recommendations blade with an estimated cost to continue running the machine.
The CPU utilization rule can be customized to 5, 10, 15, or 20 percent. In Figure 1-52, you can see the configuration of a custom CPU utilization rule within Azure Advisor. This rule is subscription-specific allowing you to have different utilization rules based on the workloads you deploy. Right-sizing your virtual machines can lead to a significant reduction in cost for underutilized servers.
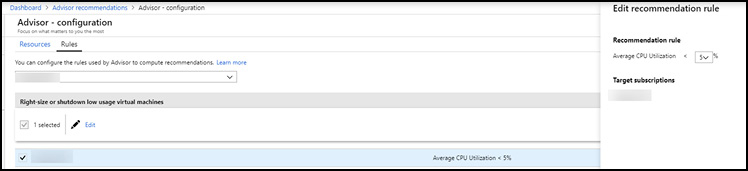
Figure 1-52 Azure Advisor CPU utilization rule
Advisor can also identify ExpressRoute circuits that have been in the provider status of Not Provisioned for more than 30 days and will recommend deleting the circuit if you are not planning to finalize provisioning the circuit with your network service provider.
Advisor will also identify virtual network gateways that have been idle for more than 90 days. Gateways are currently billed hourly, and you can recognize savings quickly by eliminating unused gateways.
Monitor and report spend
While Azure Advisor and its cost recommendations provide one method for monitoring spend and unused resources, Azure has many other tools that can help you monitor the cost of your resources and report on that cost.
There are several considerations that you must account for when reporting on the cost associated with your Azure resources:
Azure services are available to customers in 140 countries worldwide.
Billing is supported across 24 major currencies.
Azure subscriptions are billed monthly. If paying by credit card, note that pre-paid cards and virtual credit cards are not accepted.
You can also pay for Azure by monthly invoice. To apply for invoice payment, raise an appropriate billing support ticket from the Azure management portal. Processing the request takes 5-7 days, depending on the time required for the necessary credit checks. Invoice payment is only available to business customers, and once a subscription has been moved to invoice payment, it cannot be moved back to credit card payment.
Customers on an Enterprise Agreement (EA) can add up-front commitments to Azure and then create multiple subscriptions under the agreement, which draw from the monetary commitment.
EA commitments are billed immediately, and then consumed throughout the year against the Azure resources consumed.
If the committed spend is exceeded, the extra spend, or ‘overage,’ is billed at the same discounted EA rate. Billing for overage is annual if the overspend is under 50% of the commitment, or quarterly if over 50%.
Azure Marketplace services are billed separately with a potentially different billing period, separate invoice, and separate credit card charge. Each service has its own billing model, which will be described in the Azure Portal at the time of purchase. These range from pay-as-you-go per-minute billing to fixed monthly charges. Some services also offer a ‘bring your own license’ model, which must provide a license purchased separately prior to using the service.
There are three portals that are used to manage Azure subscriptions that are relevant for billing and cost management. They are:
The EA Portal available at https://ea.azure.com. This is available only to customers with an Enterprise Agreement and is used for managing spend across one or more subscriptions.
The Account Portal at https://account.azure.com/subscriptions. This is available for all subscriptions and accessible by Account owners. It is used to manage subscriptions, payment methods, and spending limits.
The Azure Portal at https://portal.azure.com. This is available for all subscriptions and includes Azure Cost Management.
The EA Portal can be used to monitor spend across multiple subscriptions with the ability to view costs by the entire organization or by the business unit. Organizations can view historical spending, broken out by commitment, and overage or third-party Azure Marketplace consumption (see Figure 1-53). They can also download their current price sheet to see their EA discount rates, which often differ from the public pricing shown in the Azure Portal and in the pricing calculator.
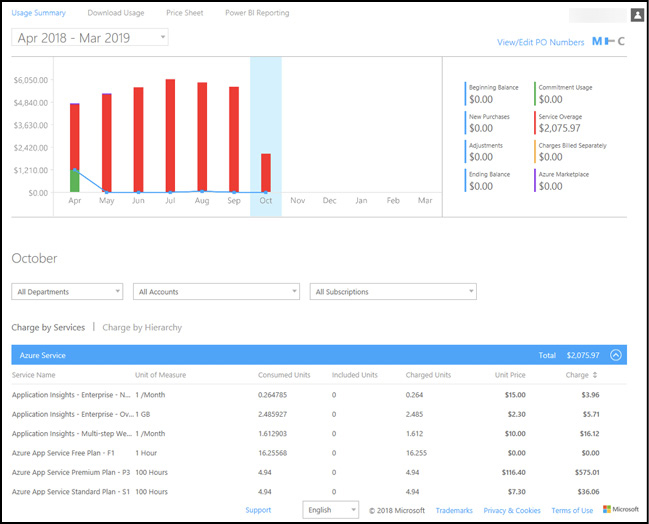
Figure 1-53 Azure EA Portal
EA customers can create spending quotas and set notification thresholds through the EA Portal. This is in addition to the budget alerts available through Azure Cost Management and Billing Alerts found in the Account Portal. An advantage of using the EA portal to configure spending notifications is that a quota alert can be triggered based on aggregate spending across all of the subscriptions within a department. Cost centers can be assigned to the departments that accounts and subscriptions roll up to for EA customers, making it easier to track cost by business unit and operate a showback or chargeback model.
Within the Azure Portal, EA customers can also use Azure Cost Management for tracking cost for individual subscriptions. Cost Management includes features for performing cost analysis, setting per-subscription budgets and alerts, setting recommendations for optimization, and exporting cost management data to perform deeper analysis.
Access to the Cost Management service is dictated by scopes. A user must have at least read access to one of the following scopes shown in Table 1-5 to view data in Cost Management.
Table 1-5 Cost Management access scopes
| Scope | Defined at | Required access to view data | Prerequisite EA setting | Consolidates data to |
| Billing account | https://ea.azure.com | Enterprise Admin | None | All subscriptions from the enterprise agreement |
| Department | https://ea.azure.com | Department Admin | DA view charges enabled | All subscriptions belonging to an enrollment account that is linked to the department |
| Enrollment account | https://ea.azure.com | Account Owner | AO view charges enabled | All subscriptions from the enrollment account |
| Management group | https://portal.azure.com | Cost Management Reader (or Reader) | AO view charges enabled | All subscriptions below the management group |
| Subscription | https://portal.azure.com | Cost Management Reader (or Reader) | AO view charges enabled | All resources/resource groups in the subscription |
| Resource group | https://portal.azure.com | Cost Management Reader (or Reader) | AO view charges enabled | All resources in the resource group |
To access Cost Management, in the Azure Portal browse to Cost Management + Billing, then Cost Management, and then select Cost Analysis as shown in Figure 1-54.
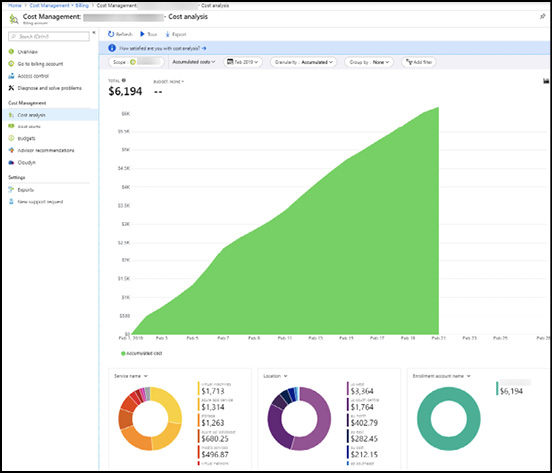
Figure 1-54 Azure Cost Management cost analysis
If you have access to more than one scope, you can filter by scope and begin interacting with the data. From cost analysis, you can view the total costs for the current month, view the budget (if available), set the granularity (Accumulated, Daily, or Monthly), and set the pivot. You can pivot by Department Name, Enrollment Account Name, Location, Meter, Meter Category, Meter Subcategory, Resource, Resource Group Name, Resource Type, Service Name, Service Tier, Subscription ID, Subscription Name, and Tag.
The data in a view can be downloaded from Cost analysis as a CSV. Any filtering that you have applied, including groupings, are applied to the file.
Cloudyn is an Azure service that is related to Cost Management, which can track resource cost for Azure resources. Cloudyn can also track resource usage for AWS and Google. Cloudyn also supports non-EA accounts including Pay-As-You-Go and Cloud Solution Provider. Cloudyn can be used to monitor usage and spending after it has been configured by tenant owner.
To enable Cloudyn, in the Azure Portal browse to Cost Management + Billing, followed by Cost Management, and then Cloudyn. Click the Go to Cloudyn button to open a new window and finish registration (see Figure 1-55). You must be signed in as a user with permission to register the CloudynCollector application with your Azure AD tenant, and the ability to assign the application to a role in your Azure subscriptions. In your Azure subscriptions, your accounts must have Microsoft.Authorization/*/Write access to assign the CloudynCollector application. This action is granted through the Owner role or User Access Administrator role. Contributors do not have permission to assign the application.
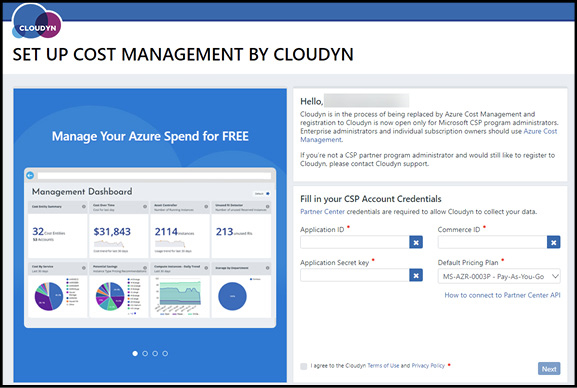
Figure 1-55 Cloudyn registration
The Offer ID for your subscription can be found in the Account Portal. In the upper-right of the Azure portal, click your user information and then click View My Bill (may be behind an ellipsis). Under Billing, click Subscriptions. Under My subscriptions, select the subscription. Your Offer ID is shown under Offer ID (see Figure 1-56).
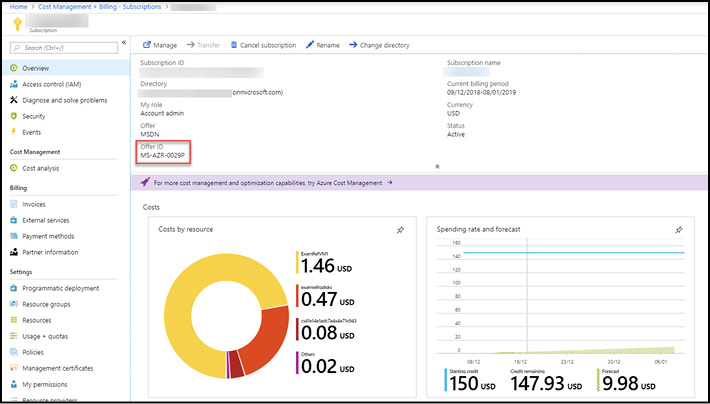
Figure 1-56 Azure subscription offer ID
After the application has been provisioned, it may take some time for the dashboards and reports in Cloudyn to show data (see Figure 1-57).
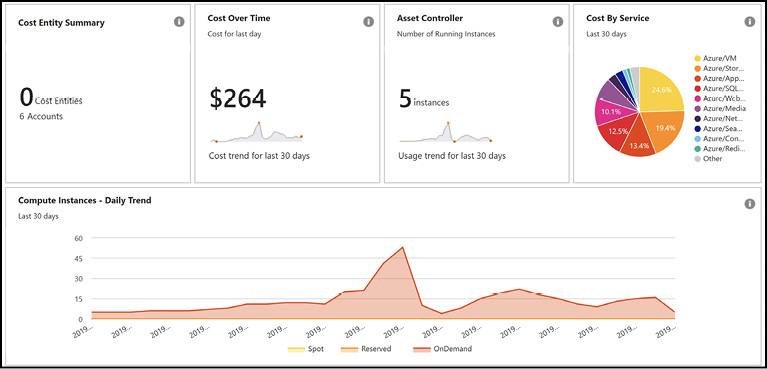
Figure 1-57 Cloudyn dashboard
Skill 1.3: Manage resource groups
As you build and deploy services in Azure you will create many types of resources. For instance, when creating your first virtual machine you will also deploy many other resources including:
A disk for the OS
A network interface for the VM
A virtual network and subnet for that network interface to bind to
A network security group (in a default portal configuration)
It is important to understand that many services in Azure create multiple resources and how you manage those resources will be driven by organizational policy and the lifecycle of your infrastructure hosted in Azure.
A resource in Azure is a single service instance, which can be a virtual machine, a virtual network, a storage account, or any other Azure service (Figure 1-58).
Figure 1-58 Azure resource
Resource groups are logical groupings of resources, or those single service instances (Figure 1-59).
Figure 1-59 Azure hierarchy
Using a virtual machine, which is many individual service instances, you can group the instances together and manage them as one unit. Each resource in Azure can only exist in one resource group, and resource groups cannot be renamed. There are no limitations to the types of resources that can be logically contained within a resource group, and there are no limitations on the regions that resources must reside in when in a resource group.
Figure 1-60 shows this hierarchy with an Azure subscription, multiple resource groups, and the resources that reside within those resource groups.

Figure 1-60 Azure hierarchy
When creating resource groups, it is import that you consider the factors noted above such as a single resource being associated with only one resource group at a time and the following:
A resource group cannot be nested in another resource group.
You can add or remove a resource from a resource group at any time.
You can move a resource from one resource group to another.
A resource group can be used to scope access control.
A resource group can be used to scope policy.
A resource in a resource group can interact with resources in another resource group.
A resource group is created in a location. The location of a resource group specifies where the metadata for the resource group is stored. If you have compliance constraints, this is an important consideration.
This section covers how to:
Create baseline for resources
Automating the creation and configuration of your resources will lead to consistent environments through idempotent deployments.
To automate the creation of Azure resources in a declarative manner you can use Azure Resource Manager templates. Resource Manager templates are JSON files that define the infrastructure and configuration of resources in Azure. When a Resource Manager template is used to create resources in Azure, it is submitted to the Resource Manager API as a deployment. Azure tooling, including the Azure Portal, also create and submit Resource Manager deployments as resources are created. In this sense, you can think of the Azure Portal as a Resource Manager template expression generator.
Templates define the resources that will be created or updated in one or more resource groups. This includes the basic metadata associated with every resource, such as name and location, resource-specific properties and configuration, and resource dependencies. For example, a template can be used to create a resource group, a virtual network with a subnet, a network interface, and a virtual machine. The virtual machine cannot be created until the network interface has been created, and the network interface cannot be created until the virtual network and subnet have been created. This dependency chain can be defined within the template (see Figure 1-61).
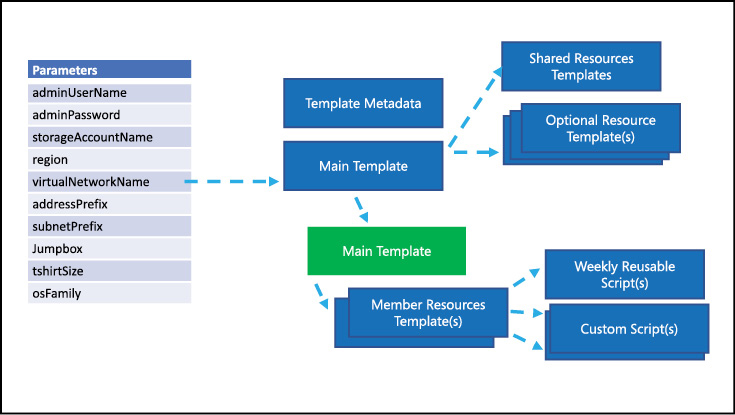
Figure 1-61 Resource Manager Template Diagram
Declarative deployments with Resource Manager templates have a number of advantages over imperative deployments with PowerShell or the CLI. These include:
Simple orchestration of complex environments
Deploy multiple resources in parallel
Use parameters, variables, and functions for dynamic deployments and templates can be reused multiple times
Templates are text files and can easily be used source control management systems and treated as formal artifacts
Resource Manager templates have a set schema. The required properties for a Resource Manager template are:
$schema
contentVersion
resources
And the following optional properties:
parameters
variables
functions
outputs
A blank template takes the following form. In this example, parameters, variables, and outputs are included. While not required, you will see these properties used in most templates, especially as you move beyond basic templates and your deployments and deployment logic become more complex.
{
   "$schema": "https://schema.management.azure.com/schemas/2015-01
-01/deploymentTemplate.json#",
   "contentVersion": "1.0.0.0",
   "parameters": {
   },
   "variables": {
   },
   "resources": [
   ],
   "outputs": {
   }
}
Where:
$schemais the URL to the JSON schema that defines the version of the template language.contentVersionis the version of your template. This is useful to ensure you are deploying the correct version of the template.parametersdefine inputs for the template.variablesare custom values usually created from parameters or output from other templates.resourcesare the resources in Azure the template defines.outputsreturn values (if any) that the template produces.
The following is an example of a complete Resource Manager template that creates a storage account. Note that properties like output are present even if no values are returned. While this is not required per the schema it is still valid and, in some cases, can make it easier to extend your template at a later time.
{
   "$schema": "http://schema.management.azure.com/schemas/2015-01-01/
deploymentTemplate.json#",
   "contentVersion": "1.0.0.0",
   "parameters": {
       "location": {
           "type": "string"
       },
       "accountType": {
           "type": "string"
       },
       "kind": {
           "type": "string"
       },
       "accessTier": {
           "type": "string"
       },
       "supportsHttpsTrafficOnly": {
           "type": "bool"
       }
   },
   "variables": {
       "storageAccountName": "[concat(uniquestring(resourceGroup().id), 'standardsa')]"
   },
   "resources": [
      {
           "name": "[variables('storageAccountName')]",
           "type": "Microsoft.Storage/storageAccounts",
           "apiVersion": "2018-07-01",
           "location": "[parameters('location')]",
           "properties": {
               "accessTier": "[parameters('accessTier')]",
               "supportsHttpsTrafficOnly": "[parameters('supportsHttpsTrafficOnly')]"
           },
           "dependsOn": [],
           "sku": {
               "name": "[parameters('accountType')]"
           },
           "kind": "[parameters('kind')]"
      }
   ],
   "outputs": {}
}
When you are creating templates, you will need to know the types of resources that are available and the values to use in your templates. The reference documentation for all valid resource types can be found at https://docs.microsoft.com/azure/templates/. If you know the resource type, you can browse directly to the documentation by using the URL format https://docs.microsoft.com/azure/templates/<provider-namespace>/<resource-type>. For example, to browse to the documentation for storage accounts, use the Microsoft.Storage resource provider and the storageAccounts resource type, making the URL https://docs.microsoft.com/azure/templates/Microsoft.Storage/storageAccounts.
There are several ways to get started with Resource Manager templates. For any resource group or resource deployed through the Azure Portal you can browse to the Automation script blade of the resource as shown in Figure 1-62.
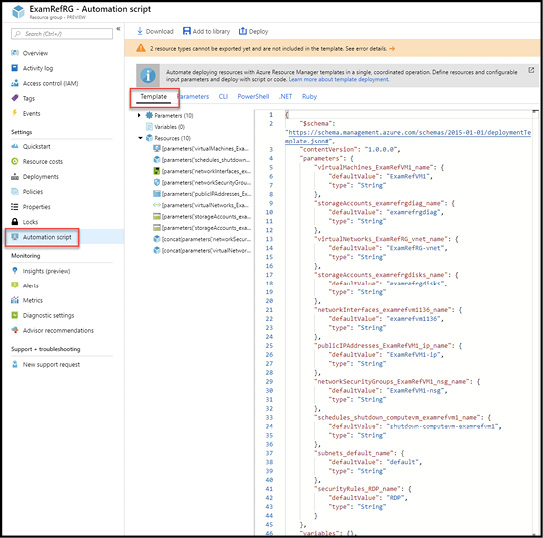
Figure 1-62 Automation script blade
From this blade you redeploy the template, add the template to a library that can secured with RBAC, or download the template to make modifications to it or store it in another location such as a source control provider. Note that the entire template is provided, including predefined parameters, variables, resources, and outputs (if any exist).
Microsoft also maintains a repository with more than 700 example templates known as the Azure Quickstart Templates, which can be found at https://azure.microsoft.com/resources/templates/. The templates found at that location are hosted in a public GitHub repository that can be found at https://github.com/Azure/azure-quickstart-templates. The GitHub repository is useful if you want to clone or download the repository to have a local copy.
To deploy a Resource Manager template, you can use the Azure Portal, Azure PowerShell, the Azure CLI, and the REST API. With any of these tools, templates can be deployed from a local source (a template that is uploaded to the Portal from a local machine) or from an external source (a publicly accessible template file in a GitHub repository).
To deploy a Resource Manager template using the Azure Portal, select +Create A Resource and search the Azure Marketplace for Template Deployment and click Create. Note that from the Custom deployment blade you can elect to Build your own template in the editor, select from a list of common templates, or search the Azure Quickstart Template repository as shown in Figure 1-63.
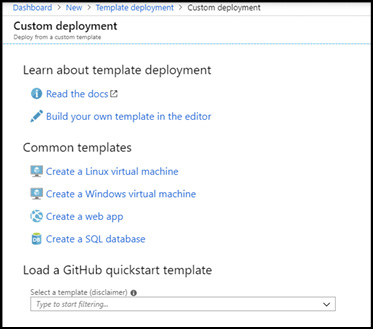
Figure 1-63 Custom template deployment blade
After selecting a starter template or building your own, you will be presented with a blade to input the Basics for your deployment, including the selection of a Subscription, the selection or creation of a resource group, and the Location for the deployment. Any parameters from the source template will be presented under Settings, offering the opportunity to supply any runtime values prior to submitting the deployment. Figure 1-64 shows an example of this blade.
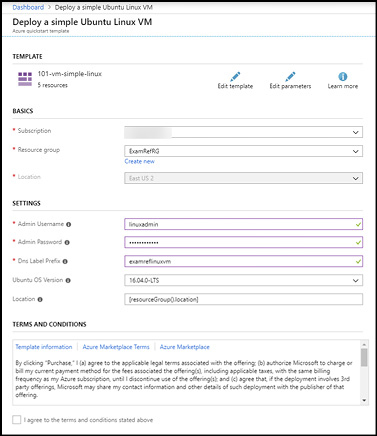
Figure 1-64 Custom template configuration blade
After you have submitted the deployment by clicking Purchase you will be able to track the deployment progress by browsing the resource group and clicking the link under Deployments on the Overview blade (see Figure 1-65).

Figure 1-65 Resource group overview blade
When you are deploying resources to Azure using a template, those resources could be from Microsoft or from a third-party publisher which may have its own payment terms (for instance, if you deploy a third-party network virtual appliance). This is why the button says Purchase, instead of Create.
Clicking through to the deployment will open the Overview for the blade where you can view the deployment history, see the status for any resources that were included in the deployment, and drill into operation details as needed. From this screen you can also once again download the template as well (see Figure 1-66).
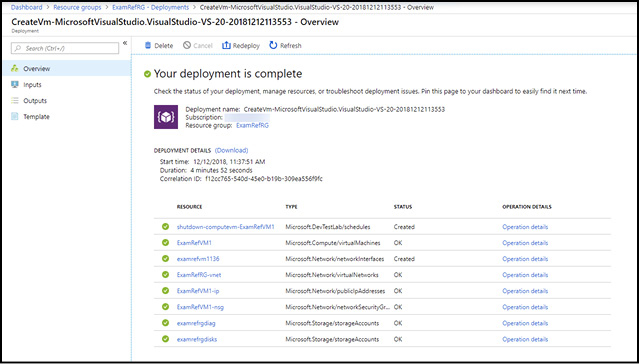
Figure 1-66 Deployment overview blade
To deploy a template with Azure PowerShell, you can use the New-AzResourceGroupDeployment cmdlet. Note that deployments are submitted to resource groups, so if you do not have an existing resource group to deploy to, you will need to create one first with the NewAzResourceGroup cmdlet.
To deploy a template from a local source:
Connect-AzAccount
Select-AzSubscription -SubscriptionName <yourSubscriptionName>

New-AzResourceGroup -Name ExamRefRG -Location "East US 2"
New-AzResourceGroupDeployment -Name ExamRefDeployment -ResourceGroupName ExamRefRG `
  -TemplateFile c:MyTemplatesazuredeploy.json -storageAccountType Standard_GRS
To deploy a template from an external source:
New-AzResourceGroupDeployment -Name ExamRefDeployment -ResourceGroupName ExamRefRG `
  -TemplateUri https://raw.githubusercontent.com/Azure/azure-quickstart-templates/
master/101-storage-account-create/azuredeploy.json `
  -storageAccountType Standard_GRS
There are cmdlets within Azure PowerShell which will allow you to validate your templates without deploying them as well. To test a template without deploying it, use the Test-AzResourceGroupDeployment cmdlet.
Test-AzResourceGroupDeployment -ResourceGroupName ExamRefRG `
  -TemplateFile c:MyTemplatesazuredeploy.json -storageAccountType Standard_GRS
If the deployment passes validation, the command will return with no output. If a deployment does not pass validation, the output will be display. For example, using the same template we can pass in a value for the storageAccountType parameter that is not allowed:
Test-AzResourceGroupDeployment -ResourceGroupName ExamRefRg `
  -TemplateFile c:MyTemplatesazuredeploy.json -storageAccountType unknownSKU
Code    : InvalidTemplate
Message : Deployment template validation failed: 'The provided value 'unkownSKU' for
  the template parameter 'storageAccountType'
           at line '15' and column '24' is not valid. The parameter value is not
part of the allowed value(s):
           'Standard_LRS,Standard_ZRS,Standard_GRS,Standard_RAGRS,Premium_LRS'.'.
Details :
To deploy a template with the Azure CLI, you can use the az group deployment create command. Just as with PowerShell, your deployment is submitted against a resource group. If the resource group does not exist, you must create one first with the az group create command.
az group create --name ExamRefRg --location "East US 2"
az group deployment create
 --name ExamRefDeployment
 --resource-group ExamRefRg
 --template-file azuredeploy.json
 --parameters storageAccountType=Standard_GRS
The Azure CLI can also be used to execute deployments from external sources:
az group deployment create
 --name ExamRefDeployment
 --resource-group ExamRefRg
 --template-uri "https://raw.githubusercontent.com/Azure/azure-quickstart-
templates/master/101-storage-account-create/azuredeploy.json"
 --parameters storageAccountType=Standard_GRS
To test a deployment, use the az group deployment validate command:
az group deployment validate
 --resource-group ExamRefRg
 --template-file azuredeploy.json
 --parameters @storage.parameters.json
Regardless of whether the template deployment succeeds or fails, the command will always return a value. If an error is found, it will be shown in the "error" object in the returned JSON.
{
  "error": {
    "code": "InvalidTemplate",
    "details": null,
    "message": "Deployment template validation failed: 'The provided value
'unknownSKU' for the template parameter
      'storageAccountType' at line '13' and column '20' is not valid. The
parameter value is not part of the allowed
      value(s): 'Standard_LRS,Standard_ZRS,Standard_GRS,Standard_RAGRS,Premium_LRS'.'.",
    "target": null
   },
   "properties": null
}
Use Azure policies for resource groups
When managing resource groups, and in many cases the multiple Azure services that reside within them, both Azure Policy with policy definitions and policy assignments can be used to govern those resources. Initiative definitions and initiative assignments can be used to govern those same resources, but instead of applying multiple policy definitions and making multiple policy assignments, you can package or group multiple definitions into a single initiative and then assign that initiative to your desired scope.
Controlling resource groups with Azure Policy is done by scoping the assignment of policy and initiatives. Recall that Azure Policy supports multiple scopes:
Management Group Assignments scoped at the Management Group (either the Tenant Root Group or a child group) apply to all child resources in the Management Group– subscriptions, resource groups, and resources.
Subscription Assignments scoped to a subscription apply to all child resources in the subscription–resource groups and resources.
Resource Group Assignments scoped to a resource group apply to all child resources in the resource group.
When creating assignments, it is also possible to configure excluded scopes. The ability to configure exclusions in an assignment is determined by the scope of the policy. For example, when scoping an assignment to a Management Group, any subscriptions, resource groups, or even resources that are children of the Management Group, can be excluded. When scoping an assignment to a subscription, child resource groups and resources can be excluded. When scoping an assignment to a resource group, only child resources can be excluded.
The flexibility of policy scoping is a powerful feature of Azure Policy. This allows you to model your environments with rich declarations in the form of policy definitions that are applied exactly as required by your organization’s governance needs.
Imagine you have an environment with the following requirements :
All resources should be tagged with the tag "Environment" and the value "Dev/Test.”
Only A-Series and D-Services virtual machines can be created, specifically Standard A0, A1, and D2 virtual machines that are not promotional.
Resources in the rgCoreNetwork resource group are exempt from these policies.
To model this environment with Azure Policy, you can create two policy definitions (or use built-in policy definitions where applicable) as shown in Table 1-6.
Table 1-6 Azure policy definitions example
| Policy Field | Policy Effect | Description |
| Type | deny | If virtual machines are not in the required SKU in the A-Series or D-Series prevent their creation |
| tags | append | Append tag name "Environment” and tag value "Dev/Test” to all resources |
In the Azure Portal, browse to the Policy service and select the Definitions blade. To reduce administrative overhead, a new initiative definition will be created. Initiative definitions are a collection of policy definitions that are focused on the same goal. They allow for a set of policies to be grouped as a single item.
From the Definitions blade, select +Initiative Definition, as shown in Figure 1-67.
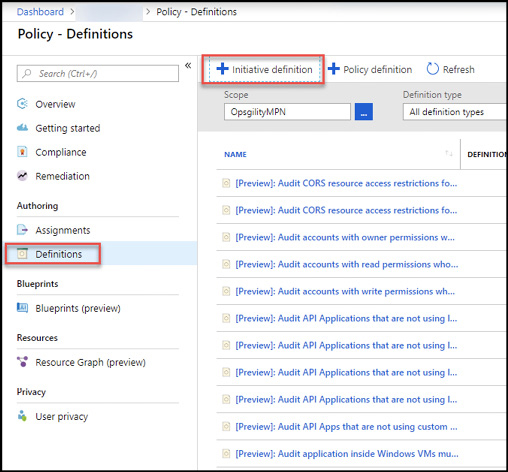
Figure 1-67 Azure Policy Definitions blade
Name the initiative Dev/Test Compliance and set the category to (create new) Custom (Figure 1-68).

Figure 1-68 Azure Policy new initiative definition
Add the following built-in policies to the definition and set the values as noted (see Figure 1-69):
Apply tag and its default value
Tag Name Environment
Tag Value Dev/Test
Allowed virtual machine SKUs
Allows SKUs Standard_A0, Standard_A1, Standard_A1_v2, Standard_D2, Standard_ D2_v2, Standard_D2_v3, Standard_D2s_v3
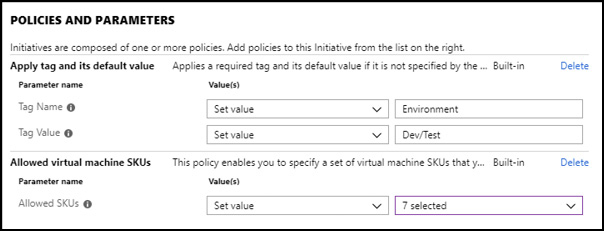
Figure 1-69 Azure Policy new initiative definition policies and parameters
Save the definition so it can be used in an initiative assignment. Browse to the Assignments blade and select Assign Initiative (see Figure 1-70).
Figure 1-70 Azure Policy Assignments blade
To meet the environmental requirements, set the Scope of the assignment to the target subscription and configure the exclusions to exclude the rgCoreNetwork resource group. Configure the rest of the assignment and click Assign (see Figure 1-71).
Figure 1-71 Azure Policy Assign initiative blade
After policy definitions have been assigned, either through policy assignments or initiative assignments, the effects of the policy will be immediately applicable. Policy evaluation for compliance, however, happens about once an hour which means you may not be able to view the compliance state of a new assignment immediately.
Compliance state can be viewed on the Compliance blade of the Azure Policy service as shown in Figure 1-72.

Figure 1-72 Azure Policy Compliance blade
Configure resource locks
Azure resource locks (sometimes called management locks) are used to prevent the accidental deletion or modification of critical resources with two types of locks available:
CanNotDelete Locks prevent the deletion of a resource. A CanNotDelete lock only prevents deletion of a resource and does not impede the modification of a resource.
ReadOnly Locks prevent users from modifying a resource, which includes updating or deleting a resource.
Note that both types of resource locks allow for authorized users to read resources and resource locks apply across all users and roles, even custom and privileged roles.
Resource locks, regardless of type, can be applied at the subscription, resource group, and resource scopes. When you apply a lock at a scope, the resources within that scope inherit the lock. This means that a lock applied at the resource group scope applies to all the resources in the resource group. Resource locks apply to all service instances and resources within a scope.
Lock inheritance varies based on the type of lock that is applied. ReadOnly locks are inherited by child resources, while CanNotDelete locks are inherited by child resources and also pushed up to parent resources up and down. For example, a CanNotDelete lock applied to a DNS A record would prevent the deletion of the DNS zone that record resides in as well as the resource group the zone is located in.
It is also important to note that resource locks apply to the management plane of Azure, specifically operations sent to https://management.azure.com. This means they only affect interactions with Azure resources and not how those resources perform their own functions. For example, a ReadOnly lock applied to an Azure App Service would prevent users from updating configuration settings such as adding or updating an application setting or configuring an SSL certificate as show in Figure 1-73.
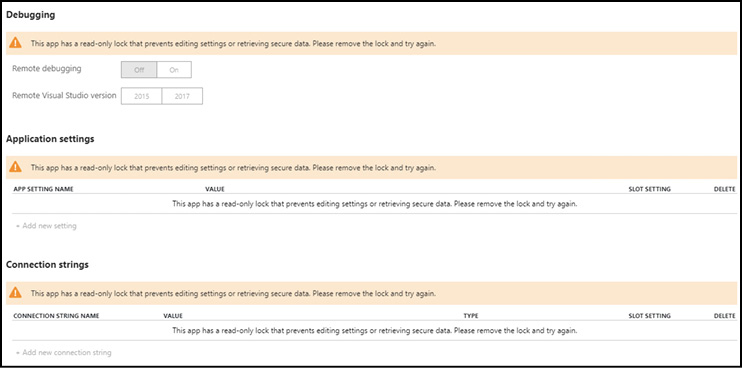
Figure 1-73 Read-only management lock applied to Azure App Service
When creating locks, you should exercise caution because they can have unexpected results. Many operations appearing to be a read operation require write access within the Azure management plane. For example, the same ReadOnly lock on an Azure App Service prevents Visual Studio from displaying files for the resource because the action requires write access.
Once you have determined the type of lock you will apply based on your requirements, you can apply the lock through the Azure Portal, Azure PowerShell, the Azure CLI, Resource Manager templates, or the REST API.
To create a lock through the Azure Portal, browse to the desired scope and select the Locks blade. From the blade, select +Add to create a new lock. Give the lock a name, select the lock type, and add a note that describes the lock as shown in Figure 1-74.
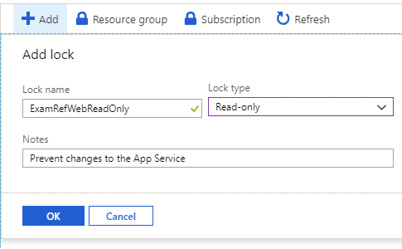
Figure 1-74 Management locks blade
When working with PowerShell, the parameter set of the New-AzResourceLock cmdlet varies
based on the scope of the lock.
To lock a resource group, provide the name of the resource group with the Name parameter and the lock type with the LockLevel parameter.
New-AzResourceLock -LockName rgCoreNetworkLock -LockLevel CanNotDelete
-ResourceGroupName rgCoreNetwork
To lock a resource, provide the name of the resource, the resource type, and the resource group name.
New-AzResourceLock -LockLevel CanNotDelete -LockName CoreNetworkERCircuitLock
-ResourceName erCircuitCore -ResourceType Microsoft.Network/expressRouteCircuits
-ResourceGroupName rgCoreNetwork
Management of resource locks include removing locks when appropriate. For instance, if you have a CanNotDelete lock on a resource that is no longer needed, the lock can be deleted so the resource can be deleted so you are no longer billed for it. To delete a lock with PowerShell you will use the Remove-AzResourceLock cmdlet. This cmdlet has a parameter LockId, which is used to identify the lock that will be removed.
$id = (Get-AzResourceLock -ResourceGroupName rgCoreNetwork -ResourceName erCircuitCore
-ResourceType Microsoft.Network/expressRouteCircuits).LockId
Remove-AzResourceLock -LockId $lockId
Implement and set tagging on resource groups
Recall that resource tags can be applied at the resource group and/or the resource scopes. Also recall that there is no inheritance model for tags when they are applied at a resource group scope. If you need a tag to be applied to all resources in a resource group, each resource must be tagged individually.
Even with this limitation, it can be advantageous to tag resource groups. You may want to do this to be able to make inferences about child resources based on metadata associated with the parent resource group, or even just to store additional metadata if you need to apply more than 15 tags per resource.
Managing tags for resource groups uses the same tools as when working with tags with resources–the Azure Portal, Azure PowerShell, the Azure CLI, Resource Manager templates, and the REST APIs. In Skill 1.1 you learned how to manage tags with Azure PowerShell. In this section, you’ll use the Azure CLI to manage tags.
To add tags to a resource group without existing tags, you will use the az group update command.
az group update -n hrgroup --set tags.Environment=Production tags.CostCode=1001
To add tags to a resource group with existing tags you must retrieve the existing tags, reformat the value, and then reapply the tags to the resource group with the new values.
jsonrtag=$(az group show -n hrgroup --query tags)
rt=$(echo $jsonrtag | tr -d '"{},' | sed 's/: /=/g')
az group update -n hrgroup --tags $rt [email protected]
The az group show command can be used to retrieve the existing tags for a resource group. Note that the output of the command is returned in JSON, which is why it had to be formatted in the example above.
az group show -n hrgroup --query tags
To retrieve all the resource groups with a particular tag you can use the az group list command. For example, to retrieve all the groups with the tag CostCode=1001, you can use the following:
az group list --tag CostCode=1001
Move resources across resource groups
Some resources in Azure can be moved between resource groups and even across subscriptions, but support for move operations does vary based on the service. A reference of services that can be moved can be found at https://docs.microsoft.com/azure/azure-resource-manager/move-support-resources. Figure 1-75 shows a resource group with a virtual machine and the ability for that virtual machine to be moved both within the same subscription and even to another subscription within the same Azure Active Directory tenant.

Figure 1-75 Moving resources diagram
Important Move Operations
Even if a resource states that it supports move operations, there may be other factors that prevent the resource from moving.
During a move operation your resources will be locked. Both write and delete operations to the Azure resource will be blocked, but the underlying service will continue to function. For example, if you move an Azure App Service, the service will continue to serve web requests to visitors.
You cannot change the location of a resource as a part of a move operation. If you need to change the location of a resource after it has been deployed, the service will need to be deleted and recreated or created with a new name if the existing service cannot be deleted.
To move resources between subscriptions, both subscriptions must be associated with the same Azure AD tenant. If the subscriptions do not belong to the same tenant, you can update the target subscription to use the source Azure AD tenant by transferring ownership of the subscription to another account. Note that this operation can have unexpected impacts, because the Azure AD tenant associated with a subscription is used for RBAC to any currently deployed Azure services.
When moving resources between subscriptions, the resource provider of the source resource must also be registered in the target subscription. This is not a concern when moving resources within the same subscription, because the resource provider will already be registered.
If you are moving resources between subscriptions, you must also be mindful of resource quotas. For example, if you are moving many virtual machines, you will need to make sure that the target subscription has enough vCPUs available or the move operation will fail. Make sure you validate any quotas prior to moving a resource.
Finally, there are limitations in Azure Resource Manager that impact the number of resources you can move in a single operation. A single move operation in Resource Manager cannot move more than 800 resources in a single operation. With this constraint, it is recommended that you break large operations into smaller batches. Note that even if you are moving less than 800 resources in a single move request, the operation may still fail by timing out.
Once you have met the stated prerequisites to a move operation, it is critical that you validate the move operation through the REST API with the validateMoveResources method. This API validates whether resources can be moved from one resource group to another resource group. If validation succeeds, an HTTP 204 will be returned, and if it fails an HTTP 409 with an error message will be returned in the response. This method can be called with a POST request to:
https://management.azure.com/subscriptions/{subscriptionId}/resourceGroups/
{sourceResourceGroupName}/validateMoveResources?api-version=2018-05-01
In a POST request, include a request body with "resources” and "targetResourceGroup” properties:
{
 "resources": ["<resource-id-1>", "<resource-id-2>"],
 "targetResourceGroup": "/subscriptions/<subscription-id>/resourceGroups/<target-group>"
}
If the request is properly formatted, the operation will return output like the following:
Response Code: 202
cache-control: no-cache
pragma: no-cache
expires: -1
location: https://management.azure.com/subscriptions/<subscription-id>/
operationresults/<operation-id>?api-version=2018-02-01
retry-after: 15
...
The HTTP 202 response code shows the request was accepted. The location URI can be used in an HTTP GET that you can use to check the status of the long running operation for the final HTTP 204 or HTTP 409 status code. Figure 1-76 shows the output of an operation to validate a move request for an Azure Automation account associated with a Log Analytics workspace. As expected, the validation operation returned an HTTP 409, since this move request cannot be executed.
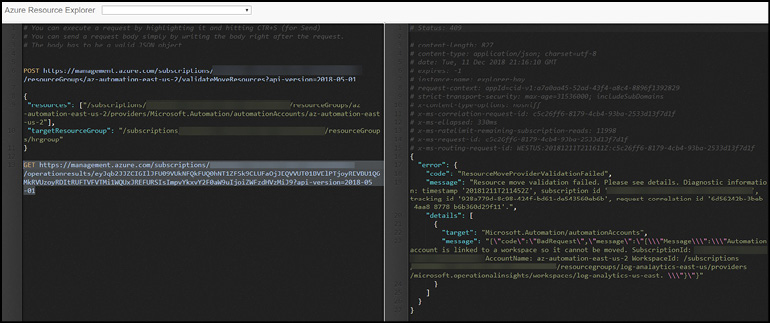
Figure 1-76 ValidateMoveResources API Response
After you have validated your resources are valid for a move operation, you can move the resources with the Azure Portal, Azure PowerShell, the Azure CLI, or the REST API.
To use the Azure Portal, browse to the resource group containing the resources and select the move button as showing in Figure 1-77.

Figure 1-77 Move button in the Azure Portal
You can now select the resources to move and select the destination resource group. Note that you must acknowledge that you may need to update existing tools or scripts to account for the changes in resource IDs (see Figure 1-78).
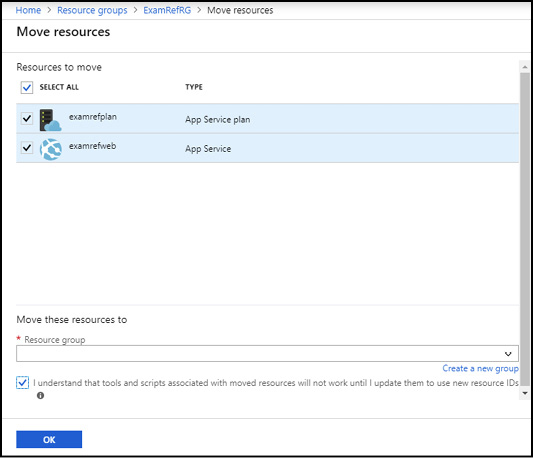
Figure 1-78 Move resources blade
To move resources with Azure PowerShell you can use the Move-AzResource cmdlet. When executing the cmdlet, the ResourceId parameter accepts an array of resource IDs for the source resources. When moving resources between subscriptions, you must also use the DestinationSubscriptionId parameter.
$webapp = Get-AzResource -ResourceGroupName ExamRegRG -ResourceName examrefweb
$plan = Get-AzResource -ResourceGroupName ExamRefRG -ResourceName examrefplan
Move-AzResource -DestinationResourceGroupName NewRG -ResourceId $webapp.ResourceId,
 $plan.ResourceId
To use the Azure CLI to move resources you can use the az resource move command. The ids parameter accepts a space-separated list of resource IDs to move. To move resources between subscriptions you must also supply the destination-subscription-id parameter.
webapp=$(az resource show -g ExamRefRG -n examrefweb --resource-type "Microsoft.Web/
sites"
 --query id --output tsv)
plan=$(az resource show -g ExamRefRG -n examrefplan --resource-type
 "Microsoft.Web/serverfarms" --query id --output tsv)
az resource move --destination-group NewRG --ids $webapp $plan
After a resource has been moved, you should validate that the resource is available and reconfigure any RBAC, resource locks, or policies. Also remember to update any scripts that interacted with the resources to account for the new resource IDs, resource group name, and potentially a different subscription.
Remove resource groups
In Azure, you can delete individual resources in a resource group, or delete a resource group and all of its resources. Deleting a resource group removes all the resources contained within it in one operation. When deleting resource groups, exercise caution because the resource group may contain resources that other resources you have deployed depend on. For example, if you delete a storage account that is used by an application to store application data, the Azure platform will not recognize that dependency and will allow the storage account to be deleted.
For resources that do support dependencies, you will not be able to delete the target resource until the dependencies have been cleared. For example, to do delete an App Service Plan, you must first remove or disassociate any App Services that depend on that plan. An example of attempting to delete an App Service Plan with existing App Service associations is shown in Figure 1-79.

Figure 1-79 Delete an Azure resource with dependencies
To delete a resource group or an individual resource, you can use the Azure Portal, Azure PowerShell, the Azure CLI, or the REST API.
To delete a resource group in the Azure Portal, browse to the resource group and select the Delete Resource Group button (see Figure 1-80).

Figure 1-80 Delete an Azure resource group
In the Are you sure you want to delete? blade that opens you will need to type the resource group name to confirm that you want to delete the resource group. The blade will also show the affected resources and warn you that the operation is irreversible. An example is shown in Figure 1-81.

Figure 1-81 Delete an Azure resource group
Selecting Delete will begin deleting resources immediately. Note that it can take several minutes for a resource group to be deleted because each resource is deleted individually.
To delete a resource group with Azure PowerShell, use the Remove-AzResourceGroup cmdlet. To delete a resource group with a confirmation prompt, execute the cmdlet with the Name parameter:
Remove-AzResourceGroup -Name "hrgroup"
To delete a resource group without confirmation, use the execute the cmdlet with the -Force switch.
Remove-AzResourceGroup -Name "hrgroup" -Force
To delete a resource group with the Azure CLI, use the az group delete command. To delete a resource group with a confirmation prompt, execute the command with the name parameter:
az group delete --name hrgroup
To delete a resource group without confirmation, execute the command with the --yes switch.
az group delete --name hrgroup --yes
Skill 1.4: Manage role-based access control (RBAC)
Access control in Microsoft Azure is an important part of an organization’s security and compliance requirements. Implementing Role-Based Access Control (RBAC) provides the capability within Azure to define access rights at a very granular level, based on each user’s assigned tasks or the activities they need to perform day-to-day in their role. This ensures that each person can perform the task they need to accomplish.
This section covers:
Controlling User Access
Implement RBAC using Azure PowerShell and the Azure CLI
Role-Based Access Control
Role-Based Access Control (RBAC) allows you to manage the entities, also referred to as security principals, that have access to Azure resources and the actions that those entities can perform. In addition to determining who can do what, Azure RBAC is also applied at a scope that dictates the areas they have access to. In Azure, access to can be granted to users, groups, service principals, and managed identities through role assignments, which are then applied at a scope such as a subscription, a resource group, or even an individual resource. Azure RBAC is applicable to the management of resources created in the Azure Resource Manager (ARM) deployment model.
A role is the definition of what actions are allowed and/or denied. RBAC is configured by selecting a role and associating the role with a security principal such as a user, a group, or a service identity. Then, this combination of role and security principal is applied to a scope of a subscription, a resource group, or a specific resource through a role assignment.
In Azure, there is also role inheritance where child resources inherit the role assignments of any parents. For example, if a user is granted read access to a subscription, that user will have read access to all the resource groups and resources in that subscription. If a managed identity is granted contributor rights for a single resource group, that security principal can only interact with that resource group and its child resources, but it cannot create new resource groups or access resources in other resource groups unless an explicit role assignment is made.
Before a security principal such as a user or group can interact with Azure resources, they must be granted access at a scope through a role assignment. Once a security principal has been granted access, it can perform any action that is has rights to perform. It is always recommended to provide the minimum privileges to an object or user to perform their actions as needed. Figure 1-82 shows a suggested access pattern that adheres to the principles of least privilege. In this example, a security group in Azure Active Directory (Azure AD), called IT Audit, is granted Reader access rights at the subscription scope, granting them read access to all resource groups and resources in the subscription. A security group called Application Admins is granted Contributor access rights to only select resource groups. Another security group called Application Owners is granted Owner access rights to select resource groups as well. By using multiple security groups and role assignments at the proper scope, access can be granted in the future just by updating the security group membership in Azure AD.
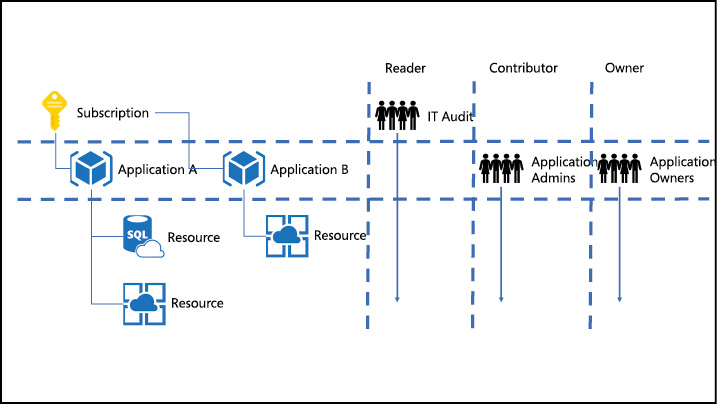
Figure 1-82 Azure RBAC Role Assignments
How RBAC works
Role assignments are the mechanism to control access to Azure resources using RBAC. This is a key concept to understand, because it is how permissions are enforced. A role assignment consists of three elements:
A security principal
A role definition
A scope
Security principals
Security principals are the objects that are associated with a role definition and a scope to apply RBAC to Azure resources. A security principal can be:
A user, or an individual identity that resides in Azure AD.
A group, which is composed of one or more users that reside in Azure AD.
A service principal, which is an application registered with Azure AD.
A managed identity, which is a security principal in the form of an application registration that is managed automatically by Azure and an Azure service.
Important Using Groups with Azure Rbac
When assigning roles to a group, all the users in the group will inherit the assigned role. Assigning groups to RBAC roles allows for easier management and greater flexibility in applying RBAC at scale.
Role definition
The specific permissions that are applied to a resource with RBAC are defined in a role definition. A role definition contains the list of permissions, or declared permissions, and those permissions define what actions can or cannot be performed against a type of resource, such as read, write, or delete.
Role definitions, or roles, can be either built-in or custom. There are a number of built-in role definitions in Azure. Some of the built-in roles in Azure grant privileged rights, such as the Owner role, with includes permissions not only managing resources, but also permissions manage security and the application of role assignments. There are also built-in roles with limited permission sets, such as a Virtual Machine Contributor, which allows the assigned security principal to manage a virtual machine and some, but not all, of its associated resources.
There are many built-in roles in Azure, but there are four built-in roles that are considered foundational in Azure:
Owner Owners have full access to all resources, including the ability to alter security, or access rights, for the resources they manage.
Contributor Contributors can create and manage resources, but they don’t have the ability to manage access rights to resources.
Reader Readers can view resources, but cannot create, manage, or alter access rights to resources.
User Access Administrator Principals assigned the User Access Administrator role manage access rights to Azure resources.
The remaining built-in roles can be found at https://docs.microsoft.com/azure/role-based-access-control/built-in-roles. Microsoft consistently adds new built-in roles as services evolve, or as new services are introduced.
Important Azure Roles and Azure AD Roles
Azure roles are separate from the administrative roles found in Azure AD. For example, a user who is granted Global Administrator rights in Azure AD does not have permissions to create resources in Azure. They must be granted rights at a scope using a role with the ability to create resources such as the Contributor role.
While the built-in roles in Azure provide a great deal of flexibility and choice, there are times when a custom permission set needs to be defined. In Azure, custom roles are defined and stored in Azure AD, where they can then be shared across all of the subscriptions that are associated with the Azure AD tenant.
Important Creating Custom Roles
Custom roles cannot be created through the Azure Portal, but they can be assigned after they are created using the Portal. Custom roles can be created using Azure PowerShell, the Azure CLI, and through the REST API.
Custom roles are defined using JSON, or JavaScript Object Notation. A role definition includes:
A name represented by the
NameattributeAn identifier represented by the
IdattributeA description represented by the
DescriptionattributeA flag that denotes if the role is custom or built-in represented by the
IsCustomattribute, which is set to false for built-in roles, and should be set to true when authoring custom rolesThe actions that can or cannot be performed within the Azure management plane represented by the
Actions[]andNotActions[]attributesOptionally the scopes at which the role is available through the
AssignableScopes[]attribute
To better understand roles (or role definitions), consider the Virtual Machine Contributor built-in role. To retrieve the definition of any role, you can use the Get-AzRoleDefintion cmdlet available in Azure PowerShell or az role definition list in the Azure CLI. For example, to retrieve the definition of the Virtual Machine Contributor role with Azure PowerShell, use the following:
Get-AzRoleDefinition -Name "Virtual Machine Contributor" | ConvertTo-Json
To retrieve the output of the same role using the Azure CLI, use the following:
az role definition list -n "Virtual Machine Contributor"
For both commands, the output of the command will be like the following:
{
  "Name": "Virtual Machine Contributor",
  "Id": "9980e02c-c2be-4d73-94e8-173b1dc7cf3c",
  "IsCustom": false,
  "Description": "Lets you manage virtual machines, but not access to them, and
 not the virtual network or storage account they're connected to.",
  "Actions": [
    "Microsoft.Authorization/*/read",
    "Microsoft.Compute/availabilitySets/*",
    "Microsoft.Compute/locations/*",
    "Microsoft.Compute/virtualMachines/*",
    "Microsoft.Compute/virtualMachineScaleSets/*",
    "Microsoft.DevTestLab/schedules/*",
    "Microsoft.Insights/alertRules/*",
    "Microsoft.Network/applicationGateways/backendAddressPools/join/action",
    "Microsoft.Network/loadBalancers/backendAddressPools/join/action",
    "Microsoft.Network/loadBalancers/inboundNatPools/join/action",
    "Microsoft.Network/loadBalancers/inboundNatRules/join/action",
    "Microsoft.Network/loadBalancers/probes/join/action",
    "Microsoft.Network/loadBalancers/read",
    "Microsoft.Network/locations/*",
    "Microsoft.Network/networkInterfaces/*",
    "Microsoft.Network/networkSecurityGroups/join/action",
    "Microsoft.Network/networkSecurityGroups/read",
    "Microsoft.Network/publicIPAddresses/join/action",
    "Microsoft.Network/publicIPAddresses/read",
    "Microsoft.Network/virtualNetworks/read",
    "Microsoft.Network/virtualNetworks/subnets/join/action",
    "Microsoft.RecoveryServices/locations/*",
    "Microsoft.RecoveryServices/Vaults/backupFabrics/backupProtectionIntent/write",
    "Microsoft.RecoveryServices/Vaults/backupFabrics/protectionContainers/
protectedItems/*/read",
    "Microsoft.RecoveryServices/Vaults/backupFabrics/protectionContainers/
protectedItems/read",
    "Microsoft.RecoveryServices/Vaults/backupFabrics/protectionContainers/
protectedItems/write",
    "Microsoft.RecoveryServices/Vaults/backupPolicies/read",
    "Microsoft.RecoveryServices/Vaults/backupPolicies/write",
    "Microsoft.RecoveryServices/Vaults/read",
    "Microsoft.RecoveryServices/Vaults/usages/read",
    "Microsoft.RecoveryServices/Vaults/write",
    "Microsoft.ResourceHealth/availabilityStatuses/read",
    "Microsoft.Resources/deployments/*",
    "Microsoft.Resources/subscriptions/resourceGroups/read",
    "Microsoft.SqlVirtualMachine/*",
    "Microsoft.Storage/storageAccounts/listKeys/action",
    "Microsoft.Storage/storageAccounts/read",
    "Microsoft.Support/*"
  ],
  "NotActions": [],
  "DataActions": [],
  "NotDataActions": [],
  "AssignableScopes": [
    "/"
  ]
}
The permissions for management of Azure resources are defined in the Actions and NotActions portions of the role definition. Actions define the management operations that can be performed. NotActions define the management operations that are excluded from any of the allowed actions. Sometimes it can be easier to define a role by excluding operations rather that defining multiple allow operations. In the case of NotActions, it is not an explicit deny rule. If a user is granted access rights in an Action, they will have the ability to perform the operation.
Actions and NotActions always include a resource provider and a permission at a minimum. For example, to grant rights to all of the operations for all of the resource types in the Microsoft.Compute resource provider, a valid Action would be Microsoft.Compute/*. The same type of wildcard permission can be used to only grant access to virtual machines. For example, to grant all rights for the virtual machines resource type, a valid Action would be Microsoft. Compute/virtualMachines/*. To grant read rights to just virtual machines, the full resource provider, resource type, and permission can be defined. For example, to grant read rights to virtual machines, a valid Action would be Microsoft.Compute/virtualMachines/read.
Operations support wildcards as well. This allows you to specify all permissions, all resource types, or all resource providers. For example, to grant read, write, and delete permissions to virtual machines, you can use Microsoft.Compute/virtualMachines/*, or to create read access to all resource types in the Microsoft.Compute resource provider you can use Microsoft. Compute/*/read.
DataActions and NotDataActions are related to a preview capability in Azure RBAC where RBAC can be extended beyond the management plane to the data plane of select Azure resources. The management plane of Azure refers to the management of Azure resources through the Azure Resource Manager APIs, while the data plane refers specifically to a security principal that can interact with the data stored in a service. For example, storage accounts have both a management plane and a data plane. When a security principal is granted access to the management plane of a storage account, it can access all of the components of that storage account, including blobs, tables, files, and queues. By extending RBAC to the data plan, it is possible to create custom roles in Azure that grant access to only blob containers, and not the other capabilities of the storage account.
To retrieve the current resource providers and resource provider operations that support DataActions and NotDataActions, you can use the Get-AzProviderOperation cmdlet with Azure PowerShell and az provider operation list with the Azure CLI.
For example, to retrieve only the operations that support DataActions and NotDataActions with Azure PowerShell, use the following:
Get-AzProviderOperation * | ? { $_.IsDataAction -eq $true }
The AssignableScopes property can be used to limit the scopes to which a custom role can be assigned. If this property is not set, the role is available for assignment in all of the subscriptions associated with the Azure AD tenant, and all of the scopes within a subscription – namely all resources groups and resources. By setting the AssignableScopes property for custom roles, you can ensure that the role is available for assignment with any scopes that are not specified, and that the Portal UI displays customer roles that are not applicable.
Scope
Scope is a logical boundary where access rights apply. For example, to grant a group Contribute rights to all of the resources in a resource group, the Contributor role can be assigned to the group at the resource group scope where it is then inherited by all of the resources in the resource group.
There are four scopes at which RBAC can be applied, and scopes are structured in a parent-child relationship where RBAC is inherited by any child scopes. The highest scope, or top-most parent scope, is a management group.
![]() Exam Tip
Exam Tip
Management groups are not applicable in all scenarios and in some cases a subscription will be the highest scope you will work with when applying role assignments.
Under the management group are subscriptions, under subscriptions are resource groups, and under resource groups are resources. Figure 1-83 shows a sample hierarchy with a parent management group, and two subscriptions, each with a resource group and child resources.

Figure 1-83 Scope Hierarchy
Important RBAC Inheritance
The concept of RBAC inheritance is critical. Granting a user access to the Owner role at the Management group scope will grant that user Owner rights to all of the subscriptions under the management group, and inclusive of all of the resource groups and resources within them.
Role assignment
After you have identified the role, security principal, and scope at which the role will be assigned, you can make the assignment. Remember that security principals do not have access to Azure until a role assignment is made, and that access can be revoked by removing a role assignment.
Important Role Assignment Subscription Limits
You can have up to 2000 role assignments in each subscription.
To create and remove role assignments, you must have Microsoft.Authorization/roleAssignments/* permission at the necessary scope. This permission is granted through the Owner or User Access Administrator built-in roles, or it can be included in custom roles.
As you begin to apply roles to security principals in Azure, it is not uncommon to have overlapping assignments where a security principal is assigned a different role assignment at both a parent and a child scope. For example, if a user is granted Contribute rights at the Management group scope, and then Reader rights in a subscription, they will still have Contribute rights across the subscription along with Contribute rights to any other subscriptions under the Management group. Another way to think of this is that the most privileged access right takes precedence.
Note Azure Role Assignments
With Azure role assignments there is no way to revoke access rights at a child scope through the application of a more restrictive role assignment, because the role assignment is inherited from the parent. It is, however, possible to apply a deny assignment at a scope when using Azure Blueprints and resource locks. Deny assignments are evaluated before role assignments and can be used to exclude service principals from accessing child scopes. For more information, see: https://docs.microsoft.com/azure/governance/blueprints/tutorials/protect-new-resources.
Implementing RBAC using the portal
To manage role assignments, you can use the Azure Portal, the Azure CLI, Azure PowerShell, Azure SDKs, or the Resource Manager REST APIs. In the following section, we will walk through how to manage role assignments using the Azure Portal.
In the Azure Portal, the Access Control (IAM) blade is used to manage access to resources. It is where role assignments are applied or removed. The Access Control (IAM) blade is available at any scope where role assignments can be made (Management group, subscription, resource group, and resource). To find the Access Control (IAM) blade, navigate to the resource or service where you want to manage role assignments.
In the following example, the Virtual Machine Contributor built-in role will be assigned to a user at the resource group scope.
In the Azure Portal, navigate to a resource group by selecting Resource groups in the left navigation, selecting a resource group, and then selecting the Access Control (IAM) blade as shown in Figure 1-84.
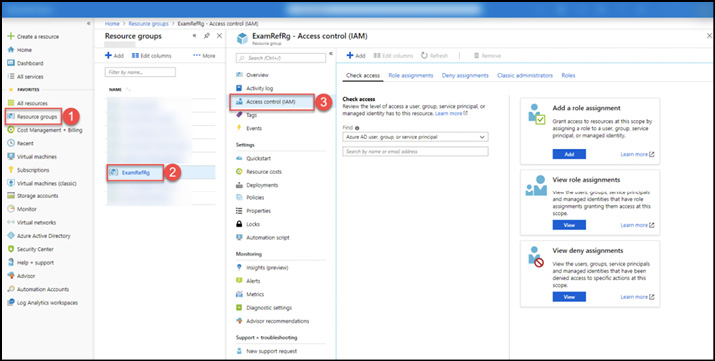
Figure 1-84 Azure Portal Access Control (IAM) blade
From the Access control (IAM) blade you can:
Check the effective access rights for a security principal at the current scope through the Check access tab, including being able to view access rights inheritance from a parent scope.
Edit role assignments, both granting and revoking access rights through the Role Assignments tab.
View deny assignments, which are controlled by Microsoft, through the Deny assignments tab.
View and manage permissions to classic resources through the Classic Administrators tab.
View the available roles, both built-in and custom, through the Roles tab.
Important Deny Assignments in the IAM Blades
The Deny Assignments tab of the Access Control (IAM) blade cannot be used to make or alter deny assignments. Deny assignments are only supported in a limited capacity, and are set and controlled by Microsoft, or through the application of a resource lock for resources created through Azure Blueprints.
To assign permissions, navigate to the Role Assignments tab and click Add, as shown in Figure 1-85.

Figure 1-85 Role assignments tab on the Access control (IAM) blade
After clicking Add, select Add Role Assignment, as shown in Figure 1-86.
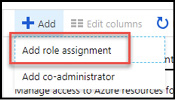
Figure 1-86 Add role assignment
In the Add Role Assignment blade, select the role and the security principal you want to assign the role to. The Select dropdown can be used to filter users, groups, or service principals found in the Azure AD tenant associated with the Azure subscription. Click Save when complete. Figure 1-87 shows an example, where the user, [email protected], is being granted access to the Virtual Machine Contributor role. In the example directory, two security principals were returned from the filtered list using the search term "cloud" (CloudynAzureCollected and [email protected]), and a single principal was selected (Selected Members) to apply to the Virtual Machine Contributor role assignment.
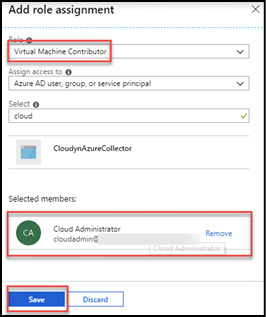
Figure 1-87 Add role assignment blade
After clicking Save, you will see the role assignment on the Role Assignments blade, as shown in Figure 1-88.
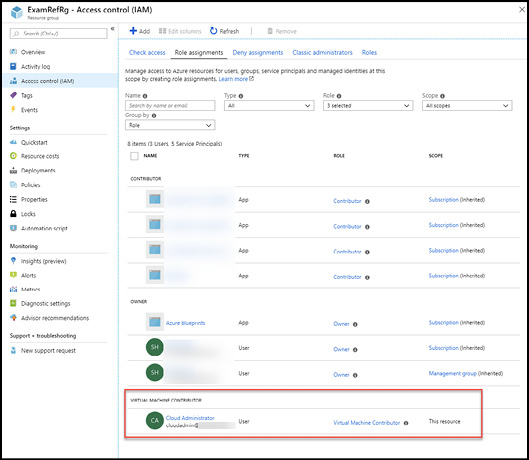
Figure 1-88 Role Assignments blade
To remove a role assignment, from the Role Assignments tab, select one or more security principals and click Remove. An example is shown in Figure 1-89.

Figure 1-89 Remove a role assignment
Azure PowerShell and the Azure CLI can also be used to manage Azure RBAC. In the following section, we will explore how to manage role assignments from the command line using these tools.
To list the roles that are available for assignment with PowerShell, the Get-AzRoleDefintion cmdlet can be used. For example, to return a list of custom roles available for assignment, use the following:
Get-AzRoleDefinition | Where-Object { $_.IsCustom -eq $true }
The Get-AzRoleDefinition cmdlet includes parameters such as Scope, which can be used to filter for available role assignments at a supplied scope. To work with a single definition, use the cmdlet with the Name parameter.
Get-AzRoleDefinition -Name "Virtual Machine Contributor"
The Azure CLI can be used to obtain the same information us the az role command group and its subcommands. For example, to return a list of custom roles available for assignment in a table, use the following:
az role definition list --custom-role-only -o table
To list a single role, use the az role definition list command with the --name parameter:
az role definition list --name "Virtual Machine Contributor"
Azure PowerShell and the CLI can be used to check the existing role assignments at a particular scope as well. For example, to view all the role assignments in a subscription, use the Get-AzRoleAssignment cmdlet to return all of the role assignments in a subscription. With the Get-AzRoleAssignment cmdlet it is also possible to filter for assignments at a scope of subscription, resource group, or even an individual resource or resource type. The equivalent command in the Azure CLI is az role assignment list. By default, the command returns only assignments scope to a subscription, but using the --all parameter will also return role assignments scoped to a resource group or a resource.
az role assignment list --all
Assigning roles with PowerShell and the Azure CLI requires several pieces of information:
The sign-in name of the user when granting access to a user or the object identifier when granting access to a security group or service principal.
The name of the role, either custom or built-in which you want to assign to the security principal.
The scope at which you are making the role assignment.
To assign a role using Azure PowerShell for a user, use the New-AzRoleAssignment cmdlet with the -SignInName parameter, where the value of the parameter is the user principal name of the user in Azure AD. For example, to grant the user [email protected] Virtual Machine Contributor rights at the ExamRefRG resource group scope, use the following:
New-AzRoleAssignment -SignInName [email protected]
-RoleDefinitionName "Virtual Machine Contributor" -ResourceGroupName ExamRefRG
To make the same assignment using the Azure CLI, the az role assignment create command group can be used:
az role assignment create --role "Virtual Machine Contributor" --assignee cloudadmin@
opsgility.onmicrosoft.com --resource-group ExamRefRG
To grant the same role to a security group, you need to first retrieve the object identifier of the security principal. In this example, to grant the Virtual Machine Contributor role to a security group called Cloud Admins at the ExamRefRG resource group scope, use the following:
$group = Get-AzADGroup -SearchString "Cloud Admins"
New-AzRoleAssignment -ObjectId $group.Id -RoleDefinitionName "Virtual Machine
Contributor" -ResourceGroupName ExamRefRG
To make the assignment using the Azure CLI from Bash, use the following:
groupid=$(az ad group list --query "[?displayName=='Cloud Admins'].objectId" -o tsv)
az role assignment create --role "Virtual Machine Contributor" –assignee-object-id
$groupid --resource-group ExamRefRG
To remove assignments using Azure Power, The Remove-AzRoleAssignment cmdlet can be used. This cmdlet has a similar parameter set to the New-AzRoleAssignment cmdlet and can be used to revoke permissions for a user when used with the -SignInName parameter, or for a security group or service principal with the -ObjectId parameter. Use the following to remove the access rights for a user:
Remove-AzRoleAssignment -SignInName [email protected]
-RoleDefinitionName "Virtual Machine Contributor" -ResourceGroupName ExamRefRG
And for a group:
$group = Get-AzADGroup -SearchString "Cloud Admins"
Remove-AzRoleAssignment -ObjectId $group.Id -RoleDefinitionName "Virtual Machine
Contributor" -ResourceGroupName ExamRefRG
The Azure CLI offers the same flexibility. To remove a role assignment from a user, use az role assignment delete:
az role assignment delete --role "Virtual Machine Contributor" --assignee cloudadmin@
opsgility.onmicrosoft.com --resource-group ExamRefRG
And to remove access for a group:
groupid=$(az ad group list --query "[?displayName=='Cloud Admins'].objectId" -o tsv)
az role assignment delete --role "Virtual Machine Contributor" –assignee-object-id
$groupid --resource-group ExamRefRG
Thought experiment
In this thought experiment, apply what you have learned. You can find answers to these questions in the next section.
You are responsible for creating and tracking resources in Azure for two business units within your organization: HR and Marketing. Your organization has an Enterprise Agreement (EA). Each business unit needs to deploy their own resources. Your Finance department needs to be able to understand the consumption of resources for each business unit for chargeback purposes. Finance would also like to be able to receive a notification when a defined monetary threshold is reached for each business unit.
The resources that each business unit will deploy are from a known set of resources and users should be prevented from creating unapproved resources. There will be resources within a subscription that are not billed back directly to the business units, but will be billed to IT. These resources must be differentiated for Finance.
How will you ensure that users can only create approved resources in Azure?
How will you grant access to create resources and restrict each business unit’s users from impacting the other business units?
How will Finance access billing data for Azure and how will they be able to tell where each cost is coming from?
How will Finance be notified when each business unit is nearing their spending threshold?
Thought experiment answers
This section contains the solution to the thought experiment for the chapter.
For each business unit, HR and Marketing, a separate subscription can be created. This will allow for the separation of resources by business unit and allow for segregated and aggregated cost reporting and monitoring for Finance through the EA Portal.
To ensure users can only create approved resources, Azure Policies should be defined that can be assigned to each subscription. The policies will deny the creation of any unapproved resources and compliance can be monitored through Azure Policy as well.
Each business unit will be placed into its own subscription. Within a subscription, resource groups will be created, and users will be granted appropriate rights at the resource group level. As RBAC is inherited by child resources, with the appropriate rights granted, users will be able to create and manage resources as needed without impact others in the subscription. This will be layered with Azure Policy to ensure that only allowed resources can be created. This can be extended further by creating Azure Resource Manager templates, which can be used by business unit users to deploy their resources with well-known configurations.
Users in the Finance department can be granted access to the EA Portal and/or Cost Azure Cost Management by configuring access through the required scopes. To make sure that they can tell where each resource cost is coming from, tags should be applied to all resources using a taxonomy defined by Finance. For example, "BusinessUnit" can be a tag with the allowed values "HR," "Marketing," and "IT." That taxonomy should be governed through Azure Policy to ensure that all resources are tagged with required and valid tags.
To manage thresholds, Department quotas can be configured in the EA Portal. In addition, Budgets can be created in Cost Management. Budgets in Cost Management can provide more flexibility has multiple notification thresholds can be set and each notification can have a different receiver. This would allow a single budget to send notifications to both business unit owners and Finance.
Chapter summary
Here are some of the key takeaways from this chapter:
Azure offers a rich ecosystem of governance controls with user-level and platform-level controls in the form of role-based access control (RBAC) and Azure Policy.
Azure Management Groups can be used to control policy and RBAC for multiple subscriptions. Management groups enable organizational alignment for your Azure subscriptions through custom hierarchies and groupings.
Tags in Azure can be used to logically organize resources by categories. Each tag is a name and a value pair. Tags can be shared across multiple resources and enforced with Azure Policy.
Azure Policy is a service that lets you create, manage, and apply policy to Azure resources at a subscription, resource group, or resource level. Policies enforce different rules over your Azure resources, so those resources remain compliant with your organization’s standards.
Role-based access control allows you to grant users, groups, and service principals access to Azure resources at the subscription, resource group, or resource scopes with RBAC inheritance. The three core roles are Owner, Contributor, and Reader.
Azure Monitor is a single-pane of glass for accessing Azure metrics, tenant and resource diagnostic logs, Log Analytics, service health, and alerts.
You can configure alerts based on metric alerts (captured from Azure Metrics) to Activity Log alerts that can notify by email, web hook, SMS, Logic Apps, or even an Azure Automation Runbook.
Azure Log Analytics can consolidate machine data from on-premises and cloud-based workloads and this data is indexed and categorized for quick searching. Data can be collected from both Windows and Linux machines.
Azure Log Analytics has many management solutions that help administrators gain value out of complex machine data. These solutions contain pre-built visualizations and queries that help surface insights quickly.
Queries in Log Analytics can be saved for quick access and visualized and shared using Azure Dashboards. To analyze data outside of Log Analytics you can export the data to Excel and Power BI.
You can create resources from the portal, PowerShell, the CLI tools, and Azure Resource Manager templates. You should understand when to use which tool and how to configure the resource during provisioning and after provisioning.
A resource is simply a single service instance in Azure. Most services in Azure can be represented as a resource. For example, a Web App instance is a resource. An App Service Plan is also a resource. Even a SQL Database instance is a resource.
A resource group is a logical grouping of resources. For example, a Resource Group where you deploy a VM compute instance may be composed of a Network Interface Card (NIC), a Virtual Machine, a Virtual Network, and a Public IP Address.
A resource group template is a JSON file that allows you to declaratively describe a set of resources. These resources can then be added to a new or existing resource group. For example, a template can contain the configuration necessary to create two API App instances, a Mobile App instance, and a Document DB instance.
A template can simplify orchestration because you only need to deploy the template to deploy all of your resources.
A template allows you to configure multiple resources simultaneously and use variables/parameters/functions to create dependencies between resources.