C H A P T E R 6
![]()
Process Plug-ins
The last type of plug-in that will be covered in this book is the Process type plug-in. This chapter will also cover process plug-ins, when to use/develop them, and provide an example of them.
A process plug-in is a plug-in that executes a block of PL/SQL using the APEX plug-in architecture. Like all APEX processes, they can be run anywhere on a page where a page process can run. This includes both during page load and during page processing (when the page is submitted). Because of this, process plug-ins may be used for both display purposes and processing data (though it is not common to use it for display content).
PL/SQL Region vs. Process Plug-in
One of the most common questions people tend to have when first looking at process plug-ins is Why? For example, why would you need a process plug-in when you can just write a stored procedure and reference it in a page process? This is an excellent and justified question.
They're a few reasons why you'd need to create a process plug-in over using a PL/SQL procedure:
Reusability: If you plan to make your plug-in public or share across domains within an organization that do not have access to your current code base (i.e. schema), you'll need a simple and easy way to store the code. By using a plug-in, you can bundle all the code together.
Hide Complexity: Similar to the previous reason, some process plug-ins can get complex. For example, if dealing with some web services, it may easier to store it all in a plug-in so that other developers don't need to worry about any complex code that may be required.
In the example that follows, we'll create a plug-in that masks some complexity/business logic and can be reused.
Business Problem
Always take time to review the business problem that a plugin is trying to resolve. Make that your common practice.
In this case, developers would like a process to quickly send text messages to a specific cellphone. Here is the list of requirements:
- Send a text message to specified cell phone.
- Specify parameters that include carrier info, phone number, and message.
- Support cell phones using Telus, Rogers, and AT&T providers.
![]() Note Normally you would use a web service that would handle which carrier a number belongs to and send the text message directly to that carrier's messaging service. To simplify things, the example plug-in requires that the APEX developer pass the name of the cell phone carrier/provider for the cell phone number.
Note Normally you would use a web service that would handle which carrier a number belongs to and send the text message directly to that carrier's messaging service. To simplify things, the example plug-in requires that the APEX developer pass the name of the cell phone carrier/provider for the cell phone number.
Building the Process Plug-in
This section will leverage the requirements listed in the previous section to build a process type plug-in. This plug-in will send text messages to cell phones by emailing specific email addresses based on the cell phone provider.
Resolving Technical Requirements
This plug-in will leverage the APEX_MAIL package to send emails (which will be forwarded to the cell phone by the cell phone provider). You will need to ensure that your APEX instance is properly configured to send emails. The following steps describe how to configure APEX with your SMTP (email) server.
![]() Note These steps require admin access to the APEX administration (internal) workspace. You may need to ask your DBA to provide you with admin access. You may also need to ask your IT administrator for the correct SMTP server settings.
Note These steps require admin access to the APEX administration (internal) workspace. You may need to ask your DBA to provide you with admin access. You may also need to ask your IT administrator for the correct SMTP server settings.
- As shown in Figure 6-1, log into the INTERNAL workspace used to manage the APEX instance on a database.
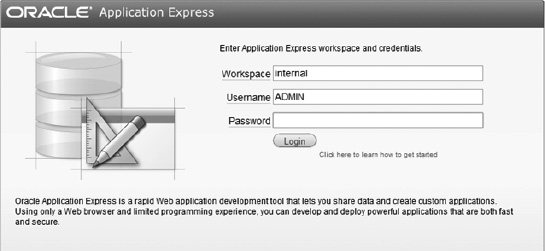
Figure 6-1. Internal Workspace Login
- As shown in Figure 6-2, click on the Manage Instance button.
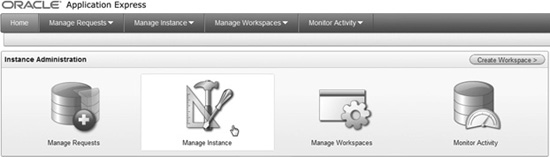
Figure 6-2. APEX Internal Workspace
- In the Instance Settings region, click on the Instance Settings link as shown in Figure 6-3.
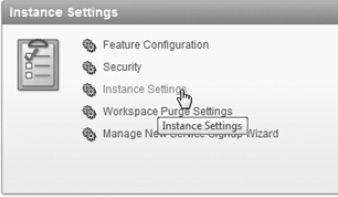
Figure 6-3. Manage Instance
- In the Instance Settings page, scroll down to the Email region as shown in Figure 6-4. Enter the appropriate SMTP server information. The figure omits an example SMTP server and related details because all that information is specific to your own environment. Once you are finished, click Apply Changes.
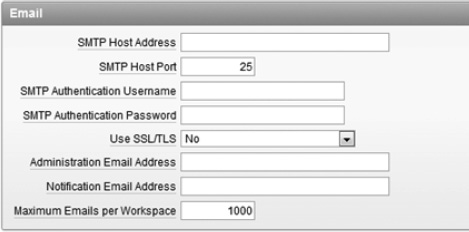
Figure 6-4. Email SMTP Configuration
It's important to note that APEX does not send emails immediately. Instead it will queue up emails and periodically send them based on a scheduled job. You can manually “push” emails off the queue by using the APEX_MAIL.PUSH_QUEUE procedure.
Setting up Initial Configuration
Create a new process plug-in with the following attributes:
Internal Name: COM.CLARIFIT.APEXPLUGIN.TEXT_MSG
Type:Process
Execution Function Name: pkg_apress_plugins.f_execute_txt_msg
The Execution Function Name references a procedure that has yet to be created. The procedure will be created in the Execution Function section below.
You'll notice that process plug-ins don't have many default configurable settings. This is because page processes run PL/SQL code and don't require a lot of attributes.
Adding Custom Attributes
The following steps list the custom attributes that the plug-in will use. These attributes are based on the requirements. Please create the following attributes for the plug-in:
- Scope: Application
Attribute:1
Label:Force Push Mail Queue
Type: Yes/No
Required: Yes
Default Value: Y - Scope:Component
Attribute:1
Label:Phone Number
Type:Text
Required:Yes
Display Width:30
Maximum Width:60North American phone numbers only require 10 digits, however it makes sense to leave the phone number width to more than 10 characters since an APEX developer will probably reference a page item and use a substitution string that may easily exceed 10 characters. The same is true for the attributes listed below. This will be highlighted on the test page.
- Scope: Component
Attribute:2
Label:Carrier Code
Type: Text
Required:Yes
Display Width:30
Maximum Width:60 - Scope: Component
Attribute:3
Label:Text Message
Type: Textarea
Required:Yes
Execution Function
Just like the other plug-ins, the first thing to do is retrieve the function header information from the help text on the plug-in page. Using the header template, add the following lines to the specification of pkg_apress_plugins and recompile it.
FUNCTION f_execute_txt_msg (

  p_process IN apex_plugin.t_process,

  p_plugin  IN apex_plugin.t_plugin )

  RETURN apex_plugin.t_process_exec_result;
Modify the package body for pkg_apress_plugins and add the following code at the bottom of the body. A detailed description follows the code.
610 …

611 FUNCTION f_execute_txt_msg (

612   p_process IN apex_plugin.t_process,

613   p_plugin  IN apex_plugin.t_plugin )

614   RETURN apex_plugin.t_process_exec_result

615 AS

616

617   -- Types

618   TYPE typ_carrier_info IS record (

619     email_addr VARCHAR2(255),

620     num_digits NUMBER(2,0) --If null then any list of numbers will work

621   );

622

623   TYPE tt_carrier_info IS TABLE OF typ_carrier_info  INDEX BY varchar2(10); -- index by

carrier code

624

625

626   -- Application Plugin Attributes

627   v_force_push_queue_flag apex_application_page_items.attribute_01%TYPE :=

upper(p_plugin.attribute_01); -- force pushing the APEX mail queue

628

629   -- Item Plugin Attributes

630   v_phone_number apex_application_page_items.attribute_01%TYPE := p_process.attribute_01;

631   v_carrier_code apex_application_page_items.attribute_01%TYPE :=

upper(p_process.attribute_02); -- Cell phone carrier code

632   v_txt_msg apex_application_page_items.attribute_01%TYPE := p_process.attribute_03; --

Text message to send

633

634   -- Other variables

635   v_return apex_plugin.t_process_exec_result;

636   v_all_carrier_info tt_carrier_info;

637

638   v_carrier_info typ_carrier_info; -- Current carrier info

639

640   -- Functions

641   FUNCTION f_ret_carrier_info_rec(

642     p_email_addr VARCHAR2,

643     p_num_digits NUMBER)

644     RETURN typ_carrier_info
645   AS

646     v_carrier_info typ_carrier_info;

647   BEGIN

648     v_carrier_info.email_addr := p_email_addr;

649     v_carrier_info.num_digits := p_num_digits;

650     RETURN v_carrier_info;

651   END;

652

653 BEGIN

654   -- Debug

655   IF apex_application.g_debug THEN

656     apex_plugin_util.debug_process (

657       p_plugin => p_plugin,

658       p_process => p_process);

659   END IF;

660

661   -- Remove non numeric values from phone number

662   -- This allows phone numbers to be in any format

663   v_phone_number := regexp_replace(v_phone_number, '[^[:digit:]]', ''),

664

665   -- Load Carrier info

666   -- Email addresses obtained from: http://www.emailtextmessages.com/

667   v_all_carrier_info('TELUS') := f_ret_carrier_info_rec(p_email_addr =>

'@NUM@@msg.telus.com', p_num_digits => 10);

668   v_all_carrier_info('ROGERS') := f_ret_carrier_info_rec(p_email_addr =>

'@NUM@@pcs.rogers.com', p_num_digits => 10);

669   v_all_carrier_info('ATT') := f_ret_carrier_info_rec(p_email_addr =>

'@NUM@@txt.att.net',

p_num_digits => 10);

670   -- Can add more carrier code information here

671

672   -- Set current carrier

673   BEGIN

674     v_carrier_info := v_all_carrier_info(v_carrier_code);

675     v_carrier_info.email_addr := REPLACE(v_carrier_info.email_addr, '@NUM@',

v_phone_number); -- Replace mnemonic

676   EXCEPTION

677     WHEN NO_DATA_FOUND THEN

678       raise_application_error(-20001, 'Invalid carrier code'),

679   END;

680

681   -- VALIDATIONS

682   IF v_phone_number IS NULL THEN

683     raise_application_error(-20001, 'Missing phone number'),

684   elsif v_carrier_info.num_digits IS NOT NULL AND v_carrier_info.num_digits !=

LENGTH(v_phone_number) THEN

685     raise_application_error(-20001, 'Number of digits is incorrect. Have: ' ||

v_phone_number || '. Expected: ' || v_carrier_info.num_digits);

686   END IF;

687

688   -- Send meail to text message

689   apex_mail.send(

690     p_to => v_carrier_info.email_addr,
691     p_from => NULL,

692     p_body => v_txt_msg);

693

694   -- Push mail queue only if necessary

695   IF v_force_push_queue_flag = 'Y' THEN

696     -- Send text message right away

697     apex_mail.push_queue();

698   END IF;

699

700   -- Return

701   v_return.success_message := p_process.success_message;

702   RETURN v_return;

703

704 END f_execute_txt_msg;

705…
The following is a description of the preceding code that is keyed to line numbers:
622-632: Plug-in attributes. Just like the other examples from previous chapters, it helps to convert them into meaningful names rather than reference them throughout your code using the attribute numbers.
640-651: Since some plug-ins may not have any dependencies on other code in the database, you can store functions and procedures directly inside the plug-in function. You can also store the additional function and procedures in the plug-in source region.
654-659: All plug-ins should include the appropriate debug code. There's really no reason why they shouldn't include debug statements.
663: This regular expression converts the phone number into digits. When applicable, this is a good technique since it allows end users to enter in phone numbers in any format they like. For example
(123) 456-7890and123-456-7890will both be converted to1234567890. This technique also helps the APEX developer since they don't need to explicitly convert the phone number to a special format to work with the plug-in. You can use this technique for other types of inputs as well.672-686: Determines the email address to use for the text message. The important thing to note is how the errors are handled. Since it doesn't make sense to continue with the process if the text messages aren't sent, an application level error is raised. The error will be handled by the standard APEX error handling process.
701: You can define your own success message or use the one that the user provided in the Process Success Message text area as shown in Figure 6-5.
You'll notice that they're a lot of similarities with this code compared to the other three plug-ins from the previous chapters. It declares variables (assigning logical names to plug-in attributes), calls the APEX plug-in debug statement (when running in debug mode), processes the information, and then does something (in this case, emails the phone carrier the text message).
Compared to the other plug-ins, the major difference with this plug-in is that it does not actually display anything. Since it is a process plug-in, it can be run when the page is being processed and it may not make sense to actually display anything. The only feedback to the end user is the success message (defined on line 701), which will be displayed to the end user if one is specified.
Testing it Out
Now that you've built the process plug-in, the last thing to do is ensure it works. The following steps will walk you through building an example page that utilizes this plug-in:
- Using the page creation wizard, create a new page with the following attribute:
Type:Blank Page
Page Number:60
Name:Text Message
HTML Region 1:Text Message
New Tab:Text Message - Edit Page 60. In the Text Message region, create the following page items:
- Type:Select List
Item Name:P60_CARRIER_CODE
Value Required:Yes
LOV-Display Null Value:- Select Carrier -
LOV-Query:STATIC2:Telus;TELUS,Rogers;ROGERS,ATT;AT&T - Type: Text Field
Item Name:P60_PHONE_NUMBER
Value Required:Yes - Type: Text Area
Item Name:P60_TEXT_MSG
Value Required:Yes
Character Counter:Yes
- Type:Select List
- In the Text Message region, create a region button with the following attributes:
Button Name:SEND_TEXT_MESSAGE
Label:Send Text Message
Position:Bottom of Region
Alignment:Left
Action: Submit Page
Execute Validations:Yes - Create a Page Process to send the text message (and use the plug-in). These steps include screen shots, as they have not been covered in earlier sections.
- In the Page Processing region, right click on the Processing tree element and select Create Process as shown in Figure 6-1.
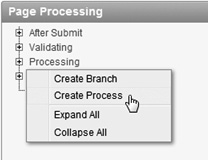
Figure 6-6. Create Page Process
- For the Process Type, select Plug-ins.
- Select ClariFit Send Text Message.
- On the Process Attributes page, enter Send Text Message in the Name field as shown in Figure 6-7. Click the Next button to continue.

Figure 6-7. Create Page Process: Process Attributes
- The Process displays the custom attributes for the plug-in. In some cases, you may hard code in the values. In this example, you'll use user-defined values that reference the appropriate page items using substitution strings. Enter the values as shown in Figure 6-8.
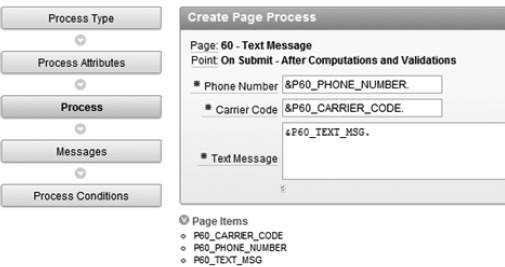
Figure 6-8. Create Page Process: Process
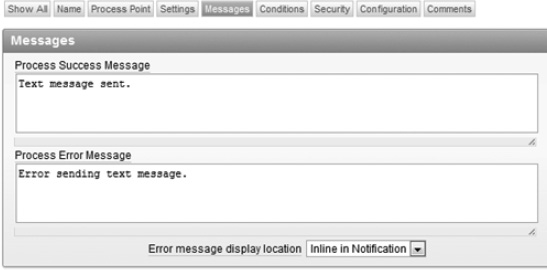
- On the Messages page, enter in the following values:
Success Message:Text message sent.
Error Message:Error sending text message.These values are not required but are recommended since it will notify the end user.
- On the Process Conditions page, select SEND_TEXT_MESSAGE for the When Button Pressed option and click the Create Process button to complete the wizard.
- In the Page Processing region, right click on the Processing tree element and select Create Process as shown in Figure 6-1.
![]() Note In step 4.e, the width of the phone number attribute is not restricted to 10 characters (for North American numbers). Since substitution strings may be used and the substitution string may exceed 10 characters, it would not make sense to restrict the input length. You should keep this in mind when setting restrictions on attributes for process plug-ins.
Note In step 4.e, the width of the phone number attribute is not restricted to 10 characters (for North American numbers). Since substitution strings may be used and the substitution string may exceed 10 characters, it would not make sense to restrict the input length. You should keep this in mind when setting restrictions on attributes for process plug-ins.
To test out the process, run Page 60. Enter the appropriate information and click the Send Text Message button. The page will be submitted and you should see a success message as shown in Figure 6-9.

Figure 6-9. Text Message Example
![]() Note The phone number can be entered using any type of format. That's because the plug-in extracts only the numbers and uses that for the email address. When developing plug-ins, you may want to consider making some attributes' formats irrelevant where applicable.
Note The phone number can be entered using any type of format. That's because the plug-in extracts only the numbers and uses that for the email address. When developing plug-ins, you may want to consider making some attributes' formats irrelevant where applicable.
Summary
This chapter covered how to build a process plug-in and when you would do so instead of using a PL/SQL process referencing a procedure.
This plug-in did not embed the code into the plug-in because it was already covered. For process type plug-ins, you would normally embed the PL/SQL code since the plug-in would most likely be shared.