
1. What Is Exposure?
ISO 800 • 1/30 sec. • f/32 • 135mm lens
Learning the Basics
It doesn’t matter what camera model you own, what brand it is, or even what type of camera it is. They all have a singular purpose: to create a properly exposed photograph. But what exactly does “properly exposed” mean? And how do we know that the camera is getting it right? It all begins with a basic understanding of exposure and how to make adjustments to get the results you want, so that’s where we will begin.
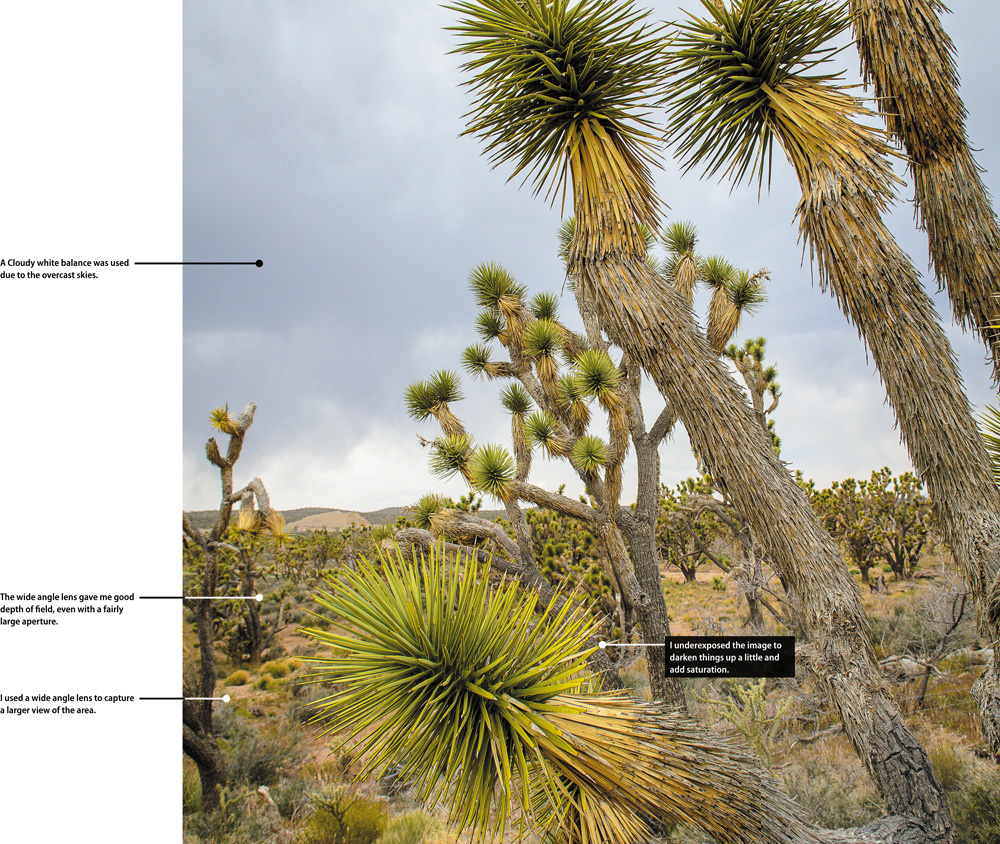
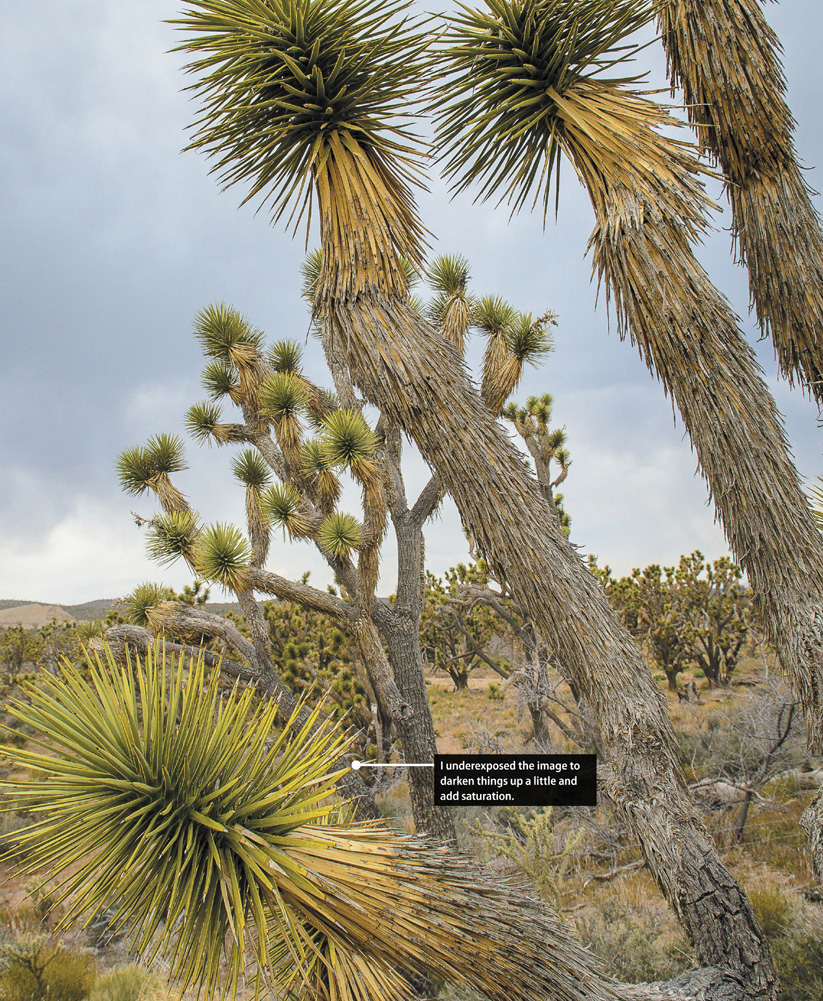
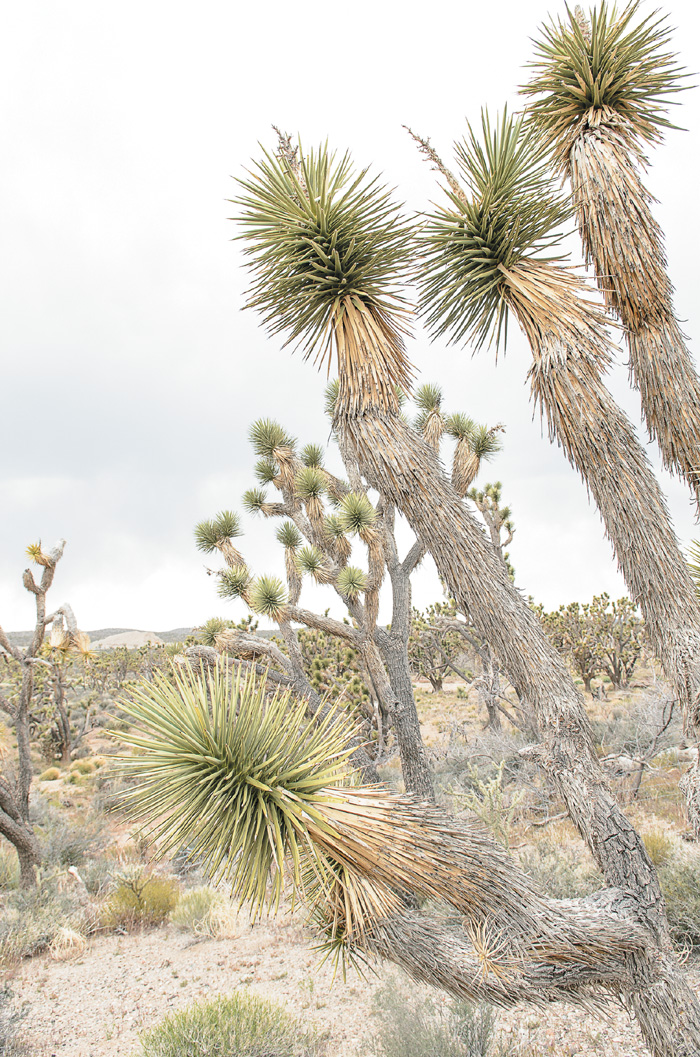
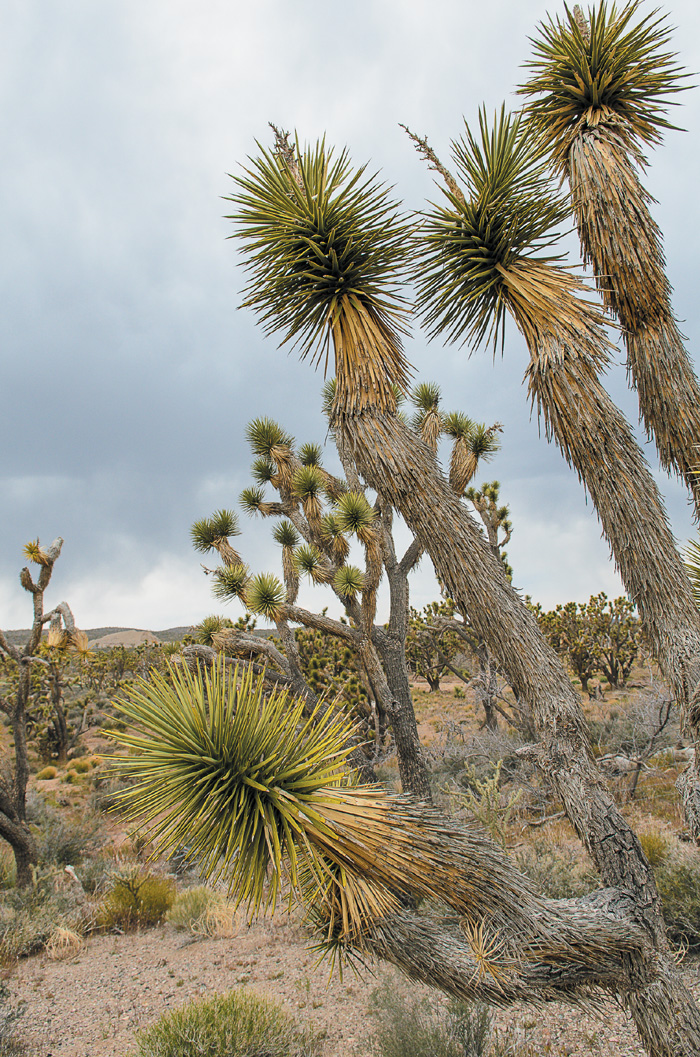
On a recent trip to Las Vegas, I had some extra time on my hands and decided to take a side trip to the Western Grand Canyon area. Along the way I came across some very cool-looking Joshua trees. These are really unique-looking trees, and I couldn’t pass up the opportunity to stop and grab a few shots.

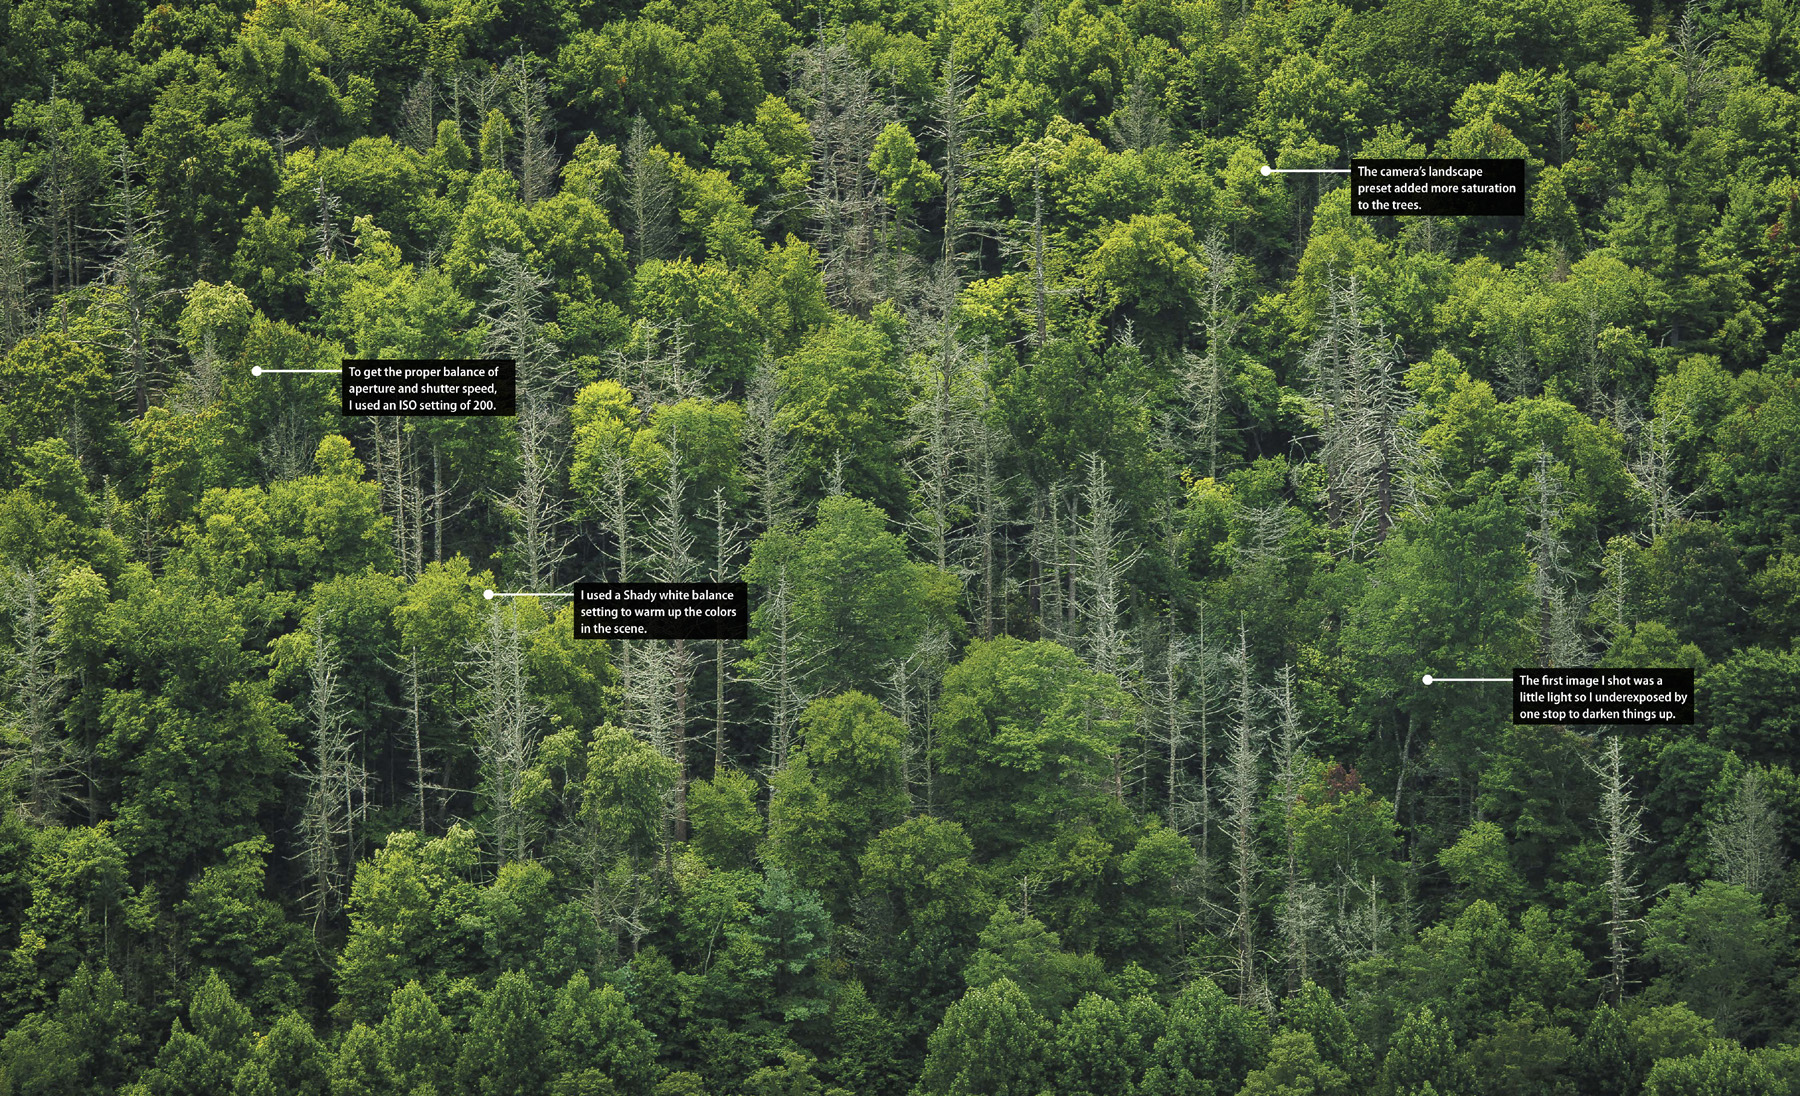
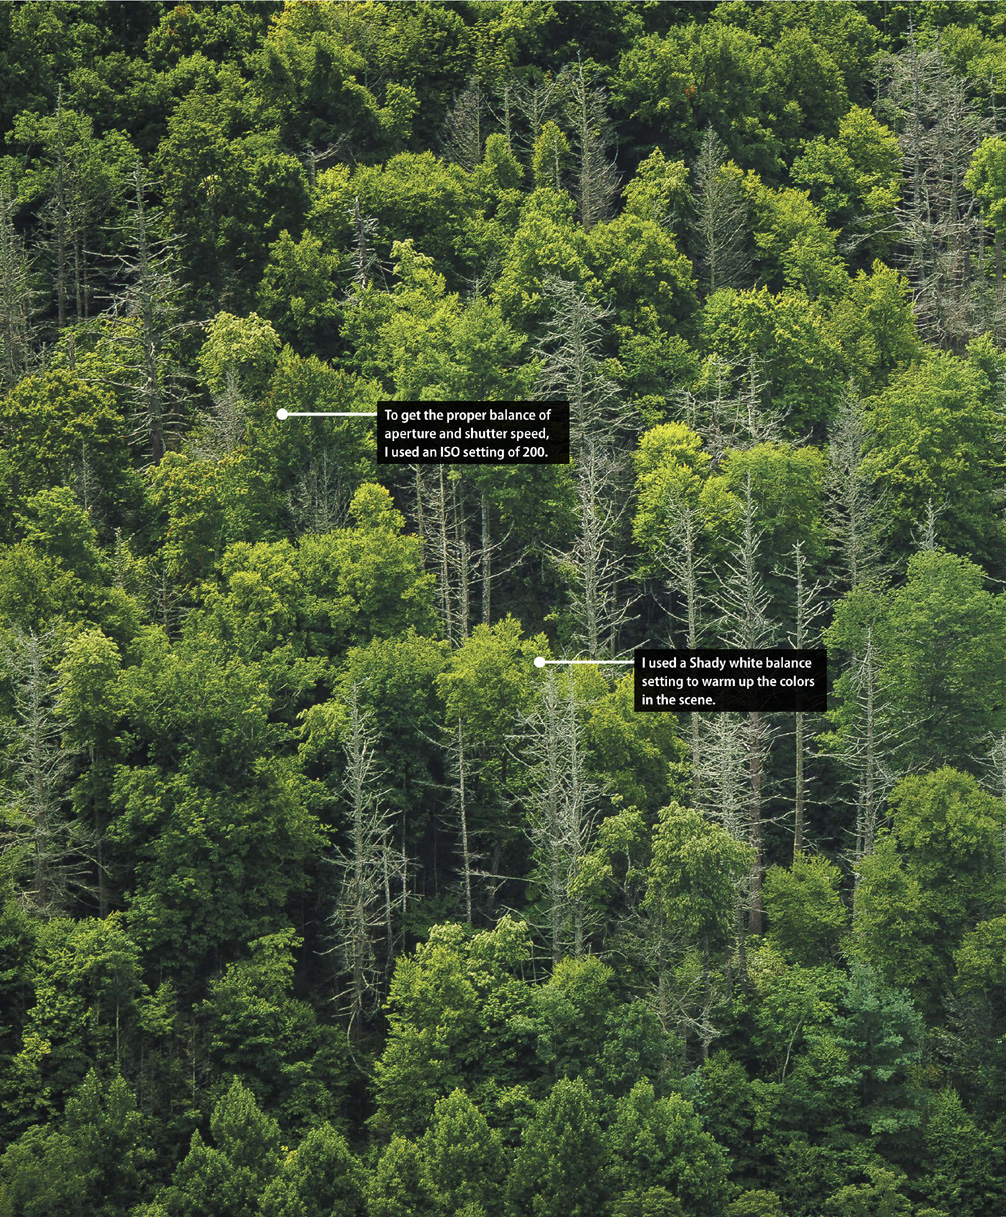
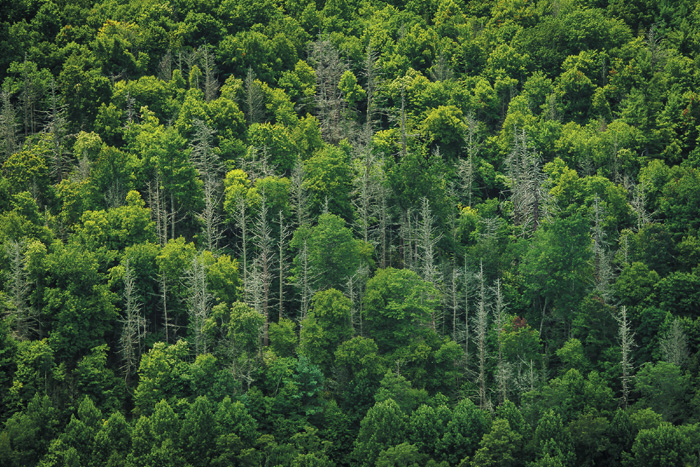
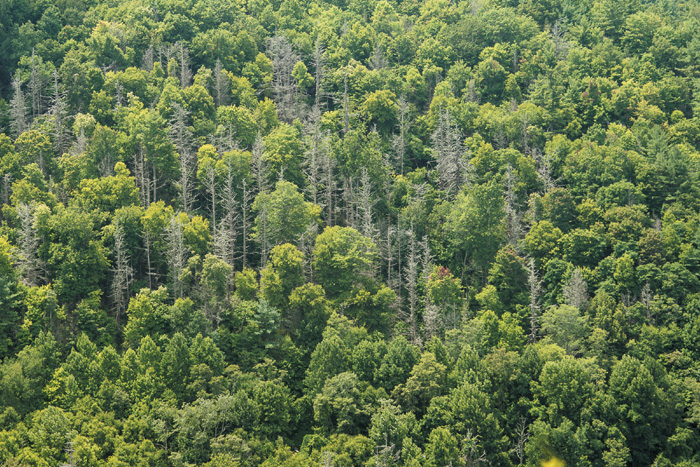
This past year I took a road trip down the Blue Ridge Parkway. Along the way I stopped at quite a few scenic overlooks. Some were photo-worthy and some were not. This particular one grabbed my attention because of the stark contrast between the lush green trees and the pale dead timbers mixed in.
The Basic Definition
Exposure is the process whereby the light reflecting off of a subject reflects through an opening in the camera lens onto the camera sensor for a defined period of time. Just how large of a lens opening and how long the light is allowed to pass through is determined by the sensitivity of the sensor. The proper combination of shutter speed, lens opening, and sensor sensitivity results in a properly exposed photograph. There is a relationship between these factors that is sometimes referred to as the Exposure Triangle.
At each point of the triangles lies one of the critical components that comprise a correct exposure (Figure 1.1):
• ISO: This is the numeric value assigned to the sensitivity level of your camera sensor
• Aperture: The opening of your lens, which controls the volume of light entering the camera
• Shutter Speed: This controls the length of time that light is allowed in through the lens
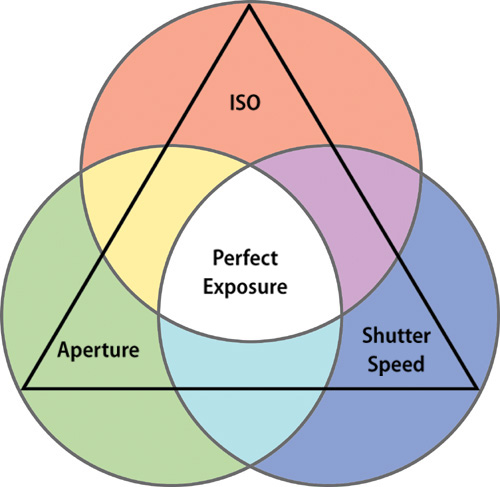
Figure 1.1 By combining the three primary elements of photography—ISO, aperture, and shutter speed—you can achieve a proper exposure.
So you can see that we now have the three points of our triangle. By combining just the right amounts of each one, we can achieve a proper exposure.
Here’s how it works. The camera sensor has a level of sensitivity (or how sensitive it is to light) that is called the ISO. To get a proper exposure—not too much, not too little—the lens needs to adjust the aperture diaphragm to control the volume of light entering the camera. This diaphragm is a circular opening in the lens that can be made large or small, depending on how it is set. Once set, the shutter is opened for a short period of time to allow the light to hit the sensor long enough for the light to record an image.
A change to any one of these factors will require changing one or more of the other two. This is referred to as “reciprocal change.” If you let more light in the lens by choosing a larger aperture opening, you will need to shorten the amount of time the shutter is open. If the shutter is allowed to stay open for a longer period of time, the aperture needs to be smaller to restrict the amount of light coming in.
In order to better understand each of these key exposure components, let’s dive in a little deeper.
ISO
We already covered a brief definition of the term ISO, but what exactly does it mean to you? Basically, it’s the starting point for defining how much exposure will be necessary for you to get a good picture. The term ISO stands for International Standards Organization and dates back to the days of film cameras. At one point there was more than one way to determine how sensitive film was, by using either the ASA (American Standards Association) scale, which was based on an arithmetic scale, or DIN (German Institute for Standardization), which used a logarithmic scale. In order to make things easier for the international photography market, most film manufacturers switched to the ISO scale.
So why the history lesson? Because the scale that we use in today’s digital cameras is based on this definition of sensitivity. The actual method of determining this number is calculated differently because we are using digital image sensors rather than film, but the actual ISO numbers and the way they are used are such that you would obtain similar exposure results. The ISO scale uses an arithmetic progression to change the sensitivity of your camera, based on the lowest determined ISO level achievable. Every time the number doubles, so does the sensitivity of the sensor. Most digital cameras today have ISO settings that range from anywhere from 50 to 126,000 (although most cameras top out around 6400). The ability to actually change that sensitivity level has given the photographer great flexibility in achieving a wider range of exposures.
Just as it was with film, the greatest level of image quality will come from using the lowest ISO number. This is also the setting that takes the most amount of light to produce a good image. As you raise the ISO level on your camera, you decrease the amount of light necessary to make a good exposure; however, your image quality might decrease slightly with each rise in ISO (Figure 1.2 on the next page). This is due to the process of amplifying the signal from your sensor. It is this amplification that decreases the signal-to-noise ratio. So, the higher you set the number, the more digital noise you will have in your image. This image noise is less of a problem in today’s cameras due to advances in signal processing and noise reduction, but it can still be an issue.

ISO 1600 • 1/25 sec. • f/4 • 12mm lens
Figure 1.2 The high ISO setting was necessary to enable handholding the camera during exposure. The downside is that there is a lot of digital noise in the image.
The bottom line here is that the ISO gives you a starting point for determining how much light you will need for a proper exposure. Pick a lower number and you have better quality and the need for more light. A higher number lets you work with less light but can diminish the quality of your image.
Aperture
The aperture of the lens allows you to control the volume of light coming into the camera. Through the use of a diaphragm of movable leaves, the opening in the lens (or aperture), which light passes through, can be changed. The largest opening possible for a given lens is called the “maximum aperture,” and it is determined by dividing the focal length of the lens by the diameter of the aperture. The result is known as an f-number, or f-stop. As the aperture gets smaller, the f-stop will actually go up. This can be confusing, but know that each f-stop is a fraction—though it is expressed without the numerator. Also, as the number gets larger, the amount of light it lets through is about half that of the preceding larger opening.
Sounds confusing, right? Well, it can be if you think of it in terms of a math problem. Think of it like this: you are outside watering your plants with a 1" garden hose. Let’s say the hose breaks and now you need to use a ½" hose. It’s going to take you longer to get the same volume of water on your plants. If they were lenses, you would be switching from an f/1 lens to an f/2 lens.
You might also be wondering why, if everything is doubling or halving, there are numbers like f/2.8, f/5.6, and f/11. It’s because the numbers are fractions based on the area of the hole in the diaphragm. Just remember that when you increase the number, you’re actually allowing less light in because the diaphragm is getting smaller.
Shutter Speed
We’ve just determined that the ISO sensitivity will dictate how sensitive the camera is to light and that the aperture will control the volume of light. Now we need to explore the final factor in achieving our exposure, which deals with controlling how long the light is allowed to strike the sensor. Controlling the shutter speed does this. Every camera has a shutter whose purpose it is to control the flow of light. Most shutters are actually made of two separate curtains that travel vertically across the camera sensor. As the shutter release button is depressed, the first curtain will begin to travel across the surface of the frame, allowing the sensor to be exposed. After a predetermined amount of time, a second curtain will begin to close over the sensor, terminating the exposure process. It is the predetermined time that is referred to as shutter speed.
The speeds that you will be working with are typically going to be just fractions of a second, and they are a little easier to figure out than aperture settings. Most cameras have the ability to select shutter speeds ranging from as long as 30 seconds to as fast as 1/8000 of a second. Each time you change from one shutter speed to the next, you are going to be effectively doubling or halving the duration of the shutter. This means that if you change your setting from 1/125 to 1/250 you will be getting half the amount of exposure. But, if you go from 1/60 to 1/30, you will double your exposure time.
How Is Exposure Calculated?
We now know about ISO and shutter speeds and f-stops, so it’s time to put all three together to see how they relate to each other and how you can change them as needed. But before we do that, I should tell you how the exposure is actually calculated. Don’t worry; this won’t be overly complicated, but it is important.
When you point your camera at a scene, the light reflecting off your subject enters the lens and is allowed to pass through to the sensor for a period of time as dictated by the shutter speed. The amount and duration of the light needed for a proper exposure is dependent upon how much light is being reflected and how sensitive the sensor is. To figure this out, your camera utilizes a built-in light meter that looks through the lens and measures the amount of light. That level is then calculated against the sensitivity of the ISO value and an exposure value is rendered. So here is the tricky part: there is not just one perfect exposure because the f-stop and shutter speeds can be combined to allow the same amount of exposure using different settings. I told you it was a little tricky.
Here is a list of reciprocal settings that would all produce the same exposure result. Let’s use the Sunny 16 Rule, which states that on a sunny day, you can use a shutter speed that is roughly equal to the ISO at f/16 and achieve a proper exposure.
For simplification purposes, we will use an ISO of 100.

If you were to use any one of these combinations of aperture and shutter speed, they would each have the same result in terms of the exposure. Also take note that every time we cut the f-stop in half, we reciprocated by doubling our shutter speed.
Now that we know this, we can start using this information to make intelligent choices in terms of shutter speed and f-stop. Let’s bring the third element into this by changing our ISO by one stop, from 100 to 200.

Notice now that we doubled the sensitivity of the sensor so now we require half as much exposure as before. We have also reduced our maximum aperture from f/2 to f/2.8 because, depending on your camera, you probably can’t use a shutter speed that is faster than 1/8000 of a second.
So why not just use the exposure setting of f/16 at 1/250 of a second? Why bother with all of these reciprocal values when this one setting will give us a properly exposed image? The answer is that the f-stop and shutter speed also control other aspects of our image that we may want to adjust so that our images look how we want them to look.
Over- and Underexposure
Typically, since there is a proper exposure, you can also guess that there are improper exposures, as well. These are called overexposed and underexposed images. Overexposure is when too much light is allowed to fall on the sensor. This could be due to too large of an opening in the lens aperture setting or too slow of a shutter speed. The resulting image is one that looks too bright and tends to have blown-out highlight areas (Figure 1.3).
ISO 400 • 1/200 sec. • f/7.1 • 17mm lens
ISO 400 • 1/800 sec. • f/7.1 • 17mm lens
Figure 1.3 The figure on the left is overexposed, has blown-out highlights, and is too light overall. By adjusting the exposure by two stops, the image is darkened and there is now more detailed information in the highlight areas.
An underexposed image will have an overall dark appearance with shadow areas that are completely black and contain no detail. This happens when the sensor has not had enough light falling on it to properly record all of the tones. This generally happens when the lens aperture is too small or the shutter speed is too short (Figure 1.4).
ISO 400 • 1/640 sec. • f/18 • 24mm lens

ISO 400 • 1/160 sec. • f/18 • 24mm lens
Figure 1.4 The picture on the left is too dark and the shadow areas are losing detail. By adding more exposure, I was able to see more detail in the shadows and the colors are much brighter and more vibrant.
What Is a Proper Exposure?
If “too dark” is underexposed and “too light” is overexposed, how do we know exactly what the proper exposure is? That in itself is a tricky question, but once you know, you will be well on your way to being a better photographer. That’s because there are two answers to this question, and neither is wrong. The first answer has to do with the camera’s light meter and how it interprets the scene. Once you point your camera at a scene and press the shutter release slightly, the camera light meter springs into action. It immediately assesses all of the light and dark areas that the camera is viewing and makes an exposure value (EV) based on that information as well as the ISO setting for the sensor. We’ll cover the light meter more extensively in the next chapter.
The second way of knowing what is a proper exposure is based solely on the outcome that you desire. As the photographer, it’s up to you to decide if you want the image to be light or dark. It’s your interpretation, and that is something that you will develop over time. That’s why it’s so important to understand just what exposure is and how to manipulate it so that you can render predictable results. Once you have accomplished that, you can begin creating your own vision—not just the one that the camera has chosen for you.
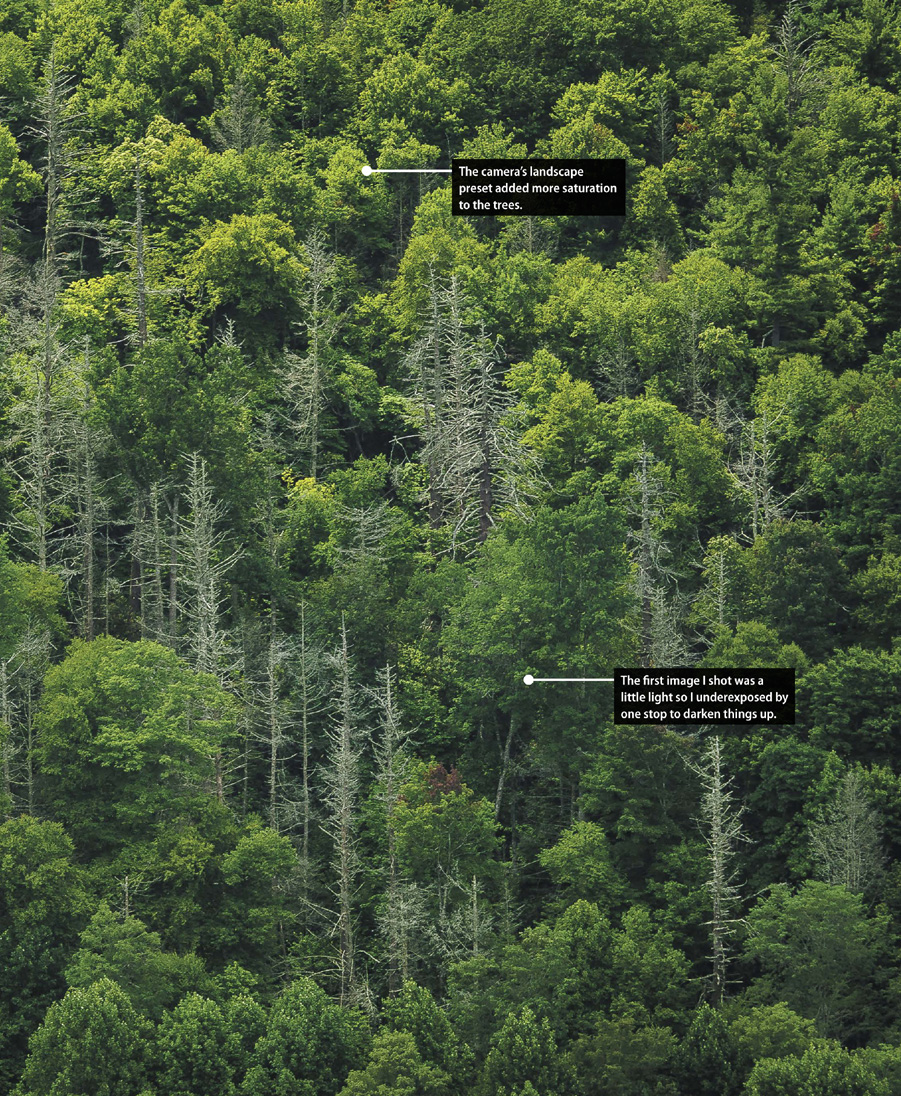
In Figure 1.5, you see two different interpretations of the same subject. The image on the top is the exposure that the camera felt was correct for the subject. It’s not bad, but it feels a little too bright and doesn’t show the contrast that I was looking for between the dead and live trees. I decided to underexpose the scene by one stop by increasing my shutter speed from 1/25 to 1/50 of a second. The result is a darker appearance to the image with colors that are slightly more saturated and better contrast.
ISO 200 • 1/25 sec. • f/10 • 70mm lens
ISO 200 • 1/50 sec. • f/10 • 70mm lens
Figure 1.5 The image on top is the result of the camera’s light meter. By altering those settings (bottom), I was able to get an image much closer to what I intended.
Chapter 1 Assignments
Gaining an understanding of the basic concepts of exposure will help you make smarter decisions down the road. It’s not enough to know how your camera works; you also need to know how to make it work for you to achieve a desired result. Try these few exercises to start getting control over the exposure process.
Changing your exposure
Put your camera in Program mode, point it at a subject, and then activate the meter. Take note of the aperture and shutter speed. Now try moving the mode to Aperture Priority or Shutter Priority mode and set the camera to the same settings. Now turn your shutter speed or aperture to something else and watch the other setting change automatically to compensate. Get a feel for how one setting affects the other.
Learn to compensate
Finding that sweet spot of exposure for your subject is what it’s all about. The camera meter will give you a starting point but you need to adjust to suit your needs. Find your Exposure Compensation function and try doing some over- and underexposure tests to see how they affect the camera settings as well as the final image.
Put your camera in Manual mode
If you really want to learn how things work, step away from those semi-automatic modes and give the Manual mode a spin. Try making a change to the ISO and then make some reciprocal changes to your other camera settings. Remember that there is a meter reading in your viewfinder so you won’t have to do all the guesswork.
Share your results with the book’s Flickr group!
Join the group here: flickr.com/groups/exposure_fromsnapshotstogreatshots