If you hate to read computer books, this chapter’s for you. By taking a brief look at the menus assembled here and the explanations of how they and various commands work, you’ll get a quick overview of FileMaker that will allow you to dive right in—if that’s your style.
For readers who prefer a go-slow approach, this chapter’s brief explanations also include page references to where in the book you’ll find all the details you could want.
No matter which approach you prefer, this chapter provides a visual map for learning all of FileMaker’s major functions.
When using FileMaker, you will always be working in one of four views or what it calls modes: Browse, Find, Layout, or Preview. Reached using the View menu, each mode is used for a different set of tasks. For that reason, FileMaker’s screen, menus, and their related options change from mode to mode.
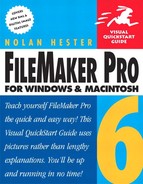
Certain features of the FileMaker screen (Figure 3.1) remain constant: the flipbook icon at the upper left, the status area along the left side (unless you elect to hide it), the Zoom-in and Zoom-out icons, and the status pop-up at the bottom of the screen, which lets you quickly choose your mode. As you switch from one view or mode to another, however, the left-hand status area displays a different set of tools and icons (Figure 3.2). The main record area also will change from mode to mode. For example, in Layout mode, the names of fields appear instead of the data itself.

Figure 3.1. While the left-hand status area (shown in Browse) changes from mode to mode, FileMaker’s main screen always displays the flipbook icon, bookmark, zoom icons, and the mode status pop-up.
Figure 3.2. Tools and icons tailored to each mode appear in the left-hand status area as you switch among the (left to right): Browse, Find, Layout, and Preview modes.
Here’s a quick rundown of the main elements of the FileMaker screen:
Layout drop-down: Clicking your cursor on the box reveals all the layouts for the current record. For more on using Layout mode, see Creating & Designing Databases on page 99.
Record bookmark: Using your cursor to click on and drag the bookmark allows you to quickly jump forward or backward through a database’s records. For more on using the bookmark, see Viewing Records on page 41.
Flipbook: This icon represents all the records in the current database. Clicking on the upper or lower pages of the flipbook moves you forward or backward one record at a time. For more on using the flipbook, see Viewing Records on page 41.
Current record, Total records: The current record number tells you where you are among all the database’s records, which is represented by the Total records number. By clicking on the Current record number, you can type in the number of a particular record you’re seeking. For more information, see Viewing Records on page 41.
Sort status: This simply tells you whether the records you’re working with have been sorted or remain unsorted. For more on sorting records, see Finding and Sorting Records on page 49.
Mode status area: Running along the left-hand side of your screen, the status area displays the icons and tools for whichever mode you’re in (Figure 3.2). For more on each mode’s tools and icons, see pages 22–23.
Hide/Show status area: Clicking on this icon allows you to hide or show the entire left-hand status area. This can be handy when you want to give the record itself as much screen space as possible.
Zoom percentage, Zoom in, Zoom out: Clicking the Zoom-in or Zoom-out icon allows you to magnify or shrink your view of the current record. Clicking on the Zoom percentage box lets you toggle between the current magnification view and the 100 percent view. This makes it easy, for example, to jump between an extreme close-up view (400 percent) and a regular view (100 percent) in a single click instead of the multiple clicks required by the Zoom-in and Zoom-out icons.
Mode pop-up: This pop-up box at the bottom left of the screen displays FileMaker’s current mode (Figure 3.3). By clicking on it, you can quickly move to another mode—just as you can by clicking on View in the menu bar. For more on modes, see the next section.

Browse mode is the view where you’ll spend most of your time if you’re working with existing databases (Figure 3.4). Whenever you open a FileMaker database, it first appears in Browse mode. In Browse, you can view, sort, add, omit, and delete records. For more on using Browse mode, see Viewing Records on page 41 and Finding and Sorting Records on page 49.
Find mode offers a powerful set of tools for locating individual records, or groups of records, within a database (Figure 3.5). In Find, you can search for records that match or don’t match particular criteria based on text or mathematical values. For more on using Find mode, see Finding and Sorting Records on page 49.
Layout mode is where you design the appearance of the fields and records that display your data (Figure 3.6). In Layout, you can control every detail of fonts, field borders, button design—as well as the overall look of forms and entry screens. For more on using Layout mode, see Creating & Designing Databases, on page 99.
Preview mode lets you control how your files look when printed (Figure 3.7). In Preview, you can set margins, get rid of unwanted gaps between fields, hide fields if you desire, and control how everything prints out, from reports to labels to envelopes. For more on using Preview mode, see Printing, on page 247.
This section provides a quick run-through of FileMaker’s contextual menus, which change to reflect the mode you’re in (Figure 3.8). Many of the menu commands and options are no different than those in any application: Open File, for example, is a fairly universal action. Some of the commands specific to FileMaker are highlighted on the following pages. Follow the page references for details on the various menu commands and options.
As the name implies, all the commands within the File menu control actions related directly to file management (Figure 3.9). The File menu appears in all four FileMaker modes, with all its functions available.
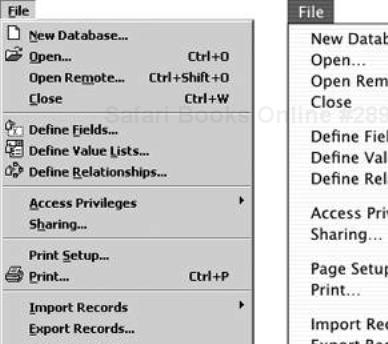
New Database, Open, Open Remote, Close: With the exception of Open Remote, these commands operate much as they do in most programs. The Open Remote command lets you open a FileMaker database shared over a network. For more information, see Networking on page 253.
Define Fields, Define Value Lists, Define Relationships: Use the second group of commands to create fields, set options for entering data in them, and establish relationships among the fields. For more information, see Defining Fields on page 107 and Creating Relational Databases on page 231.
Access Privileges, Sharing: Both commands control network-related functions. For more on determining which files can be seen on a network, who can see them, and which files can be shared, see Networking on page 253.
Print Setup/Page Setup, Print: These commands operate much as they do in all programs. For more information, see Printing on page 247.
Import/Export Records, Save a Copy As, Recover: These commands help you convert other database files to the current FileMaker format. For more on importing and exporting, see Converting Files on page 81.
Exit/Quit: Use this command to quit FileMaker. If you are running Mac OS X, the Quit command resides under the separate FileMaker Pro menu (Figure 3.42).
Most of this menu’s commands operate just as they do in other programs—except for a few explained below (Figure 3.10). The Edit menu appears in all four FileMaker modes, though not all its functions are available in every mode. (Dimmed items indicate functions not available within that mode.)
Figure 3.10. The Edit menu appears in all four modes, though not all functions are available in every mode.
 Paste Special: This command can be a tremendous time saver. Essentially, it lets you paste the contents of the clipboard into any FileMaker document.
- Object: This command takes advantage of a standard Windows feature, OLE (Object Linking and Embedding), which allows you to cut and paste data from other applications. The great advantage of OLE is that the data is updated automatically within the FileMaker record whenever it’s changed in the original application. For more information, see Creating Layouts on page 137.
Spelling offers the usual options. For more information, see Using Spell Check and Dictionaries on page 75.
Preferences: Setting FileMaker’s preferences early on will save you time and frustration. The preference dialog boxes control a variety of items, including how FileMaker works with your modem, network, memory, and Web plug-ins. If you are running Mac OS X, the preferences command resides under the separate FileMaker Pro menu. For more information, see Setting FileMaker’s Preferences on page 323.
FileMaker operates in one of four modes: Browse, Find, Layout, or Preview. Each mode is used for a different set of tasks and, so, the options offered under the View menu change depending on which mode you’re in (Figure 3.11). In each of the four contextual mode menus, however, the top section remains the same, allowing you to quickly switch to another mode.
Figure 3.11. Depending on which mode you’re in (Browse on the left, Layout on the right), the View menu’s commands and functions change.
The rest of the menu changes based on which mode you’re in. For example, the Layout mode (right, Figure 3.11) includes Show and an extensive submenu.
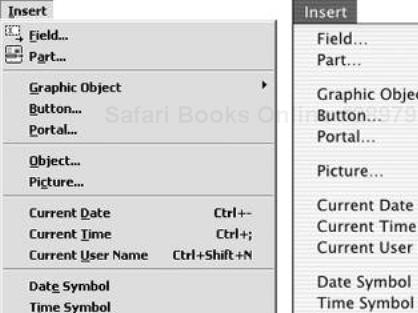
The Insert menu, available only in Find and Layout modes, offers a fast way to paste a field, part, object, button, portal, or picture into a layout (Figure 3.12). It also enables you to paste in the date, time, a user name, an indexed item, or selected content of the previous record. In FileMaker 4, most of these same functions were found under the Edit menu’s Paste Special item. For more information on inserts, see Finding and Sorting Records on page 49 and Using Variable Fields on page 156. For more on indexing, see Storage options on page 118.
The Format menu appears in all modes except Preview, but offers the most functions in Layout mode (Figure 3.13). The availability of the functions also varies depending on what you’ve selected within the current record. In general, the functions within the Format menu start at the character level and move toward the field level. For more information, see Formatting and Graphics in Layouts, on page 183.
Figure 3.13. The Format menu appears in all modes except Preview, but offers the most functions in Layout mode.
Font through Text Color: The top six functions control attributes at the character level within a selected field.
Text through Portal: The second group of functions controls attributes at the field level, that is, what type of content the field contains: text, numbers, a date, a time, a graphic, button, or portal (record view).
Field Format, Field Borders, Format Painter, Sliding/Printing: The third and fourth groups of Format menu functions control the style and behavior of the field container, that is, whether it’s a standard field or one that offers a pop-up list or repeats itself. For more information on the new Format Painter, which enables you to quickly apply the attributes of one object to another while in Layout mode, see page 189.
The Records menu (Figure 3.14), available only in Find and Preview modes, lets you create, duplicate, and delete records. It also contains commands for changing previous find requests for records and working with sorts of the records. In practice, you’ll find yourself using the Records menu in tandem with the Requests menu, explained below. In FileMaker 4, most of these functions were found under the Mode menu when you were in Browse mode or in the now-defunct Select menu. For more information, see Finding and Sorting Records, on page 49.
The Requests menu (Figure 3.15), available only in Find mode, contains commands used for finding records. In FileMaker 4, these functions were found under the Select menu. For more information, see Finding and Sorting Records, on page 49.
The Layouts menu (Figure 3.16), which naturally enough appears only in Layout mode, lets you create, duplicate, and delete layouts. It also lets you control which layouts will be visible in which modes. In FileMaker 4, most of these functions were found under the Mode menu when you were in Layout mode. For more information, see Creating Layouts on page 137.
The Arrange menu (Figure 3.17), which appears only in Layout mode, lets you control the layering and grouping of objects as you design a layout. For more information, see Creating Layouts, on page 137.
Don’t let this menu’s unassuming appearance fool you (Figure 3.18). Choosing ScriptMaker will launch a powerful FileMaker feature that enables you to automate many of the program’s operations. Existing scripts for the current file appear in the menu’s second section. For more information, see Using Templates and Scripts, on page 209.

This works much like the Window menu in most programs: The bottom half of the menu lists all currently open FileMaker databases, enabling you to arrange what’s visible on your desktop (Figure 3.19).
FileMaker’s Help menu has some of the best built-in help of any program (Figure 3.20). For the quickest route to the answers you need, choose Help > Contents and Index. When the Topics dialog box appears, click the Contents tab for big-picture topics or the Index tab to find more specific items. The FileMaker on the Web choice launches your Web browser and takes you to FileMaker’s main support page, where you can register your copy, download program updates, and find out the latest on the product.
By default, only the Standard toolbar appears when you launch FileMaker, though its appearance changes depending on which mode you’re working in (Figures 3.21–3.22). FileMaker also includes a Text Formatting toolbar (Figure 3.23), which can be very handy when you’re creating layouts and naming fields. The Arrange and Tools toolbars are available only in Layout mode (Figures 3.24–3.25). As was the case in version 5.5, FileMaker 6 doesn’t support toolbars in OS X.
Figure 3.21. FileMaker’s Standard toolbar looks pretty much the same in Browse, Find, and Preview modes, though different icons are dimmed.

Figure 3.22. In Layout mode, the Standard toolbar includes tools for creating layouts and defining their parts and relationships.

Figure 3.23. Available in all four modes, the Text Formatting toolbar provides quick access to FileMaker’s major text-related tools.
Figure 3.24. The Arrange toolbar, available only in Layout mode, helps you group and arrange various layout objects.
Figure 3.25. The Tools toolbar, also only available in Layout mode, offers fast access to FileMaker’s design tools.
Choose View > Toolbars and select a toolbar from the submenu to turn on or off (Figure 3.26). Checked toolbars are already on; unchecked ones are off.
Release your cursor on the selected toolbar and by default, it will appear in the area below FileMaker’s menu bar.

FileMaker makes it easy to rearrange the toolbars to suit your work setup. Sometimes it’s easiest to have your activated toolbars “docked,” that is, running horizontally across the top of FileMaker’s main window. For some tasks, however, you may prefer to have a toolbar sitting out on the desktop itself. You also can resize toolbars when they’re on your desktop.
To move a docked toolbar (those running across FileMaker’s main window), click your cursor on the vertical bar marking the toolbar’s left-hand edge (top, Figure 3.27).
Continue pressing the cursor and drag the toolbar to a new spot on the desktop (middle, Figure 3.27).
Release the cursor and the toolbar will appear with its own title (bottom, Figure 3.27).
To move a freestanding toolbar into a docked position below FileMaker’s menu bar, click on the toolbar’s title (top, Figure 3.28).
Continue pressing the cursor and drag the toolbar to the area just below the menu bar (middle, Figure 3.28).
Release the cursor and the toolbar will snap into place (bottom, Figure 3.28).

To resize a freestanding toolbar, click an outer edge (Windows) or its lower-right corner (Mac) and drag the cursor to shrink or enlarge the toolbar (Figure 3.29).
Opening and closing files in FileMaker works like most programs. Unlike many programs, however, FileMaker automatically saves data as you enter it. If by habit, you type ![]() or
or ![]()
![]() , the Sort dialog box will appear. Just click Done and you’ll be back to where you were with no harm done.
, the Sort dialog box will appear. Just click Done and you’ll be back to where you were with no harm done.
While FileMaker’s save feature works automatically, you can control how often and under what circumstances saves take place. For more information, see Setting FileMaker’s Preferences, on page 323.
If you haven’t started the FileMaker program, do so now by either choosing ProgramsFileMaker Pro from the Start menu (Figure 3.30) or double-clicking the FileMaker Pro icon in the FileMaker Pro 6 folder (Mac).
A dialog box will appear asking whether you want to create a new file using a template, create a new empty file, or open an existing file (Figure 3.31). Make your choice and click OK.
Depending on your choice in step 2, a dialog box will appear asking you to create and name a copy of the selected template (Figure 3.32), open an existing file, or create and name a new file. For more information on templates see Using Templates and Scripts, on page 209.


 Tips
Tips
If you’d rather not see the dialog box that asks whether you want to open a template, a new file, or an existing file every time you launch FileMaker, check the No longer show this dialog box (Figure 3.33). In the future, when FileMaker starts up, you can then go directly to the File menu.
If you’ve turned off the opening dialog box (see the Tip above), you still can open an existing file by choosing File > Open (Figure 3.34). Or use your keyboard:
 (Windows) or
 (Mac).
To learn more about the great templates included with FileMaker 6, see Using Templates and Scripts on page 209.
Choose File > New Database (Figure 3.35).

Because FileMaker automatically saves your data, closing a file is simple. You can close a file several different ways.
Choose File > Close (Figure 3.36). The keyboard equivalents are:
 (Windows) or
  (Mac).
or
- Click the close button in the record’s upper-right corner (Figure 3.37) or double-click the FileMaker icon in the upper-left corner of the menu bar (Figure 3.38).
 Click the close box in the left corner of the record’s title bar (in Mac OS X, it’s a red button marked with an X) (Figure 3.39).

Though FileMaker saves your work as you go, you may want to make a copy of a database right before making a lot of changes to the original.
Choose File > Save a Copy As (Figure 3.40).
When the dialog box appears, you can either accept the default name or type in a new name. Choose where you want to store the copy by navigating through the folder icons at the top of the dialog box. At the bottom of the dialog box (Figure 3.41), you also have the option to save the copy as a regular database file, a space-saving compressed file, or a clone. The clone option lets you save a database’s layout, scripts, and field definitions but without any data.
Once you’ve picked your file name, destination, and file type, click Save.
Choose File > Exit (Windows) or File > Quit (pre-Mac OS X) or FileMaker Pro > Quit FileMaker Pro (Mac OS X) (Figure 3.42). The keyboard equivalents are:

 or
or 
 (Windows) or (Mac, all operating systems).