Finding and sorting records are like two halves of the same process. Together, they give you the power to spotlight particular records in a particular order. That ability allows you to complete such mundane work as correcting entry errors as well as big-picture tasks like analyzing trends.
With Find you can hunt down a record that needs changing without having to go through the records one by one. While records normally are displayed in the order they were created, the Sort command lets you arrange the view to what best suits your needs. The new contextual sort feature, explained on page 67, makes sorting much easier to use.
Finding related field information in relational databases is covered in Creating Relational Databases on page 231.
The database used in this section contains house sales information. If you like, you can download the sample database at: http://waywest.net/filemaker/.
Understanding a few key terms—the Find request and the found set, along with And vs. Or searches—will make it easier to use FileMaker’s Find features (Figure 5.1).
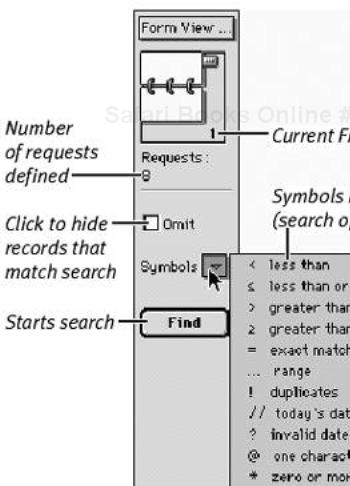
Figure 5.1. Switching to Find mode calls up search-related tools and buttons in FileMaker’s left-hand status area.
The Find Request: What FileMaker calls a Find request simply represents all the criteria entered for a particular search. Whether they’re plain or fancy, all the field criteria associated with a single search represent one Find request.
The Found Set: FileMaker calls the records returned in any search the found set, which represents only the records activated by the current Find request. The rest of the file’s records still exist but are not displayed and make up what FileMaker calls the omitted set. For more information, see Omitting Records on page 62 and Deleting Records on page 65.
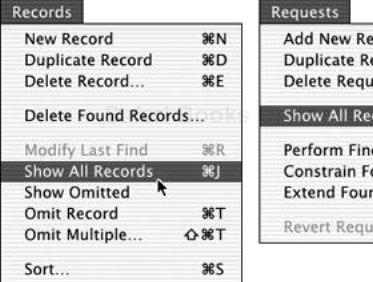
Working with a found set allows you to focus on tailoring it for sorting, printing, exporting, etc. You can return to working with the full set of records within a file at any time. To do so, choose the Show All Records command under the Requests or Records menus. Or use your keyboard: ![]() (Windows) or
(Windows) or ![]()
![]() (Mac). In effect, this turns the entire file into the found set.
(Mac). In effect, this turns the entire file into the found set.
Single- vs. Multiple-Criteria Searches: The single-criteria search is straightforward: You want to find every record containing a single item, such as the name Jones. Consequently, your Find request contains just one condition: find all instances of Jones in any field. That’s why such searches are sometimes called simple searches. Multiple-criteria searches, on the other hand, can set any number of conditions and combine those conditions to broaden or narrow the number of instances found.
Any time you create a multiple-criteria search that looks for data that match all of your search criteria you’re performing what’s called a logical And search. If, for example, you create a Find request that asks for any records within a file where the city is San Francisco and the state is California, you’re asking FileMaker to find records that contain San Francisco and California. Such And searches tend to narrow, or as FileMaker puts it constrain, your search since you’re not just looking for records containing California but a smaller group within that group that also contains San Francisco.
Any time you create a multiple-criteria search that looks for data that match any one of your search criteria you’re performing what’s called a logical Or search. If, for example, you create a Find request for all records containing California or Arizona, FileMaker will find any records that match either value. Such Or queries tend to widen, or extend, your search.
If you need to find every instance of just a single item, use the single-criteria search.
You can’t search for information in a particular field unless you have a layout with that field in it. Switch to the layout of your database that contains the field or fields you want to search.
Once the correct layout appears, choose View > Find Mode (Figure 5.2). Or use your keyboard:
 (Windows) or
 (Mac). A blank version of the selected layout will appear.
In our example we want to find all the houses on Pomona Avenue, so type Pomona into the Street Name field (Figure 5.3). Click the Find button in the mode status area along the left-hand side of the screen (Figure 5.1), or simply press
 (Windows) or
  (Mac). (You can also choose Requests > Perform Find but using the keyboard is much easier.) Nine records appear that contain “Pomona” in the Street Name field (Figure 5.4). Notice that the left-hand mode status area shows the number of found records (9), along with the total record count (49).
Within Find mode, the Symbols List (a drop-down menu in the left-hand status area) offers 13 choices for quickly fine tuning your search (Figure 5.5). Combined with the status area’s Omit checkbox (for more information on Omit, see page 62), the Symbols List can be a major help when trying to find a series of records amid hundreds (Table 5.1).
Figure 5.5. Click on the Symbols List drop-down menu to access 13 choices for fine tuning your search. See Table 5.1 for details.
Table 5.1. Using Find’s Symbols/Operators Drop-down Menu
USE | TO FIND | TYPE IN FIELD | NOTES |
|---|---|---|---|
< | Less than value to right of symbol | <200 | |
≤ | Less than or equal to value to right | ≤200 | |
> | Greater than value to right | >200 | |
≥ | Greater than or equal to value to right | ≥200 | |
= | Exactly value to right | =Pomona | Exact match and other values (e.g., will find Pomona Ave.) |
== | Exact value in order & nothing else | ==Pomona | Exact match with no other values (e.g., will not find Pomona Ave.) |
... | A range of dates, times, numbers, text | ... or .. (two periods) | Includes beginning and ending values; displays in A–Z, 1–10 order |
! | Duplicate values | ! | Finds any duplicate field entries—great for mailing lists |
// | Today’s date | // | |
? | Invalid dates, times, or calculations | ? | Finds format errors that can create calculation problems |
@ | One unknown or variable text character | @omona | A one character search that will find Pomona and Romona |
* | Zero or more unknown variable characters | P*a | No character limit: “P*a” finds Pomona but also Pia, Paula |
“ ” | Text exactly as it appears | “Pomona” | Ignores letter case, so it will find “Pomona” and “pomona” |
= | Empty fields | = | Useful for finding missing data |
Switch to the layout of your database that contains the field or fields you want to search. Choose View > Find Mode, or use your keyboard:
(Windows) or (Mac). A blank version of the selected layout will appear.Click on the field you’ll be searching. Now click on the Symbols drop-down menu in the left-hand mode status area and select the appropriate symbol or operator (Figure 5.5). (See Table 5.1 for details on how each operator functions.) In this example, we want to find all the homes selling for less than $200,000. Select the first operator in the pop-up list, then type in 200,000 (Figure 5.6).
Click the Find button in the status area or press
(Windows) or (Mac). FileMaker will then display all the records meeting that criteria (Figure 5.7).
 Tips
Tips
Use Find’s Symbols list for multiple-criteria search requests, as well as for simple searches. (For more information on multiple-criteria searches, see page 55.)
If your search request criteria include finding the current date, time, user name, an item from your index, or the last record, click on the field you’ll be searching, choose Insert, and pick any command between Current Date and From Last Record. (For information on indexing, see Storage options on page 118.)
The Symbols List also includes ...range, which you can use to search for records that contain items between two values (Figure 5.8).
While constructing multiple-criteria searches takes more time than single-criteria searches, they enable you to cast a customized, fine-mesh net for exactly what you’re seeking.
Choose View > Find Mode or use your keyboard:
(Windows) or (Mac). Type what you’re seeking into the relevant field. Click the Find button or press or (Figure 5.9). The records matching your first criteria will appear in Browse Mode (Figure 5.10).Switch back to Find Mode and type your second search criteria into another blank field (Figure 5.11).
Choose Requests > Constrain Found Set (Figure 5.12). FileMaker will search through the first found set and display only records that also meet your second criteria, thereby narrowing or constraining your search (Figure 5.13).
Tips
The Constrain Found Set approach isn’t necessary if you are searching for multiple criteria in different fields. In those cases, you can just choose View > Find Mode and enter your multiple criteria (Figure 5.14). Click the Find button in the mode status area, or press
(Windows) or (Mac), and you’re done.If nothing in the database matches one of your search criteria, FileMaker will tell you and give you the chance to revise your search by clicking Modify Find (Figure 5.15).

Choose View > Find Mode or use your keyboard:
(Windows) or (Mac). Type what you’re seeking into the relevant field. Click the Find button or press or (Figure 5.16). The records matching your first criteria will appear in Browse Mode (Figure 5.17).Switch back to Find Mode and type your second search criteria into another blank field, or in this example, the same field used in the first find (Figure 5.18).
Choose Requests > Extend Found Set (Figure 5.19). The new found set will include all records that meet your first criteria or the second criteria, thereby broadening or extending your search (Figure 5.20).
Tip
Previous versions of FileMaker accomplished the same thing using the Add New Request command, but many users found that approach confusing. If you still prefer that method, however, just remember to not hit
or after you type in your first search criteria. Instead, you choose Requests > Add New Request, type what you’re seeking into a duplicate set of the fields used in the first request, and then click the Find button or press (Windows) or (Mac).
The new Constrain and Extend found set commands make it much easier to change your find request as you work. FileMaker offers several other useful commands for altering or modifying your most recent Find request. Most reside under the Requests menu (Figure 5.21), except for Modify Last Find, which appears under the Records menu.
Figure 5.21. Commands for altering or modifying your most recent Find request reside under the Requests menu, but can be selected only if you’re in Find mode.
Make sure you’ve got the layout you want. If necessary, use the layout drop-down menu to select the right one.
Since you are modifying a previous Find, you will already be in Browse mode, so choose Records > Modify Last Find (
 in Windows or
  on the Mac) (Figure 5.22).
When the form appears, modify your request and click Find or press
(Windows) or (Mac).
Switch to the layout you want.
If you’ve typed in your first request but are still in Find mode, choose Requests > Duplicate Request (
 in Windows or
  on the Mac) (Figure 5.23).
If you’ve already performed the Find and now are in Browse mode, first choose Records > Modify Last Find (
in Windows or on the Mac) (Figure 5.22), and then choose Requests > Duplicate Request ( in Windows or on the Mac) (Figure 5.23).A duplicate of your first request will appear (Figure 5.24). You can then alter the appropriate fields—saving yourself a bit of time.
Repeat the steps until you’ve duplicated (and then changed) all the requests you need. Click Find, or press
(Windows) or (Mac).

Switch to the layout you want.
If you’ve typed in a request but are still in Find mode, use the flipbook icon to click to the Find request you want to delete (Figure 5.25).
Figure 5.25. If you want to delete a particular request and are still in Find mode, use the flipbook to reach it.
If you’ve already performed the Find and now are in Browse mode, first choose Records > Modify Last Find (
in Windows or on the Mac). Now use the flipbook icon to click to the Find request you want to delete (Figure 5.25).Choose Requests > Delete Request (Figure 5.26). Or use your keyboard:
 (Windows) or
  (Mac). The selected request will be deleted (Figure 5.27).

This command lets you correct entries while you’re creating a Find request. It does not return you to where you were before you performed a Find. But it will let you start fresh on building the current Find request—no matter how many fields you’ve already filled in within that request.
You must be in Find mode, filling out a Find request. When you make a mistake, choose Requests > Revert Request (Figure 5.28).
When the warning dialog box appears, click Revert (Figure 5.29). All the fields within that Find request will become blank, allowing you to start fresh.
If you are in Browse mode, choose Records > Show All Records (left, Figure 5.30). If you’re in Find mode, choose Requests > Show All Records (right, Figure 5.30). The keyboard command is the same in either mode:
 (Windows) or
  (Mac).
Omitting records does not delete them from your database but simply hides them from view. In that sense, omitted records are the reverse of the found set generated by a Find request. When you perform a Find, the records not shown are what FileMaker calls the omitted set. Used with the Find and Sort commands, the Omit command allows you to quickly make a selection and then invert it by finding all the records not in that selection.
In Browse mode, select the record you want to omit.
Choose Records > Omit Record (Figure 5.31). Or use your keyboard:
 (Windows) or
  (Mac).
In Browse mode, select the first record of the group you want to omit.
Choose Records > Omit Multiple (Figure 5.32). Or use your keyboard:


 (Windows) or (Mac).
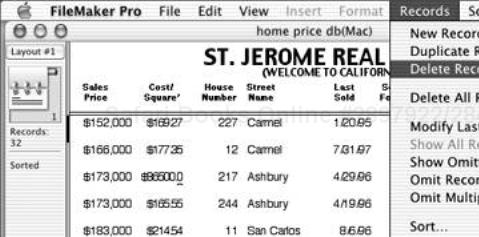
A dialog box will appear asking how many records you want to omit. In our real estate example, we sorted the records to place together the six Ashbury records we want to omit (Figure 5.33). Since we’d selected the first Ashbury record in Step 1, we enter 6 and click the Omit button (Figure 5.34). The Ashbury records have been omitted—not deleted, just hidden. The “Records: 50” and “Found: 44” in the left-hand status area confirm that six records have been omitted (Figure 5.35).
Figure 5.33. In the example, the far-left thin black bar indicates the first of the six Ashbury records that will be omitted.

Remember: Omitting a record does not delete it but simply removes it from the found set. To bring it back, choose Records > Show Omitted (Figure 5.36). The six records omitted in our previous example appear and are now the found set (Figure 5.37). The previous found set of 44 records are now omitted. It takes some getting used to, but the Find Omitted command’s back-and-forth toggle nature becomes very handy when used with the Find and Sort commands.
Tip
Whenever you select the Show Omitted command it will display any records not already on the screen—even if you have every single record displayed. In that case, the Show Omitted command will display no records. Choose Show Omitted again and up pop all the records. When you think about it, it makes sense.
Unlike the Omit command, which just hides records, the Delete command really does zap records and all the data inside them. Once you delete them, they’re gone: no undo, no going back. To play it safe, consider making a backup copy of a file before you embark on a record-deleting session.
Think about this for a second. First create a copy of the file—just in case. If you’re only looking to start with a fresh empty version of the layout, consider creating a clone of the existing database. Cloning gives you an empty database but does so by copying an existing database’s layout without touching the original.
In Browse mode, select the record you want to delete. In our real estate example, we’ve selected an unwanted blank record. Choose Records > Delete Record or use your keyboard:
(Windows) or (Mac) (Figure 5.38).As a safeguard against accidentally deleting a record, FileMaker presents a warning dialog box (Figure 5.39). If you’re sure, click the Delete button. The selected record is then deleted (Figure 5.40).

Use the Find or Omit Multiple commands to select a group of records to delete.
Once you’ve selected the group of records, choose Records > Delete Found Records (Figure 5.41). (To keep you from accidentally invoking the command, it has no keyboard equivalent.) As a second safeguard, FileMaker presents a warning dialog box that notes how many records are about to be deleted (Figure 5.42). If you’re sure, click the Delete All button.
If you truly want to delete all the records, choose Show All Records from the Requests or Records menus (
in Windows or on the Mac).Choose Records > Delete All Records (Figure 5.43).
Again, FileMaker presents a warning dialog box asking if you really want to delete that many records (Figure 5.44). Remember: There’s no undo for this command. If you’re sure, click the Delete All button.
FileMaker stores records in the order they were created but that’s no reason for you to work with them in that somewhat random order. By running a sort, you can rearrange the order for browsing, printing, or updating. FileMaker uses the found set concept discussed on page 50 to search through select fields and then arrange the records as you desire.
You can sort records using single or multiple criteria, just like finding records. FileMaker’s new contextual sort feature makes single-criteria sorts so simple that you’ll probably use it far more often than the actual Sort command. No matter which way you trigger a single-criteria sort, you can arrange your records in one of three ways: ascending order, descending order, or a custom order based on a value list you create. If, like me, you can hardly keep right and left straight, let alone what’s ascending and descending, How FileMaker Sorts What (Table 5.2) should help.
While in Browse Mode, right-click (Windows) or
 -click (Mac) on any field and use the drop-down menu to choose Sort Ascending, Sort Descending, or Sort By Value List (Figure 5.45). If you choose Sort By Value List, pick an item from the secondary drop-down menu. The records will be resorted based on your choice (Figure 5.46).
Use any combination of the Find, Omit, and Delete commands to first narrow your selection of records for sorting. Of course, you can always sort the entire file.
Choose Records > Sort (Figure 5.47). Or use your keyboard:
 (Windows) or
  (Mac).
The Sort Records dialog box will appear (Figure 5.48). On the left side is a list of the fields in your file. Select the field you want to sort with by clicking on an item in the left list, then click the Move button in the middle to place it in the right-hand window.
By default, the field will be sorted in ascending order. If you want to change the type of sort, first click the field in the right-hand list, then click on the appropriate radio button (Ascending, Descending, or Custom) in the lower-left area of the Sort Records dialog box (Figure 5.49). For more information, see To set (or reset) a custom sort order on page 72.
Click the Sort button in the middle of the dialog box or simply press
(Windows) or (Mac). If you want to adjust the results, choose Records > Sort again or use your keyboard: (Windows) or (Mac).
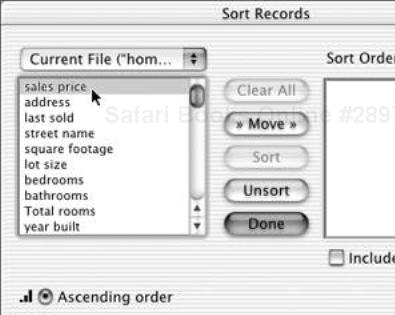
Whenever you run a sort, the Sort Records dialog box will appear. Most sort actions are controlled by six buttons (only five appear at any one time) running down the middle of the dialog box (Figure 5.50).
Figure 5.50. The Sort Records dialog box’s six buttons (Move and Clear never appear at the same time) control most Sort actions.
Clear All: Click this button to remove all sort fields in the dialog box’s right-side Sort Order list.
Move: This button appears only after you click a field name in the dialog box’s left-side list. Click Move to place a field name in the right-side Sort Order list.
Clear: This button appears only after you click a field name in the right-side Sort Order list. Click Clear to remove a field name from that list.
Sort: Click this button to start the sort itself.
Unsort: Click this button to return your file to its status before the sort was performed.
Done: Click this button to close the Sort Records dialog box without performing another sort.
A multiple sort allows you to precisely arrange the order of your database records. When you sort more than one field at once, the precedence is based on the order in the Sort Records dialog box. Fields listed first in the box’s right-side list will take precedence over fields listed later. Looking at our real estate example, if the Street field is listed before the Number field the records will be first sorted by the street name (A to Z) and then by the address number (1 to 100) (Figure 5.51).
Figure 5.51. By controlling the sort order within the Sort Records dialog box, all Ashbury homes appear first (with their house numbers in ascending order), followed by all the Carmel homes.
Use any combination of the Find, Omit, and Delete commands to first narrow your selection of records to sort. Of course, you can always sort the entire file.
Choose Records > Sort (Figure 5.47). Or use your keyboard:
(Windows) or (Mac).The Sort Records dialog box will appear (Figure 5.48). Select the left-side field name you want to first sort by. Click the Move button in the middle to place the field name in the right-hand Sort Order list.
Continue selecting field names on the left side and placing them in the right side by using the Move button. Remember: Their relative precedence is set top to bottom. If you need to change the right-side order, click and hold your cursor over the double-arrow just left of the field name and then drag up or down. The field name will move, altering the sort order precedence (Figure 5.52).
Pick the type of sort (Ascending, Descending, or Custom) for each right-side field name by clicking on the name, then clicking on the appropriate radio button in the lower-left area of the Sort Records dialog box.
When you’re ready, click the Sort button or simply press
(Windows) or (Mac). The records will then appear in the sorted order. If you need to adjust the sort order, choose Records > Sort again or use your keyboard: (Windows) or (Mac).Since you can unsort with the click of a button, feel free to experiment a bit to get a full sense of how different sorts work.
The Custom sort order is determined by a value list. Such lists—and their order—are typically created when fields are first being defined (see Defining Fields on page 107). However you can change the order of a value list—and thereby the Custom sort order—any time.
Choose Records > Sort or use your keyboard:
(Windows) or (Mac).The Sort Records dialog box will appear (Figure 5.53). If the field name for which you want to create a custom sort order is already listed in the right-side list, click on it there and go to step 3.
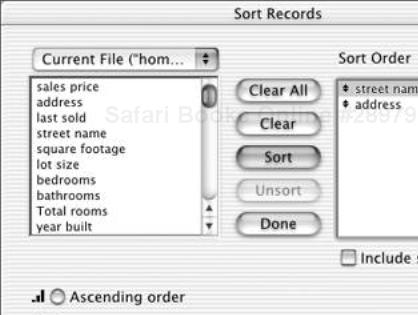
Figure 5.53. Click the radio button labeled Custom order based on value list, wait for the pop-up menu to appear, and choose Define Value Lists.
If the field name for which you want to create a custom sort order has not yet been selected and moved to the right side, click on its name in the left-side list. Now click the Move button, which will place the field’s name in the right-side list.
By default, the field’s sort type is Ascending. To change the type to a Custom order, click the radio button labeled Custom order based on value list, wait for the pop-up menu to appear, and choose Define Value Lists (Figure 5.53).
When the Define Value Lists dialog box appears, click New (Figure 5.54).
When the Edit Value List dialog box appears, type an easy-to-recognize name into the Value List Name box, then type each of your custom values into the right-side box in the exact order you want them sorted (Figure 5.55). When you’re done, click OK.
When the Define Value Lists dialog box reappears, click Done.
When the Sort Records dialog box reappears, click Sort to apply your Custom order. The records will sort out in the order of the names in the Streets value list (Figure 5.56).

Tip
Once you’ve defined a value list, you can quickly reach it with a right-click (Windows) or
-click (Mac) on any field (Figure 5.57).
