3
ABOUT BEEKEEPING
This chapter is going to work from the ground up, starting like you do—with a brand-new package in your brand-new equipment. We’ll shepherd that colony through its first year and into the next season, so next year you’ll have all the information you need to continue.
Start by reading the section on installing a package. Get familiar with the sequence of events before you begin. Installing a package is a simple process and difficult to bungle. However, it can be a bit nerve-racking the first time.
LIGHTING YOUR SMOKER
Your smoker, hive tool, and protective gear are all tied for first place as need-to-have beekeeping tools. But you also have to light and keep your smoker lit. If it goes out when you take your colony apart, you’ll need to retreat to relight. Meanwhile, your colony stands open and unsecured.
Lighting a smoker is similar to starting a campfire or a fire in a fireplace. Start with rapidly burning, easily combustible tinder. Newspaper is perfect and readily available. Once it is burning and pushed to the bottom of the smoker, add less-flammable but more durable material and establish that, pumping the bellows slowly to push the flame up into the newly added fuel while at the same time develop a bed of coals that will sustain the fire and not go out. Then, if needed, finish with longer-burning fuel that will sustain the fire. The following nine-step process works every time.
There are two tests you must pass with your smoker. The first is that your skills need to evolve to the point that your smoker will not go out after 10 minutes without puffing. If it does, you didn’t prepare the fuel correctly. Practice and more practice will enable you to prepare your smoker for a half hour without puffing. The second test is the temperature of the smoke. At any time, you should be able to hold your hand over the opening, puff, and not have hot smoke emerge. It should always feel comfortable to the skin. If it is too hot, you will singe bees, an unhappy occurrence for all concerned. If it is hot, stop, close up the hive and add more fuel (you have some handy, right?). If unavailable, add large handfuls of green grass or leaves to keep the smoke cool.
When you finish using the smoker, empty its contents on a fireproof surface, making sure the coals are out. Use caution: sometimes, when you dump out the fuel in your smoker, it will burst into flame because of the sudden availability of oxygen. This can catch you or other flammable material on fire very quickly. Some beekeepers use a dedicated small trash can with a lid to dump the residue in. They dump it in and replace the cover quickly so any smoldering fuel is quickly extinguished. Even if it’s not, the container keeps any fire in place and safely away. You can also lay the smoker on its side; without a draft from bottom to top, it will quickly go out. Still lit or still very hot smokers can cause fires if placed too close to flammable material. Make sure it’s empty and cool before putting it away.
Occasionally check the smoker’s intake air tube on the bottom to make sure it is clear and scrape out the inside of the funnel. Accumulated ash and creosote will slowly close the opening.
If sparks from the fire are coming out of the spout, check your fuel because it may be nearly gone. If the fuel is still plentiful, grab a handful of grass or leaves and put it on the top of the fuel inside to stop the sparks.
Never aim your smoker at someone and puff. Besides causing the inhalation of smoke and limiting sight, flying sparks may ignite clothing or melt plastic veil material. Also, use smoke sparingly on your bees. A little bit goes a long, long way.
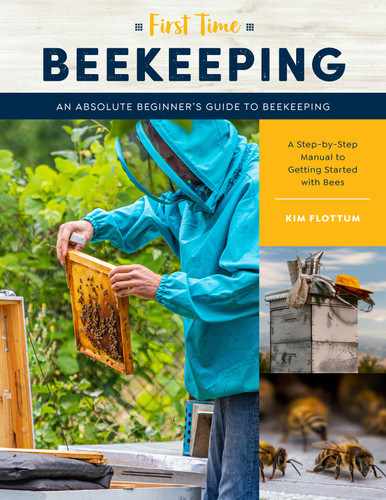
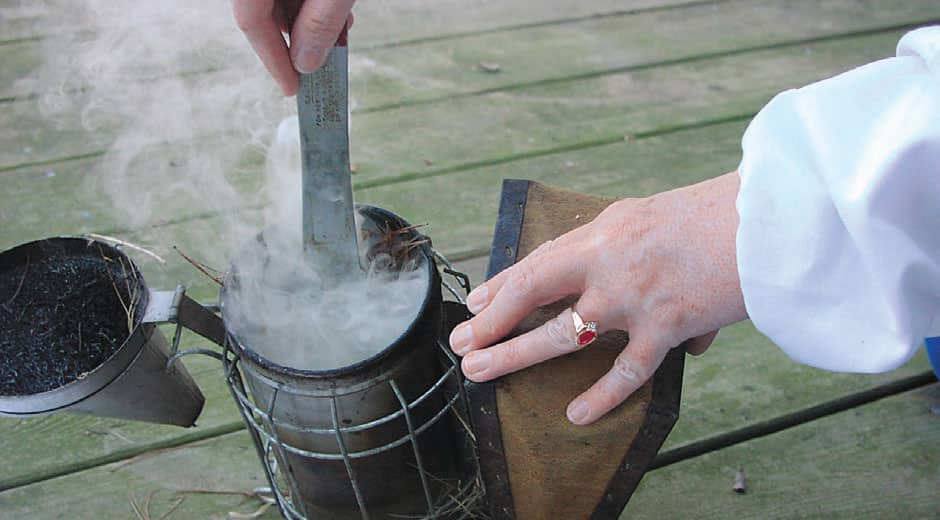
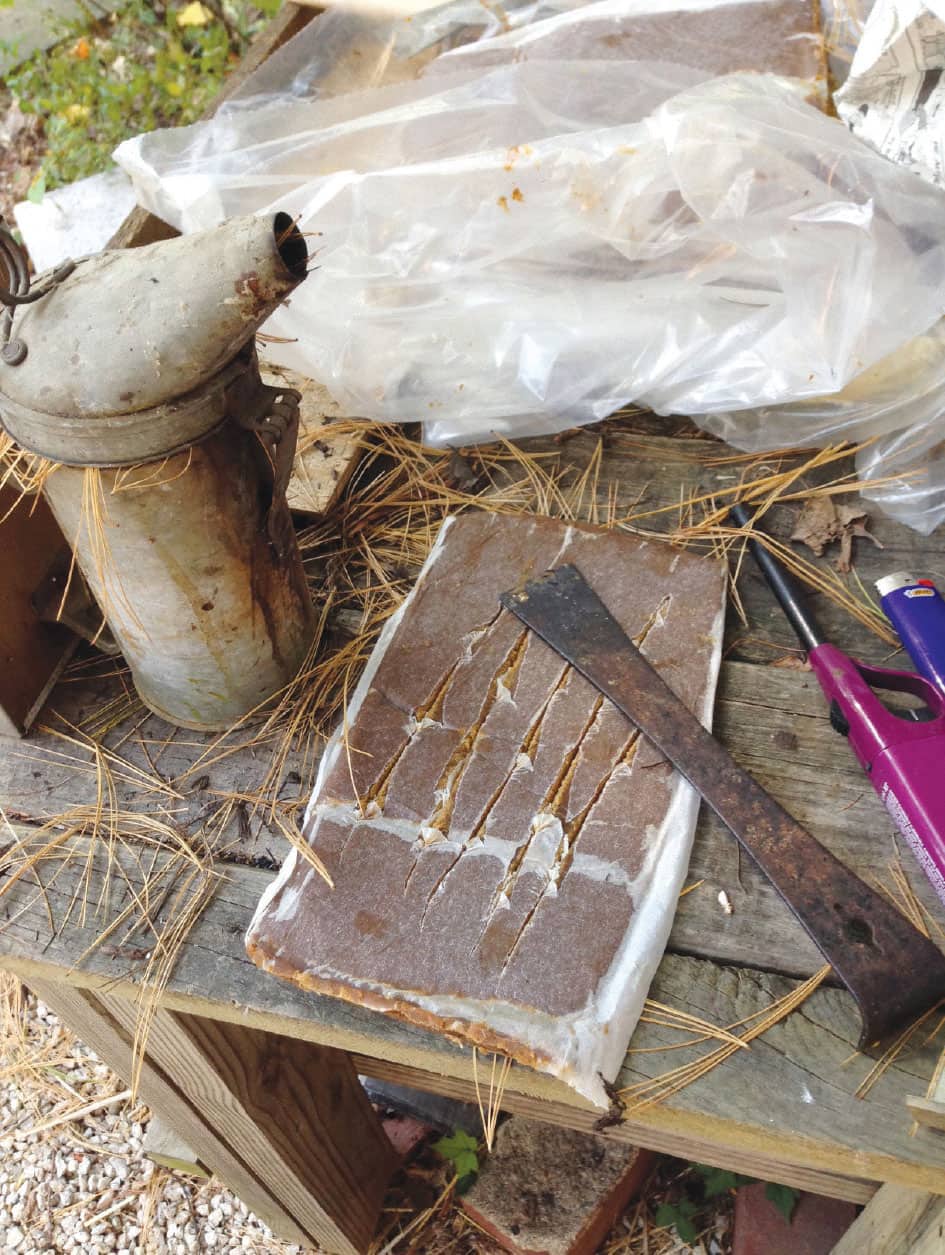
Step 1: Assemble your tools: paper, pine needles (my fuel of choice), punk wood, matches, and smoker. Smoker fuel depends to a degree on where you live. If long-needled pines are numerous, your fuel issue is solved. But people use wood shavings, cotton waste sold by bee supply companies, wooden pellets, untreated burlap or twine, sawdust, or almost anything that’s combustible and does not contain pesticides or petroleum products.
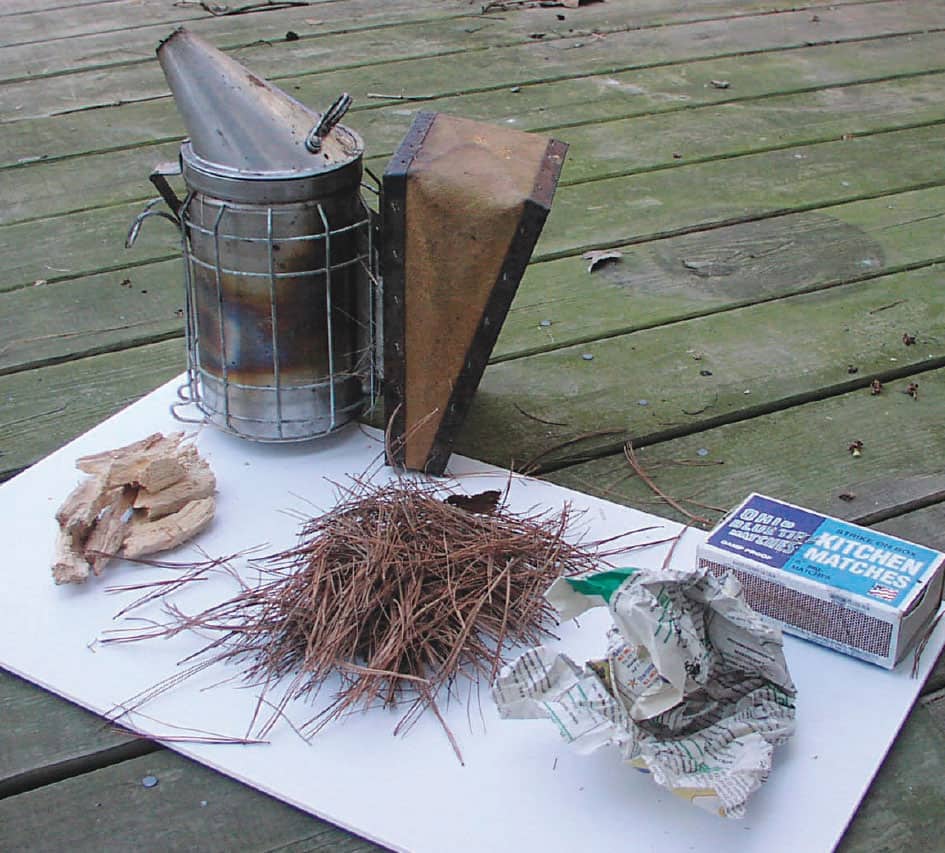
Step 2: Crumple the newspaper into a loose ball that doesn’t quite fit into the smoker and light the bottom, and once lit, let it rest on the rim of the smoker as it continues to burn.
Step 3: Let the paper catch fire and the flame begin to move up without it reaching your hand. Push the paper to the bottom of the smoker using your hive tool and puff the bellows gently two or three times to keep fresh air moving past the burning paper. It will flame up to or just over the edge of the top of the chamber.

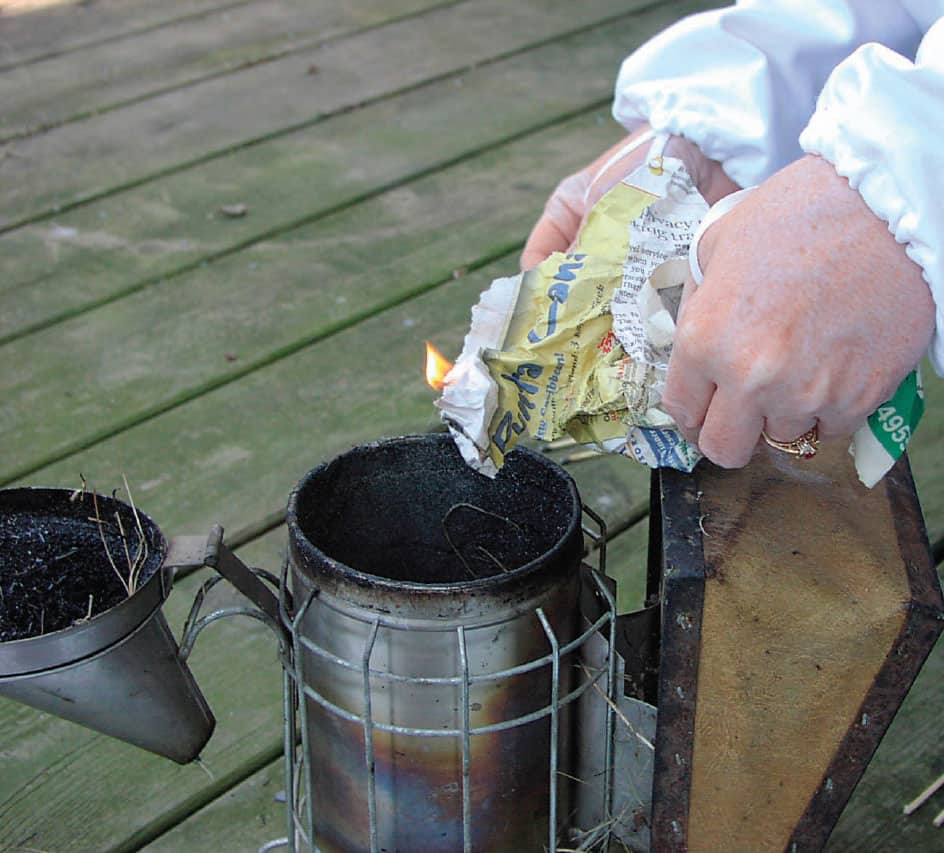
Step 4: Puff two or three times more until most of the paper is burning—but not yet nearly consumed—and add a pinch of pine needles or other fuel to the top. Don’t stuff them in, just let them fall in.
Step 5: Puff several more times until the flames from the paper reach up and catch the needles afire. Once they are burning well, push the burning needles down into the chamber with your hive tool, puffing slowly so air moves through the system.
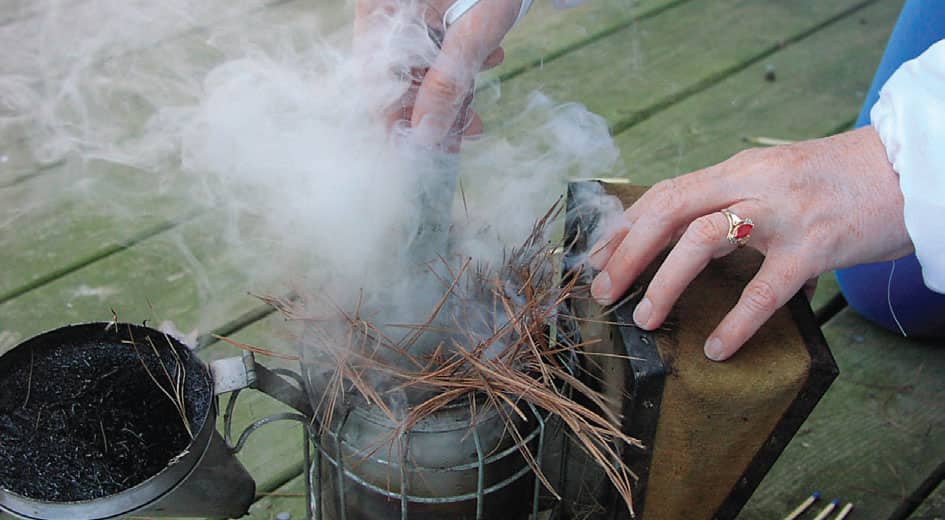
Step 6: When the first small batch of needles flames up, add a bigger pinch of pine needles, loosely. Puff several times so you don’t smother the fire. Keep air moving through the system. This is when most lighting attempts fail because too much fuel was added, so no air is available from the top and not enough is coming up from the bottom. The smoldering needles starve for oxygen and the fire dies.

Step 7: When the fourth or perhaps fifth small batch of needles has been added, puffed, and pushed to the bottom and begins to smoke from the bottom, and it smokes and burns without being puffed, add one or more larger batch. Push this fuel down first with your hive tool, then with your clenched fist so the cylinder is about half full of compressed fuel. Keep pumping. The coals should be far enough below the top that your hand will not be uncomfortable. Push fairly hard until the fuel no longer collapses. Then add the more durable fuel, if needed, on top of the needles. Keep puffing slowly to keep air in the system.

Step 8: When lots of smoke rises when you puff, and if the fire doesn’t quit when you don’t puff for a minute or so, close the smoker, still puffing occasionally.

Step 9: When lit, the smoker should smolder unattended for up to a half hour or more. If it sits idle for a while without use, puff rapidly a couple of times so the smoldering coals flare up a bit, producing lots of cool, white smoke to waft over the bees.
PACKAGE MANAGEMENT
Almost all beekeepers get their first bees from a business that sells packages. Bees are sold by the pound, and the most common size container has 3 pounds (1.4 kg) of bees. With about 3,500 bees in a pound, a 3-pound (1.4 kg) package (the most common and most recommended) contains roughly 10,000 bees. Almost all are workers who have been removed from a single colony and placed in the package. Then, a queen not from that colony, in her cage, is added to the package, a feeder can put in its slot, and the top covered.
If you have to order your bees by mail, arrange with the supplier to have them arrive midweek so they don’t sit in a post office over a weekend. Make sure the package producer displays your phone number (home, work, or cell phone for daytime messages) prominently on top of the package, with instructions to call you immediately when the package arrives at your local post office. Remember to inform the post office that you must retrieve the package immediately. Some post offices will store it in an out-of-the-way place, such as a loading dock or storage room. Unfortunately, these places can be too warm, too cold, in a draft, or in direct sunlight, any of which can be lethal to the bees if held there too long.
Another package container you may encounter is made of plastic. This design is still in development, but it has some advantages over the older model. Like the wood-and-wire cage, there is an opening to place the feeder container in, but the inside bottom of the feeding container blocks the opening so it needs no cover. Depending on the model you get, the queen will be suspended inside next to the feeding container just like the older model, or there may be a place on the top of the package the queen cage simply lies in so the bees inside can reach her through the mesh from the inside. But you don’t have to remove the feeding container first to get to the queen. You will need a way to introduce the queen cage into the hive if this is the case as there will be no wire or other means included with the cage. That’s why you brought the rubber bands. The feeding container may be a simple tin can holding syrup or it may be a plastic container filled with a fondant-like material. Again, depending on the model, one end may open to release the bees, or you may have to pour them out through the top opening. You’ll need one more thing if you have one of these: a square of cardboard or plywood large enough to cover the hole created when the feeder can inside is removed. You’ll need to get the queen out before you release the bees and make sure the bees stay in the cage when the can is removed.
You may get a plastic container as a feeder can. It will contain sugar jelly or fondant for feeding the bees during their journey from old home to new. I suggest not using this after placing the bees in their new home and stick with using sugar syrup.
Of course, you should get the bees into their new home as soon as you can. That may be just an hour or two, or a day or two, depending on your schedule and the weather. Cool, rainy weather is tolerable, but very cold temperatures—below 40°F (5°C)—are probably colder than you want, so wait a day. While waiting, keep your package in a cool, dark place, such as the basement or garage. Put down a couple sheets of newspaper to keep the floor clean.
You’ll also need to feed the bees. Get a new, unused spray bottle (such as those used for misting plants) and mix up a sugar-water solution of one-third sugar to two-thirds water by volume, that is, 1 cup (235 ml) white sugar mixed with 2 cups (475 ml) warm water. As soon as possible, on the way home even, spray some of this solution through the screen directly onto the bees through the screen or plastic mesh. Don’t saturate them but moisten as many bees as possible through all open sides of the package. Do this at least a couple of times a day as long as they are in storage. If you will be forced to hold them any time before installing them, check the feeder can, which could be plugged or empty. To do this, remove the cover if there is one and, using your hive tool or fingers, lift it a tiny bit to see if it has weight. If it does, but bees aren’t on the bottom feeding, the holes may be plugged and you will have to feed them. If empty, do the same. Don’t ever assume they have food available.

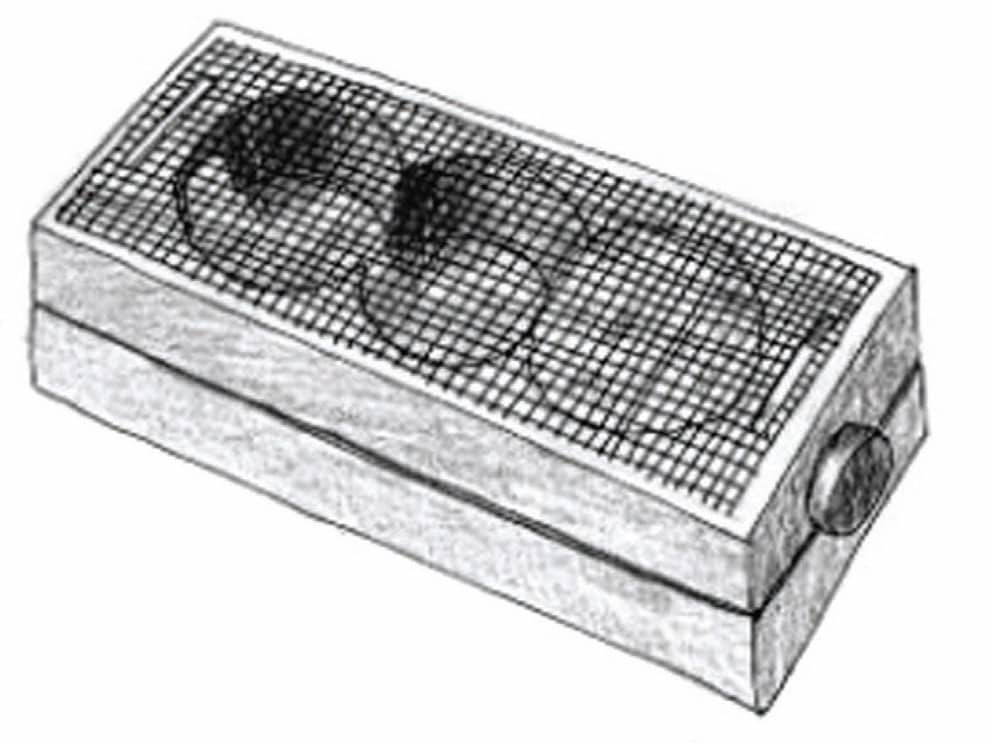
The traditional package made of wood and screen, with a tin can suspended inside along with a queen. There are typically 3 pounds (1.4 kg) of honey bees inside, with a queen. The bees hang around the queen, who is suspended inside the package next to the tin can that holds sugar syrup. The package has a cardboard or plywood cover on top, keeping the can, the queen, and the bees in place. A few dead bees will be on the bottom of the cage; if there is a 1/2” (1.3 cm)-thick layer, or more, contact the supplier. To hold these packages together, the sender must use a wooden strap nailed to the packages. Though not difficult to remove, you’ll need the right tools to do so if you have more than one package.
You’ll also need to feed protein. New packages need both, though you will seldom hear beekeepers discuss this. Bees do not live on sugar alone. You can feed your new bees protein a couple of different ways, inside and outside the colony. Initially, a patty inside is recommended as it is close and easy. However, small hive beetles like these patties even better than your bees, so be aware of them when checking the colony. If you note small hive beetle larvae present in the patty, remove and destroy it.

Use a mister bottle to put sugar syrup on the screen so the bees have food. Use a new bottle, and don’t soak the bees when misting.
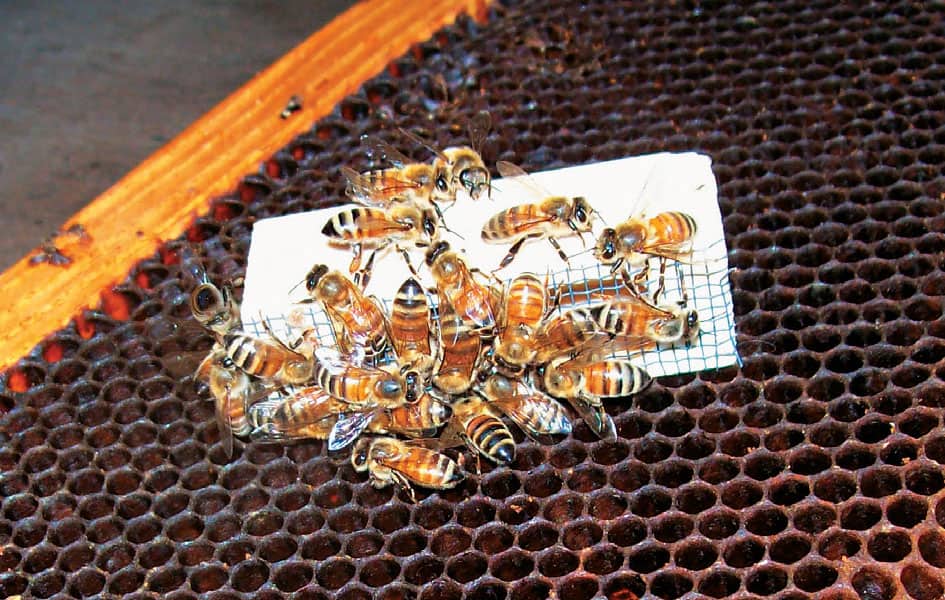
A queen cage is shown here, along with the fondant candy and cork in place. This is typically called a three-hole cage and is common in packages, but it’s not necessarily the only type you will see.
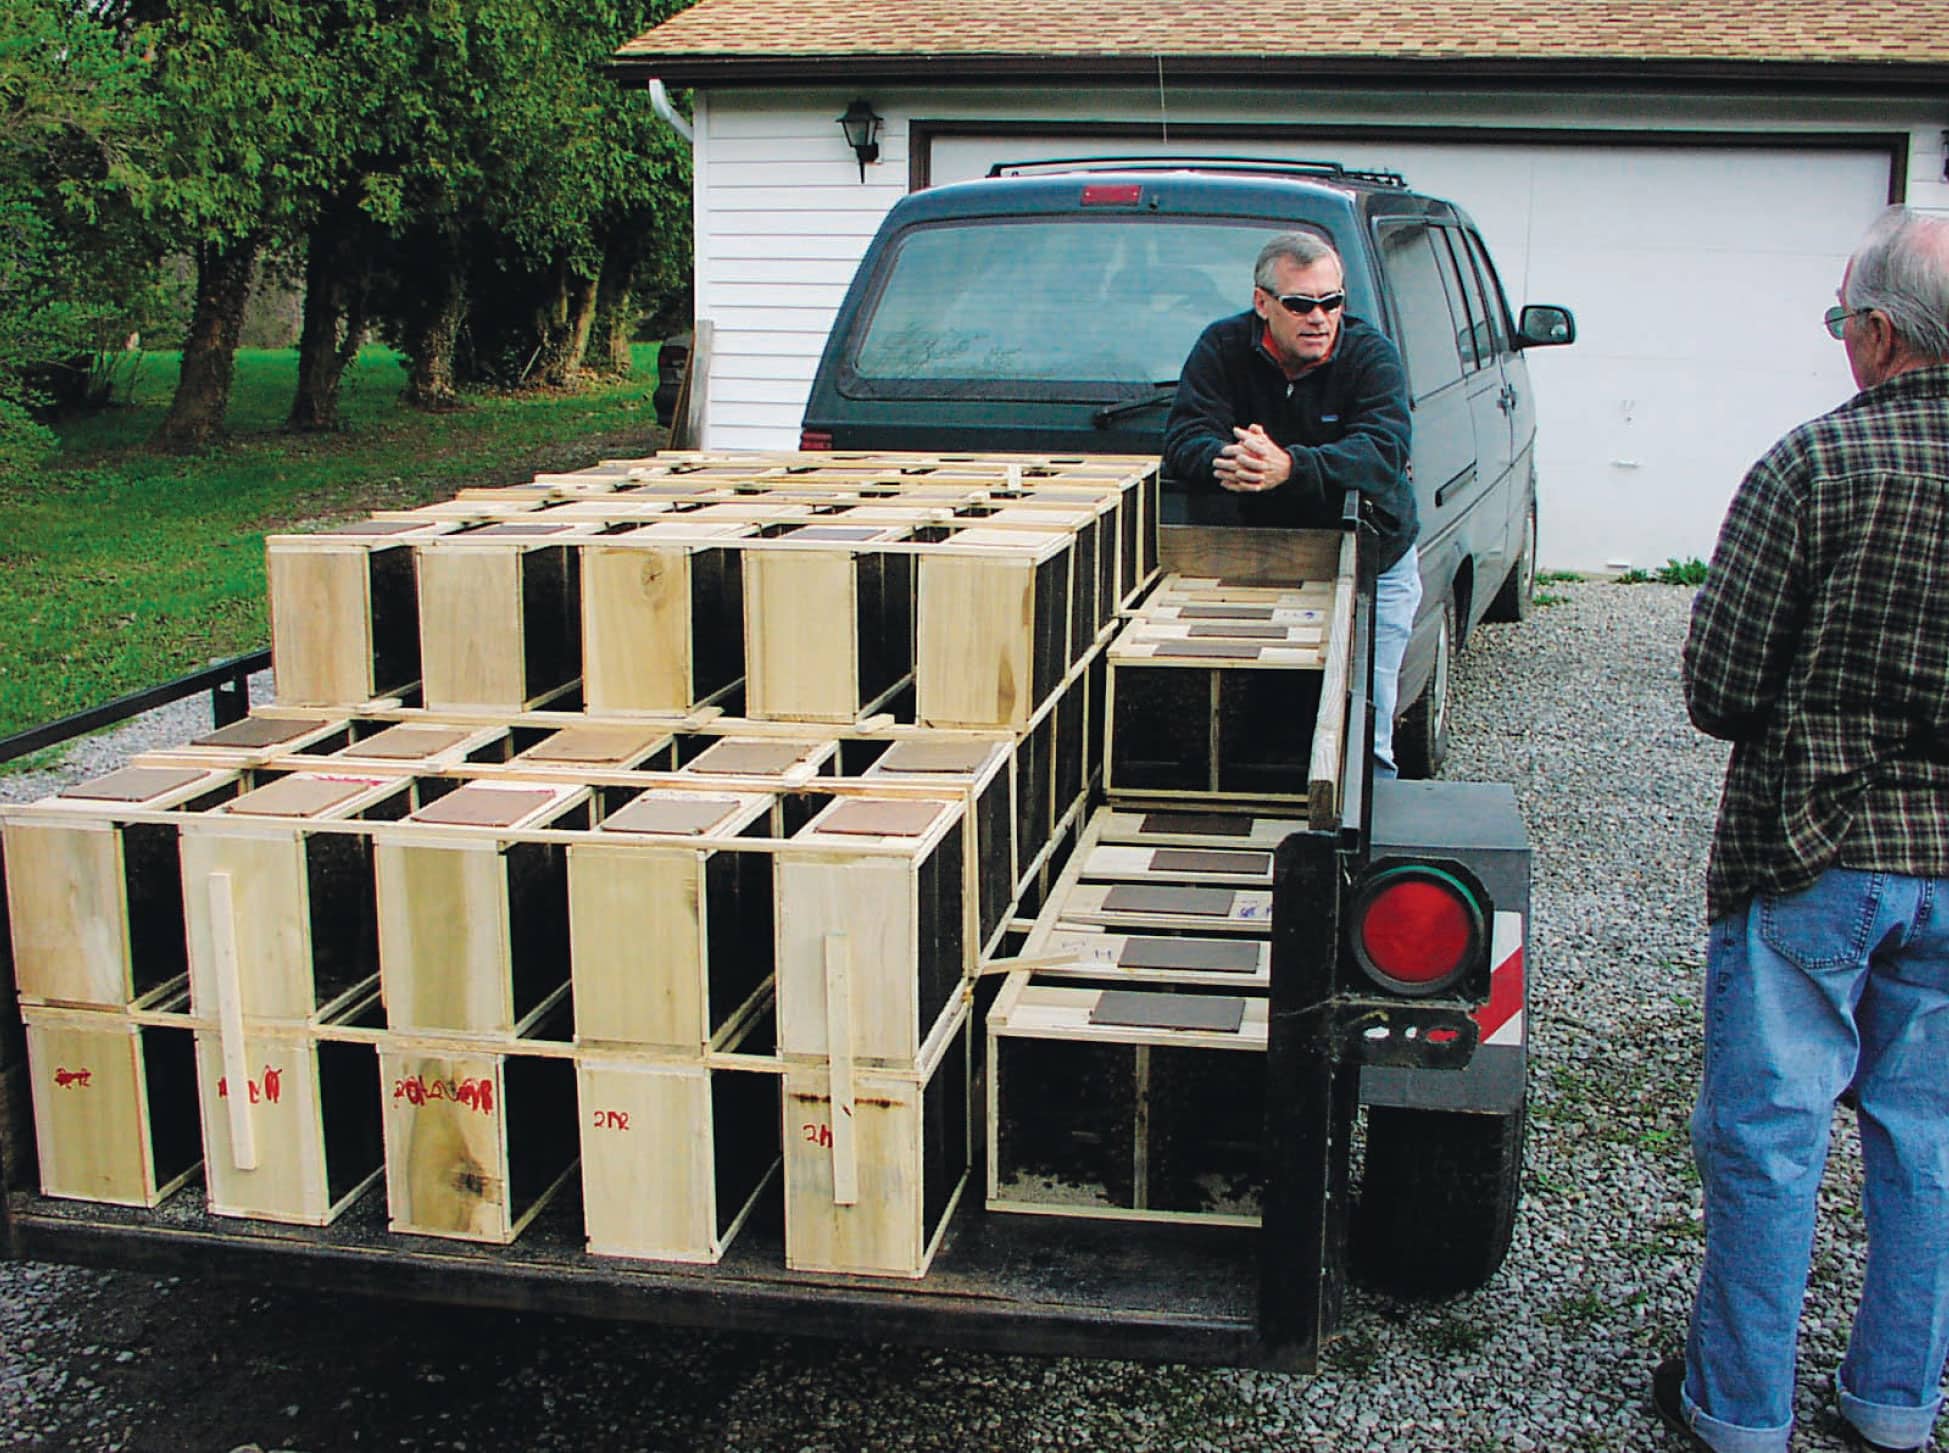
Local suppliers drive to the package producer and pick up packages directly, reducing the delivery time and the stress on the bees. You can get packages either with a queen or without one and install the one you want later. Bees are a commodity, but the queen is the future of your colony. Don’t settle for just any queen.
You can also feed protein supplement powder outside, placed nearby in a container on its side to shelter it from the weather. Your bees will find it and gather it like pollen.
Bees do not conserve food. The bees in the cage will eat as much as they can when hungry and there is no regulating body who says, ‘Slow down girls. We don’t know where our next meal is coming from and if we run out, we’re in trouble.’ The bees simply eat until it’s all gone, and then they all starve. If that occurs, you will see your package looking just fine before you go to bed and find 4 inches (10 cm) of dead bees on the bottom when you get up the next morning. It is dramatic, destructive, and absolutely preventable.
IN THEY GO!
To begin, use your spray bottle to give the package a feeding. Then, take all your equipment out to the site and get it set up. Put the bottom board on your hive stand and one super with frames intact on top of that. Leave the next two supers, without frames, stacked alongside and one super with frames intact. (You need four supers, the bottom one with bees, a second one with just frames and perhaps the queen, and, if using medium supers, two more without frames to cover the feeders.) Don’t forget the inner and outer covers. Prepare the sugar syrup for the feeder pail with a two-to-one (2:1) water–sugar solution. Fill the pail to the very top, and make sure the lid is secure. Refill your spray bottle at the same time.
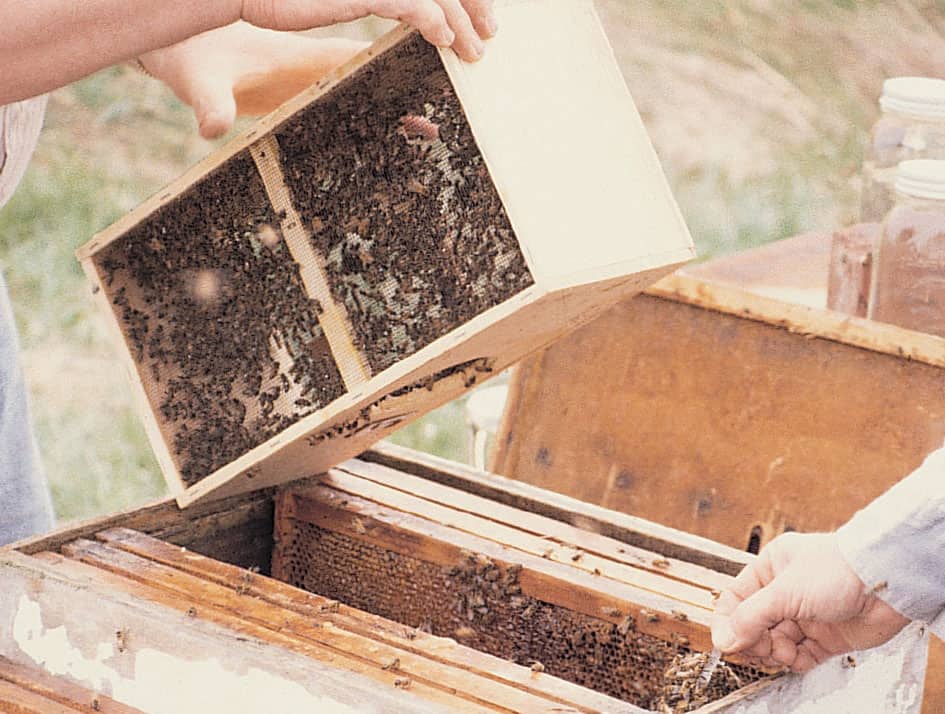
If all your equipment is new, your frames will have only foundation, either wax or wax-coated plastic. If you have combs from other equipment, place those in the center of the eight frames in the box. (Be certain, however, that the colony from which these frames came was disease free.)
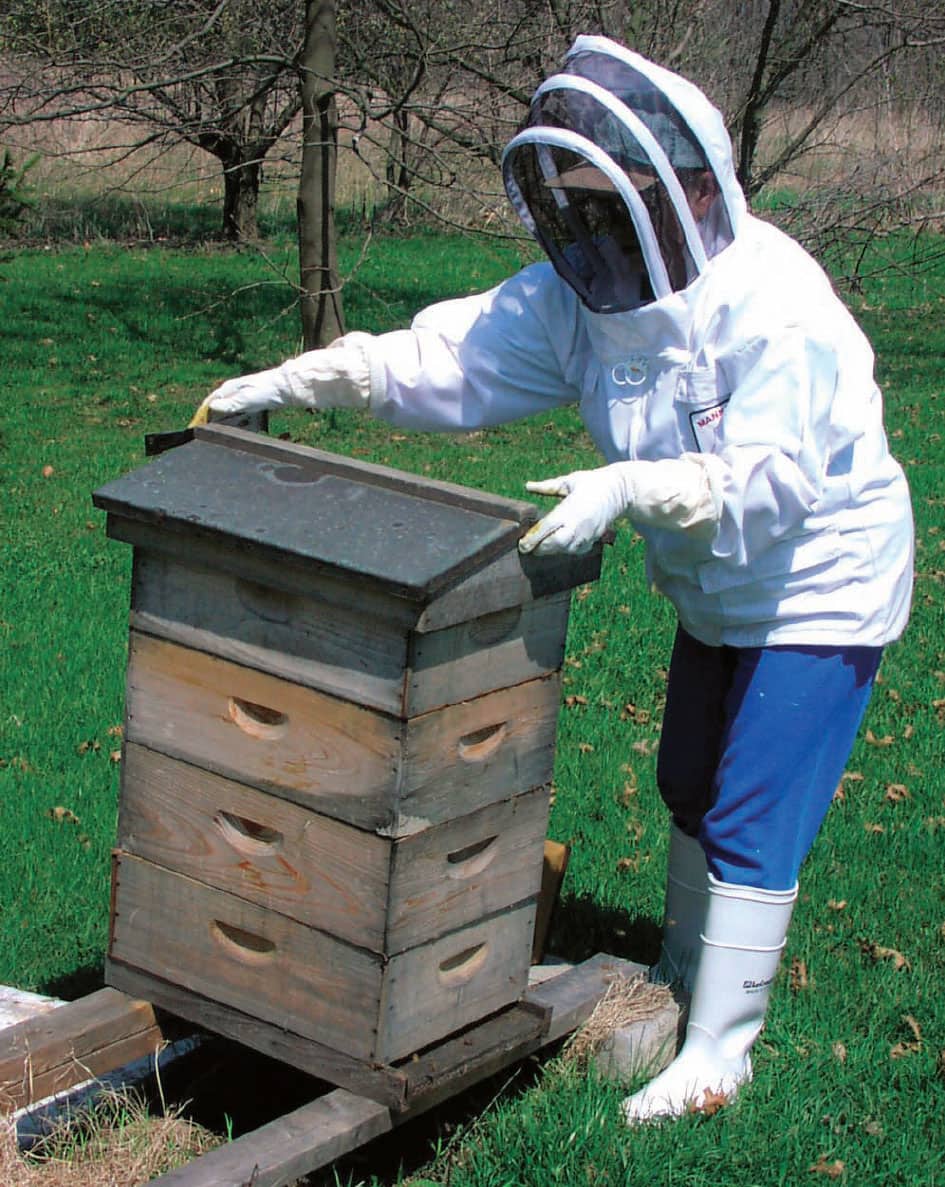
Put on your protective gear, light your smoker (you probably won’t need this, but be prepared), make sure you have your hive tool and pliers, and bring your package to the hive site. If you want, bring a board large enough to fit securely on your hive stand to serve as a solid, dry working surface, but only if the hive stand is long enough to hold both the colony and the board, with a little room to spare. Otherwise, place the board on the ground close to the back of the colony’s entrance.
Remove the cover, inner cover, and the middle six frames from the eight-frame box that sits on the bottom board, or the middle eight frames if you are using a ten-frame box. Set the cover, inner cover, and frames behind the box or to the side. If you are installing more than one package, prepare all the boxes at the same time.
Position yourself behind the colony into which you plan to install the bees. Make sure you have all your tools—smoker, hive tool, and feeder. Set the package on the board, and using your hive tool, remove the cover if there is one. You may also need pliers for this. Remove any protruding nails or staples and keep the cover close at hand because you will need it again in a few moments (this is for the wood and wire packages).

(1) Make sure you have a good hold on the can before thumping the cage. If not, it may fall off the support below, if there is one.
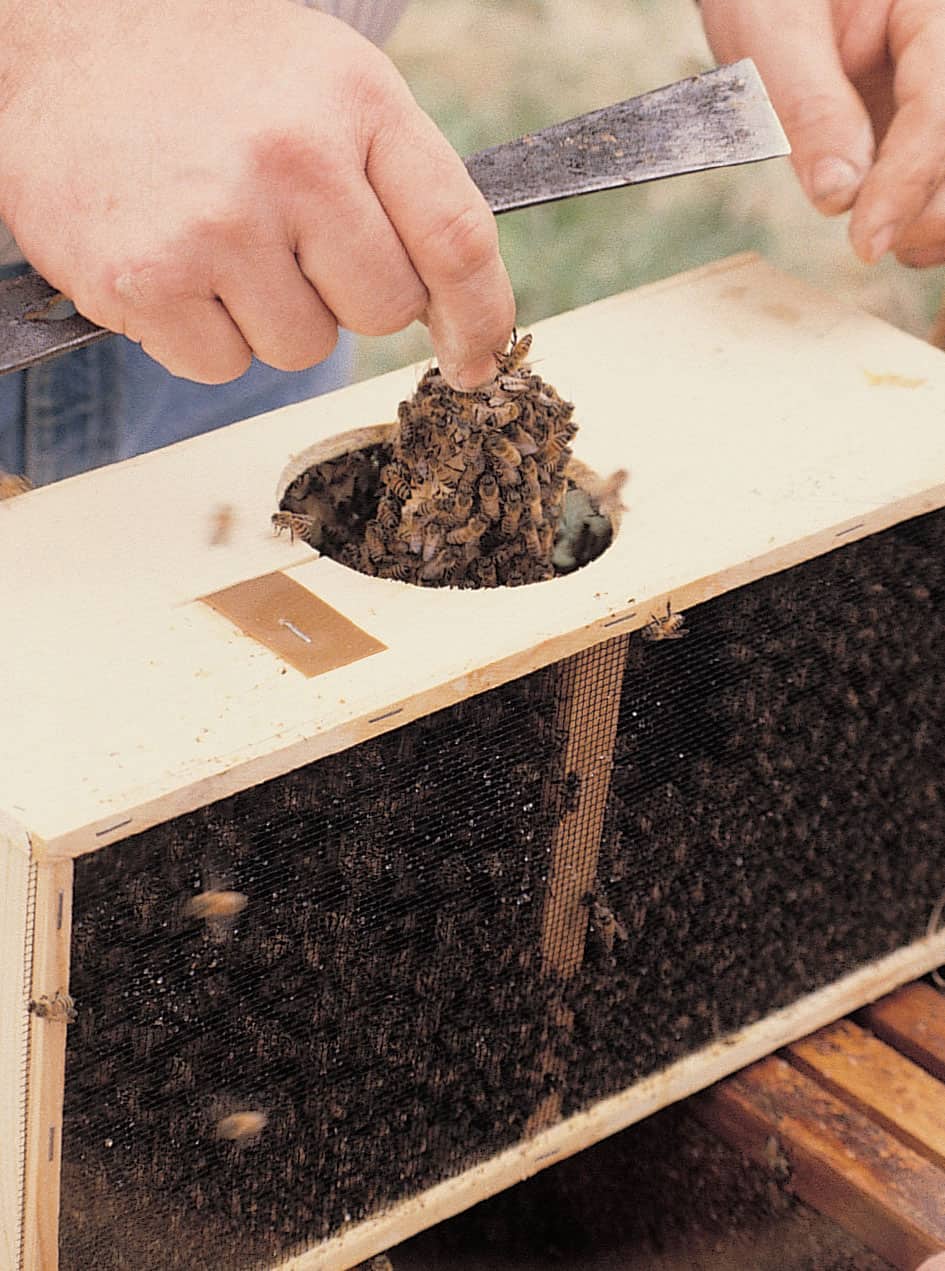
(2) Remove the queen’s cage carefully. Don’t drop her, if you can help it. Don’t let the bees unnerve you. Gently shake or blow them off the cage.

(3) When the queen’s cage is free of worker bees, put it in your pocket to keep her warm and for safekeeping.
(4) Quickly and carefully dump the bees into the space created by the missing frames. Shake the bees a bit to get them to come out, but don’t worry about every last bee. You’ll get them later.

(5) If your queen cage comes equipped with a hook or wire, loop it over a top bar, off center, and hang the cage so the screen faces the opening between frames. Seriously consider securing it to the top bar with duct tape or a staple. You can’t be too careful with a bug as expensive as a queen. The tape will make sure your queen stays where she should. If there isn’t a wire or tab, and often there isn’t one that works for installing in a package, use rubber band to hold the cage in essentially the same location. See the photos for proper installation with this technique.

(6) If you are lucky and have drawn comb in the frames in the box above the box you dump the bees into, install the queen in the upper of two boxes. The queen’s cage should be placed between frames in the top box, with the screen facing down, and the cage actually resting on the lips of the bottom bars. Gently squeeze the two frames together so the queen cage becomes just a bit embedded in the wax comb on each side. This will securely hold the cage in place until she is released. This won’t be possible if this is your first colony and you don’t have drawn comb already, but it is very useful if you do.

(7) Put the inner cover on top of the bottom box with the bees and put the two frameless boxes on top of the inner cover and place the feeder pail over the hole in the inner cover. You’ll need two medium supers to enclose the pail. Cover these boxes with the outer cover. If you put the queen in the second box from the bottom this won’t work. Use an additional box to accommodate the queen, plus feeders.
Take a look at the opening underneath the cover or simply look at the top of the package. You’ll see the top of the feeder can, flush with the surface of the package top. There may be a slot cut in the top with a metal strip in it. This strip is fastened to the queen’s cage, which is suspended below in the mass of bees. However, the cage may be held in place with a metal strap tight to the feeder can, or it may be a round disk that holds the cage from above. How you suspend the queen’s cage in your hive will vary, depending on which of these devices is used by the package producer.

Installation of the BeeBus: Lightly spray the bees with a 1:1 sugar syrup so they are distracted and busy cleaning up. Remove the queen in the same manner as the older package and keep her in your pocket. Then, close the feeder can opening with the slide door if it has one, or place a simple piece of cardboard or plywood held in place by a couple of short nails, duct tape or rubber bands. Then, lay the package on its side, so that when the opening on the end is opened, the side panel opens down. Using your hive tool, unfasten the two snaps that hold the end open, but don’t open it yet. Inside, there is a support for the feeder attached to the bottom of the package. Turn the package over so it is laying on its side, with the opening on the end such that the hinge is on the bottom, as in the photo. Once there, lift the end opposite the now-open end two or three inches (8 cm) off the ground and thump it down. This will dislodge all the bees from the top and sides to the bottom (you may have to do this a second, or even third time). Holding the package, move it to your open colony, open the end and simply slide the bees into the waiting opening in the hive. Finish by getting the queen into the colony if not already, closing it up and getting food to the bees.
Lightly mist the bees with the sugar water again. Using the corner of your hive tool or your fingers, lift the feeder can about halfway. Some are easy to catch and lift, but some will be a bit below the surface and more difficult to grasp. If you simply can’t catch it, try lifting just a bit and grasping with the pliers. Hold it with the pliers and grab with your other hand.
Leave the paper on the pollen patty to keep it from drying out but score it with your hive tool so the bees have easy access. Watch for small hive beetle larvae after a few days and remove and destroy if you find them.
Next, still holding the can in one hand, lift the package and thump it on the board, hive stand, or simply the cover resting on the ground so all the bees clinging to the feed can and queen cage let go and fall to the bottom. Don’t worry—they’re covered in sugar syrup and don’t care one bit. Try lifting and moving the package to make sure you have a secure grip. When comfortable, lift the package 1' (30.5 cm) or so and thump again. Lift out the can, set it on the board, and slide out the queen’s cage—without dropping her back into the mass of bees on the bottom—and quickly cover the hole in the package with the original cover or the one you brought. Check to make sure the queen is alive and moving, and then put her cage into your pocket to make sure she stays warm. Once removed, you will be able to see how you can fasten her cage to a frame, with a metal strap, wedged into existing comb, or with a rubber band. If needed, have those rubber bands at the ready.
Check to make sure the frames have been removed and that you have placed the wooden entrance reducer in the entrance into which you are going to dump the bees. Make sure the box that is going to go on top of the bottom box is close by, along with the inner cover that will go on the new colony.
Depending on the type of package you have—plastic or wood—you’ll proceed one of two ways. If plastic, pry open the end using a hive tool or screwdriver. Hold it closed. When you’re ready, you’re going to thump the package again, then remove the feeder can, open the end and pour the bees into the cavity in the space created in the box when you removed frames. Pour as many as you can—shake them a little, but not much—and set the package, still containing a few bees, in front of the colony. If you have the standard wood-and-screen cage, thump again, remove the can cover and the can and pour the bees out of this opening into the cavity in the hive. This action will put some bees in the air, but don’t be concerned. They are homeless, very confused, and unlikely to cause you harm.
Carefully lower the frames you removed into the bottom box. Let them slowly sink as the bees on the bottom are gently moved aside to make room for the frames.
Three criteria for inserting a queen cage are: easy access to the queen cage by the hive bees, being securely held, and out of the way of the feeder (if it leaks). The more care you take in introducing your new queens, more food, and less interaction with bees they aren’t familiar with, the greater the probability they will be accepted.
If you place her in a second box between frames, hold the frames secure, and place this box on the box with all the workers. No matter where she is, place a pollen substitute patty directly on the top bars of the second box to one side of the inner cover hole before replacing the inner cover or putting on the hive top feeder. Leave the paper on so it doesn’t dry out but score the paper with four or five cuts on both sides to make access easier. Replace the inner cover, position the feeder if you are using a pail over the inner cover hole or feeder jars on the inner cover, and cover these with the extra super you brought. Or, put on the hive top feeder and the inner cover and close the colony.
FIRST INSPECTIONS
There are many recommendations on how often to inspect your colony, especially a new package. (Checking the amount of available sugar syrup and protein patty doesn’t count as a visit.)
Do not remove the covering from the candy end of the queen cage for at least five days.
After the package has been installed, you must wait patiently. Watch the front door for activity, make notes, take pictures, watch more, and be patient. Be more patient. Check the food situation on top, but don’t worry about the pollen patty yet.
After five days, open the colony carefully, using as little smoke as possible. Put a single puff into the front door. Then, lift the cover and put in a puff. Wait a couple of minutes. Remove the cover and look into the box with the feeder or the top feeder. Puff a couple of times to move bees out of the way. Take the box off, remove the feeder, and puff into the hole in the inner cover. Wait a minute. Lift the inner cover on the end, a couple of inches (cm), and puff a couple of times. Replace. Wait a minute. Remove the inner cover and puff a couple more times to move bees away from the top of the top bars. Now, peer between the frames and see what the bees are doing around the queen cage. Are there lots of them hanging on tightly? Or are they milling around, moving over and around the cage? Then, remove the cage, either by lifting the frame with the cage banded or taped to it, or simply lift the cage out using the hanger. See if she is alive and moving, then gently lay her cage on the top bars, screen side up, and observe. Do bees rush to the cage, and grab it tightly? Do they walk around and over the cage, and then walk away? Do some stay, touching with antennae, feeding the queen? Or do they cover the screen and holes and look as if they are trying to smother the queen? Let this go on for a few minutes. Be patient and do not use smoke.
This is what you might see when the workers are still aggressive toward the queen. They cling tightly to the cage, biting the wires and are difficult to push or blow away because they are trying to get at the new queen.
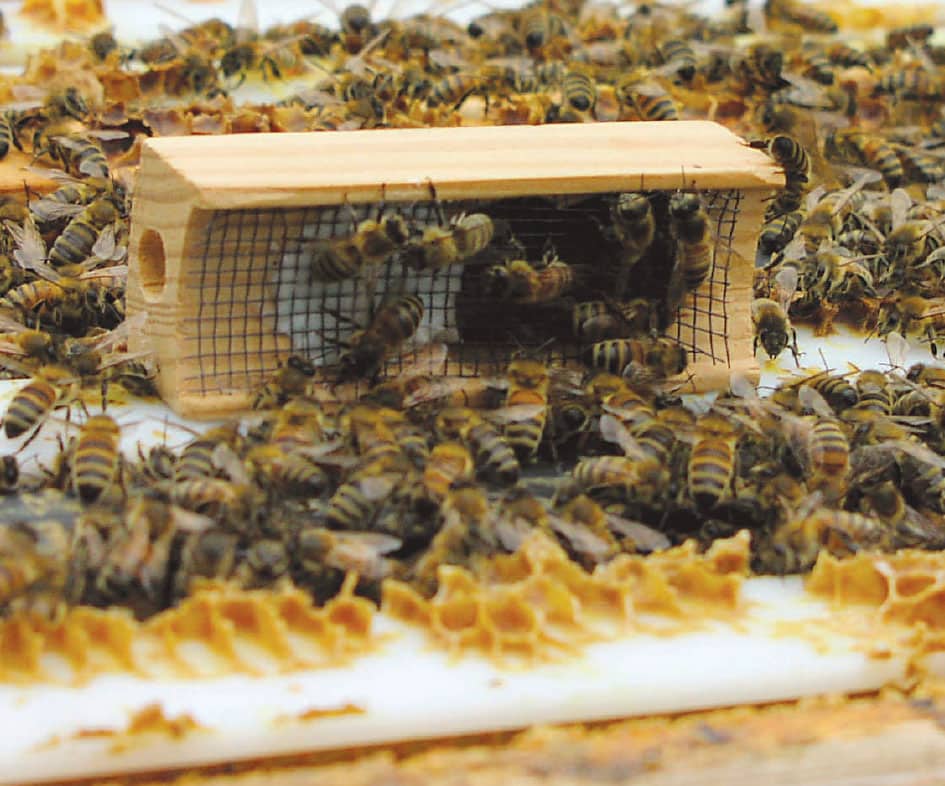
This is comfortable behavior—the bees aren’t clinging to the cage or biting the wire. Queen release now is safe.

When it is time, remove the cork on the candy end of the cage. Use the corner of your hive tool. Don’t remove the cork on the other end or the queen will walk out prematurely. If you have the plastic cage with a tube full of candy, open the cap at the end exposing the candy.
If the behavior seems casual, not urgent, laid back, then you can be relatively certain that the queen and bees have accepted each other and things will go as well as things can go. I know, since you haven’t been doing this how do you tell urgent from casual? Here’s my yardstick. I pick up the queen cage and gently blow on it to remove any adhering bees and put it back. If the cage is immediately covered again, that’s urgent. If they leave it alone, that’s casual. You might try this two or three time, and over a couple of days to get a feel for this. It’s an expensive bug, so take your time and know for sure.
If, however, the bees are still clinging to the cage and the screen, if after being removed they return immediately, you can be fairly certain that they haven’t yet accepted each other and they need more time. Give them a few more days. Check again, and if they’ve settled down (they almost always do), the queen-to-colony relationship has been established. Releasing the queen is the next step.
If the behavior seems friendly, proceed to the next step. Lightly smoke the colony in the area of the queen cage so the bees retreat. Remove the cage and remove the cork from the fondant candy end with the corner of your hive tool or a toothpick or if you have a plastic cage remove the cap covering the tube with the candy. Test the candy with the toothpick to see if it’s hard. If it’s soft, your work here is done. If it’s hard, very gently poke the toothpick through the candy, making a small hole all the way through it. Just be very careful not to jab the queen when you break through.

If you leave your feeder on and the bees come up to feed, they may construct comb that surrounds the feeder and is attached to the sides of the box. This must be cleaned up. Remove the cover and inner cover, smoke the bees with significant smoke to get them away from the comb, remove the feeder, and remove the beeswax comb, fast. Save the wax (it makes good candles, lotions, or wax for coating plastic foundation). Clean it all out, remove and fill the feeder, and replace the box and cover—and don’t leave it alone for so long again.
When complete, replace the cage in the same place, making sure the screen or the tube isn’t covered by any new wax comb that may have been built up around the cage or frame parts. In fact, you’ll often find stray slabs of beeswax comb, so carefully remove them with your fingers or hive tool first. Replace the top box carefully, check the feeder, refill it if necessary, and put everything back together.
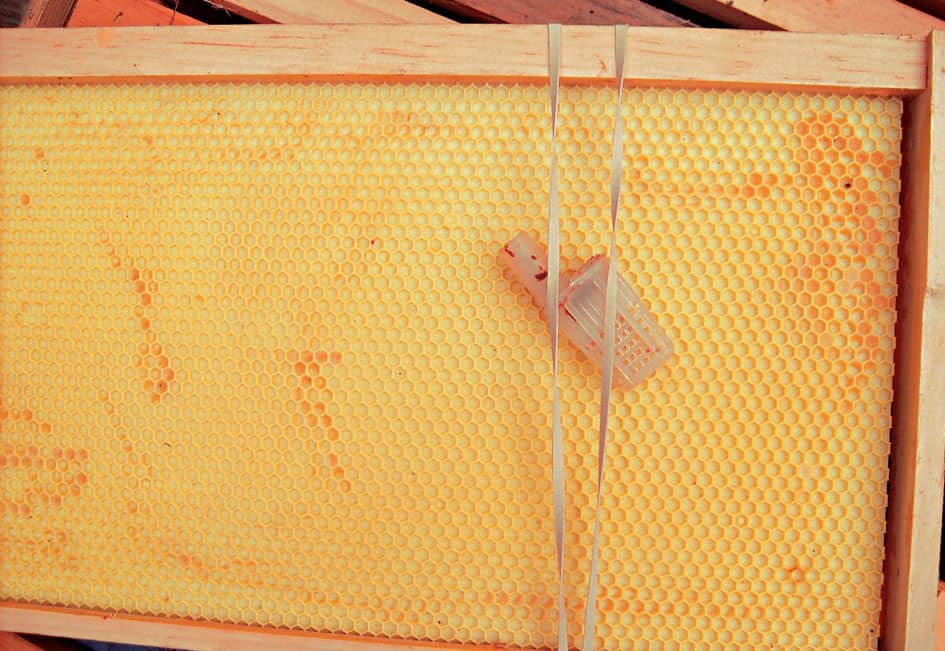
If you are using only foundation and your queen cage doesn’t have a wire, metal strip, or metal disk, use rubber bands to hold it to the frame. The candy end of the cage must be up, and as much of the cage’s screen as possible is exposed between frames so the bees in the colony can reach, feed, and touch the queen in the cage.

The queen should be released by the bees in another three days, so plan on checking again. If she’s not, and if the behavior of the workers is still protective rather than aggressive, pull back the screen or remove the whole cover of the plastic cage and let her walk out, heading down between frames. Don’t let her fly away. Close up the colony.
Looking for Eggs
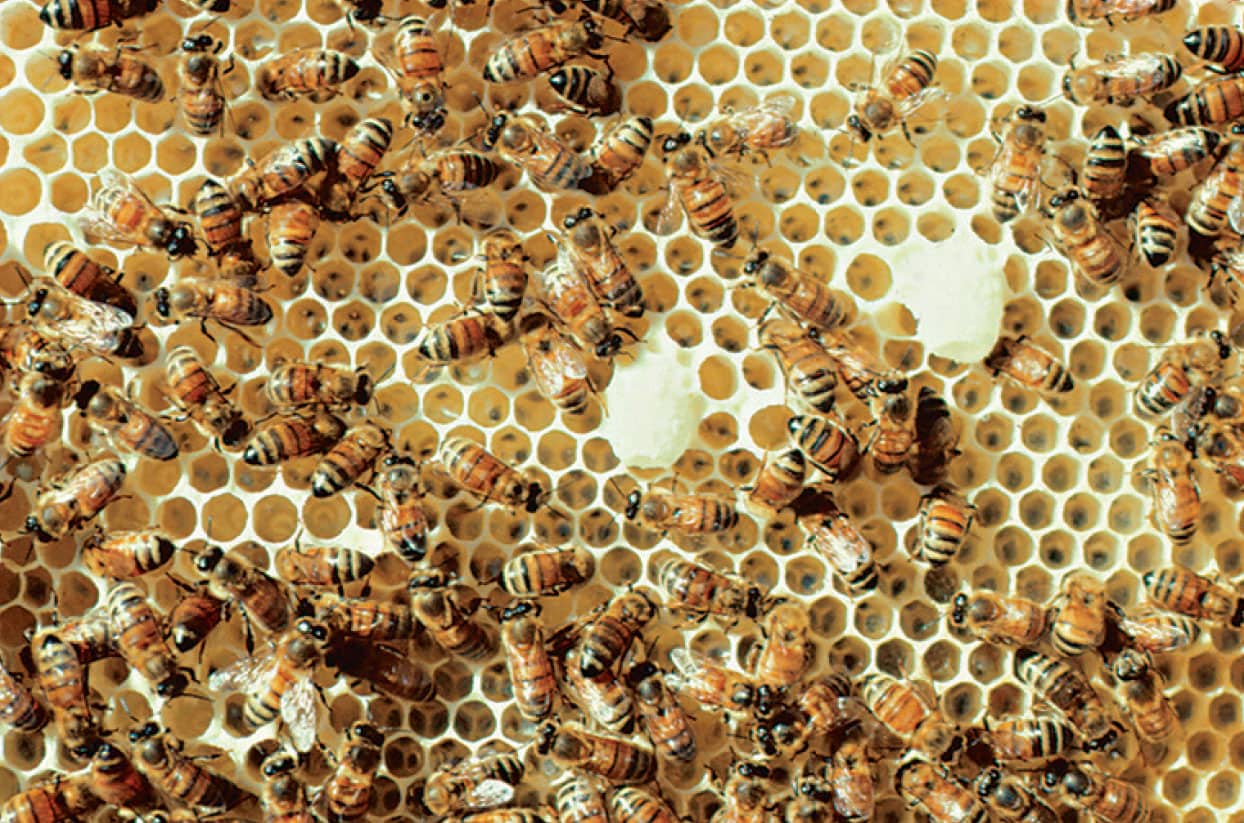
After her release, the queen should begin laying eggs in a few days, at least within a week. After that time, check for eggs. You’ll find them in the center two or three frames, probably near the tops of the frames in the bottom box. Look at all the frames that have some comb built on them if you don’t find eggs in the center. Recall that eggs are tiny, standing straight up on end, and nearly the same color as the new wax—look carefully.
Once the queen is laying eggs, you’re over the first hurdle and don’t need to inspect the broodnest for another ten to twelve days. Make certain the feeder stays full, however. The bees will continue to use the sugar syrup for some time, especially when the weather doesn’t cooperate—a sure thing in the spring—and at night. For much of the first season, the colony is living hand to mouth with little chance to build reserves. The more you can help, the better off they will be. Enough good food, all of the time, for every bee in the bunch is the best insurance you can get. Don’t skimp. Provide more than enough food. If they take it, they needed it. If they don’t, you’re ahead of the game.
So, what if you don’t find eggs? It happens. Look to see if she’s there. In a colony this small, if she is alone and walking around, she will be fairly easy to find. Listen for the telltale buzzing sounds of a queenless colony.
If you find your new queen, even if she isn’t yet laying eggs, close up the colony and give her two more days to start laying. If, after all this, nothing’s happening, something’s wrong and she needs to be replaced.
KEEPING RECORDS
Keeping a log of your colony’s activities and progress isn’t just a good idea, it’s an absolute necessity. Particularly for the first couple of seasons, making notes will force you to attend to the fundamentals, and the notes remain as a record of what happened when. If you have several colonies, some notes will serve for all, but each colony, you will learn, has its own distinct personality requiring similar but different management actions. Even before you get your bees, decide how you will identify your colonies. “The third from the right” doesn’t work after about a week. One good way is to simply number the colony with spray paint on the top of the cover. That way, no matter where the colony is, you will know all about its history. Reviewing your notes before you next open your colony will remind you of actions you need to take, equipment you need to buy, problems you need to check, and what you should expect to find.
Keep records in a large notebook that is difficult to misplace. After a few seasons, your notes will be minimal because you will have mastered the routine management skills, noting only swarming dates, new queens added, medication applications if used, and the amount of harvest.

There is no substitute for keeping good records. Get a good notebook or a three-ring binder. Designate one page for every colony (spray paint a number on the cover of each colony, too). Or, create a page for every visit to the beeyard, and keep dated notes on each colony visited on each page.
OPENING A COLONY
The first few times you examine a colony can be exciting, scary, and confusing. It’s easy to get sidetracked and forget to do one of your planned tasks. Before you get started, make a mental note of why you are looking inside. This is good advice whenever you are going to examine your colony. Check your record book first, always. When you know why you’re going in, you’ll know what you need to do the job, so get everything together and bring it with you.
Before you begin, make doubly certain your smoker is burning well, but give it a reassuring puff every few minutes, just to be sure. If you’re feeding, have your extra feeder full and ready. Bring supers or other equipment you may be adding and have your hive tool in hand. It’s not good to leave a colony open if you have to run back to the house.
This may seem obvious, but quickly scan the ground for rocks, branches, or toys. Stepping on one of these with your hands full of a box of bees can be disconcerting. Check to make sure nothing is on the hive stand where you plan to set your boxes, either, and don’t put the things you brought with you in a place where they will be in the way before you use them. Whenever possible, minimize moving things more than you need to—it saves the back and the temper.
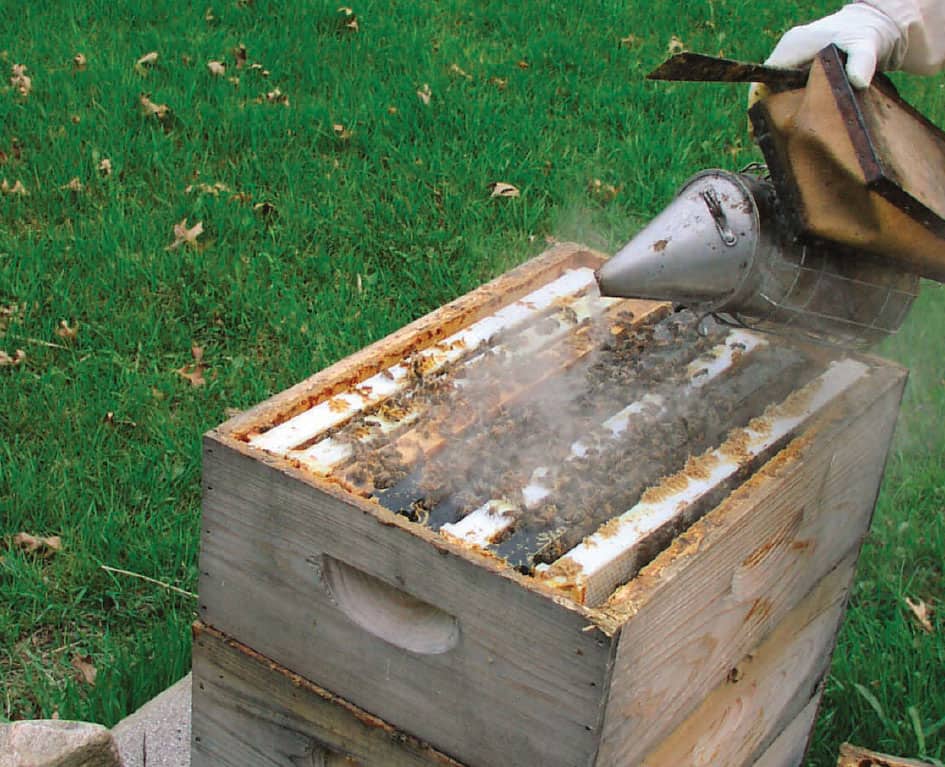
When everything’s assembled, you’re ready to puff the tiniest puff of smoke into the front door. This will offset the guards at the front immediately, reducing any flying. Then, step back and again look at the setting, making sure nothing’s in the way and you have everything you need. This delay of a minute or so allows that little bit of smoke to waft up into the lower box just a bit and contact the dance floor area, slowing that behavior and those bees, also.
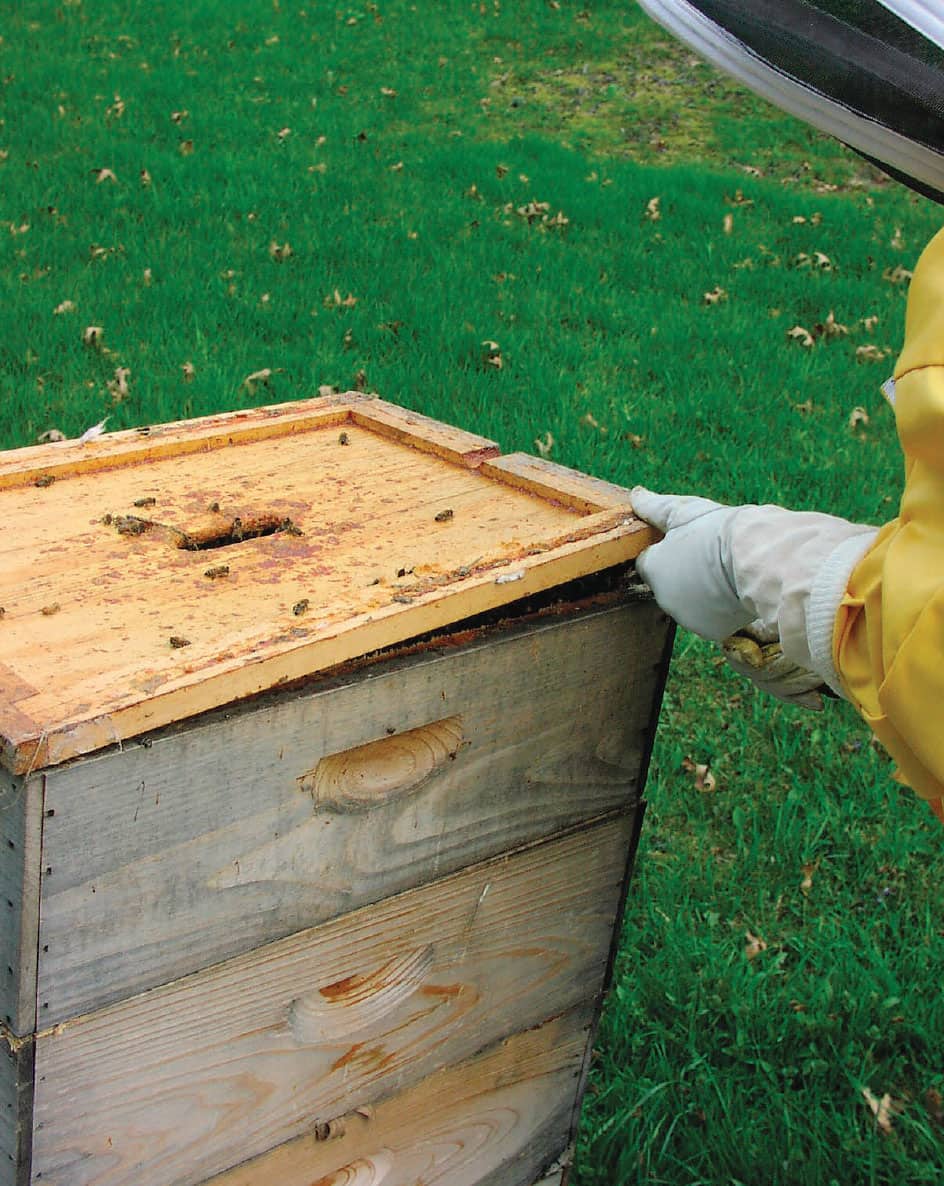
Remove the cover as carefully and as quietly as you can, but keep it close. If you have a telescoping cover, place it top-side down, next to the colony on the hive stand, about 6" to 8" (15.2 to 20.3 cm) from the colony, with the long side parallel to the bottom board. When you remove the inner cover, place it on the cover, turned about 30 degrees. Place any boxes you remove on the inner cover with the same orientation. This placement keeps bees from leaving the box from the bottom, and a bit of smoke puffed over the top will keep them inside. If there are boxes protecting your feeder, remove them and the feeder, putting them out of the way. Puff a half puff, or so, of smoke into the center hole of the inner cover, then wait a minute before you remove it to give the bees in that area time to retreat.
Pry up the inner cover with your hive tool, opening it a couple inches, and give another half puff, or so, of smoke. If bees are flying out, give a couple puffs. Slowly remove the inner cover and set it on the cover. Now, before you go any further, do this trick: with a magic marker, draw a line on the end of all the top bar lugs on one side of the box. That way, you’ll always know how to put the frames back in when you remove them. Look down between the frames. What do you see? Between the middle three or four frames will probably be lots of bees and some comb built up. Perhaps nothing has been done in this box yet, if the package is still young. If there is nothing, lift up a corner of the box and puff two or three times, then slowly remove that box and put it on the inner cover.
To begin examining a colony, lift one end of the cover a couple of inches (cm) and blow in two or three puffs of smoke.
Pry up the inner cover with your hive tool, give a half puff, and let it down for another moment, then remove it completely and give a puff, maybe two if there are a lot of bees on the top bars and between the frames. Let them go down before you begin.
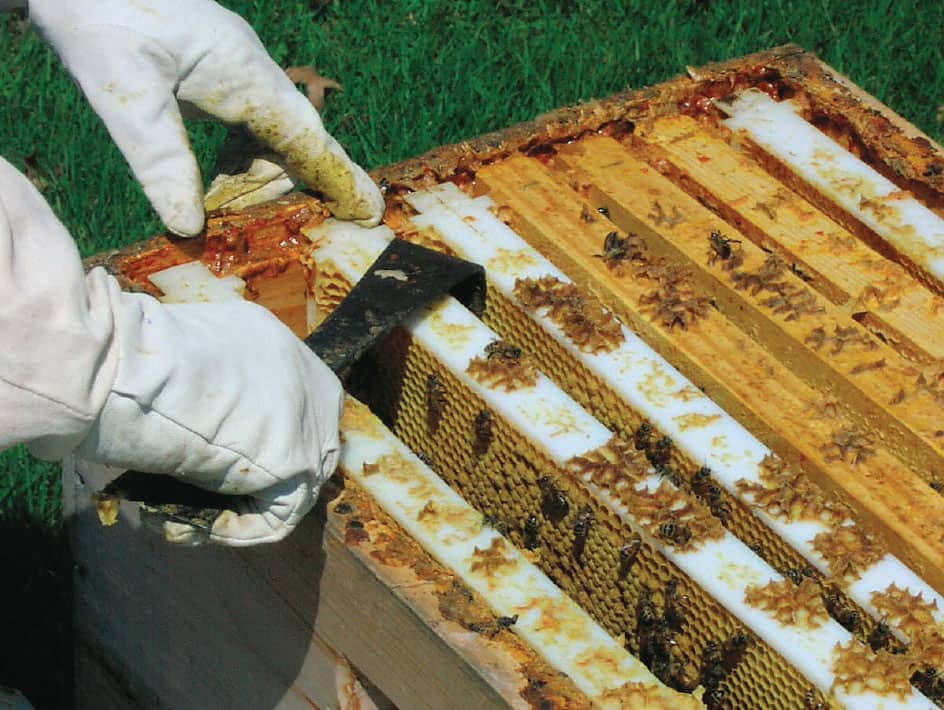
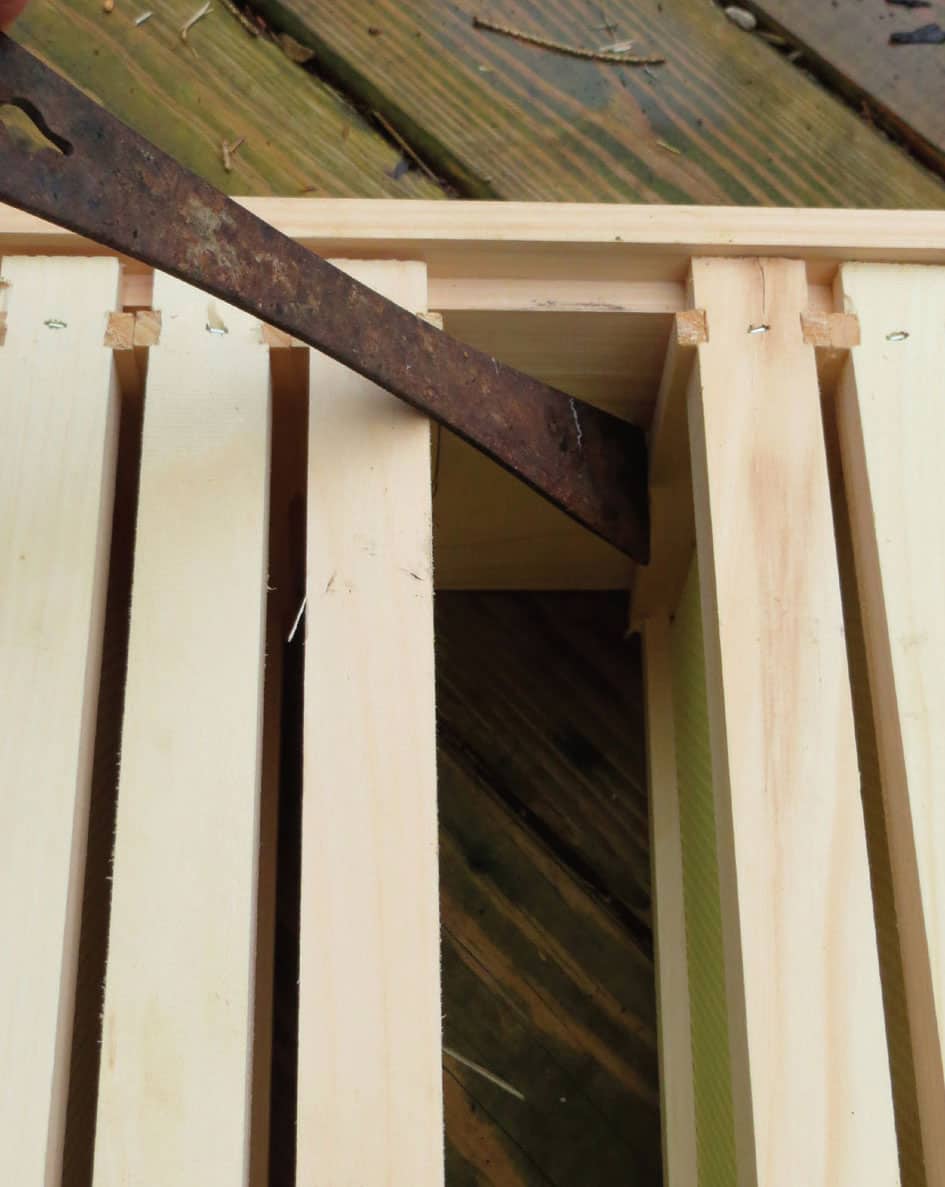
Loosen the closest or next-closest frame first. Use the curved end of your hive tool for leveraging and loosening frames.

Slowly lift the frame straight up, so you don’t trap, roll, and kill bees between the comb surfaces. If you think you’re slow enough, think again. This is the hardest part of examining a colony: care and speed. Too fast and bees get killed, releasing alarm pheromone.
When reassembling your hive, be sure the frames are straight up and down so you don’t crush bees when the next frame is replaced. Use your hive tool as a lever, and the adjacent frame as the fulcrum to straighten the bottom first, and then the top.
There should be lots of bees and built-up comb on the center frames in the bottom box. If you are going to look for eggs or perform any other broodnest inspections, follow these points:
![]() Stand behind or to one side of the colony.
Stand behind or to one side of the colony.
![]() Using your hive tool, loosen the frame closest to the edge of the box or the one second closest. If there’s a difference, choose the side that has frames with no or very little comb built on them.
Using your hive tool, loosen the frame closest to the edge of the box or the one second closest. If there’s a difference, choose the side that has frames with no or very little comb built on them.
![]() Puff some smoke if bees are coming up between frames and crawling on the top bars and your hands. Watch for lots of bees lining up between the top bars of the frames, watching you. When that space is nearly full of watching bees, it’s time for more smoke.
Puff some smoke if bees are coming up between frames and crawling on the top bars and your hands. Watch for lots of bees lining up between the top bars of the frames, watching you. When that space is nearly full of watching bees, it’s time for more smoke.
![]() When both ends of the frame are free, lift one end with your fingers and the other with the corner of your hive tool.
When both ends of the frame are free, lift one end with your fingers and the other with the corner of your hive tool.
![]() Keep your hive tool flat in the palm of your hand and between your thumb and forefinger, held in place with your other fingers. This grasp leaves your thumb and forefinger of each hand to hang onto the frame when you lift it up slowly.
Keep your hive tool flat in the palm of your hand and between your thumb and forefinger, held in place with your other fingers. This grasp leaves your thumb and forefinger of each hand to hang onto the frame when you lift it up slowly.

To make sure your frames go back in facing the correct way and in the right location, simply put a line on the top of each, so they are in same order as when opened.
![]() If the frame is empty of comb, carefully set it down on end at the front door so any bees can easily find their way home.
If the frame is empty of comb, carefully set it down on end at the front door so any bees can easily find their way home.
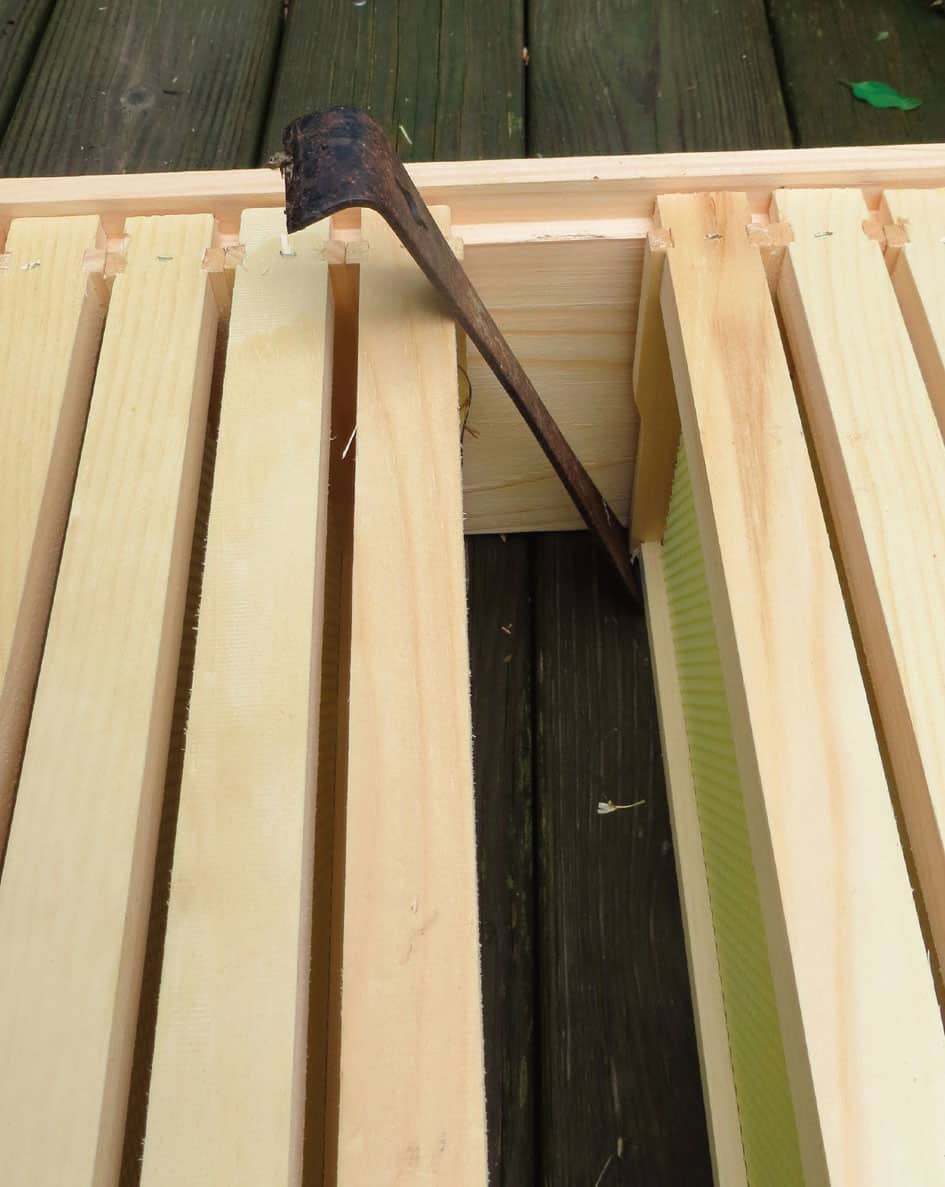
![]() Loosen the next frame, if it’s stuck, by inserting the curved end of your hive tool between the two frames and twisting it. The leverage this position gives you is amazing, and it will loosen almost any frame. A Maxant-style tool with the hook on one end works well here, too.
Loosen the next frame, if it’s stuck, by inserting the curved end of your hive tool between the two frames and twisting it. The leverage this position gives you is amazing, and it will loosen almost any frame. A Maxant-style tool with the hook on one end works well here, too.
![]() When the frame is loose, remove it slowly, especially if there’s comb on either side. Look between frames to make sure there isn’t burr comb that will get caught and squeeze bees. Lift the frame straight up until the bottom is clear, reducing the chance of rolling bees (or the queen) between moving combs and crushing them. If there is an obstruction, come at the frame from the other side so that you move the frame that would have been gouged by the burr comb out of the way.
When the frame is loose, remove it slowly, especially if there’s comb on either side. Look between frames to make sure there isn’t burr comb that will get caught and squeeze bees. Lift the frame straight up until the bottom is clear, reducing the chance of rolling bees (or the queen) between moving combs and crushing them. If there is an obstruction, come at the frame from the other side so that you move the frame that would have been gouged by the burr comb out of the way.
When bees begin looking up at you from between frames, gently puff one or two small puffs of smoke so they go down and leave you to your tasks.
![]() Hold the frame by the lugs or shoulders between your thumb and forefinger.
Hold the frame by the lugs or shoulders between your thumb and forefinger.
![]() If there’s no comb, lean the frame against the first frame, by the front door.
If there’s no comb, lean the frame against the first frame, by the front door.
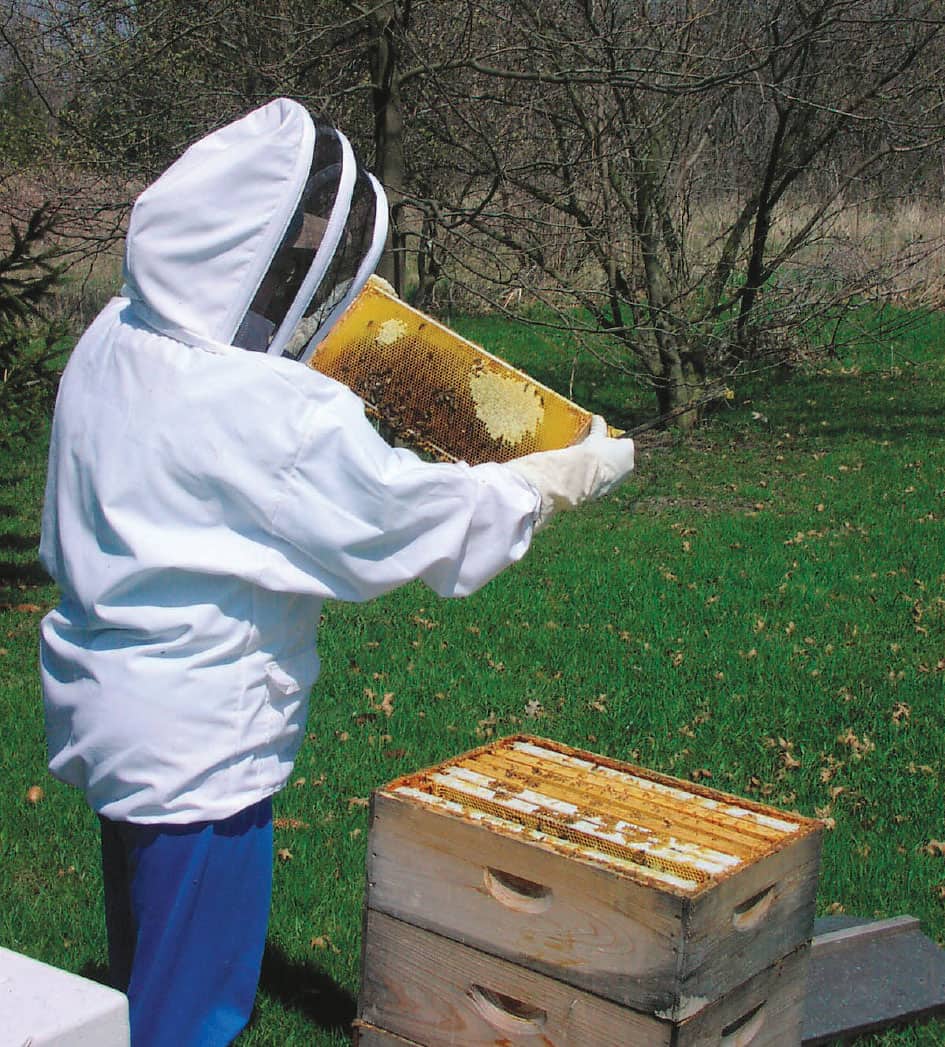
![]() If there is comb, see if eggs or brood are present. Turn so the sunlight is coming over your shoulder. Hold the frame at midchest height and away from your body. Tilt it so the light shines directly down to the bottoms of the cells. If at all possible, hold the frames over the open box or the first box you removed so that if by chance the queen is there, she won’t be lost if she falls off the frame.
If there is comb, see if eggs or brood are present. Turn so the sunlight is coming over your shoulder. Hold the frame at midchest height and away from your body. Tilt it so the light shines directly down to the bottoms of the cells. If at all possible, hold the frames over the open box or the first box you removed so that if by chance the queen is there, she won’t be lost if she falls off the frame.
![]() If you are going to look at additional frames, slide this one over to fill the empty space left by the two empty frames that were removed, keeping everybody inside and safe.
If you are going to look at additional frames, slide this one over to fill the empty space left by the two empty frames that were removed, keeping everybody inside and safe.
![]() Puff more smoke if bees are rising between frames or are starting to fly.
Puff more smoke if bees are rising between frames or are starting to fly.
Let the sun shine from behind you, directly over your shoulder, so that it shines down into the bottom of the cells.
![]() After examining the next frame as before, slide it over out of the way and examine the next frame.
After examining the next frame as before, slide it over out of the way and examine the next frame.
![]() When the examination is complete, carefully and slowly slide the frames back to their original position. Avoid squishing bees and don’t rush. When the frame is in place, look down to make sure the frame isn’t slanted. If it is, use your hive tool braced on the top of the adjacent frame to align the bottom with the top so the space for the next frame is equal top to bottom.
When the examination is complete, carefully and slowly slide the frames back to their original position. Avoid squishing bees and don’t rush. When the frame is in place, look down to make sure the frame isn’t slanted. If it is, use your hive tool braced on the top of the adjacent frame to align the bottom with the top so the space for the next frame is equal top to bottom.
![]() When everything’s back in place, quickly puff smoke on the box edges to remove those bees.
When everything’s back in place, quickly puff smoke on the box edges to remove those bees.
![]() Replace the inner cover the same way, the feeder(s), the empty box that covers it all, and cover, and call it a day. (To replace the box that covers the feeders, don’t place it directly on the bottom box, but rather offset it so you don’t squish any bees sitting on the edge, then gently twist it into place pushing those stubborn bees out of the way, minimizing any injuries and alarm pheromone. With practice, you should never crush a bee when reassembling a colony.)
Replace the inner cover the same way, the feeder(s), the empty box that covers it all, and cover, and call it a day. (To replace the box that covers the feeders, don’t place it directly on the bottom box, but rather offset it so you don’t squish any bees sitting on the edge, then gently twist it into place pushing those stubborn bees out of the way, minimizing any injuries and alarm pheromone. With practice, you should never crush a bee when reassembling a colony.)
![]() As interesting and exciting as it is to watch bees go about their business when you’re examining a colony, keep your visits to 10 minutes or less, depending on the day. Cool, cloudy days require short work. Warm, sunny days can stand a bit more time. At any rate, after a while, even the most tolerant colony begins to take a dim view of all this exposure and becomes less easy to work with.
As interesting and exciting as it is to watch bees go about their business when you’re examining a colony, keep your visits to 10 minutes or less, depending on the day. Cool, cloudy days require short work. Warm, sunny days can stand a bit more time. At any rate, after a while, even the most tolerant colony begins to take a dim view of all this exposure and becomes less easy to work with.
INTEGRATED PEST MANAGEMENT
There are a range of techniques for dealing with the problems that can befall an individual honey bee or an entire honey bee colony. The least offensive of these techniques, and safest for the bees of course, were those that prevented problems from occurring in the first place. The best way to avoid a lot of problems our bees have is to use honey bees that are resistant to, or tolerant of, the pests they encounter. There are honey bee strains that practice hygienic behaviors, some that are vigorous groomers that remove pests, others that seek out infested larvae even when capped, tear them out, and discard them. Some have shorter or longer brood times that foil the pests while others are more agile than the pests they encounter and thus can overcome them. These bees are, however, rare. They are becoming less so and you should seek them out, both for your operation and to support the producers.
The next level of dealing with honey bee pests and diseases is to use mechanical methods to keep pests from our beehives. These include keeping pests out of the hives in the first place, trapping them once they enter before their populations build up in a colony, or providing opportunities for them to leave and not return. Resistant bees, traps, and exclusion are techniques safe to use for the bees, the honey crop, and the beekeeper.
PYRAMID OF IPM TACTICS

Integrated pest management begins with the safest, least-harmful techniques of pest control, only ending up using toxic pesticides as a last resort.
The next level of defense is more intense: chemical alternatives, and within that, soft and hard chemicals.
IPM FUNDAMENTALS
To successfully manage honey bees, you need to be able to identify those pests and know what options you have to control them. You need to know what the pest population is and what it will likely be in the near and distant future if no management techniques are implemented. Also, you must know at what density will the population require treatment (the treatment threshold) so it doesn’t cause harm (the economic injury level). Also, you must know the options you have to reduce their populations within an acceptable time frame. These fundamental steps are no different from the pre-emptive measures taken for managing garden critters: fences for rabbits and groundhogs, fake owls for birds and gophers, resistant plants for some diseases, plant disposal, and so on.
MALADIES
The first season you have bees it is unlikely you will encounter a serious disease problem. Some pests may become a problem later in the season, and if you have bought used equipment, some of these diseases may show up. But mostly, new bees on new equipment have a honeymoon before the problems of the world come home. By the fall, during the coming winter and by the second spring, however, you need to be most aware of all the bad things in the world.
NOSEMA
Nosema is a protozoan-caused disease spread by Nosema ceranae spores that attack only adult bees after they have consumed the spores. Once consumed, the spores germinate inside the bee and send a long, coiled stylet through the wall of the bee’s midgut and begin consuming the hemolympth of the bees, which is, essentially, the blood of the bee. This nourishes the Nosema protozoa so that it matures and produces more spores. Some of these spores remain and continue to infest the host bees, while others are expelled in fecal material, thus spreading the disease inside the colony, and outside near the front door, on flowers, at watering sites, and anywhere infested bees go.
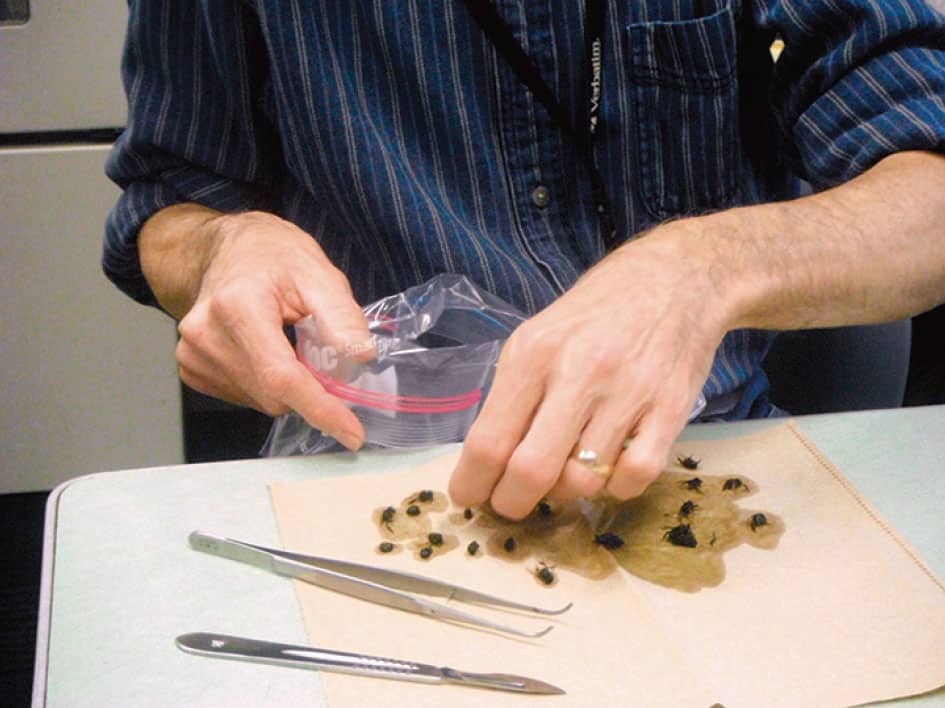
Symptoms are not easily observed, especially in the early stages, and it can be a difficult disease to identify. The most certain way to know if your bees have the disease is to send a sample of bees to the USDA Honey Bee Research Lab in Beltsville, Maryland. They will examine your bees and tell you a lot about them—the presence of Varroa mites, the number of Nosema spores, the presence of American foulbrood disease (AFB), and whether the disease is resistant to the commonly used antibiotic. Because of the seriousness of nosema, here’s a recommendation you probably won’t hear anywhere else: Send in a sample of bees right after you get your package. The lab will tell you the average spore count per bee, which can range anywhere from 0 to several million. The test is free but may take a couple of weeks for the results. Do it anyway.
Emergency supercedure cells: Your bees build them when they have lost their queen suddenly (such as in a case of nosema or an accident). The bees select a larva that is less than three days old and begin to produce a queen cell that hangs down from the cell the larva was in, hanging between the frames, to accommodate the larger queen larva that will eventually form in this cell. These may occur for any of several reasons, and they are always a warning sign.
When you send bee samples to the Beltsville bee lab, the scientists there will remove your bees from the bag containing bees and alcohol and grind them up using a mortar and pestle. The solids are strained out and the liquid placed under a microscope. The sample is in a grid and counting spores in a single grid provides a good estimate of how many spores per bee were in the sample. A heavily infected bee will have between 7 million and 10 million spores.
The best approach is to assume your bees have a mild infestation and to combat it the best way you can. Since the protozoa attack the midgut of the honey bee, she tends to stop eating and eventually starves to death. Before the bee dies, the protozoa consume the interior of her digestive system, mature, reproduce, and spread more spores.
The best way to combat this disease is to make certain your bees continue to eat a healthy diet. To do this, start by making available lots of honey or sugar syrup and fresh pollen or pollen supplement to a colony that seems to be listless and not eating and especially to a colony that isn’t foraging well when others are. If that in itself doesn’t inspire them, try a feeding stimulant that makes their food more attractive!
There are several feeding stimulants on the market that all contain various essential oils and herb extracts. Lemongrass oil, thymol, and other essential oils stimulate even infected honey bees to eat, and eating combats the disease. Continuous feeding at the beginning of a season (or at package installation) has been shown to reduce spore counts, and even reverse the disease. Even bees not infected will eat more and remain healthier because of this.
Beekeepers have found that the essential oil feeding stimulants have good results, and this is currently the only way to combat this disease. There are, however, new compounds on the market that are said to aid the bioenvironment of the honey bee digestive system. Initial tests seem to support the claims of these products, so I’d suggest following up on them as more bees are exposed to them. If they prove to be effective, it would certainly be a positive, and chemical-free, treatment.
Another recent discovery is that a colony infected with nosema that is handling the disease by being fed good food and essential oil additives sees a huge and rapid increase in spore production when exposed to even tiny amounts of agricultural insecticide. The pesticide seems to weaken an already stressed organism’s immune system past its ability to continue handling the disease.
One thing to keep in mind: If your queen encounters nosema, she’s a goner. The disease is especially hard on queens because it wreaks havoc on their ability to lay eggs.
CHALKBROOD
Chalkbrood, Ascosphaera apis, (usually called chalk), is a fungus that attacks the larval stage of the honey bee. It is a disease that shows up when the colony is stressed, especially with food shortages and erratic temperatures. Damp, cold conditions don’t help the bees any, and keeping a colony in a high, dry location and providing as much ventilation as possible is recommended to reduce incidence of this disease. Spring is the most common time of the year for this to show, but it can appear at any time. Recall the genetic diversity of the worker population that may keep this disease completely in check or allow it to run rampant any time of the year.
Somewhat like nosema, chalk is spread by spores from previous infections. Spores are first encountered when bees from your colony rob an infected colony, bees with spores drift into your colony, or you exchange equipment from an infected colony with one that isn’t.

You’ll first see chalkbrood mummies on the bottom board, having been removed by house bees.
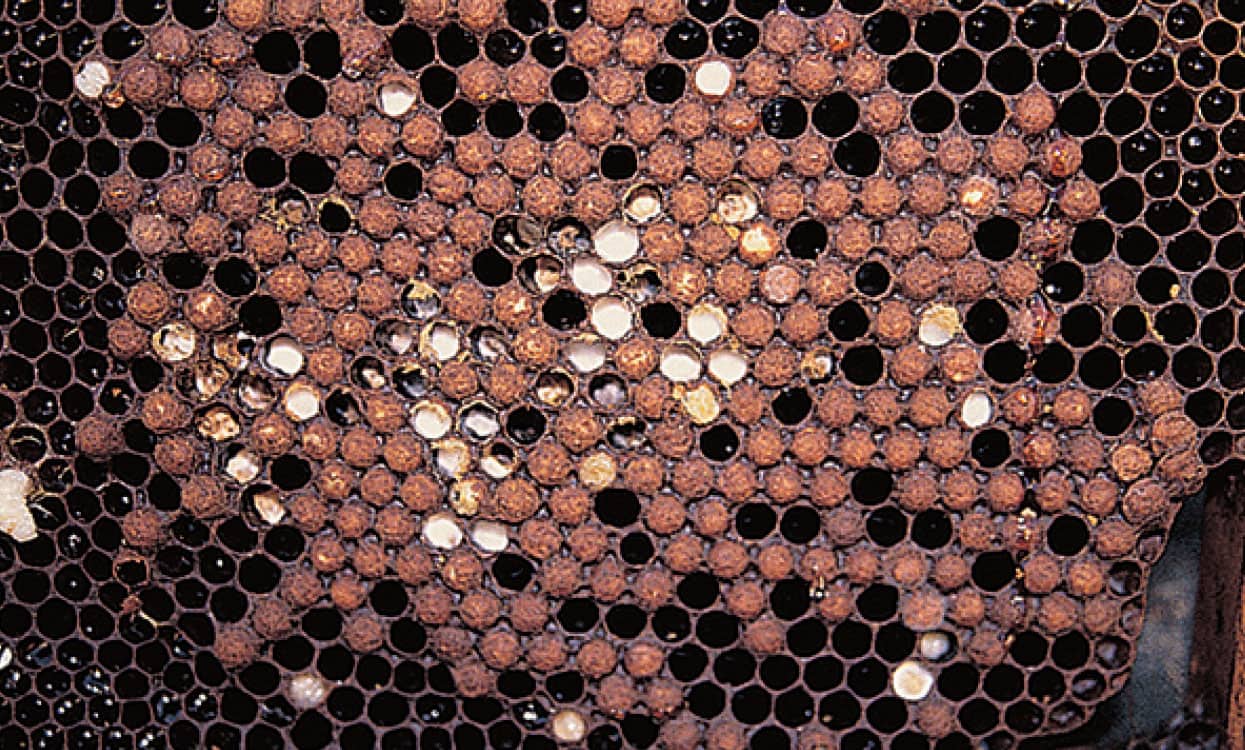
You’ll also see chalkbrood mummies in cells in the broodnest. They will be white, chalky, and hard. They may rattle when you move the frame. Some may have black spots on them, meaning the disease has matured to the point of producing spores, providing additional means of infestation.
Adult bees that have cleaned up larvae that have recently died of chalk inadvertently feed spores to other larvae. The spores are ingested, then germinate in the gut, and compete with the larva for the food. Very soon the fungus will cause the larva to starve to death. It then invades the tissue of the larva, consuming it and spreading its hyphae throughout the dead larva’s body tissue, consuming it all. Eventually, the body tissue turns hard and is chalky white. This is called a mummy. If conditions are favorable and more than one strain of the fungus is present, when mature, the fungus will mate and reproduce, casting off black spores; the dead larva now becomes white with black splotches on it. When nurse bees go to remove the chalky dead larvae, now hard and rattling around in the cell, they get some of these spores on their bodies and then share them with young larvae, completing the circle. It is a serious problem when a high percentage of the larvae in a colony die because of it.
The best defense is to have bees that are extremely hygienic who will clean out dead larvae before the fungus matures and produces spores. Good management and resistant bees are the things that work.
EUROPEAN FOULBROOD
Yet another stress disease, the bacteria Melissococcus pluton is associated with springtime stress. Much like chalk, spores are fed to young larvae by nurse bees. Spores germinate in the midgut of the larva, aggressively and rapidly compete for food, and the larva starves at a very young age, before the cell is capped. The bacteria consume the larval tissue until all that’s left is a twisted, brown rubbery mess, usually still curled at the bottom of the cell. Sometimes, they are stretched out lengthwise along the side. These “scales” are removed by nurse bees who then contact the spores.
Like chalk, spores are first encountered when bees from your colony rob an infected colony, bees with spores drift into your colony, or you exchange equipment from an infected colony.
Your first indication of an infestation is a brood pattern that appears spotty. Careful examination of an early infestation shows dead and dying larvae in the very bottom of brood cells that are not snow white! To repeat: The fastest sign of a problem with larvae is that they are no longer snow white. A darker color is always a bad thing and needs to be attended to. After the larvae die, they appear as scales—lying along the length of the cell. You can easily remove these with a toothpick to examine further, but the key is recognizing the color change and quick removal.

European foulbrood–infected larvae are first noted because they are tan to yellowish, turning dark brown and eventually to black. The larvae die before the cell is capped, which is one of the tell-tale signs used to distinguish between this and American foulbrood, another bacterial disease. Plus, the remains are easily removed by the bees, thus somewhat reducing the incidence of further infestation.

European foulbrood–infected larvae are dark brown to black, rubbery and sunken to the bottom or along the side of the cell. The telling symptom here is the color of the larvae. They should be stunningly, shiny white with no off color at all. White is right for larvae.
Consider treatment the same as for chalk. Use hygienic bees, reduce stress to a minimum, make sure adequate food is available, provide good ventilation, and make sure that the colony gets as much sun as possible. Generally, a good honey flow, warm weather, and a healthy population of hygienic nurse bees cleans up European foulbrood (EFB). You most likely won’t see this the first season you have bees from a package, but, like chalk, watch for it the next spring. Requeening is always a good idea if this becomes a persistent problem. There is an antibiotic remedy for this disease, should you choose to pursue this course of action. It is the same antibiotic used for AFB. You must have a veterinarian’s prescription to obtain it, and that vet must already know of you, and your operation. Food, resistant bees, full sun, and reduced stress are easier, safer, faster, and self-sustaining remedies to chase rather than a long-lasting drug.
AMERICAN FOULBROOD
American foulbrood (AFB) is caused by the bacteria Paenibacillus larvae. This is by far the most destructive disease (not pest) honey bees get. AFB is spread by spores that are consumed by larvae during their first couple of days in the cell. After that, they become immune to the disease.
You will probably never encounter this disease in your colonies. It is rare and well policed, but it is so very serious we need to spend some time with it, first, so that you can recognize it if it does show up, and second, so that you can efficiently deal with it so that it doesn’t spread.
Spores enter colonies in a variety of ways:
![]() Workers rob a wild colony, another apiary, or another colony in your apiary, and bring home spores inadvertently through contact or in the honey they stole.
Workers rob a wild colony, another apiary, or another colony in your apiary, and bring home spores inadvertently through contact or in the honey they stole.
![]() Equipment previously contaminated is sold and reused.
Equipment previously contaminated is sold and reused.
![]() Frames are moved from a colony with AFB to one without it.
Frames are moved from a colony with AFB to one without it.
![]() Gloves and hive tools used when working a colony with AFB are not cleaned before use in another colony.
Gloves and hive tools used when working a colony with AFB are not cleaned before use in another colony.
Spores are fed to larvae 50 or so hours old or younger—a very small window—and the infection begins. Older larvae have a built-in resistance and are not affected. Once ingested, the spores germinate and begin consuming the larvae, much like the other diseases mentioned. The larvae eventually die but only after the cell is capped. Before they die, the larvae turn a brownish/yellow color. This is a sure sign that something is wrong in a colony. Larvae should always be a stunning, nearly neon white. And they should be shiny and glistening, not dull.
Because of the seriousness of AFB, most state departments of agriculture have regulations on containment, treatments, and controls. There are a couple of antibiotics (a tylosin product is one) labeled for use when a colony is officially diagnosed with this disease (from samples taken by a bee inspector and confirmed by a recognized diagnostic lab, such as the USDA, and then prescribed by a vet). You cannot use either to prevent the disease, just as you would not take an antibiotic to prevent a disease you did not have. Resistance to antibiotics is a worldwide problem and this is one way to prevent that from occurring here, and the main reason the FDA has moved to regulate its use by prescription rather than routine prophylactic use to prevent the disease from flaring up, and to prevent exposure of a human-used antibiotic from contaminating human food. With no medication to control this disease, and since even good hygienic bees and stress reduction does not help, what’s the answer to AFB? Extreme beekeeper hygiene. Careful examination and diagnosis can locate symptoms early so that brood frames, and entire supers if necessary, can be removed and destroyed. Frames with diseased larvae can be removed and burned, but recall that the larvae don’t die until the cells are capped, so detection isn’t easy, especially when the infestation is small and early.
You can assume that in even a mildly infested colony, most of the broodnest-area bees—those that feed and clean—have AFB spores associated with them. Further, these are some of the bees that take nectar from foragers, passing spores to them also.

A spotty brood pattern is always a sign of trouble and is a first, best sign of American foulbrood disease. This is your most obvious clue that a disease is present.

One diagnostic technique for American foulbrood is what is commonly called the rope test. Shortly after the cell is capped, the larva dies and its body becomes jellylike. Poke a small twig or toothpick through the wax capping and carefully stir it around. Withdraw the probe very slowly and the sticky mass of dead larva will cling to the probe. It has the consistency of mucus. The color will be coffee brown to dark gray, and it will draw out of the cell 1/2" to 1" (1.3 to 2.5 cm) before it snaps back. Though distinctive, this isn’t the definitive test for AFB. If the rope test is positive, you should check for signs of this disease in all your colonies.
Once, bees were removed from the existing, infected equipment, shaken into brand-new equipment, and left to rebuild with new wax and no brood. But shaking bees is going to cause a lot of bees in the air, many drifting to other colonies, and similar problems with neighbors and other colonies. Regulatory agencies in the southern United States have developed a technique to rapidly contain a colony of bees when they are African and endangering people or pets. They cover the hive with commonly available, large plastic lawn litter bags. This contains all the bees in the hive, protecting nearby people, or eliminating the spread of AFB. If the weather is hot, as is common in the region, the colony quickly overheats and expires.
After the bees are dispatched, they use a burn barrel instead of a hole in the ground, which can be destructive. Frames, combs, and hive equipment are placed in the barrel with flammable material, and the equipment, and the disease, are destroyed by fire. Supers need not be destroyed, to destroy any lurking spores, crisscross and pile the supers on top of the barrel, letting the flames rise through them, scorching the insides and edges. The wood should be browned, but not blackened. When done correctly, there is no honey, no wax, and only ashes left.
VARROA MITES
For more than thirty years, Varroa mites and the problems that arise when they are present have been the most challenging health problem honey bees and beekeepers have had to deal with. And during those three-plus decades, things have gotten worse and better, relative to the damage the mites cause and how we deal with them.
The importance of handling Varroa mites in your colonies cannot be stressed enough. Controlling Varroa mites in beekeeping is as important as knowing which side of the road to stay on when learning to drive. Mostly, if you don’t control Varroa, your bees die. The upside is that detection and management are improving. Following the most recent techniques is important, and attending classes, reading recent publications and simply paying attention to your hive will go a long way in helping you manage this pest.
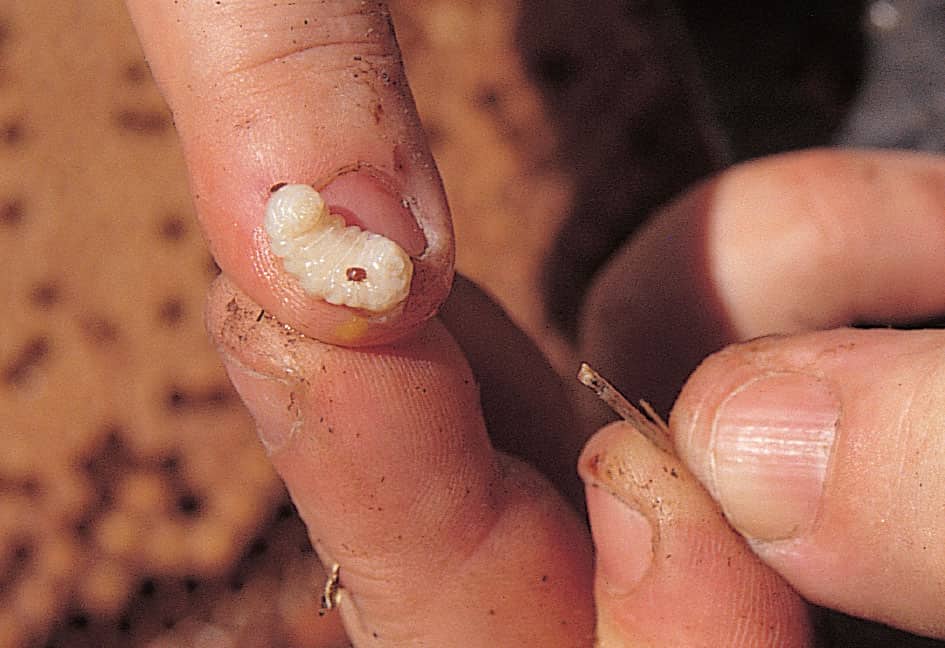
If you remove a larva from its cell that has a Varroa mite already in it, this is what you will see. Note the size and color of the Varroa mite. They are easy to identify. Generally, when you remove the pupa from the cell, the mite will scurry away, and they can move fast. If the infestation is heavy, there may be several adult females and many nymph stage mites present in a single cell.
How to Monitor Mite Populations
The most fundamental key in this ongoing battle is knowing where your bees stand relative to how many mites are in a hive. Knowing that number will tell you if there are so many there that you need to act, or if your avoidance techniques are paying off and you can relax. Count mites at least once a month and sometimes more often all during the season that access is possible. This may be at least twelve times, or more, a year if you have active brood all year long. This is a lot like monitoring pests in your garden, lawn or on pets. And this is important, for gardens, pets and bees. You don’t want to just treat. You want to make sure you have done everything possible to keep pest populations in check before you introduce control techniques into the equation. These may be simply fundamental integrated pest management techniques like making a divide, or a drastic, invasive technique like putting poison in a hive—trying to kill a bug on a bug. Avoid this at all costs.
A good comparison of size between a Varroa mite and an adult honey bee.
Sampling techniques and equipment are continuously being refined, becoming easier, faster, and more reliable. It pays to keep up with the technique du jour but, for now, we’ll explore what is considered by most the best there is.
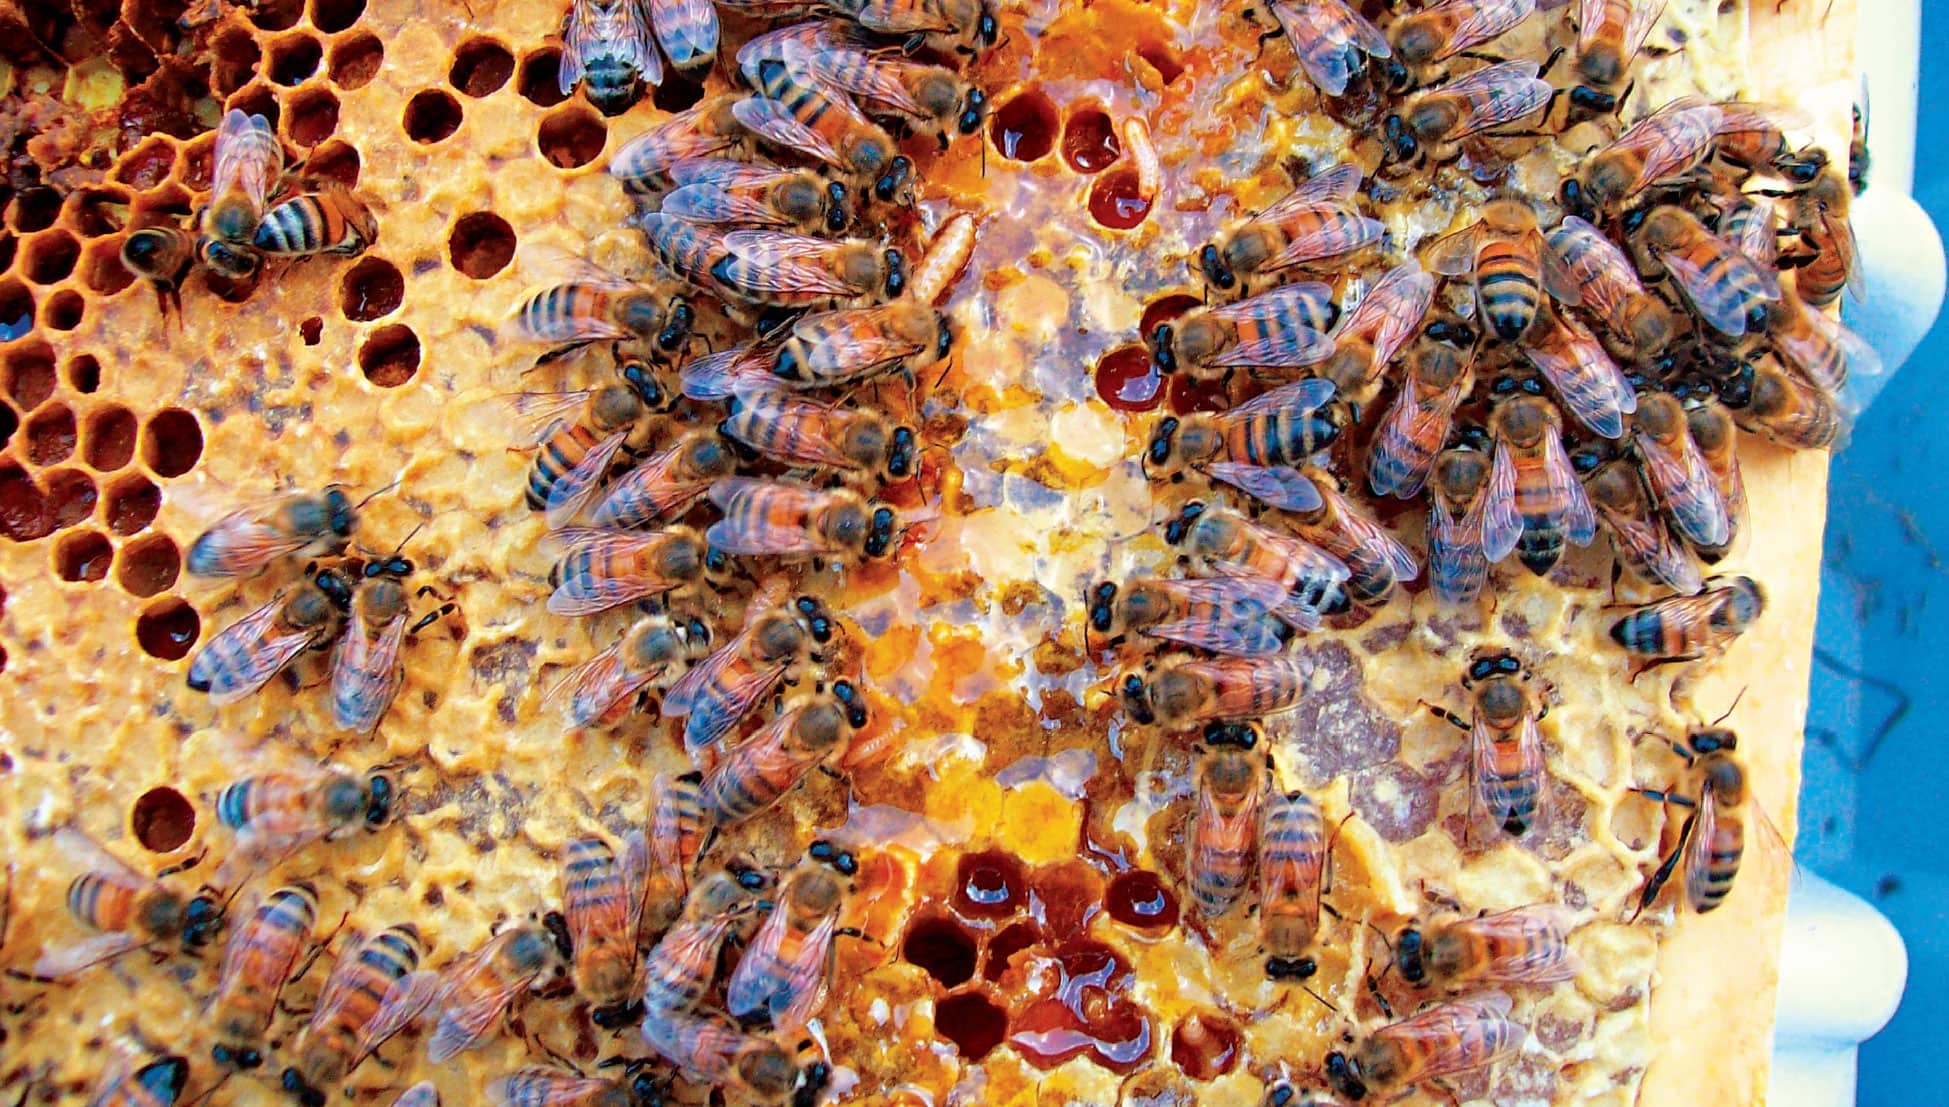
It’s called the alcohol wash. Basically, what you are going to do is capture about 300 bees, or about a half cup (118 ml). Put them in a jar with a cover of mesh small enough to allow mites and alcohol to pass but contain the bees. Then you’ll add enough alcohol (70 percent isopropyl, or even window washing fluid works) to just barely cover the bees, swirl them around in the wash for a few moments. This, unfortunately, sacrifices the bees, but it also kills any adhering mites and loosens them from the bees. Pour out the alcohol into a filter that captures the mites. Then count the mites and make a decision on your management.
Divide the number of mites captured by the number of bees sampled to obtain the infestation of your colony of phoretic mites and then follow local guidelines that offer colony size and seasonal information on how to proceed, and if you even need to do more.
How Do I Avoid Varroa Mites?
First, purchase strains of honey bees resistant to Varroa mites. Russians are very tolerant of Varroa populations. Not perfect, but not bad. There are others available, and more are becoming available routinely. Ask members of your local club and check journals for the latest in where to get bees resistant to varroa. Resistance is the answer to this pest, not poison.
Some commonsense management tricks will help your colony deal with mites all the time.
Mid-Summer Splits
This is, without doubt, the finest example of working with the bees I can imagine. With a first season package it might not work because of a slower-than-hoped-for population increase, or a poorly preforming queen eventually being replaced. But for even an average package, and especially an above average colony, it works like this.
By dividing the population of bees and brood, each resulting colony ends up with half of any mites that were present in the original. Then, one of the split colonies has the original queen, and one is queenless. For the half with the original queen, you can cage the queen for three weeks, allowing every existing brood to mature and emerge. This exposes absolutely every mite in the colony, making them all vulnerable to grooming, or an organic acid mite treatment. After three weeks and a treatment, you can either release the queen from her cage or install a new, young, genetically stronger queen of your choosing. The queenless half works about the same when you install a new queen.
What you end up with are two strong colonies going into winter with no mites and vigorous laying queens giving the colony a good population of extremely healthy, nonviral infected, and well-fed winter bees.
Treating Varroa Mites
For an active, healthy colony with even an average queen, spring and summer buildup will appear normal because the rate of brood production by the bees outpaces the rate of reproduction by the mites for much of the summer. However, as summer winds down, the queen begins to slow egg laying and both the brood and adult populations begin to decline in preparation for winter. Mite reproduction, however, remains steady, with some changes. For much of the summer, the mites have been infecting drone brood far more than worker brood. When drone populations decline in the fall, the mites turn to the worker brood and infest worker cells. It takes only a short time for much of the worker brood to become infested.
Basically, using poison is a bad idea. A more positive approach is to use products that are not poison, but rather physically damaging to the mites. There are two essential oil products available. One is Apilife Var, which is thymol, menthol, and eucalyptus oils soaked into a foam block. Break the block into four pieces and place one on each corner of the cluster, not the corner of the box, in the top box. These products need to be applied every seven to ten days. Another essential oil product is ApiGuard, which is primarily thymol oil and inert ingredients. It is a gel-like compound contained in a very thin aluminum foil container, or in bulk as a peanut butter–like compound smeared on top bars. For the single application, remove the cover, place on the top bars of the top super, and let it evaporate while the bees remove the gel. Don’t use below 60°F (16°C) or it won’t evaporate or above 105°F (41°C) or it will evaporate too fast, driving bees out of the hive and harming brood. These are not poison.
Another non-poison product is called Mite Away Quick Strip, a gel-based formic acid product that slowly evaporates. It is effective, leaves no residue, but can harm queens and brood if applied when too warm, and is mostly ineffective if applied below 50°F (10°C). It attacks free roaming mites and those in cells. Plus, it is downright dangerous to those who apply it. Gloves and a mask are necessary. But it is by far the most effective product there is relative to residues—there are none—and efficacy.
The newest treatment on the market requires protective gear and is very effective. It is oxalic acid. It can be used as a drip in sugar solution and as a vaporized gas. Use of this compound is evolving with even more effective and safer application methods, and its potential is improving. It is the perfect compound for a late summer/fall Varroa bomb treatment.
As we said earlier, it’s always a trade-off: efficacy versus beekeeper safety versus ease of use versus honey bee safety. If you choose to use a Varroa mite chemical treatment, be certain to read labels, follow instructions, and be safe—for you and your bees.
WAX MOTH
Wax moths, Galleria mellonella (also known as greater wax moth), can be a real nuisance, but they can be taken care of pretty easily.
Sometime during your bees’ first summer, a mated female wax moth will find your colony. She’ll get inside by sneaking past the guard bees, usually at night. Once inside, she will lay eggs somewhere in one of the boxes with brood. The eggs hatch, and the moth caterpillars begin to feed on beeswax, pollen, honey, and even larvae and pupae, that is, unless house bees catch and remove them. If the colony is strong and healthy, the internal police force is very protective against these invaders. But small colonies, or those being stressed by other troubles, aren’t as diligent and wax moth larvae can make some inroads.
If they get a foothold, the moth larvae tunnel through your brood comb, leaving webbing and frass (excrement) everywhere in their paths. Unimpeded, wax moth larvae can, with favorable temperatures, completely consume the comb in a super in ten days to two weeks. They eventually pupate, spinning tough cocoons fastened to the sides of supers, top bars, or the inner cover. They literally chew a groove into the wood so they fit. The cocoons are so tough that bees can’t remove them. Adult moths emerge, leave the colony, mate outside, and then the females find more colonies to infest. They’ll do the same to supers you store in the basement or garage, unless you take some precautions.
Wax moth adults are around pretty much all year in tropical and semitropical areas, and most of the year where there are mild winters. In cold climates, wax moths are a problem only from midsummer until hard frost—outside, that is. Inside the hive is a different story.
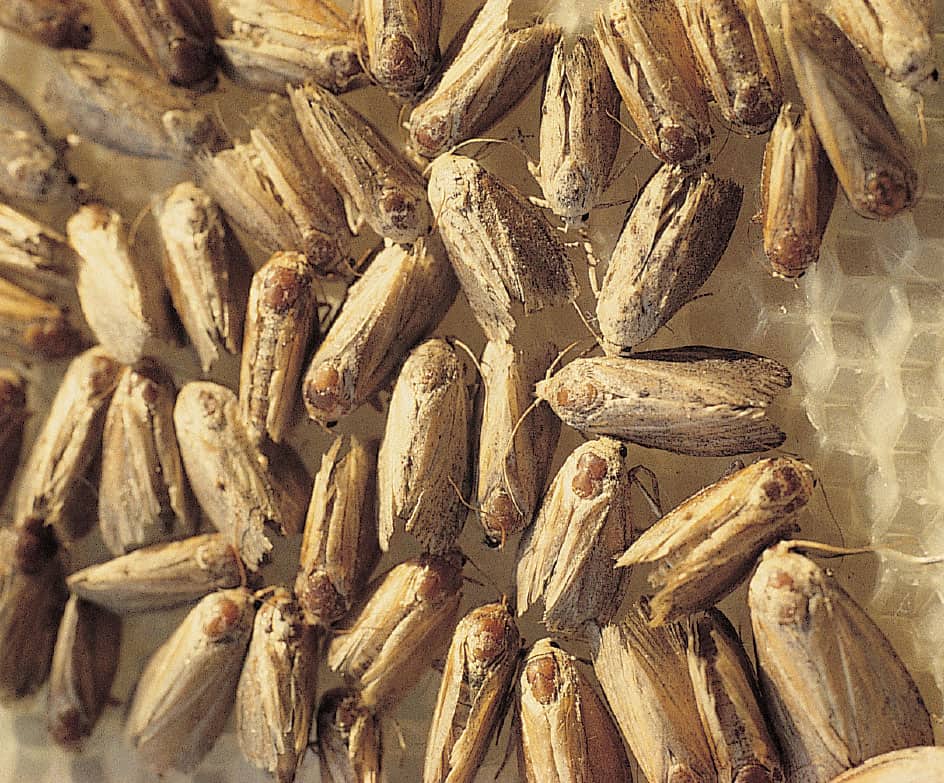
Adult wax moths are about the size of an adult worker honey bee.

Wax moth larvae, like the one shown here, do great damage in a beehive. The larva is an off-white, soft-bodied caterpillar. This one is about half grown.

As the larvae eat their way through the comb, they leave behind webbing, which hinders the bees from catching and removing them and from being able to use the comb or even clean it.
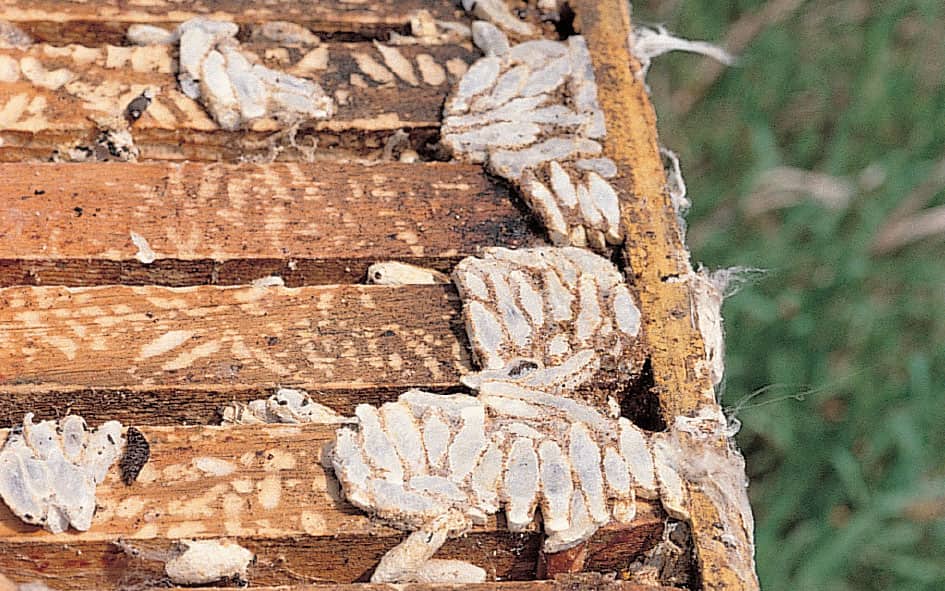
Cocoons of wax moth pupae are very tough and bees usually can’t remove them.
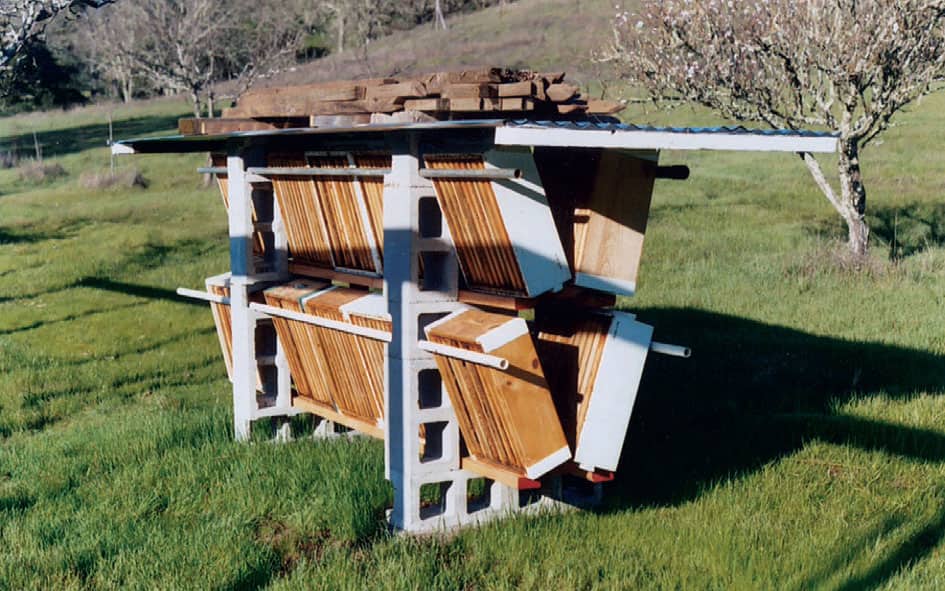
Here is an easy-to-build storage rack for supers when they are not on a colony. This arrangement allows light and fresh air into the supers, discouraging wax moths from infesting combs. It also protects them from the elements. It is made of boards, cinder blocks, and PVC pipe, and could be made longer, taller, or wider, as needed. The supers are covered with inexpensive corrugated fiberglass panels weighted with additional pipe, blocks, or other heavy material.
Storing unused supers so light and air can penetrate between frames makes them unattractive to wax moths and doesn’t require a frame or shelf.
SMALL HIVE BEETLE
Small hive beetles and our honey bees have had a decade or so to become acquainted since the beetles accidentally arrived in the southern United States from South Africa. Ironically, small hive beetles are not an issue in South Africa because the aggressive African honey bees manage to keep them in check. However, the more docile and inexperienced European honey bees common in South, Central, and North America were less prepared for their onslaught. Hives infested with these beetles can be moved from the warmer parts of the United States to the more northern areas, where the colder winters and the less sandy soil types generally keep populations in check. There are occasional outbreaks when beekeepers aren’t paying attention or when infested colonies move into an area to take advantage of a honey crop or for commercial pollination. When the colonies crash due to beetles, Varroa, or starvation, the beetles will leave and find a new home, but only after they have consumed everything worth eating in the now-deserted hive.

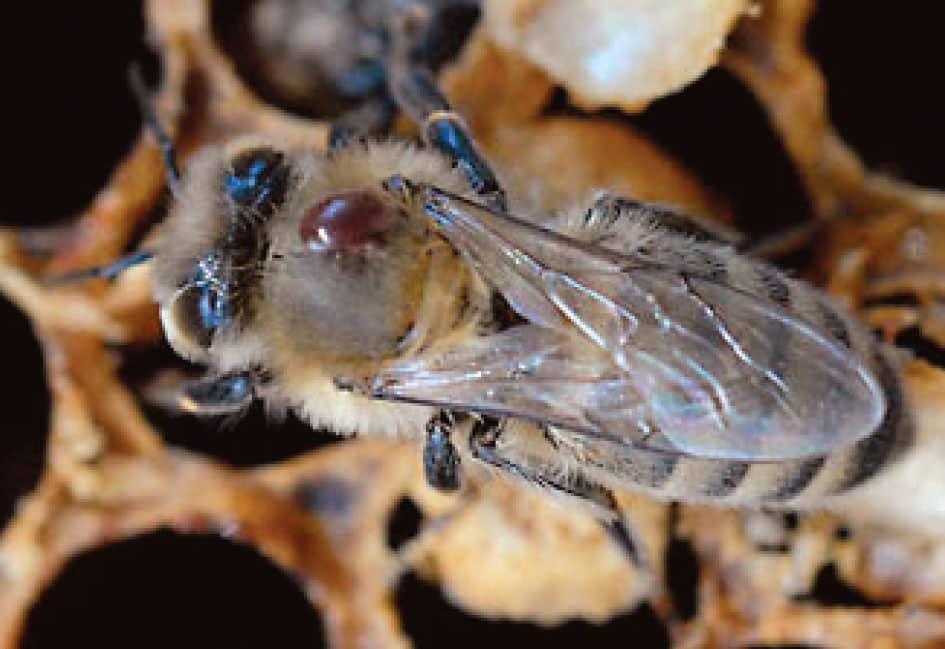
Here is an adult hive beetle on the edge of the inner cover and another on top of the inner cover—both scurrying for cover when the outer cover was removed. You almost never see a beetle sitting still. When you open a colony, they run from the light. They are about one-third the size of an adult honey bee.
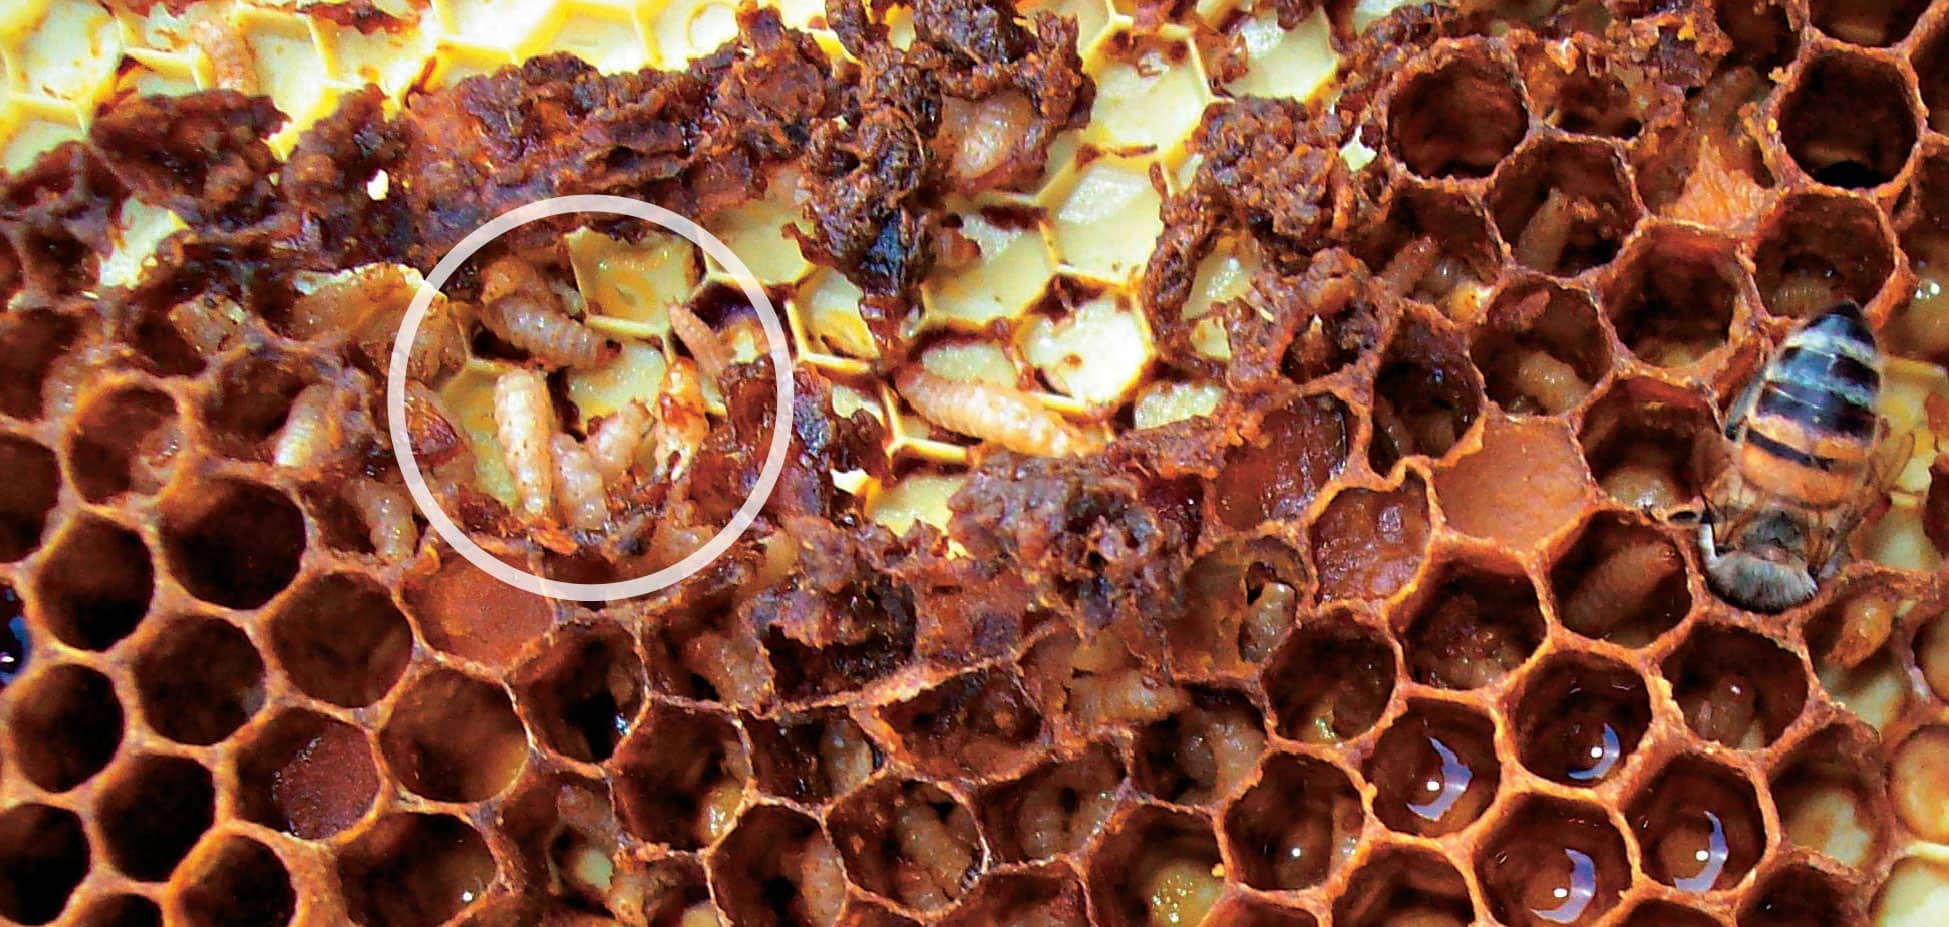
Small hive beetle larvae resemble wax moth larvae, but they tunnel without webbing and are very destructive. Pick one up and draw it between your fingertips. The cuticle is hard and unyielding, and the legs are stiff and bristle-like. Wax moth larvae are soft and pliable and easily crushed.
As the larvae tunnel through the comb, they defecate, which causes the honey to ferment and become runny and is called slime. In extreme cases, the slime will run right out the front door. The bees will abandon the hive long before it gets to that point.
A disposable small hive beetle trap. Fill the reservoir half full of vegetable oil, then place between two frames near the edge of the top box. Beetles will hide in the opening, only to fall into the oil.
Beetles can fly long distances and are attracted to colonies that have been disturbed and have released some alarm pheromone, scientists tell us. Queen producers (in the southern region of the United States) who use small mating nucs have problems because there aren’t enough bees to defend the colony, and very often colonies that go queenless decline and are destroyed by the beetles.
It’s unlikely you will see beetles in your package colony (though you may see them in your package before you install it. If so, try and remove them before installation)—but if you do see them early, you will likely see them in greater numbers as the summer moves along. You will notice them especially on the top of the inner cover when you remove the cover or on solid bottom boards.
Destruction can be extensive. Mated females lay clusters of tiny eggs in locations the bees don’t have access to. The eggs hatch and hundreds, and even thousands, of aggressive larvae tunnel through brood comb, honeycomb, any comb seeking pollen and especially larvae and pupae to eat. As they tunnel, they excrete a liquid mess that causes any honey it contacts to ferment and bubble and turn into what beekeepers call beetle slime.
When the beetles attack small, weak, or disorganized colonies, the resistance put up by the bees is futile. Soon the beetles command much of the unoccupied portions of the colony, then in mass they invade and destroy the remainder. Colonies that are strong with larger populations can often hold their own against an invasion, and with a little help from the beekeeper the bees can win this battle without using harsh chemicals or poisons.
Avoiding Small Hive Beetles
The first line of defense against small hive beetles is to maintain large, strong colonies that are not under stress from other pests, diseases, or nutritional issues. The second is to keep your colonies in full sun. Low humidity is the scourge of these beetles and Varroa mites, too.
If you have weak or small colonies, especially those splits made later in the summer, there are several traps available that are effective in keeping beetle populations down.
Some are made like trays that sit on or replace the bottom board of the hive. There are slots in the top the beetles can enter but the bees can’t, and the bottom tray holds a supply of food-grade vegetable oil the beetles drown in.
There are several trap models available that fit between the top bars and sit just below the surface of the top bars so a beetle running from bees will seek out this hiding place. Of course, the holes provided only lead to an oil-filled trap below.
The small hive beetle life cycle requires that the larvae, when ready to pupate, leave the colony and burrow into the ground outside to complete their metamorphosis. There is a ground spray that can be applied to the area around your colonies that will kill the larvae when they cross it. It also is effective against fire ants, but it must be reapplied after it rains.
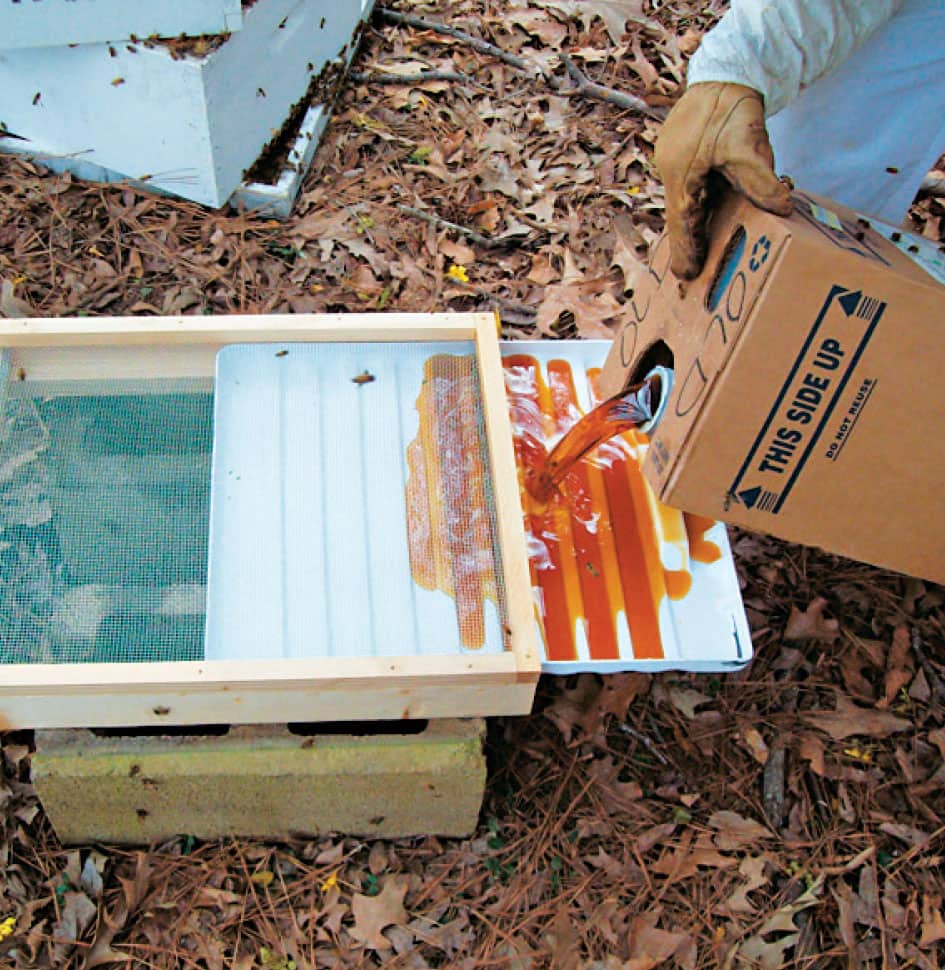
Tray traps sit on the bottom of hives and work much like the sticky board for Varroa. An oil-filled tray awaits the beetles beneath the screen. If you have a small number of colonies, you may want to consider these as they are quite effective.
COMB HONEY AND CUT-COMB HONEY
There are some options when deciding what kind of crop you would like your bees to produce. It may not be just honey in a jar.
CUT-COMB HONEY
If honey is not the goal for your beekeeping, you can always let another beekeeper harvest the surplus honey your colony produces. This is easy, inexpensive, and satisfying: The beekeeper gets paid in honey, or money, and you can get enough to share with friends and family. If you are interested in producing some honey and there’s no one to help with extracting, and purchasing uncapping equipment can be expensive (no matter how basic), there are a couple of other choices.

A piece of cut comb in a plastic container ready for sale: With this you don’t need uncappers, extractors, bottles, or pails, and you get to eat honey at its very best.
The easiest is to make cut-comb honey. You need to make only minor management and equipment changes to produce it. Special, very thin beeswax foundation, (or none at all), is easy to cut, and will be used in your frames instead of plastic foundation or regular beeswax foundation with support wires in the wax.
There should be a good, ongoing honey flow when these supers are added so the bees draw out the foundation or make the comb and fill the cells with honey rapidly. Once filled and capped, the crop is ready to harvest. Remove as soon as you can so the cappings stay snow white and don’t get what beekeepers call travel stain from bees moving across them. Remove these boxes using the same techniques as with any other honey super.
This honey is not extracted, however. No uncapping, no extracting, and no jars or pails. Rather, remove the frames from the super, place them on a draining tray, and cut the honey comb into several pieces. A draining tray is simply any tray that can be washed, with a piece of wire mesh on top of it. Before cutting, obtain some of the clear plastic boxes that bee supply companies sell for this purpose so you’ll know what size to make the cuts.
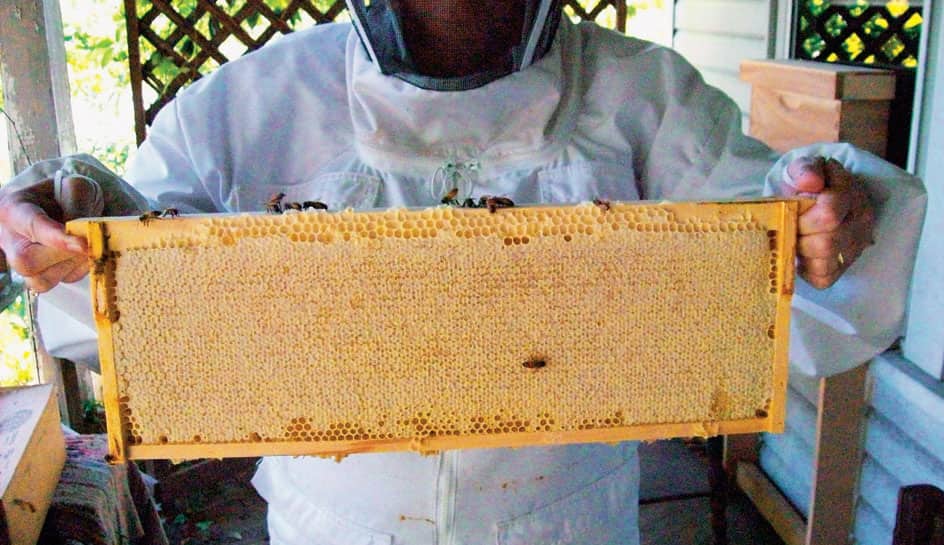
When the bees have filled and capped the frame, remove it from the colony. Once harvested, place it on a drainage tray (a tray overlaid with a grid, such as mesh screen). Cut the comb into pieces that will fit into your containers. Let drain overnight, then place in your containers (available from bee supply companies) for this purpose.
Cut the comb into correct-size squares and let the honey from the cut edges drain overnight so they are dry the next day. Use a soft plastic spatula to pick up and place the squares into the plastic boxes. Package and distribute to friends and family. Use cut-comb honey as is by the spoonful; put a spoonful on hot toast or biscuits or anywhere you want a wonderful honey taste, exactly as the bees made it, untouched by human hands. And yes, you can swallow the wax.
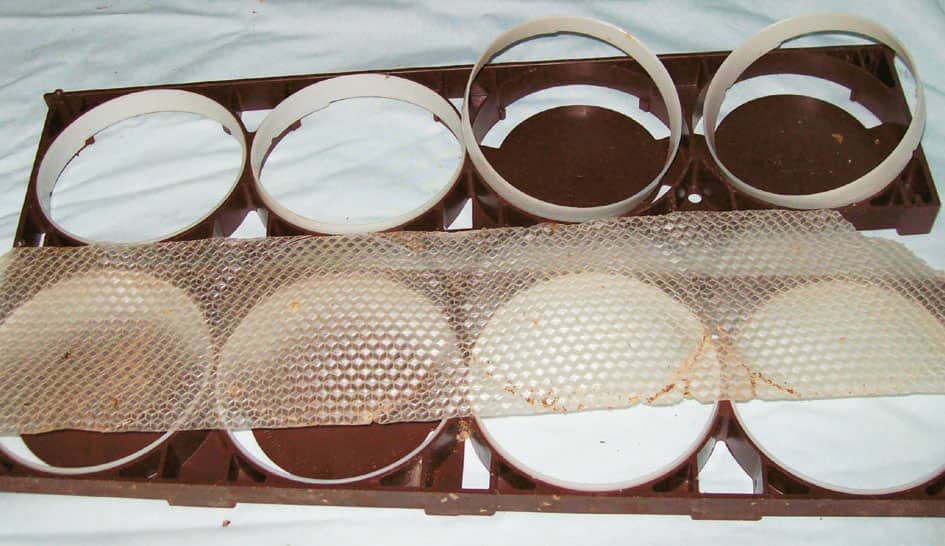
The parts and pieces of a Ross Round Comb Honey Frame: To use, insert the sheet of thin foundation, put the rings in the holes and snap the two sides of the frame together. Eight frames fit in a ten-frame super (six in an eight frame), and there are four round sections in each frame. To harvest, open the frame, lift out the rounds, trim the excess foundation, cover, and you have your finished product.

Ross Round sections: showing wet (left) and dry (right) cappings, ready to sell. Both are excellent, but dry cappings always seem to sell best.
SUMMERTIME CHORES
By early summer, your brand-new package colony has most likely grown past the rigors of becoming established. The stresses of temperature fluctuations are reduced, the population is building, the queen is producing, nectar and pollen are being collected, frames are mostly built up with beeswax cells, and honey is being stored. This is the norm.
Having at least two colonies is recommended, so you’ll have a basis for comparison. How can you tell what’s happening, no matter where you are? Mostly, bees react to their environment rather than plan ahead. You should, however, be a step ahead of them. Temperature extremes, rainfall, and even weed growth are limiting factors for your garden plants, and for the plants your bees visit. But even with that experience, an occasional chat with nearby beekeepers can be enlightening, and belonging to a local club becomes even more valuable. An experienced local beekeeper can, in a few moments, share the typical season’s progression—that bit of wisdom is worth its weight in gold.
Eight to ten weeks after installation, your package colony will probably have brood in all three of their brood chambers, but that will range from a box and a half to three boxes full. The difference will be dependent on how favorable the weather has been, the type of bees you have, and any obstacles that have arisen during that time.
By midsummer, honey will probably be in at least one and perhaps part of a second honey super. Looking ahead, you must prepare for the slow season—cold weather in the cold regions and the rainy or cool season in the warmer areas—and make sure your colony has enough honey stored to last until spring returns.
By midsummer, honey becomes an issue for you and your colony. How much do you want and how do you manage that? Certainly, nature may make that decision for you, but during an average season, your package colony may make 40 pounds (18.1 kg) of surplus honey. It can make more in a good year, but maybe none during a poor year.
You must provide room for honey production—room to dehydrate nectar—using an additional super or two. Deciding how many supers to provide is definitely an art. If you provide too much room, the super will remain unused, which isn’t too great a problem the first year, but it gives a place for wax moths and small hive beetles to gain a foothold.
Your bees will store some honey in the broodnest boxes. You want them to store enough but not so much they fill space the queen needs to continue producing the next generation of workers. In fact, you must prevent this by moving frames full of capped honey out of the broodnest and up into the honey storage supers.
To get the necessary amount stored, you want that 40 pounds (18.1 kg) in one super and an additional 20 pounds (9.1 kg) stored around the edges of the broodnest. That’s about eight full frames of honey out of the twenty-four you have in the three brood boxes. If there is more, you should move some out. If there is less, you either move some in or reduce available storage above the queen excluder.
If you are having a bumper crop, you need to continue to add boxes, two or three, as the first boxes added are filled. Here’s a trick if your colony fills those bottom three boxes with almost all brood and stored pollen and keeps putting honey above their excluder. Take a nearly full, partially capped honey super and place it on the very bottom of the colony. This is an abnormal situation for the bees, and they will actually (almost always) move it up into the broodnest.
LATE SUMMER HARVEST
Your first-year colony probably won’t have a harvestable amount of honey before late summer, if then. The conventional procedures for harvesting are outlined later and are simple enough to carry out alone—they’re even easier with help.
But now, preparations for winter begin in earnest, and they need attention. As day length shortens and weather cools, the queen’s productivity slows and there will be less brood. Your drone frame may be mostly empty, but keep it in the hive until you harvest, replacing it at season’s end with a full frame of honey for overwinter stores. Check the broodnest very carefully for signs of disease, because this is when problems you may have missed earlier begin to emerge in a first-year colony. And keep up your Varroa monitoring.
There will probably be incoming nectar for a bit, but examine closely the amount of stored honey, making sure there’s at least the 60 pounds (27.2 kg) or more for the slow season. Be mindful that a first-year colony may need additional feeding to supplement that ration and be prepared with feeders and sugar.
REMOVING HONEY
Surplus is the term beekeepers use for the honey they harvest. If at the end of the season, before fall sets in and before you apply any necessary medications, your colony has surplus honey, it’s time to harvest.
You shouldn’t leave surplus honey in the colony over winter. It will most likely crystallize in the cells. Cool temperatures hasten crystallization, and those frames will sit on a colony, uncovered by the cluster, unprotected from wax moth, and turn hard as a rock.
When this happens, you can’t get the honey out, no matter what you do, and neither can the bees without great difficulty. Come spring, most of it’s still there, but you can use it then for feeding new or hungry colonies. Your bees need some honey, certainly. Bees will consume 40 pounds (18.1 kg) if it’s warm all winter, maybe as much as 60 pounds (27.2 kg). In the far north, 100 pounds (50+ kg) isn’t unheard of. A medium frame full of honey has about 5 pounds (2.3 kg) of available food. To supply 60 pounds (27.2 kg), use twelve full frames of honey. Often, but not often enough to gamble on, a first-year colony will have six frames of honey somewhere in the three brood boxes. It may be twelve half-frames or some other combination. Examine them so you know. That’s 30 pounds (13.6 kg) or so. There may be more, so look carefully.
A full super of honey frames added to that will give your bees 70 pounds (31.8 kg). Or, they may have more below and need less above. This arithmetic is necessary.
Several things influence the actual date you will remove honey from your colony in preparation for the coming fall and winter seasons. Foremost of these is the need to do something for Varroa mites. If you are using any of the hard chemicals or the essential-oil potions, you must not expose honey that’s intended for human consumption to these chemicals. So, treating those bees raised in the fall for Varroa mite infestations influences when to harvest honey. In order to ensure you have healthy bees going into winter, remember that you need to take care of the bees that take care of the bees that go into winter. Thus, in northern areas, you need to consider treatment in July! Not August, or later. July.
If you are removing honey and giving it away, your time commitment will be minimal—perhaps an hour. However, if you’ll need to prepare the garage or basement, harvest and move those frames there, uncap, extract, remove the frames from the area, and clean up, it can take the better part of a couple days. Plan accordingly, and factor in when treatments will need to begin. Your record book will help here.
Using a Fume Board
To remove a box with frames full of capped honey and leave the bees unagitated in the colony below, you must use a fume board. The warmer and sunnier the day, the better this works. Don’t try in the evening or early morning. This simple device looks much like a telescoping outer cover, except it is the exact outside dimensions of a super, so it sits on top of the super. You can make or buy one. The principle behind this technique is fundamental. On the inside of the fume board is an absorbent pad. It can be flannel, cardboard, or wood. Apply the correct amount of a chemical repellent to the pad, put the fume board on top of the super full of honey (cover and inner cover removed) you want to remove, and wait 10 to 15 minutes for the bees to move down into the colony, away from the fumes, and out of the honey super you want to remove.
There are several products available to use with a fume board. They are all essential oil–based, and although you and I would find them almost appealing, the bees don’t like them at all and will move downward in the hive. These chemicals aren’t absorbed by the wax or the honey and are nontoxic to the bees. Fume boards are usually dark colored or black (furnished that way or painted by you), and on a sunny day they will warm the repellent, vaporizing it, and flushing the bees out of the super. In a few moments, the bees will be gone, and you can remove the bee-free super and place it in a bee-safe location.

Fume boards are easy to make. This one is made from scrap pieces of 2" × 4" (5 × 10.2 cm) lumber and plywood. The inside is lined with something as simple as thick, absorbent cardboard. You can purchase preassembled models that come with cloth liners.
Apply just the small amount of repellent recommended by the label. If you overapply, you will chase bees out of one, two, maybe three supers. And they’ll run right outside. Suddenly, you will have a flood of bees pouring out the door, stumbling over each other to escape. This is not good. Err on the side of not quite enough at first. You can add more, if needed, but you can’t push bees back inside the hive.
REMOVING FRAMES OR A SUPER
The best advice for learning to harvest honey is to help someone else do it before you have to do yours. But that may not be possible, so here are some hints and tips for making this task as easy as possible.
If time permits, the day before you harvest, quickly examine just the honey supers you will be working in the next day. Smoke the bees a tiny bit so they leave the super and go below. Then quickly loosen every frame with your hive tool, breaking all bridge and brace comb and other anomalies. Also loosen the whole super so you can move it easily the next day. Overnight, the bees will clean up any honey from the broken comb and you won’t have leaky, sticky frames to handle and store.
This quick exam also shows just what you’ll be harvesting so you have the right equipment ready. If the super you have has surplus honey in it (additional to the amount needed by the bees), whether completely full or with only a few frames, here’s how to remove them quickly, easily, and safely.

Get all your equipment together before you begin. Remember, honey is a food. Keep everything it touches clean and tidy. Your family may be eating it tomorrow.
![]() Assemble everything you’ll need, check the weather and your neighbor’s activity, and if all’s clear, get everything to the colony.
Assemble everything you’ll need, check the weather and your neighbor’s activity, and if all’s clear, get everything to the colony.
![]() If you’ll be pulling only a few frames, put your container next to your colony with the lid off and nearby. Have frames ready to replace those you remove.
If you’ll be pulling only a few frames, put your container next to your colony with the lid off and nearby. Have frames ready to replace those you remove.
![]() If removing a whole super, lay down the extra cover, board, or sheet of plastic and have the top ready on the hive stand or in the cart.
If removing a whole super, lay down the extra cover, board, or sheet of plastic and have the top ready on the hive stand or in the cart.
![]() Prepare the fume board.
Prepare the fume board.
![]() Squirt or spray just barely enough of the repellent on the absorbent material inside.
Squirt or spray just barely enough of the repellent on the absorbent material inside.
![]() Err on the side of too little rather than too much—you can add more, if necessary.
Err on the side of too little rather than too much—you can add more, if necessary.
![]() Don’t smoke the front door.
Don’t smoke the front door.
![]() Do remove the cover, smoke, wait, remove the inner cover, and smoke again. You want the bees to begin moving down to the super below.
Do remove the cover, smoke, wait, remove the inner cover, and smoke again. You want the bees to begin moving down to the super below.

You’ll find frames that have what are called wet cappings, as shown at top, and dry cappings, at bottom. When bees place the wax covering over the cell filled with ripe honey, they either place the wax capping directly on the honey, giving the cap a wet appearance, or they leave a tiny airspace between the wax and the surface of the honey, giving the cap a dry appearance. Comb honey producers prefer the dry look, but neither wet nor dry caps have any effect on the quality or flavor of the honey.
![]() Waft two or three puffs over the top and place the fume board on top.
Waft two or three puffs over the top and place the fume board on top.
![]() Wait so the goal is known until … .
Wait so the goal is known until … .
![]() Check beneath the fume board to see if there are bees there.
Check beneath the fume board to see if there are bees there.
![]() If not, gently lift the super and look at the bottom. If you see bees, replace the fume board and wait a bit more.
If not, gently lift the super and look at the bottom. If you see bees, replace the fume board and wait a bit more.
![]() If after 10 or 15 minutes there are still bees on the bottom, add a tiny bit more repellent to the fume board.
If after 10 or 15 minutes there are still bees on the bottom, add a tiny bit more repellent to the fume board.
![]() Wait until the bees have cleared the super.
Wait until the bees have cleared the super.
![]() Remove the frames to be harvested or the whole super. Leave frames with unripe honey. (Ripe honey is covered with wax cappings.)
Remove the frames to be harvested or the whole super. Leave frames with unripe honey. (Ripe honey is covered with wax cappings.)
![]() Put full frames in the container and cover between adding another frame. Don’t start a robbing melee!
Put full frames in the container and cover between adding another frame. Don’t start a robbing melee!
![]() Replace frames removed with empty frames. Don’t leave an empty spot, even for a few days. Put frames with foundation only on the edges, moving frames with comb to the middle.
Replace frames removed with empty frames. Don’t leave an empty spot, even for a few days. Put frames with foundation only on the edges, moving frames with comb to the middle.
![]() If removing a whole super, place it on the board or plastic and cover it immediately.
If removing a whole super, place it on the board or plastic and cover it immediately.
![]() Apply Varroa treatment, if planned.
Apply Varroa treatment, if planned.
![]() Close up the colony.
Close up the colony.
![]() Move the honey and gear inside and pat yourself on the back.
Move the honey and gear inside and pat yourself on the back.
EXTRACTED HONEY
This is the most common form of honey, the one you’re already familiar with—the kind sold in a jar.
To produce liquid honey, give the bees frames with plastic foundation. They build beeswax comb on the foundation, fill the cells with honey, and cover them when the honey is less than 18 percent water (called ripe honey).
Then, remove the frames and remove the wax cappings, leaving almost the entire honey-filled comb intact on the frame. Save the beeswax and honey you remove for later use.
The honey-filled frames are then put into a machine, called an extractor, which spins the frames at a fairly high speed, so the liquid honey runs out of the cells and collects at the bottom. It works just like a salad spinner. Drain the honey into jars or pails and give the frames back to the bees for a time, so that they can clean up the sticky bits left in the box.
Extraction can be done whenever there is ripe honey to be removed. Most people who extract honey tend to bunch their activity so that the setup, extraction, and cleanup time is efficient. Also, larger extractors need a minimum number of frames to run.
Do your extraction in a basement or garage (but not kitchen). The first equipment you need to consider is a way to protect the floor, or better, a floor with a drain, which allows you to thoroughly wash the floor after extraction.
Supers with frames full of honey are brought in and set on some sort of catch tray—an overturned telescoping cover works—to keep drips from running out.
If you’re doing the extraction work alone, think through the process. Cappings are removed using a variety of tools, but most commonly a type of large knife or a device to punch holes in the cappings is used. For only a few frames (two or three supers), a serrated bread knife is usually sufficient. For more frames, a specially designed knife should be used; and for numerous frames (ten or more supers), a heated knife is best.
If using a knife, the cappings are cut or scraped off and fall into a tub or specially designed tank. Then the frames are placed in the extractor, spun, removed, and put back in the supers. Each step needs a plan. Where do the frames go after they are uncapped but before going into the extractor? They’ll fit into one of those tubs, if you have one. What if two people are working together? Is there room? Can the equipment handle double speed?
When you’ve finished extracting, put the supers or frames you extracted back on the colony and let the bees reclaim the sticky bits left behind. After a day or two, leaving the cleaned frames in the super, remove the super(s) used for storing surplus honey. This leaves the three brood boxes, where your bees will spend the next few months.
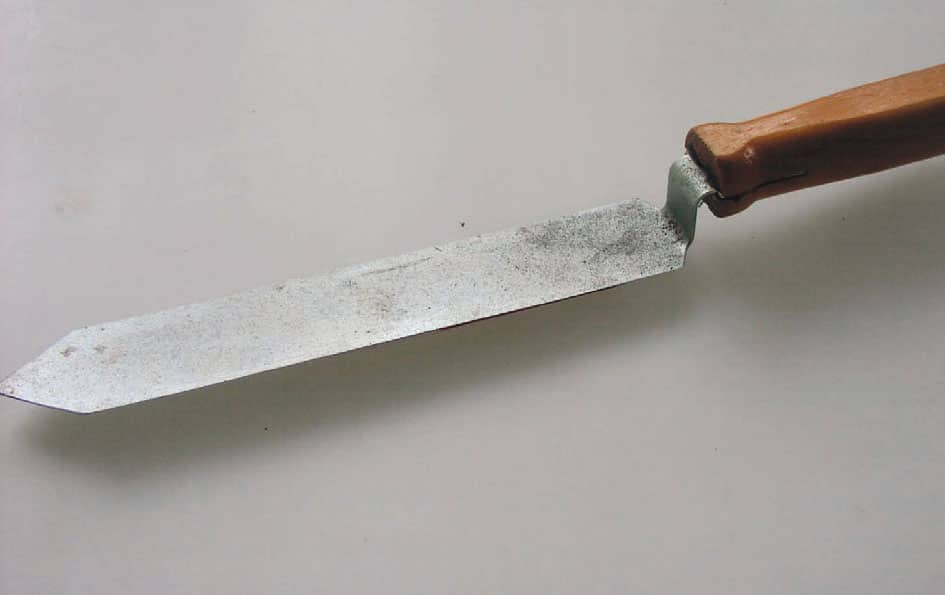
Uncapping knives range from heat-controlled units to heated units without controls to unheated uncapping knives (uncapping knives have offset handles so you don’t bump your knuckles on the frame as you remove the wax) to simple serrated kitchen knives, which work well for processing twenty to fifty frames.

This hand-powered extractor holds two frames at a time.
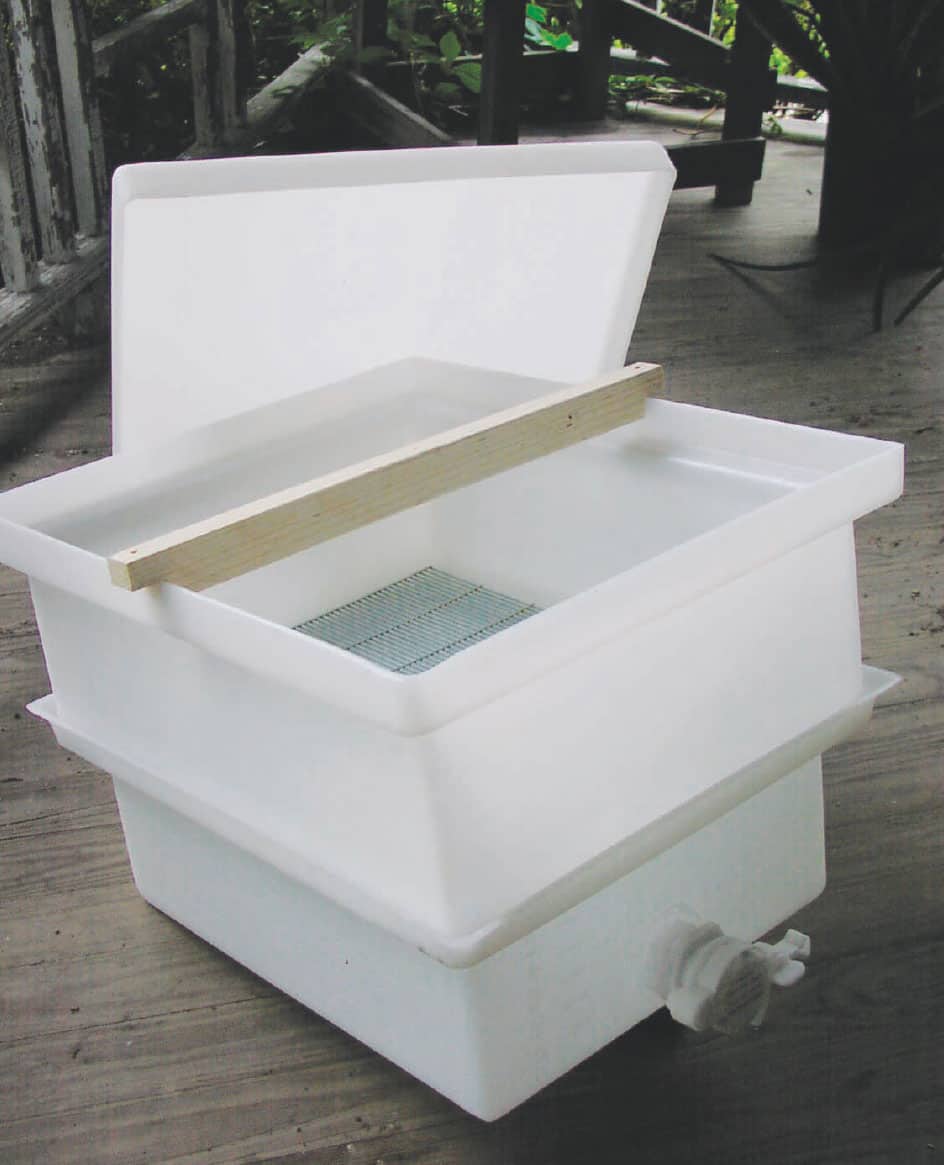
A practical uncapping tub has a large container on top to catch cappings and hold uncapped frames until ready for the extractor, a metal grid to support the cappings, and a holding tank below into which honey can drain. A valve drains honey from the bottom tank. A removable mesh liner filters the honey before it drains below so you don’t have to filter it again.

Cut the cappings off using a knife and let the cappings fall into the tub.
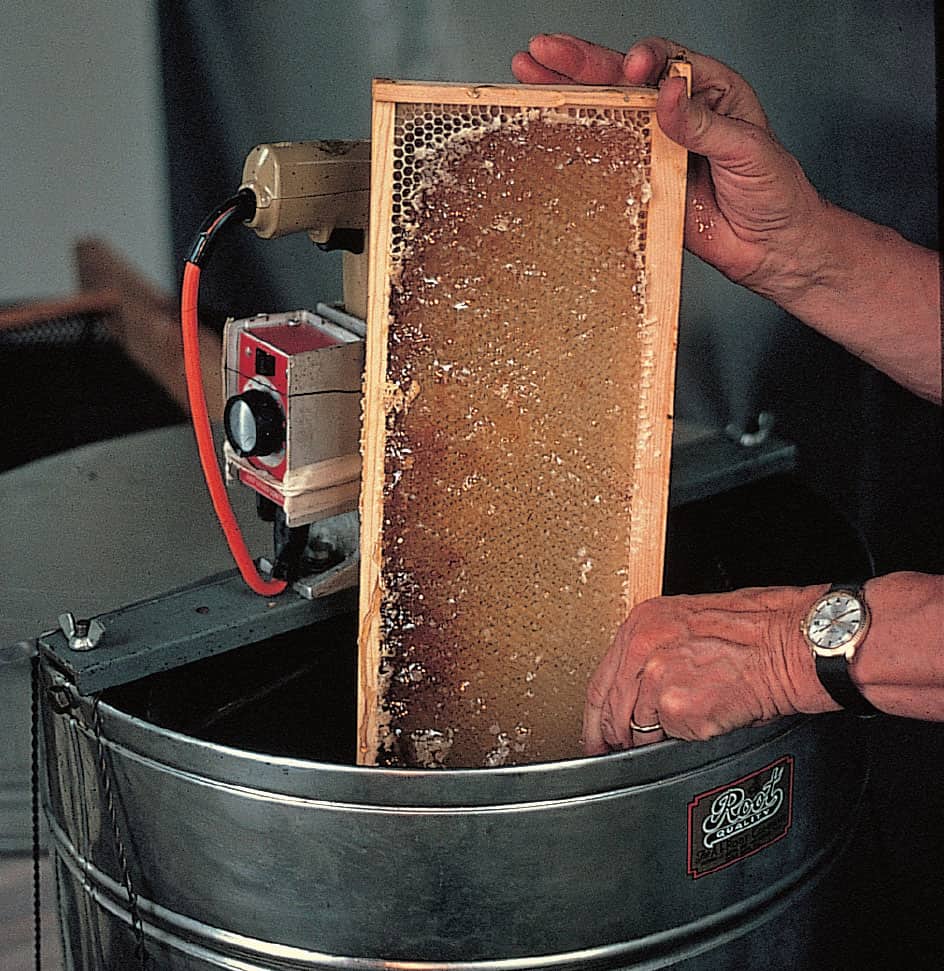
An uncapped frame, with honey ready to be removed.
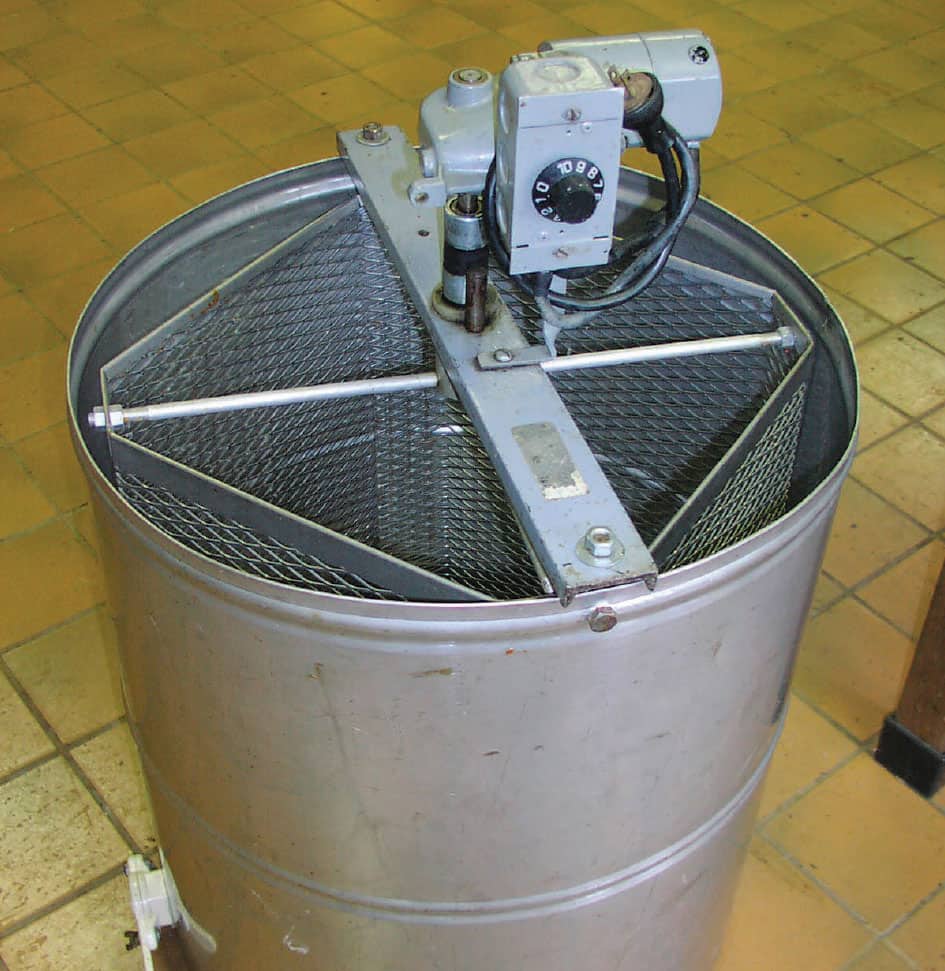
An extractor with a small motor makes the task much easier.
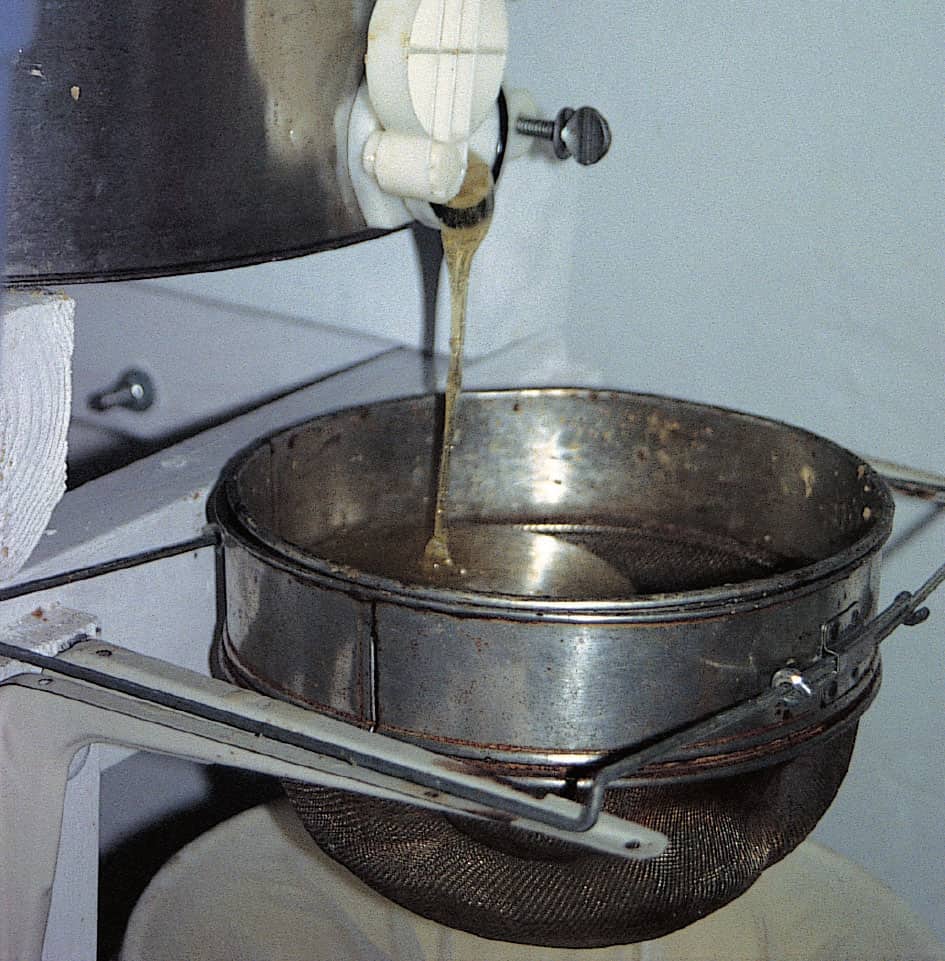
Drain the honey from the extractor and strain it to remove bits of wax, propolis, the errant honey bee, and the like. Many types of strainers are available. Most fit right on five-gallon (19 L) pails. Honey can be conveniently stored in reusable, clean 5-gallon (19 L) pails with lids. You can’t have enough 5-gallon (19 L) pails if you are in the honey business.
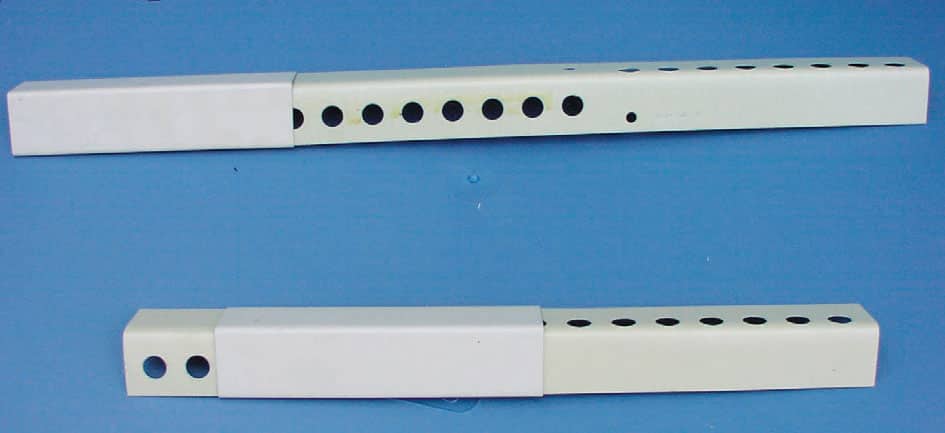
Mice can’t chew through an expandable, fits-all-hives guard such as this one. It’s the best there is.
FALL AND WINTER MANAGEMENT
Because you have been monitoring mite populations all summer, fall treatments should not be necessary. However, Varroa bombs or other issues may lead to too many mites and a treatment may be required. Most mites now will be adults, exposed because there isn’t much brood to hide in, so a quick treatment should work. If absolutely necessary, use a formic acid treatment for mites now as it will knock down adults and, if left on for only a week or even just a few days, it will damage many of the mites in cells also. This is not an ideal way to do this, but time is not on your side now, and the goal is to have your colony survive.
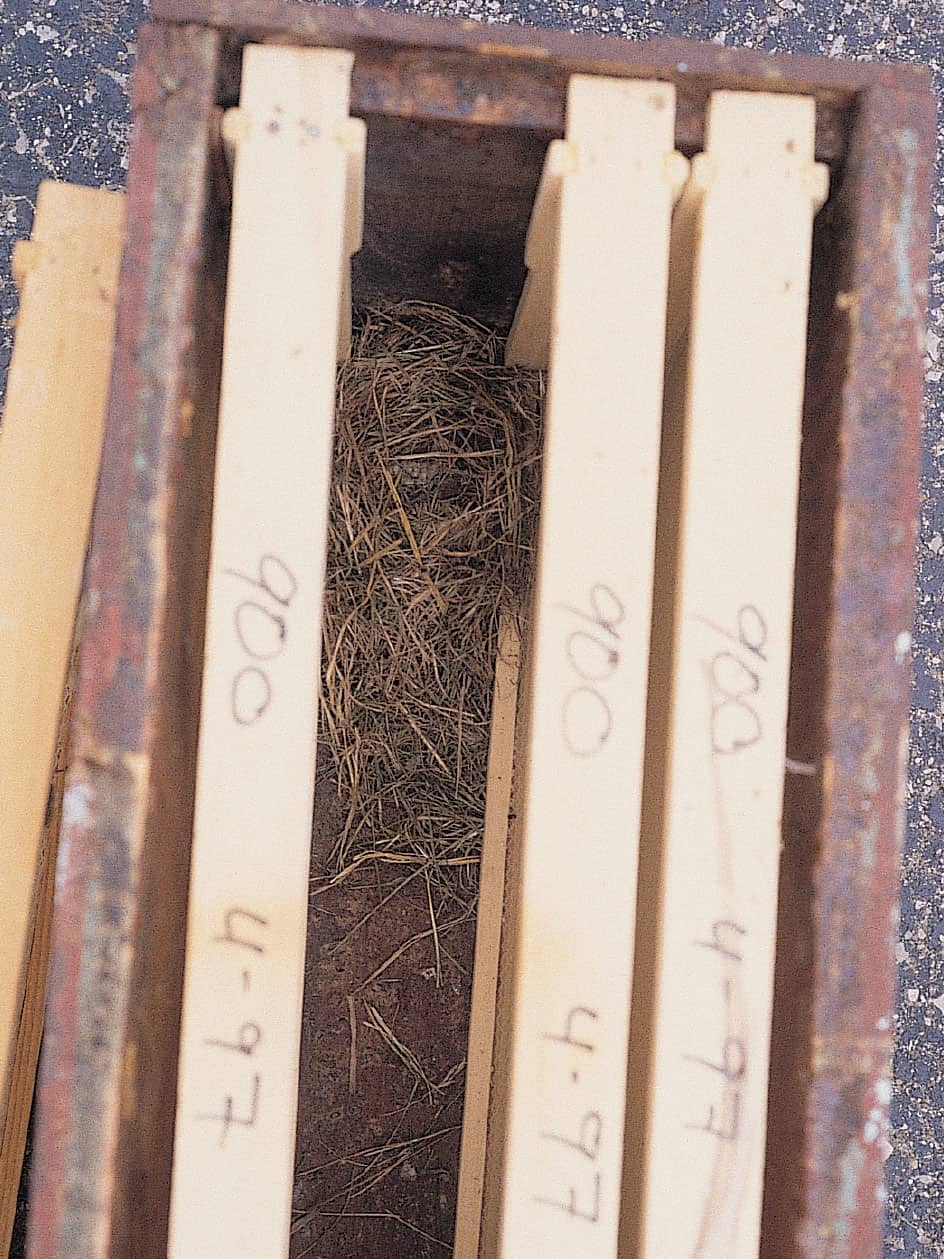
A mouse that gets into your colony will cause all kinds of trouble. It will destroy comb (even plastic foundation), defecate in the colony, and raise young in the nest material it brings in. Be sure you don’t put your mouse guard on too late in the fall and trap a mouse inside all winter.
Check also for diseases, the queen, brood pattern (there may be almost none this time of year, but look closely), and honey stores. Recall the 60 pounds (27.3 kg) or more the bees will need that should be stored in these three boxes. If the honey stores are insufficient, feed sugar syrup, or fondant to supplement their food stores.

Commercially available fondant, made from table sugar and high-fructose corn syrup, makes an excellent emergency winter food. It can be sliced and put in food storage bags until needed. It has the consistency of medium-hard butter. When placing it on the colony, cut one side of the bag corner to corner in an X shape so that the bees can get to it. It is all sugar, so you know how much you fed, and the bees relish it.
The sugar syrup you feed now, however, is a different mix than you used when establishing your package in the spring. Mix a thick 2:1 syrup—two parts (by weight or volume) sugar to one part water. Thick syrup has less water in it, and this time of year, the thicker the better. Thick syrup does not induce a buildup, but rather storing behavior, as if the bees were simply moving already-made honey. Thin, spring syrup imitates nectar, stimulating a nectar flow and buildup and queen activity laying eggs.
If you are feeding to get those 60 pounds (27.2 kg) or more of honey stored, don’t measure syrup; rather, measure the sugar used. Ten pounds (4.5 kg) of sugar in a gallon of syrup is only 10 pounds (4.5 kg) of sugar. Don’t skimp here.
When you’re finished feeding, the stored food should be at the sides of the broodnest and above the broodnest. And, the broodnest should be mostly in the bottom two boxes. Honey, then, should be in the outer two frames, plus some in the frames next to the outside frames. The top box should be almost all stored honey.
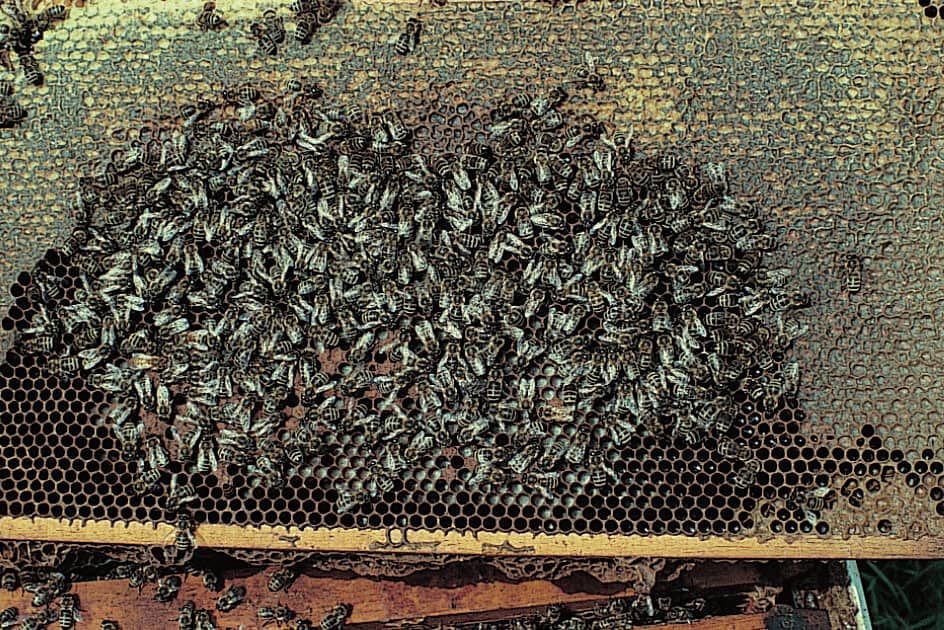
This frame has brood in the center and honey on the edges and sides and top. The honey stored here will feed brood during the winter.
You can estimate how much food remains by looking to see where the bees are anytime you check during the winter. The closer to the top they are, the closer they are to running out of food. There’s an old beekeeping axiom that says, “The top is the bottom, as far as food goes.”
If your bees didn’t read this, you may need to rearrange some honey frames while it’s still warm enough to do so to ensure this configuration is close.
By late fall, at least a full month before winter arrives according to the calendar, treatments should be complete and all assistance activities should be over. The last inspection makes sure enough food is available and the cover is secured with a brick to foil strong winter winds.
WINTER WEATHER PREPARATION
If you haven’t already, replace the board that covers the screened bottom board. To improve ventilation, some beekeepers leave the back third or so of the screen exposed (by using a shorter board). This increases the opportunity for ventilation as the warm internal air draws fresh air up from the outside. If you choose to do this, however, you must enclose the space between the screen and the ground below so you don’t get wind and blowing snow entering from below. Get mouse guards in place before mice move into your warm, dry, food-filled nesting spot. The expandable, metal types with holes rather than a slot are by far the best. The wood guards have slots, which are just not quite small enough to keep out a determined mouse.
If your colony doesn’t have a good windbreak, you can build a temporary one to help. A stack of straw bales on the windward side is one way, as is a temporary fence of horticultural burlap and a few fence posts. Even a few pallets held up as a fence will help.
Ventilation can be an issue in the winter. Without a vent for carbon dioxide and warm, moist air to escape, it will naturally accumulate inside. The carbon dioxide builds up, displacing some fresh air. But the warm, moisture-laden air comes in contact with the unheated sides and the bottom side of the inner cover and condenses—just like the fog that forms on a winter’s day window when you exhale near it.
The water that collects there eventually runs or drips down back onto the bees. If you can, imagine a cold shower on a cold winter day in an unheated house. The bees struggle to stay dry and keeping warm becomes even more problematic.
This situation can be avoided by what at first may seem a counterproductive technique. First, as you are preparing your colony for winter—checking food stores, health, and the rest—turn the inner cover so the flat side is up. Then, between the inner cover and the edge of the top super, place a pencil or any block of material that raises the inner cover 3/8” (1 cm). Replace the inner cover and the cover over that when complete. Add a brick to hold the cover in place if winter winds tend to be blustery.
If you haven’t already, tilt your colony forward just a bit by raising the back 1" (2.5 cm) or so. A 1" (2.5 cm)-thick board works well. The colony should have this forward slant so that melting snow or winter rains don’t run into the colony and collect on the bottom board.
When all the chores are done, all the equipment double-checked, the beeyard policed (any extra equipment removed), the weeds trimmed for the last time, and the bees as snug as they can be, it’s time for you to take a break. You’re finished for a while.
EARLY SPRING INSPECTIONS
If you can, time this first quick inspection at least a month to six weeks before nectar and pollen start coming in.
The bees are probably already raising brood, and the stress this puts on the colony has begun. Double-check for food, using sugar syrup or fondant as needed, depending on the weather. Pick the warmest day you can—around 40°F (4°C) or warmer—and open the colony to see where the bees are, whether brood is present, and how much food is available. Don’t do a lengthy inspection, but do check on those three things.
As early as you can, monitor for Varroa. If mite populations indicate a serious problem, which is unlikely, the best treatment you can do now is an oxalic acid vaporization because there is very little brood and any mites are exposed to the killing vapor. Oxalic acid doesn’t harm mites in the cells, so most of the mites are exposed and vulnerable. Be aware of newer oxalic treatments that enable the evaporation of the acid over time, extending the efficacy and duration of the treatment while still not contaminating wax or injuring bees. Pay attention to journals and at your club meetings.
If the weather’s warm enough, you can remove all the boxes and clean the bottom board screen, removing the insert to allow additional ventilation. It will probably have an accumulation of wax cappings, dead bees, and other material on it, all of which need cleaning off before storing for the summer. (Remember to collect what you scrape out, because if left near the hive, the scrapings will attract skunks and raccoons.) Remove the mouse guard and put the inner cover back without the ventilation spacer, flat side down, when you reassemble the colony.
If there are no bees in the bottom box, or even bottom two boxes, move the upper box with the bees down to your now clean bottom board, and place the two empty boxes above that. Bees will move up as they expand their nest, and this gives them room to expand. If you have a box of honey left, put that on the bottom, the bees in the middle, and the empty box on top. (With two boxes of bees, both full boxes will be on the bottom, the empty on top. Just make sure that the room they’ll need is above them.)
If you need to rearrange frames, put honey on the sides, brood in the center, but, and this is important, leave empty frames in the middle of the brood so there’s room to grow, all in the middle of two boxes. Visualize that the food should be close to the brood, all the brood and expansion space together in the middle, and empty space above. Pollen frames should stay next to the brood, too. The bees will rearrange and straighten out what you messed up, but keep checking to make sure there is not a ring of honey across the top of the brood area below. That will slow the queen’s laying because she’ll run out of space, and crowding will occur. Also, don’t put empty comb in the middle of the brood area, dividing the brood. This will force the bees to choose should you have a cold spell.
LOOK OUT FOR SWARMING
A healthy overwintered colony with frames of drawn comb, plenty of food, an expanding population, and a year-old queen is prime for swarming. Recall what motivates a colony to swarm: perceived limited space, lots of brood including lots of drone brood, lots of adult bees including lots of drones, an aging queen producing diminished or irregular queen pheromone, a strong honey flow just beginning, and cooperative weather. If you wish to control or prevent swarming, those are the factors you need to address.
One way to prevent a swarm is to requeen every year. Order your queens before the end of the previous year so you don’t have to wait for a delivery date to open up. Have her arrive when the Varroa mite treatments are complete (if you needed to do that), when the antibiotic treatments are complete (if you did that), or almost (but not quite) as early as the queen producer can deliver. In fact, here’s where patience is not only a virtue but often a colony-saving activity. Early spring in queen-producing areas offers unpredictable weather, and with that comes unpredictable queen mating opportunities. Cold, rainy weather reduces flight times or cuts them off completely. Waiting for the third flush of queens from a supplier, rather than the first goes a long way in making sure you receive a well-mated, healthy queen. Be patient.
Unpredictable weather, not enough time, and luck sometimes foul the best of intentions at swarm management, and the subtle steps toward swarming kick in before you can act.
You’ll see queen cells hanging from the bottom of brood frames, little or no open brood, and little activity. Once the queen cells are capped (nine days from egg to sealed cell), the door opens and the swarm takes off.
If all the queen cells are still uncapped (or all those you can find), you can make a split of the colony and, maybe, thwart the swarm. Once queen cells are well started, the colony is probably going to swarm. Watch for it and perhaps you can retrieve it.
There are as many techniques to control swarms as there are beekeepers, but the best choice is to prevent the behavior before it begins.
MAKING AN EARLY SPRING SPLIT
If expansion or swarm prevention is in your plans, early spring is the time to consider this activity. If your colony has at least four frames with open brood and four with sealed brood, you can divide the colony into two, much like dividing a daylily or other perennial.
Have ready a screened bottom board, four medium supers (two with frames), an inner cover and cover, and a feeder for the split colony. Order a queen to arrive close to the time you want to do this. Here, early queens are necessary and can be a risk. Watch them carefully.

Swarms leave the nest and fly a short distance to get organized, making sure the queen is with them, and evaluating the places scouts have found that they may soon call home. Often, they land high—the tops of trees, the sides of buildings, church steeples—but they can land just about anywhere imaginable (car bumpers, bushes, beneath picnic table benches).
When the queen arrives, assemble all the equipment near the colony you want to divide. Shoot for late in the day so as many bees as possible are home. Place the bottom board on the hive stand and an empty super (keep the frames close) on top of that.
Smoke your existing colony—now called the donor colony—remove the cover, inner cover, and top box, and locate the box below with the most brood.
From the donor colony, carefully remove two frames (three are okay, too) of open brood (there may be some sealed brood in the center), complete with the bees that are on the frames. Make sure the queen isn’t on any of the frames you move—if you find her, let her run back into the box. Put those frames in the center of the split box. On either side, place frames with sealed brood and the bees from the donor colony. This should give you four or five frames of brood and some bees. Take another frame of open brood, hold it over your new box, and give it a good downward shake so that most of the bees fall off and into the box. You may need to do this two or three times to get enough bees in the box.
Add one frame of honey and one of honey and pollen on either side of the sealed brood for convenient feeding.
When complete, replace frames on the edge in the bottom box of the new colony, put another box with frames (drawn foundation are better, with three or four borrowed from the top box of the other colony), install the new queen using the techniques explained earlier, put on the inner cover, the feeder (filled with 2:1, water–sugar), and close it up. Place a wooden entrance reducer in the split box entrance hole so only the smallest opening is available, stuff some grass into that hole, and leave it closed for at least 48 hours. Best, if possible, is to do this as late as possible on day one, and let the bees open it up. But try to keep them in at least two days, and if the weather is iffy, three is just fine.
Close up the other colony, first pushing together the remaining brood frames and replacing those missing on the edges. You now have two colonies where there was only one before. This is also a good time to requeen the donor colony. Ordering two queens isn’t a bad idea. And, if one doesn’t work out, the two colonies can be rejoined as a single unit.
After the right amount of time, make sure the new queen is released and begins laying. Once that’s under way, treat your new colony like your package and enjoy watching the growth.