
Catalyst projects are ultimately compiled and published as SWF files to be run in Adobe Flash Player. While many advanced applications are being developed in tools such as Catalyst and Flash Builder, Flash is still best known as an animation platform. Because Flash Player is the eventual target for your project, you can apply animation effects to add more visual interest or interaction to your application.
You can use Actions to add animation directly within Catalyst, or you can create more complex, advanced animations in Adobe Flash Professional and import them into your project.
You can add action sequences to any component. You begin creating an action sequence by following these steps:
Open the Interactions panel (see Figure 11.1).
From the Add Interaction menu, select the event that you want to use to trigger the sequence.
Select Play Action Sequence.
Once the sequence has been defined in the Interactions panel, it is added to the Timeline, where you can add actions and set their timings.

The primary panel used to work with animation in Catalyst is the Timeline, which is located along the bottom of the screen (see Figure 11.2).
The Timeline displays states, action sequences, and SWF controls. The left side of the panel displays any states or sequences you have created in your project and includes a filter text box along the top to help you find particular states or sequences.
The main portion of the panel displays the animation. The component to which you will be applying the animation appears on the left, while each action displays as a bar under the time scale.
Timing in Catalyst is measured in seconds. You can drag the slider at the bottom of the panel left to zoom out on the Timeline or right to zoom in.
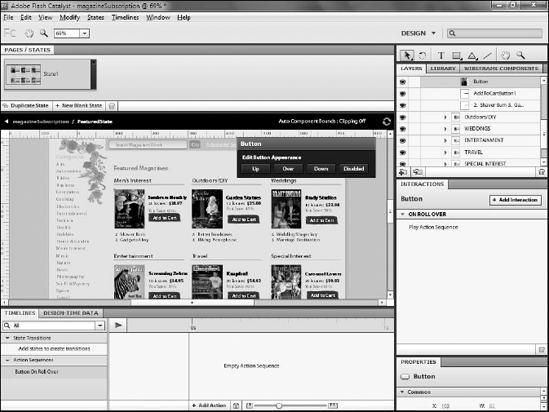
The Add Action menu at the bottom of the panel allows you to select an action to add to the sequence. You can add as many actions as you want (see Table 11.1 for available actions).
Note
See Chapter 13 for more details on inserting and working with Flash SWF files in Catalyst projects. See Chapter 14 for details on inserting and working with video.
Table 11.1. Actions
Description | |
|---|---|
Video Control | Starts a video within a video player. |
Video Control | Pauses a video in a video player. |
Video Control | Stops a video in a video player. |
SWF Control | Starts a SWF movie. |
SWF Control | Stops a SWF. |
SWF Control | Moves the playhead in an embedded SWF to the specified frame and plays the movie. |
SWF Control | Pauses a SWF movie. |
Set Component State | Sets the component to a specified state. Only available if the target component contains multiple states. |
Set Property | Allows you to set a property of the component to a new value. |
Fade | Fades the component out. |
Sound Effect | Plays a sound. |
Move | Moves the component down and to the right. |
Resize | Resizes the component. |
Rotate | Rotates the component 90 degrees to the right. |
Rotate 3D | Rotates the object in 3-D. |
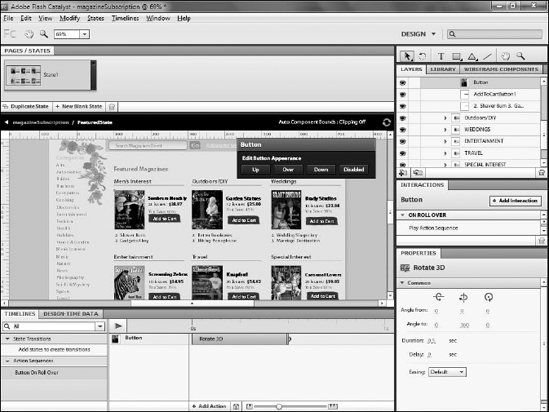
After you add an action, you can configure it using the Properties panel (see Figure 11.3). Each action has distinct properties that can be configured. Each action has its own properties, which are outlined in the following sections.
The Set Component State action produces an effect similar to the Play State Transition interaction. The action, however, gives you more control over the state change by allowing you to set a delay.
The Properties panel allows you to set the component to which you want to change, and the delay, in seconds, before the state change occurs. This action can be particularly useful if you want to have the component change states following another action, such as a video playing.
The Set Property action allows you to change either the Enabled or Alpha property of a component. If you set Enabled to False, your user cannot select or otherwise interact with the component. If the component is a button, you can design its Disabled state.
Note
See Chapter 9 for details on designing the Disabled state of a button.
The Alpha property allows you to set the transparency of a component. You can set the property to a value between 0 and 100, with 0 completely transparent and 100 completely opaque. For either property, you can set a delay to determine how many seconds elapse before the property change takes effect.
The Fade action functions much the same as Alpha but provides greater control. Using the Properties panel, you can control the starting and ending transparency of the object. You can also set the fade's duration and delay, and you can choose to have the effect repeat.
The Fade action also allows you to set up easing. Easing allows you finer control over the timing of the effect. Most of the time, components will fade in at a constant rate. Applying easing allows you to vary this rate, so that the component can for example begin fading in slowly and then gradually speed up. Table 11.2 outlines the easing values available.
Tip
Both the Fade and Set Property actions allow you to create semitransparent components. The difference between them is that the Set Property action happens instantly, while the Fade action animates the transparency.
Table 11.2. Easing Values
Value | Description |
|---|---|
Linear | The effect begins slowly and then gradually speeds up, or vice versa; it can begin quickly before gradually slowing down. |
Sine | The timing roughly follows a sine curve. Unlike Linear, Sine easing has no plateau the effect will always be either speeding up or slowing down. |
Power | Power easing is very similar to Sine easing, only more pronounced. |
Elastic | The effect will speed up, slow down, and speed up again. When used with Fade, the component will quickly disappear, reappear, and disappear again. |
Bounce | Bounce is a similar effect to ease, but less pronounced. A Fade with Bounce easing applied will quickly fade out, then in, then out. |
The Sound Effect action allows you to play an imported sound. When you select this action, the Select Asset dialog box appears (even though you are not selecting anything visual), displaying the assets in your library.
Previously imported sounds will be in the Media folder. If you have not imported sounds, you can click the Import button to do so now.
Note
See Chapter 15 for details on importing sounds into your project.
The Properties panel for sounds displays the source sound file. You can click the name of the sound in the panel to reopen the Select Asset dialog box if you wish to change to a different sound file. You can also set the duration that the sound will play and the delay.
With the Move action, you can have a component travel from one location on your artboard to another.
The Properties allow you to set an X and Y coordinate for the end location of the move, and to determine whether those coordinates should be relative to the object's starting point or an absolute location on the artboard. The 0,0 point for the artboard is the top-left corner.
As with the Fade action, you can set a duration and delay, and apply easing, which provides the same settings outlined in Table 11.2.
The Resize action is unique among Catalyst's actions in that it can only be applied to assets within a component and not the component itself. Its options are the same as the Move action.
The Rotate action spins the target component. Its properties allow you to set the angle of the rotation, either from its starting point or to a specific angle. As with Move, Resize, and Fade, you can also set the duration and delay, and apply easing as outlined in Table 11.2.
The Rotate 3D action leverages Flash Player 10's 3-D animation capabilities. You can set the Angle From and Angle To of each of three axes:
Horizontal
Vertical
The imaginary third axis that allows for the 3D effect. You can see this as an imaginary line that passes perpendicularly through your monitor, both straight towards you and straight away from you. In reality, objects moving along this axis will be resized proportionally to create the illusion of moving closer to you or further away from you.
You can also set the duration and delay, and apply easing.
When you apply one or more actions you can control their timing on the Timeline. You can drag actions left or right to determine their starting and ending times; drag the right edge of the bar representing the action on the Timeline to increase or decrease its duration.
Tip
There is no difference between dragging an action on the Timeline and adjusting its delay in the Properties panel, nor is there any difference between dragging its right edge and adjusting the duration on the Properties panel. As Set Property actions cannot have durations, you cannot drag their right edges.