
We now need to allow our users to insert new data and edit or delete existing records in the database.
The first step is creating the asynchronous method that will add a new record to the places table. This will take an instance of Place, and call the insert() database helper method to add the new place. Add the following code in the DbHelper class in the dbhelper.dart file:
 Future<int> insertPlace(Place place) async {
     int id = await this.db.insert( 'places',
         place.toMap(),
         conflictAlgorithm: ConflictAlgorithm.replace,
     );
     return id;
 }
Both the insert and edit functions require some user interface (UI) that can contain the text that the user types. We'll use another dialog box for the add and edit features, and proceed as follows:
- Let's create a new file, called place_dialog.dart, in the lib folder of our app. Here, we want to show our user a dialog window that allows them to insert or edit a Place, including its coordinates. This dialog will be called from the main screen when the user wants to add a new Place.
- At the top of the new file, we'll import the required dependencies—material.dart, our dbHelper, and the places.dart file, as follows:
import 'package:flutter/material.dart';
import './dbhelper.dart';
import './place.dart';
- Then, create the class that will contain the UI for the dialog, as follows:
class PlaceDialog{}
- For this class, we want to show the user some text boxes. So, at the top of the PlaceDialog class, let's first create three TextEditingControllers that will contain the name and coordinates of the Place, as follows:
final txtName = TextEditingController();
final txtLat = TextEditingController();
final txtLon = TextEditingController();
- Next, we'll create two other fields for this class: a Boolean telling whether this is a new place, and a Place object, as follows:
final bool isNew;
final Place place;
- When PlaceDialog gets called, we want it to always receive a Place and a Boolean telling whether the Place is new, so we'll create a constructor that takes both parameters, like this:
PlaceDialog(this.place, this.isNew);
- Then, we'll create a method called buildDialog() that will take the current BuildContext, which, in Flutter is required to show a dialog window. The buildDialog method will return a generic Widget, as follows:
Widget buildAlert(BuildContext context) {}
- Inside the buildDialog() method, first, we'll call the DbHelper class. Here, we don't need to call the openDb() method, as, from this window, we already know that it's been called previously, and we are receiving an existing instance of the class, as shown in the following code snippet:
DbHelper helper = DbHelper();
- Then, we'll set the text of the TextEditingController widgets to the values of the Place that was passed, as follows:
txtName.text = place.name;
txtLat.text = place.lat.toString();
txtLon.text = place.lon.toString();
- Finally, we can return the AlertDialog that will contain the UI that our users will see, as follows:
return AlertDialog();
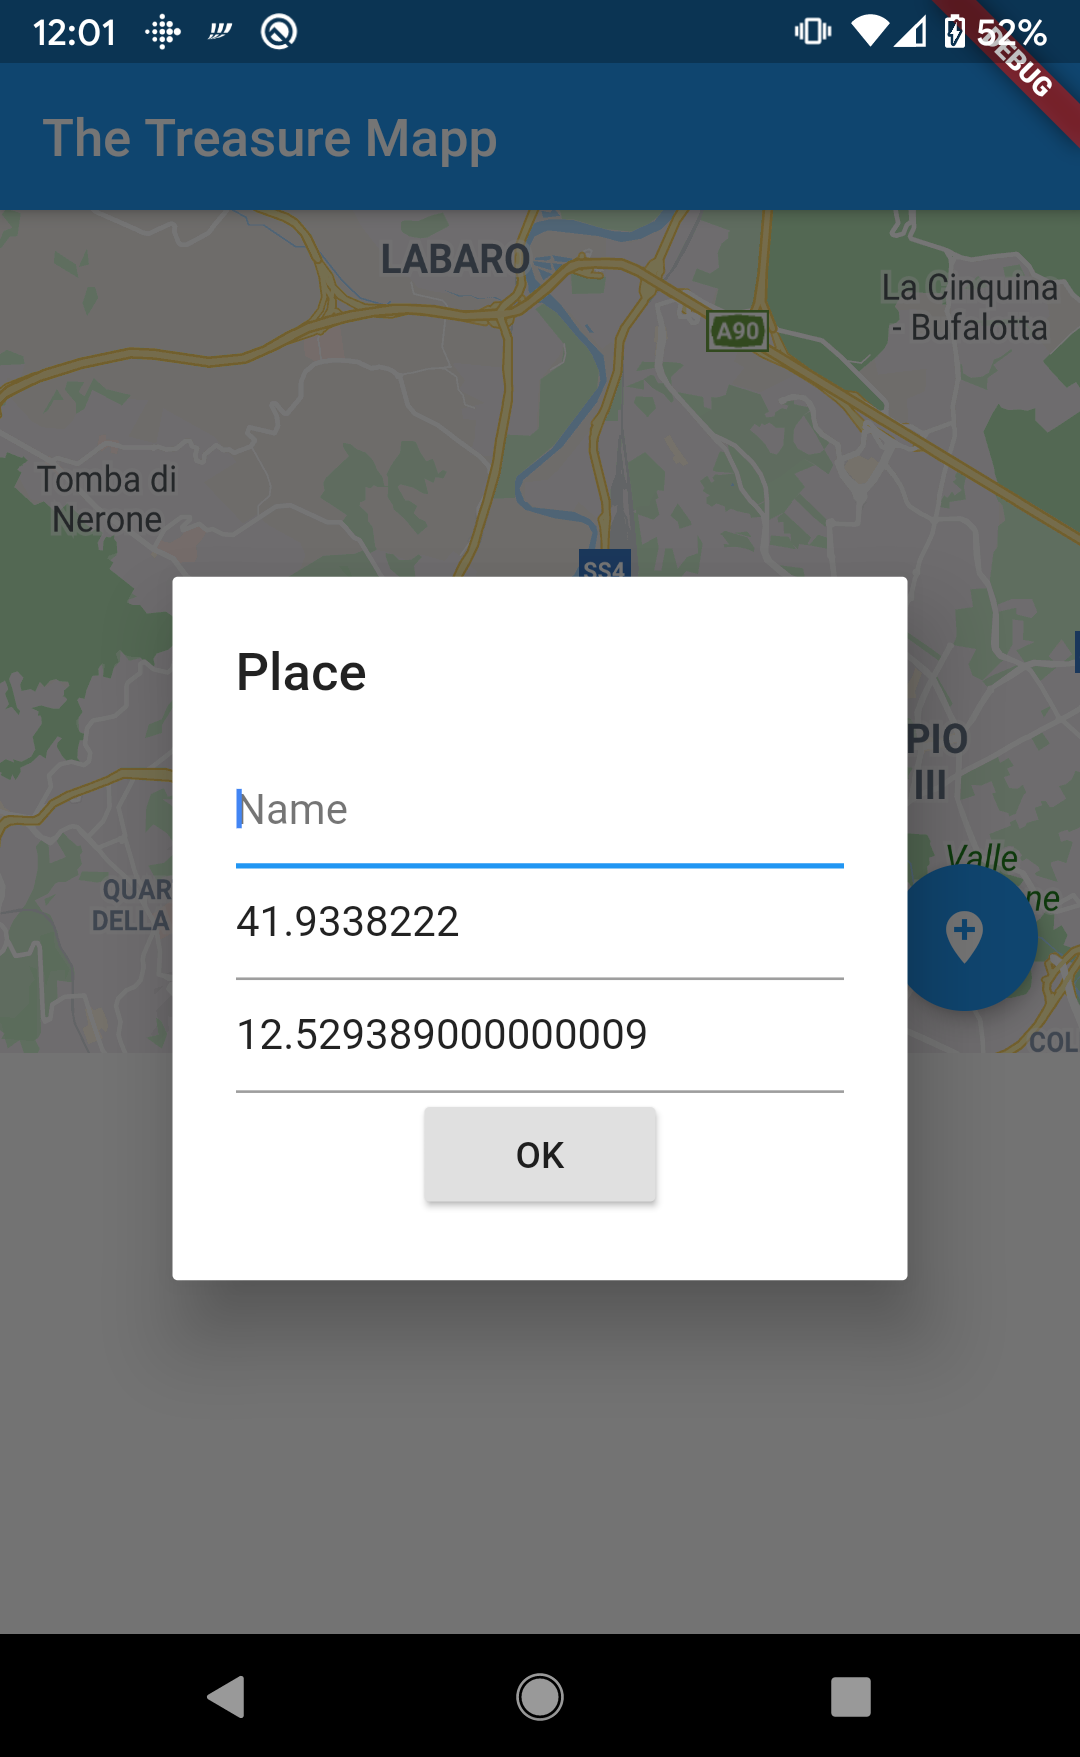
- The title of the AlertDialog will simply be a Text widget containing 'Place', as illustrated in the following code snippet:
title: Text('Place'),
- For the content, we'll place all the widgets into a SingleChildScrollView, to make scrolling available in case the widgets do not fit into the screen, as follows:
content: SingleChildScrollView()
- Inside the SingleChildScrollView, we'll place a Column, as we want the widget in this dialog to be placed vertically, as follows:
child: Column(children: <Widget>[]),
- The first element inside the Column will be three TextField widgets—one for the name, one for the latitude, and one for the longitude. After setting the relevant controller, for all the TextFields, we'll set the hintText of an InputDecoration object to guide the user in using the UI, as follows:
TextField(
    controller: txtName,
    decoration: InputDecoration(
        hintText: 'Name'
    ),
),
TextField(
    controller: txtLat,
    decoration: InputDecoration(
        hintText: 'Latitude'
    ),
),
TextField(
    controller: txtLon,
    decoration: InputDecoration(
        hintText: 'Longitude'
    ),
),
- Later on, we'll also add an image here, but for now, let's place a RaisedButton as the last widget of the Column. When pressed, all changes will be saved. The child of the button will be a Text with an 'OK' String. In the onPressed property, we will update the Place object with the new data coming from the TextFields, and then we'll call insertPlace() on the helper object, passing the Place containing the data in the TextFields.
- Finally, we'll call the pop() method of the Navigator to close the dialog and return to the caller, which at the moment is the map screen, as follows:
RaisedButton(
    child: Text('OK'),
    onPressed: () {
        place.name = txtName.text;
        place.lat = double.tryParse(txtLat.text);
        place.lon = double.tryParse(txtLon.text);
        helper.insertPlace(place);
        Navigator.pop(context);
    },
)
The next step is calling the dialog from the map. I'd say that adding a new place from the map is the main action of the screen, so we can add a FloatingActionButton widget to the Scaffold of the _MainMapState class.
Back in the main.dart file, in the build() method of the _MainMapState, when we call the Scaffold, let's add a floatingActionButton parameter that will contain a FloatingActionButton widget. There's an icon called add_location that's perfect for our purpose, and we'll use this as a child.
When the user presses the FloatingActionButton, first, we'll find the marker whose markerId contains the String currpos that contains the current position that we found previously. If this marker isn't found, we just create a LatLng object with 0 as latitude and longitude.
In case the Marker containing the current position is found, we'll get the coordinates on a LatLng object, and we'll create a Place object with the current position.
Next, we create a PlaceDialog instance, passing the place and a true value, as this is a new Place. Finally, we'll call the showDialog() method, passing the current context, as shown in the following code block:
 floatingActionButton: FloatingActionButton(
        child: Icon(Icons.add_location),
        onPressed: () {
          int here = markers.indexWhere((p)=> p.markerId ==
          MarkerId('currpos'));
          Place place;
          if (here == -1) {
            //the current position is not available
               place = Place(0, '', 0, 0, '');
          }
          else {
          LatLng pos = markers[here].position;
             place = Place(0, '', pos.latitude, pos.longitude, '');
          }
          PlaceDialog dialog = PlaceDialog(place, true);
          showDialog(
            context: context,
            builder: (context) =>
                dialog.buildAlert(context));
      },
 )
If you try the app right now, you should see a new FloatingActionButton, and, when you press it, you should see the dialog with the current coordinates, as shown in the following screenshot:
And if you insert a name and press the OK button, the new place will be saved into the database. Now that we can add a new Place to our list, we also need a way to edit and delete saved items from the database. Let's do that next!