

Chapter 2
Basics of JavaScript for Animation
What we'll cover in this chapter:
- Basic animation
- An introduction to HTML5
- Animating with code
- JavaScript objects
- User interaction
If the first chapter is a somewhat philosophical overview of animation, this one is a technical overview of what it takes to create an HTML5 document and how to animate using a canvas element and JavaScript. This chapter covers the essentials of document structure, animation loops, JavaScript objects, and user interaction. The techniques you learn here are used throughout the rest of the book.
Basic animation
To start off, let's review what Chapter 1 covers:
- Animation is made with frames, and each frame is slightly different in presenting the illusion of motion.
- Frame-by-frame animation contains an image or a description of an image for each frame.
- Dynamic animation contains an initial description of an image and rules that are applied to alter the description on each frame.
This book focuses on the rules for dynamic animation, providing different techniques to change the image description, which results in realistic motion. In this chapter, you see how to structure the initial description, how to apply those rules on each frame, and how to tie the program together. You will create plenty of working examples as you progress.
An introduction to HTML5
In this book, we create HTML5 documents that are viewed in a web browser. HTML5 is the latest iteration of HTML, Hypertext Markup Language, a language for structuring and presenting content for the World Wide Web. HTML elements are the building blocks of web pages. At the time of writing, the HTML5 specification is still in development, but a number of features are considered stable and ready to use, such as the canvas element. HTML5 improves on HTML4, which was standardized in 1997, by adding new elements and support for multimedia content, such as audio and video. Because these new, semantically meaningful elements expose properties and controls that are accessible in the document, you can manipulate them programmatically using JavaScript, giving you a powerful way to control and create media.
HTML5 is a collection of individual features. When assessing a particular browser's HTML5 support, this is not an all-or-nothing classification; rather, you test if a browser supports a specific feature of the defined specification. Different browsers have different support for different features. This can make it difficult to target individual HTML5 elements without knowing how a user will view the document. As browsers continue to improve, cross-platform feature detection becomes less of a concern, but for now, you should always test the user's web browser for the HTML5 features you target and provide a backup solution if it fails—even if it's just a politely worded message instructing your user to upgrade his browser.
Canvas support
The good news, at least for this book, is that all the major browser vendors have implemented support for the canvas element. This means that you can be relatively confident that your user can see the animation you create, provided she has upgraded to a recent version of her browser. Games and animations provide an excellent way to push users into upgrading their browsers, because, after decades of video games, most people understand that cutting-edge graphics require the latest hardware and software. At least it's easier to convince someone to upgrade her browser rather than buy a brand new gaming console.
In case the canvas element is not supported in a web browser, in your HTML document, you can provide backup content by including it within the canvas tags:
<canvas width="400" height="400">

  <p>This browser does not support the<code>canvas</code> element.</p>

</canvas>
The warning message appears only if the browser does not recognize the canvas tag. If the browser does support it, then it renders the canvas element and ignores the nested <p> element.
To programmatically test whether the browser supports the canvas element, you can add the following JavaScript to your document:
if (document.createElement('canvas').getContext) {

  console.log("Success! The canvas element is supported.");

}
This code creates a new canvas element and tests for the existence of its getContext property, which the object has if it's a valid HTML5 canvas element. If the browser does have support, it prints a message to the debugging console letting you know.
Table 2-1 lists the most popular web browsers and the minimum version required for basic support of the canvas element.

Performance
Programming graphics has always been—and for the foreseeable future, will be—a very computationally demanding operation. The reason is simple: The more you can do, the more you want to do and the more demands you place on the performance of the system. The past 25 years of video game history has been an amazing journey of technical advances, evolving from the blocky characters featured in dedicated arcade machines, to fully immersive 3D worlds run on today's consoles. But still, we want more. Sometimes we judge computer animation against features of the natural world: character realism, lighting effects, and physics. It's quite a marvel that these simulations can hold up to the scrutiny of human perception, and yet, they often do. We're still at the dawn of computer animation, and as long as computers keep getting faster—with the help of Moore's Law—and developers keep refining their techniques, our abilities for visual creation in the future seem almost unlimited.
But animation on the web using the canvas element is at the incubation stage, only now considered a viable alternative to using plug-ins like Adobe Flash. In recent years, developers have pushed the boundaries of speed and performance in web browsers and JavaScript engines, and because this is still a highly competitive area, we can look forward to more optimizations and improvements to come.
The examples in this book are written so they run at a smooth, reasonable performance on a relatively modern computer and web browser. The capability of your computer will differ from mine, so as you examine the source code in this book, feel free to adjust the values so the examples run smoothly on your machine. Plus, there is no better way to learn how the formulas work than by experimenting with their parameters and observing the output.
However, before you share any animations with the world, test them on as many different devices as you can. As more people use mobile phones and tablets—instead of more traditional desktop computers—to access the web, developers need to account for a wide range of device performance differences. Testing and measuring on all these platforms is the only way to ensure your code remains performant.
A basic HTML5 document
One of the best parts of web development is how easy it is to create and view a document—all you need is a text editor and a web browser. This simple snippet provides the setup for all of the examples contained in this book. After you walk through the structure of these elements, we'll add a couple of minor additions for clarity, but this is the basic HTML5 file you will use:
<!doctype html>

<html>

 <head>

  <meta charset="utf-8">

  <title></title>

  <link rel="stylesheet" href="style.css">

 </head>

 <body>

  <canvas id="canvas" width="400" height="400"></canvas>

  <script>

  window.onload = function () {

    //Our code here...

  };

  </script>

 </body>

</html>
Save this file as 01-skeleton.html and load it in your web browser. You won't actually see anything because it's a blank document, but the page did load and is a completely valid HTML5 document. (You can always view the source in your browser to confirm that something is there.)
Now let's go through the elements step by step. The first line simply declares that this is an HTML5 document type. If you have any familiarity with all the various HTML4 document types, you'll see that this declaration is quite simple:
<!doctype html>
Next, we declare the root html element and the header:
<html>

 <head>

  <meta charset="utf-8">

  <title></title>

  <link rel="stylesheet" href="style.css">

 </head>
At the top of the head element, set the document character encoding to utf-8. UTF-8 is an encoding for Unicode, which is a universal character set that defines the characters used in most of the world's languages. The browser uses this encoding to read the characters from a file and display them as properly formatted text. These documents are stored in a sequence of bytes contained in a file on a server somewhere, transmitted across the network, then reassembled on the client's computer and displayed in a web browser. The character encoding tells the browser how to convert this sequence of bytes into a sequence of characters, which is then processed and displayed as a web page. If you don't include the encoding declaration, the browser might attempt to guess the character encoding of the file (wrongly), or use a default setting (wrongly), causing the page to display incorrectly. It's best to explicitly set the character encoding here and avoid the potential confusion.
All valid HTML5 documents contain a title element, which is also placed in the header. Because we use a CSS stylesheet, create a link element that points to an external file. This contains the style definitions for our document; we'll look at the style.css file in a moment.
With the header set, let's look at the rest of the document:
 <body>

  <canvas id="canvas" width="400" height="400"></canvas>

  <script>

  window.onload = function () {

    //Our code here...

  };

  </script>

 </body>

</html>
In the body element, we place a canvas element. This is what we draw to and reference from our scripts. Give the canvas an id name and a height and width value so you can see it, and use its id to access the element with the DOM interface.
After the canvas element, add a script tag that includes the JavaScript code for each example. We've placed the script after the other elements, right before the closing body tag, so that the browser loads the rest of the document before executing the script. Also, if the script is loaded from a file—possibly from a different server—it won't hold up the rest of the document while waiting to download. This makes loading faster and the document more responsive.
The skeleton script is simple and effectively does nothing. The window object is the top of the Document Object Model and how we access the DOM. When the document has finished loading, the window object executes the function assigned to its onload property:
<script>

window.onload = function () {

  //Our code here...

};

</script>
The example code in this book is placed within the window.onload callback function. Because this method is executed after all the document elements have been loaded, we can be assured that the canvas element is ready to go by the time the code is called. Consequently, if your document contains a lot of data embedded in it, such as large images, you can wait a long time for window.onload to execute. In this situation, it might be better to load the assets using JavaScript, which I show you how to do in Chapter 4.
Finally, we close out our script, body, and html tags. We're finished creating a basic but perfectly valid HTML5 document.
CSS stylesheet
In the document header, we created a link to a CSS stylesheet. Now, let's look at that file. The style definitions for this book are intentionally minimal; only the background color of the document body and canvas element has been declared. By default, the canvas background color is transparent, which might be the color you want, but has been changed to white so you can see exactly where the element is positioned in the document. Here's the stylesheet for the style.css file:
body {

  background-color: #bbb; }


#canvas {

  background-color: #fff; }
This assumes the document contains an element with an id of 'canvas'. As a document gets more complicated, so does its stylesheet. The HTML file defines the structure of the document, whereas the CSS stylesheet defines the style or look of the elements. In general, it's best to organize your content, style, and scripts in separate files.
Additional scripts
As the examples get more complicated and you need to reuse portions of code, it becomes convenient, if not necessary, to move these pieces into separate files for clarity. This is done when declaring new classes that are used across multiple exercises and for functions whose verbosity would distract from the point at hand.
Throughout this book, we'll maintain a file of these utility functions; it's named utils.js. This script contains functions that set up boilerplate code for the examples, so that you can concentrate on the underlying animation principles. Each function is explained as they are introduced, so you don't have to think of this file as a black box.
In this file, many of the utility functions will be added as properties to a global JavaScript object named utils. This way, you can avoid cluttering up the global namespace with a bunch of functions. Be sure that at the top of the utils.js file you've declared an empty object like the following:
var utils = {};
To import this file and other scripts into your document, create a script element and set its src attribute to the location of the file. Include these immediately before the example code to be certain that everything has loaded properly before attempting to use it:
<script src="utils.js"></script> <script>

window.onload = function () {

  //Our code here...

};

</script>
Debugging
One of the most important aspects of writing code is debugging it. Back in the old days of web development, this usually meant throwing pop-up alert windows. Thankfully, web browsers now offer increasingly sophisticated debugging tools for code introspection and performance analysis. These tools enable you to step through a running application and interact with it, so you know exactly what's going on in your code at a given time.
It's a safe bet that every modern, HTML5-capable browser has some built-in developer tools and a console to input JavaScript statements and print out the results. You might have to dig around the menus of the application, but they're in there somewhere.
For example, in the Chromium web browser, click the wrench icon near the upper right corner, scroll down to Tools, and then click JavaScript Console. This is where the logging messages print out. Figure 2-1 shows an open debugging session in Chromium. The Firefox web browser has something similar: In the File menu, click Tools, and then click Web Console. Likewise, Internet Explorer 9 and Opera each has its own developer environments. It's important you get comfortable with these tools in all the major browsers because to maintain cross-browser compatibility, you debug in all of them. If you're having trouble finding a particular browser's web development tools, be sure to check its help section.
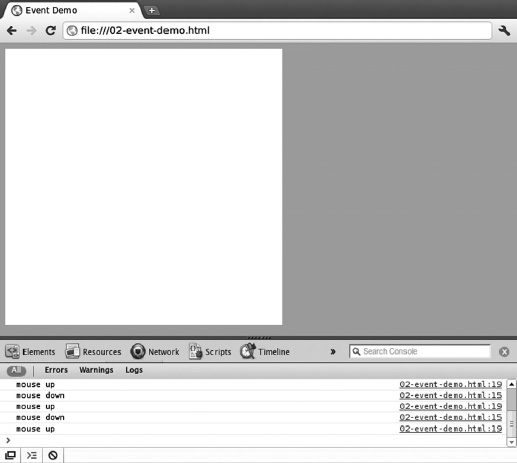
Figure 2-1. The Chromium browser debugging console
After you have opened a web developer console, you can type JavaScript expressions directly into the browser and have them evaluated. Try it by entering these statements:
console.log("Hello, World!");

2 + 2
From the console, you can access DOM elements and script variables to inspect their values (provided they are in the proper scope), which makes it easy to reason about how your program runs. This is a great way to test and debug small sections of code before committing them to a larger program. Find those bugs as early as possible!
Animating with code
With the document structure in place, you should now understand enough of the basics to start coding. You need a text editor to input the examples and an HTML5-capable web browser to run them. For debugging, you should be familiar with your browser's built-in developer console. After you have these tools—which may already be on your computer—you're ready to go. Let's dive in to some animation!
Animation Loops
Almost all programmed animation is expressed as some kind of loop. If you think about a frame-by-frame animation, you might create a flowchart resembling a series of images, where each frame just needs to be drawn, as shown in Figure 2-2.

Figure 2-2. Frame-by-frame animation
When you start drawing shapes, though, things are a bit different. JavaScript code won't create and store a new image for each frame, even in a frame-by-frame animation. For each frame, we store the position, size, color, and other attributes of every object drawn to the canvas. So, if you had a ball moving across the screen, each frame would store the position of the ball on that frame. Maybe frame 1 would indicate the ball is 10 pixels from the left side, frame 2 would indicate it's 15 pixels, and so on. The code reads this data, draws the object according to the description given, and displays that frame. From that process, you can derive a flowchart, as shown in Figure 2-3.

Figure 2-3. Rendering and then displaying frames
But when you consider how we described a dynamic, coded animation, the flowchart looks more like Figure 2-4.
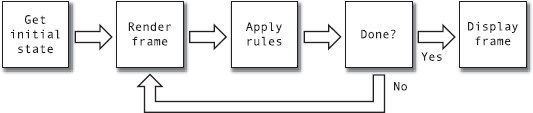
Figure 2-4. Scripted animation
As you see in Figure 2-4, there is no concept of frame 1, frame 2, and so on. Programmed animation generally can, and usually does, all occur in just one frame. Here, you can start to see what we mean by a loop.
First, you set up an initial state, such as by drawing a circle to the screen using the built-in canvas drawing API. You then render and display the frame. Next, you apply your rules. The rules can be as simple as, “The ball will move 5 pixels to the right,” or they can be made up of dozens of lines of complex trigonometry. The examples in the book cover that entire spectrum. Applying the rules results in a new state—a new description that is then rendered and displayed. Then you apply the same rules all over again.
The same set of rules is applied over and over; you don't have one set of rules for the first frame, and then another set for the next. So, your challenge is to come up with a set of rules that can handle every possible situation that can arise in your scene. What happens when the ball moves so far to the right that it's off the canvas? Your set of rules needs to account for this. Do you want the user to interact with the ball using a mouse? Your rules need to take that into account as well.
It sounds daunting, but it's not that complex. You start off with some simple behavior by creating a rule or two, and when that works, you add another rule. The “rules” we've been referring to are actually programming statements. Each rule can be a single statement or composed of several statements. In the example of moving the ball 5 pixels to the right, the rule is expressed in JavaScript like this:
ball.x = ball.x + 5;
This says to take whatever the ball's x position (horizontal axis) is, add 5 to it, and make that its new x position. You can even simplify the expression like this:
ball.x += 5;
The += operator adds the value on the right to the variable on the left and assigns the result back to that variable.
Here's a more advanced set of rules that you'll see later in the book:
var dx = mouse.x - ball.x,

    dy = mouse.y - ball.y,

    ax = dx * spring,

    ay = dy * spring;
vx += ax;

vy += ay;

vy += gravity;

vx *= friction;

vy *= friction;


ball.x += vx;

ball.y += vy;

ball.draw(context);
Don't worry about what it all means, just know that we need to run this code over and over to generate each new frame.
So, how do these loops run? Here's a misguided attempt, which reflects an error that many beginning programmers make. It's based on the while loop structure that exists in almost every programming language. You set up a loop to run indefinitely, updating the ball from within:
while (true) {

  ball.x += 1;

}
It seems simple: The while evaluation always passes because we're testing a value of true, so the loop keeps executing. We increment the ball's x position by 1 each time through the loop, from 0 to 1 to 2, 3, 4, etc. Each time it moves across the canvas from left to right.
If you've made the same mistake, you know that the ball doesn't move across the canvas, and in fact you won't see it at all—it's already moved past the right side of the screen. Why doesn't it move to all the points in between? Actually, it did! But you didn't see it because the canvas element was never updated. Figure 2-5 is another flowchart that shows essentially what happens.
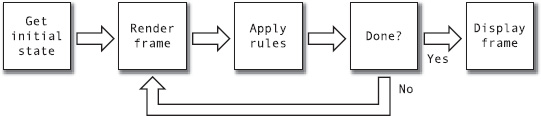
Figure 2-5. Why you can't animate with a while loop
You applied the rules and moved the ball into position, creating a new scene, but it never got displayed because you didn't draw the object to the canvas at the end of a frame. This is an important point.
Here is the sequence of actions you must take on each frame to animate:
- Execute all the code that needs to be called for that frame.
- Draw all objects to the canvas element.
- Restart the process to render the next frame.
Keeping these steps in mind, we'll create a function that we can call repeatedly to update the object's position and draw it to the canvas element. We then create a JavaScript timer to set up the loop:
function drawFrame () {

  ball.x += 1;

  ball.draw(context);

}


window.setInterval(drawFrame, 1000/60);
Here, we've set up the drawFrame function to update the ball and render it to the canvas using its draw method (which we haven't created yet). We pass drawFrame as an argument to window.setInterval, which repeatedly executes the function at an interval specified in milliseconds by the second argument. In this example, that's 1000/60, which is 60 frames a second, or about 17 ms.
For a long time, this was the way developers had to set up an animation loop using JavaScript. If you really wanted to, you could still use this method in the example code throughout this book. The problem is that JavaScript timers were never intended to be used for animation. They are not accurate to the millisecond—timer resolutions vary across browsers—so you cannot count on them for high quality animations. Furthermore, the delay specified by the second argument is only a request to be executed at a given time. If there are other jobs in the browser's execution queue that need to be run, then the animation code has to wait.
Because animation was never a feature of the previous HTML specification, browser vendors had not placed much priority on these kinds of optimizations. However, with HTML5's canvas element and a new emphasis on multimedia content, browsers are once again competing against each other on performance and speed. Recognition that animation has become an increasingly important component of web applications has led browser vendors to invent new solutions to handle the demands placed on them.
An animation loop using requestAnimationFrame
Because of the increased interest in HTML5-based animation, web browsers have implemented an API that lets developers indicate they're using JavaScript specifically for animation, which allows for browser-based optimizations. The function window.requestAnimationFrame accepts a callback function as an argument and executes it prior to redrawing the screen. In some browsers, a second, optional parameter is implemented that specifies an HTML element that provides the visual bounds of the animation. Changes to the program that are made in this function argument happen before the next browser repaint. To create an animation loop, chain together multiple calls to requestAnimationFrame:
(function drawFrame () {

  window.requestAnimationFrame(drawFrame, canvas);


  //animation code...

}());
This might be a small snippet of code, but it's important you understand exactly how it works because it provides the core animation loop used in the book examples. We've defined a function, drawFrame, that contains the animation code to run on every frame. On the first line in this function, we make a call to window.requestAnimationFrame and pass a reference to the same drawFrame function that we're defining. The second optional argument is the canvas element that we'll draw to. You might find it surprising that we can pass a function as an argument to another function before we have finished defining it. Just keep in mind, by the time it is needed here as an argument, it has already been defined.
When we execute the drawFrame function, window.requestAnimationFrame queues the drawFrame function to be run again at the next animation interval, which repeats this process. Because we keep requesting that the function run again, we've chained together a loop. Therefore, any code we place in this function is called again and again, allowing us to animate the canvas at discreet intervals.
To start the loop, after drawFrame has been defined, wrap the function in parentheses and immediately invoke it. This is a more space-efficient—and arguably clearer—alternative to defining the function first, then immediately invoking it on the following line.
Because requestAnimationFrame is a relatively new feature, browsers are still working on their own implementations of it. Because you want your code to be cross-platform, here is a little code snippet that you can use to normalize the function across multiple browsers:
if (!window.requestAnimationFrame) {

  window.requestAnimationFrame = (window.webkitRequestAnimationFrame ||

                                  window.mozRequestAnimationFrame ||

                                  window.oRequestAnimationFrame ||

                                  window.msRequestAnimationFrame ||

                                  function (callback) {

                                  return window.setTimeout(callback, 1000/60);

                                  });

}
This code tests whether the function window.requestAnimationFrame is defined, and if it's not, runs through the known browser implementations and assigns that as the function. If it cannot find a browser-specific version of the function, then it falls back to a JavaScript timer-based animation using setTimeout at an interval of 60 frames a second.
Because this environment check is used in all of the examples, include it in the utils.js file to import into our documents. This way, you can be sure the animation loop works across multiple browsers, keeping the scripts uncluttered so we can concentrate on understanding the core ideas of each exercise.
JavaScript objects
In this book, the focus is on the various principles and formulas needed to create animations with JavaScript instead of teaching specific coding methodologies. As such, we won't create large framework libraries or complex data structures; instead, we'll keep things as simple as possible.
The animation concepts you learn here can be incorporated into more advanced JavaScript projects; however, the goal is not to hand you a collection of pre-built code for you to copy and paste, but to convey an understanding of the principles that make each one work.
Because this book is written using JavaScript, you need to know some of the main ideas of the language to appreciate what's going on in the examples. Since the most important things in JavaScript are objects and functions (which is just a special kind of object), we'll look at those first.
Basics Objects
JavaScript has been designed as a simple object-based system. An object is a data structure that contains properties. These properties can be variables, functions, or other objects. When a function is assigned to a property, it is known as an object's method. Objects are predefined in the browser, or you can create your own. For example, to create an empty object and store it in a variable to reference later, you write:
var objA = {};
This creates an object with no properties and stores it in the variable objA. Because JavaScript objects can be modified by default at any time, we can add a new property to it like this:
objA.name = "My Object A";
This creates a new property called name on the objA object and assigns it a string value "My Object A". You can always access the object's property value using the notation objA.name. You can also create properties when declaring a new object, as follows:
var objB = {

  name: "My Object B",

  hello: function (person) {

    console.log("Hello, " + person);

  }

};
Here, we've created a new object, objB, that contains two properties: the property name, which contains a string, and the property hello, within which we've stored a function. Because a function is also an object in JavaScript, you can pass it around and assign it to variables like any other value. This example method takes a string as an argument and prints a message to the browser's debugging console:
objB.hello("Gentle Reader"); //prints: "Hello, Gentle Reader"
Creating new kinds of objects
We've declared objects with properties as we've needed them, but what if you want to create multiple objects with the same property definitions? You can create them one by one, but it's more efficient to use a constructor function. A constructor is a special kind of function that creates a new object based on the properties assigned to that constructor. After it's set up, you can create a new object instance by invoking the constructor with the new command. To distinguish a constructor function from a regular function, use the convention of starting the name with a capital letter:
function MyObject (person) {

  this.name = person;

  this.say = function () {

    console.log("It's " + this.name);

  };

}


var objA = new MyObject("Gentle Reader");


objA.say(); //prints: "It's Gentle Reader"
In the constructor, notice the special object this, which we can add properties to. This is the object that is returned from the constructor. Any variables declared in the constructor function that are not attached to the this object cannot be directly accessed from outside the constructor.
Prototypes
Using constructors to create object instances is exactly what we'd do in a more class-based language. In fact, when you see references to classes in JavaScript documentation, this is typically what it's referring to, the constructor function. Sometimes this terminology overlooks that JavaScript is, in fact, a prototype-based language.
When you create a new object instance in JavaScript, you actually create a new object that inherits properties from its constructor object—this is its prototype. You can directly access this object from the constructor's prototype property. Any properties you assign to the prototype are shared by all objects derived from its type. Building off the previous example constructor, here is the code:
MyObject.prototype.hello = function () {

  console.log("Hello, " + this.name);

};


objA.hello(); //prints: "Hello, Gentle Reader"


var objB = new MyObject("Inspired Coder");


objB.hello(); //prints: "Hello, Inspired Coder"
Here we've added the hello function to the constructor prototype, and in doing so, we added this method to both object instances: the one previously declared and a newly created object.
Throughout this book, we create classes (a constructor function and prototype properties) that are shared across many examples. Typically, we keep these in a separate file that can be imported into documents.
Functional style
One strength of the JavaScript language is that functions are first-class objects. This means you can assign functions to variables, pass them around, and use them as arguments to other functions. This is a powerful concept and a feature that is not available in many programming languages. Although the implications of this idea can be fairly complex, the concept is simple, and something we take advantage of throughout the book. If you can understand it, You're on your way to becoming a successful JavaScript programmer.
You've already used functional arguments earlier in the chapter when you created an animation loop: setInterval and requestAnimationFrame each take function callbacks as parameters. But, we can also use functions to structure code clearly. For example, here is a typical for loop used to iterate over values in an array. We create a counter variable, i, that increments each loop cycle, using it to access the array values. We've declared an array of three elements and printed each one in turn to the console:
var arr = [1, 2, 3];

for (var i = 0, len = arr.length; i < len; i++) {

  console.log(arr[i]);

}
You can also express iteration functionally. Every JavaScript array object has a method named forEach, which takes a function as an argument. forEach iterates over all the array elements, passing each one as the first argument to the user-defined function, and the second, optional, argument is the element's index position. Here's how the previous example looks using this method:
var arr = [1, 2, 3];

arr.forEach(function (element, i) {

  console.log(element);

});
This code snippet does the same thing as the previous one—printing out each array element value to the console—but it is structurally different. There are a couple of benefits to this approach. For one, we didn't declare any temporary variables used only for iteration that linger around after this code has executed. But perhaps more important, this style allows you to reason about the code at a functional level. This means you can understand how the code works by examining the function that is passed as an argument and the parameters it accepts. You do not have to worry about the state of the loop or if any dependent variables are setup correctly. This can have advantages when debugging, because when something goes wrong, you can dig down through the function calls in the stack trace to determine where exactly the error occurred.
The drawback to functional iteration is that it's typically slower than a for-loop, due to the increased computation needed to execute the function. As is often the case when writing programs, the developer needs to consider both readability of the code and the speed of its execution, and that can be determined only by testing. Generally, you should write programs that are clear and easy to understand, and let the browser makers worry about getting the code to run fast.
We use both kinds of iteration throughout this book, depending on speed requirements and the need for clarity. More often, and central to working with JavaScript and the DOM, is the need to pass function arguments as event handlers. We look at how these work in the next section on user interaction.
User interaction
User interaction is probably one of the main reasons you're reading this book. After all, if it weren't for interaction or some sort of dynamic input going into the animation, you might as well watch a movie. User interaction is based on user events, and these are generally mouse events, touch events, and keyboard events. Let's quickly go through the various user event types and how to handle them.
Events and event handlers
To understand events, you must understand a couple of additional concepts: listeners and handlers. A listener determines whether an element should act on a particular event, and a handler is a function that is called when the event occurs.
The shapes that we draw to the canvas element have no built-in means for detecting events. But, the HTML elements do, which means that we can capture user input using the DOM interface, calculate where the event occurred relative to the drawn objects, and make decisions based on this information. In this section, we look at how to capture DOM events, and in later chapters, we'll see how to use them to add interaction to an animation.
Listeners and handlers
As just stated, a listener is an object that listens for events. You can specify a DOM element as a listener for a particular event by calling its method addEventListener. You pass it a string as the first argument, which is the type of the event to listen for, and a handler function that is called when the element receives this event. Here's what the syntax looks like:
element.addEventListener(type, handler [, useCapture]);
The third argument is usually optional, however, in some browser implementations it is not. For that reason, in this book, we always pass a value of false for useCapture, which is the default. This affects how an event bubbles up the DOM tree, but is not applicable to the examples in this book. For details about DOM event model flow, see the specification at http://www.w3.org/TR/DOM-Level-3-Events/#event-flow.
A typical example is listening for a mouse press on a canvas element (mouse events are discussed shortly):
canvas.addEventListener('mousedown', function (event) {

  console.log("Mouse pressed on element!");

}, false);
The first argument, the event type 'mousedown', is a string. Make sure you double-check the spelling of the event type You're listening for, because a typo here can mean You're waiting for an event that doesn't exist. addEventListener happily listens for any event type you specify, so this can be a difficult bug to track down (and you won't be happy when you do).
Now, I've said a listener listens for events, but perhaps a more accurate description is that a listener is notified of events. Internally, the object that generates events keeps a list of every object that has added itself as a listener. If an object is capable of generating different types of events, such as mousedown, mouseup, and mousemove, it keeps a list of listeners for each event type it can generate. Whenever one of these events occurs, the object runs through the corresponding list and lets each object in that list know what event has occurred.
Another way of describing events is that the object that becomes a listener is subscribing to a particular event. The object that generates the event is broadcasting the event to all its subscribers.
Additionally, if you no longer want an object to listen for a particular event, you can tell it to stop listening, or unsubscribe, by calling its removeEventListener method. Notice it has the exact same parameters as the addEventListener method:
element.removeEventListener(type, handler [, useCapture]);
This tells the object to remove the listener from its list of listeners for that particular event, so it will not receive further notifications.
Let's go ahead and see this in action. Start out with the skeleton document presented earlier, and add the code to that:
<!doctype html>

<html>

 <head>

  <meta charset="utf-8">

  <title>Event Demo</title>

  <link rel="stylesheet" href="style.css">

 </head>

 <body>

  <canvas id="canvas" width="400" height="400"></canvas>

  <script>

  window.onload = function () {

    var canvas = document.getElementById('canvas'),


    canvas.addEventListener('mousedown', function (event) {

      console.log("mouse down");

    }, false);


    canvas.addEventListener('mouseup', function (event) {

      console.log("mouse up");

    }, false);

  };

  </script>

 </body>

</html>
In this example, first we accessed the canvas element (that has an id of 'canvas') through the DOM interface using document.getElementById and stored it at the variable canvas. We then added listeners for two events, mouseup and mousedown. As handlers, we passed in callback functions that are defined inline (remember, functions are objects that can be passed around), which print a message to the debugging console. The handlers get passed an event object as an argument that contains some information about the event; minimally, it contains the name of the event and information about what object triggered it. In the case of mouse events, it contains information about the mouse location at the time of the event, which mouse button was pressed (if any), and so on. For keyboard events, it would have information about what keys were pressed at the time of the event.
Save this example as 02-event-demo.html. When you load the file in your web browser, you'll see that it prints a message to the debugging console each time the mouse is pressed or released on the canvas element. Make sure you get this exercise working, and the path to your CSS file is correct. It's a simple exercise, but it's a good test to ensure your development environment is set up correctly.
If you are new to JavaScript and can get this example working and understand it, congratulations—you've just moved from beginner up to intermediate status!
Now that you know a little bit more about handlers, you can get a better understanding of listeners. An object generates an event, broadcasts that event, or notifies its listeners of the event. How does it do that exactly? Well, all it does is call the function on that object that has the correct handler name. In the previous example, document 02-event-demo.html added the canvas element as a listener for a couple of mouse events. Internally, the element keeps a list for each event. So it has a list for the mousedown event and another list for the mouseup event.
When the user presses the mouse button on the canvas element, the element responds, “Hey! Mouse down! Must notify listeners!” It then goes through its mousedown list and sees what is in there. The element finds a reference to the function that was specified as a handler and then calls that function on the listener. If other objects had registered as listeners to the mousedown event, they would also be on the list, and whatever handlers they had defined would be called.
The same thing happens when the mouse is released, except it looks at its mouseup list.
Those are the basics of events and handlers. Next, we introduce you to some of the event types used for interaction.
Mouse events
To capture a mouse event, you must add a listener to a DOM element to handle the event. Mouse event types are defined by strings, and different browsers have varying levels of support for particular events. Here is a list of the most common ones:
mousedownmouseupclickdblclickmousewheelmousemovemouseovermouseout
These mouse event types are self-explanatory. To get a feel for them, create and run the following document, which prints to the console each mouse event as it occurs on the canvas element. You can find this file with the rest of the example code, 03-mouse-events.html:
<!doctype html>

<html>

 <head>

  <meta charset="utf-8">

  <title>Mouse Events</title>

  <link rel="stylesheet" href="style.css">

 </head>

 <body>

  <canvas id="canvas" width="400" height="400"></canvas>

  <script>

  window.onload = function () {
    var canvas = document.getElementById('canvas'),


    function onMouseEvent (event) {

      console.log(event.type);

    }


    canvas.addEventListener('mousedown', onMouseEvent, false);

    canvas.addEventListener('mouseup', onMouseEvent, false);

    canvas.addEventListener('click', onMouseEvent, false);

    canvas.addEventListener('dblclick', onMouseEvent, false);

    canvas.addEventListener('mousewheel', onMouseEvent, false);

    canvas.addEventListener('mousemove', onMouseEvent, false);

    canvas.addEventListener('mouseover', onMouseEvent, false);

    canvas.addEventListener('mouseout', onMouseEvent, false);

  };

  </script>

 </body>

</html>
Notice that we're using the same handler function for every mouse event type, and it prints the type of event that has been dispatched.
Because we can reference only the canvas element, and not what has been drawn to it, we can't add an event listener to specific lines or shapes. If you've drawn a rectangle to use as a button, the canvas has no way of determining where the button boundaries are. To detect a button click, it's up to you to capture the canvas element's mouse event, determine the position relative to the button, and perform the calculation yourself. As we work through the book examples, you'll see some ways to do this.
Mouse position
Every mouse event contains two properties to determine the current location of the mouse cursor: pageX and pageY. By combining these values and the offset of the canvas element, you can determine where on the canvas element the mouse is. Unfortunately, these mouse event properties are not supported across all browsers, so in these cases, you can use clientX and clientY.
Having to calculate the offset every time you need the mouse position is a bit unwieldy. Because we want to keep the examples uncluttered, add this cross-platform mouse position code into an utility function utils.captureMouse to include in the file utils.js. We import this into our documents:
utils.captureMouse = function (element) {

  var mouse = {x: 0, y: 0};


  element.addEventListener('mousemove', function (event) {

    var x, y;

    if (event.pageX || event.pageY) {

      x = event.pageX;

      y = event.pageY;

    } else {

      x = event.clientX + document.body.scrollLeft +

          document.documentElement.scrollLeft;

      y = event.clientY + document.body.scrollTop +

          document.documentElement.scrollTop;
    }

    x -= element.offsetLeft;

    y -= element.offsetTop;


    mouse.x = x;

    mouse.y = y;

  }, false);


  return mouse;

};
This function takes a DOM element as an argument, attaches a mousemove event handler to it, and returns an object with x and y properties. When the mouse moves over the element, the event handler calculates the mouse position using the event's location (as supported by the browser) and the document offset position of the element. It then assigns these values to the object we returned, which we can access from our main script. The mouse x and y positions are relative to the top-left corner of the element, which is the coordinate (0, 0).
For example, you invoke this function at the start of the script, passing the canvas element as an argument:
var canvas = document.getElementById('canvas'),

    mouse = utils.captureMouse(canvas);
After the mouse object has been initialized, you can query its x and y properties whenever you need to determine the current location of the mouse cursor. Here's a complete example that demonstrates how this function is used throughout the rest of the book:
<!doctype html>

<html>

 <head>

  <meta charset="utf-8">

  <title>Mouse Position</title>

  <link rel="stylesheet" href="style.css">

 </head>

 <body>

  <canvas id="canvas" width="400" height="400"></canvas>

  <script src="utils.js"></script>

  <script>

  window.onload = function () {

    var canvas = document.getElementById('canvas'),

      mouse = utils.captureMouse(canvas);


    canvas.addEventListener('mousedown', function () {

      console.log("x: " + mouse.x + ", y: " + mouse.y);

    }, false);

  };

  </script>

 </body>

</html>
Run this file (04-mouse-position.html) in your browser with the debugging console open. Make sure you've included the utils.captureMouse function in utils.js and imported that file into the document.
When you click on the canvas element, you'll see a message displaying the current mouse position using the mouse.x and mouse.y properties.
Touch Events
Because touch screen devices are gaining in popularity, it's a good idea to see how to use them with JavaScript. Touch events are similar to mouse events, but have a few key differences. A touch point can be thought of like a mouse cursor; however, a mouse cursor will always stay on the screen, whereas a finger will press, move, and release from the device, so there will be times when no cursor is available. When querying the touch position, you must take this into consideration. Secondly, there is no touch event equivalent to mouseover—there is either a touch or there isn't, there is no finger hovering. Finally, multiple touches can occur at the same time. Each touch is stored in an array on the touch event, but for these examples we just use the first one.
Here's the touch events we use to interact with our animations:
touchstarttouchendtouchmove
These are demonstrated in example 05-touch-events.html, so if you want to see this in action then make sure you are on a device or emulator that can support touch events:
<!doctype html>

<html>

 <head>

  <meta charset="utf-8">

  <title>Touch Events</title>

  <link rel="stylesheet" href="style.css">

  </head>

 <body>

  <canvas id="canvas" width="400" height="400"></canvas>

  <script>

  window.onload = function () {

    var canvas = document.getElementById('canvas'),


    function onTouchEvent (event) {

      console.log(event.type);

    }


    canvas.addEventListener('touchstart', onTouchEvent, false);

    canvas.addEventListener('touchend', onTouchEvent, false);

    canvas.addEventListener('touchmove', onTouchEvent, false);

  };

  </script>

  </body>

</html>
This code does the same thing as the mouse events example (03-mouse-events.html): When a touch event is detected on the canvas element, it prints out the type to the debugging console.
Touch position
Like the utils.captureMouse function, you can use the utils.captureTouch utility to determine the location of the first finger touch on an element. The two functions are similar, but because there might not be a finger touching the screen, the property isPressed has been added to the returned object. This property contains a Boolean value indicating whether a touch is detected. Also, when there is no active touch present, the properties x and y are set to null. Add the following function to the utils.js file:
utils.captureTouch = function (element) {

  var touch = {x: null, y: null, isPressed: false};


  element.addEventListener('touchstart', function (event) {

    touch.isPressed = true;

  }, false);


  element.addEventListener('touchend', function (event) {

    touch.isPressed = false;

    touch.x = null;

    touch.y = null;

  }, false);


  element.addEventListener('touchmove', function (event) {

    var x, y,

        touch_event = event.touches[0]; //first touch


    if (touch_event.pageX || touch_event.pageY) {

      x = touch_event.pageX;

      y = touch_event.pageY;

    } else {

      x = touch_event.clientX + document.body.scrollLeft +

          document.documentElement.scrollLeft;

      y = touch_event.clientY + document.body.scrollTop +

          document.documentElement.scrollTop;

    }

    x -= offsetLeft;

    y -= offsetTop;


    touch.x = x;

    touch.y = y;

  }, false);


  return touch;

};
The function definition is similar to the mouse position version, but with a few extra event listeners. It takes an element argument and returns an object with properties x, y, and isPressed. The touchmove event handler keeps track of the position of the first touch relative to the element, using some cross-browser code to calculate the offset. There are also also event handlers added for touchstart, which sets isPressed to true, and touchend, which sets isPressed to false. It also sets the x and y properties to null, because there is no longer an active position.
You can initialize the touch object like before:
var canvas = document.getElementById('canvas'),

    touch = utils.captureTouch(canvas);
You must be certain that there is a touch present before accessing the x and y properties; otherwise, their values will be null and potentially mess up the animation calculations. Therefore, for any touch location queries, be sure to check whether there is an active touch press:
if (touch.isPressed) {

    console.log("x: " + touch.x + ", y: " + touch.y);

}
Touch events won't be used much in this book because we're concentrating on the underlying math that makes the examples work. But, this should give you an idea about how to use them if you wanted to experiment with a touch device.
Keyboard events
Keyboard event types, like all event types, are defined as strings. There are only two:
keydownkeyup
You can listen for keyboard events on elements that support character input—such as a text area element—the same way you listened for mouse events on the canvas element. But, you first need to set the focus to that element to capture these keyboard events. Assuming you have an HTML textarea element stored at the variable textarea, you can set its focus and capture a keydown event, like so:
textarea.focus();

textarea.addEventListener('keydown', function (event) {

  console.log(event.type);

}, false);
In many cases, though, it makes more sense to listen for keyboard events on the web page, regardless of what has focus. To do that, attach a keyboard event listener on the global window object. The following example detects when you press and release a key, regardless of what element has focus (example 06-keyboard-events.html):
<!doctype html>

<html>

 <head>

  <meta charset="utf-8">

  <title>Keyboard Events</title>

  <link rel="stylesheet" href="style.css">

 </head>

 <body>

  <script>

  window.onload = function () {


    function onKeyboardEvent (event) {

      console.log(event.type);

    }
    window.addEventListener('keydown', onKeyboardEvent, false);

    window.addEventListener('keyup', onKeyboardEvent, false);

  };

  </script>

 </body>

</html>
Key codes
More often than not, within the event handler function, you'll want to know which key has been pressed. Earlier, when introducing events, you saw that an event handler gets passed an event object, which contains data about the event that just occurred. In a keyboard event, you can use the keyCode property to determine what key was involved with the event.
The keyCode property contains a numeric value that represents the physical key that was pressed. If the user pressed the “a” key, the keyCode would contain the number 65, regardless of what other keys were pressed. If the user pressed the Shift key first and then “a,” you would get two keyboard events: one for Shift (keyCode 16) and one for “a” (keyCode 65).
In the next example, we're testing the keyCode against a set of known values, the numbers of the directional arrow keys: 37, 38, 39, and 40. If it matches any of these numbers, we print a message to the console displaying the direction that has been pressed. Otherwise, we just print out the keyCode value of the unknown key. Here is the document 07-key-codes.html:
<!doctype html>

<html>

 <head>

  <meta charset="utf-8">

  <title>Key Codes</title>

  <link rel="stylesheet" href="style.css">

 </head>

 <body>

  <script>

  window.onload = function () {


    function onKeyboardEvent (event) {

      switch (event.keyCode) {

      case 38:

        console.log("up!");

        break;

      case 40:

        console.log("down!");

        break;

      case 37:

        console.log("left!");

        break;

      case 39:

        console.log("right!");

        break;

      default:

        console.log(event.keyCode);
      }

    }


    window.addEventListener('keydown', onKeyboardEvent, false);

  };

  </script>

 </body>

</html>
Often, you won't know the exact numeric value of the key you want to capture. To make finding this information easier, we've created a file keycode.js to use as a reference cheat-sheet or to include in your document, so you can lookup a key by name instead of number—this makes your code much easier to understand. This script creates a global object keycode that contains the property names of most keyboard keys and maps them to their associated keyCode value. You can find this file, as the rest of the source code for this book, at www.apress.com, or, http://github.com/lamberta/html5-animation.
Let's rewrite the previous example using key names instead of key codes. Place the file keycode.js in the same directory as the example and include it in the document 08-key-names.html:
<!doctype html>

<html>

 <head>

  <meta charset="utf-8">

  <title>Key Names</title>

  <link rel="stylesheet" href="style.css">

 </head>

 <body>

  <script src="keycode.js"></script>

  <script>

  window.onload = function () {


    function onKeyboardEvent (event) {

      switch (event.keyCode) {

      case keycode.UP:

        console.log("up!");

        break;

      case keycode.DOWN:

        console.log("down!");

        break;

      case keycode.LEFT:

        console.log("left!");

        break;

      case keycode.RIGHT:

        console.log("right!");

        break;

      default:

        console.log(event.keyCode);

      }

    }
    window.addEventListener('keydown', onKeyboardEvent, false);

  };

  </script>

 </body>

</html>
You can see this example—like the previous example, 07-key-codes.html—prints the same messages to the console, but, because we're now using key names instead of key codes, our switch statement is easier to understand. Not only is it clearer, but it prevents you from accidentally typing a wrong number.
We won't use the keycode.js file in this book because the exercises are relatively simple and I want you to see exactly what's going on in the examples. But it can make your code more readable, so in more complex programs it's something you should consider using.
Summary
This chapter covered just about all the JavaScript basics you need to understand the rest of the examples found in this book. You now know about setting up an HTML5 document, debugging, loops, events, and handlers. We've touched on JavaScript objects, basic user interaction, and created a few utility functions to make things a little easier. That's a lot of material! Don't worry if some of these areas are still a little vague. Most of the topics here are shown in more detail as we get into specific techniques, and you can always come back here to brush up on the basics. At the very least, now you are familiar with the terms and concepts, and you're ready to move forward.