
Chapter 6
Boundaries and Friction
What we'll cover in this chapter:
- Environmental boundaries
- Friction
You covered a lot of ground in the preceding chapters. You can create graphics with the canvas drawing API and use all kinds of forces to move them around the screen. However, you've probably run into a small annoyance with many of the examples: If an object moves off the screen, it's gone. Sometimes, you have no way of knowing how to get it back and your only option is to reload the web page.
In most real-world scenarios, some boundaries exist, usually the ground beneath you, and sometimes walls with a ceiling. Unless you're making a space simulator, you want some environmental barriers to keep your objects in view. And if your scene does take place in space, you need a way to keep your main objects in view.
Another annoyance with the examples so far is the animation environment fails to have any effect on the object as it moves. The object starts moving, and it keeps on going in the direction it's headed at the same speed, until you apply some other force. Actually, this isn't a bug at all, but the way the universe works. Inertia is the tendency of an object in motion to stay in motion unless acted on by another force. Or from a programming perspective, the object's velocity won't change unless something changes it. One thing in the physical world that changes an object's velocity is some sort of friction, even if only the friction of air. So, although you successfully simulated an object moving in a vacuum, you might want to create a scene more like your everyday environment.
This chapter covers both of these issues: First, you learn how to add boundaries to contain your objects, and then how to apply friction to these objects.
Environmental boundaries
With any activity you're involved in—whether it's playing a sport, working at your job, building a house, etc.—there's a space for that activity. This enables you to focus your attention on what happens in this area and ignore, at least temporarily, events that take place outside this area.
If one of the objects in your zone of interest moves outside that space, you have a choice to make: move the object back into the zone, or stop paying attention to the it. Another option is to follow the object, or move the space so that it continues to enclose the object, even though it is moving. When programming animations, these choices are not much different.
In your canvas animations, you set up a space for your objects. Generally, this is the whole canvas element, but the area can be some portion of the canvas, or even a space that is larger than the canvas. Because the objects are moving, there's a good chance that they will eventually leave that space. When they leave, you can forget about them, move them back into the area, or follow them. In this chapter, we cover strategies for the first two of these approaches. First, though, let's determine where the boundaries are and how to specify them.
Setting boundaries
In most cases, a simple rectangle works as a boundary. Let's start with the easiest example, the boundaries based on the size of the canvas. As in the examples so far, we access the HTML canvas element using the DOM interface, specifying the element id, and then assign it to a variable:
var canvas = document.getElementById('canvas'),
The top and left boundaries of the animation are zero, and the right and bottom boundaries are canvas.width and canvas.height. You can store these in variables, like so:
var left = 0,

    top = 0,

    right = canvas.width,

    bottom = canvas.height;
If you store the dimensions in variables like this, realize that their values will not change if the size of the canvas element changes later. Use this if you have a fixed area for your boundaries. If you use the full dimensions of the element, you can refer directly to the canvas.width and canvas.height properties in your code.
Just because these examples use the full canvas area doesn't mean that you have to. For example, you can make a “room” that an object stays within, setting up boundaries like the following: top = 100, bottom = 300, left = 50, right = 400.
With the boundaries in place, you can check all the moving objects you're tracking to see whether they're still within this space. You can do this with a couple of if-else statements, and here is a simplified version of what that looks like:
if (ball.x > canvas.width) {

  // do something

} else if (ball.x < 0) {
  // do something

}

if (ball.y > canvas.height) {

  // do something

} else if (ball.y < 0) {

  // do something

}
Stepping through these boundary checks, if the ball's x position is greater than the right edge, or canvas.width, then it is too far to the right. There's no way it can also be past the left edge going the other way, which is 0—so you don't need to check that. You need to check the left position only in the case that the first if fails. Do the same for the top and bottom by checking the ball's y position against the canvas.height. However, it is possible for the object to be out of bounds on the x and y axis at the same time, so keep those two checks separate.
But what are you supposed to do when the object goes out of bounds? You learn about these four options:
- Remove it.
- Bring it back into play as if it were a brand-new object (regeneration).
- Wrap it back onto the screen, as if it were the same object reappearing at a different location.
- Have it bounce back into the area.
Let's start with simple removal.
Removing objects
Removing the object once it goes out of bounds is especially useful if you have objects being continually generated. The ones you remove are replaced by new ones coming in, so you won't end up with an empty canvas. Also, you won't wind up with too many objects being moved around, which would eventually slow down the browser.
With many moving objects, you should store their references in an array, and then iterate through the array to move each one. To remove one of these objects from the array, you use the Array.splice method. To remove an object, knowing its position and what the boundaries are, you can use something like this for your if statement:
if (ball.x > canvas.width ||

    ball.x < 0 ||

    ball.y > canvas.height ||

    ball.y < 0) {

  balls.splice(balls.indexOf(ball), 1);

}
The || symbol means “OR,” so you're essentially saying: “If the object is off to the right, OR the object is off to the left, OR it is off to the top OR the bottom, remove it from the array.” This technique is usually fine for most cases of removal, because it doesn't matter where the object went out of bounds—just that it did. But in other cases, you might want to respond differently if the object hit a particular boundary, such as the left wall as opposed to the right wall. For that, you need to use separate if statements, and you see an example of that when screen wrapping, coming up shortly.
But there is a small problem that may cause things to look wrong. Take a look at Figure 6-1.
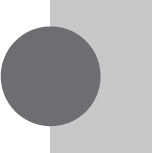
Figure 6-1. This ball isn't fully off the canvas, but it will be removed.
In Figure 6-1, you can see that the ball's position, as determined by its x and y coordinate in the center, is past the right edge of the screen, so it will be removed. If the ball is moving fast enough, you might not notice. But if it's moving slowly—like a pixel per frame—it will ease off the edge of the canvas. When it gets halfway, it will vanish from the screen and ruin the illusion.
To fix this, the ball should be all the way out of the area before removing it. To do this, you must take the object's width into account. And because the position is in the center of a circle, you need to worry about half of its width, which is stored in the radius property defined in our Ball class. The if statement needs to become a bit more complex, so it will change to something like this:
if (ball.x - ball.radius > canvas.width ||

    ball.x + ball.radius < 0 ||

    ball.y - ball.radius > canvas.height ||

    ball.y + ball.radius < 0) {

  balls.splice(balls.indexOf(ball), 1);

}
The changes are demonstrated in Figure 6-2.
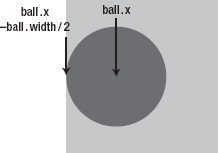
Figure 6-2. This ball is completely off the canvas and can be safely removed.
Although this particular example uses a ball, or round object, the same boundary check should work for any shape, as long as the position coordinate of the object is in the center.
Let's try it out. In the next example, use the Ball class we used in the Chapter 5, with a small addition. Add vx and vy properties to it, so that each ball keeps track of its own velocity. Here it is in its entirety:
function Ball (radius, color) {

  if (radius === undefined) { radius = 40; }

  if (color === undefined) { color = "#ff0000"; }

  this.x = 0;

  this.y = 0;

  this.radius = radius;

  this.vx = 0;

  this.vy = 0;

  this.rotation = 0;

  this.scaleX = 1;

  this.scaleY = 1;

  this.color = utils.parseColor(color);

  this.lineWidth = 1;

}


Ball.prototype.draw = function (context) {

  context.save();

  context.translate(this.x, this.y);

  context.rotate(this.rotation);

  context.scale(this.scaleX, this.scaleY);

  context.lineWidth = this.lineWidth;

  context.fillStyle = this.color;

  context.beginPath();

  context.arc(0, 0, this.radius, 0, (Math.PI * 2), true);

  context.closePath();

  context.fill();

  if (this.lineWidth > 0) {

    context.stroke();

  }

  context.restore();

};
The following example, 01-removal.html, sets up a number of these balls and removes them when they move off the canvas:
<!doctype html>

<html>

 <head>

  <meta charset="utf-8">

  <title>Removal</title>

  <link rel="stylesheet" href="style.css">


 </head>

 <body>

  <canvas id="canvas" width="400" height="400"></canvas>

  <textarea id="log"></textarea>

  <script src="utils.js"></script>

  <script src="ball.js"></script>

  <script>

  window.onload = function () {

    var canvas = document.getElementById('canvas'),
        context = canvas.getContext('2d'),

        log = document.getElementById('log'),

        balls = [],

        numBalls = 10;


    for (var ball, i = 0; i < numBalls; i++) {

      ball = new Ball(20);

      ball.id = "ball" + i;

      ball.x  = Math.random() * canvas.width;

      ball.y  = Math.random() * canvas.height;

      ball.vx = Math.random() * 2 - 1;

      ball.vy = Math.random() * 2 - 1;

      balls.push(ball);

    }


    function draw (ball, pos) {

      ball.x += ball.vx;

      ball.y += ball.vy;

      if (ball.x - ball.radius > canvas.width ||

          ball.x + ball.radius < 0 ||

          ball.y - ball.radius > canvas.height ||

          ball.y + ball.radius < 0) {

        balls.splice(pos, 1); //remove ball from array

        if (balls.length > 0) {

          log.value = "Removed " + ball.id;

        } else {

          log.value = "All gone!";

        }

      }

      ball.draw(context);

    }


    (function drawFrame () {

      window.requestAnimationFrame(drawFrame, canvas);

      context.clearRect(0, 0, canvas.width, canvas.height);


      var i = balls.length;

      while (i--) {

        draw(balls[i], i);

      }

    }());

  };

  </script>

 </body>

</html>
This should be easy to follow. First, create 10 object instances of Ball, randomly placing them on the canvas, assigning them random x and y velocities, and pushing them into an array.
The drawFrame function is our typical animation loop that clears our canvas, iterates over each ball in the array, and passes it to the draw function. This function applies the ball's velocity to move it around, checks the boundaries, and removes any out-of-bounds balls from the array. The parameters to Array.splice are the index position to start removing elements at, and the amount of elements to remove. In this example, we remove only one element: the one at the current index. When you test this, you won't be aware of their removal—which is a good thing—but you can be confident the balls are not lingering around outside the canvas.
Notice that the while loop in this example is a little different from previous examples:
var i = balls.length;

while (i--) {

  draw(balls[i], i);

}
This causes the while loop to iterate backward through the array instead of forward. This is necessary because, when you splice the array, the indexing will change. When you increment i, you will skip over one of the elements. Going backward handles this, as long as nothing is added to the beginning of the array during iteration.
Finally, after splicing an element out of the array, we check to see whether the array length is zero, to display a message that all the balls have been removed from the animation.
Regenerating objects
The next method for handling an object that leaves the defined boundaries is to regenerate it, or more precisely, to reposition it. The basic idea is that when an object has moved off the canvas and is no longer necessary, you can place it at a new position as if it were a brand-new object. This provides you with a steady stream of objects without the worry about having too many objects slowing down the browser, because there will be a set number.
This technique is useful for creating fountains and other particle effects, where you have a stream of objects spraying constantly. The particles go off the canvas and are reintroduced at the source point of the stream.
The mechanics of regeneration are similar to removal: You wait until the object is out of bounds, but instead of removing it, you move it.
Let's dive right in by making a fountain. For the fountain particles, use the same Ball class, but make them very small by setting their radius of just 2 pixels across, and give each a random color. The source of the fountain will be a point at the bottom-center of the canvas element. Every particle will originate there, and when they move off the canvas, they'll be repositioned there. Also, each particle starts with a random negative y velocity and a (small) random x velocity. The particles shoot upward, moving slightly to the left or the right, and also react to gravity. When a particle regenerates, its position and velocity will be reset. Here's the document 02-fountain.html:
<!doctype html>

<html>

 <head>

  <meta charset="utf-8">

  <title>Fountain</title>

  <link rel="stylesheet" href="style.css">

 </head>

 <body>
  <canvas id="canvas" width="400" height="400"></canvas>

  <script src="utils.js"></script>

  <script src="ball.js"></script>

  <script>

  window.onload = function () {

    var canvas = document.getElementById('canvas'),

        context = canvas.getContext('2d'),

        balls = [],

        numBalls = 80,

        gravity = 0.5;


    for (var ball, i = 0; i < numBalls; i++) {

      ball = new Ball(2, Math.random() * 0xffffff);

      ball.x  = canvas.width / 2;

      ball.y  = canvas.height;

      ball.vx = Math.random() * 2 - 1;

      ball.vy = Math.random() * -10 - 10;

      balls.push(ball);

    }


    function draw (ball) {

      ball.vy += gravity;

      ball.x += ball.vx;

      ball.y += ball.vy;

      if (ball.x - ball.radius > canvas.width ||

          ball.x + ball.radius < 0 ||

          ball.y - ball.radius > canvas.height ||

          ball.y + ball.radius < 0) {

        ball.x = canvas.width / 2;

        ball.y = canvas.height;

        ball.vx = Math.random() * 2 - 1;

        ball.vy = Math.random() * -10 - 10;

      }

      ball.draw(context);

    }


    (function drawFrame () {

      window.requestAnimationFrame(drawFrame, canvas);

      context.clearRect(0, 0, canvas.width, canvas.height);


      balls.forEach(draw);

    }());

  };

  </script>

 </body>

</html>
You begin at the top of the script by setting all the particles at the starting point and giving them each an initial random upward velocity.
The drawFrame function loops through all the elements of the balls array, passing each ball as a parameter to the draw function. This function adds gravity to the ball's vy value, adds the velocity to the ball's position, and then checks to see whether the ball has crossed any boundaries. If it has, the ball gets placed back at the starting position and “regenerated” with a new velocity. It acts the same as a newly created particle, so your fountain will flow forever.
You should play around with this effect; it's simple but looks great. Have the fountain shoot off in different directions. Make it shoot out of a wall, or even the ceiling. Change the random factors to make the fountain wider or narrower, or one that shoots higher or lower. Try adding some wind into the mix (hint: make a wind variable and add it to vx).
Screen wrapping
The next common way to handle objects going out of bounds is to use screen wrapping. The concept is simple: If an object moves off the left side of the screen, it then reappears on the right. If it moves off the right, it comes back on the left. If it moves off the top, it comes back on the bottom. You get the idea.
Screen wrapping is similar to regeneration, in that you put the object back on the screen at a different location. But in regeneration, you generally return all objects to the same location, making them look like brand-new objects. In wrapping, you are usually trying to maintain the idea that this is the same object; that it has just gone out the back door and in the front, so to speak. Thus, you generally don't change velocity during a screen wrap.
This, again, is reminiscent of that classic game, Asteroids. Recall from Chapter 5 that this was one of the problems with the spaceship animation: The ship would fly off the canvas, and it was sometimes impossible to figure out where it was and how to get it back. With screen wrapping, the ship is never more than a pixel from the edge of the screen.
Let's rebuild the spaceship example and add this behavior. Here's the document you'll want to use (03-ship-sim-2.html), with the new code added in bold:
<!doctype html>

<html>

 <head>

  <meta charset="utf-8">

  <title>Ship Sim 2</title>

  <link rel="stylesheet" href="style.css">

  <style>

  #canvas {

    background-color: #000000;

  }

  </style>

 </head>

 <body>

  <canvas id="canvas" width="400" height="400"></canvas>

  <script src="utils.js"></script>

  <script src="ship.js"></script>

  <script>

  window.onload = function () {

    var canvas = document.getElementById('canvas'),

        context = canvas.getContext('2d'),

        ship = new Ship(),

        vr = 0,

        vx = 0,
        vy = 0,

        thrust = 0;


    ship.x = canvas.width / 2;

    ship.y = canvas.height / 2;


    window.addEventListener('keydown', function (event) {

      switch (event.keyCode) {

      case 37:      //left

        vr = -3;

        break;

      case 39:      //right

        vr = 3;

        break;

      case 38:      //up

        thrust = 0.05;

        ship.showFlame = true;

        break;

      }

    });


    window.addEventListener('keyup', function () {

      vr = 0;

      thrust = 0;

      ship.showFlame = false;

    });


    (function drawFrame () {

      window.requestAnimationFrame(drawFrame, canvas);

      context.clearRect(0, 0, canvas.width, canvas.height);


      ship.rotation += vr * Math.PI / 180;

      var angle = ship.rotation, //in radians

          ax = Math.cos(angle) * thrust,

          ay = Math.sin(angle) * thrust,

          left = 0,

          right = canvas.width,

          top = 0,

          bottom = canvas.height;


      vx += ax;

      vy += ay;

      ship.x += vx;

      ship.y += vy;


      //screen wrapping

      if (ship.x - ship.width / 2 > right) {

        ship.x = left - ship.width / 2;

      } else if (ship.x + ship.width / 2 < left) {

        ship.x = right + ship.width / 2;

      }

      if (ship.y - ship.height / 2 > bottom) {

        ship.y = top - ship.height / 2;
      } else if (ship.y < top - ship.height / 2) {

        ship.y = bottom + ship.height / 2;

      }

      ship.draw(context);

    }());

  };

  </script>

 </body>

</html>
This uses the Ship class from Chapter 5, so make sure you include that script in your document. As you can see, this updated script adds the boundary definitions and the checks for them. We're back to using separate if and else statements, because the actions are different for each circumstance.
Bouncing
And now we arrive at perhaps the most common, and possibly the most complex of bounds handling methods. But not to worry—it's not much more complicated than screen wrapping.
The strategy with bouncing is to detect when the object has gone off screen. Only this time, leave it where it is and only change its velocity. The rules are simple: If the object went off the left or right edge, reverse its x velocity. If it went off the top or bottom, reverse its y velocity. Reversing an axis velocity is simple: Multiply the value by -1. If the velocity is 5, it becomes -5; if it's -13, it becomes 13. The code is even simpler:
vx *= -1;

vy *= -1;
There are a few more differences from screen wrapping. First, in wrapping, you let the object move completely off the canvas before you reposition it. You do that by taking its position and adding or subtracting half its width. For bouncing, you want to do almost exactly the opposite. Don't wait until the object is entirely off the canvas before you make it bounce. In fact, you don't want it to be even partially out of the picture. If you throw a real ball against a real wall, you wouldn't expect to see it go partially into the wall before bouncing back. It would hit the wall, stop right there, and then bounce back. The first thing you want to know is the instant that any part of the object has gone over the edge. All you need to do is reverse the way you add the half width/height (see Figure 6-3). So, for example, instead of saying this:
if (ball.x - ball.radius > right) ...
you say this:
if (ball.x + ball.radius > right) ...
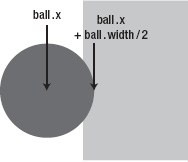
Figure 6-3. This ball is just slightly off the canvas, but it needs to bounce.
After you determine that the object has crossed at least a bit of one of the boundaries, you now reverse the velocity on that axis. But there's a little more to it than that. You must reposition the object so that it sits on the edge of the boundary. This has the obvious visual effect of making the object look more like it's hitting and bouncing, rather than sinking into the wall. But it is also a necessary step for other reasons. You find that if you don't adjust the object's position, then on the next frame, it might still be past that boundary, even after it moves. If this happens, the object will again reverse its velocity and head back into the wall! Then you get a situation where the object seems to be stuck halfway in and out of the wall, just sitting there and vibrating—it's not pretty.
The point where you need to place the object to have it sitting on the boundary is actually the same point you are checking in the if statement. You just need to restate it with a little basic algebra. Here's the full if statement for the x axis:
if (ball.x + ball.radius > right) {

  ball.x = right - ball.radius;

  vx *= -1;

} else if (ball.x - ball.radius < left) {

  ball.x = left + ball.radius;

  vx *= -1;

}
Figure 6-4 shows what the ball looks like after being repositioned.
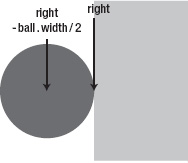
Figure 6-4. The ball has been repositioned to be exactly against the boundary.
The steps for bouncing are as follows:
- Check whether the object went past any boundary.
- If so, place it on the edge of that boundary.
- Then reverse the velocity.
That's all there is to it, so let's see it in action. The next example again uses the same Ball class, but scaled back up to a decent size. Here's the document (04-bouncing-1.html):
<!doctype html>

<html>

 <head>

  <meta charset="utf-8">

  <title>Bouncing 1</title>

  <link rel="stylesheet" href="style.css">

 </head>

 <body>

  <canvas id="canvas" width="400" height="400"></canvas>

  <script src="utils.js"></script>

  <script src="ball.js"></script>

  <script>

  window.onload = function () {

    var canvas = document.getElementById('canvas'),

        context = canvas.getContext('2d'),

        ball = new Ball(),

        vx = Math.random() * 10 - 5,

        vy = Math.random() * 10 - 5;


    ball.x = canvas.width / 2;

    ball.y = canvas.height / 2;


    (function drawFrame () {

        window.requestAnimationFrame(drawFrame, canvas);

        context.clearRect(0, 0, canvas.width, canvas.height);


        var left = 0,

            right = canvas.width,

            top = 0,

            bottom = canvas.height;


        ball.x += vx;

        ball.y += vy;


        if (ball.x + ball.radius > right) {

          ball.x = right - ball.radius;

          vx *= -1;

        } else if (ball.x - ball.radius < left) {

          ball.x = left + ball.radius;

          vx *= -1;

        }

        if (ball.y + ball.radius > bottom) {

          ball.y = bottom - ball.radius;

          vy *= -1;

        } else if (ball.y - ball.radius < top) {

          ball.y = top + ball.radius;

          vy *= -1;
      }

      ball.draw(context);

    }());

  };

  </script>

 </body>

</html>
Test this a few times to see the ball moving at different angles. Try making the velocity higher or lower.
This is one of those many areas in the book where the math and calculations are not exactly in accordance with real-world physics. If you look at Figure 6-5, you see where the ball should actually hit the wall, and also where this simulation places it.
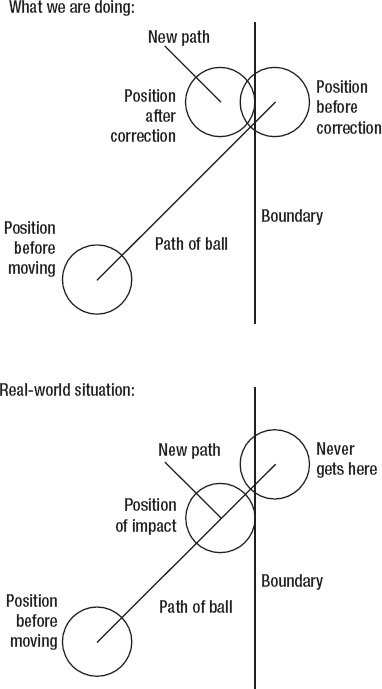
Figure 6-5. This technique isn't perfect, but is quick, easy, and close enough for most situations.
Determining the correct position takes more complex calculations. Although you are free to figure out how to do this (using the trigonometry covered in Chapter 3), you won't notice much of a difference in most situations. For almost any game or visual effect you create for the canvas element, this method will serve you just fine. However, you can add one more thing to take the realism just a notch higher.
If you hold the most rubbery, bounciest ball ever made out at arm's length and drop it, it would fall to the floor and bounce back up almost to where it started—never making it all the way back to your hand. This is because the ball loses a little bit of energy in the bounce. It might lose some energy in the form of sound, maybe a little heat, the floor will absorb some of the energy, and maybe the surrounding air will, too. However it works out, the important point is that the ball travels slower after the bounce than before. In other words, it loses some velocity on the axis of the bounce.
You can easily re-create this in the animation. So far, you've used -1 as the bounce factor. That means that the object bounces back with 100% of the force it hit with. To make it lose some energy, simply use a fraction of -1. As with other numeric values, it's best to define this as a variable at the top of your script and reference that in your code. Just create a variable named bounce and set it to something like -0.7:
var bounce = -0.7;
Then replace each instance of -l in the if statements with the variable bounce. Go ahead and try that, and you'll see how much more real the bounces look. Try different factors for the bounce variable until you get a feel for how it works.
One of the best ways to understand these concepts is to take each principle you learn and see how many other principles you can combine it with. You can check the example files at www.apress.com for document 05-bouncing-2.html, which demonstrates bouncing and gravity, but you should have enough knowledge to start adding things like this on your own. Perhaps you want to try using the keyboard to add acceleration to the ball, or apply something else you've already learned.
Let's leave behind the discussion of boundaries and look at what happens between the boundaries, when your object is moving through space.
Friction
So far, you've seen two scenarios:
- The object is simply moving with whatever velocity it has until it hits a boundary.
- Either the object itself or some external force is applying acceleration to the object, changing its velocity.
With either setup, unless the object is pushed or pulled, or it hits something, it keeps moving in the same direction at the same speed. But in the real world, it doesn't happen just like that.
Here's an example, grab a piece of paper, crumple it up, and throw it as hard as you can. There's a good chance it didn't even make it across the room. Sure, gravity pulls it down (y axis), but when it left your hand, it was moving pretty fast on the x axis. And yet, very quickly, it had almost zero x velocity.
Obviously, no “negative acceleration” was pulling the paper back toward your hand, but its velocity changed. This is known as friction, drag, resistance, or damping. Although it's not technically a force, it does act that way; it changes an object's velocity. The rule is that friction reduces only the magnitude of the velocity, not the direction. In other words, friction can reduce velocity to zero, but it will never make an object turn around and move in the other direction.
So, how do you implement friction in code? There are two ways, and like most things in life, you have the right way and the easy way. The easy way is preferred in this book, but you'll see examples of both and you can make up your own mind.
Friction, the right way
Friction is subtractive of velocity, which means you have a certain value for friction, and you subtract that from your velocity. More precisely, you must subtract it from the magnitude, or speed, of the velocity; you can't just subtract the friction from the x axis and y axis separately. If you do that for an object traveling at an angle, one of the component velocities will reach zero before the other, and the object will continue moving either vertically or horizontally, which looks strange.
What you need to do is find the angular velocity in terms of speed and direction (if you don't have it already). To find the speed, take the square root of vx squared plus vy squared (yes, that's the Pythagorean Theorem, which you should recognize from Chapter 3). To find the angle, you calculate Math.atan2(vy, vx), which looks like this:
var speed = Math.sqrt(vx * vx + vy * vy),

    angle = Math.atan2(vy, vx);
Then you can subtract the friction from the speed, but you want to make sure you don't send the speed into negative values, which reverses the velocity. If your friction is greater than your speed, the speed becomes zero. Here is the code for that calculation:
if (speed > friction) {

  speed -= friction;

} else {

  speed = 0;

}
At that point, you need to convert the angular velocity back into vx and vy, using sine and cosine, like so:
vx = Math.cos(angle) * speed;

vy = Math.sin(angle) * speed;
Here's how it looks all together in the document 06-friction-1.html:
<!doctype html>

<html>

 <head>

  <meta charset="utf-8">

  <title>Friction 1</title>

  <link rel="stylesheet" href="style.css">

 </head>

 <body>

  <canvas id="canvas" width="400" height="400"></canvas>

  <script src="utils.js"></script>

  <script src="ball.js"></script>

  <script>

  window.onload = function () {

    var canvas = document.getElementById('canvas'),

        context = canvas.getContext('2d'),
        ball = new Ball(),

        vx = Math.random() * 10 - 5,

        vy = Math.random() * 10 - 5,

        friction = 0.1;


    ball.x = canvas.width / 2;

    ball.y = canvas.height / 2;


    (function drawFrame () {

      window.requestAnimationFrame(drawFrame, canvas);

      context.clearRect(0, 0, canvas.width, canvas.height);


      var speed = Math.sqrt(vx * vx + vy * vy),

          angle = Math.atan2(vy, vx);

      if (speed > friction) {

        speed -= friction;

      } else {

        speed = 0;

      }

      vx = Math.cos(angle) * speed;

      vy = Math.sin(angle) * speed;

      ball.x += vx;

      ball.y += vy;

      ball.draw(context);

    }());

  };

  </script>

 </body>

</html>
Here, the friction is set to 0.1, and the ball is given a random velocity on the x and y axes. In the drawFrame function, speed and angle are calculated as we described. If speed is less than friction, subtract; otherwise, speed equals zero. Finally, vx and vy are recalculated and added to the position.
Test this example several times to see it at different speeds and angles. That's how friction looks, and it took a dozen lines of code and four trigonometry functions to accomplish. Now you're probably thinking that it's time to look at the easy way.
Friction, the easy way
As you would expect, the easy way to simulate friction is not as accurate as the technique that was just described, but nobody will ever notice. It consists of two lines of simple multiplication. Multiply the x and y velocities by some fraction of 1. A number around 0.9 usually works quite well, but use your eye as the judge. On each frame, vx and vy become 80% or 90% of what they were on previous frame. In theory, the velocity approaches zero, but never actually reaches it. In practice, the computer only calculates such numbers to a defined precision. But long before that, the applied motion is so small that it is indiscernible.
The good news is that the velocity never becomes negative using this method, so you don't have to check for that. Also, the x and y velocities approach zero at the same rate, so there's no need to convert axis velocities to angular and back.
The only alterations to the code (which can be found in the document 07-friction-2.html) is adjusting the friction variable to 0.95 and the following changes to the drawFrame function:
(function drawFrame () {

  window.requestAnimationFrame(drawFrame, canvas);

  context.clearRect(0, 0, canvas.width, canvas.height);


  vx *= friction;

  vy *= friction;

  ball.x += vx;

  ball.y += vy;

  ball.draw(context);

}());
Now, that's certainly easier! Test this version a number of times and get a feel for it. The motion looks virtually identical to the “correct” method, but at a fraction of the calculation cost. And the average viewer won't even notice.
Because these methods continue to add the friction value to the ball's position after it has any visual effect, you can save some calculations by checking whether the number is larger than a designated minimum distance before applying the friction, like so:
if (Math.abs(vx) > 0.001) {

  vx *= friction;

  ball.x += vx;

}
Math.abs returns the absolute value of vx. The friction variable is a fairly arbitrary number (within a range) and really depends on how the animation “feels” to you. Experiment with different values to see how it affects the motion characteristics.
Friction applied
We return to our familiar spaceship simulation and apply some friction to that universe. In example 08-ship-sim-friction.html, take the flle 03-ship-sim-2.html and add a friction variable:
var friction = 0.97;
Then, change the drawFrame function to the following:
(function drawFrame () {

  window.requestAnimationFrame(drawFrame, canvas);

  context.clearRect(0, 0, canvas.width, canvas.height);


  ship.rotation += vr * Math.PI / 180;

  var angle = ship.rotation,

        ax = Math.cos(angle) * thrust,

        ay = Math.sin(angle) * thrust,

        left = 0,

        right = canvas.width,

        top = 0,

        bottom = canvas.height;
  vx += ax;

  vy += ay;

  vx *= friction;

  vy *= friction;

  ship.x += vx;

  ship.y += vy;


  //screen wrapping

  if (ship.x - ship.width / 2 > right) {

    ship.x = left - ship.width / 2;

  } else if (ship.x + ship.width / 2 < left) {

    ship.x = right + ship.width / 2;

  }

  if (ship.y - ship.height / 2 > bottom) {

    ship.y = top - ship.height / 2;

  } else if (ship.y < top - ship.height / 2) {

    ship.y = bottom + ship.height / 2;

  }

  ship.draw(context);

}());
That's a different feel for just three new lines of code.
Don't forget to think outside the x, y box. Friction can be applied anywhere you have any type of velocity. Maybe you have something that rotates (with a vr property), applying friction to that eventually causes it to slow down and stop spinning. You can try that with the spinning arrow example from Chapter 5.
You can see how you can use this approach for all types of objects, such as a roulette wheel, an electric fan, or a propeller.
Important formulas in this chapter
Let's review the important formulas introduced in this chapter.
Remove an out-of-bounds object
if (object.x - object.width / 2 > right ||

    object.x + object.width / 2 < left ||

    object.y - object.height / 2 > bottom ||

    object.y + object.height / 2 < top) {

  //code to remove object

}
Regenerate an out-of-bounds object
if (object.x - object.width / 2 > right ||

    object.x + object.width / 2 < left ||

    object.y - object.height / 2 > bottom ||

    object.y + object.height / 2 < top) {

  //reset object position and velocity

}
Screen wrapping for an out-of-bounds object
if (object.x - object.width / 2 > right) {

  object.x = left - object.width / 2;

} else if (object.x + object.width / 2 < left) {

  object.x = right + object.width / 2;

} if (object.y - object.height / 2 > bottom) {

  object.y = top - object.height / 2;

} else if (object.y + object.height / 2 < top) {

  object.y = bottom + object.height / 2;

}
Apply friction (the correct way)
speed = Math.sqrt(vx * vx + vy * vy);

angle = Math.atan2(vy, vx);

if (speed > friction) {

  speed -= friction;

} else {

  speed = 0;

}

vx = Math.cos(angle) * speed;

vy = Math.sin(angle) * speed;
Apply friction (the easy way)
vx *= friction;

vy *= friction;
Summary
This chapter covered an object's interaction with its environment—specifically, an object's interaction with the edges of its universe and the universe itself. You learned the possible ways to handle an object that has gone off the edge of the world, including removing, regenerating, wrapping, and bouncing. And, you now know all about applying friction to objects. With these simple techniques, you can make the objects in your animations move with a great deal of realism. In the next chapter, you allow the user to interact with the objects.