
Chapter 14
Inverse Kinematics: Dragging and Reaching
What we'll cover in this chapter:
- Reaching and dragging single segments
- Dragging multiple segments
- Reaching with multiple segments
- Using the standard inverse kinematics method
In Chapter 13, we covered the basics of kinematics and the difference between inverse and forward kinematics. The last chapter was about forward kinematics, and now you're ready for its close relative, inverse kinematics: the movements for dragging and reaching.
As with the forward kinematics examples, the code in this chapter build systems from individual segments. You begin with single segments, and then move on to multiple segments. First, you'll see the simplest method for calculating the various angles and positions. This just approximates measurements using the basic trigonometry you've already seen in action. Then, we briefly cover another method using the law of cosines, which can be more accurate at the cost of being more complex—that familiar trade-off.
Reaching and Dragging Single Segments
When the free end of the system reaches for a target, the other end of the system, the base, might be unmovable. So the free end might never be able to get all the way to the target if it is out of range. An example of this is when you grab hold of something. Your fingers move toward the object, your wrist pivots to put your fingers as close as possible, and your elbow, shoulder, and the rest of your body move in whatever way they can, to give you as much reach as possible. Sometimes, the combination of all these positions put your fingers in contact with the object, and other times, you won't be able to reach it. If the object moves from side to side, all your limbs constantly reposition themselves to keep your fingers reaching as close as they can to the object. Inverse kinematics shows you how to position all the pieces to give the best reach.
The other type of inverse kinematics is when something is dragged. In this case, the free end is moved by some external force. Wherever it is, the rest of the parts of the system follow along behind it, positioning themselves in whatever way is physically possible. For this, imagine another person lying on the floor, that you grab by the hand and drag around. The force you apply to their hand causes the wrist, elbow, shoulder, and rest of their body to pivot and move in whatever way they can as they are dragged along. In this case, inverse kinematics shows you how the pieces fall into the correct positions as they are dragged.
To give you an idea of the difference between these two methods—drag and reach—let's run through an example of each one with a single segment. You need the Segment class we used in the Chapter 13, so make sure you include that script in your document.
Reaching with a Single Segment
For reaching, all the segment is able to do is turn toward the target. The target, in these examples, is the mouse cursor. To turn the segment toward the target, you need the distance between the two on the x and y axes. You then can use Math.atan2 to get the angle between them in radians, which we use to rotate the segment. Here's the code (which you also find in 01-one-segment.html):
<!doctype html>

<html>

 <head>

  <meta charset="utf-8">

  <title>One Segment</title>

  <link rel="stylesheet" href="style.css"<

 </head>

 <body>

  <canvas id="canvas" width="400" height="400"></canvas>

  <script src="utils.js">t</script>

  <script src="segment.js">t</script>

  <script>

  window.onload = function () {

    var canvas = document.getElementById('canvas'),

        context = canvas.getContext('2d'),

        mouse = utils.captureMouse(canvas),

        segment0 = new Segment(100, 20);


    segment0.x = canvas.width / 2;

    segment0.y = canvas.height / 2;


    (function drawFrame () {

      window.requestAnimationFrame(drawFrame, canvas);

      context.clearRect(0, 0, canvas.width, canvas.height);


      var dx = mouse.x - segment0.x,

          dy = mouse.y – segment0.y;
segment0.rotation = Math.atan2(dy, dx);
segment0.draw(context);
}());
};
</script>
</body>
</html>
Figure 14-1 shows the result. Test this and watch how the segment follows the mouse around. Even if the segment is too far away, you can see how it seems to be reaching for the mouse.
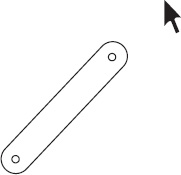
Figure 14-1. A single segment reaching toward the mouse
Dragging with a Single Segment
Now, let's try dragging. The first part of the dragging method is the same as the reaching method: You rotate the object toward the mouse. But then you go a step further and move the segment to a position that places the second pivot point exactly where the mouse is. To do that, you need to know the distance between the two pins on each axis. You can get this from the difference (on each axis) between the segment's getPin() point and its actual x, y location—we call these w and h. Then subtract w and h from the current mouse position, and you know where to put the segment. Here's the drawFrame function from 02-one-segment-drag.html, which is the only part that has changed from the previous example:
(function drawFrame () {

  window.requestAnimationFrame(drawFrame, canvas);

  context.clearRect(0, 0, canvas.width, canvas.height);


  var dx = mouse.x – segment0.x,

      dy = mouse.y – segment0.y;


  segment0.rotation = Math.atan2(dy, dx);


  var w = segment0.getPin().x - segment0.x,

      h = segment0.getPin().y – segment0.y;


  segment0.x = mouse.x - w;

  segment0.y = mouse.y - h;
segment0.draw(context);
}());
The segment is now permanently attached to the mouse and rotates to drag along behind it. You can even push the segment around in the opposite direction.
Dragging Multiple Segments
Dragging a system with inverse kinematics is a bit simpler than reaching, so we cover that first. We begin moving a couple of segments.
Dragging Two Segments
Starting with the previous example, create another segment, segment1, at the top of the script. Because segment0 is already dragging to the mouse position, you have segment1 drag on segment0. To start with, you can use some of the same code as before—just change a few references. The new additions to the drawFrame function are shown in bold:
(function drawFrame () {

  window.requestAnimationFrame(drawFrame, canvas);

  context.clearRect(0, 0, canvas.width, canvas.height);


  var dx = mouse.x – segment0.x,

      dy = mouse.y – segment0.y;


  segment0.rotation = Math.atan2(dy, dx);


  var w = segment0.getPin().x – segment0.x,

      h = segment0.getPin().y – segment0.y:


  segment0.x = mouse.x - h;

  segment0.y = mouse.y - w;


  dx = segment0.x – segment1.x;

  dy = segment0.y – segment1.y;


  segment1.rotation = Math.atan2(dy, dx);


  w = segment1.getPin().x – segment1.x;

  h = segment1.getPin().y – segment1.y;

  segment1.x = segment0.x – w;

  segment1.y = segment0.y – h;


  segment0.draw(context);

  segment1.draw(context);

}());
In the new section of code, you figure out the distance from segment1 to segment0, and use that for the angle, rotation, and position of segment1—reusing the variables from the previous calculation. You can test this example and see how it's a pretty realistic two-segment system.
In the next example, we remove some of the duplicated code by creating a new function named drag. The parameters for this are the segment to drag and the x, y point to drag to. Then you move segment0 to point mouse.x, mouse.y and segment1 to point segment0.x, segment0.y. Here's the complete code listing for document 03-two-segment-drag.html:
<!doctype html>

<html>

 <head>

  <meta charset="utf-8">

  <title>Two Segment Drag</title>

  <link rel="stylesheet" href="style.css"<

 </head>

 <body>

  <canvas id="canvas" width="400" height="400"></canvas>

  <script src="utils.js"></script>

  <script src="segment.js"></script>

  <script>

  window.onload = function () {

    var canvas = document.getElementById('canvas'),

        context = canvas.getContext('2d'),

        mouse = utils.captureMouse(canvas),

        segment0 = new Segment(100, 20),

        segment1 = new Segment(100, 20);


    function drag (segment, xpos, ypos) {

      var dx = xpos - segment.x,

          dy = ypos – segment.y;


      segment.rotation = Math.atan2(dy, dx);


      var w = segment.getPin().x - segment.x,

          h = segment.getPin().y – segment.y;


      segment.x = xpos - w;

      segment.y = ypos - h;

    }


    (function drawFrame () {

      window.requestAnimationFrame(drawFrame, canvas);

      context.clearRect(0, 0, canvas.width, canvas.height);


      drag(segment0, mouse.x, mouse.y);

      drag(segment1, segment0.x, segment0.y);


      segment0.draw(context);

      segment1.draw(context);

    }());

  };

  </script>

 </body>

</html>
Dragging More Segments
Now you can add as many segments as you want. In the next example, add five segments, named segment0 through segment4, and store them in an array. Each segment is passed as an argument to the drag function. Here's the code (document 04-multi-segment-drag.html):
<!doctype html>

<html>

 <head>

  <meta charset="utf-8">

  <title>Multi Segment Drag</title>

  <link rel="stylesheet" href="style.css">

 </head>

 <body>

  <canvas id="canvas" width="400" height="400"></canvas>

  <script src="utils.js"></script>

  <script src="segment.js"></script>

  <script>

  window.onload = function () {

    var canvas = document.getElementById('canvas'),

        context = canvas.getContext('2d'),

        mouse = utils.captureMouse(canvas),

        segments = [],

        numSegments = 5;


    while (numSegments--) {

      segments.push(new Segment(50, 10));

    }


    function drag (segment, xpos, ypos) {

      var dx = xpos – segment.x,

          dy = ypos – segment.y;


      segment.rotation = Math.atan2(dy, dx);


      var w = segment.getPin().x – segment.x,

          h = segment.getPin().y – segment.y;


      segment.x = xpos - w;

      segment.y = ypos - h;

    }


    function move (segment, i) {

      if (i !== 0) {

        drag(segment, segments[i-1].x, segments[i-1].y);

      }

    }


    function draw (segment, i) {

      segment.draw(context);

    }

    (function drawFrame () {
window.requestAnimationFrame(drawFrame, canvas);
context.clearRect(0, 0, canvas.width, canvas.height);
drag(segments[0], mouse.x, mouse.y);
segments.forEach(move);
segments.forEach(draw);
}());
};
</script>
</body>
</html>
In the drawFrame animation loop, the first segment is positioned at the mouse cursor. Then, each segment is passed to the move function as an argument, and positioned behind the segment before it (using the drag function). The first segment is ignored in the move function because it has already been positioned. Figure 14-2 shows the result.
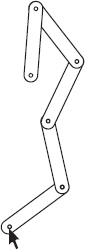
Figure 14-2. Multiple-segment dragging
Well, there you have the basics of inverse kinematics. You can add as many segments as you want by changing the numSegments variable. In Figure 14-3, you can see 50 segments, demonstrating just how robust this system is.
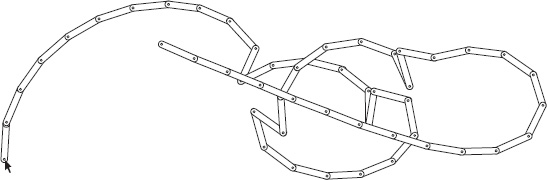
Figure 14-3. Dragging 50 segments
Reaching with Multiple Segments
The following excercises build off the first example in this chapter, 01-one-segment.html, and add to that. That animation contained a segment rotating to a target, which was the mouse position.
Reaching for the Mouse
To reach with multiple segments, first determine the position of the segment for it to touch the target, which is the same calculation you use to position the segment when you drag. In this case, you don't move the segment; you just find the position. You use the position as the target of the next segment up the line and have the segment rotate to that position. When you reach the base of the system, you then work back through the line, positioning each piece on the end of its parent. Figure 14-4 illustrates how this works.
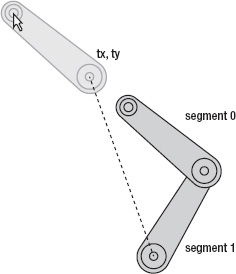
Figure 14-4. segment0 is moved to the mouse cursor. In turn, segment1 follows segment0, positioning itself toward point tx, ty.
For our example, we first need to add another segment to work with. At the top of the script, create an additional segment and position it in the center of the canvas element. Since this segment will now act as the base, remove the initial positioning for segment0 as well:
var segment1 = new Segment(100, 20);


segment1.x = canvas.width / 2;

segment1.y = canvas.height / 2;
The next step is to find the point where segment0 will hit the target. Once again, this is the same point you moved the segment to in the dragging examples, but don't move it, just store the position. So, you get this:
(function drawFrame () {

  window.requestAnimationFrame(drawFrame, canvas);

  context.clearRect(0, 0, canvas.width, canvas.height);


  var dx = mouse.x – segment0.x,

      dy = mouse.y – segment0.y;


  segment0.rotation = Math.atan2(dy, dx);


  var w = segment0.getPin().x – segment0.x,

      h = segment0.getPin().y – segment0.y,

      tx = mouse.x – w,

      ty = mouse.y – h;


  segment0.draw(context);

  segment1.draw(context);

}());
We called the point tx, ty because it will be the target for segment1 to rotate to.
Next, you add the rotation code for segment1 to rotate to its target. This code is the same as the calculation for segment0, but it uses a different segment and different target:
(function drawFrame () {

  window.requestAnimationFrame(drawFrame, canvas);

  context.clearRect(0, 0, canvas.width, canvas.height);


  var dx = mouse.x – segment0.x,

      dy = mouse.y – segment0.y;


  segment0.rotation = Math.atan2(dy, dx);


  var w = segment0.getPin().x – segment0.x,

      h = segment0.getPin().y – segment0.y,

      tx = mouse.x – w,

      ty = mouse.y – h;


  dx = tx – segment1.x;

  dy = ty – segment1.y;


  segment1.rotation = Math.atan2(dy, dx);
segment0.draw(context);
segment1.draw(context);
}());
Finally, reposition segment0 so it sits on the end of segment1, because segment1 is now rotated to a different position:
(function drawFrame () {
window.requestAnimationFrame(drawFrame, canvas);
context.clearRect(0, 0, canvas.width, canvas.height);
var dx = mouse.x – segment0.x,
dy = mouse.y – segment0.y;
segment0.rotation = Math.atan2(dy, dx);
var w = segment0.getPin().x – segment0.x,
h = segment0.getPin().y – segment0.y,
tx = mouse.x – w,
ty = mouse.y – h;
dx = tx – segment1.x;
dy = ty – segment1.y;
segment1.rotation = Math.atan2(dy, dx);
segment0.x = segment1.getPin().x;
segment0.y = segment1.getPin().y;
  segment0.draw(context);

  segment1.draw(context);

}());
When you test this example, you see that the segments work as a unit to reach for the mouse. Now, let's clean up the code so you can add more segments to it easily. Move all of the rotation code into its own function, named reach:
function reach (segment, xpos, ypos) {

  var dx = xpos – segment.x,

      dy = ypos – segment.y;


  segment.rotation = Math.atan2(dy, dx);


  var w = segment.getPin().x – segment.x,

      h = segment.getPin().y – segment.y;


  return {

    x: xpos – w,

    y: ypos – h

  };

}
This function sets the rotation of the segment parameter, and then uses it to return an object with x and y properties based on our previous calculations for tx and ty. This allows you to call the reach function to rotate a segment, and returns a target you can pass to the next call. So, the drawFrame function becomes the following:
(function drawFrame () {

  window.requestAnimationFrame(drawFrame, canvas);

  context.clearRect(0, 0, canvas.width, canvas.height);


  var target = reach(segment0, mouse.x, mouse.y);

  reach(segment1, target.x, target.y);


  segment0.draw(context);

  segment1.draw(context);

}());
Here, segment0 reaches toward the mouse, and segment1 reaches toward segment0. We then move the positioning code into its own function:
function position (segmentA, segmentB) {

  segmentA.x = segmentB.getPin().x;

  segmentA.y = segmentB.getPin().y;

}
Then you can position segment0 on the end of segment1 by calling:
position(segment0, segment1);
Here's the final code for 05-two-segment-reach.html:
<!doctype html>

<html>

 <head>

  <meta charset="utf-8">

  <title>Two Segment Reach</title>

  <link rel="stylesheet" href="style.css">

 </head>

 <body>

  <canvas id="canvas" width="400" height="400"></canvas>

  <script src="utils.js"></script>

  <script src="segment.js"></script>

  <script>

  window.onload = function () {

    var canvas = document.getElementById('canvas'),

        context = canvas.getContext('2d'),

        mouse = utils.captureMouse(canvas),

        segment0 = new Segment(100, 20),

        segment1 = new Segment(100, 20);

    segment1.x = canvas.width / 2;

    segment1.y = canvas.height / 2;


    function reach (segment, xpos, ypos) {
var dx = xpos – segment.x,
dy = ypos – segment.y;
segment.rotation = Math.atan2(dy, dx);
var w = segment.getPin().x – segment.x,
h = segment.getPin().y – segment.y;
return {
x: xpos - w,
y: ypos - h
};
}
function position (segmentA, segmentB) {
segmentA.x = segmentB.getPin().x;
segmentA.y = segmentB.getPin().y;
}
(function drawFrame () {
window.requestAnimationFrame(drawFrame, canvas);
context.clearRect(0, 0, canvas.width, canvas.height);
var target = reach(segment0, mouse.x, mouse.y);
reach(segment1, target.x, target.y);
position(segment0, segment1);
segment0.draw(context);
segment1.draw(context);
}());
};
</script>
</body>
</html>
Building off this example, it's easy to create an array to hold as many segments as you like. The next exercise does just that, 06-multi-segment-reach.html:
<!doctype html>

<html>

 <head>

  <meta charset="utf-8">

  <title>Multi Segment Reach</title>

  <link rel="stylesheet" href="style.css">

 </head>

 <body>

  <canvas id="canvas" width="400" height="400"></canvas>

  <script src="utils.js"></script>

  <script src="segment.js"></script>

  <script>

  window.onload = function () {

    var canvas = document.getElementById('canvas'),

        context = canvas.getContext('2d'),

        mouse = utils.captureMouse(canvas),
segments = [],
numSegments = 5,
target; //referenced by drawFrame and move
while (numSegments--) {
segments.push(new Segment(50, 10));
}
//center the last one
segments[segments.length - 1].x = canvas.width / 2;
segments[segments.length - 1].y = canvas.height / 2;
function reach (segment, xpos, ypos) {
var dx = xpos – segment.x,
dy = ypos – segment.y;
segment.rotation = Math.atan2(dy, dx);
var w = segment.getPin().x – segment.x,
h = segment.getPin().y – segment.y;
return {
x: xpos - w,
y: ypos - h
};
}
function position (segmentA, segmentB) {
segmentA.x = segmentB.getPin().x;
segmentA.y = segmentB.getPin().y;
}
function move (segment, i) {
if (i !== 0) {
target = reach(segment, target.x, target.y);
position(segments[i - 1], segment);
}
}
function draw (segment) {
segment.draw(context);
}
(function drawFrame () {
window.requestAnimationFrame(drawFrame, canvas);
context.clearRect(0, 0, canvas.width, canvas.height);
target = reach(segments[0], mouse.x, mouse.y);
segments.forEach(move);
segments.forEach(draw);
}());
}; </script>
</body>
</html>
You can see the results of this example in Figure 14-5. Of couse, the segment chain doesn't have to chase the mouse all day. Let's see what happens when we give it a toy to play with.
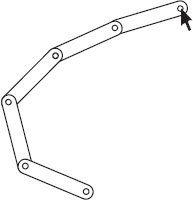
Figure 14-5. Multiple-segment reaching
Reaching for an Object
Again, we build off the previous example. This time we need the Ball class, so include that file in your document. Then create some new variables at the top of the script for the ball to use as it moves around:
var ball = new Ball(20),
gravity = 0.5,
bounce = -0.9;
ball.vx = 10; //start the ball with velocity on the x axis
We're also going to shrink the segments down a little bit, to give them more room to play. You can adjust these values to see what looks best in your animation:
while (numSegments--) {
segments.push(new Segment(20, 10));
}
Create another function, moveBall, that allows us to separate the ball-moving code so it doesn't clutter up the program:
function moveBall () {
ball.vy += gravity;
ball.x += ball.vx;
ball.y += ball.vy;
if (ball.x + ball.radius > canvas.width) {
ball.x = canvas.width – ball.radius;
ball.vx *= bounce;
} else if (ball.x - ball.radius < 0) { ball.x = ball.radius;
ball.vx *= bounce;
}
if (ball.y + ball.radius > canvas.height) {
ball.y = canvas.height – ball.radius;
ball.vy *= bounce;
} else if (ball.y - ball.radius < 0) {
ball.y = ball.radius;
ball.vy *= bounce;
}
}
Finally, in the drawFrame animation loop, call the moveBall function, and have the first segment reach for the ball instead of the mouse:
(function drawFrame () {
window.requestAnimationFrame(drawFrame, canvas);
context.clearRect(0, 0, canvas.width, canvas.height);
moveBall();
target = reach(segments[0],ball.x, ball.y);
segments.forEach(move);
segments.forEach(draw);
ball.draw(context);
}());
When you run this example you should see something like Figure 14-6. The ball now bounces around, and the arm follows it. Pretty amazing, right?
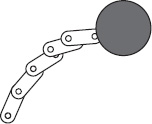
Figure 14-6. It likes to play ball.
Right now, the arm touches the ball, but the ball completely ignores the arm. Let's have them interact.
Adding Some Interaction
How the ball and the arm interact depends on what you want them to do. But, no matter what you do, the first thing you need is some collision detection. Then, you can have the reaction if there is a collision. Again, put all the code into its own function and call it from the drawFrame animation loop:
(function drawFrame () {
window.requestAnimationFrame(drawFrame, canvas);
context.clearRect(0, 0, canvas.width, canvas.height); moveBall();
target = reach(segments[0], ball.x, ball.y);
segments.forEach(move);
checkHit();
segments.forEach(draw);
ball.draw(context);
}());
The collision detection is executed after the motion code, so everything is in its final position. Here's the start of the checkHit function:
function checkHit () {
var segment = segments[0],
dx = segment.getPin().x – ball.x,
dy = segment.getPin().y – ball.y,
dist = Math.sqrt(dx * dx + dy * dy);
if (dist < ball.radius) {
//reaction goes here
}
}
The first thing you do is determine the distance from the end pin of the first arm to the ball, and use distance-based collision detection to see whether it hits the ball.
Now you need to do something when you detect a hit. For this example, the arm throws the ball up in the air (negative y velocity) and moves it randomly on the x axis (random x velocity), like so:
function checkHit () {
var segment = segments[0],
dx = segment.getPin().x – ball.x,
dy = segment.getPin().y – ball.y,
dist = Math.sqrt(dx * dx + dy * dy);
if (dist < ball.radius) {
ball.vx += Math.random() * 2 – 1;
ball.vy -= 1;
}
}
This works out pretty well, and the final code can be found in 07-play-ball.html. If the arm happens to lose its ball, don't be sad, you can always refresh your browser to keep playing. But this example is just that, an example. You might want to use this technique to have the arm catch the ball and throw it toward a target, or play catch with another arm. Try different reactions, because you certainly know enough now to do some interesting things.
Using the Standard Inverse Kinematics Method
The method we describe for inverse kinematics is relatively easy to understand and program, doesn't require a lot of system resources to process, and most importantly, works. But there is a more standard, mathematical, solution to this problem using the law of cosines. We take a look at the standard way of doing inverse kinematics, so then you have a couple different methods at your disposal and can choose whichever one you like.
Introducing the Law of Cosines
This way of calculating inverse kinematics uses something called the law of cosines. Recall that in Chapter 3, all the examples used right triangles, which are triangles with one right angle (90 degrees). The rules for such triangles are fairly simple: Sine equals opposite over hypotenuse, cosine equals adjacent over hypotenuse, etc. We use these rules quite extensively throughout the book.
But what if you have a triangle that doesn't have a 90-degree angle? Well, that's where the law of cosines fits in, it can help us figure out the various angles and lengths of this kind of triangle. It is a little more complex, but if you have enough information about the triangle, you can use this formula to figure out the rest. So what does this have to do with inverse kinematics? Take a look at the diagram in Figure 14-7.
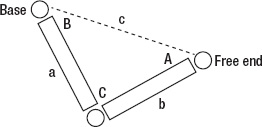
Figure 14-7. Two segments form a triangle with sides a, b, c, and angles A, B, C.
Here, you have two segments. The one on the left (side a) is the base, which is fixed, so you know that location. You want to put the free end at the position shown. Thus, you've formed a triangle.
What do we know about this triangle? You can easily find the distance between the two ends—the length of side c. And you know the length of each segment—sides a and b. So, you know all three lengths.
What do you need to know about this triangle? You just need the two angles of the two segments—angles B and C. This is where the law of cosines can help you:
c2 = a2 + b2 - 2 × a × b × cos C
Now, you need to know angle C, so you can isolate that on one side. We won't go through each step, but, with a little algebra, you should wind up with this:
C = acos ((a2 + b2 - c2) / (2 × a × b))
The acos there is arccosine, or inverse cosine. The cosine of an angle gives you a ratio, and the arccosine of that ratio gives you back the angle. The JavaScript function for this is Math.acos. Because you know sides a, b, and c, you can now find angle C. Similarly, you need to know angle B, and the law of cosines says this:
b2 = a2 + c2 - 2 × a × c × cos B
Which, when isolating angle B, boils down to this:
Converting these equations to JavaScript gives you this:
var B = Math.acos((a * a + c * c - b * b) / (2 * a * c)),
C = Math.acos((a * a + b * b - c * c) / (2 * a * b));
Now you have almost everything you need to position things. Almost, because the angles B and C aren't really the angles of rotation you use for the segments. Look at the next diagram in Figure 14-8.
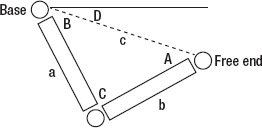
Figure 14-8. Figuring the rotation of side a
Although you know angle B, you still need to determine how much to actually rotate side a (segment1). This is how far from zero, or horizontal, it's going to be, and is represented by angles D plus B. To get angle D, call Math.atan2 using the difference between the free end and base position. For the rotation of side b (segment0), you know angle C, but that is only in relation to side a So you take the rotation of side a, plus 180, plus angle C, (as shown in Figure 14-9), and this is your angle E.
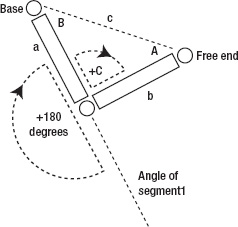
Figure 14-9. Figuring out angle E and the rotation of side b
Yes, this way requires a lot more math. But let's see how this looks in code, which should hopefully make the calculations a little clearer.
Programming the Law of Cosines
First, here's the complete code listing for next example (08-cosines-1.html), then we'll step throught it:
<!doctype html>
<html>
<head>
<meta charset="utf-8">
<title>Cosines 1</title>
<link rel="stylesheet" href="style.css">
</head>
<body>
<canvas id="canvas" width="400" height="400"></canvas>
<script src="utils.js"></script>
<script src="segment.js"></script>
<script>
window.onload = function () {
var canvas = document.getElementById('canvas'),
context = canvas.getContext('2d'),
mouse = utils.captureMouse(canvas),
segment0 = new Segment(100, 20),
segment1 = new Segment(100, 20);
segment1.x = canvas.width / 2;
segment1.y = canvas.height / 2;
(function drawFrame () {
window.requestAnimationFrame(drawFrame, canvas);
context.clearRect(0, 0, canvas.width, canvas.height);
var dx = mouse.x – segment1.x,
dy = mouse.y – segment1.y,
dist = Math.sqrt(dx * dx + dy * dy),
a = 100,
b = 100,
c = Math.min(dist, a + b),
B = Math.acos((b * b - a * a - c * c) / (-2 * a * c)),
C = Math.acos((c * c - a * a - b * b) / (-2 * a * b)),
D = Math.atan2(dy, dx),
E = D + B + Math.PI + C;
segment1.rotation = (D + B);
var target = segment1.getPin();
segment0.x = target.x;
segment0.y = target.y;
segment0.rotation = E;
segment0.draw(context);
segment1.draw(context);
}());
};
  </script>

 </body>

</html>
Here's the procedure for this excercise:
- Get the distance from
segment1to the mouse. - Get the lengths of the three sides. Sides
aandbare easy. They're equal to 100, because that's how long we made the segments. Sidecis equal todistora + b, whichever is smaller. This is because one side of a triangle can't be longer than the other two sides added together. - Figure out angles
BandCusing the law of cosines formula, and angleDusingMath.atan2. angleE, as mentioned, isD+B+ 180 +C. But in code, you substituteMath.PIradians for 180 degrees. - Just as the diagram in Figure 14-8 shows, use the angle
D+Bassegment1's rotation. Use the same angle to find the end point ofsegment1and positionsegment0on it. - Finally,
segment0's rotation is angleE.
So that's inverse kinematics using the law of cosines. You might notice that the joint always bends the same way. This might be good if you're building something like an elbow or a knee that can bend only one way, but what if you want to bend it the other way?
When you figure out the angles analytically like this, there are two solutions to the problem: It can bend this way, or it can bend that way. You coded it to bend one way by adding D and B, and then adding C. If you subtracted them all, you get the same effect, but the segment bends in the other direction. Here's the modified drawFrame function to see how this looks (document 09-cosines-2.html):
(function drawFrame () {

  window.requestAnimationFrame(drawFrame, canvas);

  context.clearRect(0, 0, canvas.width, canvas.height);
var dx = mouse.x – segment1.x,
dy = mouse.y – segment1.y,
dist = Math.sqrt(dx * dx + dy * dy),
a = 100,
b = 100,
c = Math.min(dist, a + b),
B = Math.acos((b * b - a * a - c * c) / (-2 * a * c)),
C = Math.acos((c * c - a * a - b * b) / (-2 * a * b)),
D = Math.atan2(dy, dx),
E = D - B + Math.PI – C;
segment1.rotation = (D – B);
var target = segment1.getPin();
segment0.x = target.x;
segment0.y = target.y;
segment0.rotation = E;
segment0.draw(context);
segment1.draw(context);
}());
If you want it to bend either way, you need to figure out some kind of conditional logic to say: “If it's in this position, bend this way; otherwise, bend that way.” But these examples should give you plenty to get started.
Important Formulas in This Chapter
For the standard form of inverse kinematics, you use the law of cosines formula.
Law of Cosines
a2 = b2 + c2 - 2 × b × c × cos A

b2 = a2 + c2 - 2 × a × c × cos B

c2 = a2 + b2 - 2 × a × b × cos C
Law of Cosines in JavaScript
var A = Math.acos((b * b + c * c – a * a) / (2 * b * c)),

    B = Math.acos((a * a + c * c – b * b) / (2 * a * c)),

    C = Math.acos((a * a + b * b – c * c) / (2 * a * b));
Summary
Inverse kinematics is a vast subject—far more than can ever be covered in a single chapter. Even so, this chapter described some pretty interesting and useful things. You saw how to set up an inverse kinematics system and two ways of looking at it: dragging and reaching. Hopefully you've seen that there's some fun stuff you can build with it, and it doesn't have to be that complex. There's much more that can be done with inverse kinematics, and you should be ready to go discover it and put it to use.
In the next chapter, you enter a whole new dimension, which enables you to add some depth to your animations.