
Chapter 17
Backface Culling and 3D Lighting
What we'll cover in this chapter:
- Backface culling
- Enhanced depth sorting
- 3D lighting
In the previous chapter, we looked at the basics of modeling 3D solids: how to create the points, lines, and polygons that make up a form, and how to give each polygon a color. But if you recall, that color was left at 50% transparency, so you could see right through it. Although we created some complex 3D shapes, the models still lack a lot in terms of realism.
In this chapter, we fix that by learning about backface culling (not drawing the polygons facing away from you), enhanced depth sorting (we covered this a bit in Chapter 15, but we take a new look at it in terms of polygons), and 3D lighting.
You should be amazed at the results on your 3D models once these three techniques are applied. After the first two, you will be able to create 3D solids that look solid. And with 3D lighting, they really come alive.
In the examples presented here, we build on the rotating, extruded, 3D letter A that was created in the previous chapter. This serves as a sufficiently complex model that makes it obvious if you do something wrong, and looks pretty good when you do everything right! The foundation of this chapter was provided by the techniques described by Todd Yard in Chapter 10 of Macromedia Flash MX Studio (friends of ED, 2002).
Backface culling
Backface culling was mentioned a couple of times in the previous chapter, and now you find out what it is all about and exactly how it works.
Remember that in the earlier models, you made all the color fills semitransparent. The reason for this was that you were always drawing every polygon, and you had no control over what order they were drawn in. So a polygon on the back of the model might get drawn on top of one on the front of the model, creating some odd looking results. Giving every face an alpha value of 50% made them all relatively equal and let us put off this discussion while you concentrated on your modeling techniques. Now, you are going to deal with it.
In principle, backface culling is simple. You draw the polygons that are facing you, and you don't draw the ones that are facing away from you. The tricky part is determining which are which.
You were constantly reminded to define the points of each polygon in a clockwise direction. Even though that is unnecessary for the examples so far, you now see why this is so important, and why it is good to get into the habit from the start.
It's an interesting observation that if the points of a polygon are arranged in a clockwise fashion when the triangle is facing you, they are counterclockwise when the polygon is facing away from you. You can see this demonstrated in Figure 17-1, which has a triangle facing you. (A note on terminology in this book: For the most part, “polygon” is used as a general term, and “triangle” for a specific triangular polygon under discussion.)
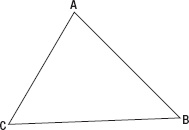
Figure 17-1. A triangle facing you has points in a clockwise direction.
In Figure 17-2, the triangle has been rotated so it is facing in the opposite direction.
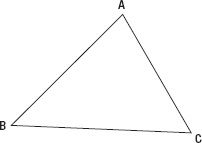
Figure 17-2. A triangle facing away from you has points in a counterclockwise direction.
Now you see that points go around in a counterclockwise direction.
But what does it mean when a polygon is “facing you”? It means that the exterior side of the polygon is facing you. Although it's not obvious when we look at a single triangle, remember that we”re talking about solids in 3D space. In that case, each polygon has one exterior side and one interior side.
There are times when you want to draw the opposite side of the triangle. For example, if the viewport is located inside a cube and looking out, you want to see the interior sides—the walls, ceiling, and floor. But for the examples here, looking at a model, you want to view the exterior sides of the geometry that it's made of.
When determining if a polygon is clockwise or counterclockwise, we refer to the screen positions of the points—not the 3D x, y, and z positions, but the getScreenX(), getScreenY() position that is the location on the canvas determined by applying perspective.
You can reverse the setup and make a system where counterclockwise polygons face you, and clockwise ones faced away. Either way works as long as you are consistent.
So again, we return to the question: How do you determine whether three points are arranged in a clockwise or counterclockwise direction? It's such an easy thing for your eyes to pick out, but when it comes to writing it down in code, the problem suddenly seems like an abstract concept.
What you do is add a method to the Triangle class, called isBackface. This evaluates the three points that make up the triangle, and returns true if they are counterclockwise and false if they are clockwise. Here is the updated Triangle class with the new method (file triangle.js). Notice that alpha is set to 1, since we are drawing opaque shapes in this chapter:
function Triangle (a, b, c, color) {

  this.pointA = a;

  this.pointB = b;

  this.pointC = c;

  this.color = (color === undefined) ? "#ff0000" : utils.parseColor(color);

  this.lineWidth = 1;

  this.alpha = 1;

}


Triangle.prototype.draw = function (context) {

  if (this.isBackface()) {

    return;

  }


  context.save();

  context.lineWidth = this.lineWidth;

  context.fillStyle = context.strokeStyle = utils.colorToRGB(this.color, this.alpha);

  context.beginPath();

  context.moveTo(this.pointA.getScreenX(), this.pointA.getScreenY());

  context.lineTo(this.pointB.getScreenX(), this.pointB.getScreenY());

  context.lineTo(this.pointC.getScreenX(), this.pointC.getScreenY());

  context.closePath();

  context.fill();

  if (this.lineWidth > 0) {

    context.stroke();
}
context.restore();
};
Triangle.prototype.isBackface = function () {
var cax = this.pointC.getScreenX() - this.pointA.getScreenX(),
cay = this.pointC.getScreenY() - this.pointA.getScreenY(),
bcx = this.pointB.getScreenX() - this.pointC.getScreenX(),
bcy = this.pointB.getScreenY() - this.pointC.getScreenY();
return (cax * bcy > cay * bcx);
};
For a quick explanation, the isBackface function calculates the lengths of two sides of the triangle, and with some multiplication and comparison involving the triangle's normal vector relative to the camera, is able to tell which direction they are going.
So, how do you use this method? Well, you don't really need to think about it; the function is called only from within the Triangle.draw method. If it returns true, it is a back-face triangle and should not be drawn, so the draw method stops there and returns. If isBackface returns false, the triangle is facing forward and is rendered as usual using the canvas drawing API.
Now, you can run 01-extruded-a.html, or any other 3D model you created, and you see that things look quite a bit different. As you rotate the shape around, you see that as soon as a particular face is facing the other way, it is no longer drawn. Things aren't perfect yet, because there are still parts that are farther away drawing on top of parts that are closer, but we”re getting there. If the term “z-sorting,” or “depth sorting,” just came to mind, you”re right on track—and that's what's coming up next.
Right now you should be looking at something similar to what appears in Figure 17-3.
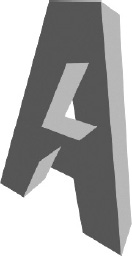
Figure 17-3. Backface culling in action
Enhanced depth sorting
Depth sorting, or z-sorting, is something we discussed in Chapter 15, when you applied perspective to the shapes. In that case, you sorted the array of objects (which had 3D properties) by their zpos property.
But now, you are not dealing with multiple objects. Whenever a particular polygon is drawn, it is drawn on top of any that have been drawn earlier. Rather than swapping an object's depth, you need to determine the order that each polygon is drawn. Specifically, you want to draw the ones that are farthest away first; then you draw the rest, working your way forward, so that the closest polygons are drawn last, covering anything they might be in front of.
So how do you do that? Well, you have all the polygons in an array called triangles. When you draw the shape, you iterate through this array drawing each triangle from first element through the end. You must sort this array so that the triangle that is farthest away is in element zero, and the one closest to the viewer is in the last element of the array.
This is similar to what we did when sorting the array of objects, but here, the triangles are just a collection of three Point3d objects. They don't have a single property that describes the overall depth of the triangle. However, it is easy enough to create such a property. It turns out that the value that works best is the minimum z value of the three points within a triangle. In other words, if a triangle had three points with depths 200, 250, and 300, we should say this triangle is at a z position of 200.
We can use the Math.min function to determine the minimum z value of all three points. We do this within a new getDepth method that we add to our Triangle class. Here's that function to add to the file triangle.js:
Triangle.prototype.getDepth = function () {
return Math.min(this.pointA.z, this.pointB.z, this.pointC.z);
};
Now you can sort the array of triangle objects and know which to draw first and which to draw last. Again, you want to sort it in descending order so that the one with the highest depth (farthest away) is first. You calculate this in the drawFrame animation loop, before you draw any of the triangles. Here's the updated section of our example in 02-extruded-a-depth.html:
function depth (a, b) {
return (b.getDepth() - a.getDepth());
}
(function drawFrame () {
window.requestAnimationFrame(drawFrame, canvas);
context.clearRect(0, 0, canvas.width, canvas.height);
angleX = (mouse.y - vpY) * 0.0005;
angleY = (mouse.x - vpX) * 0.0005;
points.forEach(move);
triangles.sort(depth);
triangles.forEach(draw);
}());
When you run this exercise in your browser, you should have a perfectly rendered solid, as shown in Figure 17-4. You've made real progress here, and the next step boosts this example over the top in terms of realism!
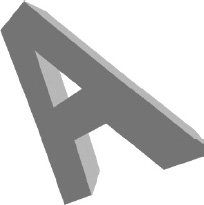
Figure 17-4. Sorting the depths puts it all right!
3D lighting
Although the previous example does a nice job with the render accuracy, it still lacks a bit of realism—it's a bit flat. You already know where we're heading with this, so let's add some 3D lighting.
Like backface culling, the specifics behind 3D lighting can get complex and math intensive. We don't want to get into a detailed discussion of all the finer points, but there's plenty of information on the web about the equations. What you have here are the basics, along with some functions you can use and adapt as needed.
First, you need a light source. The simplest light source has two properties: location and brightness. In more complex 3D systems, it might point in a certain direction, have a color of its own, have falloff rates, conical areas, and so on. But all that is beyond the scope of what you are doing here.
Let's start out by making a Light class to hold the two properties we just mentioned: location and brightness. Save this code as file light.js:
function Light (x, y, z, brightness) {
this.x = (x === undefined) ? -100 : x;
this.y = (y === undefined) ? -100 : y;
this.z = (z === undefined) ? -100 : z;
this.brightness = (brightness === undefined) ? 1 : brightness;
}
Light.prototype.setBrightness = function (b) {
this.brightness = Math.min(Math.max(b, 0), 1);
};
Now, at the top of your script, you can create a new default light like so:
var light = new Light();
Or, you can create a light with a particular position and location like this:
var light = new Light(100, 200, 300, 0.5);
Two things are important here. The distance between the object and light position has no affect on how brightly the object is lit. The coordinates of the light are used only to calculate the angle that the light ray bounces off the object and into the viewpoint for us to see it. Because the strength of the light you are creating does not fall off with distance, changing the x, y, and z to -1,000,000 or down to -1 makes no difference to the object brightness. Only the brightness property changes that characteristic of the light. You can certainly add this functionality, altering the brightness value based on the distance from the light to the area it is hitting, but that exercise is left to you.
Also, brightness must be a number from 0.0 to 1.0. If you go outside of that range, you can wind up with some odd results from the forthcoming calculations. This is something you can play around with, but for more realistic lighting effects, you want to stay within this range. For this reason, the brightness property is adjusted using the method setBrightness. This enables us to validate the number that is passed in, to make sure it falls within the specified range; this is known as clamping the light.
Now, the light source changes the brightness of the color of a triangle, based on the angle of the light that is falling on that polygon. If the polygon is facing directly at the light, it displays the full value of its color. As it turns away from the light, it gets darker and darker. Finally, when it is facing in the opposite direction of the light source, it is completely in shadow and colored black.
Because Triangle objects keep track of their own color and know how to draw themselves, each triangle also needs access to this light to perform calculations in its drawing function. So, in the Triangle constructor, give it a light property:
function Triangle (a, b, c, color) {
this.pointA = a;
this.pointB = b;
this.pointC = c;
this.color = (color === undefined) ? "#ff0000" : utils.parseColor(color);
this.lineWidth = 1;
this.alpha = 1;
this.light = null;
}
Then in the main script, assign each triangle a reference to the light object that we created:
triangles.forEach(function (triangle) {
triangle.light = light; });
Now, each Triangle object requires a way to look at its base color and the angle and brightness of the light, and return an adjusted color. Here is that method:
Triangle.prototype.getAdjustedColor = function () {
var color = utils.parseColor(this.color, true),
red = color >> 16,
green = color >> 8 & 0xff,
blue = color & 0xff,
lightFactor = this.getLightFactor();
red *= lightFactor;
green *= lightFactor;
blue *= lightFactor;
return utils.parseColor(red << 16 | green << 8 | blue);
};
This method first splits the triangle's base color into red, green, and blue components (see Chapter 4). The command utils.parseColor(this.color, true) converts the color from a string format to a number. There is a call to getLightFactor, which we'll look at next, but for now, it returns a number from 0.0 to 1.0. This is the amount to alter the color of that particular triangle, 1.0 being full brightness, and 0.0 being black.
Each of the component colors is then multiplied by that light factor, and they are joined back into a single color value—using utils.parseColor to convert it back to a string—and is returned as the adjusted color. This is the color of the triangle, based on its lighting.
Now, how do you come up with this lightFactor method? Let's look:
Triangle.prototype.getLightFactor = function () {
var ab = {
x: this.pointA.x – this.pointB.x,
y: this.pointA.y – this.pointB.y,
z: this.pointA.z – this.pointB.z
};
var bc = {
x: this.pointB.x – this.pointC.x,
y: this.pointB.y – this.pointC.y,
z: this.pointB.z – this.pointC.z
};
var norm = {
x: (ab.y * bc.z) - (ab.z * bc.y),
y:-((ab.x * bc.z) - (ab.z * bc.x)),
z: (ab.x * bc.y) - (ab.y * bc.x)
};
var dotProd = norm.x * this.light.x +
norm.y * this.light.y +
norm.z * this.light.z;
var normMag = Math.sqrt(norm.x * norm.x +
norm.y * norm.y +
norm.z * norm.z);
var lightMag = Math.sqrt(this.light.x * this.light.x +
this.light.y * this.light.y +
this.light.z * this.light.z);
return (Math.acos(dotProd / (normMag * lightMag)) / Math.PI) * this.light.brightness;
};
Now that is quite a function to take in. To fully understand all that's going on here, you need a good grasp of advanced vector math, but we'll walk through the basics of it.
First, you need to find the normal of the triangle. This is a vector that is perpendicular to the surface of the triangle, depicted in Figure 17-5 and mentioned briefly in the last chapter. Imagine you had a triangular piece of wood and you put a nail through the back of it so it stuck out directly through the face. The nail represents the normal of that surface. If you study anything about 3D rendering and lighting, you see all kinds of references to surface normals.
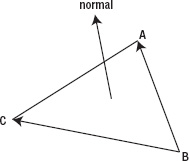
Figure 17-5. The normal is perpendicular to the surface of the triangle.
You can find the normal of a surface by taking two vectors that make up that surface plane and calculating their cross product. A cross product of two vectors is a new vector, which is perpendicular to those two. The two vectors you use are the lines between points A and B, and points B and C. Each vector is held in an object with x, y, and z properties.
var ab = {
x: this.pointA.x – this.pointB.x,
y: this.pointA.y – this.pointB.y,
z: this.pointA.z – this.pointB.z
};
var bc = {
x: this.pointB.x – this.pointC.x,
y: this.pointB.y – this.pointC.y,
z: this.pointB.z – this.pointC.z
};
Then you calculate the normal, which is another vector, and you call this object norm. The following code computes the cross product of the vectors ab and bc, using a standard formula from linear algebra:
var norm = {
x: (ab.y * bc.z) - (ab.z * bc.y),
y: -((ab.x * bc.z) - (ab.z * bc.x)),
z: (ab.x * bc.y) - (ab.y * bc.x)
};
Now you need to know how closely that normal aligns with the angle of the light. Another bit of vector math is the dot product, which is the difference between two vectors. You have the vector of the normal, and the vector of the light. The following calculates that dot product:
As you can see, dot products are a bit simpler than cross products!
Next, you calculate the magnitude of the normal and the magnitude of the light, which you might recognize as the 3D version of the Pythagorean Theorem:
var normMag = Math.sqrt(norm.x * norm.x +
norm.y * norm.y +
norm.z * norm.z);
var lightMag = Math.sqrt(this.light.x * this.light.x +
this.light.y * this.light.y +
this.light.z * this.light.z);
This lightMag variable is calculated every time a triangle is rendered, which allows for a moving light source. If you know that the light source is going to be fixed, you can create this variable at the beginning of the code and calculate it one time as soon as the light is created or assigned to the triangle. Alternatively, you can add a lightMag property to the Light class. This can be calculated any time its x, y, or z properties changed.
Finally, you take all these pieces you just calculated, and put them into the magic formula:
return (Math.acos(dotProd / (normMag * lightMag)) / Math.PI) * this.light.brightness;
Basically, dotProd is one measurement and (normMag * lightMag) is another. Dividing these two gives you a ratio. Recall from our discussion in Chapter 3 that the cosine of an angle gives you a ratio, and the arccosine of a ratio gives you an angle. So using Math.acos here on this ratio of measurements gives you an angle. This is essentially the angle at which the light is striking the surface of the polygon. It is in the range of 0 to Math.PI radians (0 to 180 degrees), meaning it's either hitting head on or completely from behind.
Dividing this angle by Math.PI gives you a percentage, and multiplying that by the percentage of brightness gives you your final light factor, which you use to alter the base color.
All this was just to get a new color for the surface! Implementing it in your existing code is pretty easy—you add it to the draw method of the Triangle class. Instead of using the base color, use the adjusted color, like so:
context.fillStyle = context.strokeStyle = this.getAdjustedColor();
To wrap things up, here is the complete and final code for triangle.js and the document 03-extrudeda-light.html.
First, here's the Triangle class:
function Triangle (a, b, c, color) {
this.pointA = a;
this.pointB = b;
this.pointC = c;
this.color = (color === undefined) ? "#ff0000" : utils.parseColor(color);
this.lineWidth = 1;
this.alpha = 1;
this.light = null;
}
Triangle.prototype.draw = function (context) {
if (this.isBackface()) {
return;
}
context.save();
context.lineWidth = this.lineWidth;
context.fillStyle = context.strokeStyle = this.getAdjustedColor();
context.beginPath();
context.moveTo(this.pointA.getScreenX(), this.pointA.getScreenY());
context.lineTo(this.pointB.getScreenX(), this.pointB.getScreenY());
context.lineTo(this.pointC.getScreenX(), this.pointC.getScreenY());
context.closePath();
context.fill();
if (this.lineWidth > 0) {
context.stroke();
  }

  context.restore();

};


Triangle.prototype.isBackface = function () {

  var cax = this.pointC.getScreenX() - this.pointA.getScreenX(),

      cay = this.pointC.getScreenY() - this.pointA.getScreenY(),

      bcx = this.pointB.getScreenX() - this.pointC.getScreenX(),

      bcy = this.pointB.getScreenY() - this.pointC.getScreenY();

  return (cax * bcy > cay * bcx);

};
Triangle.prototype.getDepth = function () {

  return Math.min(this.pointA.z, this.pointB.z, this.pointC.z);

};
Triangle.prototype.getAdjustedColor = function () {
var color = utils.parseColor(this.color, true),
red = color >> 16,
green = color >> 8 & 0xff,
blue = color & 0xff,
lightFactor = this.getLightFactor();
red *= lightFactor;
green *= lightFactor;
blue *= lightFactor;
return utils.parseColor(red << 16 | green << 8 | blue);
};
Triangle.prototype.getLightFactor = function () {
var ab = {
x: this.pointA.x – this.pointB.x,
y: this.pointA.y – this.pointB.y,
z: this.pointA.z – this.pointB.z
};
var bc = {
x: this.pointB.x – this.pointC.x,
y: this.pointB.y – this.pointC.y,
z: this.pointB.z – this.pointC.z
};
var norm = {
x: (ab.y * bc.z) - (ab.z * bc.y),
y:-((ab.x * bc.z) - (ab.z * bc.x)),
z: (ab.x * bc.y) - (ab.y * bc.x)
};
var dotProd = norm.x * this.light.x +
norm.y * this.light.y +
norm.z * this.light.z;
var normMag = Math.sqrt(norm.x * norm.x +
norm.y * norm.y +
norm.z * norm.z);
var lightMag = Math.sqrt(this.light.x * this.light.x +
this.light.y * this.light.y +
this.light.z * this.light.z);
return (Math.acos(dotProd / (normMag * lightMag)) / Math.PI) *
this.light.brightness;
};
And here's the code for example 03-extruded-a-light.html:
<!doctype html>
<html>
<head>
<meta charset="utf-8">
<title>Extruded A Light</title>
<link rel="stylesheet" href="style.css">
</head>
<body>
<canvas id="canvas" width="400" height="400"></canvas>
<script src="utils.js"></script>
<script src="point3d.js"></script>
<script src="triangle.js"></script>
<script src="light.js"></script>
<script>
window.onload = function () {
var canvas = document.getElementById('canvas'),
context = canvas.getContext('2d'),
mouse = utils.captureMouse(canvas),
light = new Light(),
points = [],
triangles = [],
fl = 250,
vpX = canvas.width / 2,
vpY = canvas.height / 2,
angleX, angleY; //referenced in drawFrame and move
//first set
points[0] = new Point3d( -50, -250, -50);
points[1] = new Point3d( 50, -250, -50); points[2] = new Point3d( 200, 250, -50);
points[3] = new Point3d( 100, 250, -50);
points[4] = new Point3d( 50, 100, -50);
points[5] = new Point3d( -50, 100, -50);
points[6] = new Point3d(-100, 250, -50);
points[7] = new Point3d(-200, 250, -50);
points[8] = new Point3d( 0, -150, -50);
points[9] = new Point3d( 50, 0, -50);
points[10] = new Point3d( -50, 0, -50);
//second set
points[11] = new Point3d( -50, -250, 50);
points[12] = new Point3d( 50, -250, 50);
points[13] = new Point3d( 200, 250, 50);
points[14] = new Point3d( 100, 250, 50);
points[15] = new Point3d( 50, 100, 50);
points[16] = new Point3d( -50, 100, 50);
points[17] = new Point3d(-100, 250, 50);
points[18] = new Point3d(-200, 250, 50);
points[19] = new Point3d( 0, -150, 50);
points[20] = new Point3d( 50, 0, 50);
points[21] = new Point3d( -50, 0, 50);
points.forEach(function (point) {
point.setVanishingPoint(vpX, vpY);
point.setCenter(0, 0, 200);
});
triangles[0] = new Triangle(points[0], points[1], points[8], "#cccccc");
triangles[1] = new Triangle(points[1], points[9], points[8], "#cccccc");
triangles[2] = new Triangle(points[1], points[2], points[9], "#cccccc");
triangles[3] = new Triangle(points[2], points[4], points[9], "#cccccc");
triangles[4] = new Triangle(points[2], points[3], points[4], "#cccccc");
triangles[5] = new Triangle(points[4], points[5], points[9], "#cccccc");
triangles[6] = new Triangle(points[9], points[5], points[10], "#cccccc");
triangles[7] = new Triangle(points[5], points[6], points[7], "#cccccc");
triangles[8] = new Triangle(points[5], points[7], points[10], "#cccccc");
triangles[9] = new Triangle(points[0], points[10], points[7], "#cccccc");
triangles[10] = new Triangle(points[0], points[8], points[10], "#cccccc");
triangles[11] = new Triangle(points[11], points[19], points[12], "#cccccc");
triangles[12] = new Triangle(points[12], points[19], points[20], "#cccccc");
triangles[13] = new Triangle(points[12], points[20], points[13], "#cccccc");
triangles[14] = new Triangle(points[13], points[20], points[15], "#cccccc");
triangles[15] = new Triangle(points[13], points[15], points[14], "#cccccc");
triangles[16] = new Triangle(points[15], points[20], points[16], "#cccccc");
triangles[17] = new Triangle(points[20], points[21], points[16], "#cccccc");
triangles[18] = new Triangle(points[16], points[18], points[17], "#cccccc");
triangles[19] = new Triangle(points[16], points[21], points[18], "#cccccc");
triangles[20] = new Triangle(points[11], points[18], points[21], "#cccccc");
triangles[21] = new Triangle(points[11], points[21], points[19], "#cccccc");
triangles[22] = new Triangle(points[0], points[11], points[1], "#cccccc");
triangles[23] = new Triangle(points[11], points[12], points[1], "#cccccc");
triangles[24] = new Triangle(points[1], points[12], points[2], "#cccccc");
triangles[25] = new Triangle(points[12], points[13], points[2], "#cccccc"); triangles[26] = new Triangle(points[3], points[2], points[14], "#cccccc");
triangles[27] = new Triangle(points[2], points[13], points[14], "#cccccc");
triangles[28] = new Triangle(points[4], points[3], points[15], "#cccccc");
triangles[29] = new Triangle(points[3], points[14], points[15], "#cccccc");
triangles[30] = new Triangle(points[5], points[4], points[16], "#cccccc");
triangles[31] = new Triangle(points[4], points[15], points[16], "#cccccc");
triangles[32] = new Triangle(points[6], points[5], points[17], "#cccccc");
triangles[33] = new Triangle(points[5], points[16], points[17], "#cccccc");
triangles[34] = new Triangle(points[7], points[6], points[18], "#cccccc");
triangles[35] = new Triangle(points[6], points[17], points[18], "#cccccc");
triangles[36] = new Triangle(points[0], points[7], points[11], "#cccccc");
triangles[37] = new Triangle(points[7], points[18], points[11], "#cccccc");
triangles[38] = new Triangle(points[8], points[9], points[19], "#cccccc");
triangles[39] = new Triangle(points[9], points[20], points[19], "#cccccc");
triangles[40] = new Triangle(points[9], points[10], points[20], "#cccccc");
triangles[41] = new Triangle(points[10], points[21], points[20], "#cccccc");
triangles[42] = new Triangle(points[10], points[8], points[21], "#cccccc");
triangles[43] = new Triangle(points[8], points[19], points[21], "#cccccc");
triangles.forEach(function (triangle) {
  triangle.light = light; });
function move (point) {
point.rotateX(angleX);
point.rotateY(angleY);
}
function depth (a, b) {
return (b.getDepth() - a.getDepth());
}
function draw (triangle) {
triangle.draw(context);
}
(function drawFrame () {
window.requestAnimationFrame(drawFrame, canvas);
context.clearRect(0, 0, canvas.width, canvas.height);
angleX = (mouse.y - vpY) * 0.0005;
angleY = (mouse.x - vpX) * 0.0005;
points.forEach(move);
triangles.sort(depth);
triangles.forEach(draw);
}());
};
</script>
</body>
</html>
As you can see, there are only minor changes to the main document, because most of the work happens in Triangle class. However, all the triangles are now the same color, which shows off the lighting effect much better (see Figure 17-6).
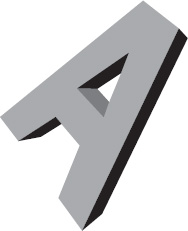
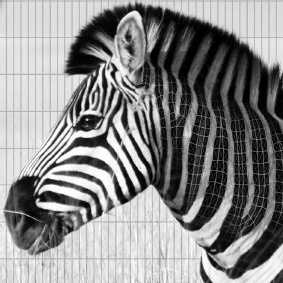
Figure 17-6. 3D solid with backface culling, depth sorting, and 3D lighting
Summary
That was a lot to cover in just a few pages! But the results are incredible and you now have the tools to make some stunning 3D animations. There are a lot of variations you can throw in here; for instance, in the last example, the light is stationary and the object moves. Try moving the light around instead. (It's just a matter of altering its x, y, and/or z positions.)
That about wraps up our main discussion of 3D. In the next chapter, you look at matrix math, which is often used as an alternative to some of the scaling and rotation methods you used so far, and thus is something you often see in 3D programming.