
One thing that ES5 does not have is a built-in module system. When you built CoffeeRun, you used a workaround that let you write modular code – but depended on modifying a global variable.
ES6 provides true modules, like those in many other programming languages. Babel understands ES6 module syntax, but there is no equivalent ES5 code for it to convert to. That is why Browserify is necessary.
Figure 17.10 shows how Browserify and Babel will work together.

By default, Babel converts ES6 module syntax into the equivalent
Node.js-style require and
module.exports syntax. Browserify then converts
Node.js module code into ES5-friendly functions.
Open package.json and add a configuration section for Browserify:
...
  "scripts": {
    "test": "echo "Error: no test specified" &&
     exit 1",
    "start": "node index.js",
    "dev": "nodemon index.js",
  },
  "browserify": {
    "transform": [
      ["babelify", {"presets": ["es2015"], "sourceMap": true}]
    ]
  },
...
This tells Browserify to use Babelify as a plug-in.
It passes two options to Babelify:
First, it activates the ES2015 compiler option.
It also turns on
the sourceMap option, which helps with debugging.
You will learn how to debug with source maps as you build the
rest of Chattrbox.
You will also want to write some scripts for common Browserify tasks,
as you did for nodemon. Write those in
your "scripts" section in package.json. (Remember to add the comma at the end of "dev": "nodemon index.js".)
...
  "scripts": {
    "test": "echo "Error: no test specified" && exit 1",
    "start": "node index.js",
    "dev": "nodemon index.js",
    "build": "browserify -d app/scripts/src/main.js -o app/scripts/dist/main.js",
    "watch": "watchify -v -d app/scripts/src/main.js -o app/scripts/dist/main.js"
  },
  "browserify": {
    "transform": [
      ["babelify", {"presets": ["es2015"], "sourceMap": true}]
    ]
  },
...
The first script, build, uses the browserify
command directly. The second script, watch, uses
watchify to rerun
browserify whenever your code changes. (It
serves a similar purpose to nodemon.)
Now to use the ES6 module system. In ES6 modules, you must explicitly export the pieces of your module you want others to use. Update app.js to export your ChatApp class rather than simply creating an instance.
class ChatApp {
  constructor() {
    console.log('Hello ES6!');
  }
}
new ChatApp();
export default ChatApp;
You specified that ChatApp is the default
value available from the app module. Some of
your other modules will export multiple
values. When you only need to export a single value, it is best
to use export default.
In main.js, import the ChatApp class and create a new instance of it.
import ChatApp from './app';
new ChatApp();
main.js is importing the
ChatApp class that app.js
exported. After the import, you create
a new instance of the ChatApp class.
One important note here: The name ChatApp is
not significant in main.js. Because ChatApp is
the default export from app.js, writing
import MyChatApp from './app', for example, would assign the default export
value to the local MyChatApp name.
Naming it ChatApp is a best practice, however,
because that is its name inside app.js.
Next, go to your terminal and run your build script:
npm run build
npm will run your build command, which
will then run browserify.
As it runs each command, it will show you what it is doing.
Browserify itself will be silent, though, unless there
is an error (Figure 17.11).

When Browserify is successful, it will package your en-Babeled main.js in your app/dist/ folder, just as you did earlier by hand.
Now to reload your browser and see the output. You added no new functionality, other than restructuring where the call to ChatApp’s constructor lives. So you should see the same message in the console that you saw earlier (Figure 17.12).

The next piece to integrate is Watchify.
Watchify will do the same thing for running your
Browserify build that nodemon
did for running your Node.js server: It will automatically trigger a rebuild every time
you modify one of your source files.
Start Watchify to kick off the build process any time you make a change to your code:
npm run watch
Watchify will confirm that it is running (Figure 17.13).
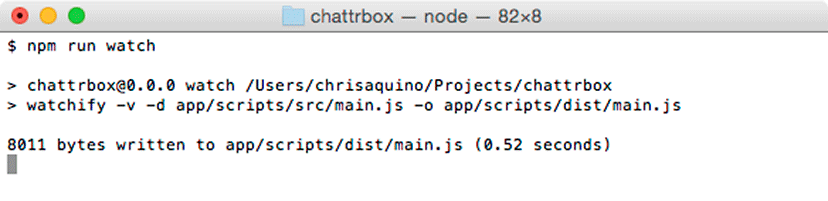
Watchify is a bit chattier than Browserify. Every time it runs Browserify, it tells you how many bytes it wrote to the file. That is not terribly interesting, but it does tell you when the output changes. Leave Watchify running in one of your terminals as you continue to work on Chattrbox. (Your server should still be running in the other terminal.)