
When you visit a website, your browser has a conversation with a server, another computer on the internet.
Browser: “Hey there! Can I please have the contents of the file named cat-videos.html?”
Server: “Certainly. Let me take a look around … here it is!”
Browser: “Ah, it’s telling me that I need another file named styles.css.”
Server: “Sure thing. Let me take a look around … here it is!”
Browser: “OK, that file says that I need another file named animated-background.gif.”
Server: “No problem. Let me take a look around … here it is!”
That conversation goes on for some time, sometimes lasting thousands of milliseconds (Figure 2.1).

It is the browser’s job to send requests to the server; interpret the HTML, CSS, and JavaScript it receives in the response from the server; and present the result to the user. Each of these three technologies plays a part in the user’s experience of a website. If your app were a living creature, the HTML would be its skeleton and organs (the mechanics), the CSS would be its skin (the visible layer), and the JavaScript would be its personality (how it behaves).
In this chapter, you are going to set up the basic HTML for your first project, Ottergram. In the next chapter, you will set up your CSS, which you will refine in Chapter 4. In Chapter 6, you will begin adding JavaScript.
In Chapter 1, you created a folder for the projects in this book as well as a folder for Ottergram. Start your Atom text editor and open the ottergram folder by clicking File → Open (or File → Open Folder... on Windows). In the dialog box, navigate to the front-end-dev-book folder and choose the ottergram folder. Click Open to tell Atom to use this folder (Figure 2.2).

You will see the ottergram folder in the lefthand panel of Atom. This panel is for navigating among the files and folders in your project.
You are going to create some files and folders within the ottergram project folder using Atom. Control-click (right-click) ottergram in the lefthand panel and click New File in the pop-up menu. You will be prompted for a name for the new file. Enter index.html and press the Return key (Figure 2.3).

You can use the same process to create folders using Atom. Control-click (right-click) ottergram in the lefthand panel again, but this time click New Folder in the pop-up. Enter the name stylesheets in the prompt that appears (Figure 2.4).

Finally, create a file named styles.css in the stylesheets folder: Control-click (right-click) stylesheets in the lefthand panel and choose New File. The prompt will pre-fill the text “stylesheets/”. After this, enter styles.css and press the Return key (Figure 2.5).

When you are finished, your project folder should look like Figure 2.6.

There are no rules about how to structure your files and folders or what to name them. However, Ottergram (like the other projects in this book) follows conventions used by many front-end developers. Your index.html file will hold your HTML code. Naming the main HTML file index.html dates back to the early days of the web, and the convention continues today.
The stylesheets folder, as the name suggests, will hold one or more files with styling information for Ottergram. These will be CSS, or “cascading style sheets,” files. Sometimes developers give their CSS files names that describe what part of the page or site they pertain to, such as header.css or blog.css. Ottergram is a simple project and only needs one CSS file, so you have named it styles.css to reflect its global role.
Time to get coding. Open index.html in Atom and add some basic HTML to get started.
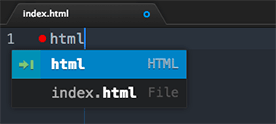
Start by typing html.
Atom will offer you an autocomplete option, as shown in Figure 2.7.
(If it does not, make sure you installed the emmet plug-in as directed in Chapter 1.)
Press the Return key, and Atom will provide bare-bones HTML elements to get you started (Figure 2.8).

Your cursor is between <title> and </title> – the opening and closing title tags.
Type “ottergram” to give the project a name. Now, click to put your cursor in the blank line between the opening and closing body
tags. There, type “header” and press the Return key. Atom will convert
the text “header” into opening and closing header tags with a blank line between them
(Figure 2.9).

Next, type “h1” and press Return. Again, your text is converted into tags, this time without a blank line. Enter the text “ottergram” again. This will be the heading that will appear on your web page.
Your file should look like this:
<!doctype html>
<html>
  <head>
    <meta charset="utf-8">
    <title>ottergram</title>
  </head>
  <body>
    <header>
      <h1>ottergram</h1>
    </header>
  </body>
</html>
Atom and emmet have together saved you some typing and helped you build well-formed initial HTML.
Let’s examine your code.
The first line, <!doctype html>, defines the doctype –
it tells the browser which version of HTML the document is written in.
The browser may render, or draw, the page a little differently based the doctype.
Here, the doctype specifies HTML5.
Earlier versions of HTML often had long, convoluted, and hard to remember doctypes, such as:
<!DOCTYPE html PUBLIC "-//W3C//DTD XHTML 1.0 Transitional//EN"
"http://www.w3.org/TR/xhtml1/DTD/xhtml1-transitional.dtd">
Often, folks had to look up the doctype each time they created a new document.
With HTML5, the doctype is short and sweet. It is the one that will be used throughout all of the projects in this book, and you should use it for your apps.
After the doctype is some basic HTML markup consisting of a
head and a body.
The head will hold information about
the document and how the browser should handle the document.
For example, the title of the document, what CSS or
JavaScript files the page uses, and when the document
was last modified are all included in the head.
Here, the head contains
a <meta> tag. <meta> tags
provide the browser with information about the
document itself, such as the name of the document’s author or
keywords for search engines.
The <meta> tag in Ottergram,
<meta charset="utf-8">, specifies that the document is
encoded using the UTF-8 character set, which encompasses all Unicode characters. Use this tag
in your documents so that the widest range of browsers can interpret
them correctly, especially if you expect international traffic.
The body will hold all of the HTML code
that represents the content of your page: all the images, links, text,
buttons, and videos that will appear on the page.
Most tags enclose some other content.
Take a look at the h1 heading you included; its anatomy is shown in Figure 2.10.

HTML stands for “hypertext markup language.” Tags are used to “mark up” your content, designating their purpose – such as headings, list items, and links.
The content enclosed by a set of tags can also include other HTML.
Notice, for example, that the <header> tags enclose the <h1> tag shown above (and the <body> tags enclose the <header>!).
There are a lot of tags to choose from – more than 140. To see a list of them, visit MDN’s HTML element reference, located at developer.mozilla.org/en-US/docs/Web/HTML/Element. This reference includes a brief description of each element and groups elements by usage (e.g., text content, content sectioning, or multimedia).
In Chapter 3, you will write styling rules in your stylesheet, styles.css.
But remember the conversation between the browser and the server at the beginning of this chapter?
The browser only knows to ask for a file from the server if it has been told that the file exists.
You have to link to your stylesheet so that the browser knows to ask for it.
Update the head of index.html with a link to your styles.css file.
<!doctype html>
<html>
  <head>
    <meta charset="utf-8">
    <title>ottergram</title>
    <link rel="stylesheet" href="stylesheets/styles.css">
  </head>
  <body>
...
The <link> tag is how you attach an external
stylesheet to an HTML document. It has two attributes,
which give the browser more information about the tag’s purpose (Figure 2.11).
(The order of HTML attributes does not matter.)

You set the rel
(or “relationship”) attribute to
"stylesheet", which lets the browser
know that the linked document provides styling information. The
href attribute tells the browser to send a
request to the server for the styles.css file
located in the stylesheets folder. Note that
this file path is relative to the current
document.
Save index.html before you move on.
A web page without content is like a day without coffee.
Add a list after your header to give your project a reason for living.
You are going to add an unordered list (that is, a bulleted list) using the <ul> tag.
In the list, you will include five list items using <li> tags,
and in each list item you will include some text surrounded by <span> tags.
The updated index.html is shown below. Note that throughout this book we show new code that you are adding in bold type. Code that you are to delete is shown struck through. Existing code is shown in plain text to help you position your changes within the file.
We encourage you to make use of Atom’s autocompletion and autoformatting features. With your cursor in position, type “ul” and press Return. Next, type “li” and press Return twice, then type “span” and press Return once. Enter the name of an otter, then create four more list items and spans in the same way.
<!doctype html>
<html>
  <head>
    <meta charset="utf-8">
    <title>ottergram</title>
    <link rel="stylesheet" href="stylesheets/styles.css">
  </head>
  <body>
    <header>
      <h1>ottergram</h1>
    </header>
    <ul>
      <li>
        <span>Barry</span>
      </li>
      <li>
        <span>Robin</span>
      </li>
      <li>
        <span>Maurice</span>
      </li>
      <li>
        <span>Lesley</span>
      </li>
      <li>
        <span>Barbara</span>
      </li>
    </ul>
  </body>
</html>
The <span> tags nested inside each <li> tag do
not have any special meaning. They are generic containers for
other content. You will be using them in Ottergram for styling
purposes, and you will see other examples of container elements as you continue through this book.
Next, you will add images of otters to go with the names you have entered.
The resource files for all the projects in this book are at www.bignerdranch.com/downloads/front-end-dev-resources.zip. They include five Creative Commons-licensed otter images taken by Michael L. Baird, Joe Robertson, and Agunther that were found on commons.wikimedia.org.
Download and unzip the resources. Inside the ottergram-resources folder, locate the img folder. Copy the img folder to your ottergram/ project directory. (The .zip contains other resources, but for now you will only need the img folder.)
You want your list to include clickable thumbnail images in addition to the titles.
You will achieve this by adding anchor and image tags to each item in your ul.
We will explain these changes in more detail after you enter them.
(If you use autocompletion, note that you will need to move the </a> tags so that they follow the spans.)
...
    <ul>
      <li>
        <a href="#">
          <img src="img/otter1.jpg" alt="Barry the Otter">
          <span>Barry</span>
        </a>
      </li>
      <li>
        <a href="#">
          <img src="img/otter2.jpg" alt="Robin the Otter">
          <span>Robin</span>
        </a>
      </li>
      <li>
        <a href="#">
          <img src="img/otter3.jpg" alt="Maurice the Otter">
          <span>Maurice</span>
        </a>
      </li>
      <li>
        <a href="#">
          <img src="img/otter4.jpg" alt="Lesley the Otter">
          <span>Lesley</span>
        </a>
      </li>
      <li>
        <a href="#">
          <img src="img/otter5.jpg" alt="Barbara the Otter">
          <span>Barbara</span>
        </a>
      </li>
    </ul>
...
If your lines are not nicely indented, you can take advantage of the atom-beautify plug-in that you installed. Click Packages → Atom Beautify → Beautify and your code will be aligned and indented for you.
Let’s look at what you have added.
The <a> tag is the anchor tag. Anchor tags make elements on the page
clickable, so that they take the user to another page. They are commonly
referred to as “links,” but beware: They are not like the <link> tag you used earlier.
Anchor tags have an href attribute, which indicates the resource the anchor points to.
Usually the value is a web address. Sometimes, though, you do not want a link to go anywhere. That is the case for now,
so you assigned the “dummy” value # to the href attributes.
This will make the browser scroll to the top of the page when the image is clicked.
Later you will use the anchor tags to open a larger copy of an image when the thumbnail is clicked.
Inside the anchor tags you added <img>, or image, tags with src attributes indicating filenames in the img directory you added earlier.
You also added a descriptive alt attribute to your
image tags. alt attributes
contain text that replaces the image if it is unable to load.
alt text is also what screen readers use to describe an image to a user with a visual impairment.
Image tags are different from most other
elements in that they do not wrap other
elements, but instead refer to a resource. When the browser
encounters an <img> tag, it draws the image to
the page. This is known as a replaced
element. Other replaced elements include embedded documents and applets.
Because they do not wrap content or other elements, <img> tags do not have a corresponding closing tag.
This makes them self-closing tags (also known as void
tags).
You will sometimes see self-closing tags written with a
slash before the right angle-bracket, like <img src="otter.jpg"/>. Whether to include the slash is a matter
of preference and does not make a difference
to the browser. In this book, self-closing tags are written
without the slash.
Save index.html. In a moment, you will see the results of your coding.