
You are almost there! CoffeeRun’s users can fill out the form to add orders. When they submit the form, it adds the order information to the application’s database and draws a checklist item for the order.
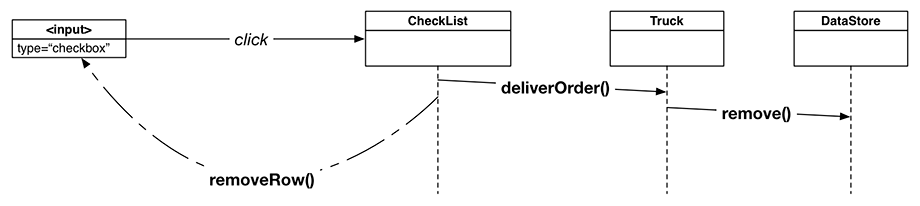
Next, users should be able to check off the checklist items. When a checklist item is clicked, meaning that the order has been delivered, the order information should be deleted from the database and the checklist item should be removed from the page. Figure 11.7 shows this process.
First, you will create the functionality for removing the checklist item from the page.
When you create a Row, the
value of the <input> is set to the
customer’s email address. removeRow will use
the email address argument to find the right
CheckList item to remove from the UI. It will
do that by creating an attribute selector to find the
<input> whose value attribute
matches the email address.
When it has found the matching element, it will move up the
DOM until it finds the [data-coffee-order="checkbox"].
This is the <div> that wraps around all of the
elements that are part of a row. Finally, with that
<div> selected using jQuery, its
.remove method can be called, removing the element from
the DOM and also cleaning up any event listeners that were attached
to any element in that DOM subtree.
Add the removeRow method in checklist.js and specify an
emailAddress parameter. Use the
$element instance property to search for any
descendant elements whose value attribute
matches the email parameter. From that matching
element, add a call to closest to search for
an ancestor whose data-coffee-order attribute
is equal to "checkbox".
Finally, call remove on that element.
(You will notice some new syntax in this code, which we will explain after you enter it.)
...
  CheckList.prototype.addRow = function (coffeeOrder) {
    ...
  };

  CheckList.prototype.removeRow = function (email) {
    this.$element
      .find('[value="' + email + '"]')
      .closest('[data-coffee-order="checkbox"]')
      .remove();
  };

  function Row(coffeeOrder) {
    ...
Here, you have chained several method calls together. jQuery is designed so that you can write multiple method calls for an object like a list of steps. You only include the semicolon at the end of the very last method call.
The requirement for chaining is that a method must return a jQuery-wrapped selection in order to have another method call chained to it. find returns a jQuery-wrapped selection, as does closest. This allows you to chain the three method calls together.
Notice that you used
this.$element.find. This does a
scoped selection: Instead of searching
the entire DOM, it only searches the descendants of the checklist,
which you have a reference to with
this.$element.
Save your file and switch to the browser.
Using your form, enter two orders for the same email address.
Make the coffee for the first “order 1” and for the second “order 2.”
After submitting both orders, call myTruck.printOrders in the console. Figure 11.8 shows the result.

You decided early on to allow only one open order per customer. Because you are using a simple key/value store for your data, any subsequent orders for the same customer email address overwrite the existing one. So, as the console shows, “order 2” is the only pending order. “Order 1” has been overwritten.
But the checklist does not reflect this – it still shows rows for both “order 1” and “order 2.” When you add a row for an order, you need to make sure that any existing rows associated with the same customer email address are removed.
Now that you can remove rows based on the customer’s email address, this is straightforward. In checklist.js, update the addRow prototype method so that the first thing it does is call removeRow, passing in the email address of the customer.
...
  CheckList.prototype.addRow = function (coffeeOrder) {
    // Remove any existing rows that match the email address
    this.removeRow(coffeeOrder.emailAddress);

    // Create a new instance of a row, using the coffee order info
    var rowElement = new Row(coffeeOrder);

    // Add the new row instance's $element property to the checklist
    this.$element.append(rowElement.$element);
  };
...
Save checklist.js and verify in the browser that the first order’s checklist item is removed when a second order with the same email is submitted.
Now that you can remove a checklist row from the
UI, turn your attention to handling the
checklist click event.
To handle clicks to the checklist, you will use the same event handler registration technique that you used with FormHandler.
FormHandler.prototype.addSubmitHandler
accepts a function argument, fn, and then registers an anonymous
function to handle the submit event of this.$formElement.
Inside of that anonymous function, fn is invoked.
Here is that method definition for reference:
  FormHandler.prototype.addSubmitHandler = function (fn) {

    console.log('Setting submit handler for form');
    this.$formElement.on('submit', function (event) {
      event.preventDefault();

      var data = {};
      $(this).serializeArray().forEach(function (item) {
        data[item.name] = item.value;
        console.log(item.name + ' is ' + item.value);
      });
      console.log(data);

      fn(data);
      this.reset();
      this.elements[0].focus();
    });
  };
This makes FormHandler.prototype.addSubmitHandler flexible, because it can be passed any function that needs to run when the form is submitted. This way, FormHandler.prototype.addSubmitHandler does not need to know the details of that function or what steps it takes.
You will add a prototype method to CheckList called addClickHandler that will work the same way as FormHandler’s addSubmitHandler. That is, it will:
-
Accept a function argument.
-
Register an event handler callback.
-
Invoke the function argument inside the event handler callback.
CheckList.prototype.addClickHandler differs from
FormHandler.prototype.addSubmitHandler
in that it will listen for a click event and bind
the callback to the CheckList instance.
In checklist.js,
add the addClickHandler method and specify a
parameter named fn. Listen for a
click event using jQuery’s
on method.
Inside the event handler function,
declare a local variable named email
and assign it event.target.value, which
is the customer’s email address.
Then call removeRow,
passing it email.
After that, invoke fn
and pass it email also. Make sure to
use bind(this) to set the context object of the
event handler function.
...
  function CheckList(selector) {
    ...
  }

  CheckList.prototype.addClickHandler = function (fn) {
    this.$element.on('click', 'input', function (event) {
      var email = event.target.value;
      this.removeRow(email);
      fn(email);
    }.bind(this));
  };

  CheckList.prototype.addRow = function (coffeeOrder) {
    ...
When you registered the event handler callback with
this.$element.on, you specified click as
the event name. But you also passed in a filtering selector
as the second argument. The filtering selector tells the event handler
to run the callback function only
if the event was triggered by an <input> element.
This is a pattern called event delegation. It works because some events, like clicks and keypresses, propagate through the DOM, meaning each ancestor element is informed about the event.
Any time you need to listen for an event on elements that are dynamically created and removed, such as the checklist items, you should use event delegation. It is easier and more performant to add a single listener to the dynamic elements’ container and then run the handler function based on what element triggered the event.
Notice that you do not call
event.preventDefault inside the event
handler. Why not? If you called
event.preventDefault, the checkbox would
not actually change its visual state to show a checkmark in the
box.
Also, notice that you bind the event handler callback
to this, which refers to the instance of
CheckList.
addClickHandler needs to be connected to deliverOrder. Go to main.js to make that connection. Pass a bound version of deliverOrder to checkList.addClickHandler.
...
  var myTruck = new Truck('ncc-1701', new DataStore());
  window.myTruck = myTruck;
  var checkList = new CheckList(CHECKLIST_SELECTOR);
  checkList.addClickHandler(myTruck.deliverOrder.bind(myTruck));
  var formHandler = new FormHandler(FORM_SELECTOR);
...
Save your changes and add some coffee orders in the form. Click either the checkbox or the text of one of the checklist items, and it will be removed (Figure 11.9)!

You have learned how to create dynamic form elements and work with the events they generate. You were able to associate each one with a specific coffee order by using the email address as an identifier.
Using these techniques, you completed the modules that manage the UI, turning what was a console-only application into one that could be used for a real-world task.
You have completed two of the three major parts of CoffeeRun. The internal logic governs the data within the application. The form elements, FormHandler, and CheckList provide the interactive UI. The next chapters deal with preparing and exchanging data with a remote server.