
3. The Viewfinders

ISO 400 • 1/35. sec. • f/2 • 23mm lens
Two interfaces for added flexibility
When Fujifilm launched the original X100, one of the standout features was the hybrid viewfinder. It offered the unique opportunity to shoot using an optical viewfinder (OVF) and electronic viewfinder (EVF). It was a “marriage of intuitive analog operation and state-of-the-art digital functionality,” according to Fujifilm.
The X100’s hybrid viewfinder has been developed further and is now also a core feature of your X100S. It really does offer a flexibility rarely seen in other camera systems: The OVF enables you to view the scene with maximum quality and reduce any perceivable shutter lag; and you can use the EVF for confirmation of focus, exposure, white balance, and depth of field while shooting the scene.
Poring Over the Viewfinders
Optical Viewfinder
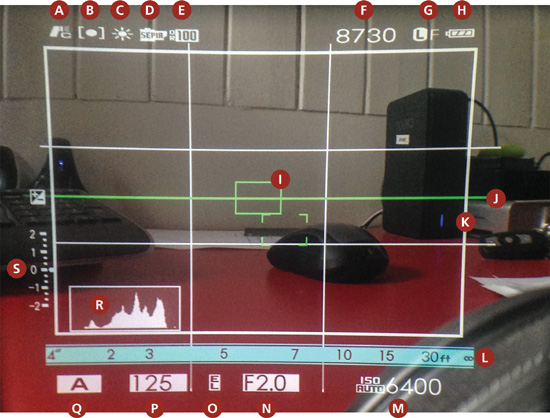
A Flash Mode
B Metering
C White Balance
D Film Simulation
E Dynamic Range
F Number of Available Frames
G Image Quality and Size
H Battery Level
I Focus Frame
J Virtual Horizon
K Bright Frame
L Distance Indicator
M Sensitivity (ISO)
N Aperture
O Exposure Lock
P Shutter Speed
Q Shooting Mode
R Histogram
S Exposure
Electronic Viewfinder
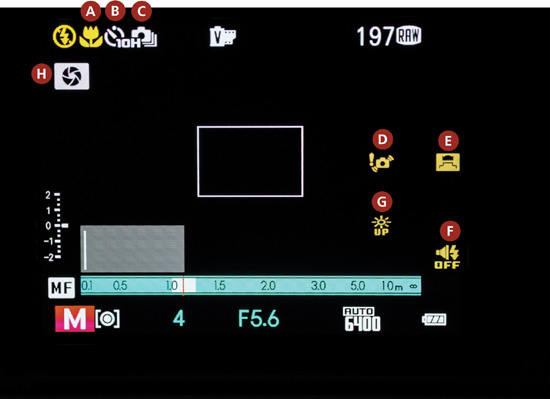
A Macro/Close Up
B Self-timer Indicator
C Continuous Mode
D Blur Warning
E Wide Converter Lens (WCL)
F Silent Mode Indicator
G Monitor Sunlight Mode
H Depth of Field Preview
The Optical Viewfinder
Here is an overview of the functions that you’ll see displayed in the Optical Viewfinder.
• Flash Mode: Use the built-in flash for additional lighting when shooting at night or indoors under low light. To choose a flash mode, press the command dial to the right to display the flash options, then rotate the dial or press it left or right to highlight an option, and press Menu/OK to select. (See Chapter 7, “Low Lighting,” for more information.)
• Metering: To choose how the camera meters exposure, press the AE button to display the metering options. Use the command dial to highlight an option and press AE to select. (See Chapter 10, “Advanced Features.”)
• White Balance: Press the command dial down to display the white balance options, then rotate the dial or press it left or right to highlight an option that matches the light source, and press Menu/OK to confirm. (See Chapter 6, “Landscape Photography.”)
• Film Simulation: Simulate the effects of different kinds of film, including black and white and sepia. (See Chapter 5, “Say Cheese!”)
• Dynamic Range: Control contrast by choosing lower values to increase contrast when shooting indoors or under dark skies, and higher values to reduce loss of detail in highlights and shadows when photographing high-contrast scenes. (See Chapter 10.)
• Number of Available Frames: This indicates how many more images can be stored on the memory card. (See Chapter 1, “The Fujifilm X100S Top Ten List.”)
• Image Quality and Size: This indicates the size of the file and the file type, either JPEG or RAW. (See Chapter 1.)
• Battery Level: Indicates whether the battery level is full or partially discharged (full battery icon), more than half discharged (half battery icon), low (red battery icon), or exhausted (blinking red battery icon). (See Chapter 1.)
• Focus Frame: Use the focus frame for composing your images. (See the parallax coverage later in this chapter.)
• Virtual Horizon: The camera is level when the two horizon lines overlap. (See the “Customizing the Viewfinders” section, later in this chapter.)
• Bright Frame: This refers to the outer border of the image. Note that in the OVF you can see beyond the edges of the bright frame.
• Distance Indicator: When focusing manually, use the focus distance scale to gauge how far from your camera your area of focus will be, using the current aperture. (See Chapter 9, “Hitting the Streets.”)
• Sensitivity (ISO): You can set the camera’s ISO levels between 200 and 6400 (or 100, 12800, and 25600 in expanded mode). The sensitivity refers to the camera’s sensitivity to light. (See Chapter 1 and Chapter 4, “The Professional Modes.”)
• Aperture: To adjust the aperture, manually rotate the aperture dial on the lens barrel. (See Chapter 4.)
• Exposure Lock: This indicates that the exposure has been locked into the camera settings by pressing the AFL/AEL button. (See Chapters 4 and 5.)
• Shutter Speed: To adjust the shutter speed manually, rotate the shutter speed dial on the top of the camera. (See Chapter 4.)
• Shooting Mode: The camera offers a choice of Program, Shutter Priority, Aperture Priority, and Manual exposure modes. (See Chapter 4.)
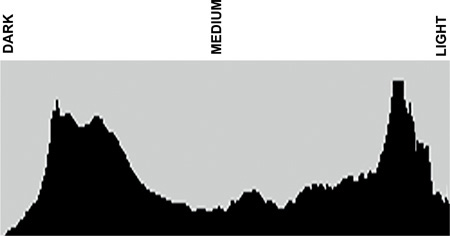
• Histogram: Histograms show the distribution of tones in the image. Brightness is shown by the horizontal axis and the number of pixels by the vertical axis. (See the “Understanding Histograms” sidebar, earlier in this chapter.)
• Exposure Compensation/Indicator: Exposure can be altered by rotating the exposure compensation dial in Program, Shutter Priority, and Aperture Priority mode. In Manual mode, the exposure cannot be altered and the indicator represents overall exposure brightness. (See Chapter 4.)
I will discuss how to switch between the standard view and the custom view later in the chapter; however, it’s worth pointing out that the viewfinder image in the Poring Over the Viewfinders section is set up to show as many of the available options for ease of reference, and your viewfinder display may vary slightly. Some icons are not displayed in the reference image, as they are mutually exclusive with other items.
Here are a few icons that may appear on your OVF yet are not captured in the Poring Over the Viewfinders image for the OVF:
![]() Manual focus indicator: Appears in the top left, to the left of the flash icon, when you have the camera in manual focus (MF) mode (See Chapter 9.)
Manual focus indicator: Appears in the top left, to the left of the flash icon, when you have the camera in manual focus (MF) mode (See Chapter 9.)
![]() ND filter icon: Appears to the right of the Dynamic Range icon when the ND (Neutral Density) filter is switched on. (See Chapter 6.)
ND filter icon: Appears to the right of the Dynamic Range icon when the ND (Neutral Density) filter is switched on. (See Chapter 6.)
![]() Internal memory indicator: Appears to the left of the Number of Available Frames Left icon. It indicates that no memory card is inserted and that pictures will be stored in the camera’s internal memory (room for about two RAW files, so always shoot with a card in place!).
Internal memory indicator: Appears to the left of the Number of Available Frames Left icon. It indicates that no memory card is inserted and that pictures will be stored in the camera’s internal memory (room for about two RAW files, so always shoot with a card in place!).
![]() Temperature warning: Appears in the viewfinder just to the right of the focus frames. If this appears, you are likely in a very warm environment. Switch off the camera immediately, go get a cool drink, and try again later.
Temperature warning: Appears in the viewfinder just to the right of the focus frames. If this appears, you are likely in a very warm environment. Switch off the camera immediately, go get a cool drink, and try again later.
Note also that continuous shooting (burst) mode is available when using the OVF, though no icon appears. However, an icon for continuous shooting appears in the EVF.
With the OVF you will get a very sharp, bright view of the actual scene in front of the camera. Because you are looking through the optical viewfinder, the image will always be sharply focused, regardless of your focusing technique, just like the viewfinder in traditional DSLR cameras. The OVF offers a great shooting environment, and it will display much of the shooting data that you require in the large viewfinder window. Because it’s using the optical window, there will be no shutter lag, meaning you can focus and shoot quicker than when using the EVF.
Another benefit of the OVF is that it provides a view that is slightly larger than the image actually recorded. Similar to rangefinder-type viewfinders, you can actually view content that is outside of the photographic frame. I use this a lot when shooting street photography, as I can see much more of the overall scene and watch a scene evolving before the core subjects even enter the frame.
The Problem of Parallax
The view you see through the optical viewfinder has what’s known as a parallax effect. This isn’t some kind of rare illness that requires a trip to the doctor. Rather, it’s simply a symptom of viewing the image through the window near the lens, not through the lens itself, as most DSLR systems do. As defined by Wikipedia, parallax is a “displacement or difference in the apparent position of an object viewed along two different lines of sight, and is measured by the angle of inclination between those two lines.” For example, “it can be seen in the dashboard of motor vehicles that use a needle-style speedometer gauge. When viewed from directly in front, the speed may show exactly 60; but when viewed from the passenger seat the needle may appear to show a slightly different speed, due to the angle of viewing.”
Essentially, this means the view you see through the OVF is slightly offset, and thus different from what the actual lens is seeing and the image that will ultimately be created. Parallax is more apparent the closer you get to the subject; if you are shooting from a long distance, you are unlikely to notice it at all. Shooting close up will make it more profound, so if you switch to macro mode the camera automatically reverts to the EVF, as the OVF would be almost useless at very close distances from the subject.
Addressing Parallax with Corrected AF Frame
Fuji has thought about this parallax problem and introduced the Corrected AF Frame option to help in situations where it may be an issue. As we know, parallax affects only the optical viewfinder, so this option has no impact on the EVF. Further, it is applicable only to Area mode AF.
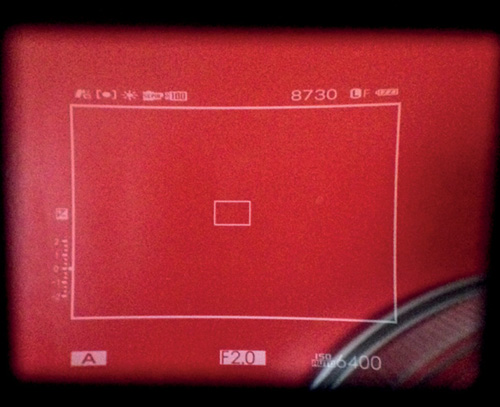
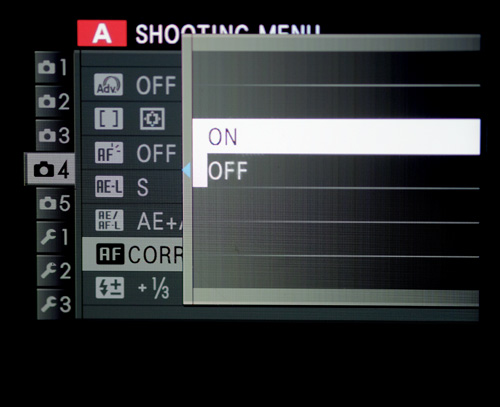
If you don’t have the Correct AF Frame option turned on (Figure 3.2), you will see the single focus area; depending on your focus accuracy, you may end up missing some shots because of the effect of parallax. For this reason, when shooting with the OVF, I always ensure I have the Corrected AF Frame option turned on (Figure 3.3).
Setting up the Corrected AF Frame option:
1. Press the Menu button on the back of the camera to bring up the menu list.
2. Using the command dial, navigate to Shooting Menu 4.
3. Using the command dial, scroll down and select Corrected AF Frame.
4. Press the command dial right to enter the submenu.
5. Select On and then press Menu/OK to confirm.
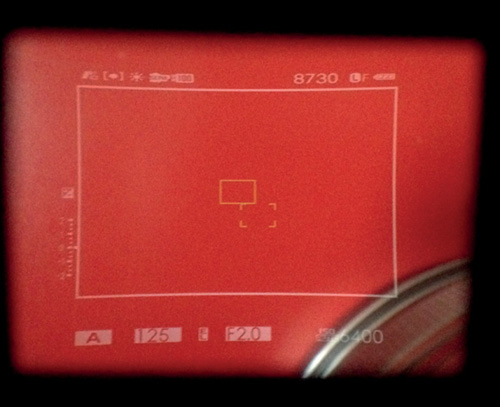
When Corrected AF Frame is on, you will notice a second focus frame appears just below, and to the right of, the primary focus frame. When you focus on an object (really noticeable only on relatively close objects) and press the shutter button halfway, you will see a third focus frame appear in the viewfinder (Figure 3.4). These different focus frames represent different focus planes: the solid white frame represents the infinity focus distance; the broken frame (four corner brackets) represents the closest focus area; and when focus is achieved, a green frame appears that represents the focus point at your current focusing distance. Note that if the focus cannot be achieved, the third green focus frame will instead be red and the icon AF! will appear next to it, indicating that focus cannot be attained.

Figure 3.4 The OVF when the Corrected AF Frame option is set to On with the third focus frame displayed.
Your subject’s distance in relation to you determines how close the green focus frame is to the primary AF frame. The farther away you are from your subject, the closer the focus frames will become as the parallax lessens. The closer you are to the subject, the more pronounced the parallax error, thus the farther apart these focus frames become. If you are too close (around 50 cm or fewer), you should shoot in macro mode, which is available only using the EVF.
The Electronic Viewfinder
Since the electronic viewfinder is functionally very similar to the optical viewfinder, the icons and layout are almost identical, with the exception of the icons and features that are applicable only to shooting in the Electronic Viewfinder mode. For that reason, in this Poring Over the Viewfinders image for the EVF, I am showing functions that are visible only on the EVF screen. In addition to the functions labeled here, you may see the Eye-Fi upload icon (![]() ). The X100S can be used with third-party Eye-Fi cards for transferring images directly from the camera to a computer. (The Eye-Fi card was unavailable in the UK at the time of this writing.)
). The X100S can be used with third-party Eye-Fi cards for transferring images directly from the camera to a computer. (The Eye-Fi card was unavailable in the UK at the time of this writing.)
Here are the functions visible only on the EVF screen:
• Macro/Close Up: To focus at a distance as close as 10 cm, or 4 inches, press the command dial left and select Macro On. (See Chapter 10.)
• Self-timer Indicator: Use the timer for self-portraits or to prevent blur caused by camera shake. (See Chapter 7.)
• Continuous Mode: Press the Drive button to display drive options. Press the command dial up or down to highlight Continuous and select the speed.
• Blur Warning: This icon, presented in the viewfinder to the right of the focus frame, indicates the exposure is likely to result in blur due to low shutter speed.
• Wide Converter Lens (WCL): This icon appears when the WCL is attached and the option in the shooting menu has been activated. (See Chapter 12, “Pimp My Ride.”)
• Silent Mode Indicator: Setting the camera to Silent Mode On disables the speaker, flash, and focus illuminator in situations where camera sounds or lights may be unwelcome. (See Chapter 1.)
• Monitor Sunlight Mode: Reflections and glare caused by ambient lighting may make it hard to see the display in the monitor, particularly when the camera is used outdoors. This can be addressed by holding down the Q button to trigger the outdoor mode.
• Depth of Field Preview: This preview can be assigned to the Fn button. When this is the case, the aperture is stopped down, allowing depth of field to be previewed in the viewfinder or LCD monitor. (See Chapter 4.)
The OVF is great if you want to work quickly and view the subject in a bright frame using the natural light around you. However, many people, myself included, often use the electronic viewfinder for general shooting purposes.
The EVF offers a lot more shooting information on the display, such as the silent mode indicator. It also, crucially, gives you a “what you see is what you get” view of the image. This means that the EVF will mostly give you an accurate representation of focus, depth of field, exposure, white balance, etc., enabling you to make conscious decisions about exposure before you shoot the image. What you will lose using the EVF is the very bright framed image that you see in the OVF. Your view is likely to be much dimmer, and there will be a display refresh lag, too.
Because you are essentially seeing an electronic simulation of the image, you do not need to worry about parallax, but you may notice that your battery diminishes quicker using the EVF. This is because the electronic display takes up far more battery during the image playback of the image.
Switching Between the Viewfinders
To switch between the OVF and the EVF, you must pull the little viewfinder selector, which is located on the front of the camera above and to the left of the lens as you look at the camera (Figure 3.5).

You can use the viewfinder selector only when you have selected Viewfinder or Eye Sensor mode with the View Mode button (Figure 3.6).
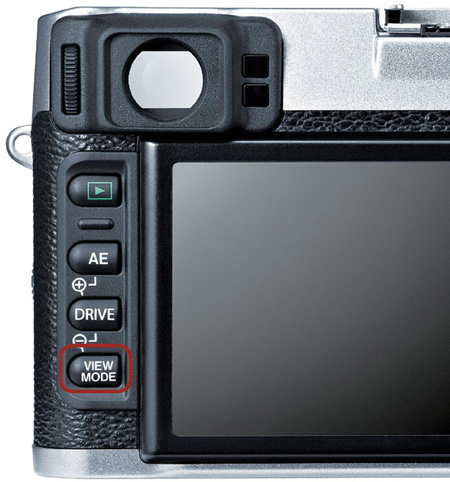
The View Mode button allows you to cycle between the X100S’s three different view modes:
• LCD: In this mode, the viewfinder (live view), menus, image review, and all display options are presented on the rear LCD panel.
• Viewfinder: Selecting this option moves the camera into the viewfinder mode, and you can then use the viewfinder selector to select the optical or electronic viewfinder.
With the EVF, you will see all shooting data, playback and image review, menus, and all display options in the viewfinder when you peer through it.
If you choose the OVF, you will be able to see the bright frame and shooting data through the viewfinder. If you choose to view a menu or perform an image review when the OVF is active, the viewfinder will switch off, and the display will resort to the EVF display using the LCD panel on the back of the camera.
• Eye Sensor: With this mode, the view will always be in the LCD panel unless you raise the viewfinder to your eye (or, in fact, pass any object in front of the sensor next to the viewfinder). At that point, the view will revert to a viewfinder view. It will display either the EVF or the OVF, depending on what your viewing preference was the last time you used the viewfinder view.
Customizing the Viewfinders
You have a certain amount of control over what appears, and what does not appear, in the viewfinders. Both EVF/LCD and OVF have configurable display options. This is known as Display Custom Setting and involves a two-step process. First you need to select the items you wish to display in your viewfinder. Then you need to tell the camera to display the viewfinder’s “custom view.”
Before I explain how to do this, let’s look at the options you have to include in the viewfinder displays:
• Framing Guideline
• Electronic Level
• AF Distance Indicator
• MF Distance Indicator
• Histogram
• Aperture/Shutter Speed/ISO
• Exp. Compensation
• Photometry
• Flash
• White Balance
• Film Simulation
• Dynamic Range
• Frames Remaining
• Image Size/Quality
• Battery Level
You can choose to display all or none of these in your viewfinder. I find that having all of them on display can be a bit distracting, so I tend to switch off the ones that I rarely use or that I’m always going to be aware of anyway. My list usually looks like this:
• MF Distance Indicator
• Histogram
• Aperture/Shutter Speed/ISO
• Exp. Compensation
• Flash
• Frames Remaining
• Battery Level
Customizing viewfinder displays:
1. Press the Menu button on the back of the camera to bring up the menu list.
2. Using the command dial, navigate to Shooting Menu 3.
3. Using the command dial, scroll down and select Disp. Custom setting (A).
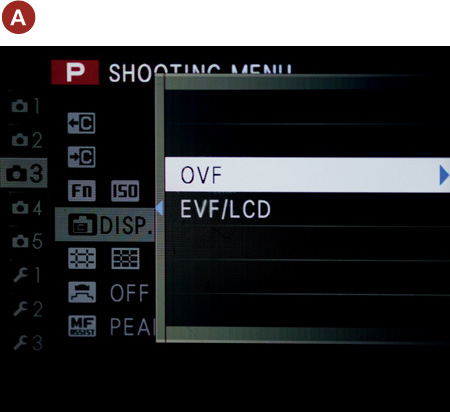
4. Select either OVF or EVF/LCD and press the command dial to the right to enter the submenu.
5. Using the command dial, scroll through each of the items using Menu/OK to toggle on or off (B).
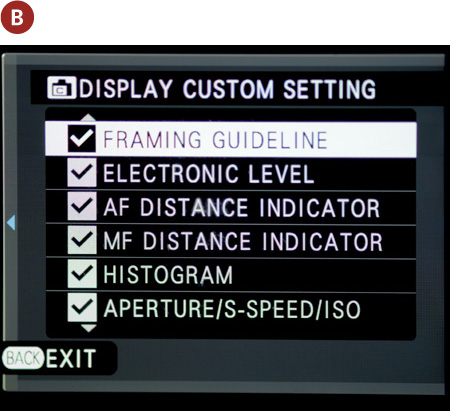
6. Press Disp/Back to save and confirm your settings.
As I mentioned, this is only the first part of configuring your custom viewfinder. Both the EVF and OVF have two different display options: Standard and Custom. Unless you tell the camera to display the Custom display, your customized viewfinder will never appear.
7. Press the Disp/Back button to view the display choices (C). Once you press Disp/Back, you need to move quickly to select the Custom display option.
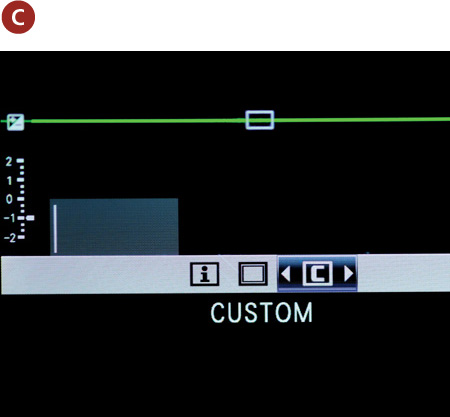
8. Use the command dial to select the Custom option.
To make things even more confusing, the LCD panel has a third display mode called Detailed (Figure 3.7). This will show you your shooting configuration and current exposure values.

Figure 3.7 Available only on the LCD panel, the Detailed view shows your focus point and other relevant shooting data.
Chapter 3 Assignments
In this chapter, we have taken a comprehensive look at the hybrid viewfinder that is featured in the X100S. While using either the EVF or OVF is unlikely to make a difference to your photographic ability, each has a place, I think, depending on what and how you are shooting. Let’s see what we have learned in this chapter.
Work with parallax
Put the camera into OVF mode and make sure the Corrected AF Frame setting is switched on. Focus and take a shot from around 2 feet away from your subject, making a mental note as to the location of the third AF frame when it is illuminated in the viewfinder upon achieving focus. Now move back a few feet and repeat the exercise. Now move back much farther. What happens to the AF frame?
Shoot quickly with the OVF
Head out into the city streets and try and shoot some street photography (see Chapter 9). Shoot for a while with the EVF, paying attention to the exposure displayed in the viewfinder. Now switch to the OVF and notice how you can no longer rely on the visual exposure in the viewfinder. Can you shoot faster? Can you achieve good exposures?
Rely on the histogram
Now that you are shooting quickly using the OVF, you will need to rely on the histogram to ensure that your exposures are as accurate as possible. Find an area where there are lots of bright or white areas. What happens to your histogram? What happens when you find the opposite end of the spectrum and try to shoot a scene that has a lot of black or shadow areas?
Share your results with the book’s Flickr group!
Join the group here: flickr.com/groups/fujiX100S_fromsnapshotstogreatshots